Quick Navigation
Hey, coffee aficionado! I know how frustrating it can be when your beloved Keurig K-Slim suddenly stops working or starts acting up. But don’t worry, I’ve got you covered! In this troubleshooting guide, I’ll be sharing the top problems you might encounter with your Keurig K-Slim and their solutions. From clogged needles to brewing issues, I’ve got practical tips and tricks to help you get your coffee fix in no time. So, sit back, grab your favorite mug, and let’s start fixing those pesky Keurig K-Slim problems together!
Overview
If you’re a proud owner of a Keurig K-Slim coffee maker, you know how convenient it is to enjoy a fresh cup of coffee anytime. However, like any other machine, the K-Slim is not immune to problems. Some of the most common issues you might encounter include clogging the needles, brewing problems, and weak coffee. Other possible issues include malfunctioning LCD screens, error messages, and difficulties with descaling. However, worry not because I’ve got you covered! In the next section, I’ll guide you through the steps to troubleshoot and fix these problems so that you can get back to enjoying your favorite cup of coffee. So, let’s get started!
Getting Started
If you’re a Keurig K-Slim owner experiencing issues with your coffee maker, don’t worry – you’re not alone. In this article, we’ll explore some of the most common problems that K-Slim owners face and offer solutions to help you troubleshoot your coffee maker.
Before diving into the troubleshooting process, it’s important to have the right tools on hand. Here are some essential tools that you’ll need:
- Descaling Solution: Descaling your Keurig K-Slim is important to regular maintenance. Over time, mineral deposits can build up inside the machine, affecting the taste and quality of your coffee. A descaling solution can help remove these deposits and restore your coffee maker’s optimal performance.
- Cleaning Solution: A cleaning solution is essential for keeping the brewer clean and free from bacteria and mold. It’s recommended to clean your K-Slim every few weeks to ensure that your coffee tastes fresh and your machine operates at its best.
- Paperclip: A simple paper clip can come in handy when troubleshooting your K-Slim. If your brewer is clogged or not dispensing water, you can use a paperclip to clear out any blockages in the needle that pierces the K-Cup.
- Water Filter: If you’re experiencing issues with the taste or quality of your coffee, a water filter can help. A water filter removes impurities from your water, which can affect the flavor of your coffee.
With these essential tools, you’ll be better equipped to troubleshoot and maintain your Keurig K-Slim coffee maker. Let’s get deep into the common problems and their solutions!
Problem 1: Why The Keurig K-Slim Does Not Have Power?
As you wake up early in the morning, eagerly longing for your daily dose of coffee, you make your way to the kitchen to switch on your dependable Keurig, anticipating a freshly brewed cup. But alas, today holds a surprise—the Keurig stubbornly refuses to power on. Frustration and determination surge as you contemplate the steps to troubleshoot and resolve this frustrating situation. Continue reading to uncover the measures you can undertake to fix the problem.
Cause 1: Problem With Power Supply
An inadequate power supply could cause the Keurig not to turn on. Try following the steps to solve this issue. Now let’s move towards the points you are more interested in, the solutions.
Solution: Check For The Damaged Outlet
If your Keurig K-Slim is not turning on, you must verify that the outlet you plug it in is functioning correctly. The Keurig may not receive power due to an issue with the outlet. If you suspect this is the case, check the outlet by plugging in another device or contacting an electrician to inspect and repair it if necessary.
Furthermore, ensure that the Keurig K-Slim is plugged into a dedicated outlet solely intended for this appliance. Avoid connecting other devices or appliances to the same outlet, as this can potentially overload the circuit and prevent the Keurig from powering on.
Solution 2: Check For The Broken Plug

Before panicking, please take a moment to double-check the plug of your Keurig K-Slim and ensure it is correctly plugged into the outlet. Sometimes the plug is not fully inserted or becomes loose, leading to a loss of power to the machine. You can plug another appliance, such as a toaster, into the same outlet to check if it powers on. If the toaster doesn’t turn on, it indicates a possible issue with the electrical outlet. When you are confirmed that the plug is inserted correctly, you can prevent any potential power issues and ensure the proper functioning of your Keurig K-Slim.
Solution 3: Check The Voltage.

Ensuring that your brewer receives the appropriate voltage is crucial for optimal performance. You must check that the voltage supplied to the machine is within the required range and that there are no fluctuations in voltage. Sudden electrical fluctuations in voltage can cause the brewer to halt its performance, resulting in the lights and system shutting off. By monitoring and maintaining a stable voltage supply, you can help prevent any issues and ensure the continuous operation of your machine.
Cause 2: Malfunctioning Heating Element
If you have tried all of the above solutions and your Keurig still is not turning on despite receiving power, then the issue lies in the heating element of your Keurig K-Slim. The Keurig machine relies on a heating element to warm up the water needed for brewing. If this heating element malfunctions, the machine cannot turn on or operate properly. Without further delay, let’s explore the solutions that can rectify this issue.
Solution: Contact Keurig Customer Care
Since this is a technical issue, I recommend you take help from a professional or contact Keurig customer care. For Contact Information, you can check this article’s “When To Seek Professional Help” section.
So, now you can deal with a Power issue with your Keurig; let us see what you should do if your Keurig K-Slim does not brew.
Problem 2: Why My Keurig K-Slim Is Not Brewing?
The Keurig K-Slim is a versatile coffee machine that enables you to brew single-serve K-Cup pods. Occasionally, you may encounter issues during brewing that disrupt your coffee routine. Instead of assuming the machine is at fault, you can take proactive steps to resolve the problem. Following essential troubleshooting tips, you can quickly get your Keurig K-Slim back to brewing your favorite coffee smoothly. Let’s explore the steps and solutions to tackle this problem head-on without hesitation.
Cause 1: Keurig K-Slim Is Clogged
A frequently encountered problem by Keurig K-Slim users is a clogged machine, which can lead to slow brewing, incomplete brewing, or no brewing. When your Keurig K-Slim is clogged, the water flow is obstructed, preventing the machine from functioning properly. Get ready to solve the clogging problem with your Keurig K-Slim with the solution given below.
Solution: Descale Your Keurig K- Slim

To effectively address a clogged Keurig K-Slim machine, the most practical solution is to run a descaling cycle. You can refer to the “How To Descale Keurig K-Slim” section provided below in this article for detailed instructions on performing the descaling process for your Keurig K-Slim.
Cause 2: Air Bubbles
If the water reservoir of your Keurig is not adequately filled or appropriately placed on the base, it can result in air bubbles forming in the water lines. These air bubbles obstruct water flow and prevent Keurig from brewing coffee. Read the two solutions below vigilantly, and perform what you think is more doable.
Solution 1: Remove The Air Bubble
To remove air bubbles from your Keurig, follow these steps:
- Disconnect the brewer from its power source.
- Remove the water reservoir and the drip tray.
- Firmly grasp the Keurig with both hands.
- Vigorously shake the Keurig to eliminate trapped air bubbles inside.
Note: While this may seem unusual, shaking the Keurig helps dislodge any trapped air bubbles, allowing for smoother operation.
Solution: 2 Use The Finger Method
Here’s another method to clear clogs in your coffee maker’s water lines:
- Open the water reservoir of the coffee maker.
- Use your finger to cover the connection or opening hole of the coffee maker and the water tank.
- Start a water-only brew cycle without inserting any coffee pod.
- Keep your finger on the water hole throughout the process to maintain pressure.
- It will compel the brewer to pump water through the lines, effectively pushing out any air bubbles causing the clog.
Cause 3: Problem With Water Reservoir
One common reason why a Keurig K-Slim may not brew properly is due to an issue with the water reservoir. For your Keurig to function properly, it is necessary to ensure that the water reservoir is correctly positioned on its base and filled up to the maximum line. Keurig can only access the water needed for brewing coffee if the water reservoir is filled correctly. Additionally, it is vital to maintain the water level within the recommended range, avoiding both excessively low or high levels, as this can also impact the optimal functioning of the coffee maker. Let us look at the solution for this problem, which are straightforward yet most important steps.
Solution 1: Place The Water Reservoir Correctly
Correctly placing the water reservoir on the base of your Keurig K-Slim is as crucial as inserting the plug in the outlet because, with this, the brewer will start its brewing process.
Solution 2: Fill The Water Reservoir

If the water reservoir is not adequately filled, the “Add Water” light on the Keurig K-Slim display will turn on, and the brewer will not commence brewing. To resolve this, fill the water reservoir to the Max Fill level, which should turn off the indicator. However, if the Add Water light continues to illuminate even after filling the reservoir, it is recommended to reach out to Keurig customer services for further assistance. You can find contact information in the “When To Seek Professional Help” section of the provided article.
Cause 4: The Handle Is Not Closed Properly
If your Keurig K- Slim is not brewing, it is worth checking if the handle is closed properly. The handle of the K-Slim is responsible for puncturing the K-cup and allowing water to flow through it during the brewing process. If the handle is not closed correctly, it can prevent the brewing process from initiating. Therefore, ensuring the handle is securely closed is essential for proper functioning and brewing with the Keurig K-Slim.
Let us delve into the solution to this problem!
Solution: Close The Handle Properly

Once you have inserted the K-cup into the pod holder, it is crucial to ensure that you fully close the handle of the brewer by firmly pushing it downwards. It provides a secure and proper seal, allowing the brewing process to initiate effectively.
Problem 3: My Keurig K- Slim Is Leaking
Experiencing a problem where your Keurig coffee maker will continue leaking can be incredibly frustrating and messy. It can cause significant damage to your kitchen countertops, floors, and other surfaces. There is also a risk of electrical problems or safety hazards if the water reaches the machine’s electrical components. Additionally, the constant dripping can result in wasted water and promote the growth of mold and mildew, leading to unpleasant odors and potential health concerns for your family. It is crucial to address this issue promptly to prevent further complications. Let’s address this problem with a proactive approach by examining the essential steps and viable solutions to tackle it head-on.
Cause 1: Your Keurig Is Clogged
The main reason behind a leaking Keurig K-Slim is often a clog in its internal components. When the machine gets clogged, the water flow becomes uneven, which creates pressure inside and can eventually cause leaks. Let’s see how you can solve this.
Solution: Desacle Your Keurig K-Slim
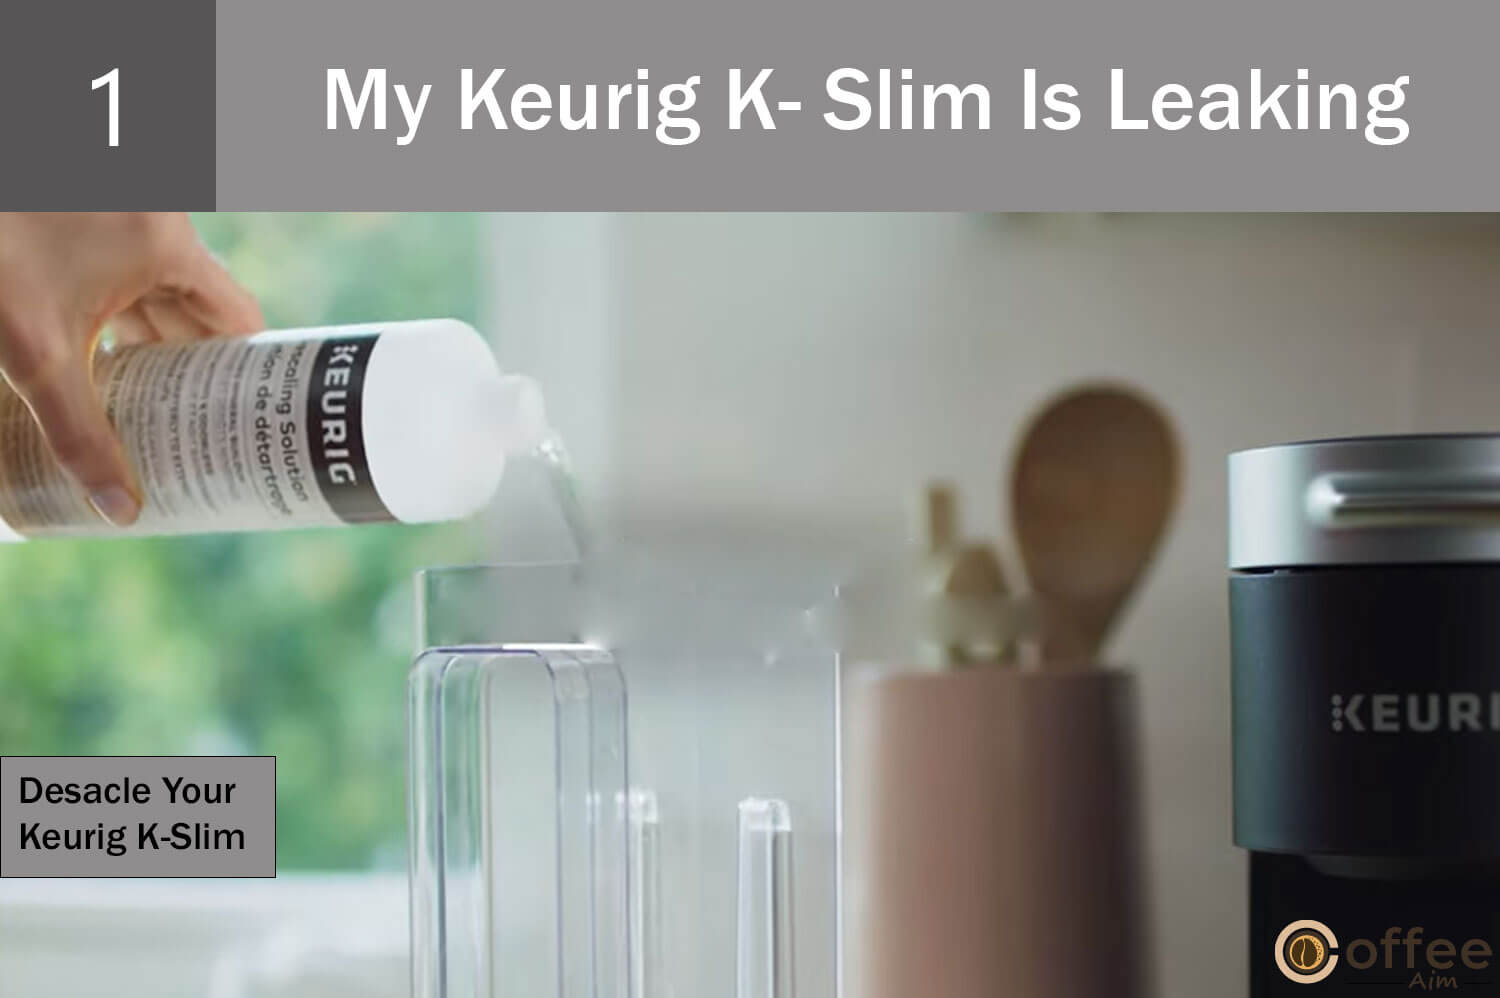
As a Keurig K-Slim user, regular descaling is a must-step to prevent issues such as leaking, preferably every three months. You can learn how to describe your machine correctly by referring to this article’s “Descaling The Keurig K-Slim” section written below.
Cause 2: Damaged Exit Needle
In order to pierce the bottom of the K-cup, the exit needle must be pointing straight up. Cleaning the exit needle won’t solve the problem if you find it faulty. Now let us see what you can do in such a situation.
Solution: Replace With New Gasket
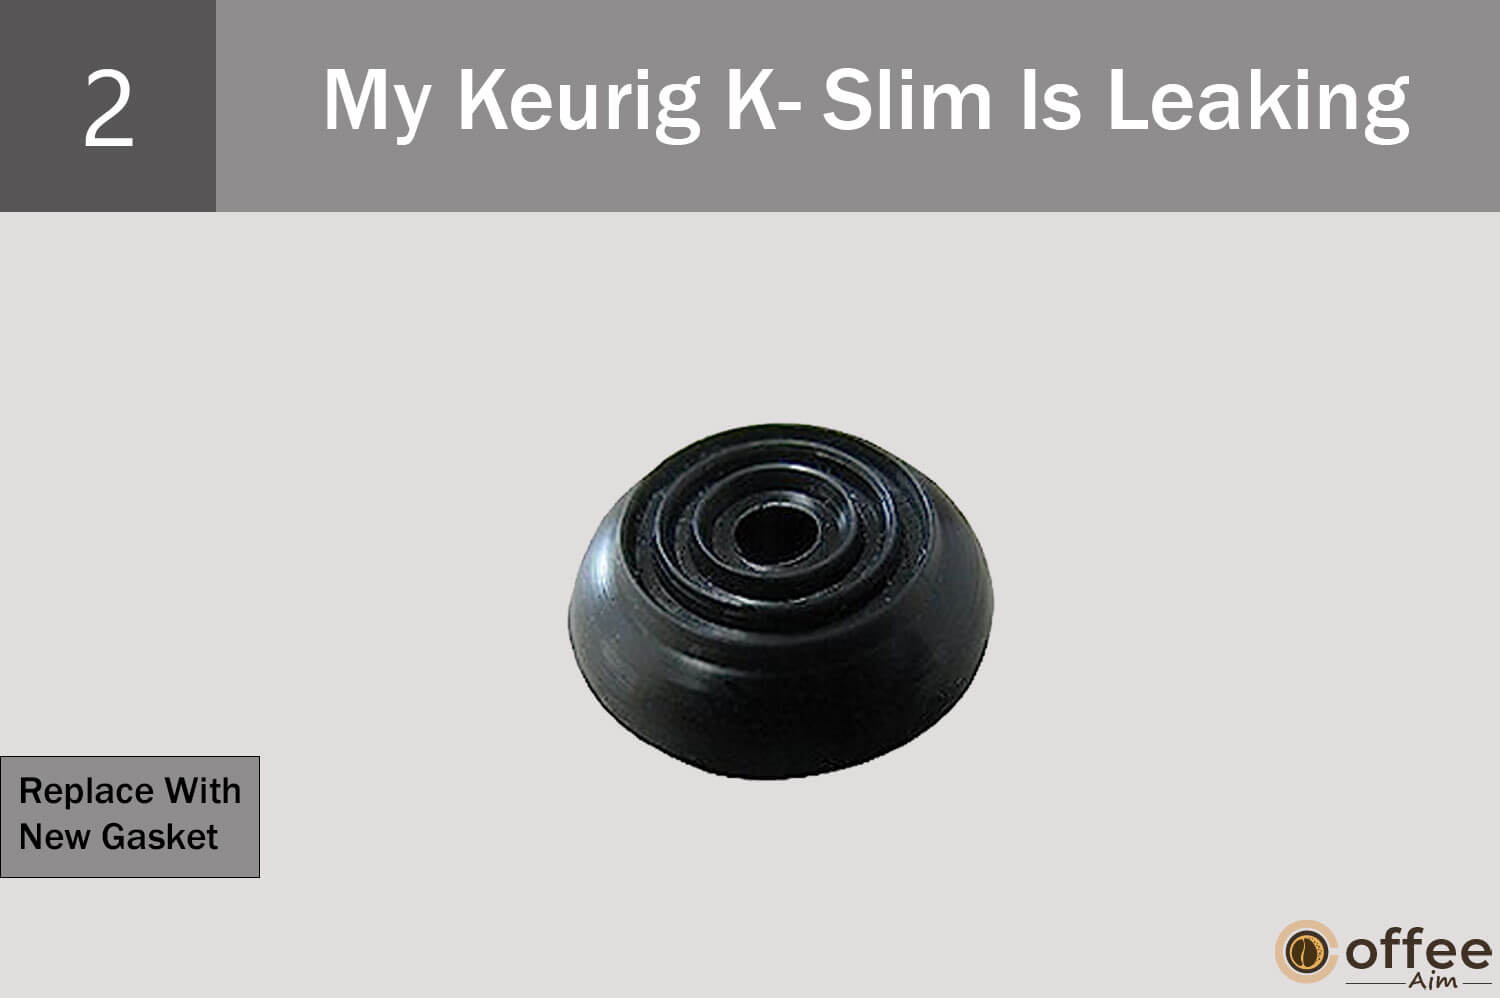
In such a case, the best action is to replace it with a compatible replacement needle gasket. By purchasing and installing a new needle gasket, you can ensure that the needle functions securely and adequately punctures the bottom of the K-cup.
Cause 3: Dirty Exit Needle
During the brewing process of a K-cup in your coffee maker, there are two needles responsible for creating holes in the pod—one at the top and another at the bottom. These holes allow hot water to pass through the capsule and into your cup. However, over time, coffee grounds can build up and become dry and hardened, primarily if used K-cups are left in the pod holder for a prolonged period.
The accumulation of coffee grounds inside the exit needle can hinder its ability to puncture the pod effectively. As a result, during a brew cycle, coffee may back up in the brewing chamber and eventually leak out from the top of the machine.
Yes! You look ready for the solutions.
Solution: Clean The Exit Needle

If you come across this issue, there’s no need to panic! Cleaning the exit needle is a straightforward and effective solution. Refer to the “Cleaning The Exit Needle” section under the “How To Clean Your Keurig K-Slim” heading for a step-by-step guide on how to clean it properly.
Cause 4: The Water Reservoir Is Overfilled
When you add too much water to the water reservoir, the machine will use more water than required to brew your coffee. The excess water will then be heated up, expanding and increasing pressure within the machine. Consequently, If the brewer’s internal components cannot handle the increased pressure, it can cause water to leak or drip from the machine. Therefore, adding the appropriate amount of water to the reservoir is essential to prevent such issues. You can save yourself from this situation by following the preventive measure written below in the solution.
Solution: Fill It To The Max Fill Level

In order to prevent leaking problems due to excessive water pressure, it is essential to refrain from filling the water reservoir beyond the MAX FILL line indicated on it. By adhering to this marking, you can ensure the water volume remains within the safe and recommended range, minimizing the risk of pressure build-up and potential leaks.
Cause 5: Use Of Third-Party Coffee Pods
Using a third-party K-cup could also be the reason behind your leaking Keurig K-Slim.
These pods may not fit perfectly, resulting in problems such as difficulty piercing the lid or leaks, mainly if the lid is thicker than the standard K-cup used by Keurig. Let us look at the possible solution for this peculiar issue.
Solution: Use Original Keurig K-Cup

Using Keurig K-Cup pods is an easy and fruitful way to avoid any issues with your coffee maker. These pods are available in a wide variety of coffee flavors, making it easy to find and enjoy your favorite taste, ensuring that every cup of coffee is enjoyable.
Cause 6: The Upper Gasket Might Be Loose Or Broken
A coffee maker’s upper gasket is a vital silicone component in creating a secure seal between the needle and the K-Cup during brewing. This seal ensures water flows through the needle and into the K-Cup without leaks. The needle punctures the K-Cup, while the gasket maintains a tight seal to prevent water from escaping. However, if the gasket becomes damaged or loose, it may fail to create a proper seal, leading to water leakage from the coffee maker while brewing. To prevent this issue, it is essential to regularly inspect the gasket for any signs of damage and ensure it is appropriately in place to maintain a reliable seal during brewing. Are you ready to know about the possible solution?
Solution: Repair The Gasket
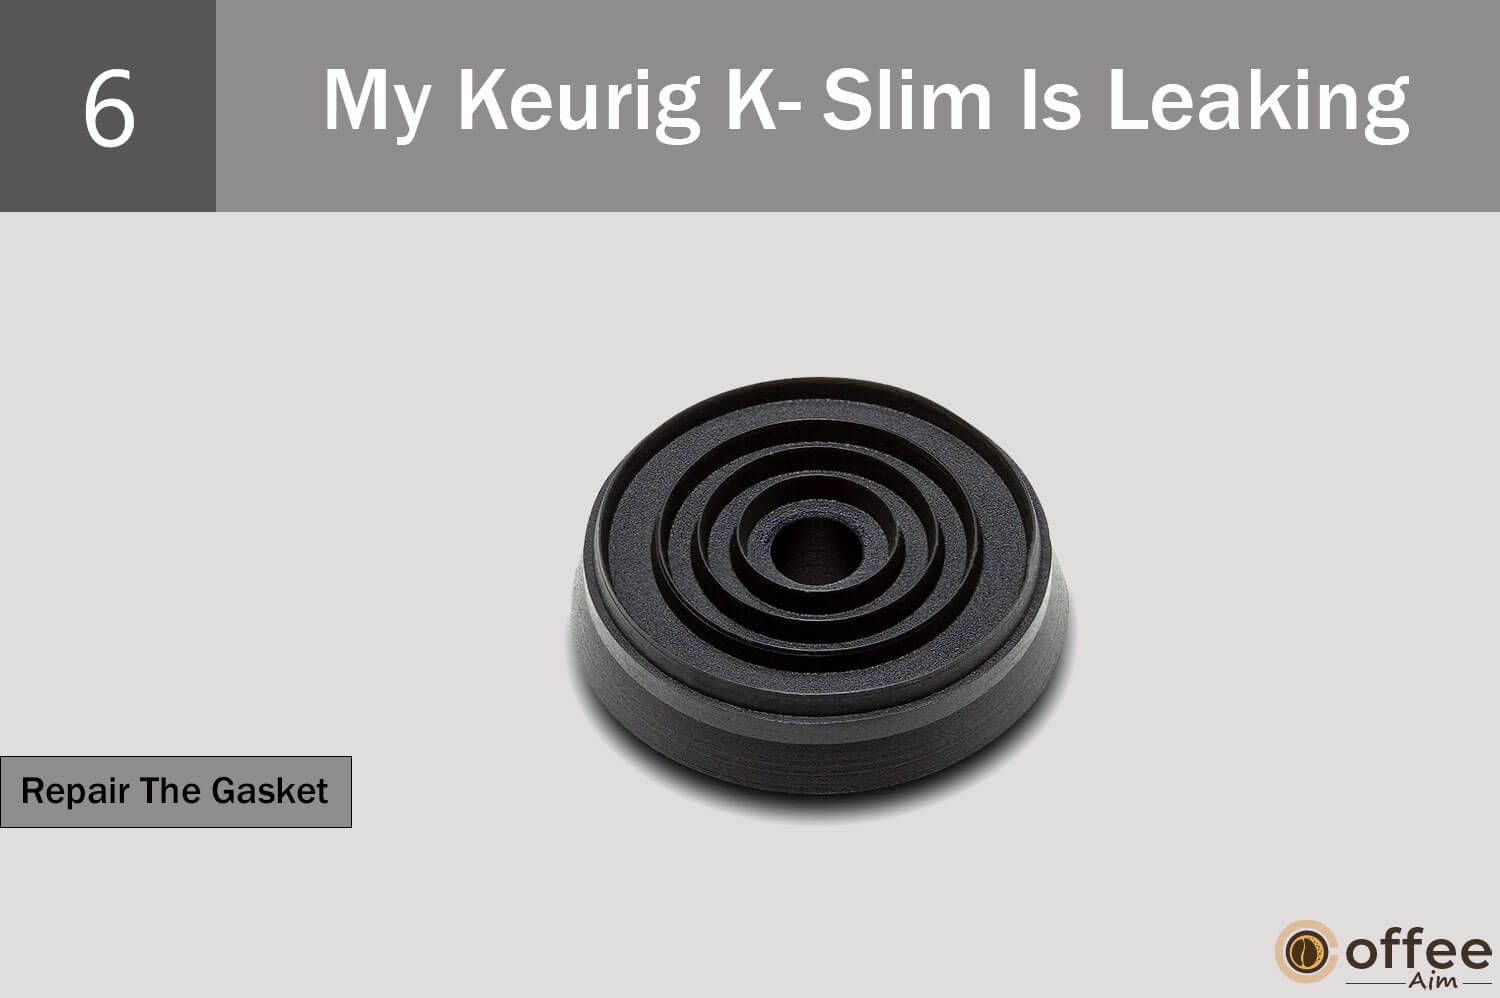
- Start by removing the water reservoir and reservoir lid from the coffee maker.
- Then, locate the circular screen at the bottom of the reservoir and use a screwdriver to remove the three screws holding it in place.
- Once the circular screen is removed, you will notice an O-ring attached. Carefully remove the rubber seal using a plastic opening tool.
- Replace the old, damaged O-ring with a new undamaged one. Make sure it is positioned securely to ensure a tight seal and prevent any leaks or other issues.
- After replacing the O-ring, reattach the circular screen to the bottom of the reservoir using the three screws.
- Finally, place the reservoir lid back on the water tank and reinsert the water reservoir into the coffee maker.
Suppose you need more clarification about the steps mentioned to fix the issue. In that case, it might be a good idea to seek the assistance of a professional technician to handle the repair for you. You can find the contact details of such services in this article’s “When To Seek Professional Help” section.
Cause 7: The Brewer Does Not Grip The K-Cup
When your brewer does not properly secure the lid of your K-cup, it can create pressure within the pod holder. This pressure can cause the ground coffee and water to be forced out of the K-cup and into your cup, resulting in leaks from the top of the machine. This issue can lead to a messy and unappealing cup of coffee, as the brewer’s water pressure must be properly controlled. Let us see what you can do to resolve this matter.
Solution: Contact Keurig Customer Support

You should contact Keurig’s customer service team to seek their assistance. You can have their contact information in this article’s “When To Seek Professional Help” section.
Cause 8: Entrance Needle Is Dirty
During the brewing process in a Keurig coffee maker, the entrance needle plays a crucial role in puncturing the top of the K-cup. However, if this needle becomes dirty or clogged with coffee grinds or other debris, it may need help effectively performing its task. It can lead to the water being unable to flow into the K-cup, causing it to drip out of the pod holder area instead. Let us know how you can get rid of a dirty entrance needle.
Solution: Clean The Entrance Needle
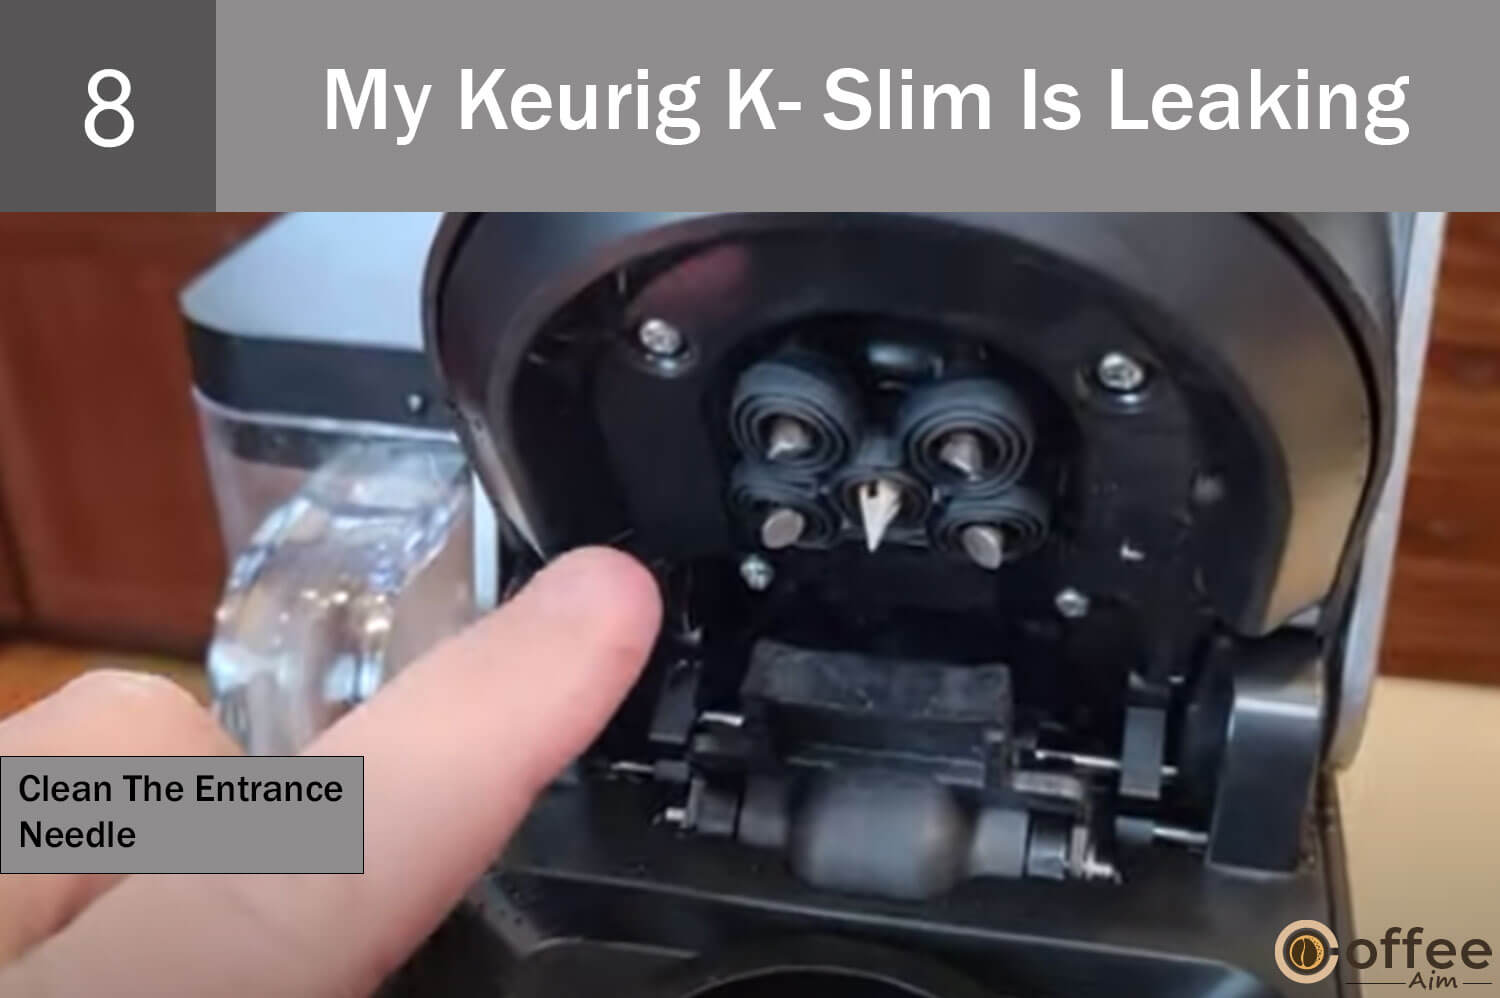
To learn how to clean the entrance needle, refer to this article’s “Cleaning The Entrance Needle” section provided at the end. It will provide the necessary steps and instructions to clean the entrance needle and ensure its proper functioning effectively.
Cause 9: Water Reservoir Is Cracked
Lastly, a cracked water reservoir is another possible reason for a leaking Keurig. To inspect for cracks, invert the water tank and visually examine it for any visible indications of damage. Cracks can vary in size, ranging from large and noticeable to tiny hairline fractures that are challenging to detect. By carefully examining the water reservoir, you can determine if a crack is present and potentially causing the leakage issue.
Solution: Replace With A New One
If you discover any cracks or signs of damage to the water reservoir, it’s important to replace the water reservoir promptly. Continued use of a cracked reservoir can result in further leaking or other issues with your Keurig coffee maker.
Now that we have discussed all possible causes and their solutions for a leaking Keurig, we should see what a user must do if he/ she encounters coffee grounds in the coffee cup with their Keurig K-slim.
Problem 4: Why Are There Coffee Grounds In My Coffee?
As a coffee lover who seeks the perfect brew, it can be disheartening to anticipate a delightful cup from your Keurig machine only to encounter the unwelcome presence of bitter coffee grounds in every sip. It’s akin to a disappointing twist in a captivating story, leaving you questioning the overall quality of your coffee maker. Not only does it detract from the pleasurable coffee experience, but it can also impact the efficiency and longevity of your Keurig device. Therefore, it becomes crucial to investigate the underlying cause of this issue and address it promptly to restore the full enjoyment of your coffee brewing journey. Let’s Start exploring!
Cause: Keuig K-Slim Is Clogged
A common culprit for coffee grounds escaping from a Keurig is a blockage in the exit needle. This blockage occurs when coffee grounds or tea residue accumulate on the needle over time.
Consequently, the Keurig becomes clogged, and the build-up of grounds can find its way into subsequent brews, compromising the quality and flavor of the coffee. Clearing the blockage in the exit needle and ensuring smooth, debris-free brewing for a delightful coffee experience is essential to resolve this issue. Do you want to see how you can do that? See the possible solutions below.
Solution 1: Run A Descaling Cycle

Running a descaling cycle may help resolve the issue if the previous methods do not work. You can find detailed instructions for describing your Keurig in this article’s “Descaling The Keurig K-Slim” section at the end.
Cause 2: Dirty Exit Needle
The main reason why coffee grounds may come out of a Keurig machine is, indeed, the blockage of the exit needle. This blockage occurs when coffee grounds or tea particles accumulate and clog the exit puncture of the machine. Here’s how you can solve this.
Solution: Clean The Exit Needle

This step is essential in ensuring the proper functioning of your Keurig K-Slim and preventing coffee grounds from escaping. For detailed instructions on cleaning the exit needle, please refer to the “Cleaning The Exit Needle” section in this article’s “How To Clean Your Keurig K-Slim” heading given at the end.
I hope you have resolved the issue of the presence of Coffee grounds in your cup, but what if your Keurig starts making weird loud noises? Do you want to see this problem’s troubleshooting methods too? Let’s dive in, then.
Problem 5: Why Does My Keurig K-Slim Coffee Maker Make A Loud Noise?
The soothing sound of a brewing coffee maker in the morning can be a delightful experience for coffee enthusiasts. However, when your beloved Keurig K-Slim coffee maker emits loud and unsettling noises, it can disrupt the peaceful ambiance of your morning routine. These unexpected sounds can raise concerns about the proper functioning of your coffee maker and warrant immediate attention. Identifying and addressing the root causes behind these noises is crucial to restoring the tranquility and performance of your cherished coffee maker.
Are you ready to learn about its causes and solutions?
Cause 1: Keurig K-Slim Is Clogged
With time, mineral buildup can create problems for your Keurig coffee maker. Tap water that hasn’t been filtered may contain impurities, contributing to the accumulation of minerals and potentially damaging the machine. This buildup can result in clogs, reduced efficiency, and even generate loud noises during the brewing process.
Solution: Descale your machine
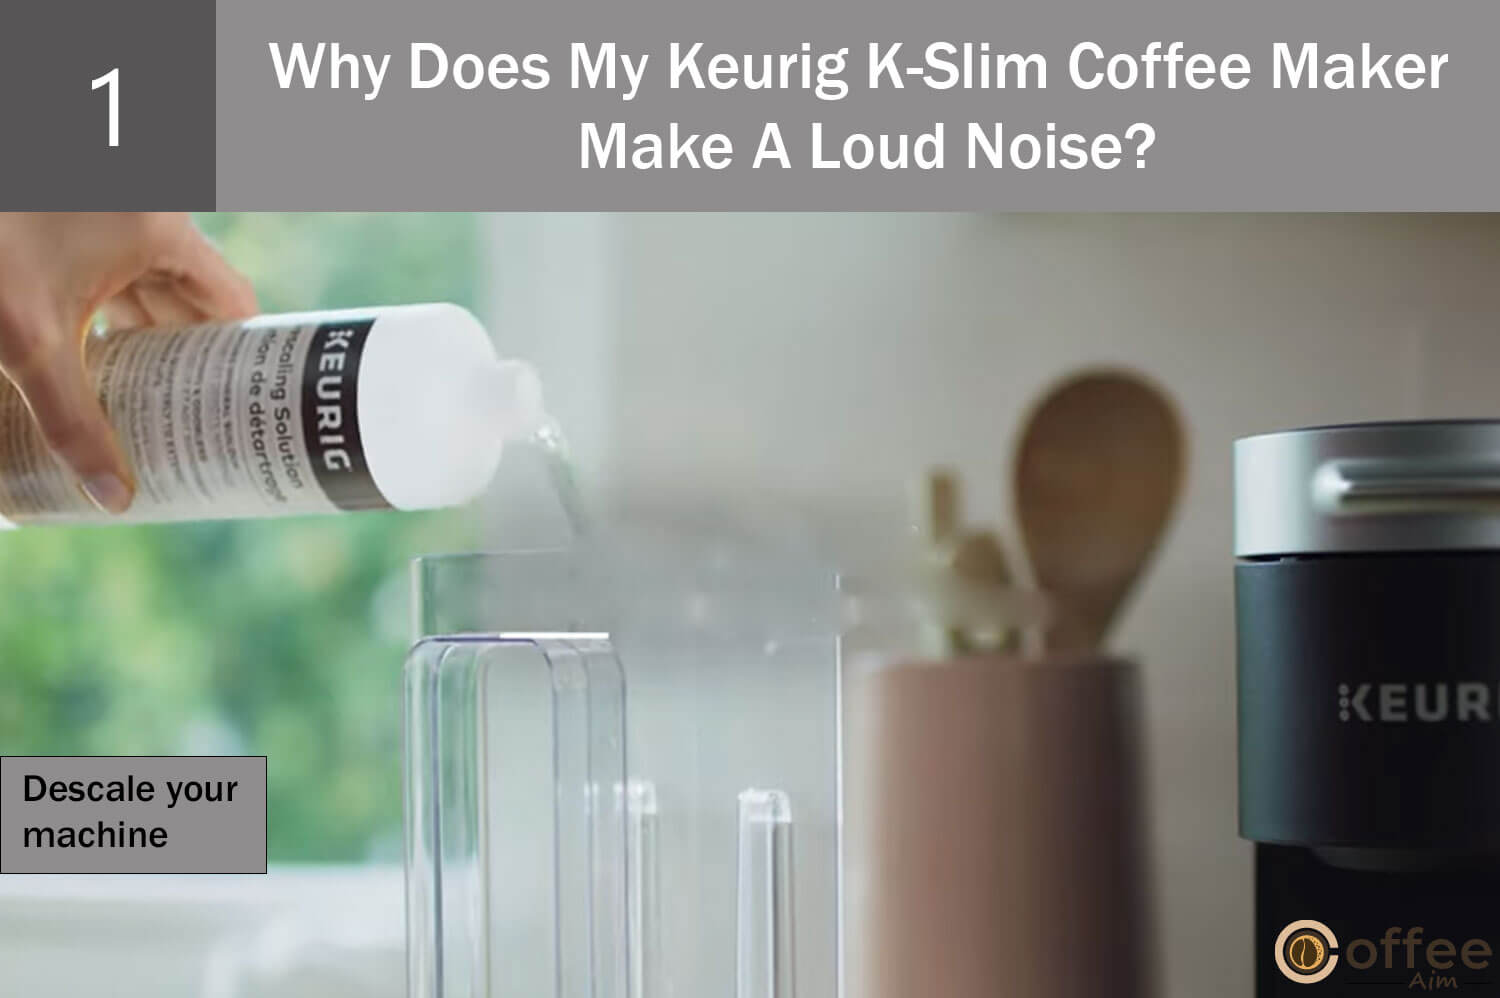
If you need assistance with descaling your Keurig K- Slim, refer to the “Descaling The Keurig K-Slim” section below. It provides a detailed, step-by-step guide to help you perform the descaling process effectively and efficiently.
Cause 2: Wrong Placement
The placement of your coffee machine plays a crucial role in its noise level, mainly influenced by the type of surface it sits on. When placed on an uneven surface, the machine vibrates more, increasing the noise. Let us move towards its solution.
Solution: Place It On A Steady Surface
It’s vital to adhere to a simple rule: always place the machine on a stable surface such as a kitchen slab or table.
Cause 3: The Entrance Needle Is Dirty
A potential reason for the clicking noise in your Keurig K-Slim could be a dirty entrance needle. The entrance needle is responsible for piercing the K-Cup during the brewing process. When it becomes clogged with coffee grounds or debris, it can result in the machine producing a clicking noise. Cleaning the entrance needle can help resolve this issue and restore the smooth operation of your coffee maker. Want solution? Look below.
Solution: Clean The Entrance Needle
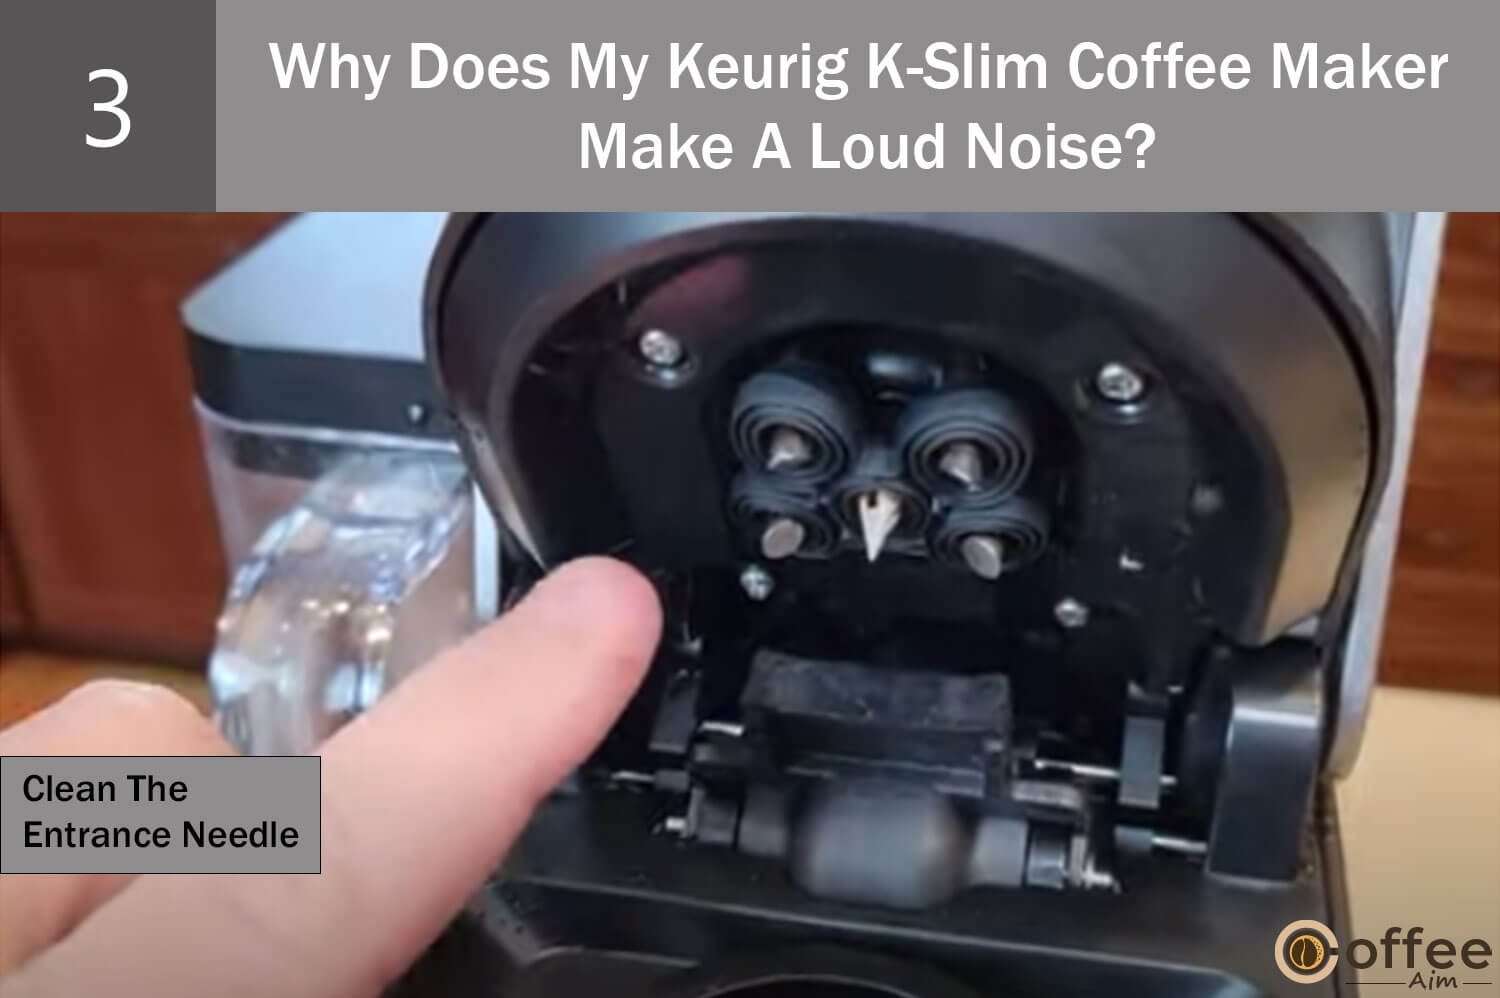
Cleaning the Enterance Needle ensures that debris and blockages are effectively removed. For detailed instructions on cleaning the entrance needle, please refer to the “Cleaning the Entrance Needle” section in this article’s “How To Clean Your Keurig K-Slim” section.
Cause 4: Broken Water Pump
The water Pump’s primary function is to extract water from the tank and circulate it throughout the machine for coffee brewing. However, if the water pipe or pump gets damaged, it can lead to abnormal noises during operation. The pump can also stop working, resulting in no water flow and rendering your coffee maker non-functional. It is important to promptly address any issues with the water pump to ensure the smooth functioning of your coffee machine and a delightful coffee brewing experience.
Solution: Repair The Water Pump
In such a case, contacting Keurig Customer Care will be the best decision. Contacting them will enable you to request professional assistance in repairing or replacing the water pump. You can find the contact information for Keurig Customer Care in the “When To Seek Professional Help” section of this article.
After summing up the problem related to producing weird noises, Let us now see how you can deal with a Keurig K-Slim brewing a partial Cup of coffee.
Problem 6: Why Is My Keurig K-Slim Brewing A Partial Cup?
When your Keurig machine fails to brew a full cup of coffee despite pressing the button, it can be incredibly frustrating. This issue indicates a malfunction in the machine, which can greatly diminish your satisfaction and overall coffee-drinking experience. After all, the purpose of owning a Keurig machine is to enjoy a convenient and full cup of coffee. It is essential to troubleshoot the problem promptly to identify the underlying cause and restore the machine’s ability to brew a full cup of coffee.
Cause 1: Keurig K-Slim Is Clogged
An underlying reason for your Keurig machine not brewing a full cup of coffee could be the accumulation of mineral deposits or water scaling inside the machine. These deposits can create blockages in the water line, impeding the proper flow of water and resulting in an incomplete brewing process. Without further ado, let’s uncover the solutions to overcome this solution.
Solution: Run A Descaling Cycle

Regularly descaling your Keurig K-Slim coffee maker is crucial to remove scaling and prevent any potential issues that may affect its performance. To learn how to descale your Keurig K-Slim, refer to the section titled “Descaling Your Keurig K-Slim” provided in this article.
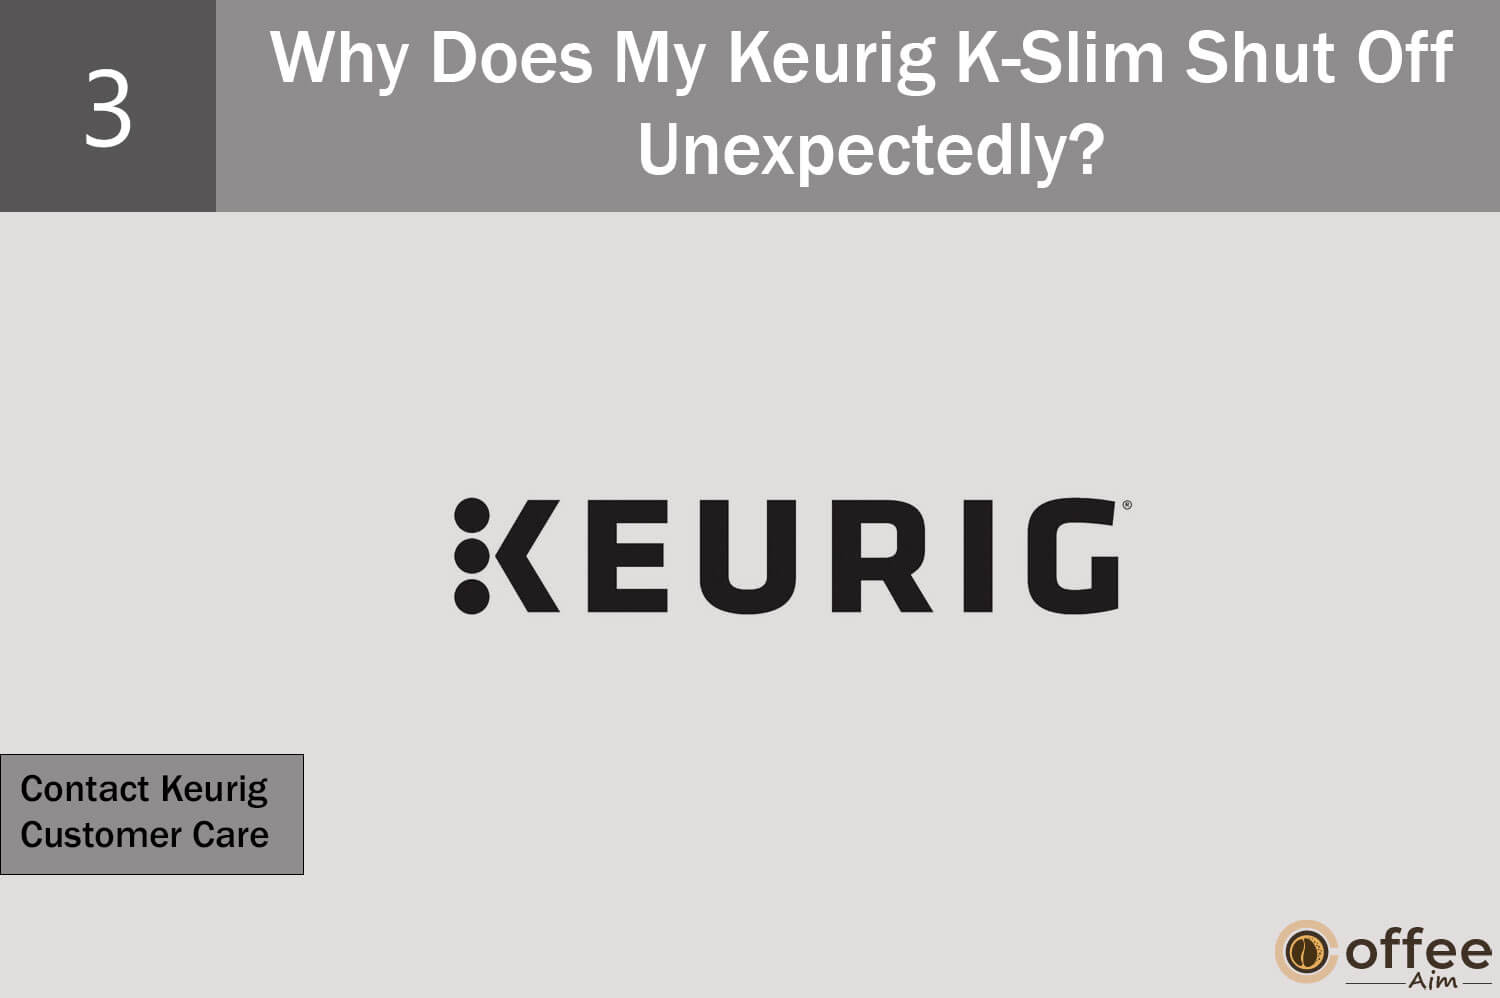
Cause 2: Dirty Needles
In some cases, simply cleaning the Keurig may not solve the issue of brewing an incomplete cup of coffee. The problem could be due to clogged needles that pierce the K-Cup. Debris such as K-Cup foil and coffee residues may get trapped in these needles, causing blockages that obstruct the water flow. As a result, the machine may not extract enough coffee from the K-Cup, resulting in an insufficient amount. Getting rid of a dirty needle can be very easy if you follow the solution given below.
Solution: Clean The Needles
Regularly cleaning the needles and ensuring they are free from any debris can help prevent blockages and ensure proper water flow. For detailed instructions on how to clean the needles of your Keurig K-Slim, refer to the sections titled “Cleaning The Exit Needle” and “Cleaning The Entrance Needle” under the heading “Cleaning The Keurig K-Slim” in this article provided at the end.
Cause 3: Water Reservoir Tube Is Blocked
Partial cup brewing can also be caused by an obstruction in the tube connecting the reservoir to the machine. Let us see how you can fix it.
Solution: Remove The Blockage
By following these steps, you can ensure that the tubing connecting the reservoir to the machine is clear of any obstructions, allowing for a proper and complete cup of coffee.
- Swirl the water around the reservoir and clean the area where the reservoir connects to the machine using a cloth to remove debris.
- Use a high-pressure tool, like a turkey baster, to force water into the tubing. This increased pressure can dislodge any obstructions and improve water flow.
- Utilize a can of compressed air to blow air through the tube. Ensure the reservoir is empty before doing this; the air pressure should help clear any blockages.
Cause 4: Air Bubble
If you have mistakenly brewed a cycle with insufficient water in the tank, air may have entered the water tubes. This can lead to a clog in the system, preventing Keurig from efficiently pumping water and brewing coffee.
Solution: Remove The Air Bubble
Move to “Problem 2(cause 2)” to learn about removing the air bubble.
After exploring the causes and solutions of Keurig K-Slim dispensing a partial cup of coffee, it’s time to explore the troubleshooting methods for the problem when your Keurig K-Slim starts shutting off unexpectedly.
Problem 7: Why Does My Keurig K-Slim Shut Off Unexpectedly?
Experiencing an unexpected shutdown of your Keurig coffee maker during brewing can be disappointing and disruptive to your daily coffee routine. This unwelcome disturbance can delay your brewing process and leave you without your desired cup of coffee. Thankfully, I can tell you how to troubleshoot this issue, and I will discuss potential causes and solutions to help you resolve the problem.
Cause 1: Faulty Wiring
One common reason for unexpected shutdowns in Keurig coffee makers is faulty wiring, often caused by a damaged plug cable. When the wiring of your Keurig K-Slim is defective, it can trigger an automatic shut-off to prevent further damage. Let’s move forward with the solution.
Solution: Repair The Wiring
Attempting to fix wiring issues on your own can be dangerous and potentially result in additional damage to the machine. Instead, contact an expert who can safely and effectively inspect and repair your Keurig. You can find contact information for professional help in the “When To Seek Professional Help” section of the article.
Cause 2: Keurig Is Overheating
Sometimes, Keurig coffee makers can shut off unexpectedly due to overheating. It can happen when the machine is overworked, consequently shutting the brewer off automatically to prevent damage. Frequent use can also lead to overheating by wearing down the coils. However, several solutions are available to address this issue and restore your Keurig K-Slim to full functionality. If you want to see what you do to prevent overheating your Keurig, look at the solutions below.
Solution: Let It Rest

One way to tackle an overheating Keurig that keeps shutting off is to take a straightforward approach. If you’ve been using the machine for a long time or too much, turn it off and unplug it to give it time to cool down. Giving the Keurig a break can help it reset itself and prevent further overheating.
Solution 2: Replace Or Repair The Coils
If giving it some rest does not yield fruitful results, it can be due to worn-out coils. Replacing these coils can help restore your machine’s functionality, but it is a complex process that requires technical knowledge and expertise. In such instances, my recommendation to you would be to seek assistance from Keurig Customer Care. They can provide the necessary guidance and support to resolve the issue best. For contact information, refer to this article’s “When To Seek Professional Help” section.
Cause 3: Faulty Thermostat
When the thermostat of your Keurig coffee maker malfunctions, your Keurig can turn off unexpectedly. The thermostat regulates the water temperature, and if it malfunctions, it can cause the machine to shut down. To resolve this problem, you can rely on the solution given below.
Solution: Contact Keurig Customer Care.
For help with a potentially faulty thermostat, contact Keurig’s customer care for troubleshooting advice, repair, or replacement options. If your Keurig K-Slim warranty is still valid, ask them for a replacement or any other compensation. See the “When To Seek Professional Help” section for contact information.
Cause 4: Low Water Level In Water Reservoir
When the water level in the Keurig is below the required amount, the “LOW WATER LEVEL” light on the control panel will start blinking. This is a signal for the user to refill the water reservoir before they can proceed with brewing. If Keurig detects that there is not enough water in the reservoir, it will automatically shut off. Let us see what we have for solutions.
Solution: Refill The Water Reservoir.

You must ensure that the reservoir has enough water before brewing your coffee. In case the water level is low or the reservoir is empty, you should add water to the MAX FILL level stated on the reservoir.
Cause 5: The K Cup’s Bottom Is Unpunctured
One possible explanation for your Keurig coffee maker shutting off while brewing is that the bottom of the K-Cup is not being pierced. When the machine fails to puncture the bottom of the cup, it cannot properly brew the coffee, leading to the automatic shutdown. But the real question is how can you solve this problem.
Solution: Contact Keurig Customer

To investigate why your brewer is failing to puncture the K-Cup, it is advisable to contact Keurig Customer Care or seek assistance from a qualified professional. For further support and guidance, you can find their contact information in the “When To Seek Professional Help” section.
Cause 6: Brewing Process Was Interrupted
Your Keurig coffee maker might turn off while brewing due to an interrupted brewing process. This can occur as a result of various factors, such as a power outage or a malfunctioning machine. Let’s take a deeper dive into the available solutions to address and fix this problem.
Solution 1: Ensure A Stable Electric Connection
You may take a few steps to prevent your Keurig from shutting down in the middle of brewing due to an unstable power connection. First, ensure your coffee maker is directly connected to an electrical socket rather than through a power strip or extension cord. Additional connections can weaken the electrical connection and increase the likelihood of the machine shutting down while in operation.
Cause 7: Clogged Exit Needle
When coffee grounds accumulate around the needles in your Keurig machine, they can obstruct the piercing process, resulting in only one hole being made in the K-cup. Consequently, the hot water cannot flow through the K-cup, leading to the Keurig not brewing and shutting off automatically.Let’s progress further and explore the available solutions.
Solution: Clean The Exit Needle
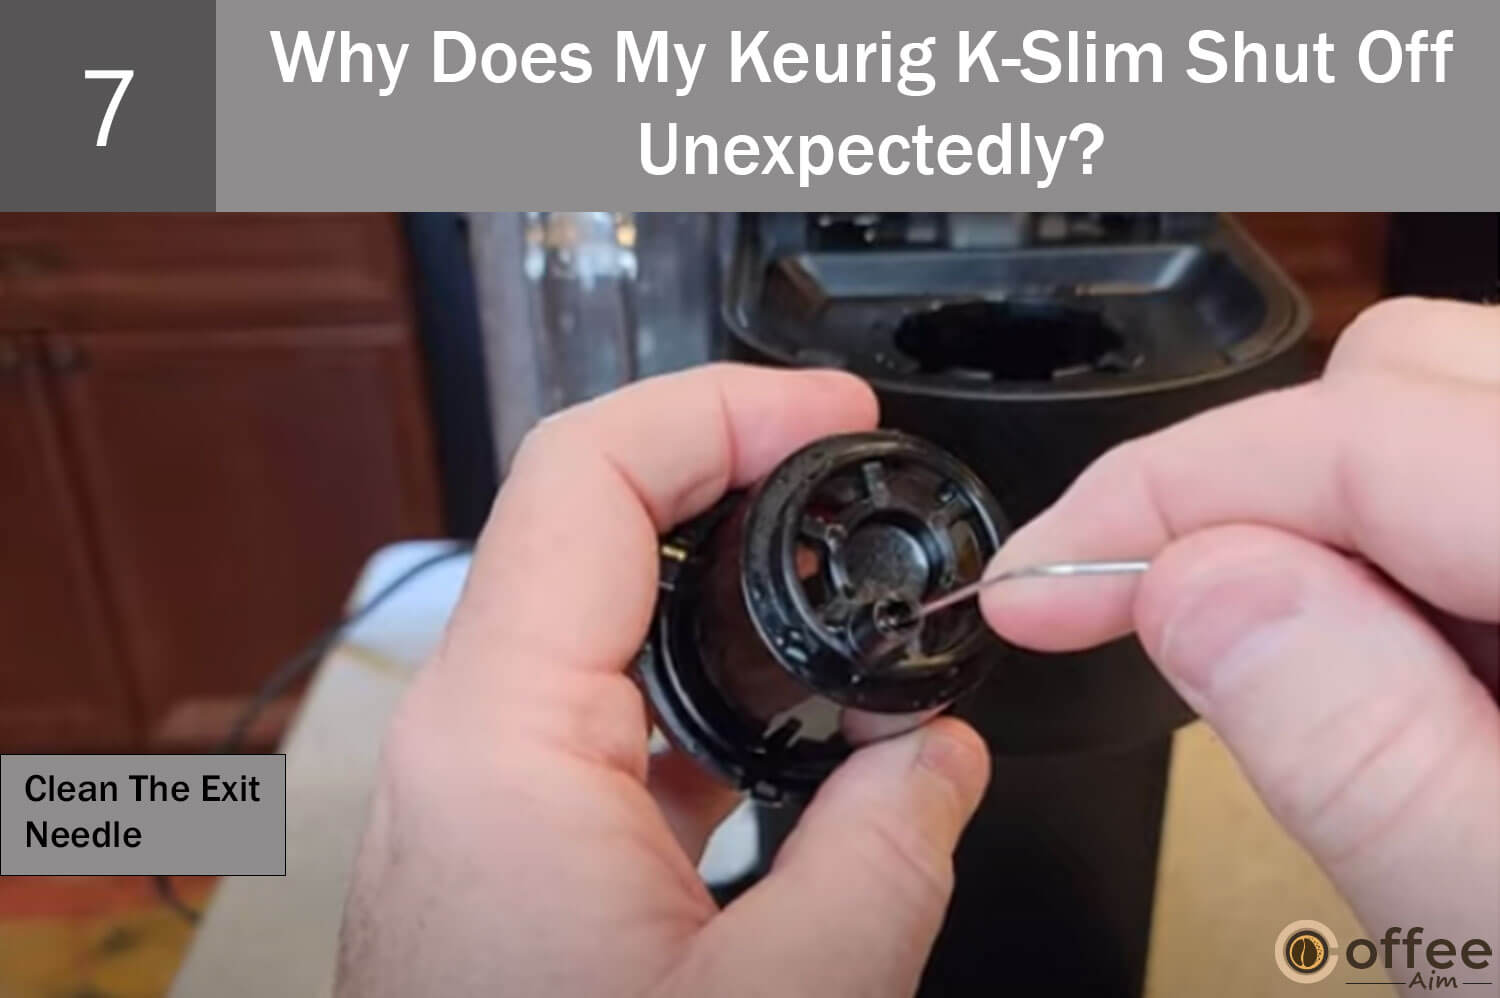
To quickly diagnose this issue, you can perform a simple check. The next time your Keurig repeatedly shuts off during the brewing process, remove the K-cup. If you notice an incomplete or insufficient hole in the bottom of the pod, it indicates that the bottom needle of your brewer is causing the problem. Clean the exit needle before brewing your next cup of coffee. Head to the “Cleaning The Exit Needle” section available below in this article.
Cause 8: Bent Needle
Another possible cause of your Keurig repeatedly shutting off during brewing is broken or bent needles. Although the needles are less common to break or bend, it can occur if excessive force is applied. This typically happens when attempting to use a K-cup that is too tall for the Keurig machine and forcefully inserting it, damaging the needle.
The needles in your Keurig can become broken or bent in two areas: the top entrance needle, where the hot water enters the K-cup holder, and the exit needle, where the brewed coffee flows into your cup. These needles can experience damage if not handled carefully or if excessive force is applied.Continuing our discussion, let’s explore the steps to resolve this problem.
Solution: Replace The Needle

If you discover that either the top entrance needle or the exit needle in your Keurig needs to be replaced, you have likely identified the source of the problem.
Cause 9: Water Reservoir Magnet Alignment Is Wrong
One potential cause of your Keurig shutting off during the brewing process is a magnet in the water reservoir that is either misaligned or stuck. The magnet’s purpose is to detect the water level in the reservoir, but it can become misaligned from the vibrations generated during brewing. This can prevent your Keurig from detecting the water level accurately, leading it to shut off instead of brewing.Without further ado, let’s uncover the solutions to overcome this challenge.
Solution: Gently Tab The Water Reservoir

If you suspect that a misaligned magnet in the water reservoir is causing your Keurig to shut down while brewing, there are various measures you can take to address the problem. To begin, gently tap the water reservoir near the magnet housing to check whether it realigns the magnet. If that doesn’t work, gently shake the reservoir to move the magnet into the appropriate position. If the magnet still won’t budge, empty the reservoir and clean it with a mild soap before refilling it with water and reusing your Keurig.
After carefully examining the many causes of a leaking Keurig and the remedies that can be applied to them, it is now imperative to discuss the steps that a user should take if they find coffee grounds in their coffee cup when using a Keurig K-Mini Plus.
Problem 8: Why Is My Keurig K-Slim Coffee Not Hot Enough?
Discovering that your Keurig coffee maker cannot brew a hot cup of coffee can be disheartening, especially for those who cherish the ritual of starting their day with a steaming beverage. There are several potential reasons why your Keurig K- Slim may fail to deliver the desired temperature. Let’s explore these factors and possible solutions to remedy the situation.
Cause 1: Malfunctioned Water Pump
A malfunctioning Pump can easily disrupt the normal flow of water; to save the brewer from more damage, the heating element shuts off automatically to prevent the machine from overheating. Sadly, this implies that the brewing process is halted before the water reaches the desired temperature for brewing. Therefore, your coffee is brewed at a lower temperature than what is typically preferred, resulting in a less satisfying cup. Now, let’s concentrate on identifying and implementing the necessary measures to resolve this issue.
Solution: Repair The Water Pump.
Instead of trying this challenging task yourself, I recommend contacting Keurig’s customer service for assistance. Their team can provide advice and, if necessary, arrange a repair or replacement. You may even be eligible for a replacement if your Keurig is still under warranty. For contact information, please see the article’s “When to Seek Professional Help” section.
Cause 2: Use Of Cold Cup
When your brewer dispenses hot coffee into a cold cup, the heat is transferred to the cup, which causes the coffee to cool down instantly. This is particularly more recurrent during colder months when there is a significant temperature difference between the hot coffee and the cold cup. Moving ahead, let’s delve into the potential remedies.
Solution: PreHeat The Cup
Preheating your cup is an effective and easy technique to minimize heat transfer and maintain the temperature of your coffee for a longer duration. This simple yet incredible trick can exceptionally enhance your coffee-drinking experience, especially if you prefer your coffee to be extremely hot. There are two methods you can use to preheat your cup.
- Microwaving method

Add some water to your cup and microwave it for approximately 30 seconds to a minute, depending on the power of your microwave. Once the cup is heated, discard the water and promptly brew your coffee into the preheated cup.
- Boiling water method

Pour boiling water into your cup and let it sit for about 30 seconds to a minute. After preheating the cup, pour out the water and immediately brew your coffee into the preheated cup.
Cause 3: Keurig Is Clogged
The efficiency of your coffee machine’s water pump and heating element can noticeably decrease when limescale and clogs accumulate inside the system. This buildup impedes the machine’s proper functioning, leading to a drop in the brewing temperature. Consequently, you may end up with a cup of coffee that needs to be hotter. Let’s take a deeper dive into the available solutions to address and fix this problem.
Solution: Run A Descaling Cycle

The most effective way to eliminate clogs from limescale buildup in your Keurig K-Slim coffee machine is by running a descaling cycle. To learn about the detailed descaling process specific to your machine, refer to the “Descaling Your Keurig K-Slim” section in this article.
Having covered the causes and solutions for the issue of Keurig K-Slim dispensing not hot enough coffee, let us now shift our focus to troubleshooting methods for another problem that you may encounter. Specifically, we will explore what to do when your Keurig K-Slim produces weak coffee.
Problem 9: Why Is My Keurig K-Slim Producing Weak Coffee?
Oh no, weak coffee can be so disappointing and ruin your entire coffee-drinking experience! Not only does it takes away the necessary caffeine boost to start your day, but the lack of flavor can leave you a feeling of dissatisfaction and annoyance. All of this unnecessary hustle can hurt your mood and overall productivity. Identifying the underlying causes of weak coffee and taking immediate action to address the issue is crucial.
Cause: Poor Coffee Grounds
What If I tell you the real malefactor is not your Keurig K-Slim machine but the poor coffee grounds you use to make your coffee? Therefore, When you notice a sudden decrease in the flavor or strength of your coffee, it is vital to consider the quality of the coffee grounds used, primarily when you rely on reusable K-Pods. Poor-quality coffee grounds, which have been stored improperly or exposed to humidity, can exponentially impact the taste and strength of your brew.
Solution 1: Grind Only The Required Amount Of Coffee Beans

You only need to grind the amount needed for each brew instead of grinding a large quantity simultaneously. This practice helps maintain the coffee’s freshness and flavor for extended periods.
Solution 2: Store In An Airtight Container

Coffee grounds are prone to losing their freshness and flavor if not stored correctly. Factors such as light, air, and moisture exposure will result in stale coffee. If you want to maintain the real essence of your coffee, you need to store the coffee grounds in airtight containers and in dry conditions. By taking these precautions, the coffee can remain fresh and flavorful for an extended period.
After discussing this problem thoroughly, it is time to Shift our attention to a different concern. Let’s explore the troubleshooting approaches for the lights flashing on your Keurig K-Slim.
Problem 10: Why Is My Keurig K-Slim Light Flashing?
The Keurig K-Slim coffee maker features a sleek and simple control panel on the top, which includes various buttons. Sometimes these buttons blink to indicate a specific signal to the user. Let us see what those signals are and what they mean.
Cause1: Low Water Level
The moment the Keurig K-Slim detects a low water level in the water reservoir than required, the ADD WATER light on the control will turn on. Without delay, let’s move on to the solutions that can help resolve the problem.
Solution: Fill It To The Max Fill Level

To turn the add water light off on the control panel and resume the brewing process, fill the water reservoir up to the MAX FILL line. This line is imprinted on the reservoir as a guide to indicate the appropriate water level. Once the reservoir is filled up to the MAX FILL line, the light on the control panel will turn off.
Cause 2: Need Descaling
When The Keurig K-Slim detects heavy mineral deposits or scale buildup in the machine, it will indicate this by illuminating the “DESCALE” light on the control panel. This light serves as a signal to alert the user that the coffee maker requires descaling. Now, let’s proceed toward the possible fixes.
Solution: Run A Descle Cycle

Running a descale cycle can only turn off the displayed DESCALE light on the control panel. Detailed instructions on how to descale your specific model can be found in the “Descaling The Keurig K-Slim” section of this article. Follow the step-by-step guide provided to effectively descale your coffee maker and eliminate the descaling lights.
Other Events When Lights On The Keurig K- Slim Illuminate, Which Does Not Need Any Solutions.
There are some instances when the buttons on the control panel illuminate during the brewing process to signal the user about specific processes being in the process. Below are the instances when the button lights blink or turn steady during the brewing process.
- When you turn on the brewer and insert a K-cup, all of the size buttons start blinking, indicating to choose a size among them.
- When you choose the size, that specific size button will display a steady light with the K button at the center starting flashing.
- When you press the K button to begin the process, its light will also turn steady.
Desacling Of Keurig K-Slim
Minerals like calcium have a tendency to accumulate in your brewer over time, which can result in the formation of scale that can obstruct the proper functioning of your equipment. Therefore, it is crucial to descale your brewer at least every three months to ensure consistent performance and avoid potential problems like low coffee volume or slower brewing times. By regularly descaling your brewer, you can also help maintain its internal components that come into contact with water, ensuring that your coffee tastes just as good as it did the first time you brewed it. So, keep in mind the importance of regular descaling to keep your brewer running smoothly and your coffee tasting delicious.
Descaling Instructions For Keurig K-Slim
Descaling every three months is recommended to maintain your brewer’s heating element and other water-contacting components. However, depending on the mineral content of your water, calcium deposits may accumulate more quickly, requiring more frequent descaling.
Prepare for Descaling
You will need a large ceramic mug, fresh water, Keurig Descaling Solution, and access to a sink. Make sure there is no beverage pod in the K-Cup pod holder.
Start The Desacling Process
Follow all steps and instructions below to perform the descaling process and complete all steps.
STEP 1: Descaling Solution Rinse

- Ensure the brewer is powered off, then remove any remaining water from the reservoir and discard it.
- Pour the entire bottle of Keurig Descaling Solution into the emptied water reservoir. Then, fill the empty bottle with water and pour that into the water reservoir. Do not insert a K-Cup pod.
- Place a large mug on the drip tray of the brewer.
- To activate Descale Mode, ensure the brewer is powered off, then press and hold the 8oz and 12oz buttons together for 3 seconds until the DESCALE light turns solid.
- Once the brew button starts flashing, press the brew button to begin the cleansing rinse brew. The brewer will dispense the descaling solution into the mug. Pour the hot liquid into the sink.
- Repeat step 5 until the ADD WATER light illuminates. It may take several cycles.
- Once the ADD WATER light illuminates, empty any remaining liquid from the water reservoir and rinse it thoroughly. Fill the reservoir with fresh water and run several brew cycles without a K-Cup pod to flush out any remaining descaling solution.
STEP 2: Rest & Rinse
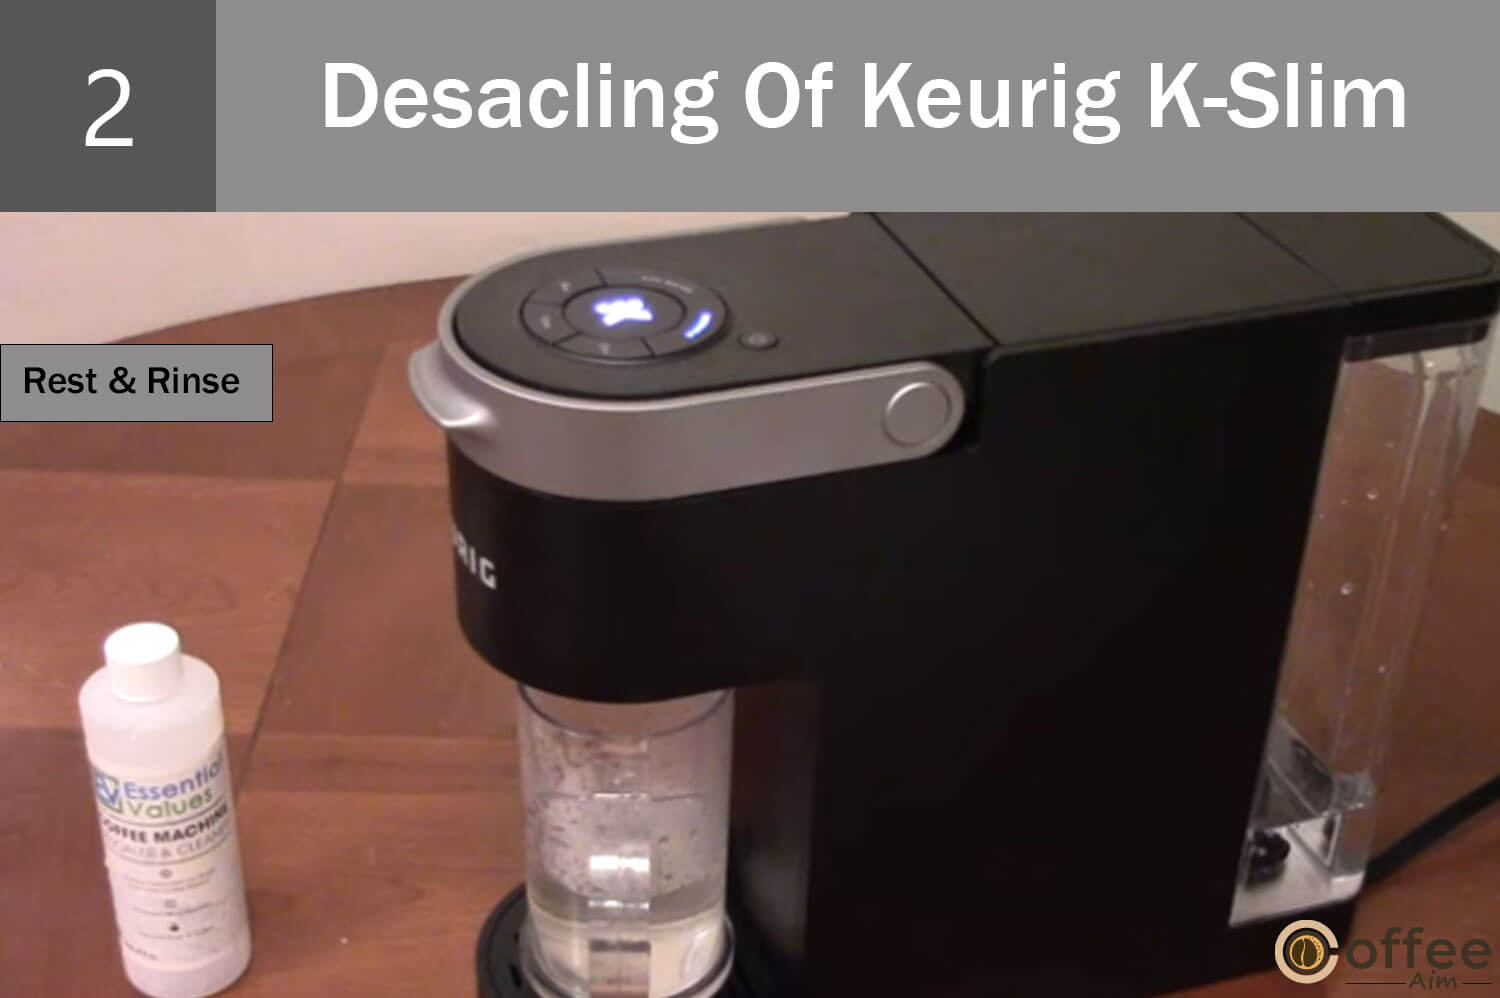
- Lift the water reservoir of the brewer and empty any remaining water into the sink.
- Rinse the water reservoir thoroughly with fresh water.
- Refill the water reservoir with fresh water up to the MAX fill line. Be careful to fill the reservoir evenly.
- Carefully place the water reservoir back onto the brewer, ensuring it is securely in place.
STEP 3: Fresh Water Rinse

- Press the brew button to begin the cleansing rinse brew once the brew button starts flashing.
- Once the brew cycle is complete, pour the hot liquid into the sink.
- Repeat steps 1-3 until the ADD WATER light illuminates.
- The brewer will now exit Descale Mode and will be ready for use!
How To Run A Water Cleansing Brew
Follow the steps to Run a Cleansing brew in your Keurig K-Slim.
- Remove the lid of the water reservoir.
- If you have a Keurig Water Filter, install it as instructed in your Water Filter Starter Kit.
- Fill the reservoir with fresh water, ensuring that you fill it up to the MAX fill line.
- Lift and lower the handle of the brewer. Do not insert a K-Cup® pod. The brewer will power on automatically.
- The three available cup sizes will start blinking. Press the 8oz button.
- After selecting the 8oz size, press the blinking brew button to start the cleansing brew.
- Allow the brewer to complete the cycle.
How To Clean Keurig K-Slim?
Please keep in mind that the components of your Keurig K-Slim are not dishwasher safe. They should only be cleaned by hand using soap and water.
Cleaning The K-Cup Pod Holder
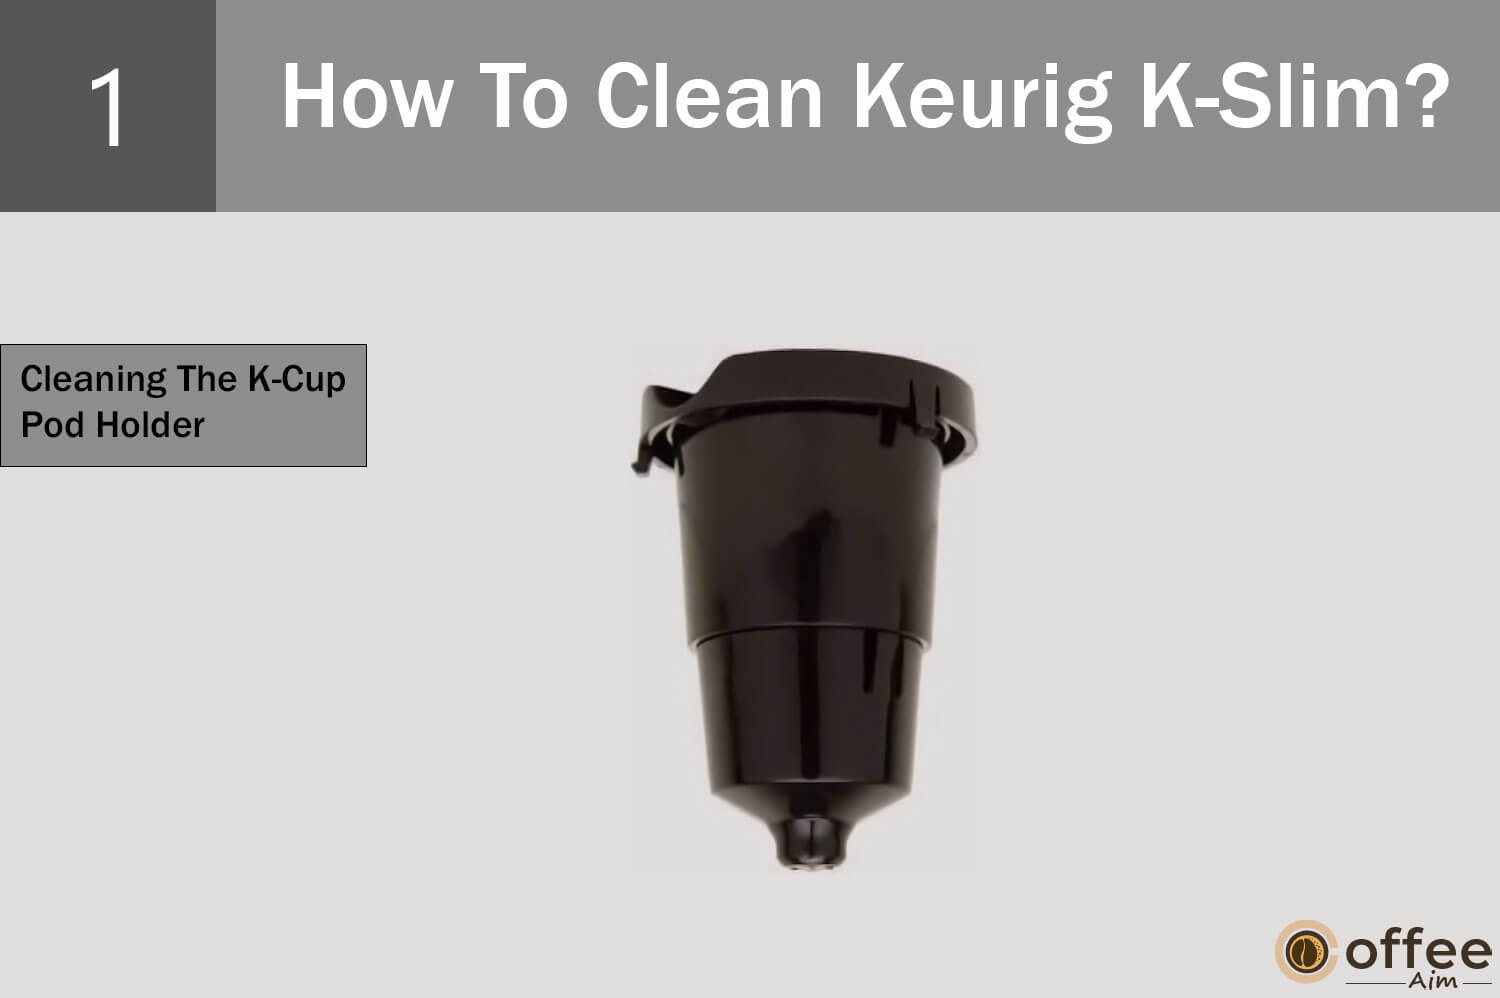
To clean the K-Cup pod holder from the brewer, follow these steps:
- Lift the handle of the brewer.
- Grasp the top of the K-Cup pod holder with one hand.
- Simultaneously, push up on the bottom of the K-Cup® pod holder from underneath with your other hand until it releases from the brewer.
- After cleaning the K-Cup pod holder, align it with the opening in the brewer.
- Use the two front ribs of the pod holder as a guide and snap it into place from the top to secure it back in position.
Cleaning The Exit Needle

To clean the Exit needle of your Keurig K-Slim, follow these steps:
- Remove the pod holder assembly from the brewer.
- Detach the funnel from the pod holder.
- Locate the exit needle, which is situated on the inside bottom of the K-Cup® pod holder.
- Take a straightened paper clip and carefully insert it into the exit needle to loosen any trapped coffee grounds. Be gentle while doing this to avoid damaging the needle or other components.
Cleaning The Entrance Needle

To clean the entrance needle of your Keurig K-Slim, follow these steps:
- Lift the brewer handle to access the underside of the lid.
- Locate the entrance needle on the underside of the lid.
- Hold the brewer handle in the upward position.
- With your other hand, take a straightened paper clip and carefully insert it into both holes of the entrance needle.
- Gently move the paper clip around to loosen any coffee grounds.
- Lower the handle completely.
- Run two brew cycles using only water. Do not insert a K-Cup® pod.
Maintenance Tips
Now that you’ve identified and solved any issues with your Keurig K-Slim coffee maker, it’s important to keep up with regular maintenance to prevent future problems from occurring. With just a few simple steps, you can keep your coffee maker in top working condition for years to come.
Here are some easy maintenance tips to keep your Keurig K-Slim running smoothly:
- Clean the Brewer: Regular cleaning is essential to maintain the taste and quality of your coffee. To clean the brewer, remove any leftover K-Cups and run a brew cycle with a cleaning solution. Follow the manufacturer’s instructions for the specific cleaning solution you’re using.
- Descaling: Mineral buildup can occur over time and affect the performance of your Keurig K-Slim. Descaling your coffee maker every three to six months can help remove any buildup and keep your machine in top shape. Follow the manufacturer’s instructions for the specific descaling solution you’re using.
- Replace the Water Filter: If you’re using a water filter in your Keurig K-Slim, it’s important to replace it regularly to ensure the quality of your coffee. Follow the manufacturer’s instructions for the specific water filter you’re using.
- Check for Blockages: If you notice that your Keurig K-Slim is not dispensing water properly, there may be a blockage in the needle that pierces the K-Cup. Use a paperclip to clear any blockages and ensure proper flow of water.
By following these simple maintenance tips, you can prevent future problems with your Keurig K-Slim coffee maker and ensure that your coffee tastes fresh and delicious every time. Remember, regular maintenance is key to keeping your coffee maker in good working condition, so don’t neglect it!
When To Seek Professional Help
If you’ve tried all of the troubleshooting tips and maintenance suggestions but are still experiencing issues with your Keurig K-Slim coffee maker, it may be time to seek professional help. Here are some signs that you should consider seeking assistance from a professional repair service:
- Your coffee maker is still not functioning properly after attempting all the troubleshooting steps.
- You notice any unusual noises, smells, or smoke coming from your Keurig K-Slim while brewing coffee.
- Your Keurig K-Slim coffee maker is leaking water or experiencing electrical issues.
If any of these issues arise, it’s best to seek professional help to avoid further damage to your coffee maker or potential safety hazards.
Here are some reputable repair services in the USA that specialize in Keurig K-Slim coffee makers:
- Keurig Customer Service: If you’re experiencing any issues with your Keurig K-Slim coffee maker, you can contact Keurig’s customer service team at 1-866-901-2739 or through their website at keurig.com/support.
- Mr. Coffee Repair Service: Mr. Coffee is a reputable brand that offers repair services for Keurig K-Slim coffee makers. You can contact them at 1-800-672-6333 or through their website at mrcoffee.com.
- Repair Café USA: Repair Café USA is a non-profit organization that offers free repair services for various appliances, including Keurig K-Slim coffee makers. You can search for a location near you on their website at repaircafe.org.
Remember, it’s important to seek professional help if you’re experiencing any issues with your Keurig K-Slim coffee maker to ensure its safe and proper operation.
Conclusion
In conclusion, the Keurig K-Slim coffee maker is a great addition to any coffee lover’s kitchen, but it can encounter some common issues that may affect its performance. If you’re experiencing any issues, it’s essential to identify the problem and follow the appropriate troubleshooting steps to fix it.
I’ve outlined the most common problems faced by Keurig K-Slim owners, their causes, and solutions. Remember to always unplug your coffee maker before attempting any maintenance or repair work.
Regular maintenance is crucial to keep your coffee maker in good working condition. Cleaning the brewer, descaling, replacing the water filter, and checking for blockages are simple steps you can take to ensure the quality and taste of your coffee.
If you’ve tried all the troubleshooting tips and still experience problems, it’s best to seek professional help. However, we encourage you to try to troubleshoot the issues on your own first to save time and money.
By following the tips outlined in this article, you can keep your Keurig K-Slim coffee maker in excellent condition and enjoy a delicious cup of coffee every time.
FAQs
How Do I Fix My Keurig That Won’t Brew?
If your Keurig coffee maker won’t brew, here are a few troubleshooting steps you can take to try and fix the issue:
- Check the power source: Ensure that your Keurig is plugged into a working electrical outlet and that the outlet is switched on.
- Check the water level: Ensure that the water reservoir is adequately filled with water. If it’s not, fill it to the recommended level.
- Clean the brewer: Sometimes, a clogged brewer can prevent your Keurig from brewing coffee. Clean the needle and K-cup holder to remove any buildup that might be causing a blockage.
- Check the K-cup: Ensure that the K-cup is correctly inserted into the holder and that the foil is punctured at the bottom.
- Descale your Keurig: If your Keurig is still not brewing, it could be due to mineral buildup in the water lines. Follow the manufacturer’s instructions to descale your Keurig and remove any mineral buildup.
If none of these steps work, it might be time to seek professional help or consider purchasing a new Keurig.
How Does Keurig Know Water Level?
The sensor in a Keurig machine that detects the water level in the reservoir typically relies on electrical conductivity to determine the presence of water. This type of sensor requires the presence of dissolved solids or ions in the water to conduct electrical current effectively. Distilled water, however, has very few or no dissolved solids, which can lead to issues with the sensor’s functionality.
How To Get A New Keurig For Free?
It’s unlikely that you can get a new Keurig coffee maker for free unless you win one in a promotional giveaway or contest. However, here are a few ways you can save money on a new Keurig:
- Look for sales and discounts: Keurig coffee makers often go on sale during major holidays or promotional events. Keep an eye out for discounts, coupons, and promo codes to save money on your purchase.
- Buy a refurbished Keurig: Keurig sells refurbished coffee makers that have been tested and restored to like-new condition at a reduced price.
- Check for warranty or recall issues: If your current Keurig has a warranty or recall issue, you might be eligible for a free replacement or repair.
- Consider buying a lower-end model: Keurig offers a range of coffee makers at different price points. Consider purchasing a lower-end model if you’re on a budget.
Remember to always purchase your Keurig coffee maker from a reputable retailer or the official Keurig website to ensure that you’re getting a genuine product with a warranty.
What Is The Life Expectancy Of A Keurig Machine?
The life expectancy of a Keurig coffee maker can vary depending on factors such as usage, maintenance, and model. However, on average, a Keurig machine can last between three to five years with proper care and regular maintenance.
To extend the life of your Keurig, it’s essential to perform routine cleaning and descaling to prevent mineral buildup and clogs that can affect its performance. Additionally, it’s important to follow the manufacturer’s guidelines for usage, such as using only compatible K-Cups and avoiding overfilling the water reservoir.
If you notice any issues with your Keurig, such as slow brewing or error messages, try troubleshooting the issue before seeking professional help. In some cases, minor issues can be resolved with a simple reset or cleaning. However, if the problem persists or your Keurig is several years old, it might be time to consider purchasing a new one.
Why Does My Keurig Stop Brewing After A Few Seconds?
If your Keurig stops brewing after a few seconds, it’s likely due to a clog or blockage in the machine’s needle or water line. Here are a few things you can try to fix the issue:
- Clean the needle: The needle that punctures the K-Cup can become clogged with coffee grinds, which can prevent the machine from brewing properly. To clean the needle, use a paper clip or a Keurig-approved cleaning tool to gently remove any debris.
- Check the water line: If the water line is clogged, it can restrict the flow of water and cause the machine to stop brewing. To check the water line, remove the water reservoir and inspect the tubing for any clogs or kinks. If you find a blockage, gently clean it with a soft brush or a small amount of water.
- Descale the machine: If the above steps don’t work, it’s possible that mineral buildup is causing the issue. Descaling your Keurig can help remove mineral deposits and improve its performance. Follow the manufacturer’s instructions for descaling your machine.
If none of these solutions work, it might be time to contact Keurig customer support or professional repair service for assistance.