Quick Navigation
Welcome to all new and old Creatista Plus users! If you have bought Nespresso Creatista Plus just now, you are at the perfect place as now you are in search of How to use Nespresso Creatista Plus properly. Furthermore, if you have been using this coffee maker for a long time but have met a problem at one point or lost your user manual, don’t worry.
So Dear Creatista Plus users! Look no more as you have found the best article for proper guidelines.
Without any further delay, let’s start it.
Precautions:
Don’t forget to look at the safety precautions to avoid damaging yourself and your precious Nespresso Creatista Plus. These precautions can make your usage of Nespresso Creatista Plus secure and risk-free. Read these safety precautions thoroughly and apply them to enjoy your lovely drink!
Specifications of Nespresso Creatista Plus
Look at the specifications to know the features of your coffee maker. If these specifications match your requirements and taste, then it’s great; otherwise, you are entirely to return or exchange this coffee maker.
So let’s start!
| ~ | 220-240 V, 50-60 Hz, 1300-1600W |
| Maximum Pressure | 19bar/1.9MPa |
| Weight | -5.2kg/11.4lbs |
| Water tank capacity | 1.5L/50oz |
| Dimensions in cm | 17.0cm width30.9cm height40.9cm depth |
| Dimensions in inches | 6.7in width12.2in height16.1in depth |
Packaging Content
What will you find inside the box?
As you receive a box of Nespresso Creatista Plus, check these below-mentioned things, which are mandatory items.
If the seal is scratched or anything is missing or damaged, feel free to return your Nespresso Creatista Plus.
So let’s begin!
Creatista Plus Coffee Machine
Here is the actual item that you purchased to make your favorite drink. Check it thoroughly.

Tasting Box Of Nespresso Capsules
With the machine, you will also get a tasting box of Nespresso capsules. This tasting box is free of cost. Initially, you use these Nespresso capsules to check your coffee maker.

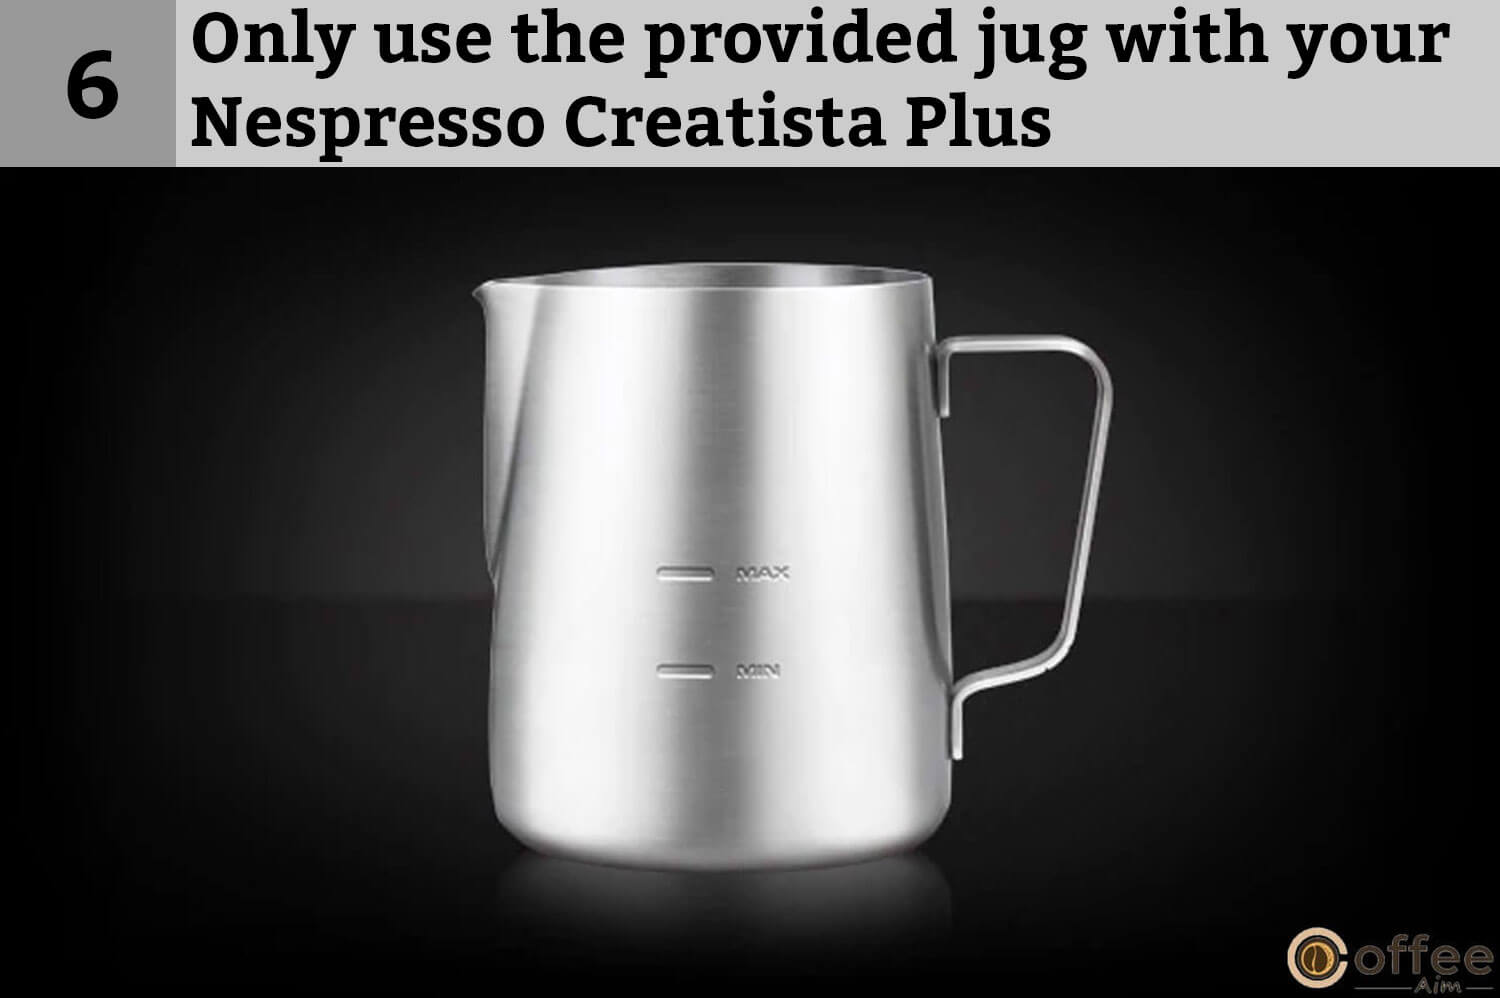
Milk Jug
This milk jug is available with Nespresso Creatista Plus. Always use it for milk purposes with your coffee builder. Don’t use any other milk jug. Also, don’t cross the maximum limit level mentioned on the milk jug.

Nespresso Welcome Brochure
You will find a Nespresso welcome brochure inside the box of Nespresso Creatista Plus. Manufacturers use it to welcome their worthy users.

User Manual
A complete user manual guide is also available in the packaging content to guide the users properly.

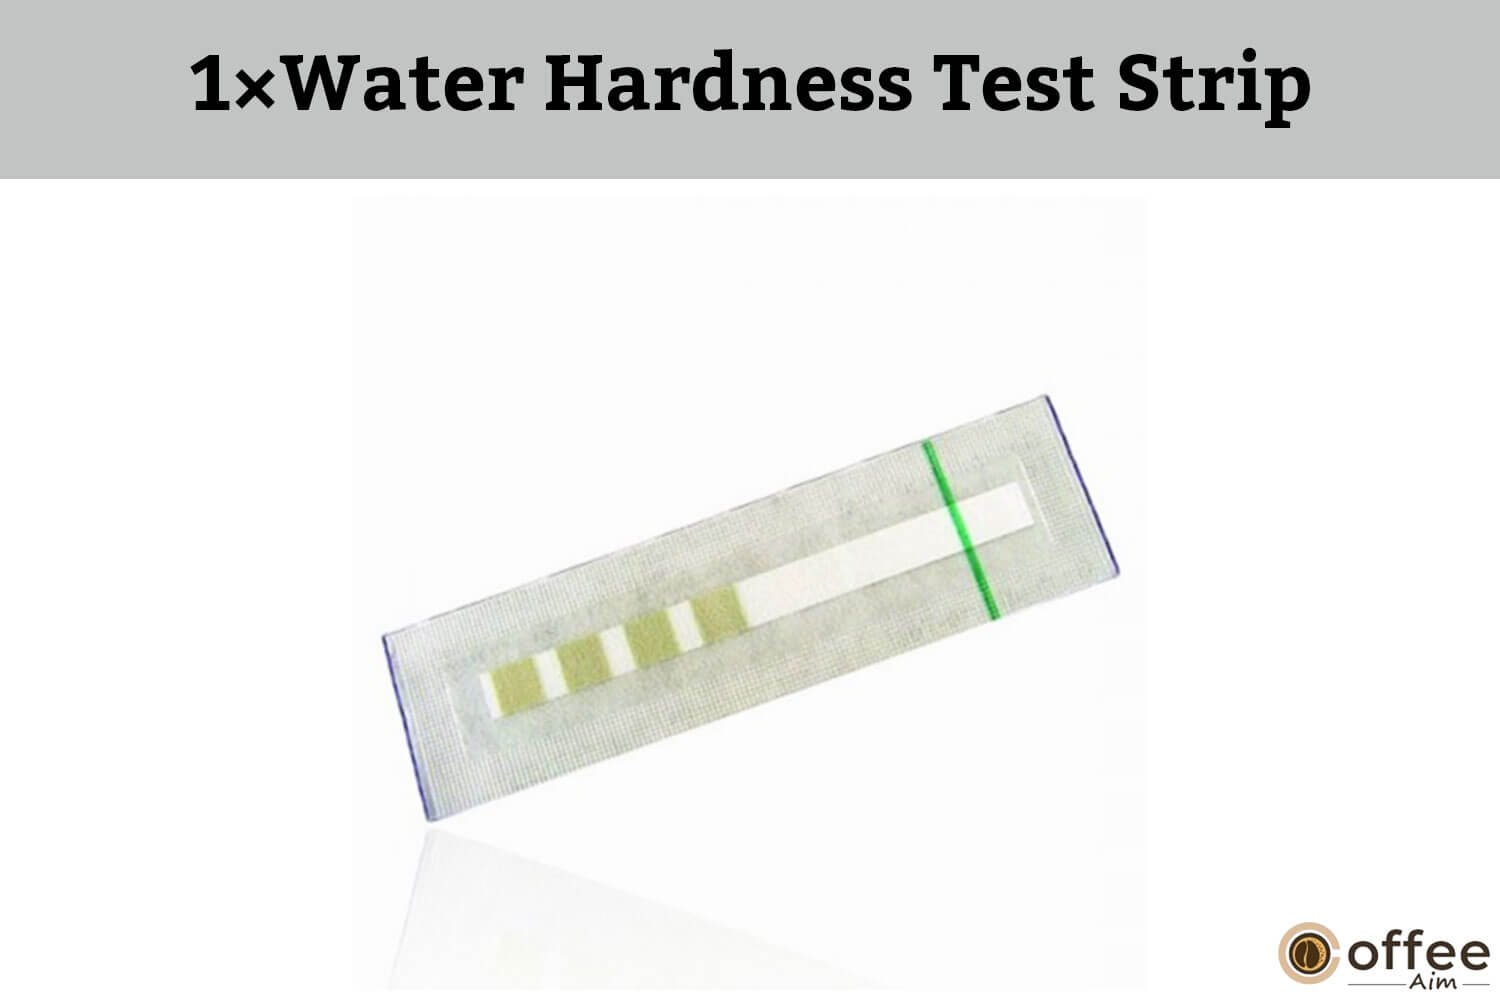
1×Water Hardness Test Strip
The test strip in the user manual is available to check the water’s hardness. Therefore, you can set the water hardness level of your machine before brewing coffee.
Parts Of Nespresso Creatista Plus
Nespresso Creatista Plus consists of multiple parts. All these parts play an essential role in the preparation of coffee. So let’s familiarize you with all the features of Nespresso Creatista Plus.
Color Display

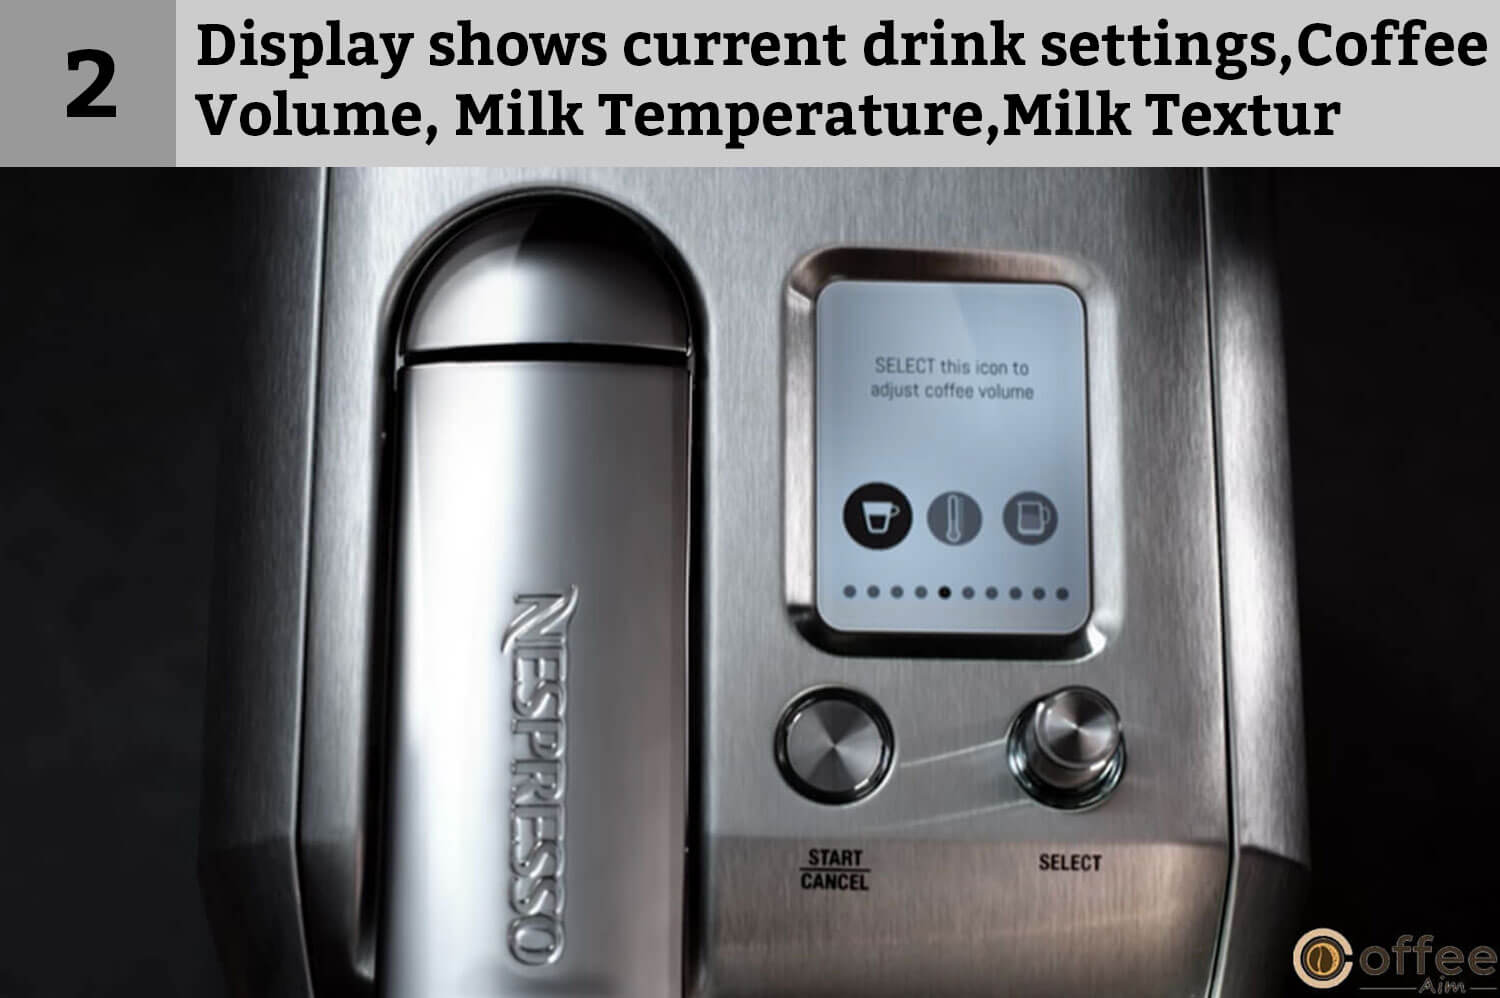
This button is present at the top of the coffee maker. It is used to select current drink settings, coffee volume, milk temperature, and milk texture. You can choose all things according to your taste and choice.
Select Dial
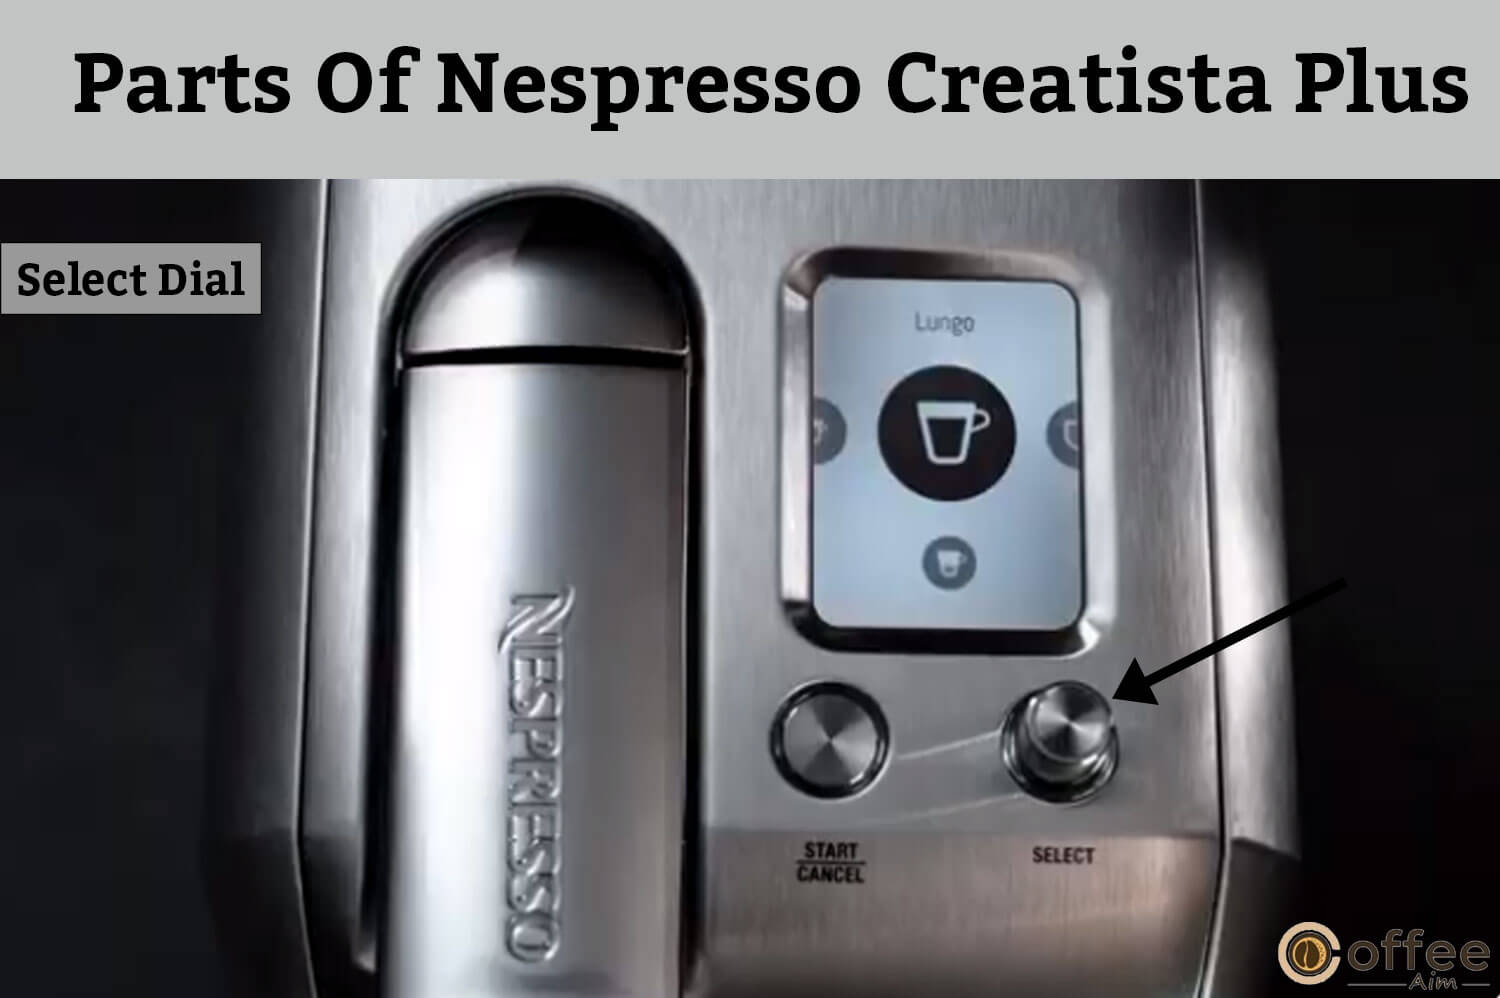
This dial is also present at the top of your Nespresso Creatista Plus. Use it to select your language. You can also adjust the water hardness level through this dial.
Start/Cancel Button
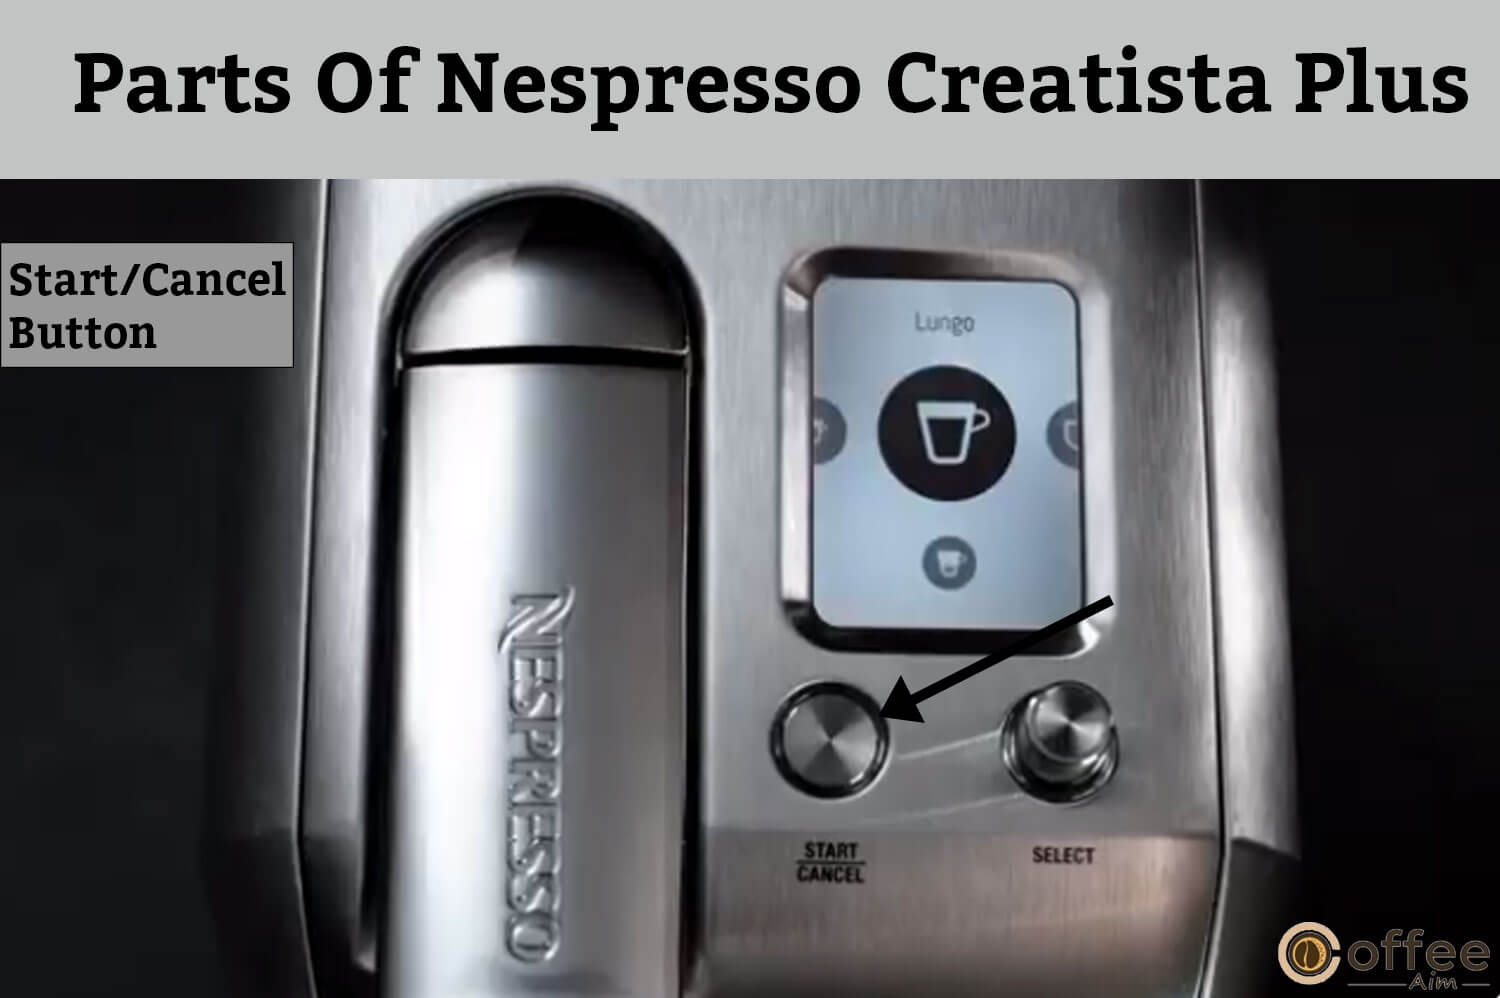
The Start/Cancel button is at the top of your coffee maker. As it appears from the name, this button is used to turn on and off your Nespresso Creatista Plus.
Lever For Capsule Insertion
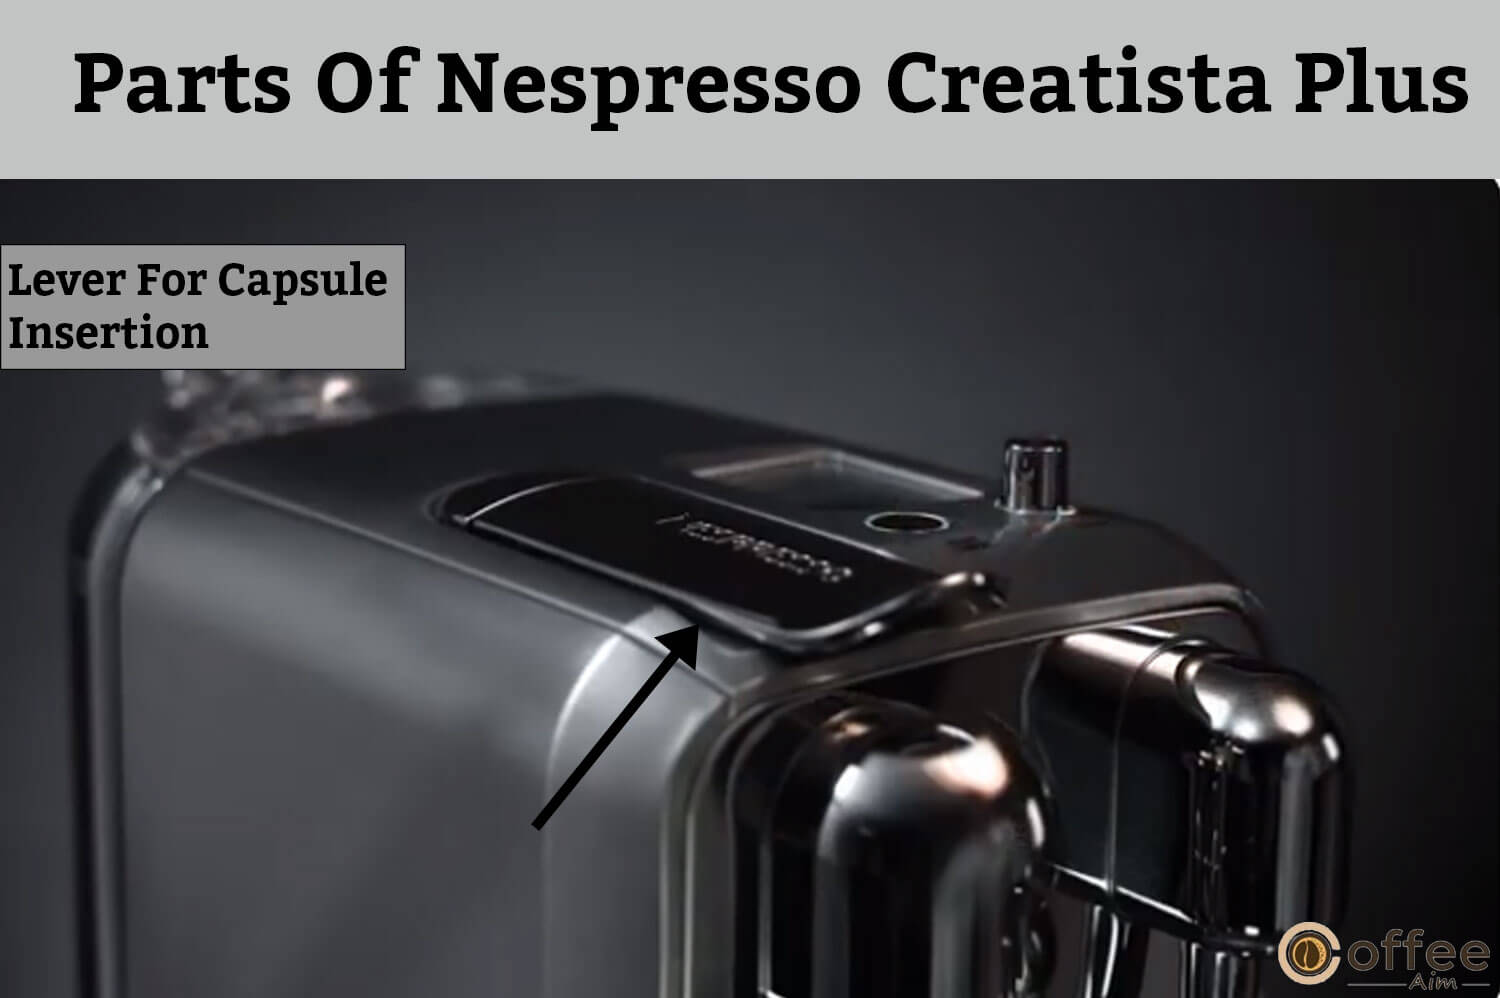
Here is another moveable item at the top of your Nespresso Creatista Plus. Pull the lever to find the capsule compartment where you will insert your capsule. It is also used to eject capsules into capsule containers.
Used Capsule Container
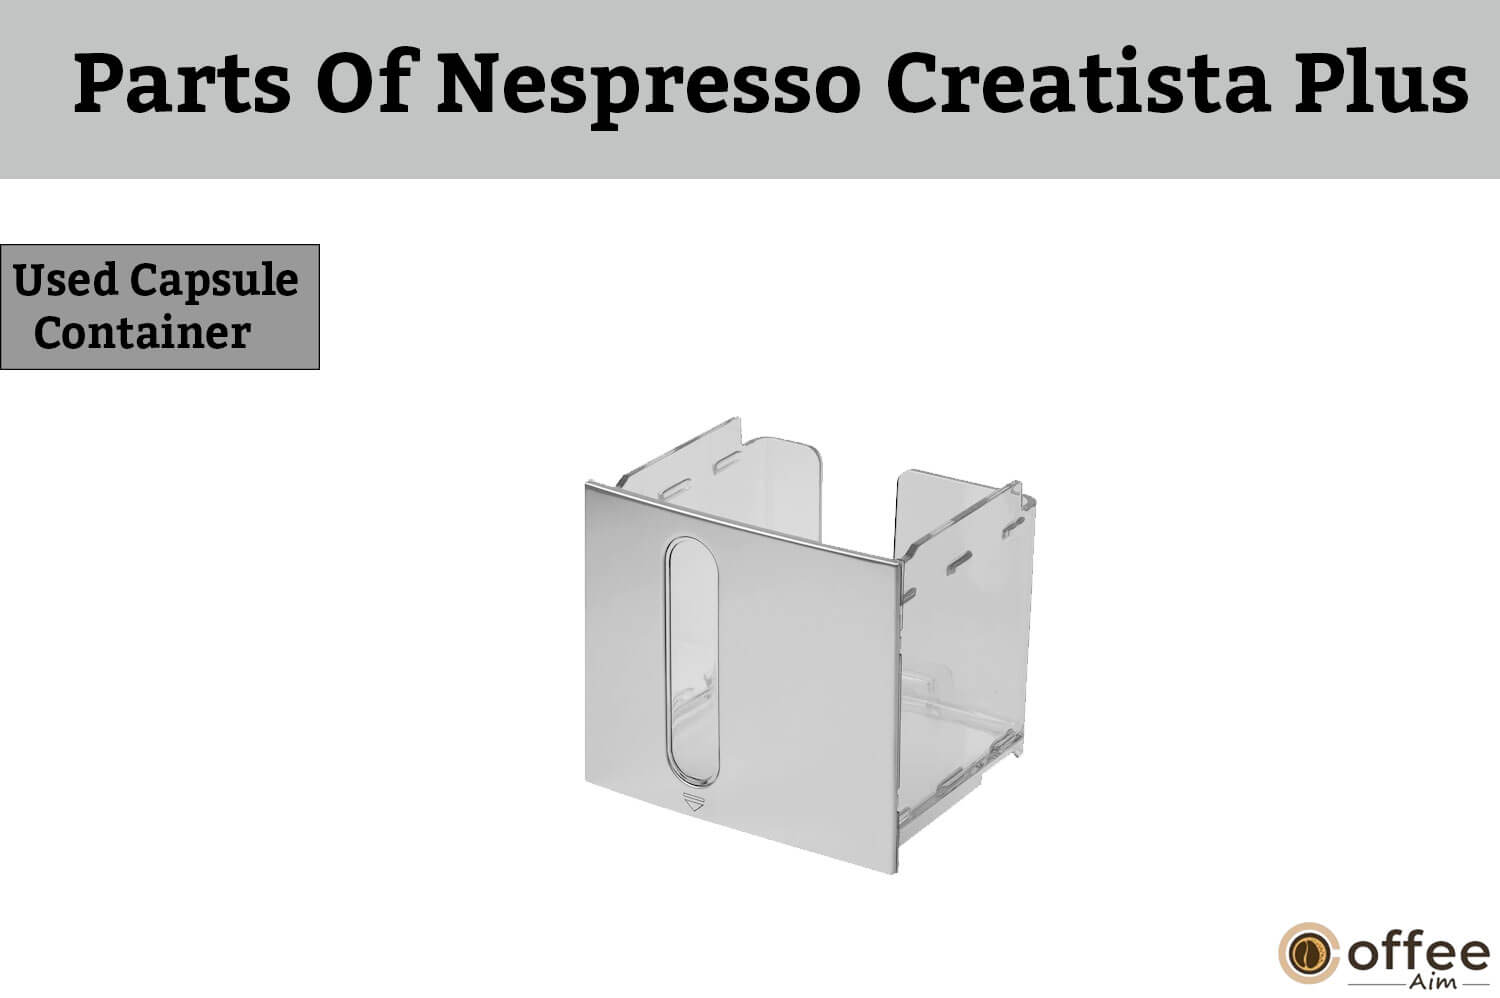
A used capsule container is an integral part of your Nespresso Creatista Plus. Put regular capsules of Nespresso into the Capsule Container.
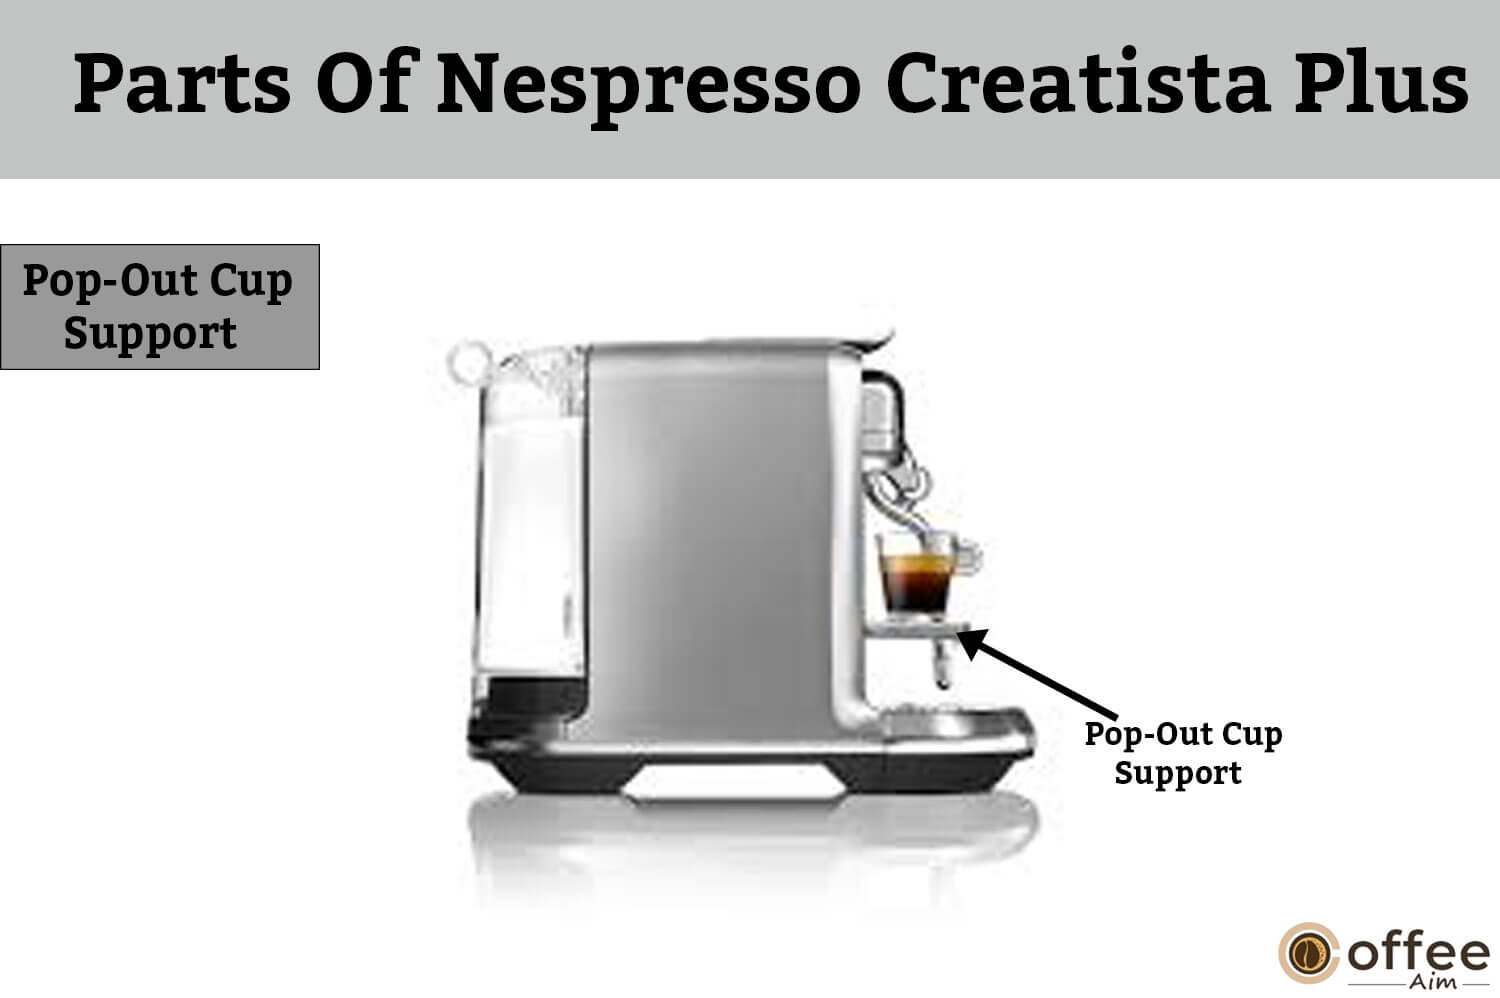
Pop-Out Cup Support
This pop-out cup support is at the bottom of the coffee maker. It is used to support your coffee cup.
Removable Drip Grid

Here is a removable drip grid. It is located at the bottom of your Nespresso Creatista Plus. You can easily remove it to wash. It is used to support the drip tray.
Removable Drip Tray With Full Indicators
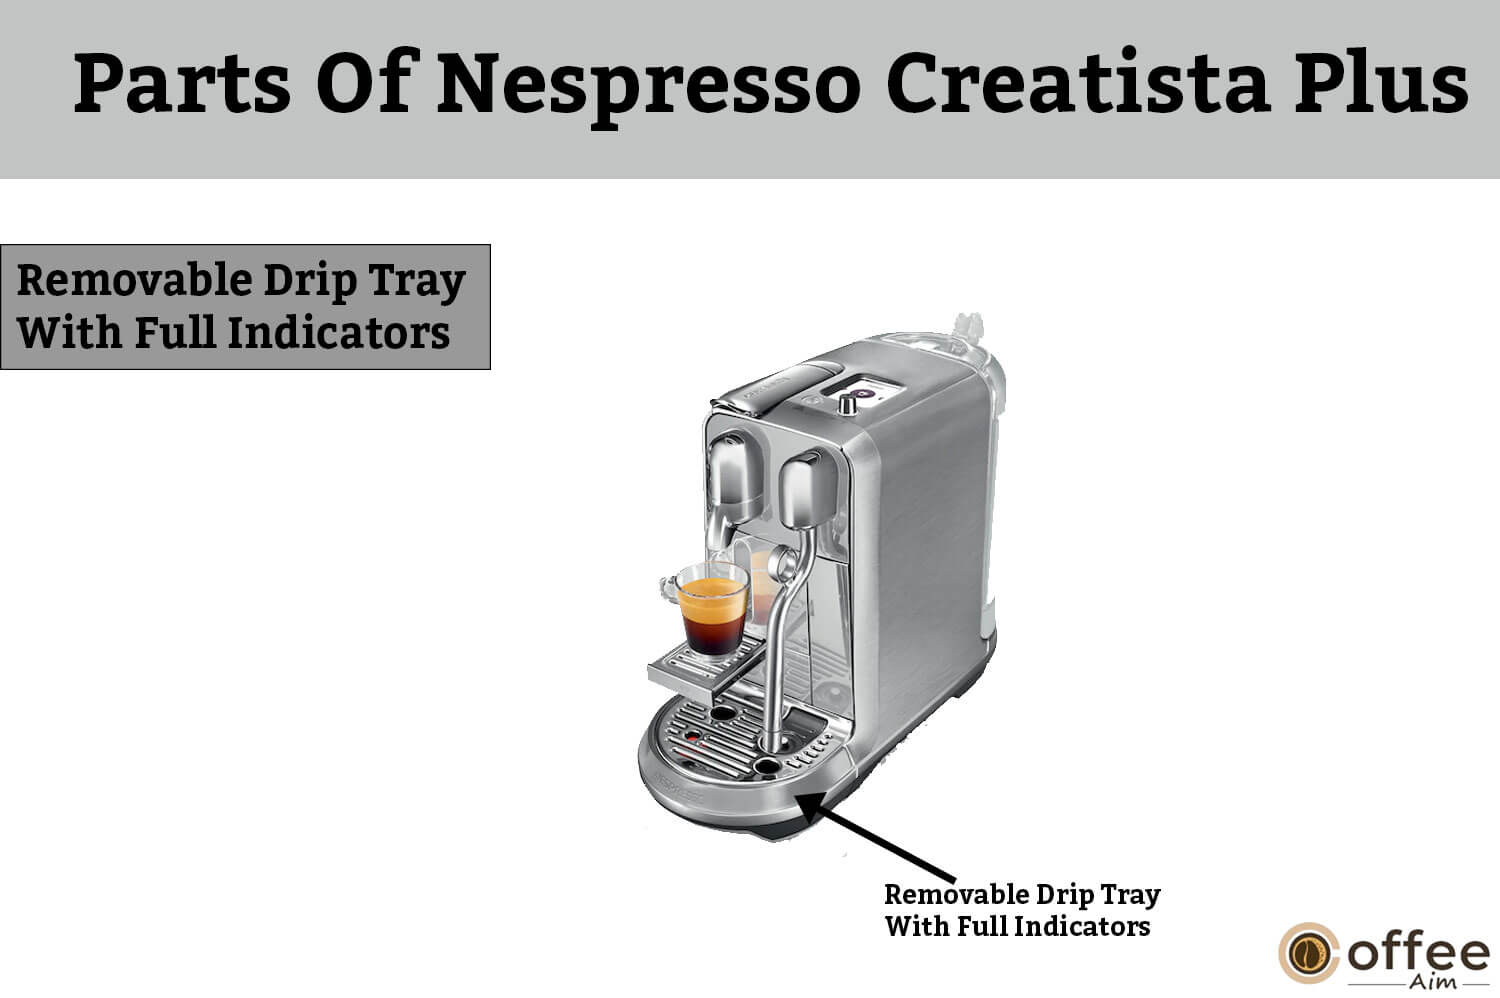
This removable drip tray is present at the bottom of the coffee maker. As it appears from the name, you can remove this drip tray. It also has an indicator.
Water Tank & Tank Lid

You can observe the water tank and lid in the below picture. Pour fresh and portable water into this tank and then cover it with the lid. This tank is present at the back of your coffee maker.
How To Use For The First Time
You have opened the box of Nespresso Creatista Plus and checked all the packaging content. As a newbie, don’t you know how to use it for the first time? Then keep on accompanying us.
The first use is about rinsing the machine and priming the heating system of the Nespresso Creatista Plus.
Let’s start the process:
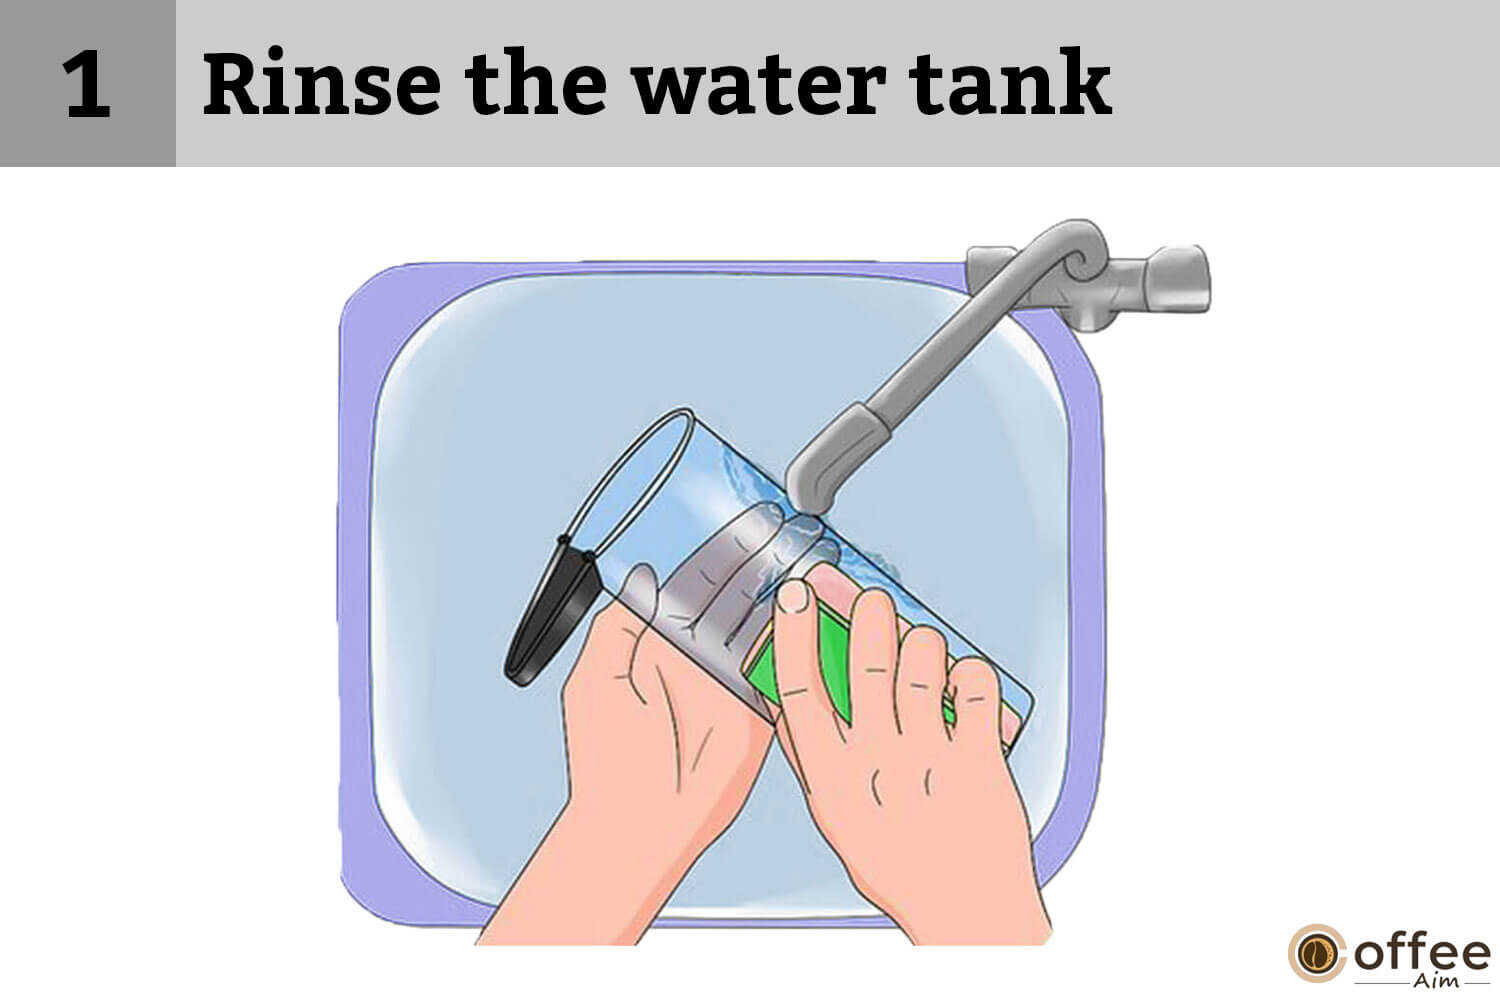
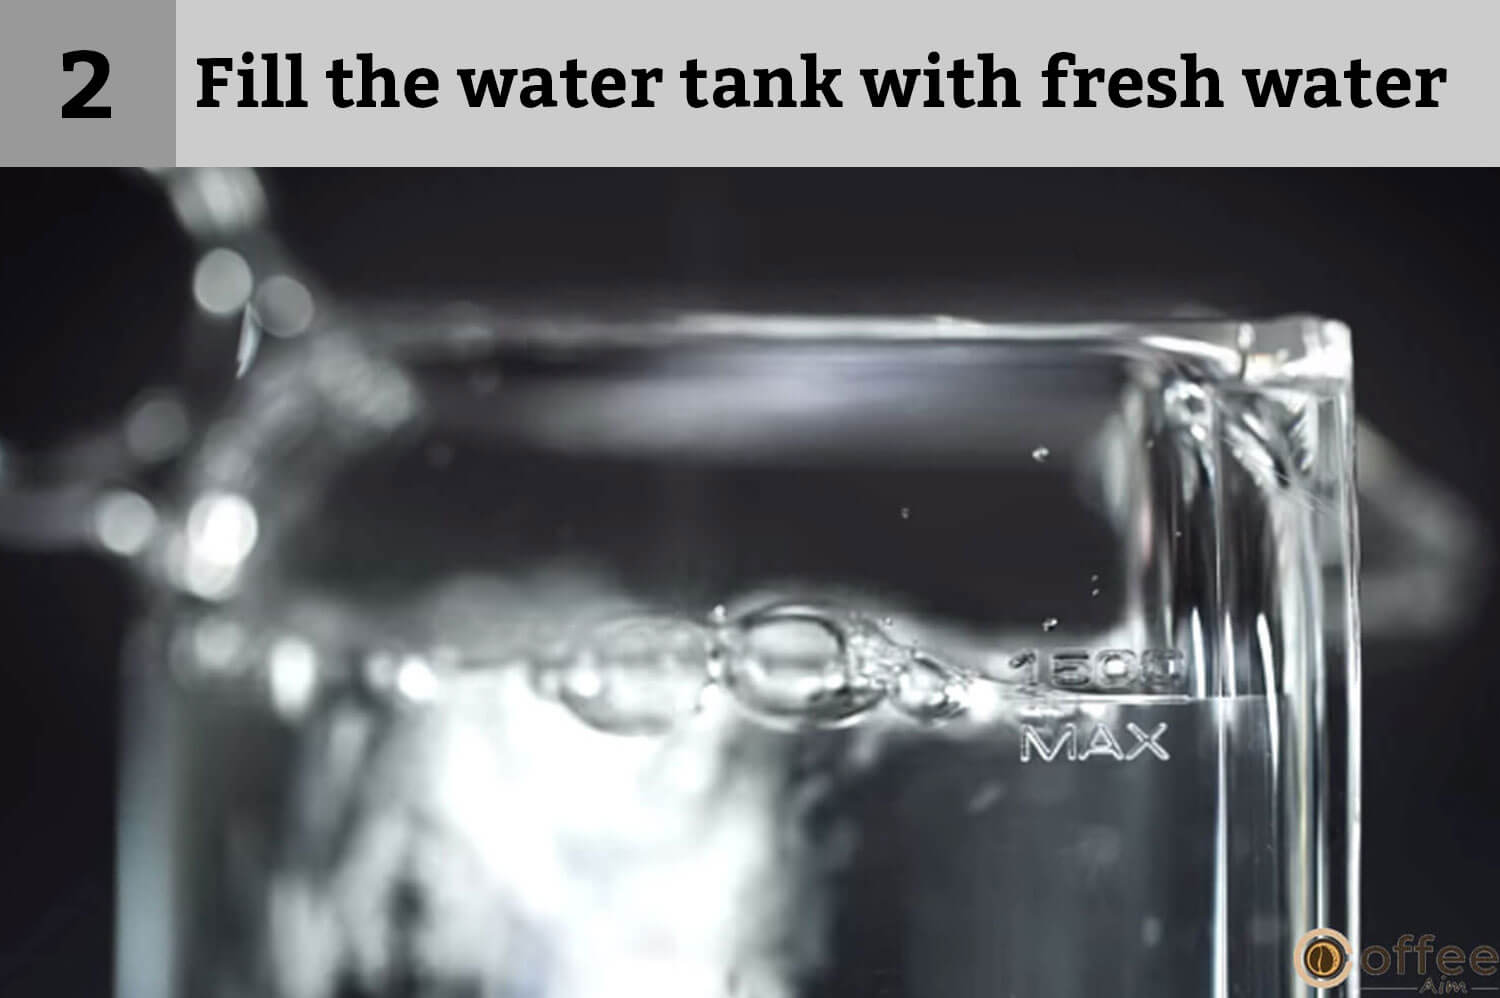
- First, rinse the water tank properly and fill it with potable water.
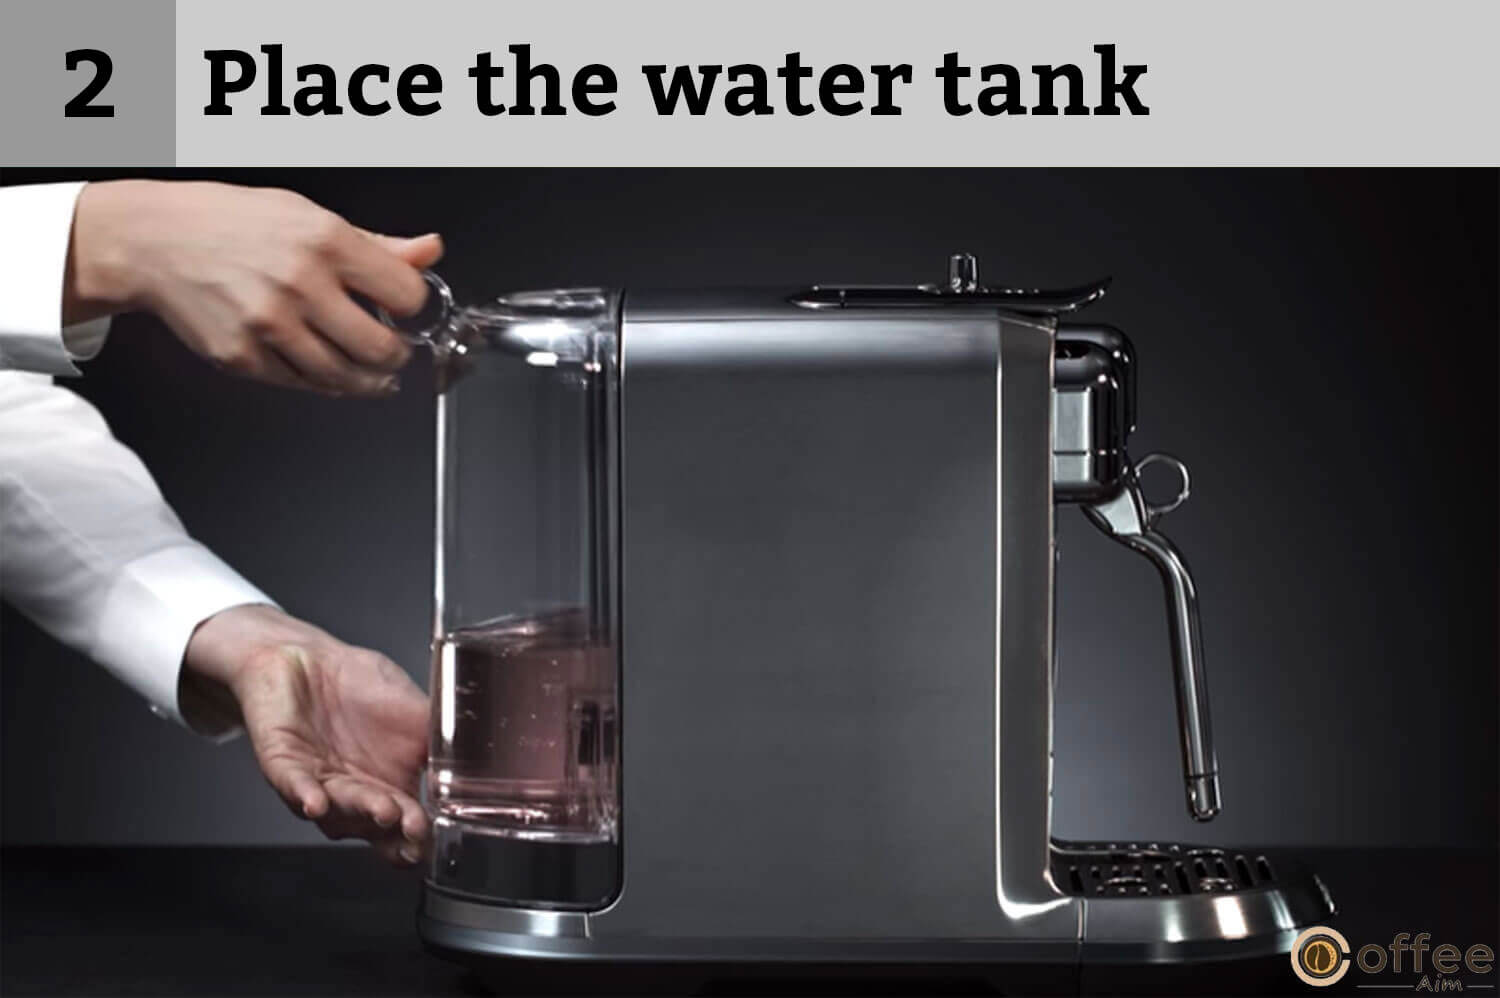
- Place the water tank, drip tray, and capsule container in their specified positions. Operate the machine only when all these items are in the correct position to ensure your city.
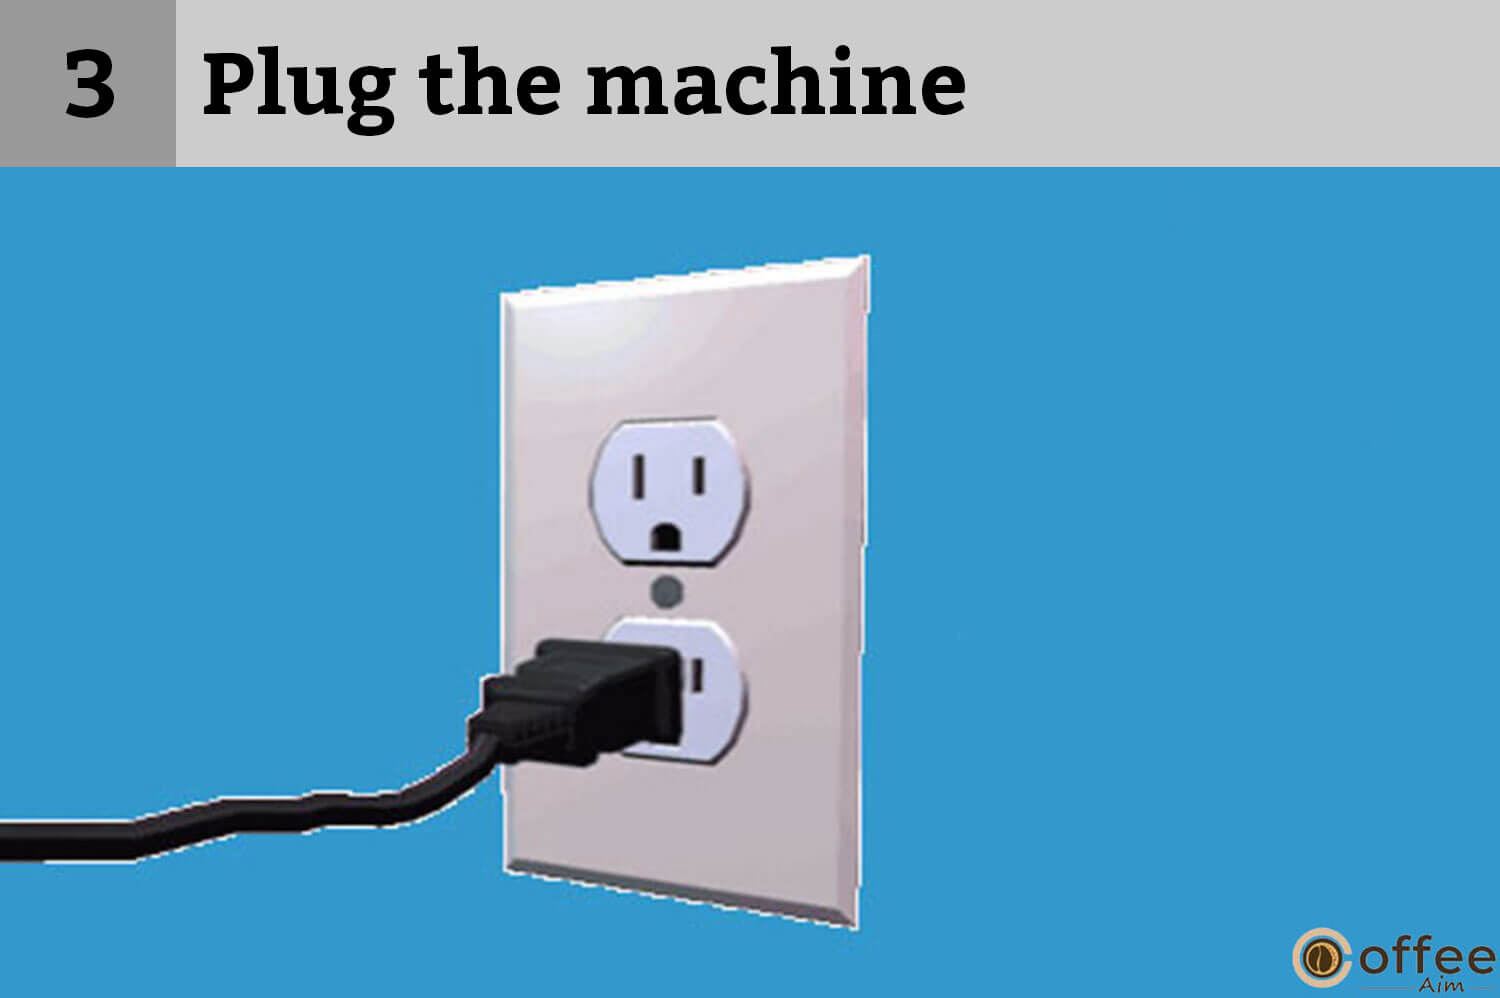
- Now plug the switch of the machine into the power outlet.
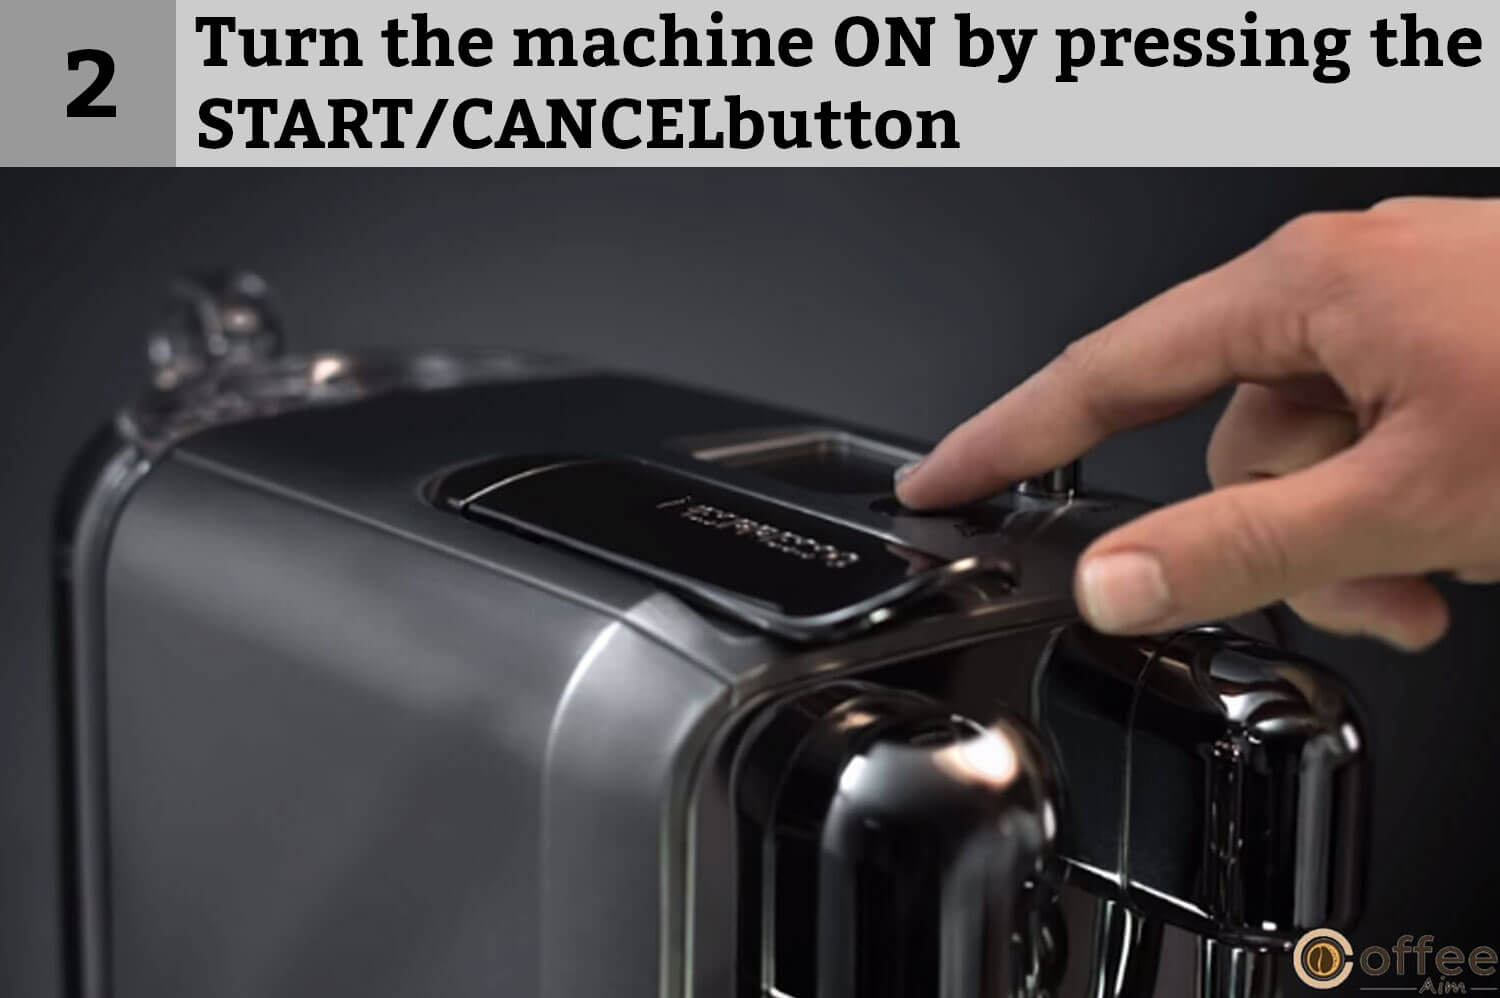
- You can turn the machine on by pressing the Start /Cancel button. The heat-up process takes almost three seconds.

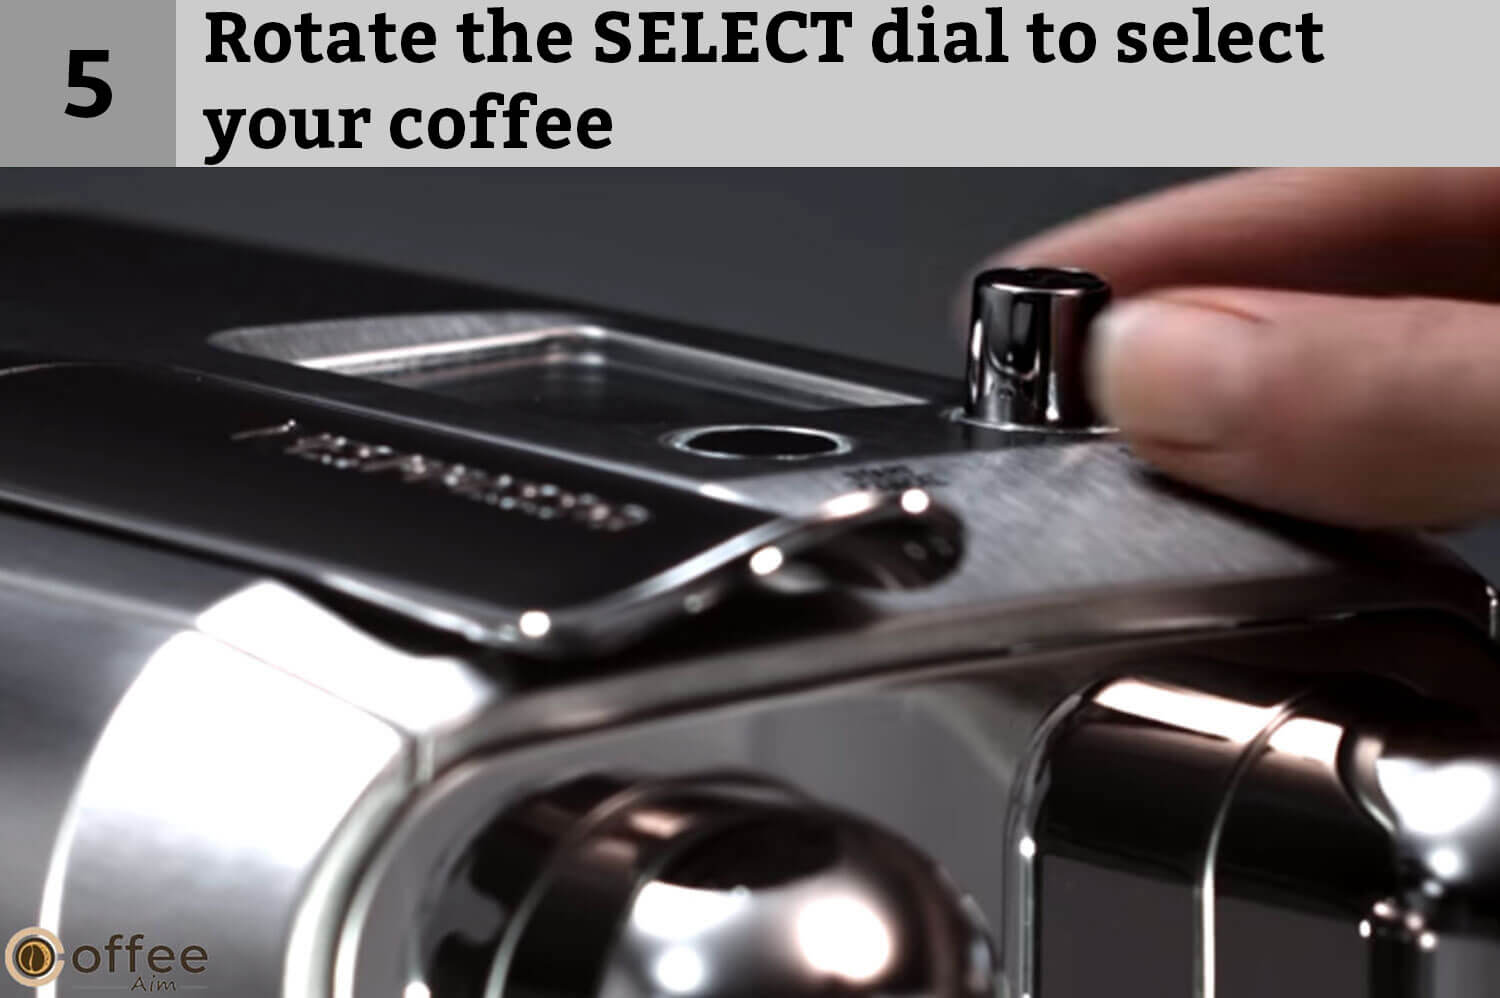
- Now rotate the SELECT dial to set your language. You have to press “SELECT” to confirm.

- Take a Water Hardness Test Strip, and dip it in and out of the water tank. Now, wait for one minute. You can set the water hardness by rotating the SELECT dial according to the results on the test strip. Press SELECT to confirm.

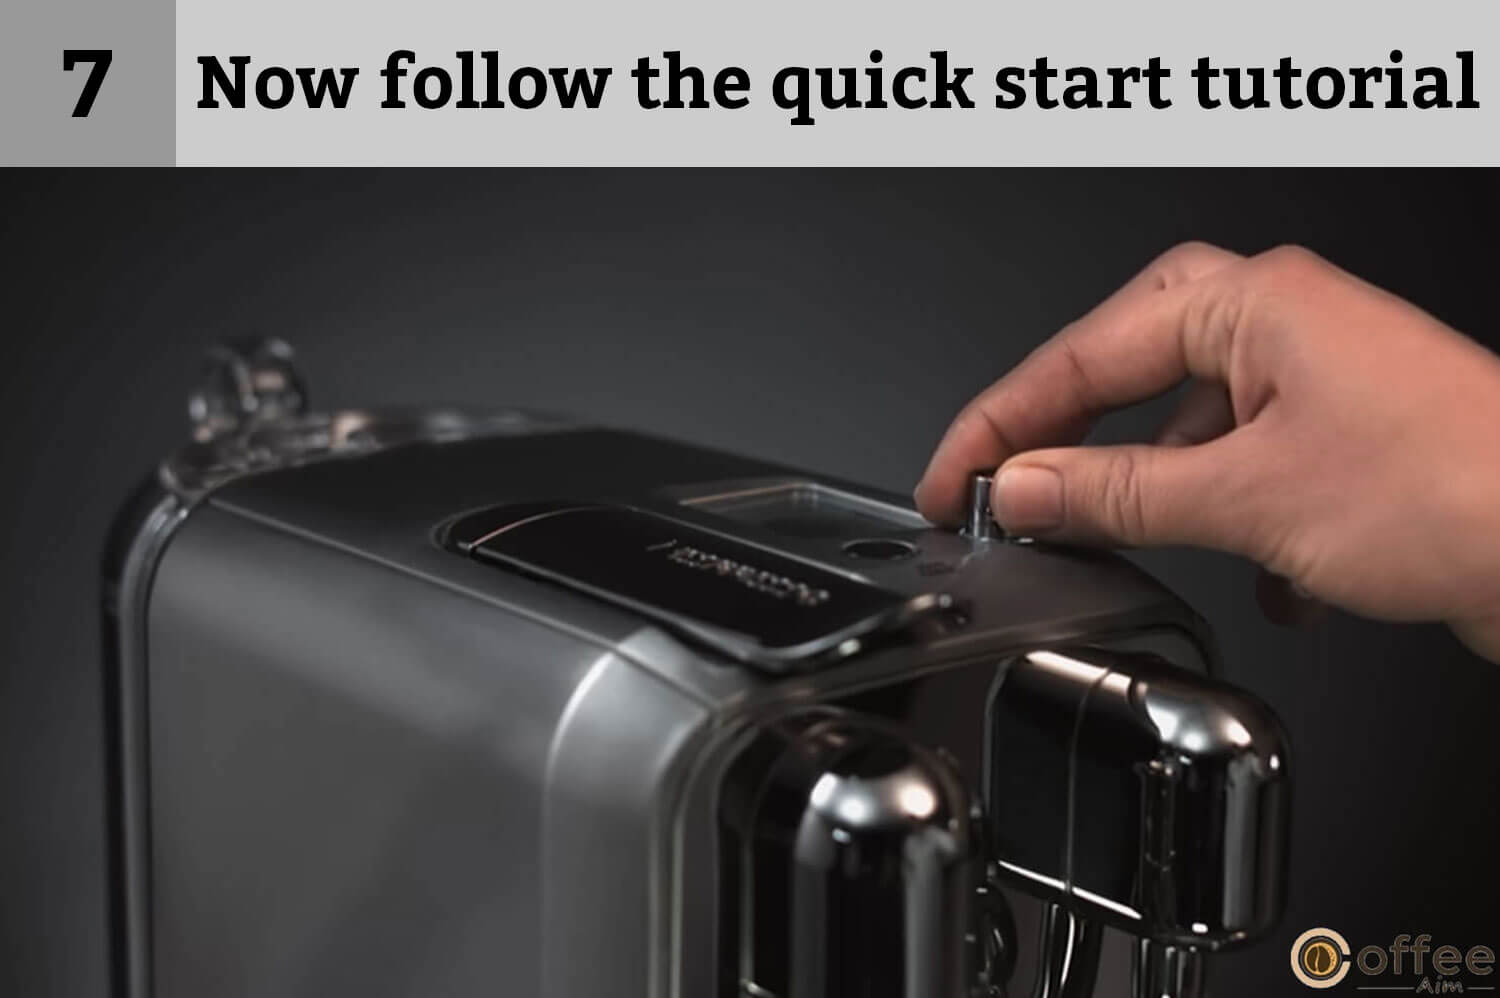
- Follow the on-screen prompts to rinse and prepare your Nespresso Creatista Plus for use.
Then follow the Quick Start Tutorial.
- Do you want to turn off your Nespresso Creatista Plus? You must press and hold the Start/Cancel button for two seconds until your coffee maker turns off.

How To Do Navigation?
Everyone likes the different tastes of coffee. So if you want to know how you can prepare coffee of your own choice, then keep on following us.
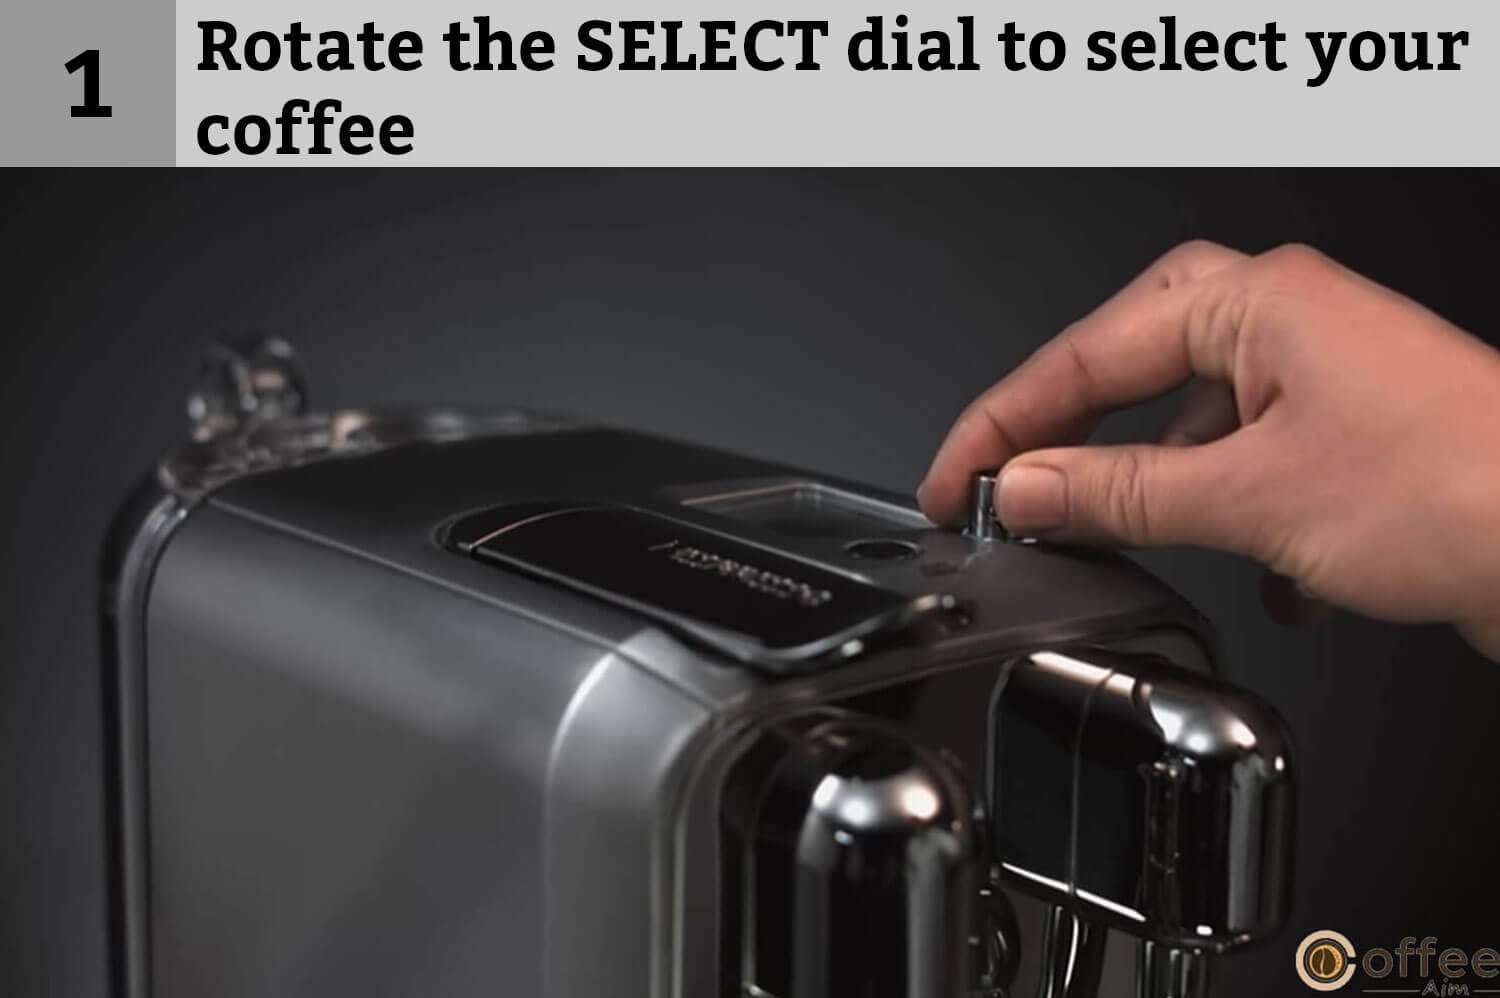
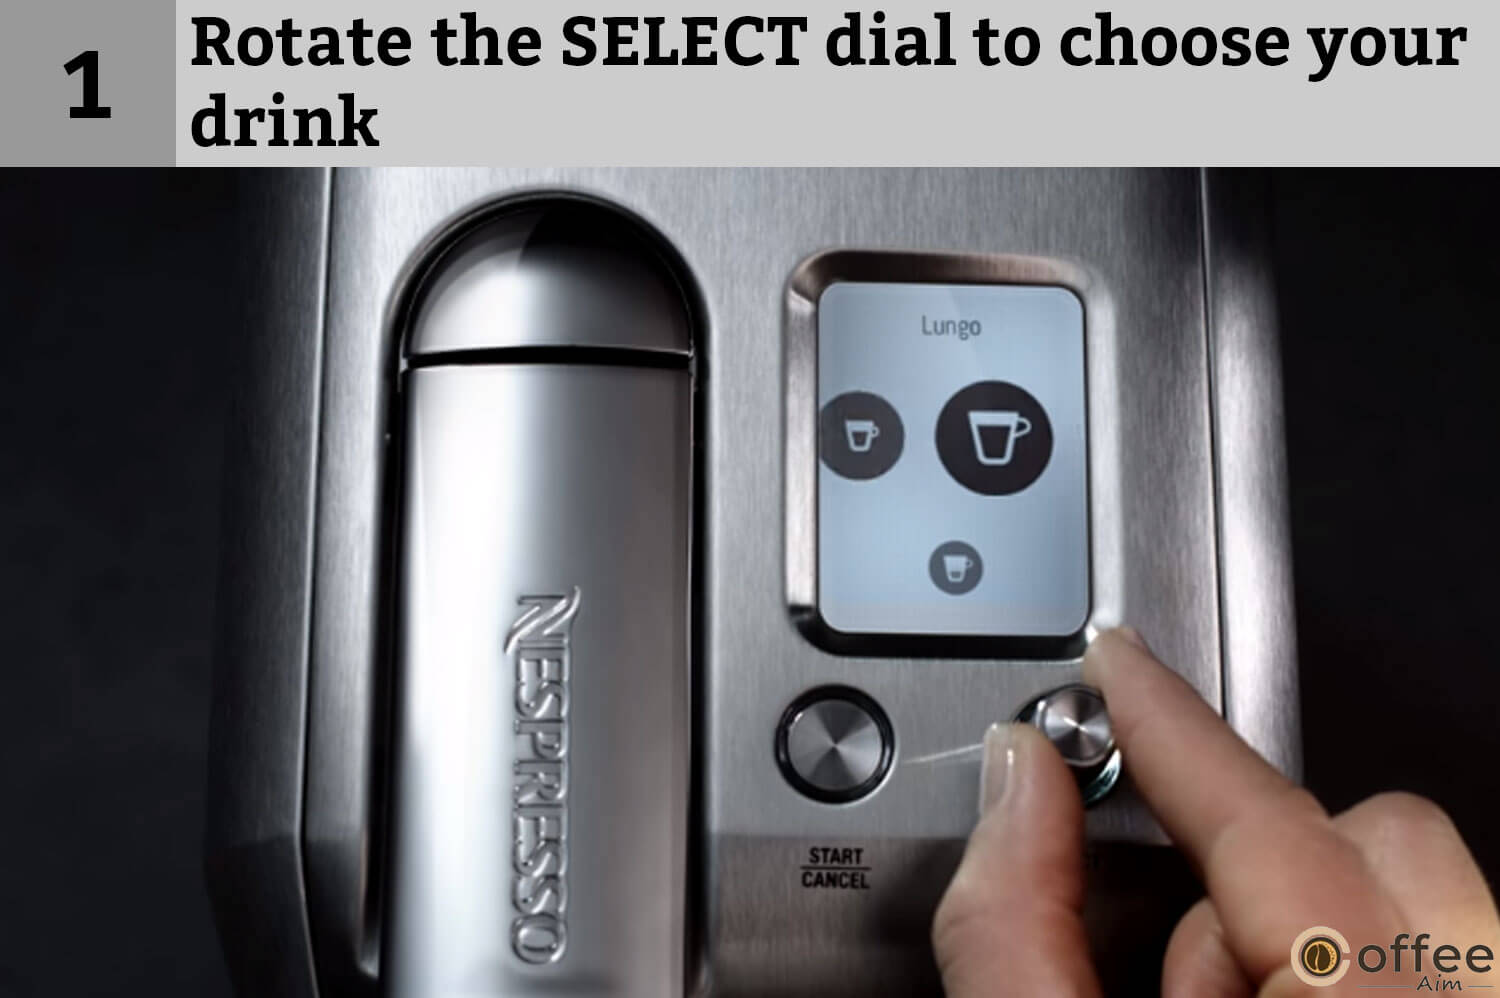
- You are going to rotate the SELECT dial to select your coffee.
- Now there will appear different options on the display which show current drink settings, Milk Temperature, Coffee Volume, and Milk Texture.
- Now press the Start/Cancel button to make the coffee with your desired settings.

- Now, press the SELECT dial to adjust the current settings.

How To Do Regular Coffee Preparation
Are you fond of regular coffee and have no idea about its preparation? Then don’t worry anymore as now you will be a master at preparing your regular coffee. So keep on staying with us.
- The first step is to fill the water tank with potable water.

- Turn your Nespresso Creatista Plus on by pressing the Start/Cancel button. The heating process takes almost three seconds.
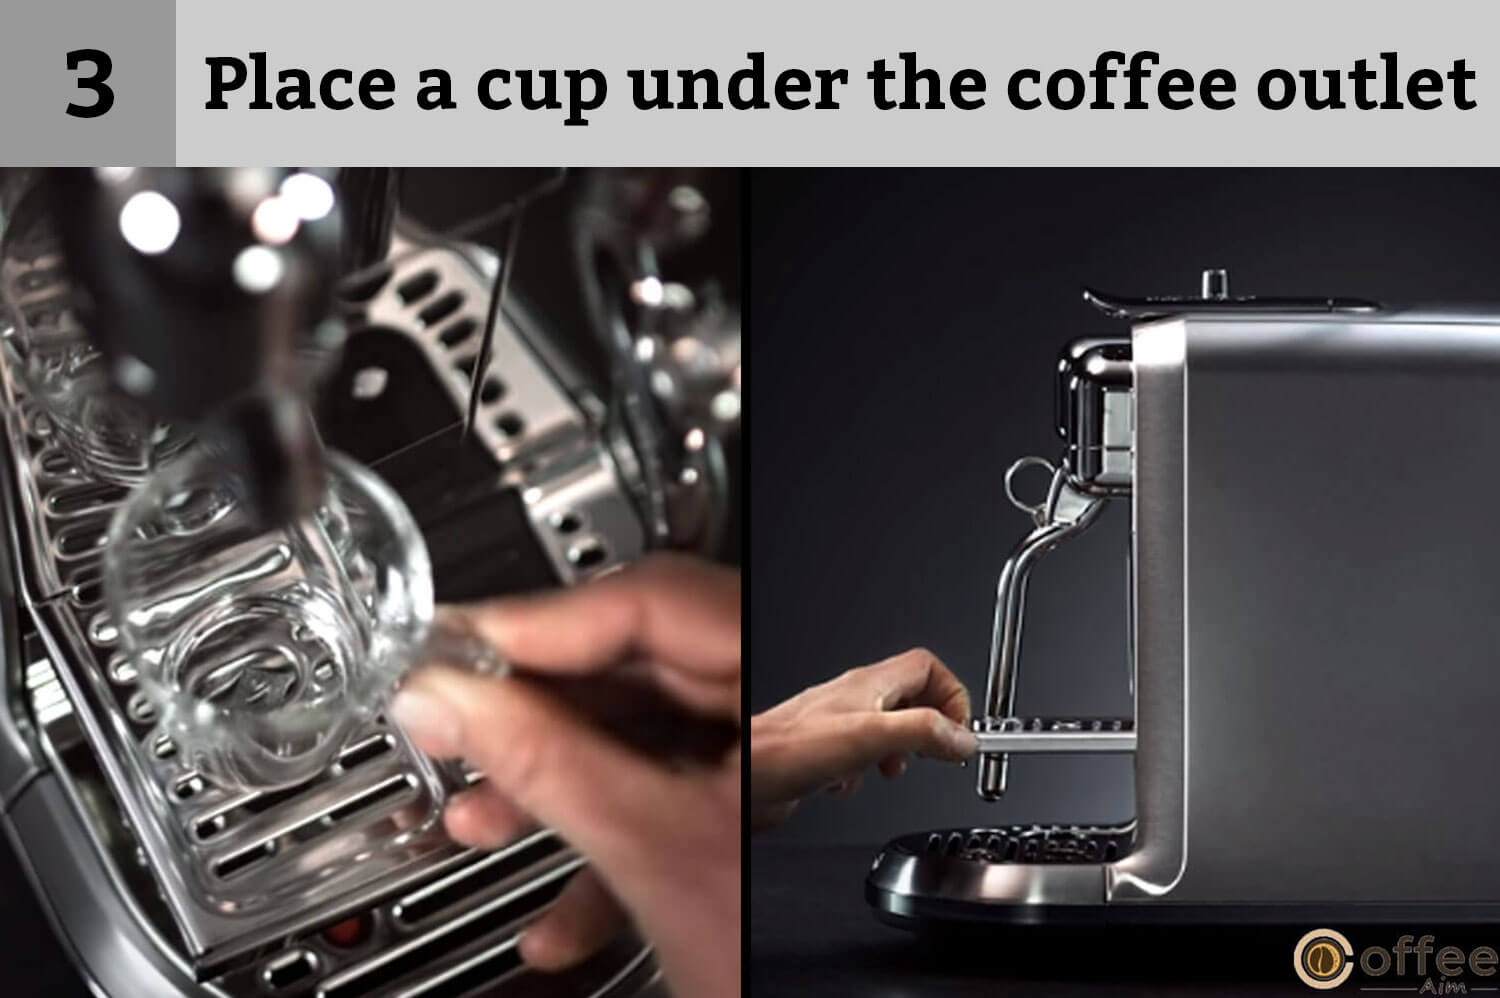
- Now, place a cup under the coffee outlet. You can also use cup support if required. You have to push the cup support to unlock it.
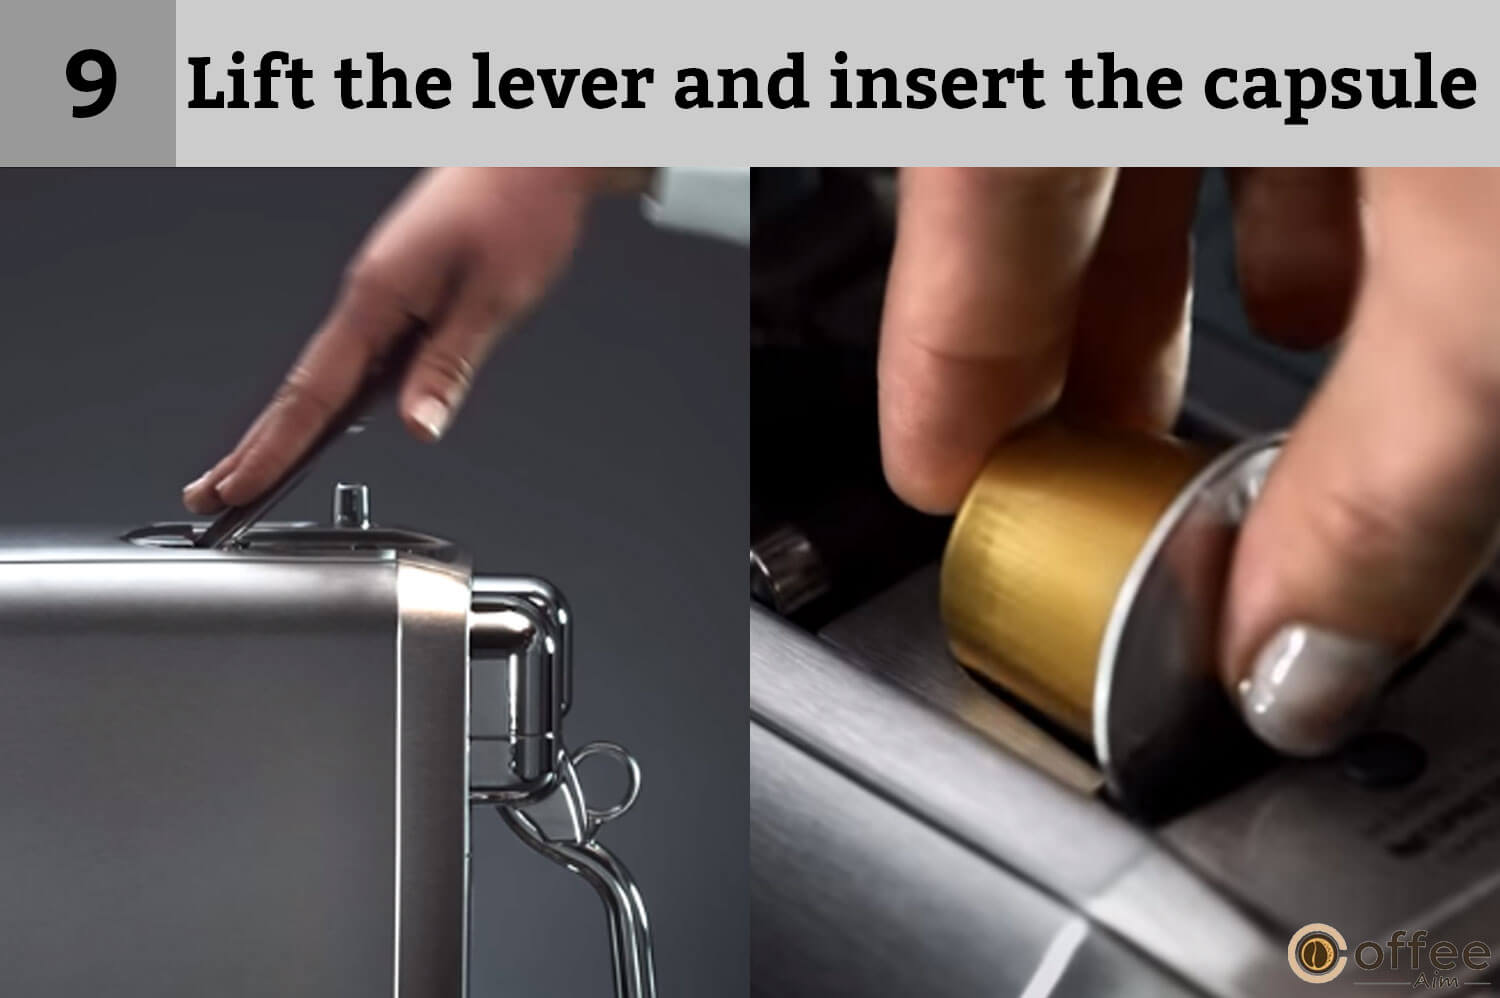
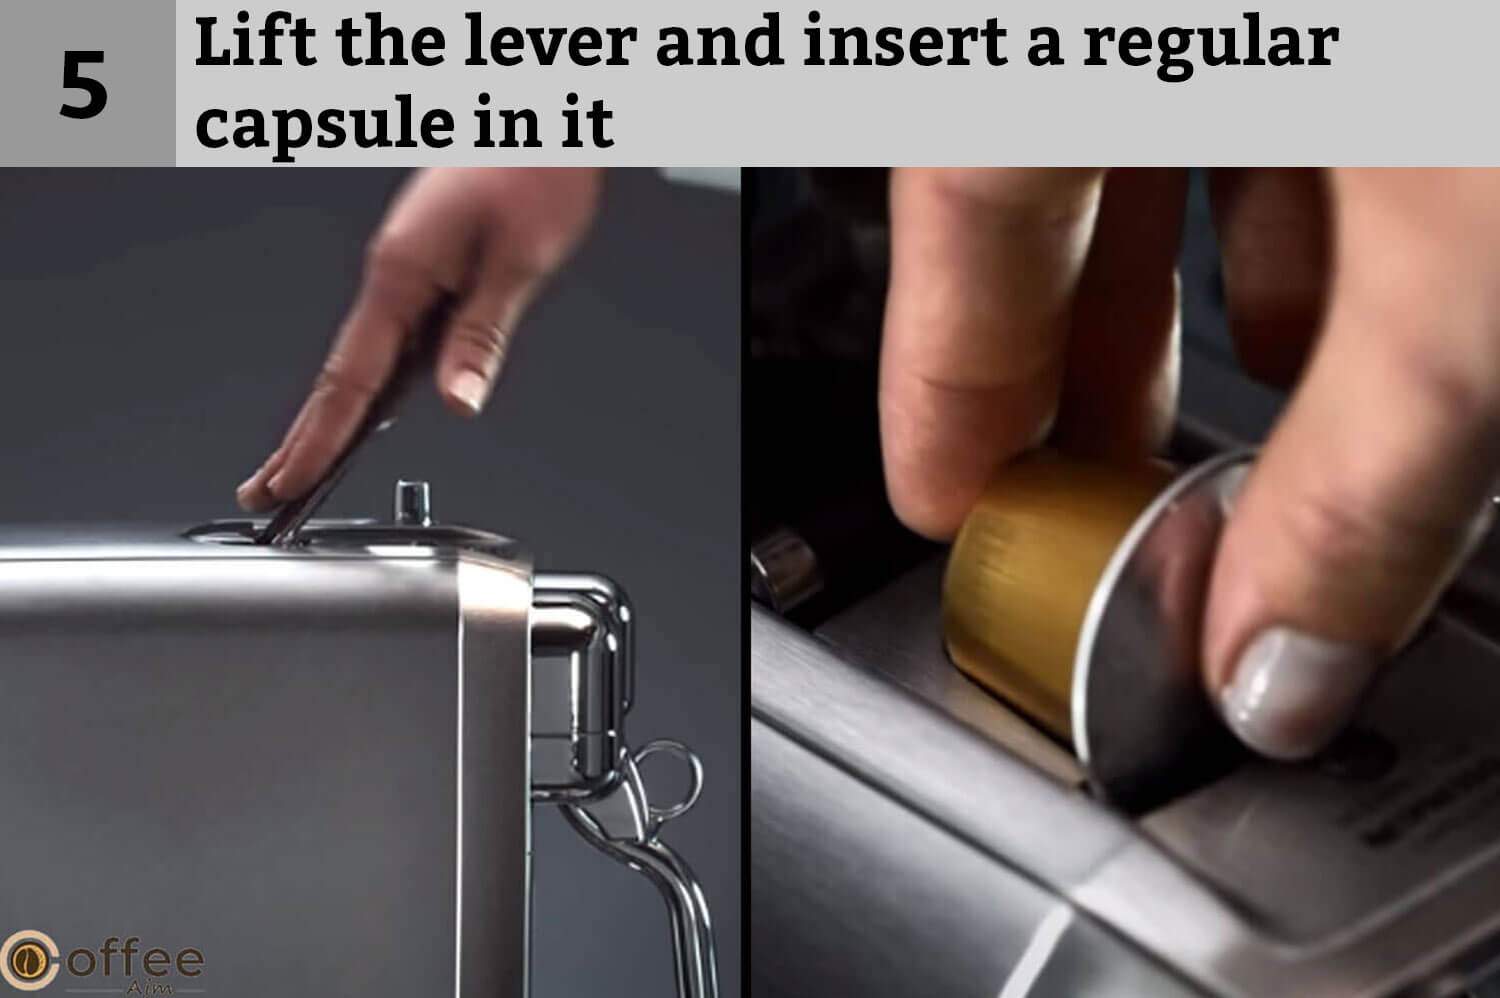
- Now lift the lever, insert a capsule in it, and close the lever. Don’t reuse a used tablet to ensure hygienic conditions.

- Rotate the SELECT dial to choose your coffee.
Nespresso Creatista Plus Cup Sizes:
There are three different cup sizes of Nespresso Creatista Plus. Look at this table and select one of your taste or choice.
So scroll down!
| Lungo | (110ml/3.7oz) |
| Espresso | (40ml/1.35oz) |
| Ristretto | (25 ml/0.85oz) |
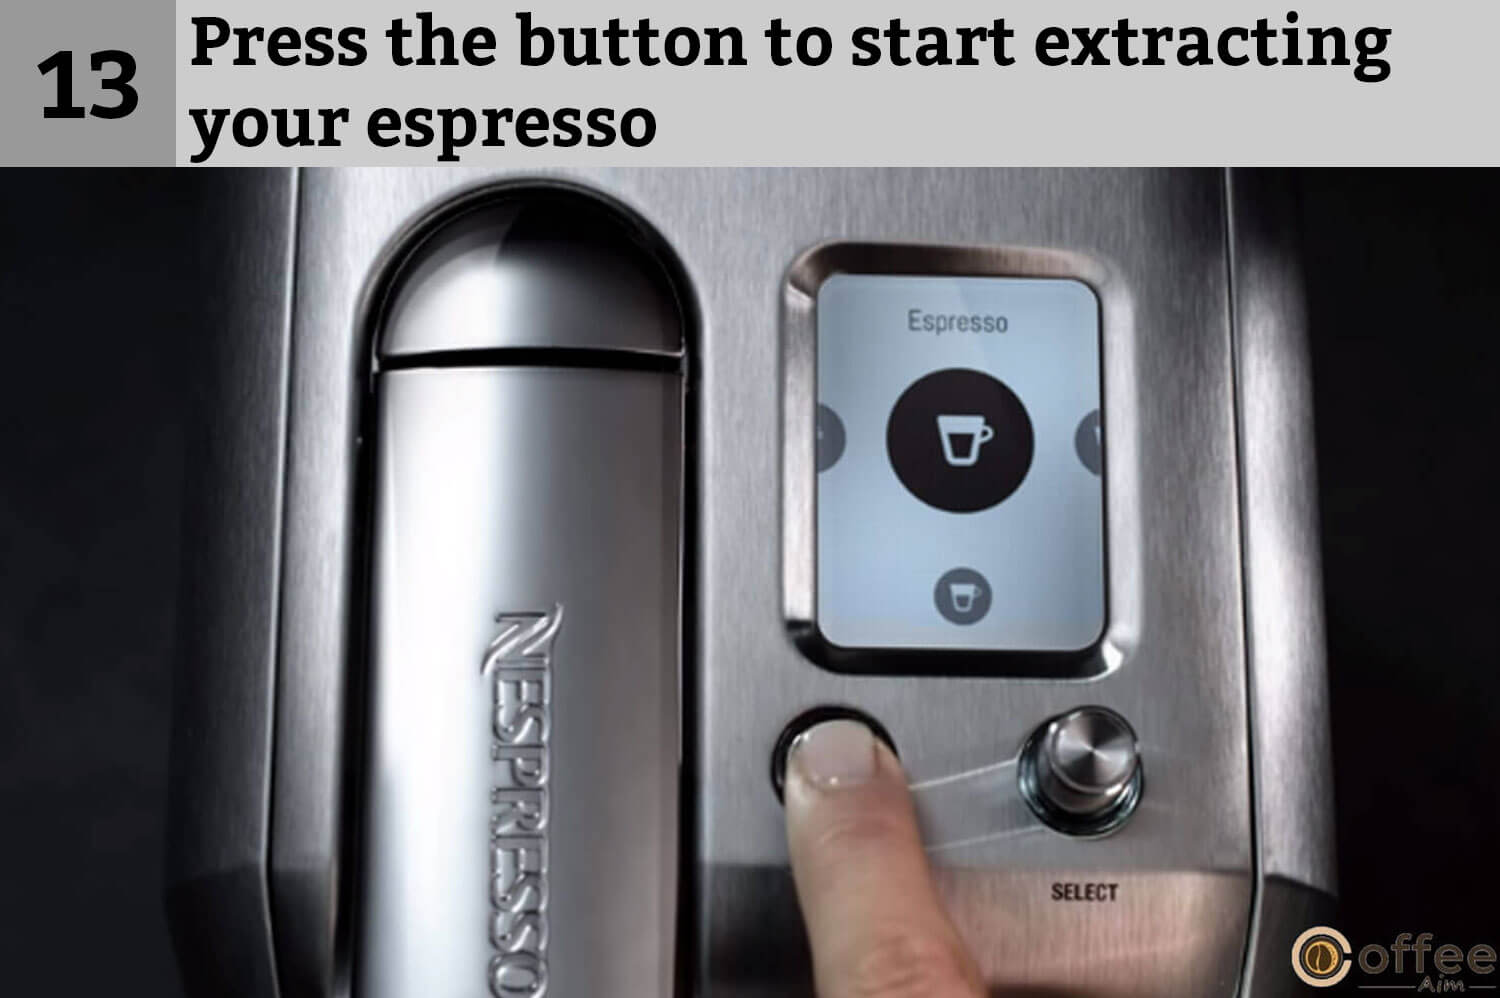
- Press the Start/Cancel button to extract your favorite coffee.

- Now, the brewing process will stop automatically. Lift the lever to eject the capsule.

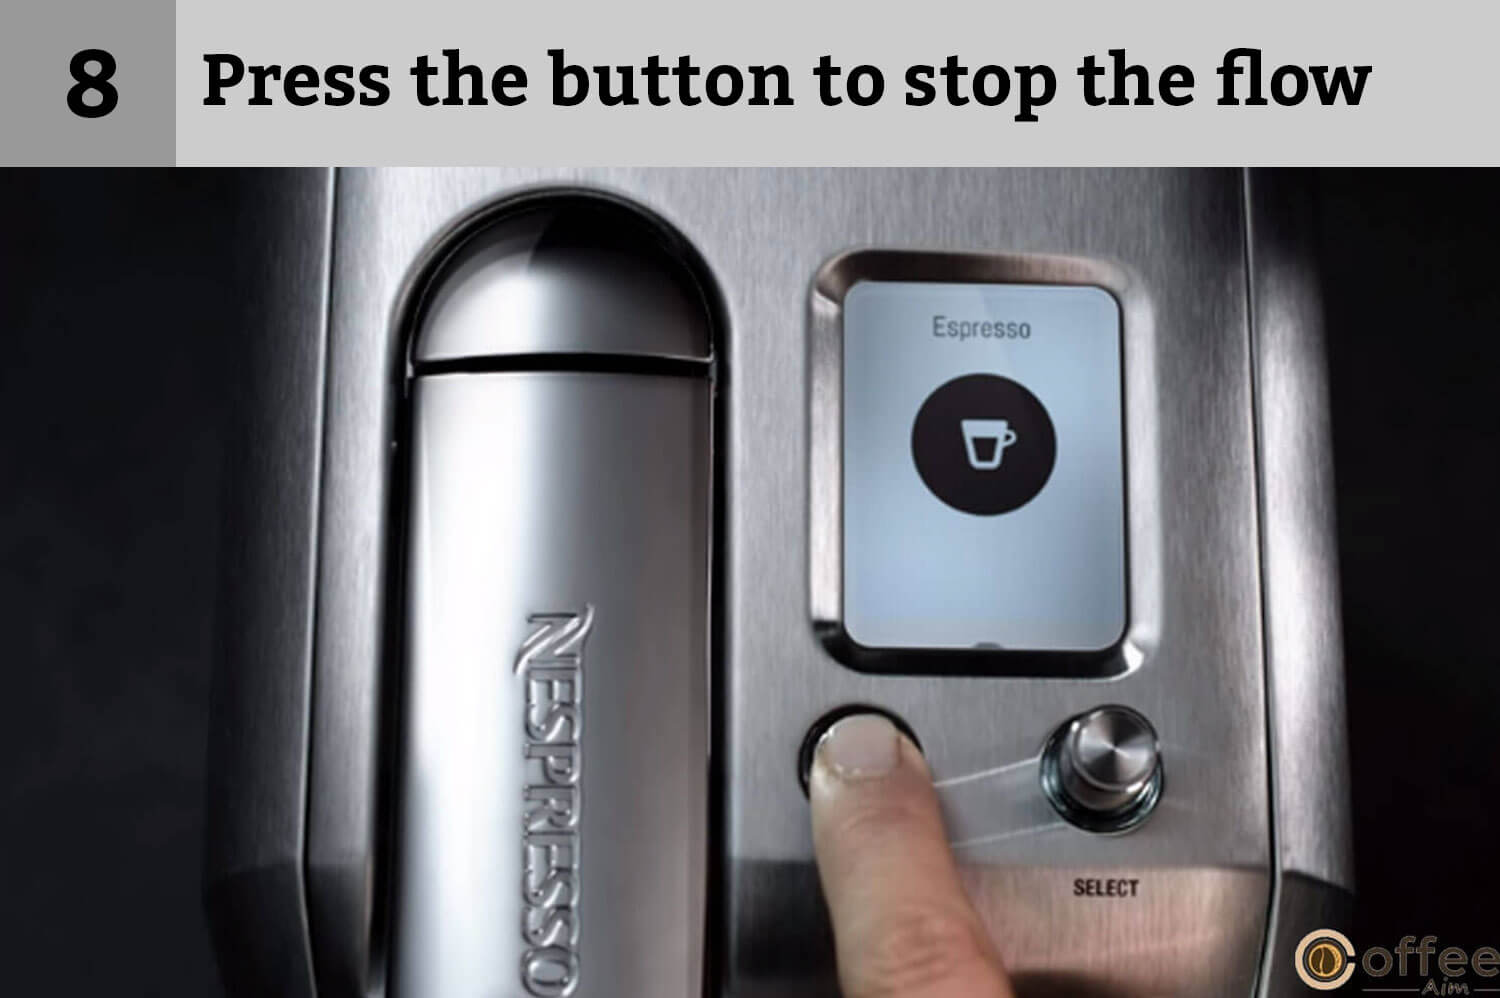
- However, if you want to stop the coffee flow manually, then push the Start/Cancel button.
How To Do Milk Coffee Preparation – Single Cup
While keeping the tastes of different people in mind, Nespresso Creatista Plus is designed to create a maximum variety of coffee for coffee lovers. If you love to enjoy your milk coffee with yourself, then this single-cup milk coffee preparation is for you.
Tip:
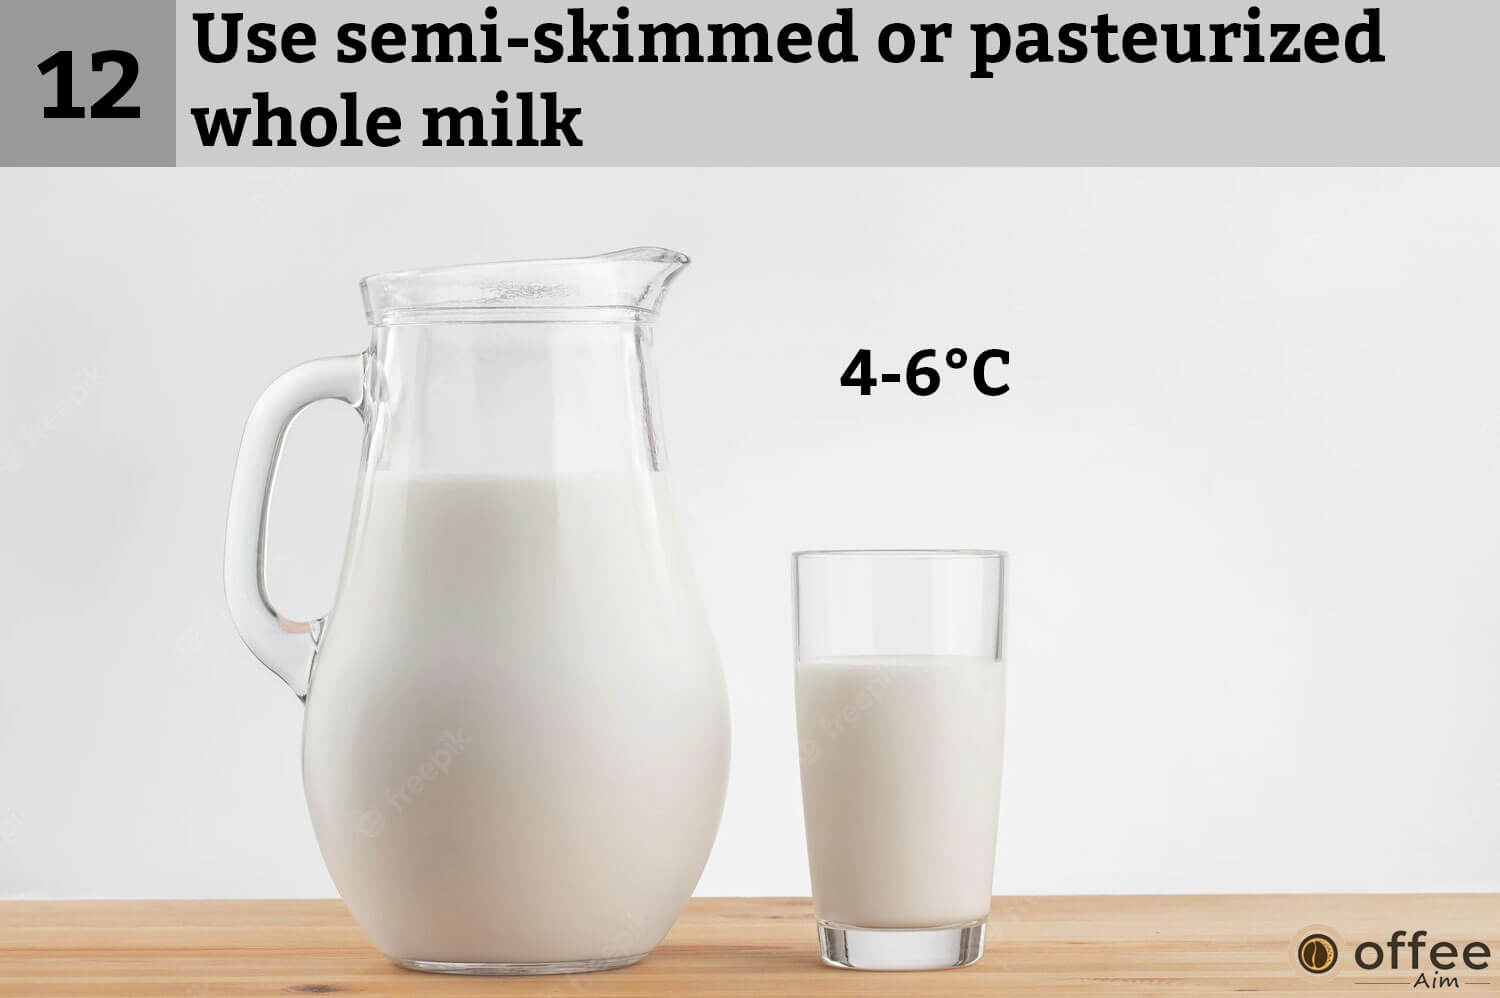
If you want to make optimal milk froth, don’t forget to use pasteurized semi-skimmed milk at refrigerated temperature(about 4-6°C/39-43°F)
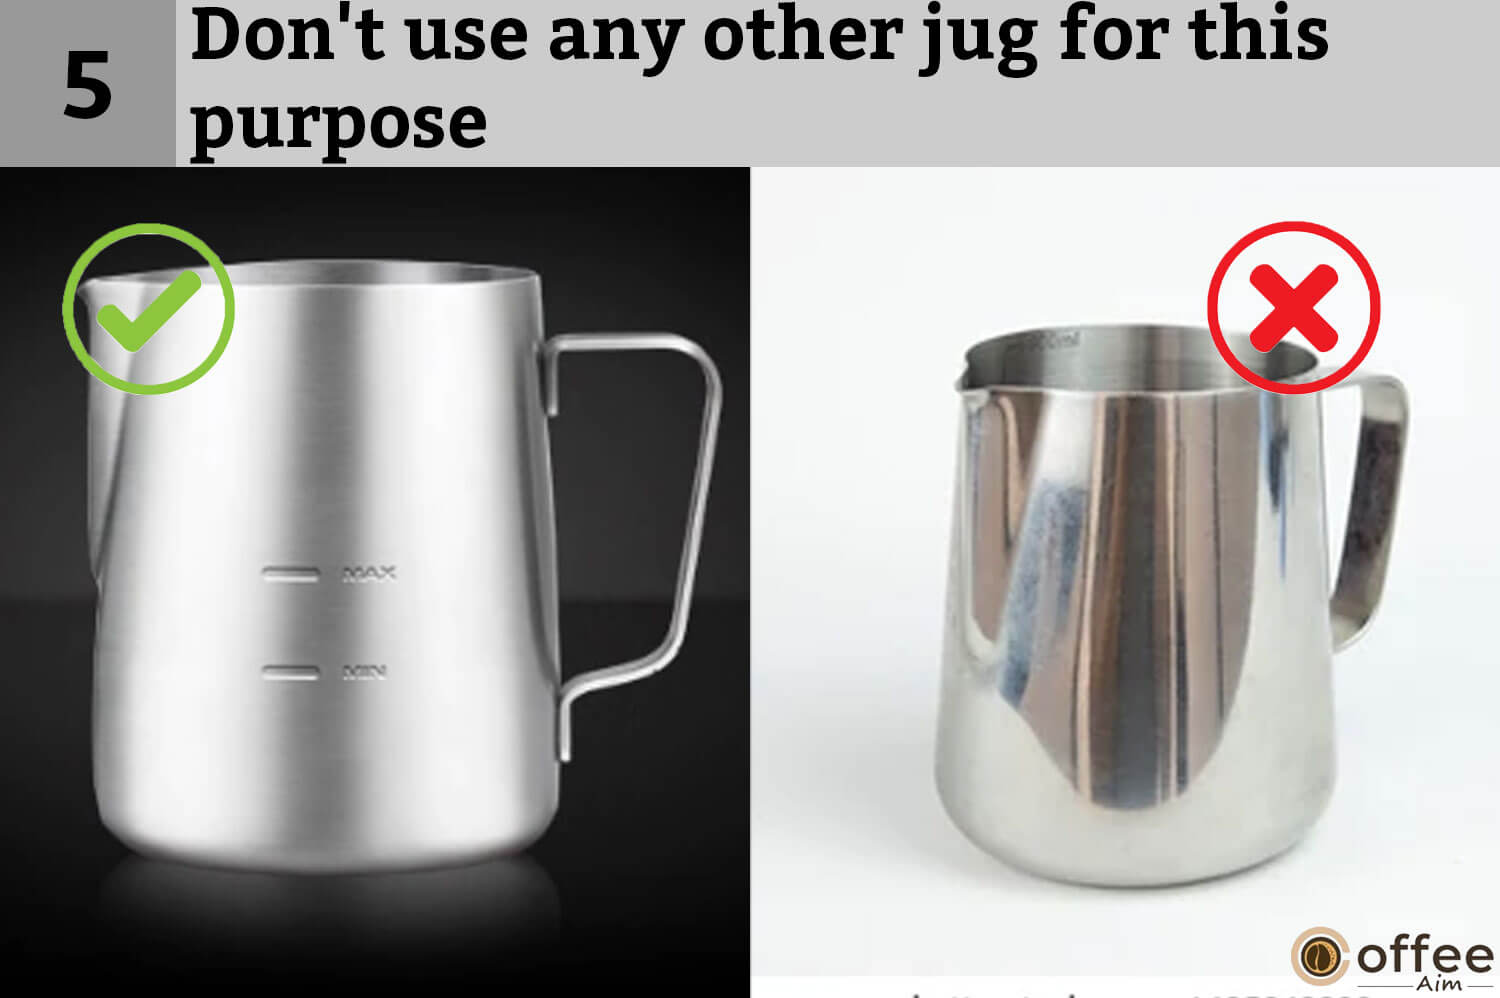
- Don’t use any other jug. Only use the provided milk jug with your Nespresso Creatista Plus.

- You must always fill the water tank to the mark (MAX Line).

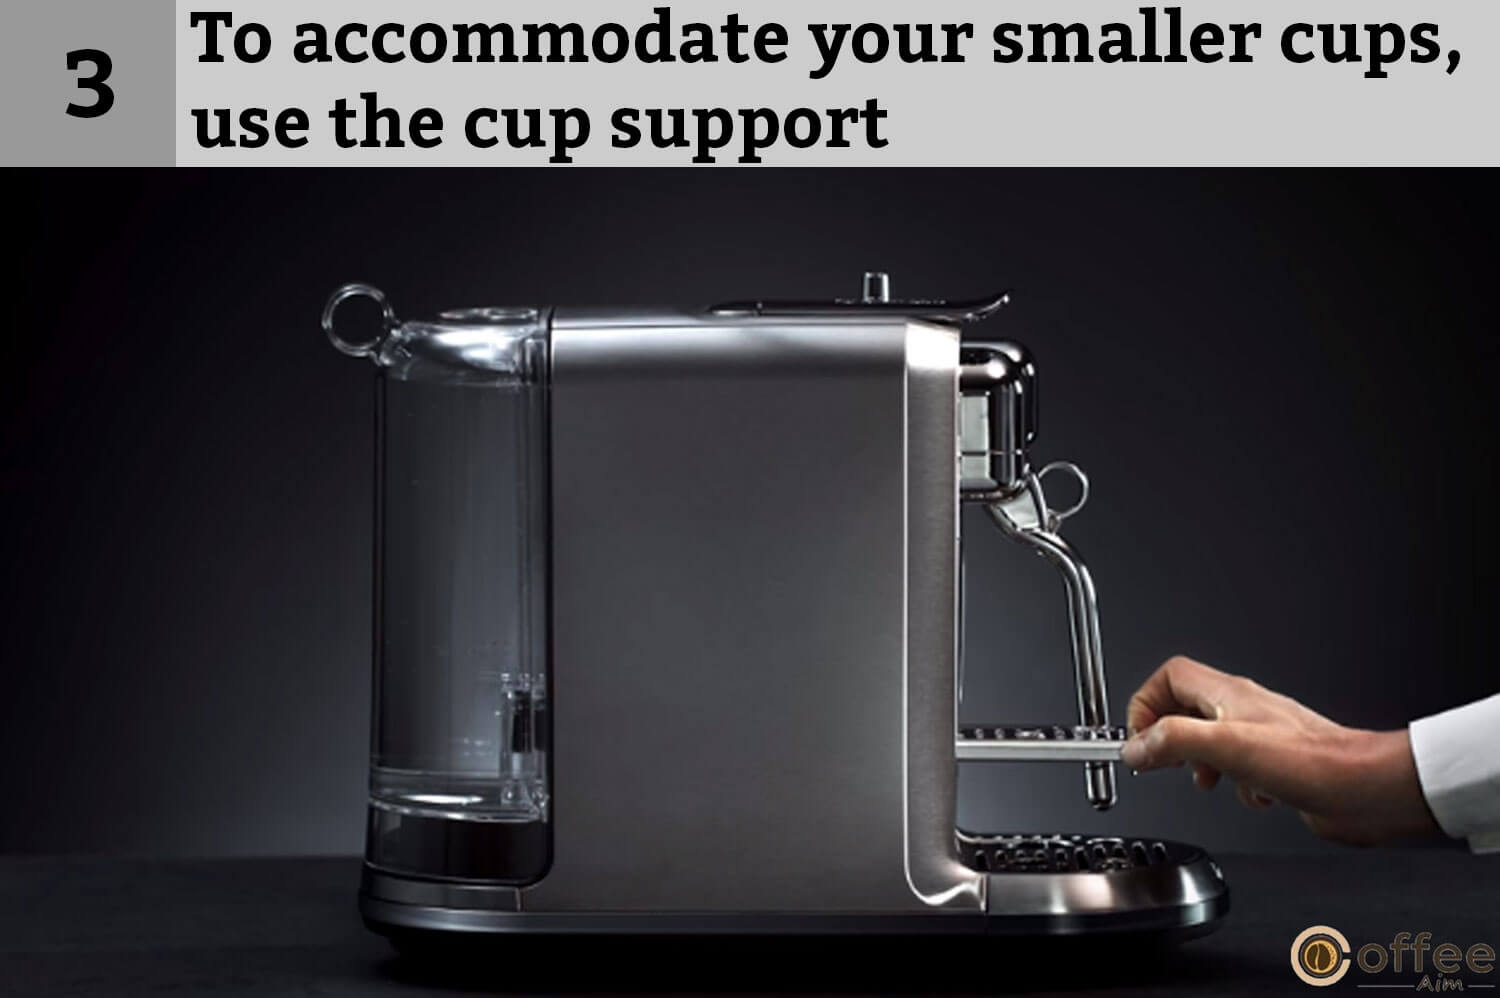
- To accommodate your smaller cups, use the cup support. To use it, unlock it first.
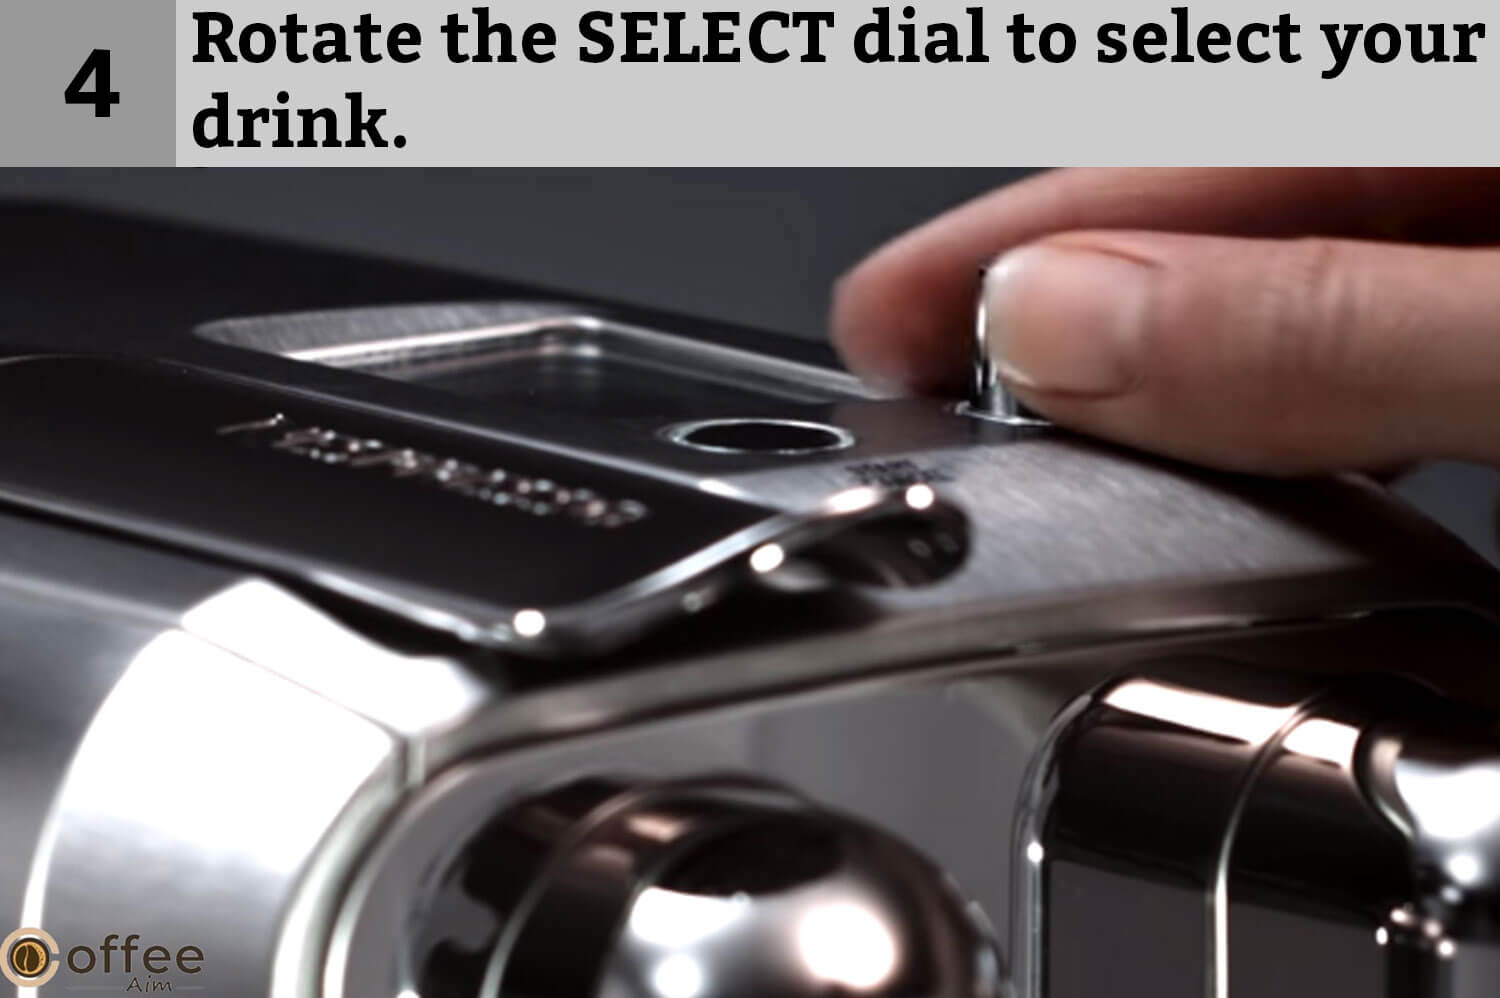
- Now rotate the SELECT dial to choose the coffee of your taste.
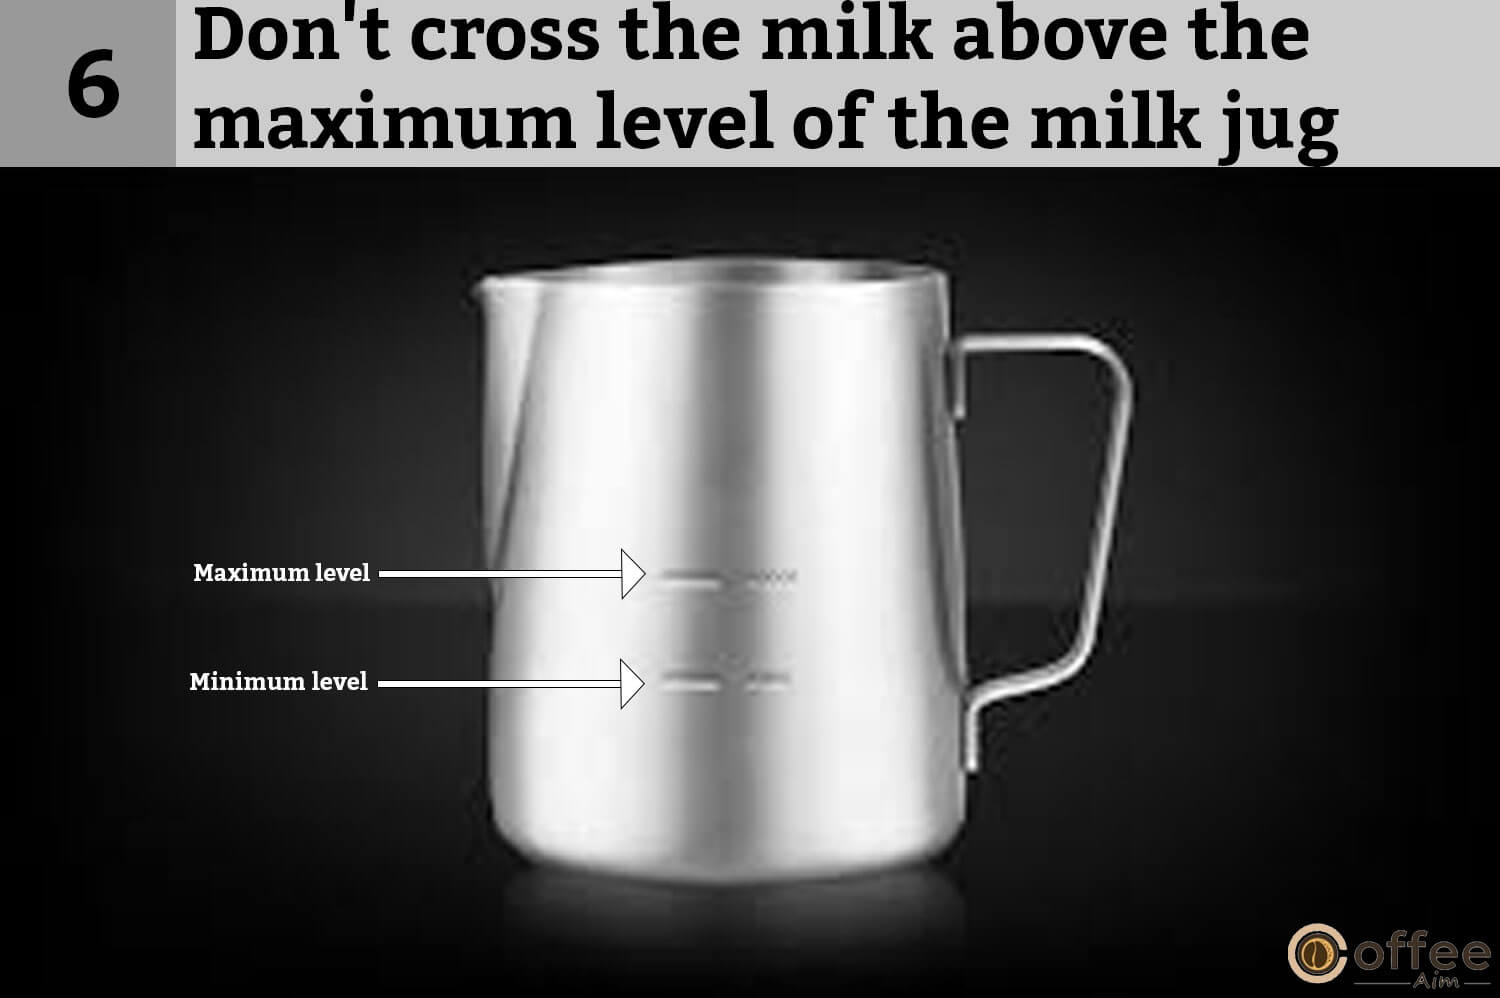
- Fill the milk jug with enough fresh cold milk. Don’t forget to look at the maximum and minimum milk levels marked inside and outside the milk jug.

- Don’t fill the milk jug beyond the limit of the maximum level marked on the jar.
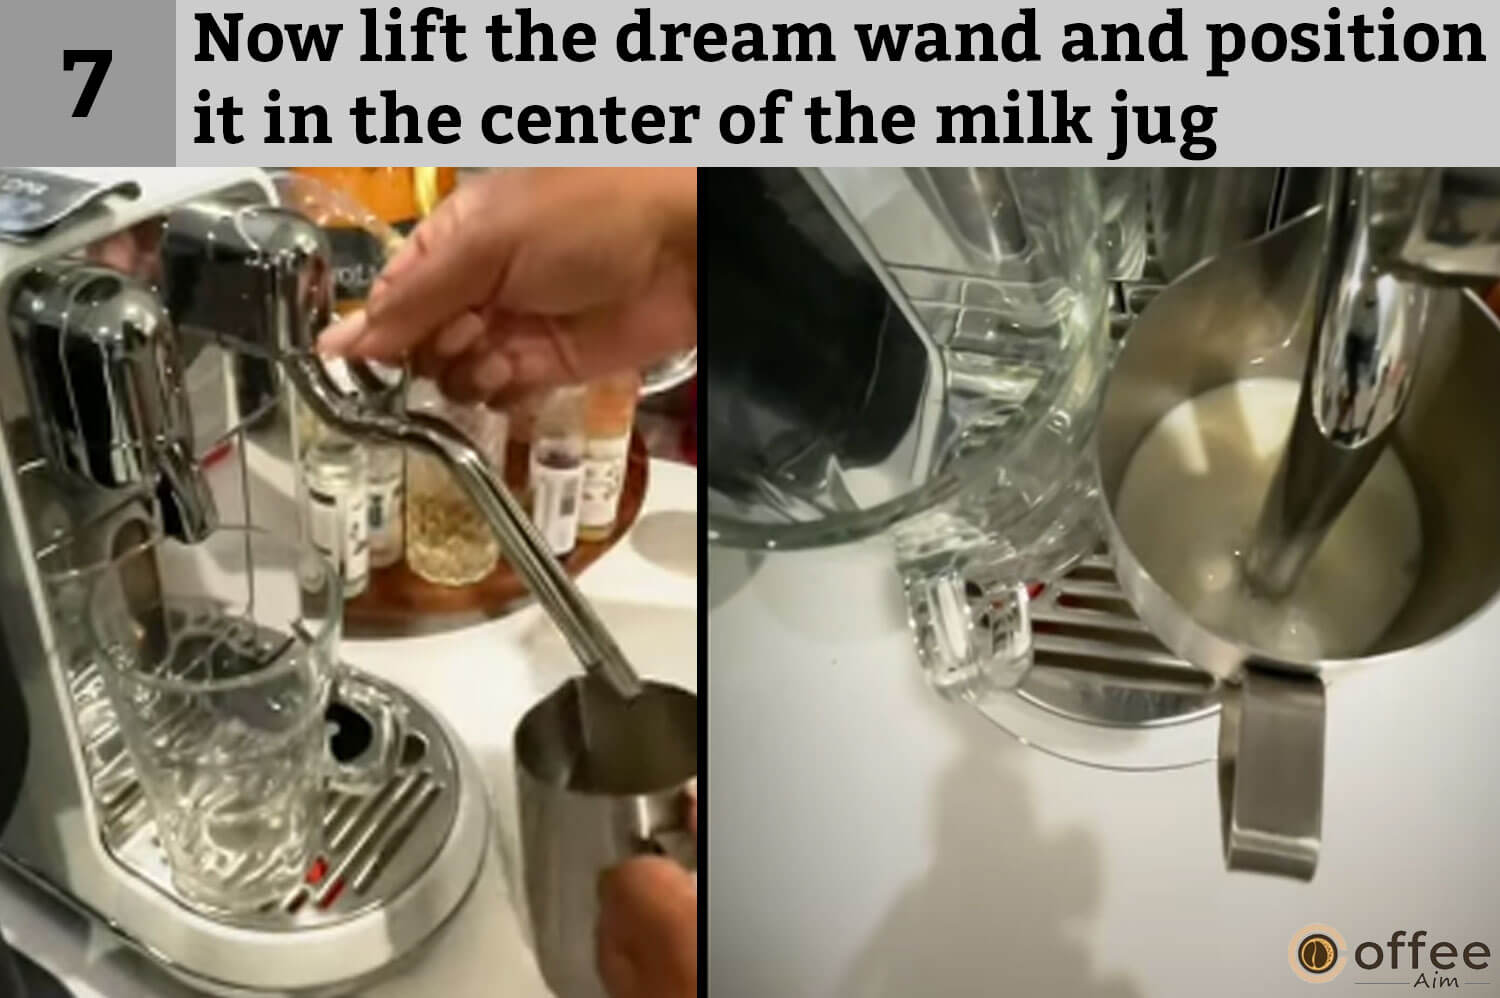
- Now lift the steam wand and position it in the center of the milk jug.
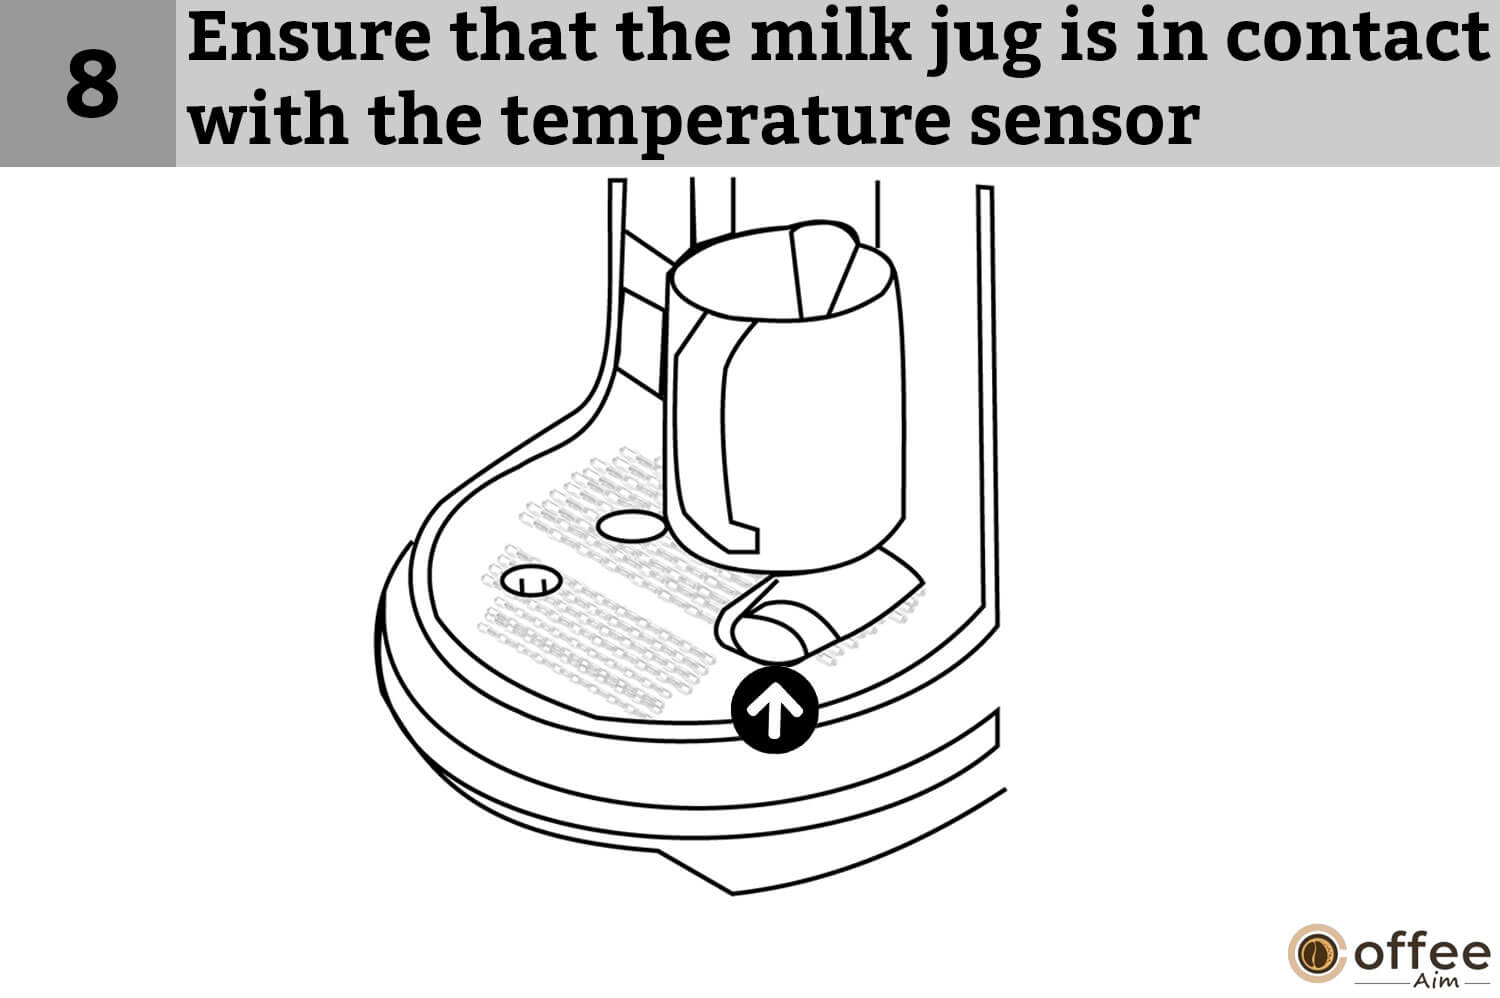
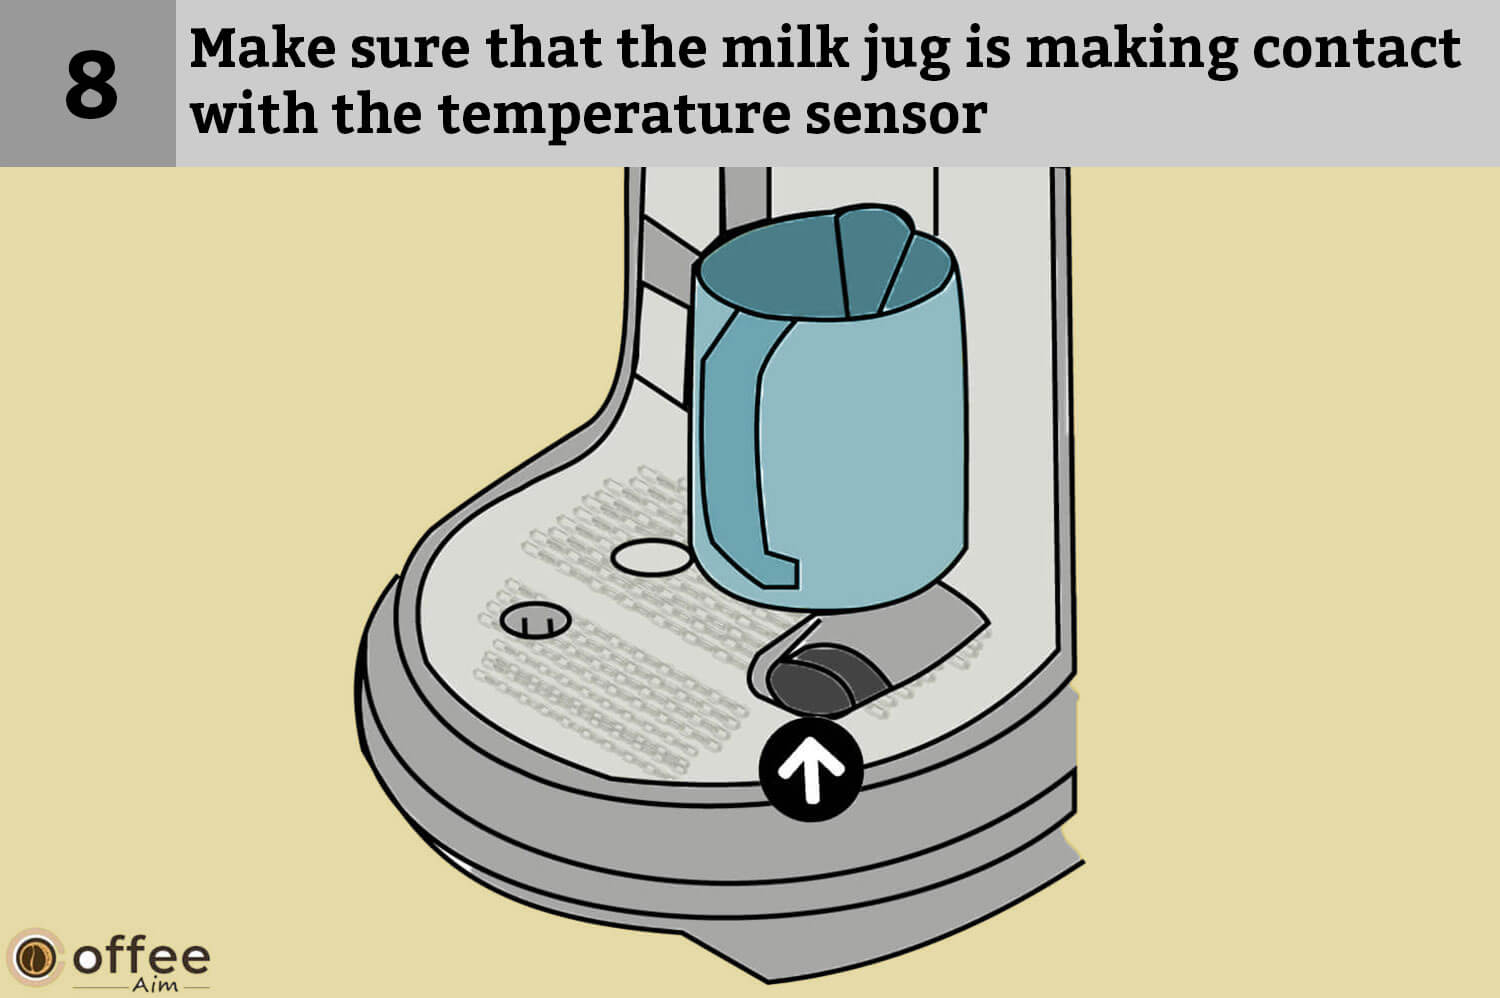
- You have to ensure that the milk jug is in contact with the temperature sensor in the drip tray.
- Now, lift the lever and insert the capsule into it.
- Press the Start/Cancel button to start extracting your favorite coffee.

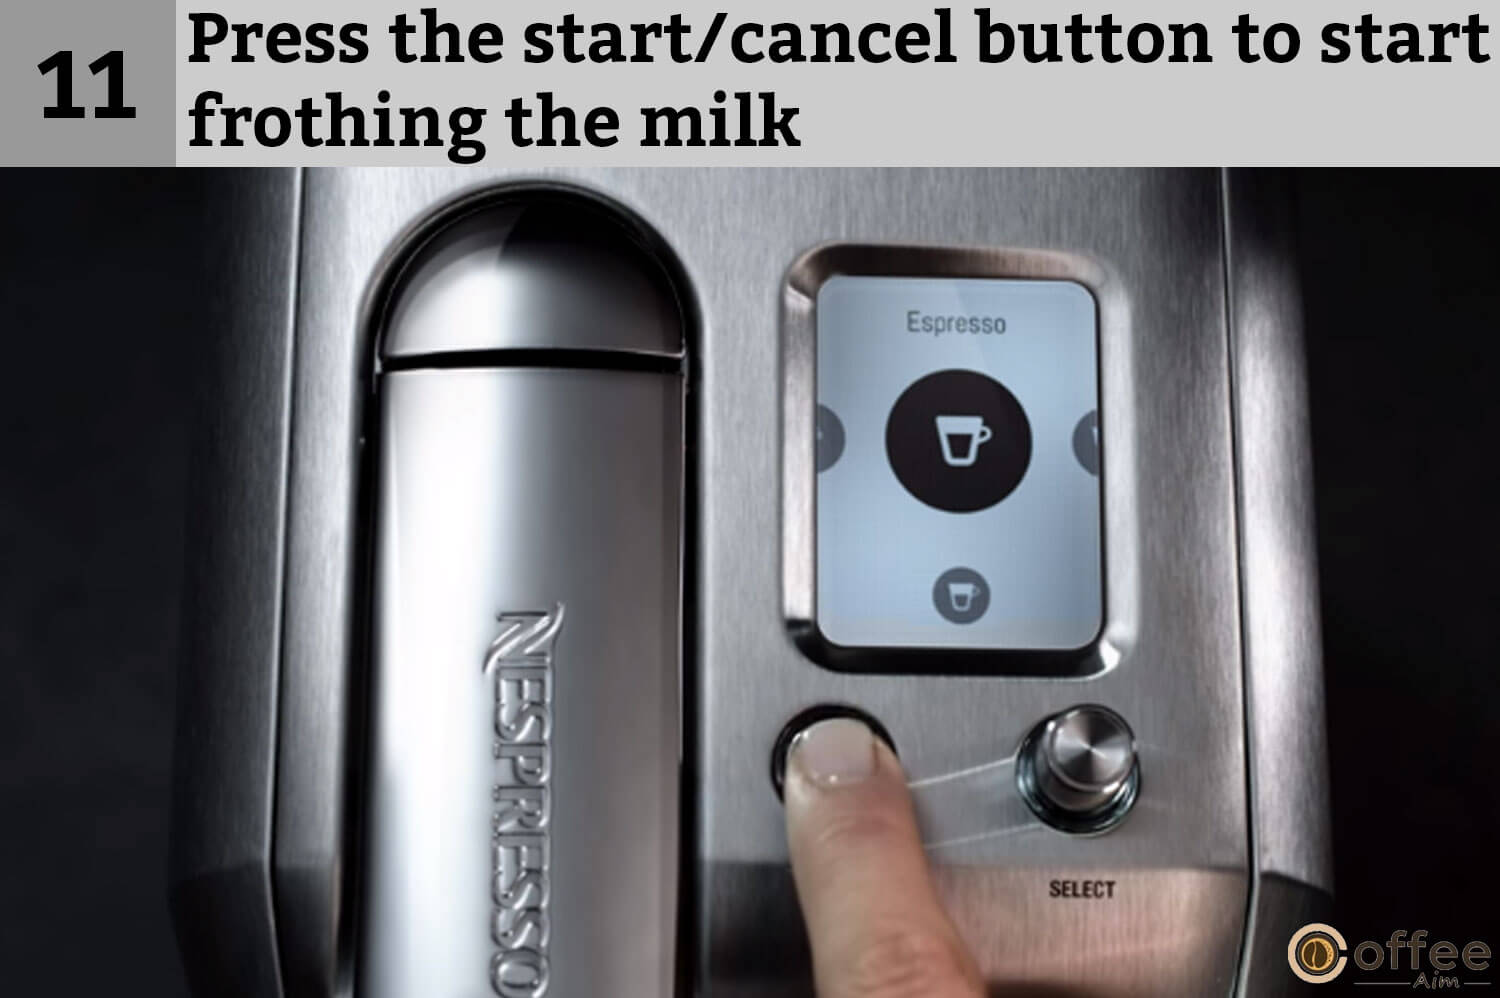
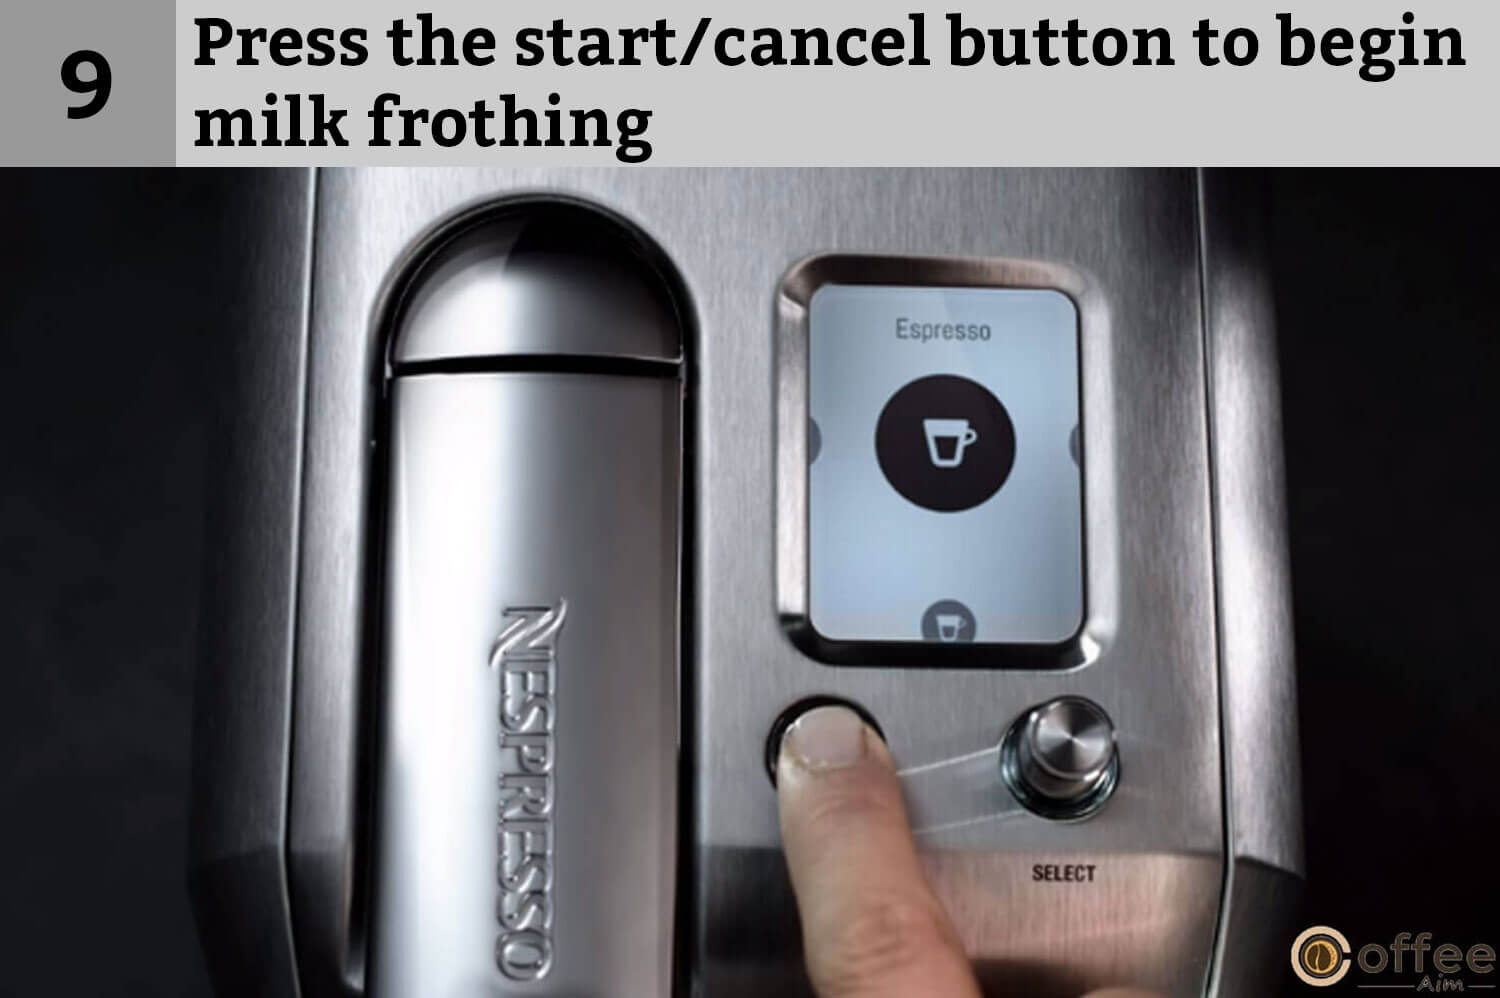
- When the coffee extraction is completed, press the Start/Cancel button to start frothing the milk.
- For maximum milk froth, use semi-skimmed or pasteurized whole milk at refrigerated temperatures of 4-6°C and 39-43°F.
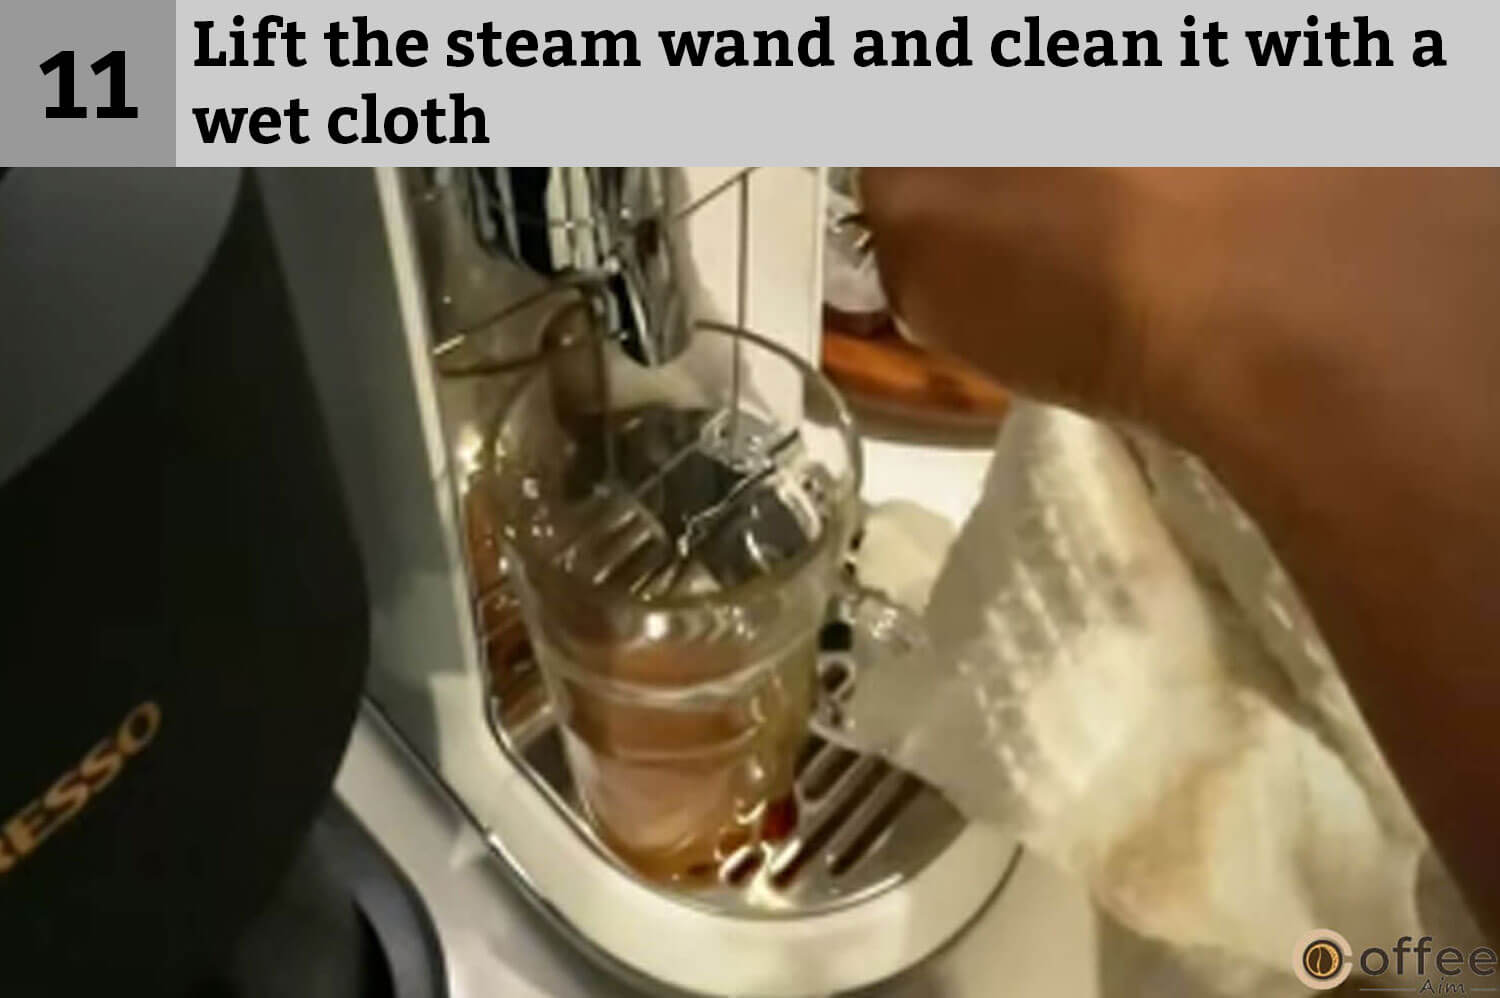
- As the milk frothing is complete, pick up the steam wand, and wipe with a clean wet cloth. Allow the steam wand to return to its normal down position. Then it will auto-purge to clean itself.

- Now pour milk into your espresso to finish the process of preparation.

- Enjoy your milk coffee!

How To Do Milk Coffee Preparation – Two Cups
Do you want to enjoy your milk coffee with someone special? Then keep on gossiping while preparing two cups of coffee. Follow this simple process of coffee preparation and enjoy your company while sipping your lovely drink.
- Instead of using any other milk jug, use the provided jar with your Nespresso Creatista Plus.

- Fill the water tank with fresh potable water.
- To place your smaller cups, use the cup support. Push the cup support to unlock it.

- Rotate the SELECT dial to choose the drink of your taste.

- Now, lift the lever and insert a regular capsule in it.
- Now press the Start/Cancel button to start the extraction process of your espresso.

- Fill the milk jug with enough fresh cold milk to make two cups of your drink. The maximum level is marked inside and outside of the milk jug. Don’t overfill the jar.

- Now lift the wand stream and insert it in the center of the milk jug.

- Now press the Start/Cancel button to begin milk frothing.
- Ensure that the milk jug is in contact with the temperature sensor in the drip tray.

- As the milk frothing is complete, lift the steam wand and clean it with a wet cloth.
- Let the steam wand return to its position, and it will auto-purge itself to rinse automatically.

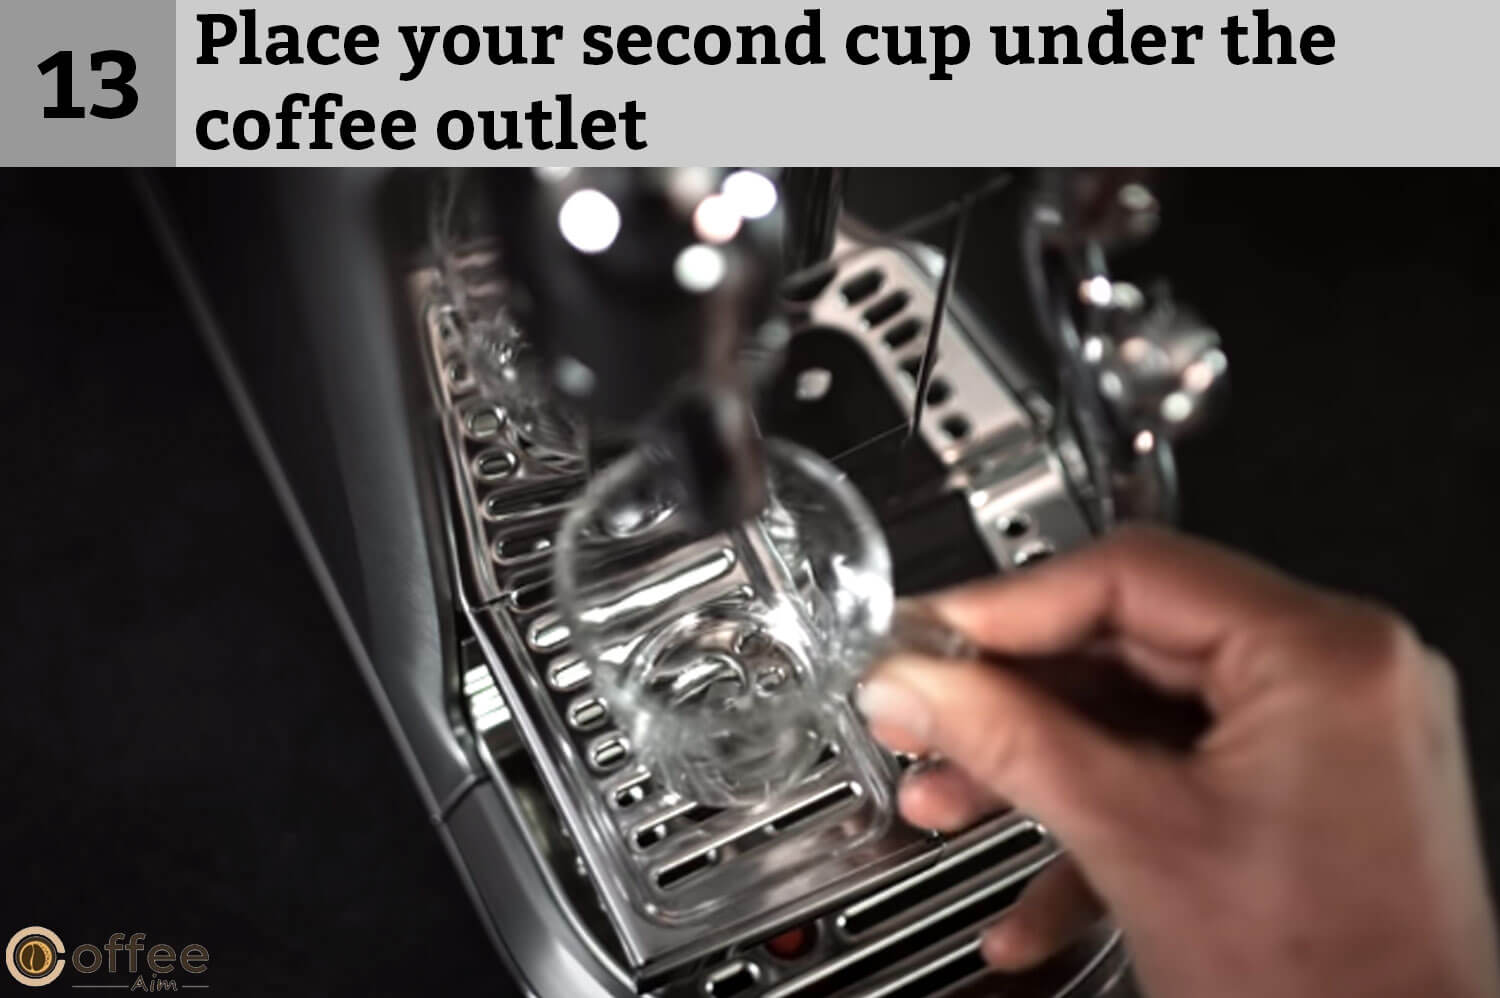
- Now place your second cup under the coffee outlet.
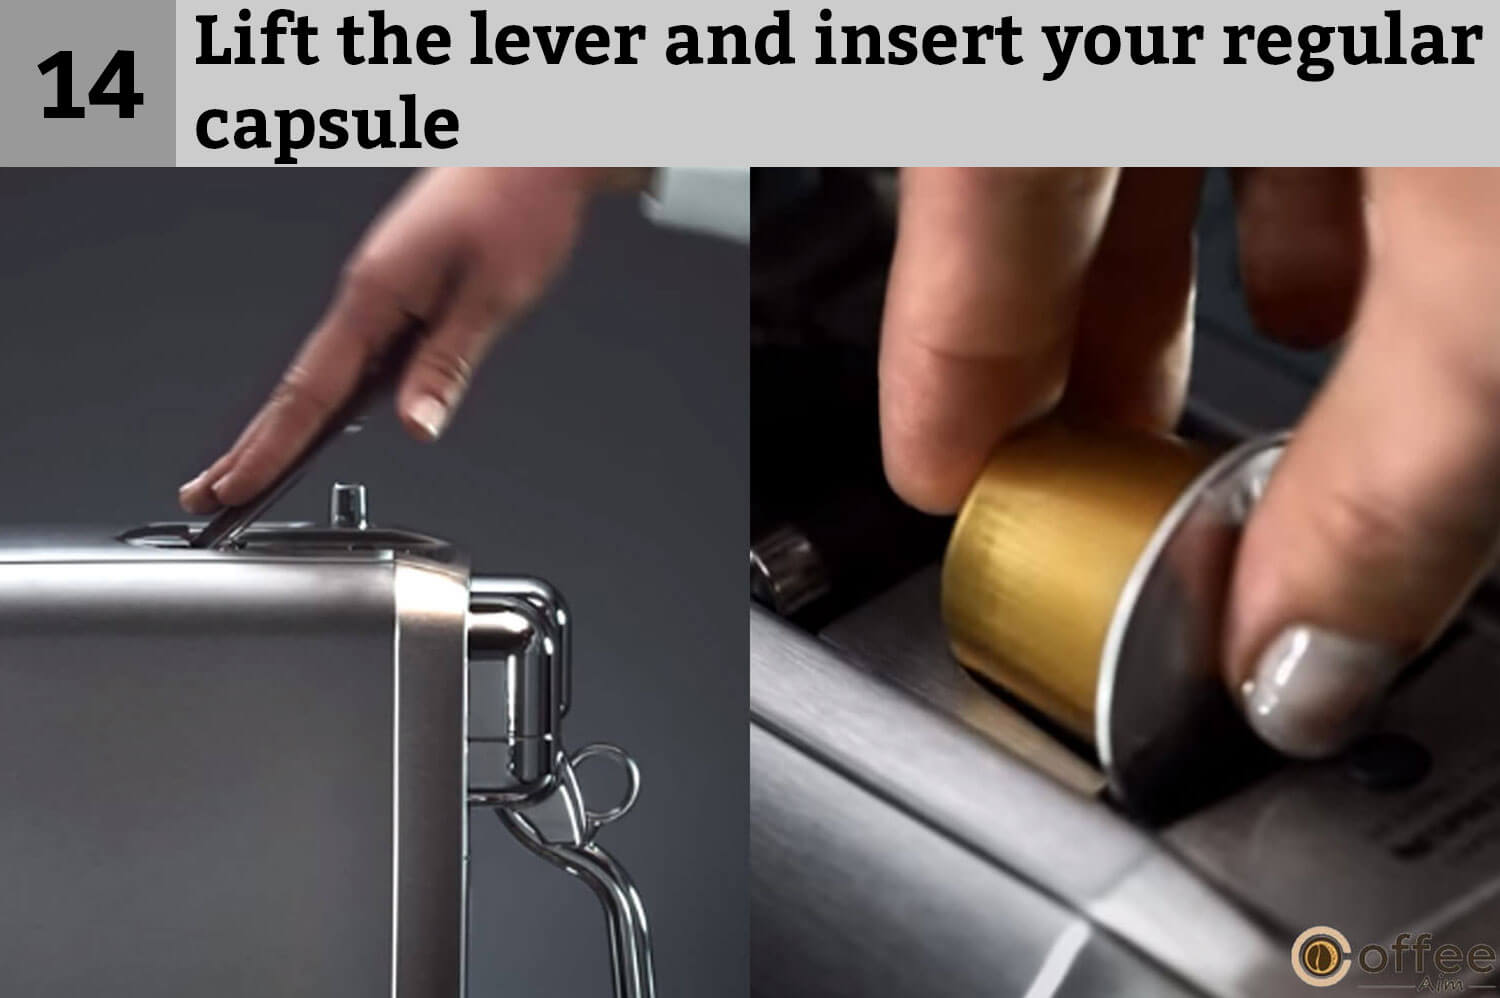
- You lift the lever and insert your regular capsule.
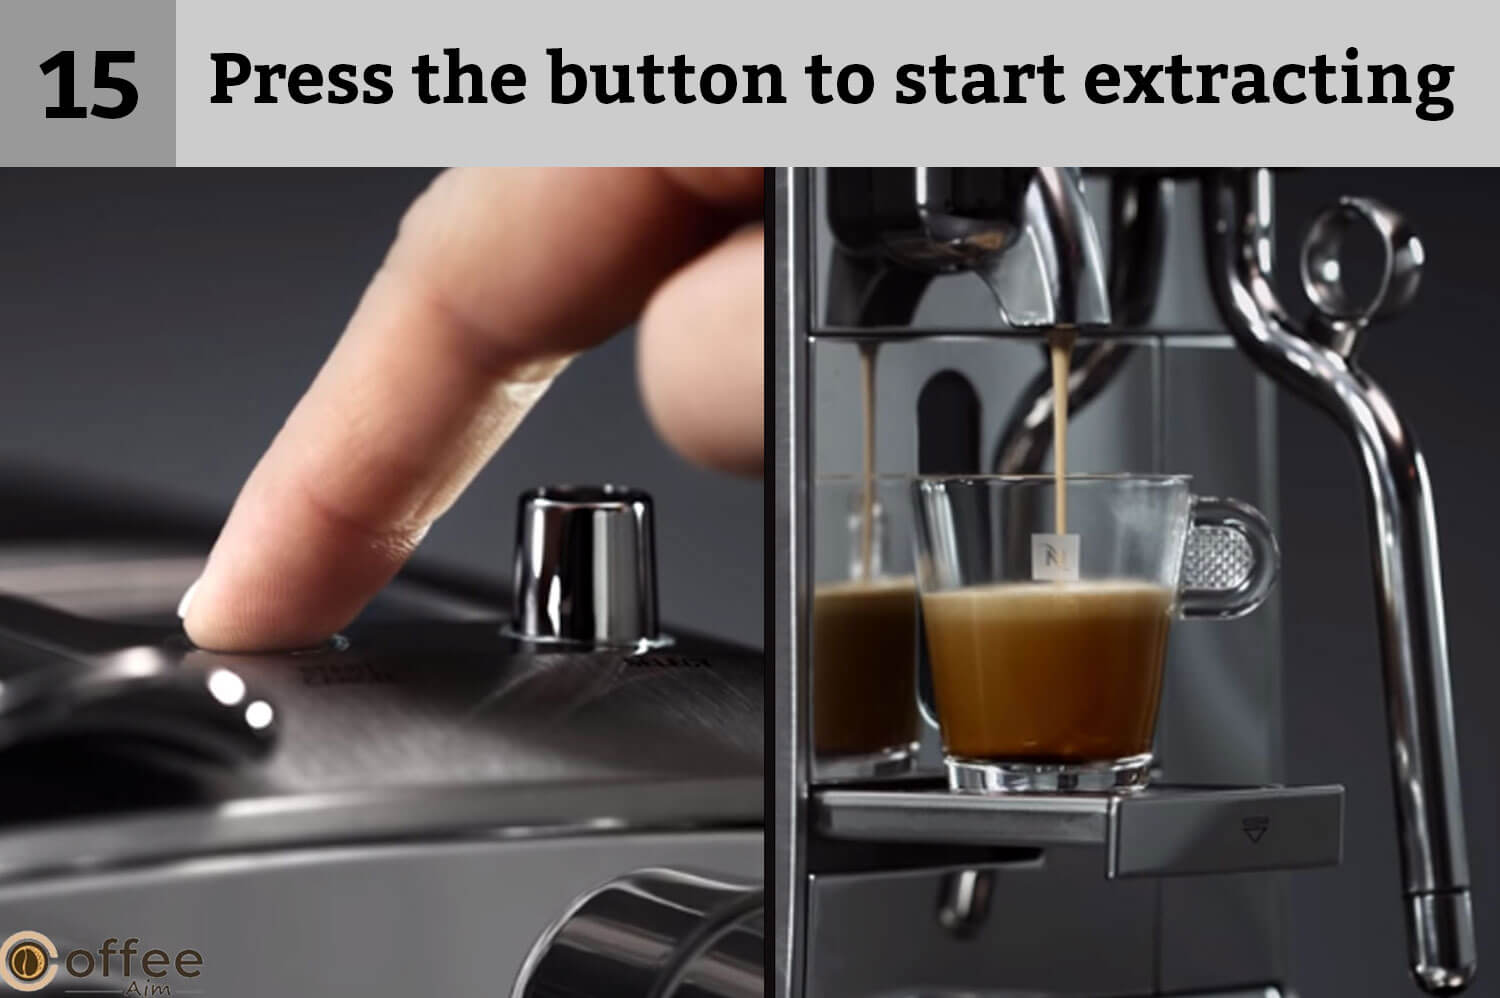
- Press the start/cancel button to start extracting your espresso.
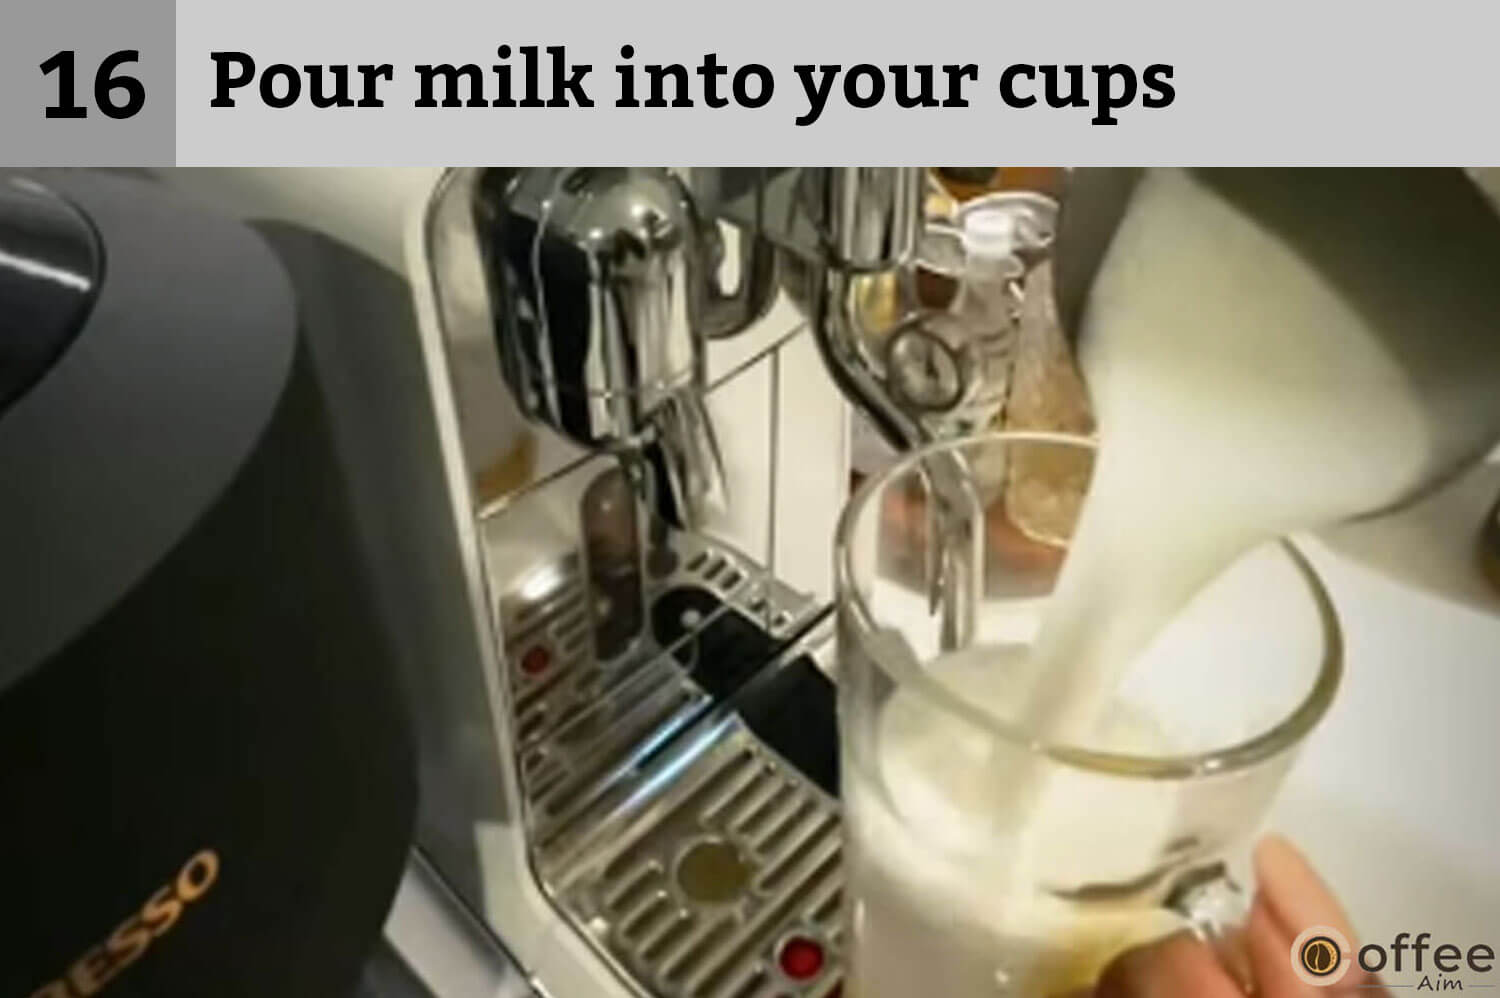
- Pour milk into your cups to finish the process of milk-coffee coffee preparation.
- Enjoy your favorite drink with your favorite one!

How To Do Latte Macchiato Preparation
If your favorite coffee is Latte Macchiato, then there is no need to be worried at all, as now you are going to learn about its preparation. So let’s not wait any longer to prepare your lovely drink.
So let’s start:
- In the very beginning, fill the water tank with fresh potable water.

- To accommodate the Latte Macchiato glass, push the cup support in until it locks.

- Now rotate the SELECT dial to choose the drink of your taste.

- Now fill the milk jug with the fresh cold milk to the maximum mentioned level.

- Only use the provided jug with Nespresso Creatista Plus instead of any other pitcher.
7. Now lift the wand stream, place it in the center of the milk jug, and press the button to start/cancel to start milk frothing.

- Make sure that the milk jug is making contact with the temperature sensor placed in the drip tray.
- As the milk frothing is complete, lift the steam wand, then clean it with a damp cloth.

- Now let the steam wand return to its down position to purge itself automatically to rinse itself.

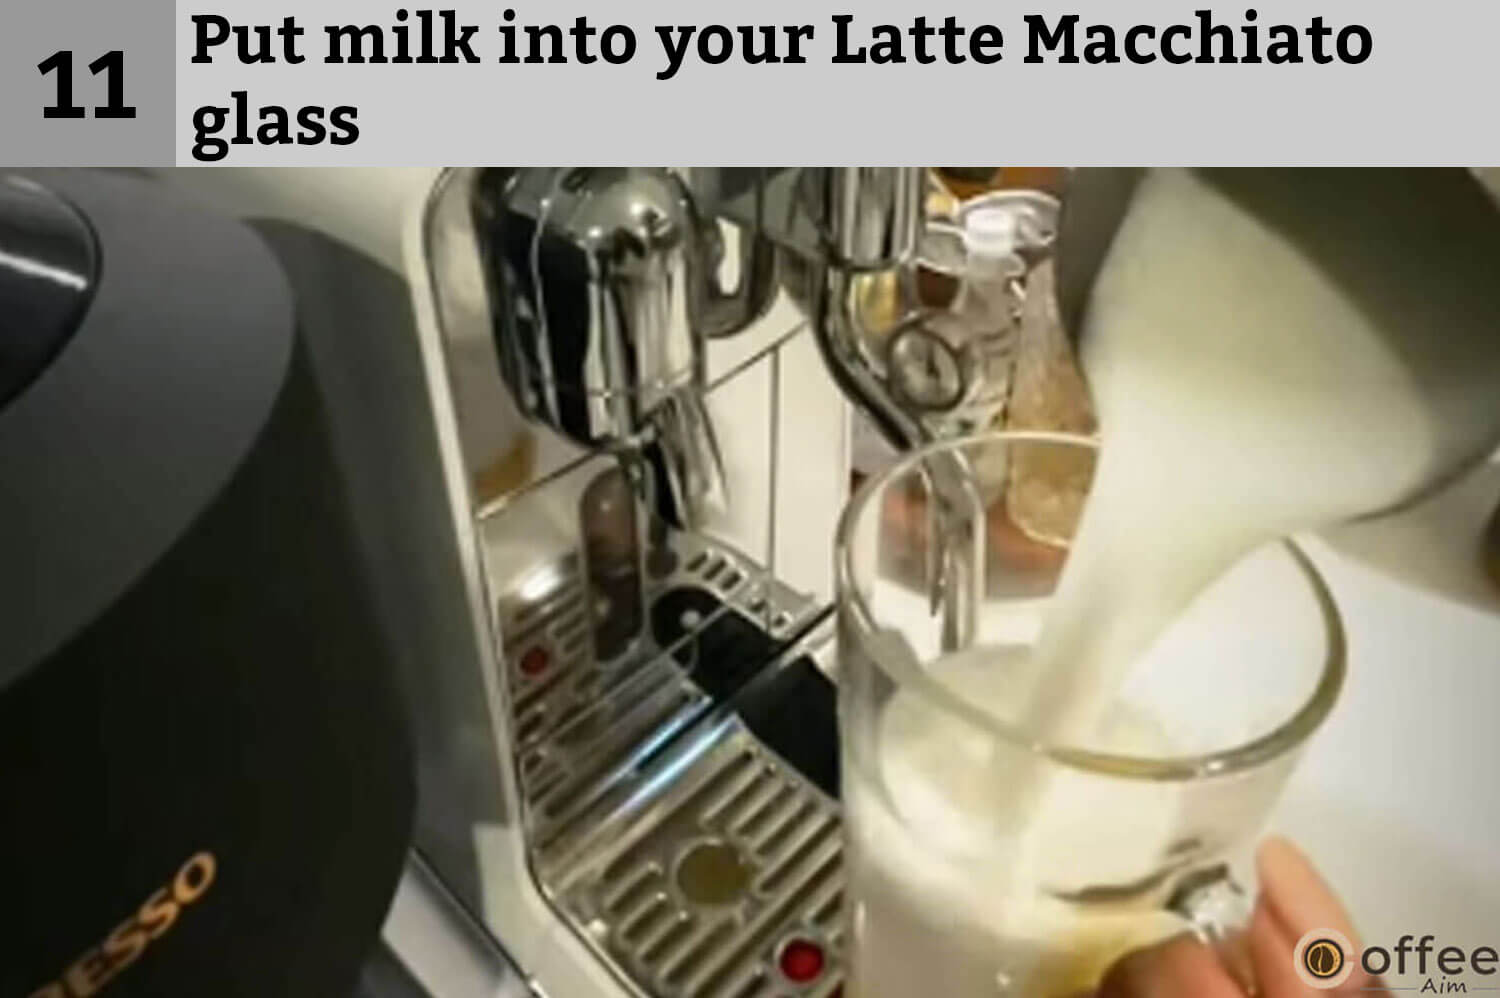
- Put milk into your Latte Macchiato glass and keep it beneath the coffee outlet.
- Now lift the lever and insert your regular coffee capsule.

- Press the start/cancel button to start extracting your lovely drink.
How To Adjust Regular Coffee Drinks
If you like to take regular coffee drinks, here is a complete guideline for adjusting your coffee drinks. Have a look here and learn how you can adapt different coffee drinks.
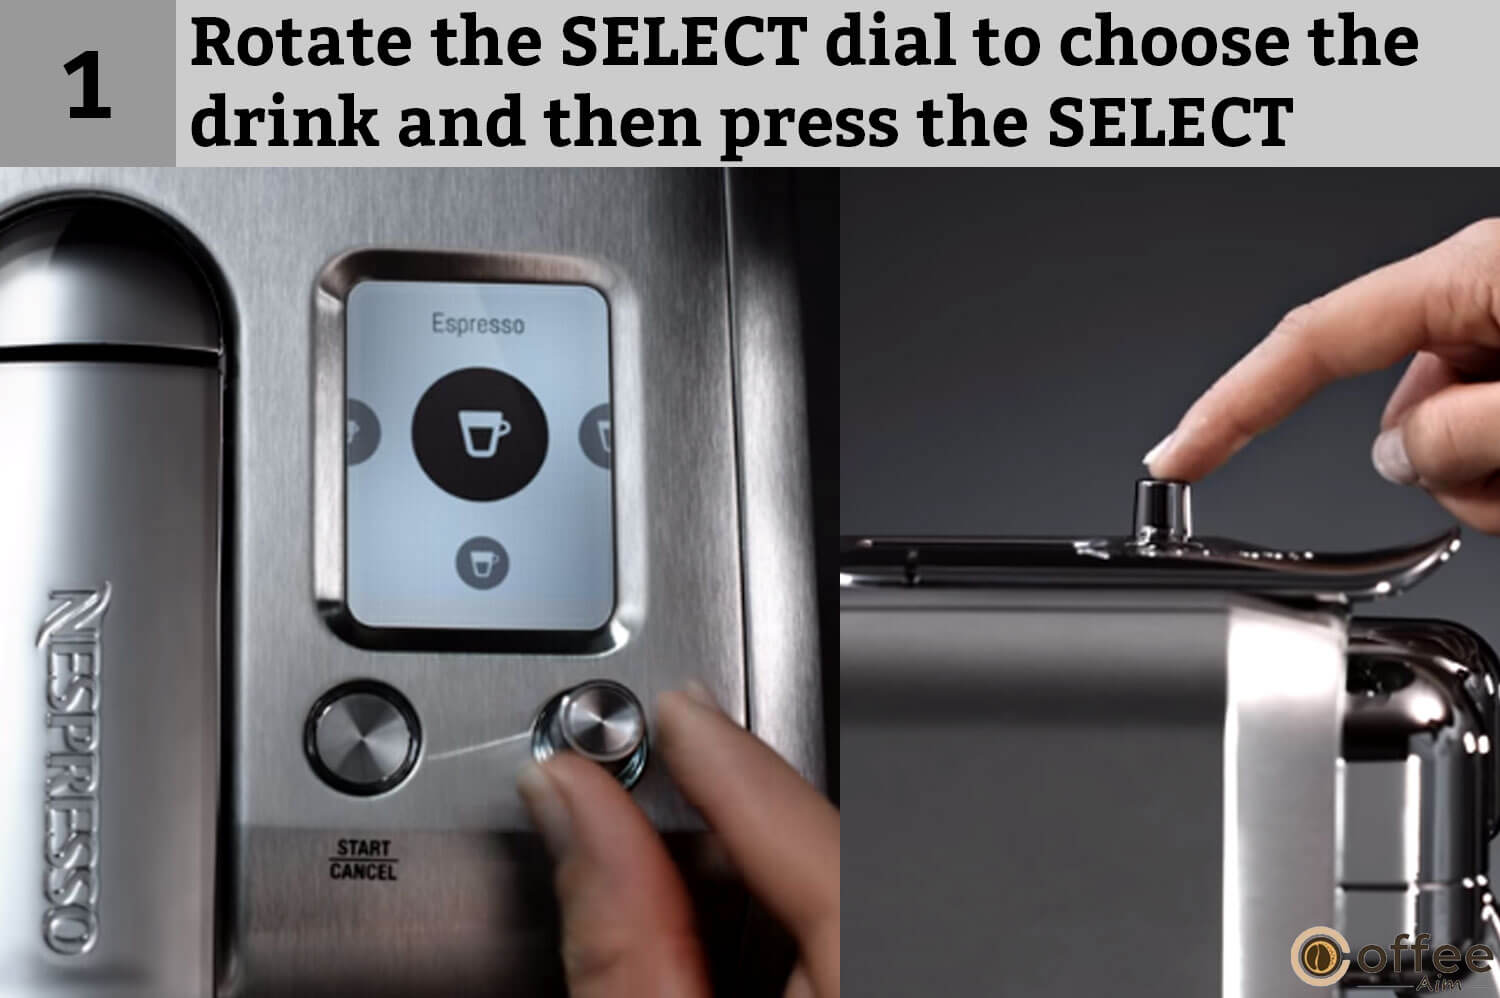
- First of all, rotate the SELECT dial to choose your drink.
- Press the SELECT dial to choose the volume of your drink.

- Rotate the SELECT dial to choose the volume of your coffee. The suggested book is marked with a dotted line.

- Now press the SELECT dial to save and exit. You can also press the start/ cancel button to leave without saving.

Nespresso Creatista Plus Regular Coffee Drinks Volumes
Regular coffee drinks of Nespresso Creatista Plus are available in three different flavors and volumes. Look at the table of these volumes and select which suits your taste!
| Lungo | from 70 to 150 ml/2.37 to 5 oz |
| Espresso | from 25 to 60 ml/0.85 to 2 oz |
| Ristretto | from 25 to 60 ml/ to 2 oz |
How To Adjust Milk Coffee Drinks
Nespresso Creatista Plus is optimized for pasteurized whole or semi-skimmed milk. You can change the milk temperature and foam according to the type of milk. So let’s start learning how you can adjust your milk coffee drinks.
Keep on scrolling down:
- Rotate the SELECT dial to choose the drink, and then press the SELECT to adjust your drink.
- Now rotate the SELECT dial to choose the Milk Temperature, Milk Froth level, and Espresso Volume.

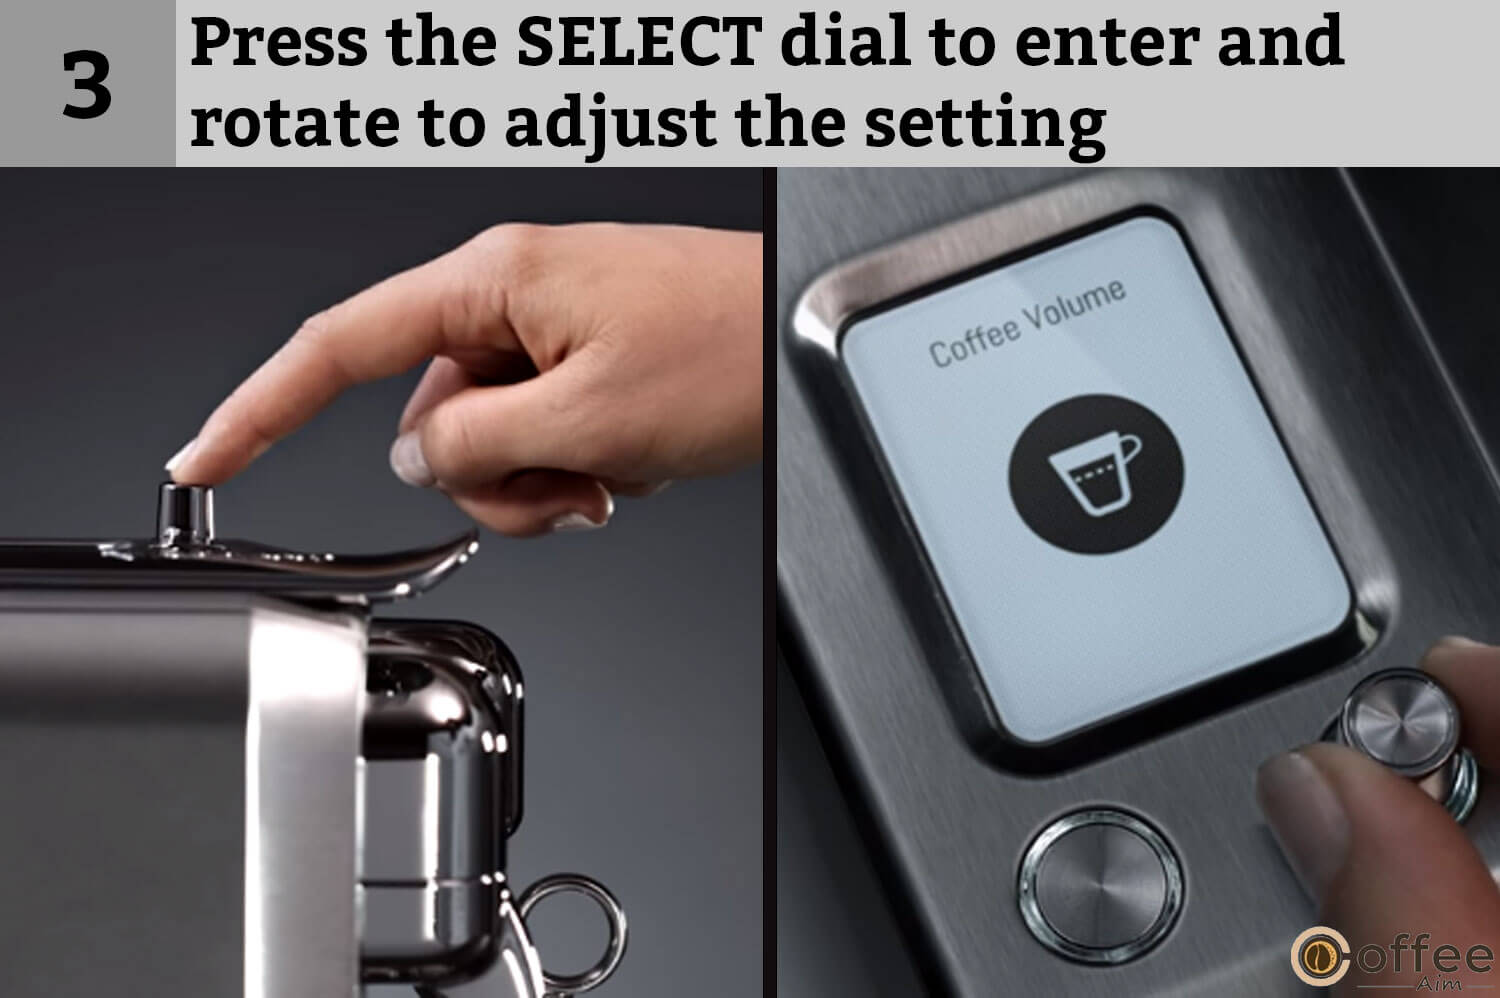
- Now press the SELECT dial to enter and rotate to adjust the settings. Suggested settings of Froth level and Espresso Volume are marked with a dotted line.
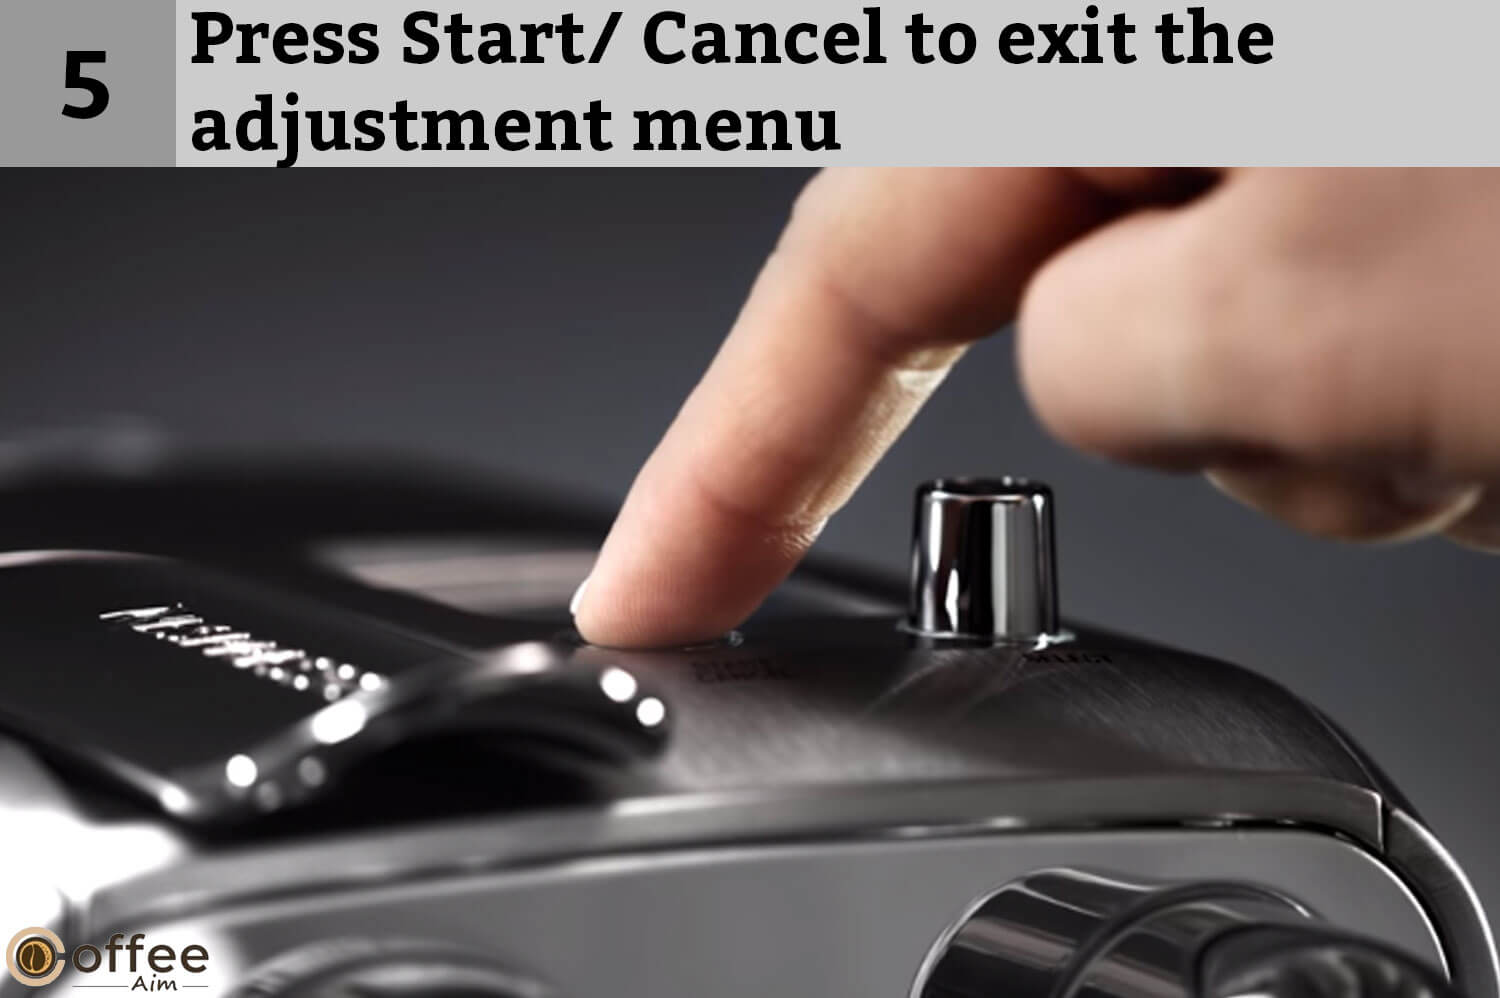
- Press the SELECT dial to save and exit. You can also press the Start/Cancel button to leave without saving the settings.

- Now press the Start/Cancel to exit the adjustment menu.
- Here are the limits of Milk Froth, Milk Temperature, and Coffee volumes provided by Nespresso Creatista Plus.
Have a look!
- Milk Froth: From 2 to 30mm / 0.08 to 1.2 in.
- Milk Temperature: From 56 to 76°C / 133 to 169°F.
- Coffee Volume: From 25 to 60 ml/0.85-2 oz.

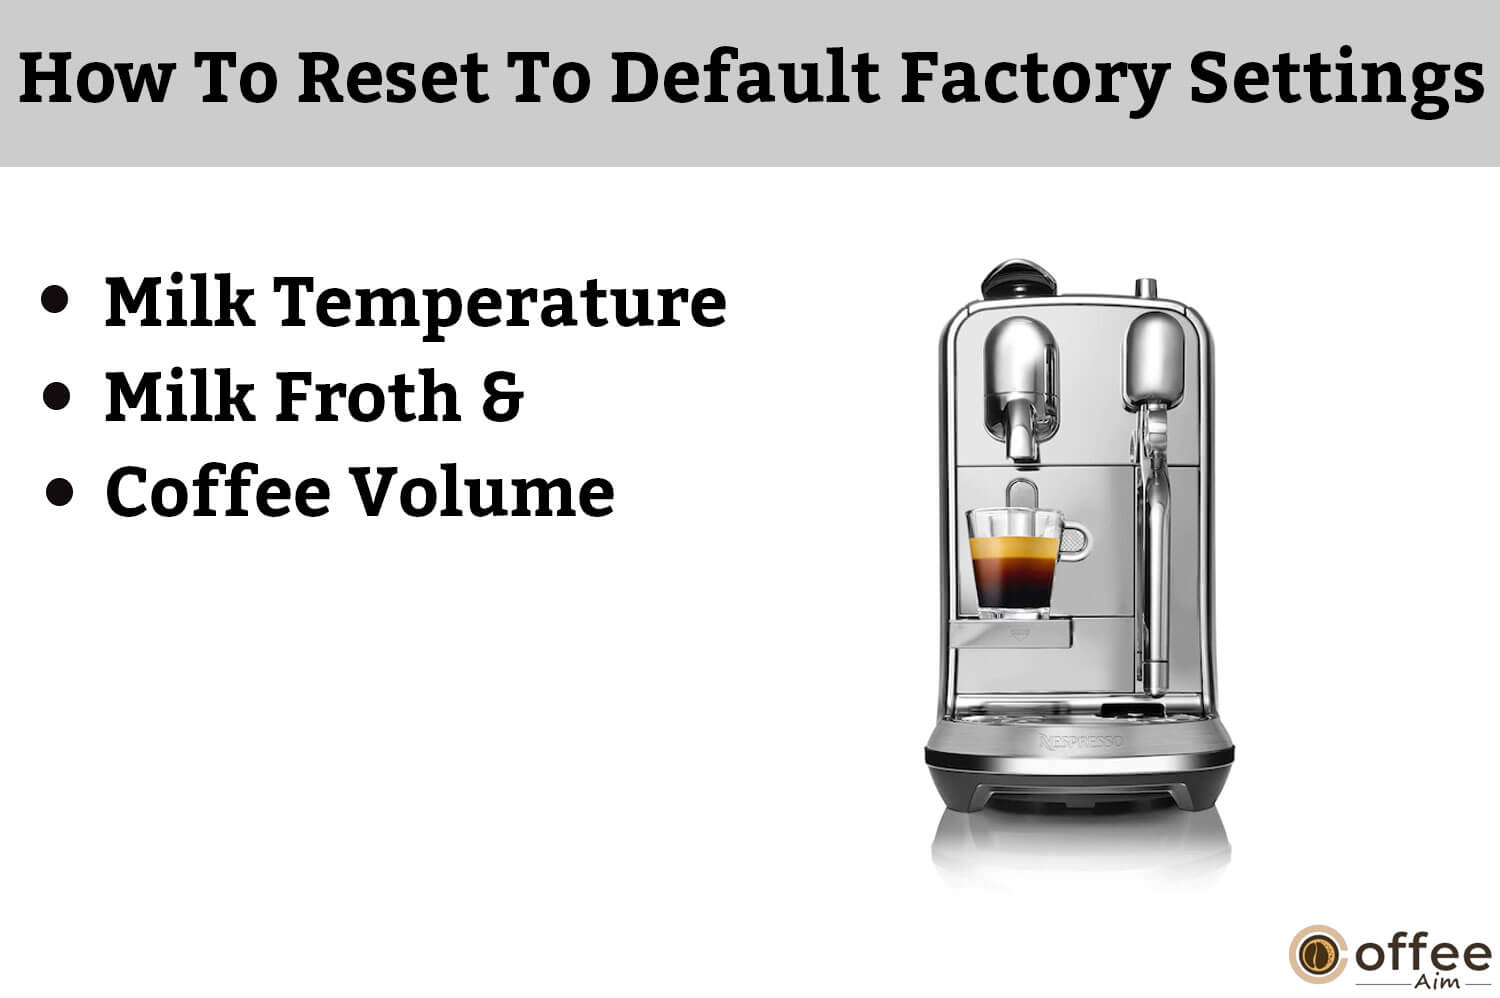
How To Reset To Default Factory Settings?
Before moving toward factory settings, let’s do drink settings first.
Drink settings include
- Milk Temperature
- Milk Froth &
- Coffee Volume
How To Reset Your Drink Settings
Have a look at the settings! If these settings don’t match your tastes, follow this procedure to change settings according to your choice.
- First of all, select SETTINGS
- Then select RESET
- Then select COFFEE RESET
- Select the sign of ✅to confirm.
- Select the sign of ❎ to cancel.

How To Reset Factory Settings:
Do you want to reset factory settings? Don’t know how to do it? Then kindly follow the below-mentioned procedure.
So let’s start:
- First of all, select SETTINGS
- Then select RESET
- Then select Factory RESET
- Select ✅to confirm
- Select ❎ to cancel
- Now the machine is powered off.
- On the subsequent use, follow all the first-use instructions.

How To Empty The System Before A Period Of Non-Use
If you are traveling somewhere, you are not taking your lovely machine with you. For short trips, clean your device by following these steps. However, for longer trips after emptying and cleaning your Nespresso Creatista Plus, don’t forget to pack it in its carton to avoid any damage. The emptying process is not complicated at all.
So let’s start:
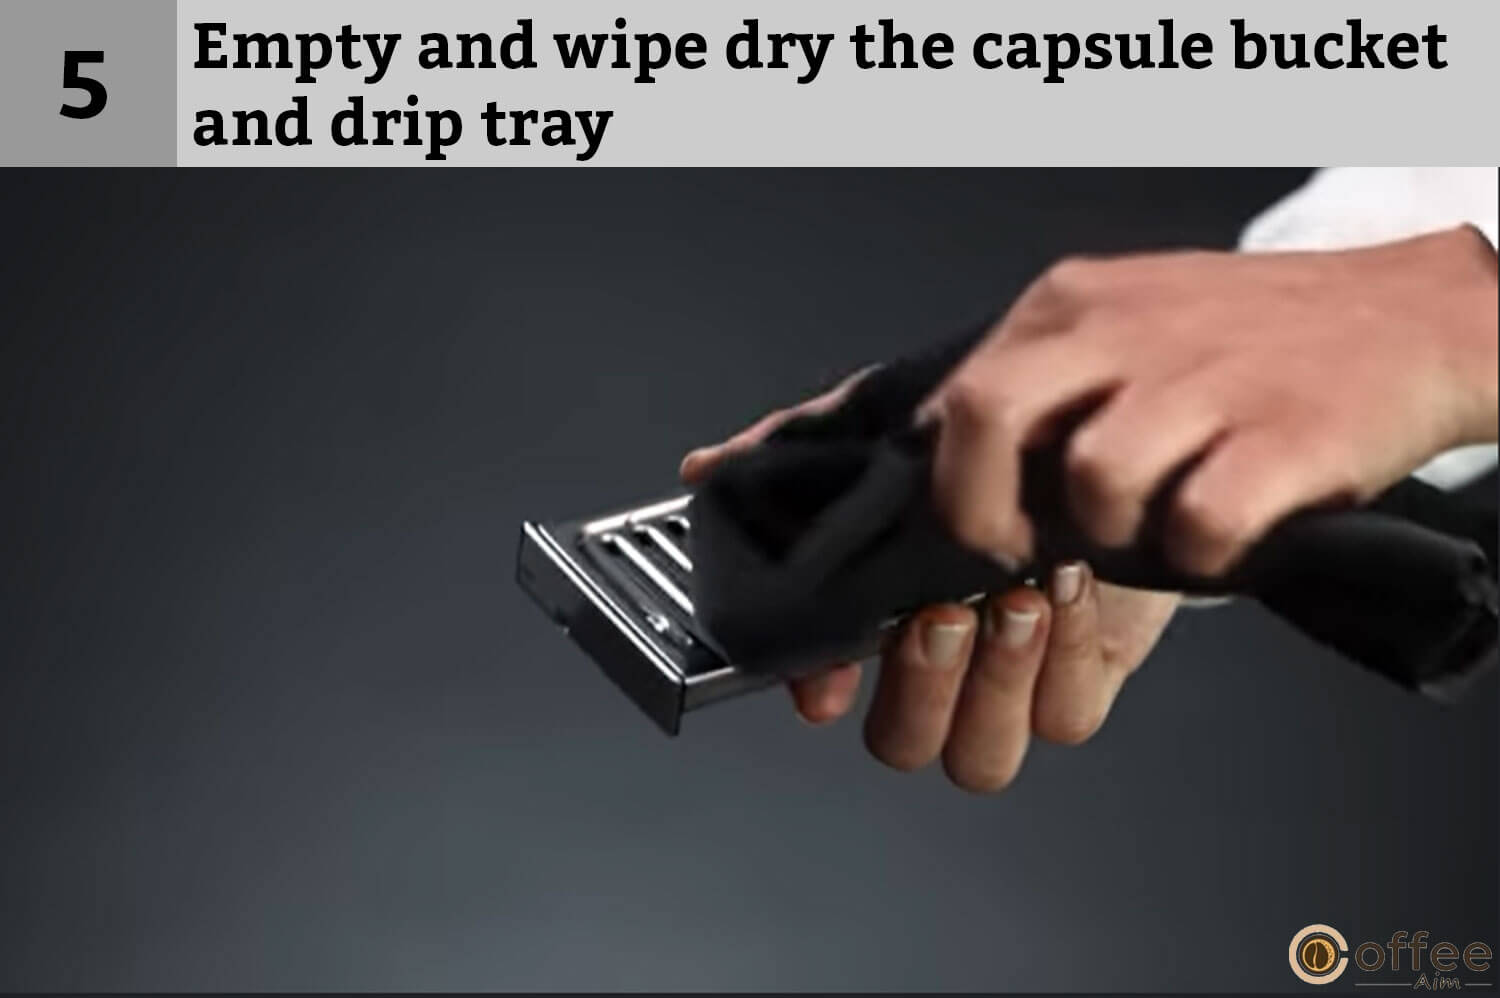
1. While emptying Nespresso Creatista Plus, the first thing is to remove the water tank.

- Place the empty milk jug under the coffee outlet.

- Rotate the SELECT dial to MAINTENANCE and then press the SELECT dial.

- Now select “Empty Cycle” and press SELECT to start.

- As the pump stops, empty and wipe dry the capsule bucket and drip tray.
How To Do Energy Saving?
People are always curious about energy savings modes. If you are, keep scrolling down to learn about it.
So let’s start talking about the energy-saving concept of Nespresso Creatista Plus.
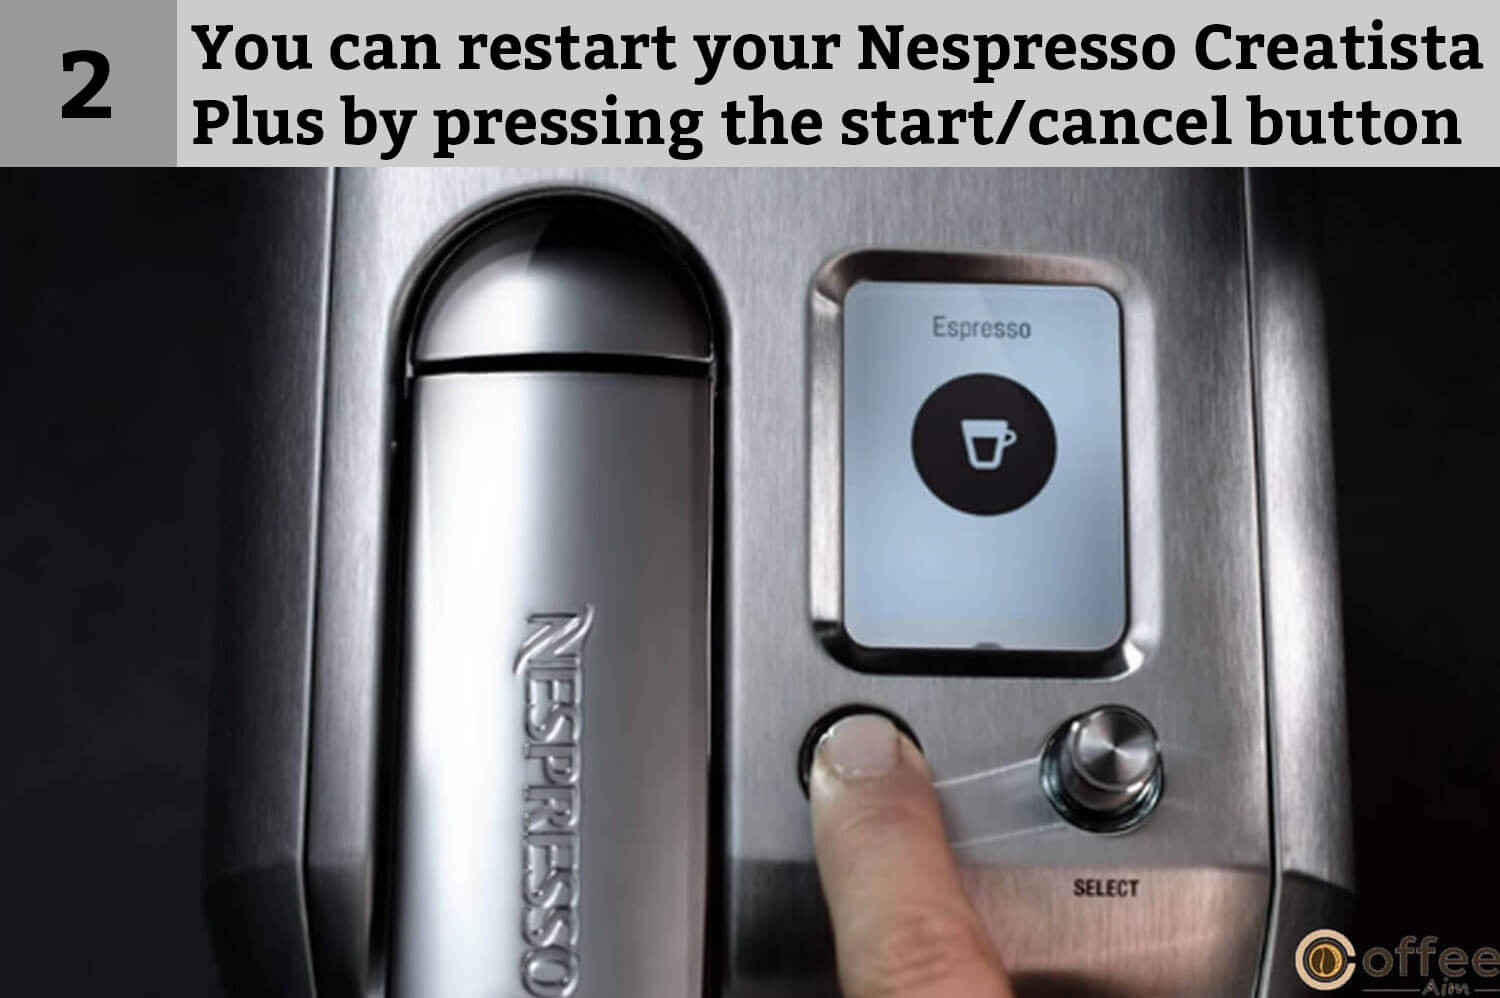
- Power usage is minimal when Nespresso Creatista Plus is not making a drink. When you don’t use it for two minutes, the display dims. If you don’t use it for ten minutes, the show turns off.

- You can restart your Nespresso Creatista Plus by pressing the Start/Cancel button.
How To Do Daily Cleaning?
Now, let’s move toward the critical task, which is the cleaning of Nespresso Creatista Plus. Coffee lovers love to keep their coffee makers neat and clean. Are you also a coffee fan? So let’s start learning about cleaning off your Nespresso Creatista Plus.
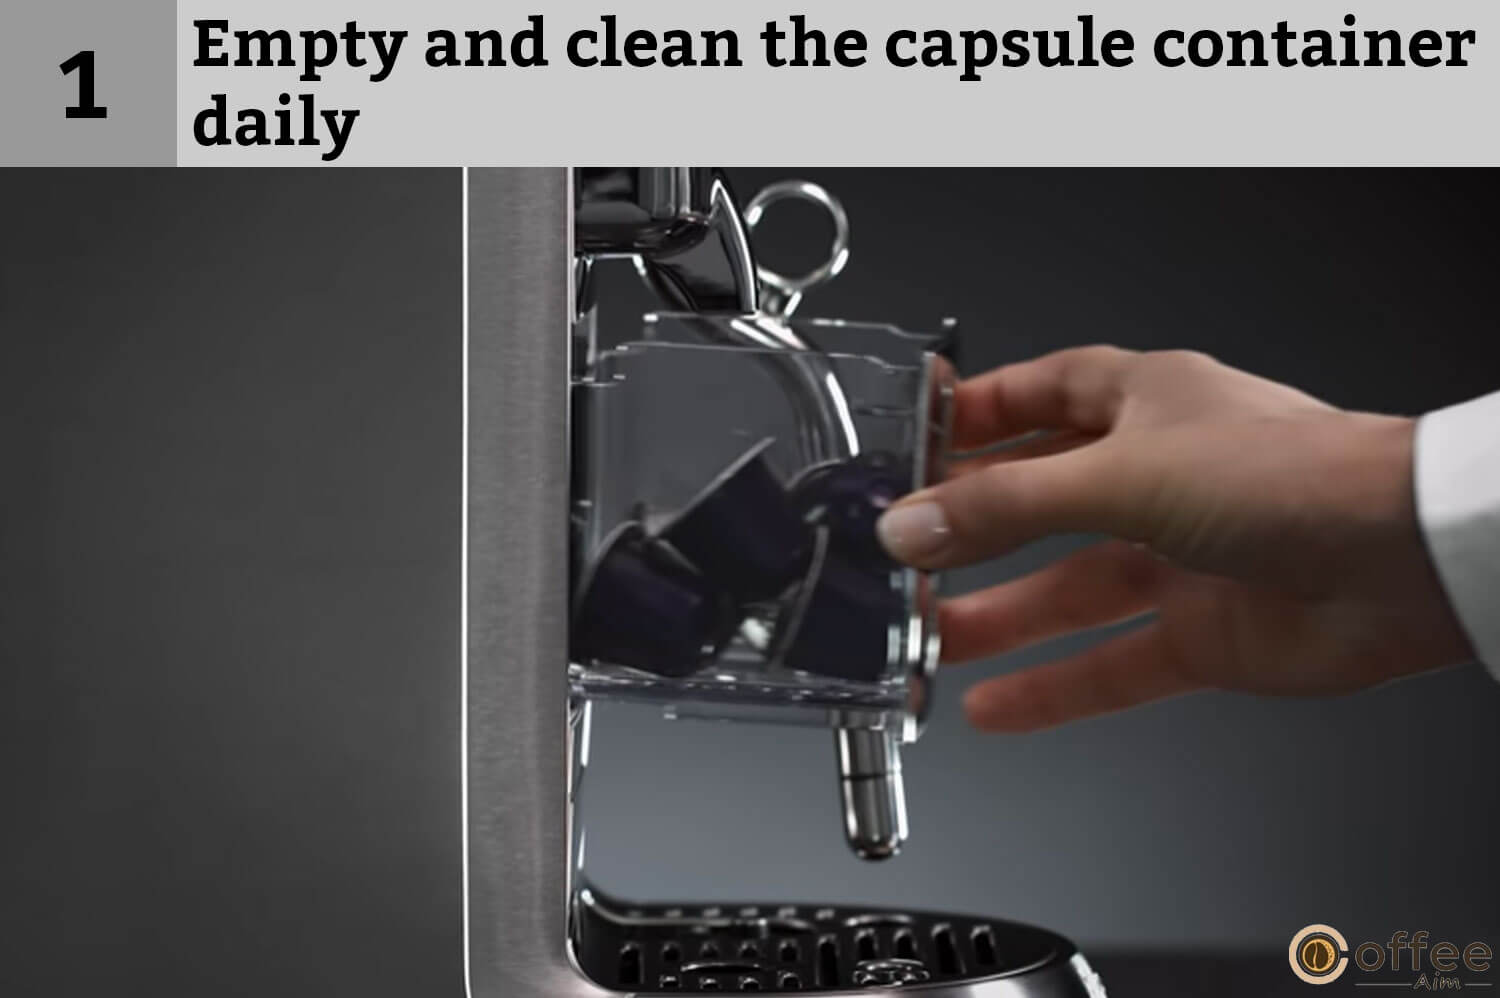
- To ensure hygienic conditions, emptying and cleaning the capsule container daily is highly recommended.
- Like a capsule container, empty and clean the drip tray daily.

- First, remove the capsule bucket to remove the cup support. Now unlock the cup support.
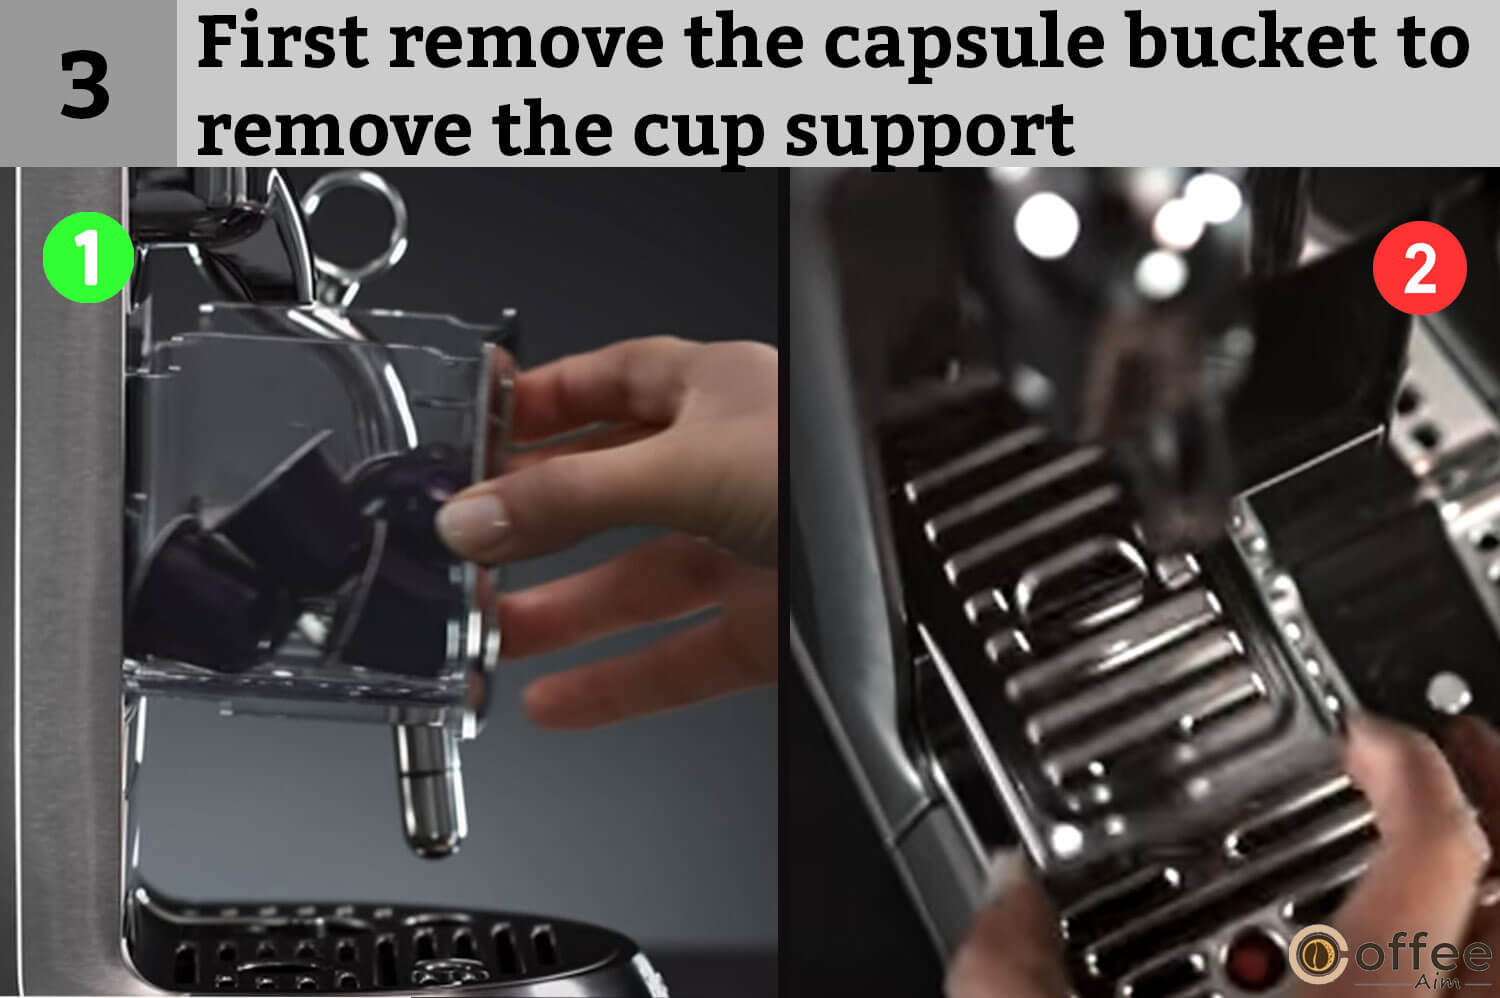
- Pull the cup support forward and lift it upward to disconnect it from the Nespresso Creatista Plus. Now clean the cup support and wipe inside the Nespresso Creatista Plus.

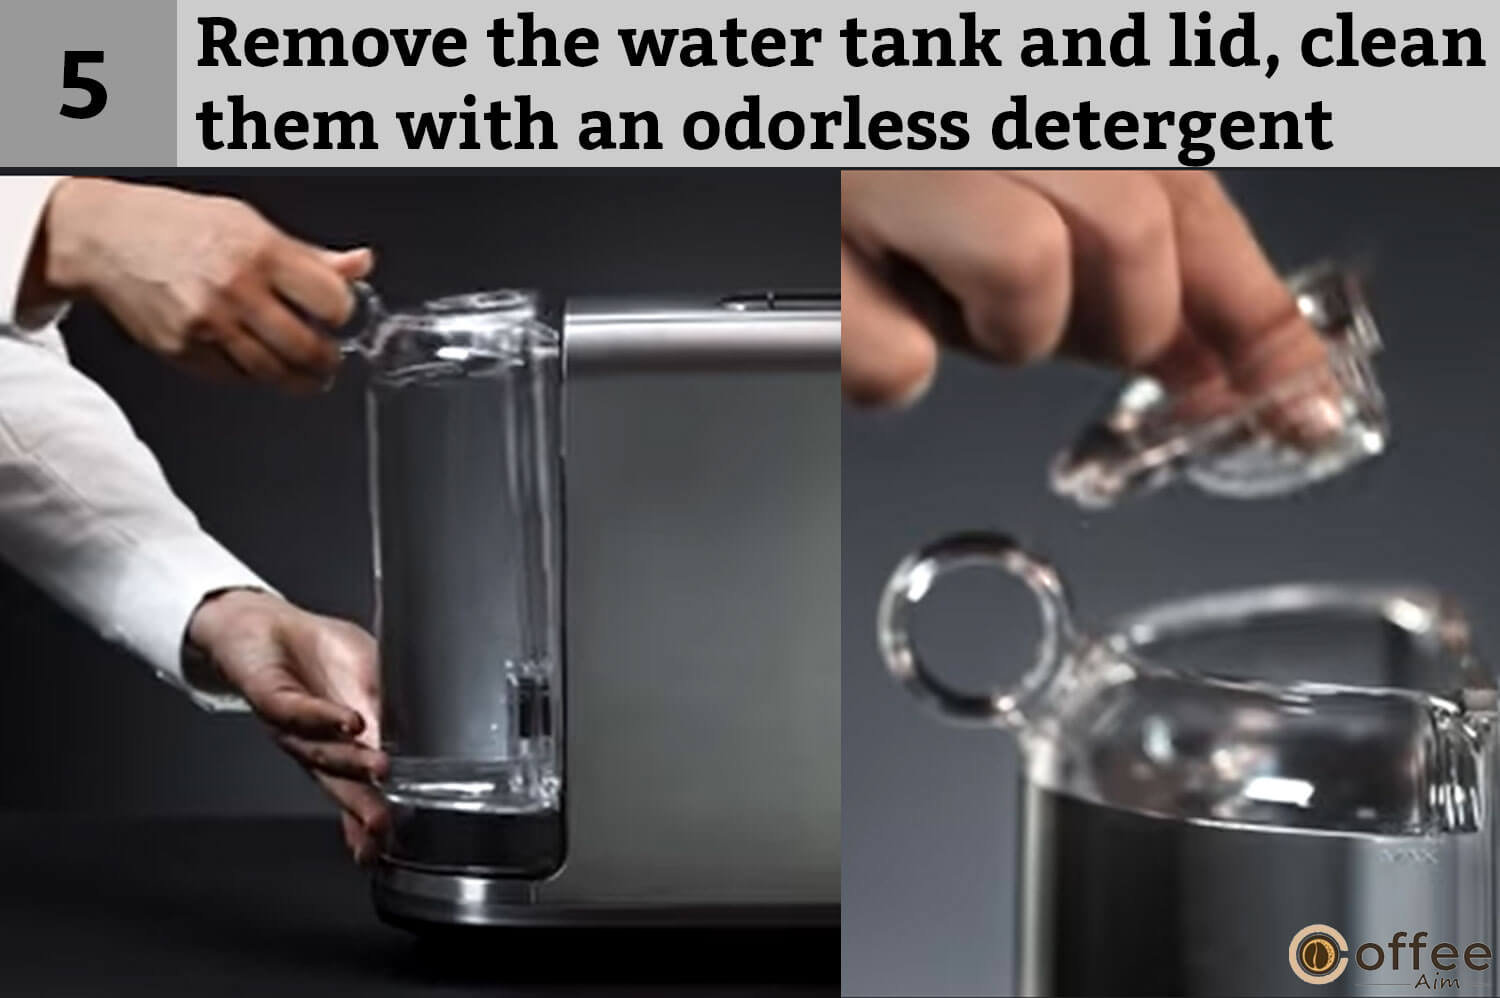
- Remove the water tank and lid, clean them with an odorless detergent, and wash them with warm water. Refill the water tank with fresh potable water.
- Don’t forget to wash the milk jug after every use and dry it. If it is necessary, clean the milk jug with mild detergent.

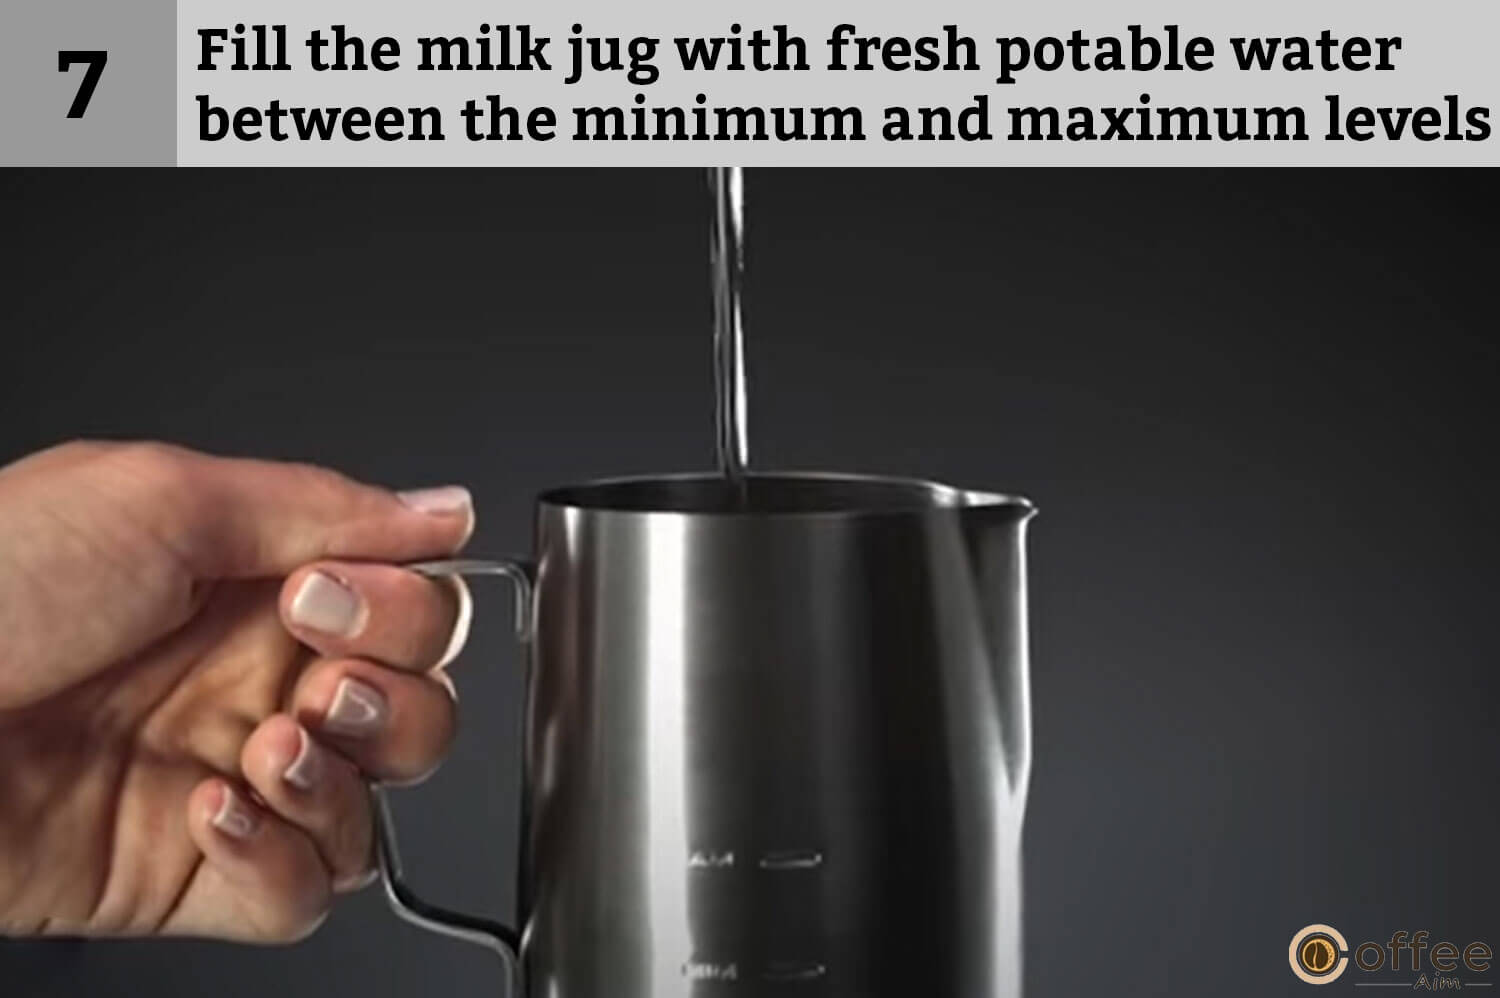
- Now, fill the milk jug with fresh potable water between the minimum and maximum levels. Select the MILK function and press the button to start. As it completes, remove the warm water and clean with a damp clean cloth.
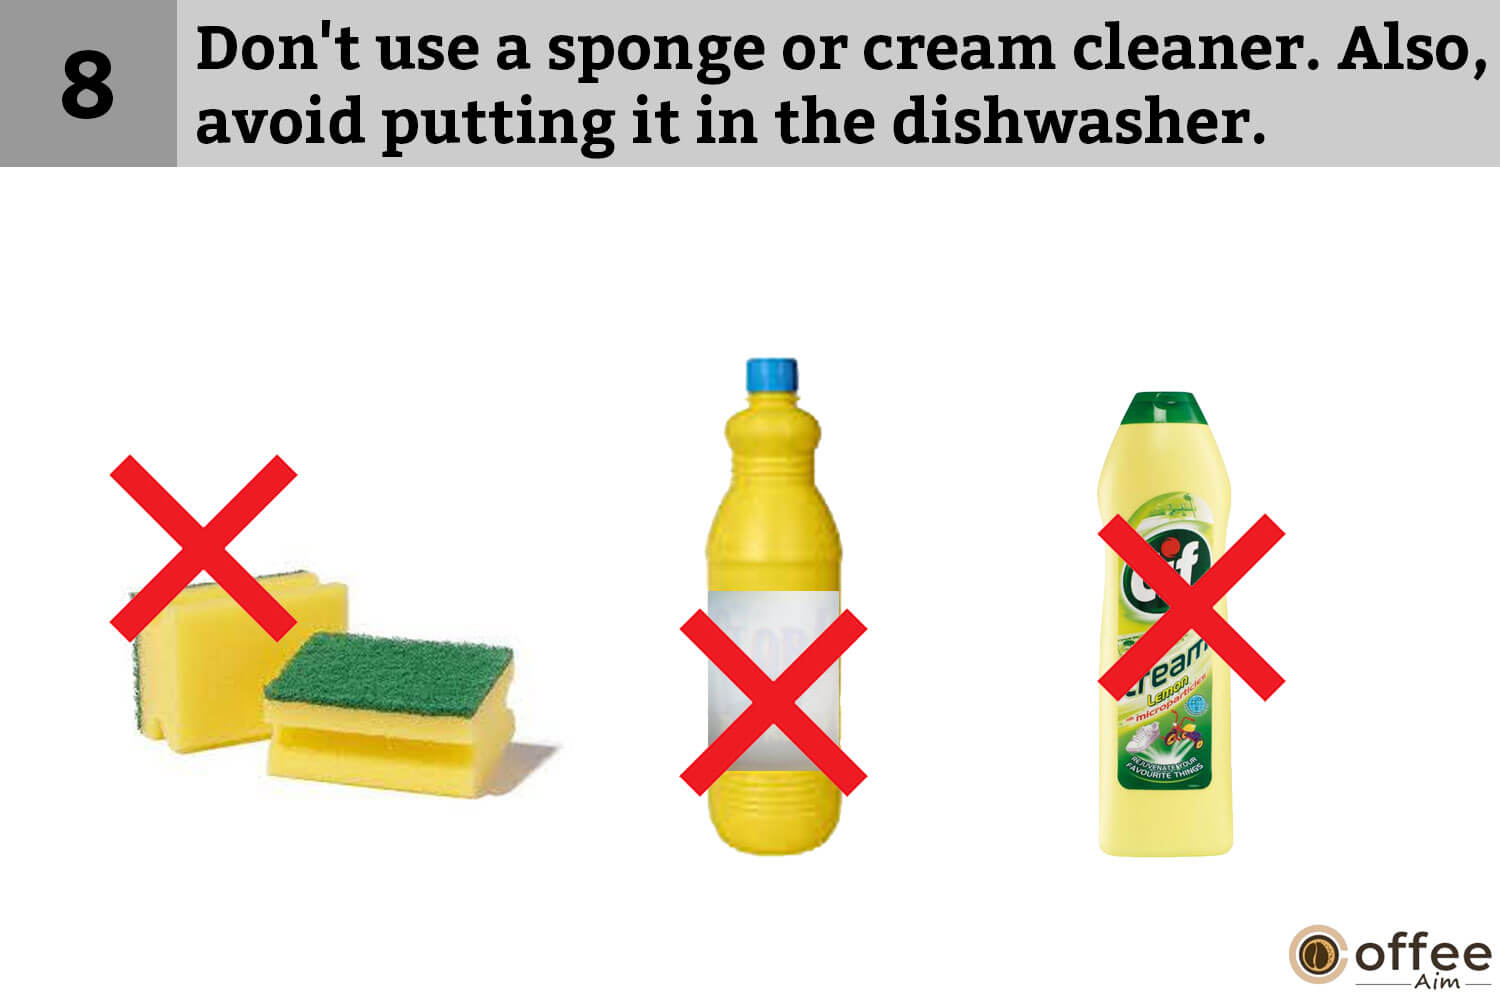
- You are not allowed to use any solid or abrasive detergent. Don’t use a sponge or cream cleaner. Also, avoid putting it in the dishwasher.
- Dry all the parts with a soft clean cloth and reassemble all the details. Don’t forget to regularly clean the coffee outlet and inside Nespresso Creatista Plus with a clean wet cloth.

- Never immerse the Nespresso Creatista Plus or any of its parts in water or liquid.

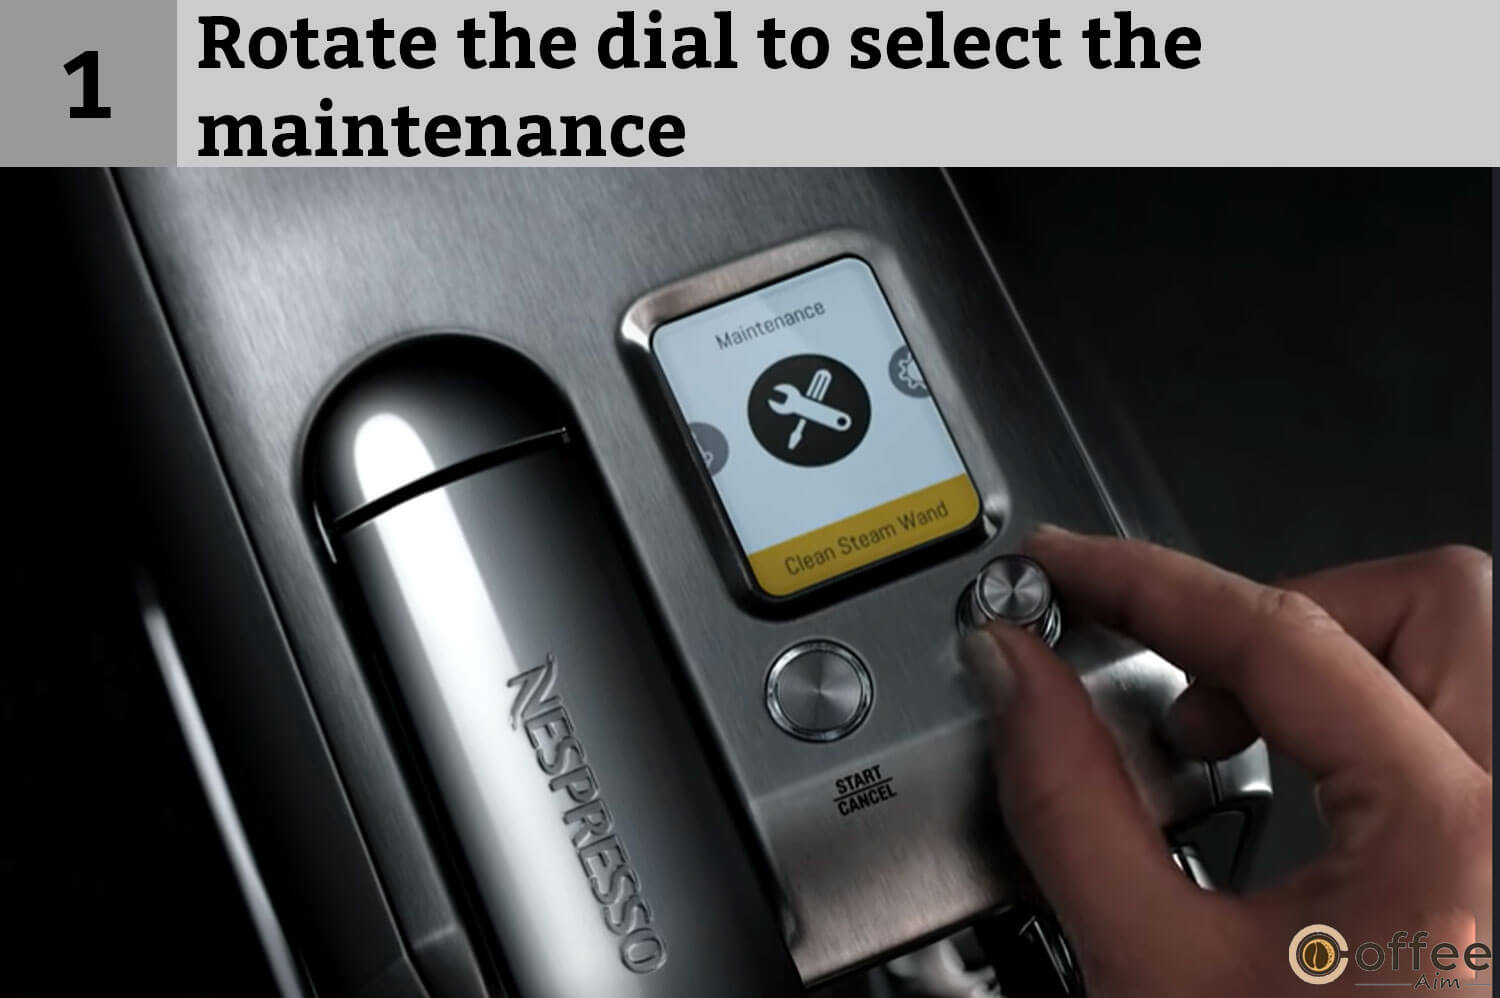
How To Do Steam Wand Cleaning Procedure?
Now let us learn how to do the milk system cleaning procedure. Kindly perform this cleaning procedure monthly to avoid steam tip blockages. You can also serve it when the display shows a “clean steam wand.”
- First of all, select maintenance.
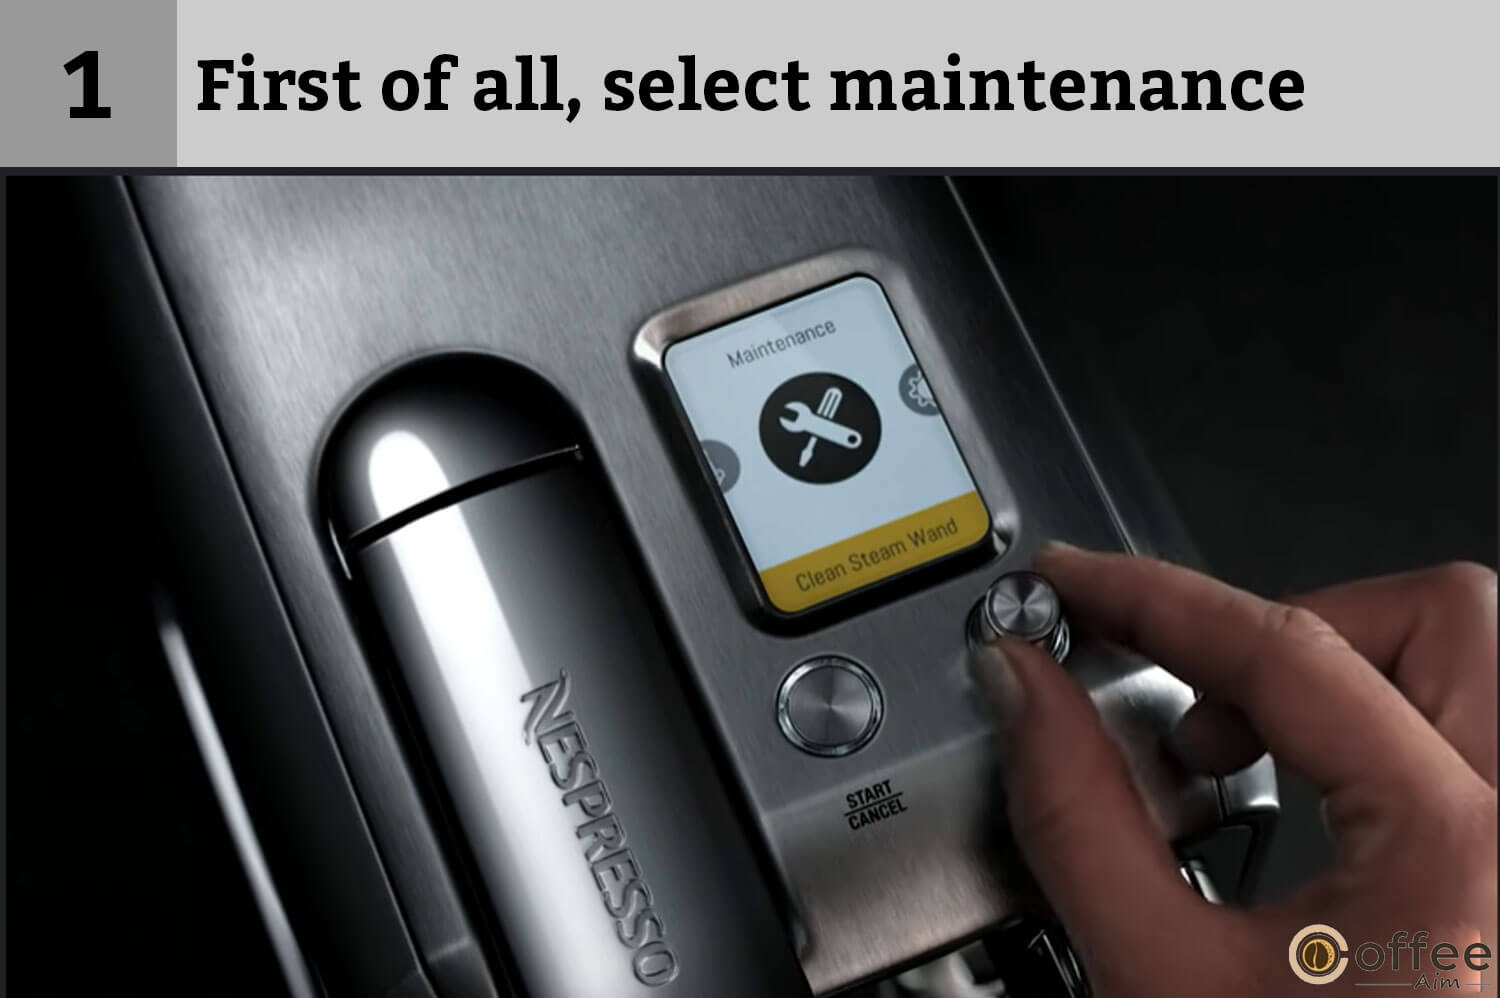
- Then select Clean Steam Wand.

- Then follow the on-screen prompts.

How To Avoid Calcification?
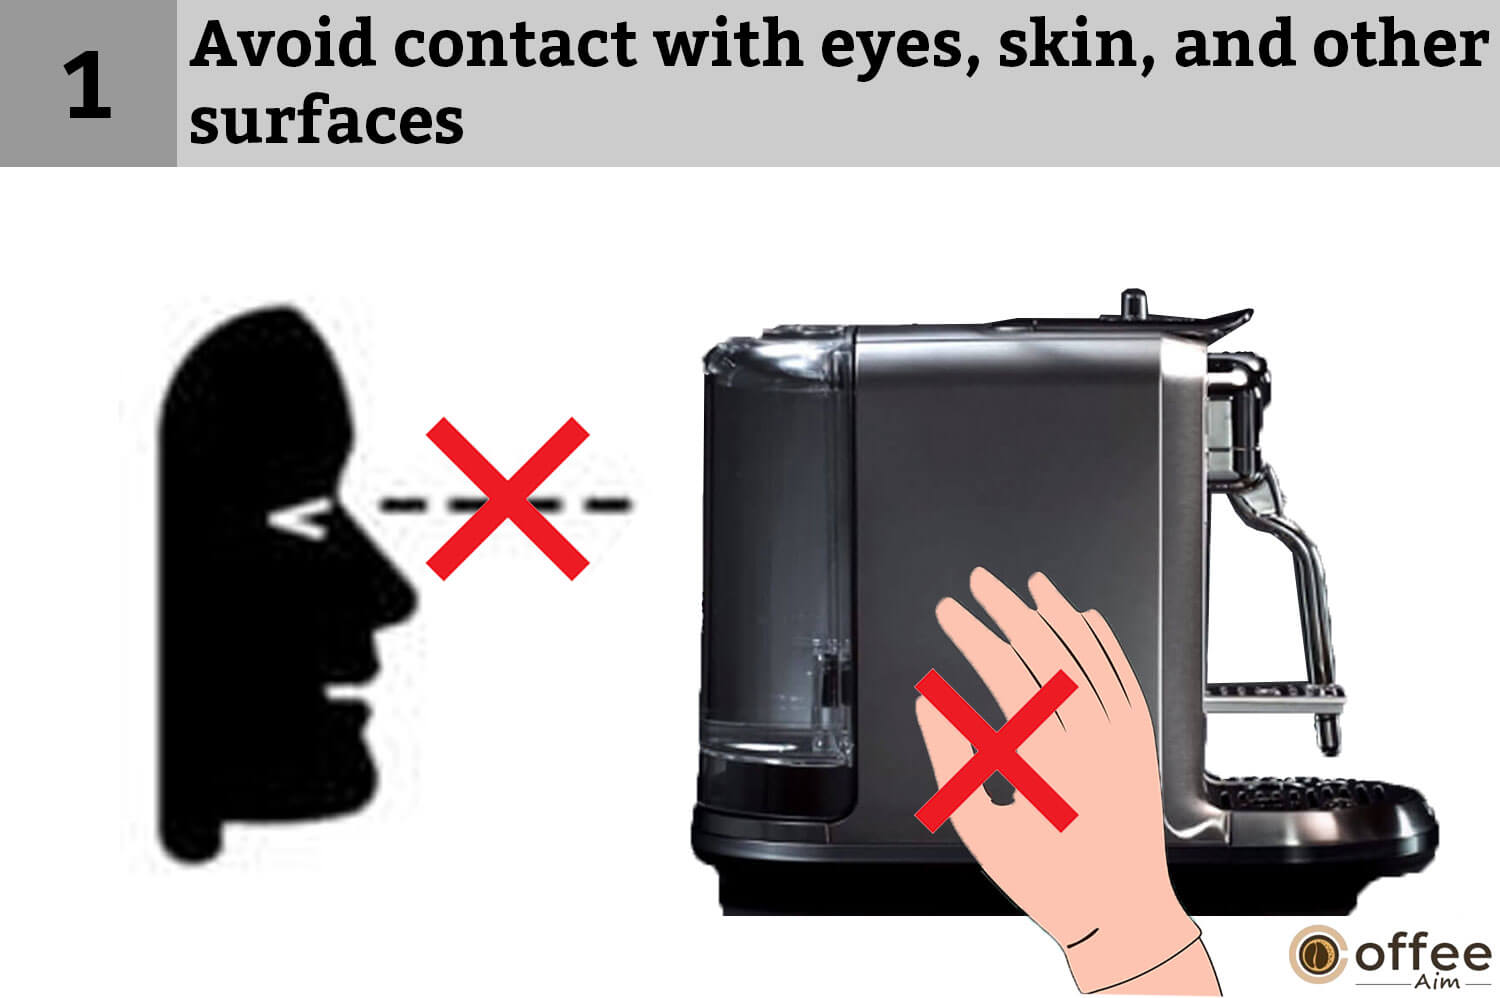
While operating Nespresso Creatista Plus, you must be conscious to avoid mishaps. Keep these few points in mind while making coffee with Nespresso Creatista Plus.
- Avoid contact with eyes, skin, and other surfaces.
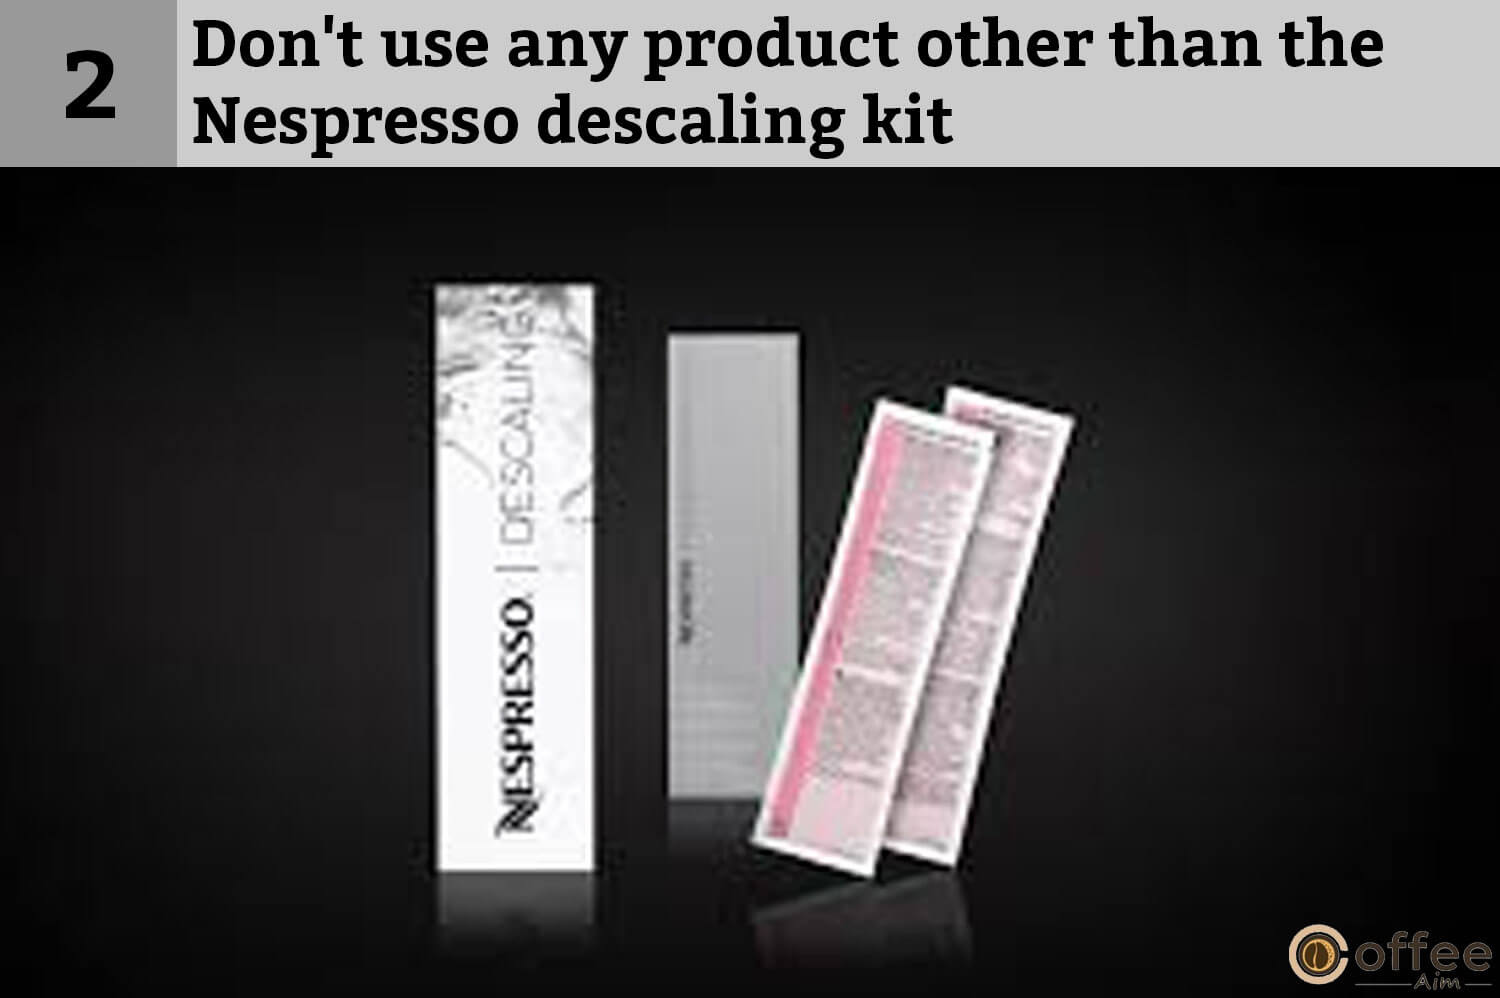
- Don’t use any product other than the Nespresso descaling kit available at Nespresso to avoid damaging your Nespresso Creatista Plus.
- For any queries related to descaling, kindly contact Nespresso Club.

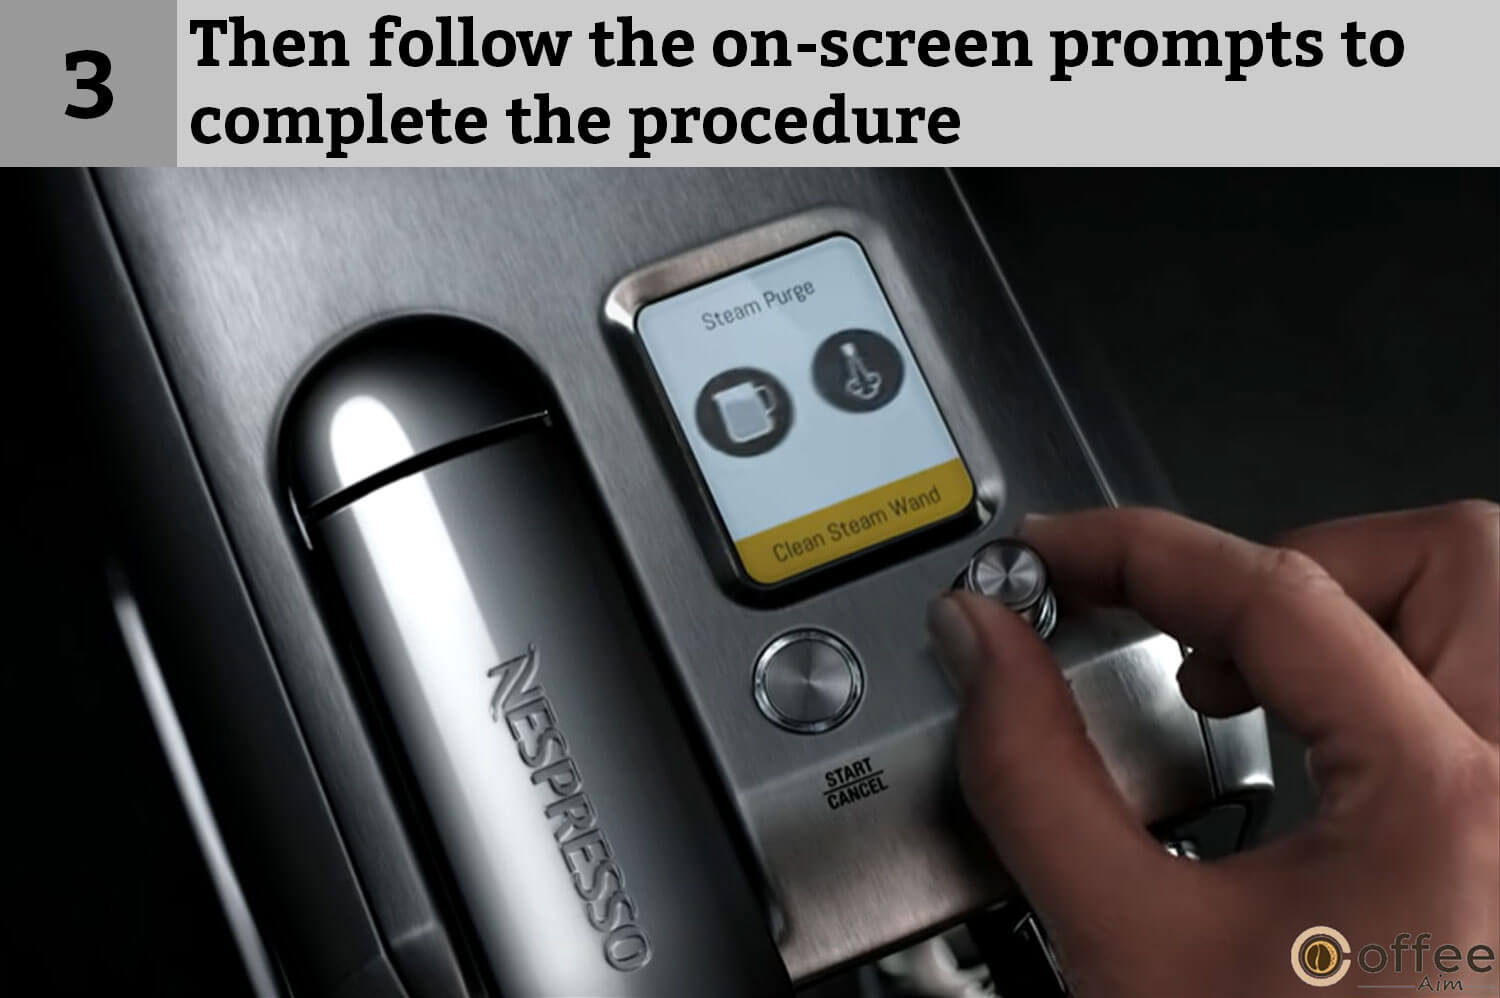
How To Descale Nespresso Creatista Plus
Depending on the hardness of the water, calcification often occurs in your machine. Don’t worry! You can easily descale your appliance in no time.
This process removes scale build-ups, maintains the taste of coffee, and prevents damage to Nespresso Creatista Plus. Frequency depends upon water hardness and the amount of use. Do a quick descale when prompted on the screen.
Nespresso Creatista Plus will stop you if you don’t perform the descale cycle after ten uses. A lockout countdown will inform you about the remaining usage.
Let’s do it:
- Rotate the dial to select the maintenance.
- Then select descale.

- Then, follow the on-screen prompts to complete the procedure.
Water Hardness
Water plays a vital role in the preparation of coffee. Water hardness matters a lot in the taste of your favorite drink. You can determine the water hardness level by using the test strip available in the packaging.
Do you want to change the water hardness level?
Then follow these three simple steps:
1. Rotate the dial to select Settings.
2. Then Select Water Hardness.
3. Now, follow the on-screen prompts to complete.
Water Hardness Table:
| App. | fh | DH | Descaling after CaCo3 | ☕(40ml) |
| Level 0 | <5 | <3 | <50 mg/l | 2200 |
| Level 1 | >7 | >4 | >70 mg/l | 1800 |
| Level 2 | >13 | >7 | >130 mg/l | 1400 |
| Level 3 | >25 | >14 | >250 mg/l | 1000 |
| Level 4 | >38 | >21 | >380 mg/l | 600 |
Troubleshooting
While operating your Nespresso Creatista Plus, you can face multiple unwanted and unexpected situations. Are you feeling worried? No need to panic at all! Here are numerous undesired conditions and possible solutions to cope with them.
So let’s start:
Buttons Not Illuminated.
The machine turns off automatically. Check the energy-saving topic for better guidance. Check out the outlet, voltage, plug, and fuse. Press the start/cancel button or SELECT button to turn to On mode.
No Steam Or Hot Water.
Check out if there is any capsule blocked inside your Nespresso Creatista Plus. Be very careful while checking; otherwise, your fingers may entangle into Nespresso Creatista Plus. Also, check out the outlet, plug, voltage, and fuse.
No Coffee, No Water, Unusual Coffee Flow.
Check if the water tank is placed correctly. If the water tank is empty, fill it with fresh and potable water. If necessary, descale the Nespresso Creatista Plus.
Coffee Is Not Hot Enough.
Preheat cup. If necessary, descale your Nespresso Creatista Plus.
The Capsule Lever Doesn’t Close Completely.
Empty the capsule container. Check out if there is any capsule blocked inside the Nespresso Creatista Plus. Be careful while checking Nespresso Creatista Plus; otherwise, your fingers may entangle.
Leakage (Water Under Nespresso Creatista Plus).
Suppose the drip tray is full; empty it. Check if the drip tray is securely inserted. If the problem persists, call the Nespresso Club.
No Coffee Flow;
water goes directly into the capsule bucket (despite the inserted capsule).
Make sure that the capsule lever is closed. Empty capsule bucket. Check out if there is any capsule blocked inside the Nespresso Creatista Plus. Take care of your fingers while checking; otherwise, you may entangle them into Nespresso Creatista Plus. If the problem persists, call the Nespresso Club.
The Color Display Is Dim And Hard To See/Read.
The color display dims automatically if you don’t use Nespresso Creatista Plus for two minutes. Check “energy saving” for better guidance. Press the Start/Cancel or SELECT button to turn to “On mode.” Adjust the screen brightness settings. Navigate to the Settings menu. Then select screen brightness. Turn the did and select High.
Buttons Flashing
Follow the on-screen prompt. If the water tank is empty, fill it with fresh and potable water and brew a coffee. Check the steam tip for blockages. Use a pin-cleaning tool stored under the water tank to unblock each hole. Descale Nespresso Creatista Plus if necessary. Do a Clean Steam Wand cycle if necessary.
Fill Water Tank Alert Remains On Display (
The water Tank is full
Check out if the water tank is positioned correctly. If the problem persists, call the Nespresso Club.
Descale Now Alert Is Displayed.
Then descale your Nespresso Creatista Plus. Navigate to the maintenance menu. Select descale and follow the on-screen prompts.
The Machine Error Message Is Displayed.
A major fault has occurred. You need to visit nespresso.com or call the Nespresso Club to contact your local service center.
The Machine Is On But Ceases To Operate.
Power the machine Off by holding the Start/Cancel button. Wait for sixty minutes and press the Start/Cancel button or SELECT to turn to “On mode.” If the problem persists, call the Nespresso Club.
The Machine Turns To OFF Mode.
After ten minutes of non-use, Nespresso Creatista Plus turns off mode to save energy. Press the Start/Cancel button or SELECT to turn to “On mode.”
Troubleshooting Milk Froth Preparation
You may face unwanted results while frothing milk. Therefore here is a massive list of possible problems and their potential positive effects to make you trouble-free.
So let’s begin:
The Milk Steam Cycle Doesn’t Start.
➡Check out if the water tank is positioned correctly.
➡If the water tank is empty, fill it with fresh and potable water.
➡Check out steam tips in case of blockages.
➡Make sure the wand is lowered.
The Quality Of The Froth Is Not Up To Standard.
➡Make sure to use the pasteurized whole or semi-skimmed milk at refrigerated temperature(4-6°C/39-43°F).
➡For better results, use the newly opened milk (fresh milk).
➡Also, check the milk froth settings. Use the Breville-provided milk jug.
➡Clean both the steam wand and milk jug after each use.
➡Then Navigate to the maintenance menu.
➡Select Clean Steam Wand and follow the on-screen prompts.
The Steam Is Very Wet.
➡Always use cold and potable water.
➡Do not use highly filtered, demineralized, or distilled water.
Milk Overflows.
➡Fill out the milk jug with the appropriate milk volume.
➡Minimum fill level as marked inside and outside of the milk jug.
➡To stop overflow, reduce the milk’s initial volume or froth level. This varies depending on the milk type.
The Milk Temperature Is Too Hot.
➡Make sure to use the Breville-provided milk jug.
➡Check if the milk jug is positioned correctly on the temperature sensor. ➡Check if the temperature sensor inside the drip tray is clean.
➡Decrease the milk temperature settings.
The Milk Temperature Is Not Hot Enough.
➡Preheat the coffee cup.
➡Make sure to use the Breville-provided milk jug.
➡Check if the milk jug is positioned correctly on the temperature sensor.
➡Increase the milk temperature settings.
➡Check out the steam tips in case of blockages.
The lower Wand Alert Is Displayed.
➡Ensure the steam wand is lowered.
A Clean Steam Wand Alert Is Displayed.
➡Clean the steam wand.
➡Navigate to the maintenance menu. ➡Select Clean Steam Wand and follow the on-screen prompts.
Contact The Nespresso Club
I hope you have learned everything about the parts, usage, and problems of Nespresso Creatista Plus with solutions. If something is still missing or unclear, or you want any addiadditionalormation or to seek advice, or you may face any problem, then feel free to contact Nespresso Club or your Nesporized representative.
How can you contact them?
Contact details for your Nespresso Club or authorized representative are available in the “Welcome to Nespresso ” folder in your machine box or at nespresso.com.
Disposal and Environmental Protection
Your Nespresso Creatista Plus contains multiple valuable materials you can recycle or recover. Separation of the remaining waste into different types can make the recycling procedure of valuable raw materials easy. Leave the damaged Nespresso Creatista Plus at a collection point. Then you can get information on disposal from your local authorities.
Limited Guarantee
Breville guarantees that this Nespresso Creatista Plus is faultless in materials and artistry for two years of domestic use and three months of commercial use from the date of purchase. During this period, Breville is responsible for repairing or replacing free of cost if you face any fault in the material or artistry of the Nespresso Creatista Plus.
The guarantee date remains the same for the repaired or replaced items from the date of purchase, not the date of repair. This guarantee excludes liability for consequential loss or any other loss or damage caused to property or person arising from any cause whatsoever.
It also excludes damages caused by the product if you don’t use it according to the instructions. All accidental injuries and misuses are also excluded from this guarantee. If any unauthorized person tries to repair it, Breville is not responsible for the consequences.
Improper maintenance, consumable items, or normal wear and tear do not cover the cost of claiming under warranty.
How To Claim Under The Breville Warranty?
Nespresso is handling product inquiries and product servicing on Breville’s behalf. If you believe your product is defective, contact the Nespresso Customer Service team directly for instructions on where to send or bring it for repair by a Breville authorized service agent.
Contact Nespresso Australia: at 1800 623 033 or New Zealand at 0800 234 579 at auclub@nespresso.com.
This product is imported and distributed by Breville, and Breville provides this warranty. To the extent permitted by law, Nespresso has no liability for the product, and all guarantees, contracts, and conditions by Nespresso are excluded.
To Squeeze The Whole Discussion
Let’s sum up all the lengthy discussions in a few words. I have discussed the using procedure in detail. If you are still confused, then re-read the article. Furthermore, if you want to learn about coffee beans or makers, scroll the pages at CoffeeAim.
I am waiting for your worthy thoughts!
Have a nice cup of coffee!
FAQs
How To Use Nespresso Creatista Plus Step-by-Step?
You can use your Nespresso Creatista Plus by following these simple steps:
- Fill the water tank with potable water.
- Turn your Nespresso Creatista Plus on by pressing the start/cancel button.
- Put a cup under the coffee outlet.
- Insert a capsule by lifting the lever.
- Press the SELECT to choose your coffee.
Can You Make Coffee With Nespresso Creatista Plus?
Espresso Creatista Plus is unable to prepare drip coffee. However, it can prepare lungo, espresso, and ristretto.
Nespresso Creatista Plus enables you to prepare top-notch and top-quality coffee at home with simple steps. So you can easily enjoy your favorite coffee without going outside and wasting your time.
What Pods To Use With Nespresso Creatista Plus?
Only use the Original line pods specially designed for Nespresso Creatista Plus. Don’t use any other pods with Nespresso Creatista Plus.
How To Use The Three Buttons On Nespresso Creatista Plus?
On a Nespresso U model, there are three buttons to use. These buttons are used to choose the cup sizes for Lungo, Espresso, and Ristretto. Yep, the best recommendation is 110 ml for Lungo, 40 ml for Espresso, and 25 ml for Ristretto.