Quick Navigation
Hey, coffee enthusiast! Are you experiencing some hiccups with your belove Keurig K-Classic machine? Don’t worry; you’re not alone. How disturbing it can be when unexpected problems disrupt your morning cup of joe. But fear not! In this article, I’ve got your back. We’ll delve into the most common issues that Keurig K-Classic owners encounter and provide simple yet effective solutions to get your machine brewing like a champ again. So, please sit back, grab your favorite mug, and let’s troubleshoot those Keurig K-Classic problems together!
Getting Started
Now that we’re ready to troubleshoot your Keurig K-Classic ensure you have the essential tools. With these handy items, you’ll be well-equipped to tackle any issues that come your way. Keep in mind even a small preparation goes a long way in returning your coffee maker to its brewing glory!
Here are the must-have tools for troubleshooting your Keurig K-Classic:
- Clean, lint-free cloth: This trusty cloth will become your best friend when wiping down surfaces, removing coffee residue, or cleaning up spills. It ensures a clean brewing environment and helps maintain the longevity of your machine.
- Descaling solution: Over time, mineral deposits can build up in your Keurig K-Classic, affecting its performance and taste. A descaling solution is formulated to remove these deposits, keeping your machine in top shape. It’s an essential tool for maintaining the quality of your coffee.
- Needle cleaning tool: The needle that punctures the K-Cup can sometimes get clogged with coffee grounds or debris, leading to brewing issues. A needle cleaning tool helps you quickly clear any obstructions, ensuring a smooth brewing process.
- Fresh, high-quality water: It may sound simple, but using fresh, filtered water can make a world of difference in the taste and performance of your coffee maker. Avoid using hard water, as it can lead to mineral buildup and potentially impact the performance of your machine.
These tools will empower you to tackle the common problems Keurig K-Classic owners face. So gather your supplies, and let’s move on to the next section, where I’ll address specific troubleshooting steps to get your coffee make up and running again!
Problem 1: Why Is Keurig K-Classic Brewing Weak Coffee?
Keurig brewers, including the Keurig K-Classic, are widely recognized for their durability and exceptional brewing efficiency. Due to their advanced technology and precise brewing mechanisms, it is highly uncommon for a Keurig K-Classic to produce weak coffee. If you find yourself in such a situation, there’s no need to worry. I can provide you with the necessary steps to fix the issue.
Weak coffee not only brings you an unpleasant taste and bitter taste but ruins your entire experience of coffee, potentially making you feel embarrassed if you serve that coffee to your guests. You can avoid experiencing such a potentially awkward situation by trying the troubleshooting methods below.
Cause 1: Poor Coffee Grounds
In Keurig K-Classic, weak coffee is more often a result of poor coffee grounds, mainly when using reusable K-Cups. When coffee grounds are exposed to humidity, their essential flavors and aromas can deteriorate, resulting in poorer and weaker coffee extraction. This can happen when the coffee grounds come into contact with oxygen, causing a loss of freshness and overall quality. Hence, if you observe a sudden decline in the flavor or strength of your coffee when using the Keurig K-Classic, it is crucial to assess the quality of the coffee grounds. You can prevent this by following the solution written below.
Solution 1: Grind Only The Required Amount Of Coffee Beans

In order to maintain the freshness and flavor of your coffee, it is advisable to grind the beans in the quantity required for each brew rather than grinding a large quantity all at once.
Solution 2: Store In An Airtight Container

Incorrect storage can lead to the loss of their essence over time. Factors like exposure to light, air, and moisture contribute to the development of stale coffee. Storing the grounds in airtight containers and dry conditions is recommended to maintain the true essence of your coffee. By taking these necessary precautions, you will remain confident that the coffee grounds remain fresh and flavorful for a long period of time, allowing you to enjoy a satisfying cup of coffee every time.
Cause 2: Clogged Needles
If you are not using reusable K-Cups and your Keurig K-Classic is brewing weak coffee, the primary cause of weak coffee is often a clogged needle in Keurig machines. Keurig are equipped with a needle at the top, designed to puncture K-Cups and allow water to flow into the coffee grounds, ultimately ending up in your cup. In a well-functioning Keurig, the needle effectively pierces the K-Cup, allowing water to pass through and extract the coffee’s flavor.
However, regular use can clog the needle with old coffee grounds, mineral deposits, or other debris. When this occurs, it interrupts the water flow, causing only a fraction of the water to reach the coffee grounds while the remainder bypasses them. Consequently, this results in a diluted and insipid cup of coffee. Now, let’s explore the potential remedies for this issue.
Solution: Unclog The Needles
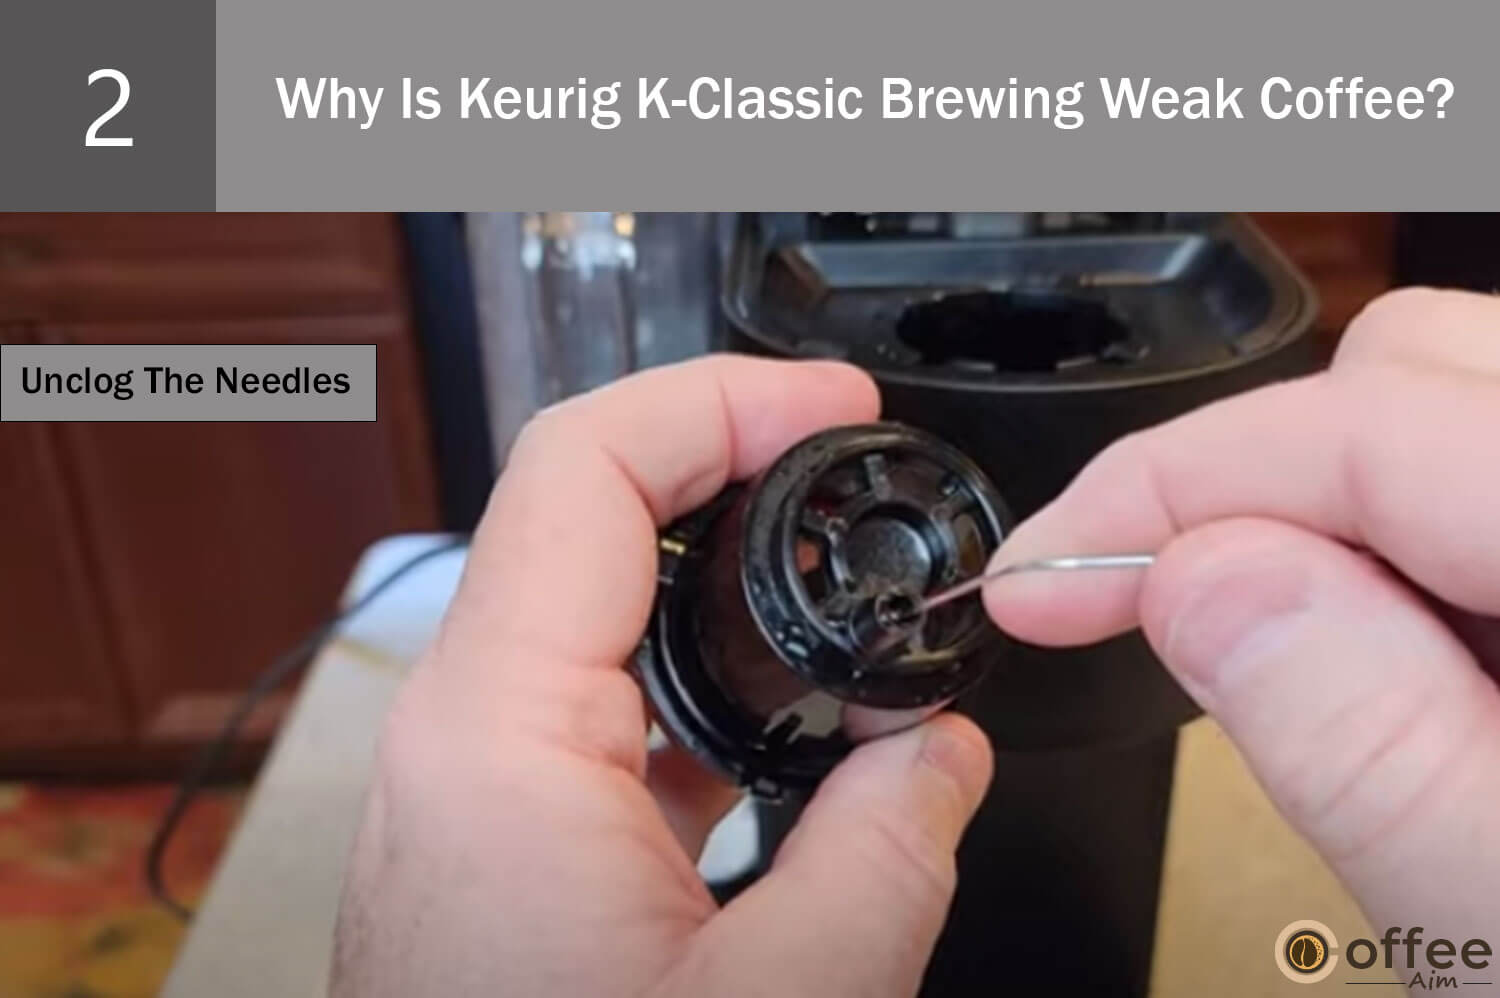
The solution to this issue is easy; you only need to clean the needles. To get the detailed procedure for cleaning the needles, head to the section “Cleaning The Exit Needle” and “Cleaning The Entrance Needle” of this article.
Now, let’s address a potential issue with your Keurig. If you find your Keurig K-Classic leaking, here’s what you should do.
Problem 2: Why Is My Keurig K-Classic Leaking?
Experiencing a leaking Keurig K- Classic and calling it only frustrating would be an understatement as the continuous leaking not only cause significant damage to your kitchen surfaces, such as countertops and floors, creating additional expenses for repairs or replacements but if the water reaches the electrical components of the machine, there is a risk of electrical problems or safety hazards. Apart from the physical damages, the persistent dripping can lead to the wastage of water, which is not environmentally friendly. Before reaching the ultimate conclusion of this issue, you need to decipher the root cause of this problem, as this can happen for various reasons.
After conducting thorough research on this matter, I have gathered the necessary information and am ready to provide you with the answers. Please find our findings listed below in causes and solutions.
Cause 1: Excessive Water In Water Reservoir
The most frequent reason behind this problem is the presence of excessive water in the water reservoir. Here is how you can solve this.
Solution: Pour Out The Excessive Water.
The simpler the cause, the easier the solution. After figuring out that the excessive water in the reservoir is the real reason for your Keurig K-classic leaking, lift the reservoir from its base and pour the extra water into the sink while ensuring that the reservoir should be filled till the Max Fill Line.
Cause 2: Keurig K-Classic has Clogged
Another primary cause of a leaking Keurig K-Classic is typically a blockage within its internal parts. When the machine is obstructed, the water flow becomes irregular, resulting in increased pressure and leaks.
Solution: Desacle your keurig

For every Keurig K-Classic user, it is important to regularly descale their machines to avoid problems like leaking. It is recommended to perform descaling every three months. You can have instructions on how to correctly descale your Keurig K-Classic in the “Descaling The Keurig K-Classic” section of the provided article.
Cause 3: Damaged Exit Needle
If you notice that the exit needle of your Keurig K-Classic is bent, it indicates that the needle is not in its intended position. Ideally, the exit needle should be perfectly vertical, pointing straight up, to puncture the K-cup’s bottom during brewing. A bent needle can obstruct the puncturing process and disrupt the water flow through the K-Cup.
Solution: Replace With New Gasket
In this situation, the recommended course of action is to replace the bent needle with a compatible replacement needle gasket. Purchasing a new needle gasket and accurately installing it ensures the needle functions properly, securely puncturing the bottom of the K-cup during brewing. Buy
Cause 4: Dirty Exit Needle
There are two needles assigned to puncture the pod: one positioned at the top and the other at the bottom. These holes allow hot water to flow through the pod and into your cup. However, if K-cups are left in the pod holder for an extended period, coffee grounds can accumulate and harden around the exit needle.
The buildup of dry and hardened coffee grounds can thwart the needle’s ability to puncture the pod effectively. Consequently, during a brewing cycle, coffee may back up in the chamber and eventually leak from the top of the machine.
Solution: Clean The Exit Needle
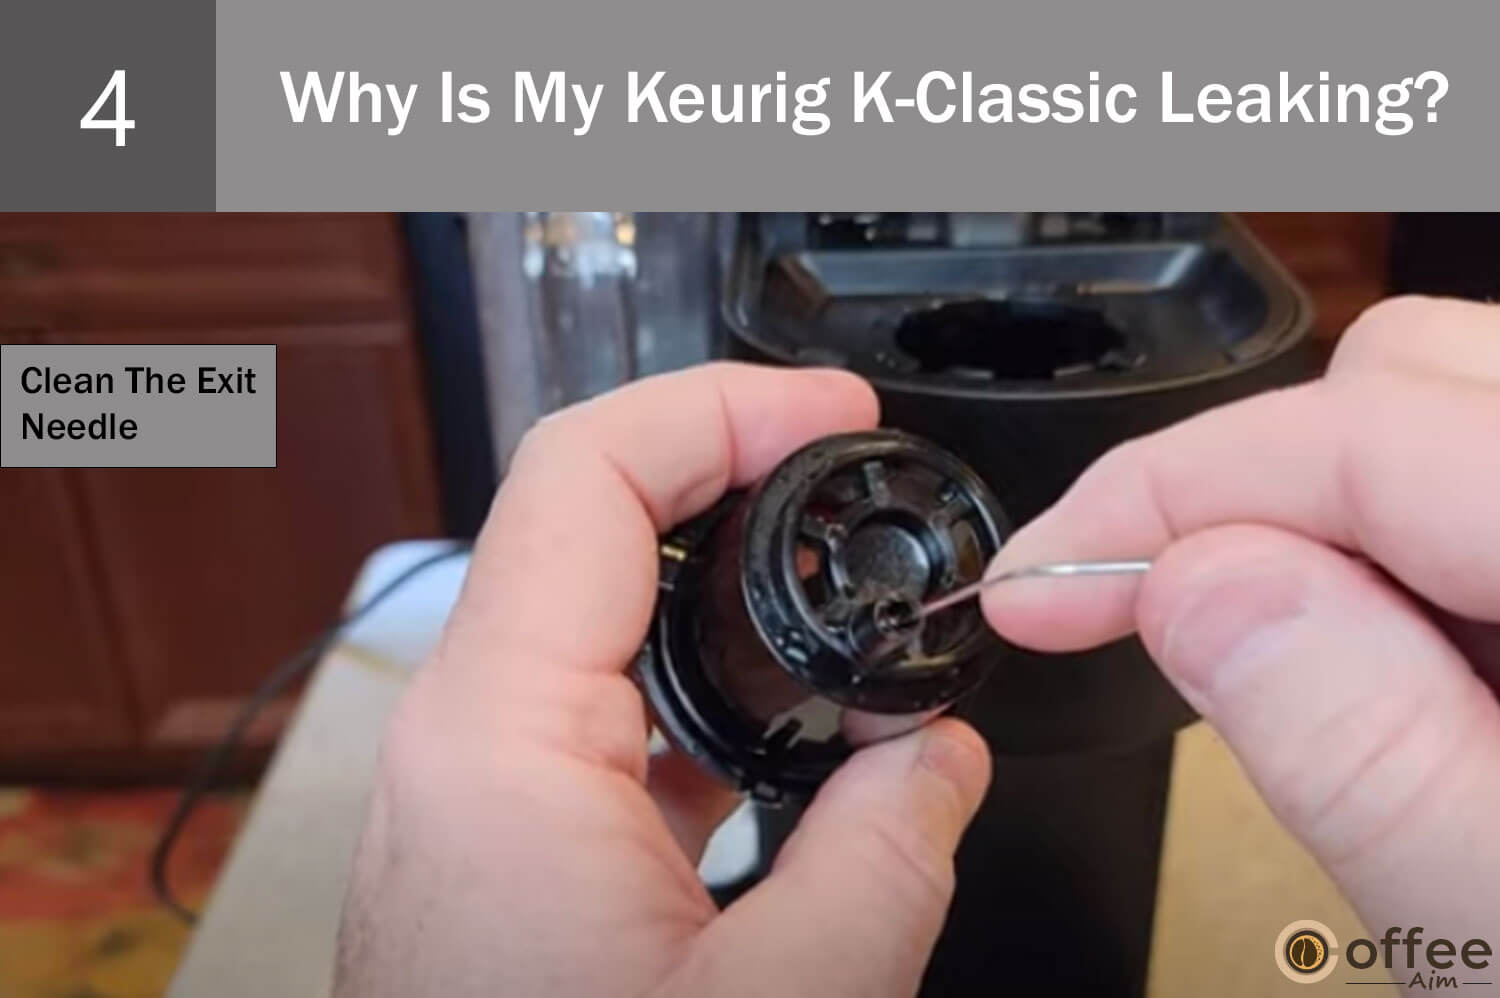
To solve this, you only need to clean the exit needle thoroughly to have a proper flow of water stream in the brewer. For the cleaning procedure of the Exit needle, refer to the “Cleaning The Exit Needle” section given below in the article.
Cause 5: Use Of Third-Party K-Cups
One potential cause of a leaking Keurig K- Classic is the use of third-party K-cups. These pods may need a better fit, leading to difficulty piercing the lid or leaks, particularly if the lid is thicker than the standard K-cup manufactured and recommended by Keurig. It is important to consider a suitable solution for this specific problem.
Solution: Use Keurig K- Cup
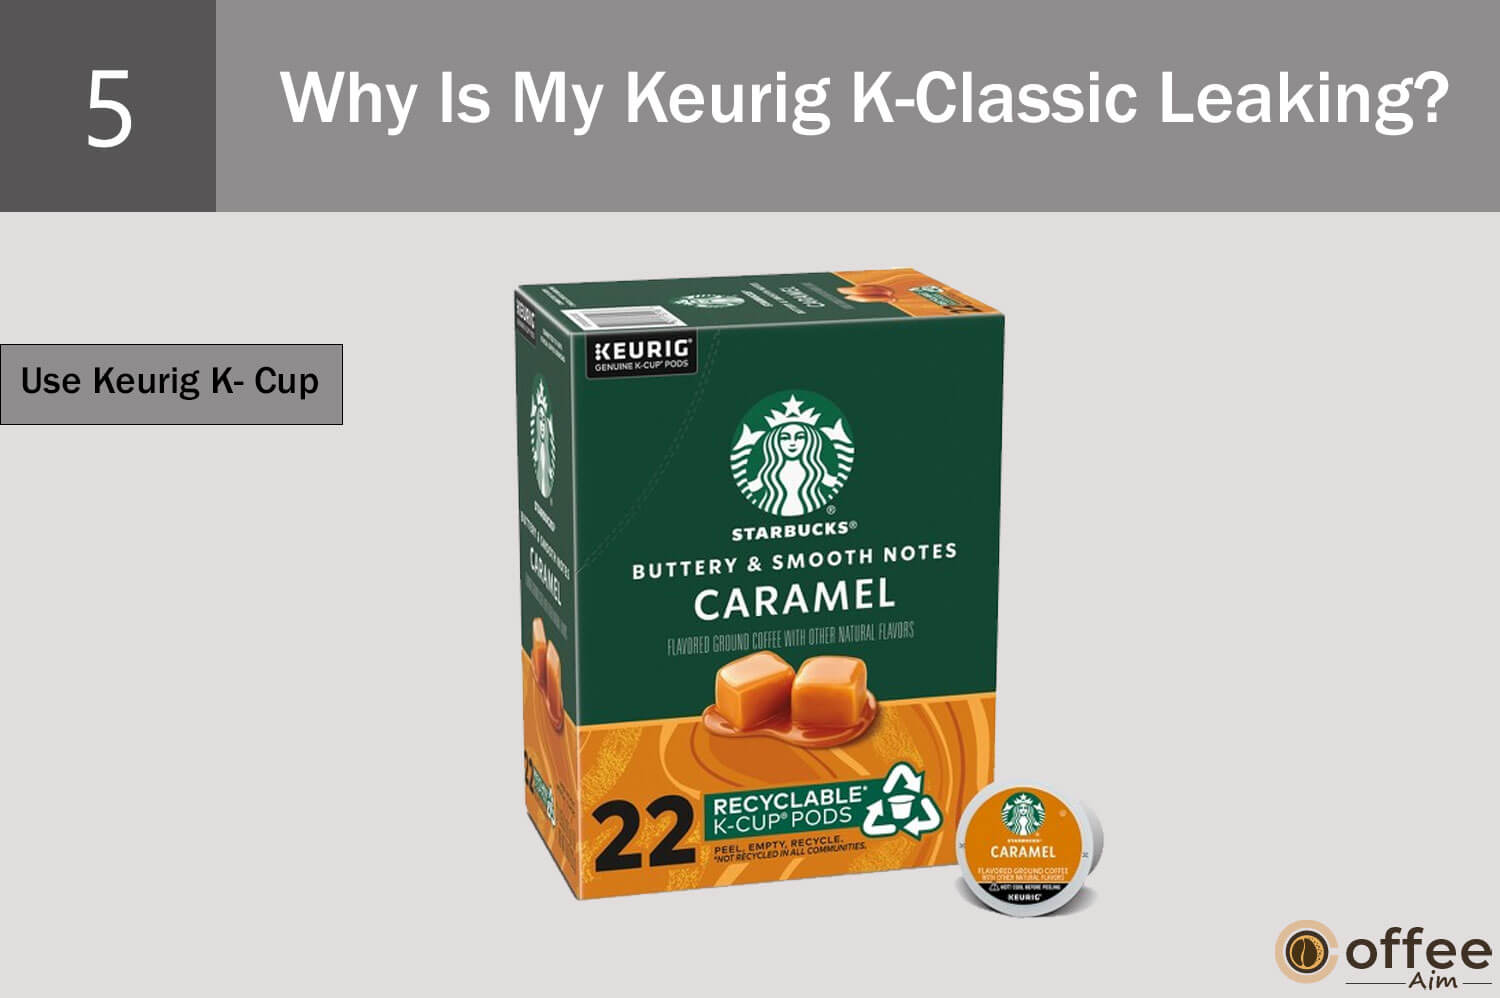
Using Keurig K-Cup pods is a convenient and effective method to prevent any potential issues with your coffee maker, especially leaking. These pods are designed to work effortlessly with Keurig machines, ensuring compatibility and reliable performance. You can easily find and enjoy your preferred taste with diverse coffee flavors, guaranteeing a consistently enjoyable cup of coffee.
Cause 6: The Brewer Does Not Grip The K-Cup
When the lid of your K-cup is not adequately secured in your brewer, it can lead to increased pressure within the pod holder. Consequently, the ground coffee and water can be forcefully expelled from the K-cup, resulting in leaks from the top of the machine. This issue can significantly affect the quality of your coffee, creating a messy and unappealing experience. It is crucial to ensure proper control of the brewer’s water pressure to prevent such problems. Now, let’s examine some practical measures you can take to resolve this matter.
Solution: Contact Keurig Customer Support
If you’re experiencing this issue with your brewer, it’s recommended to contact Keurig’s customer service team for assistance. The “When To Seek Professional Help” section provides the contact information you need to contact them. They will provide the necessary guidance and support to address the problem effectively.
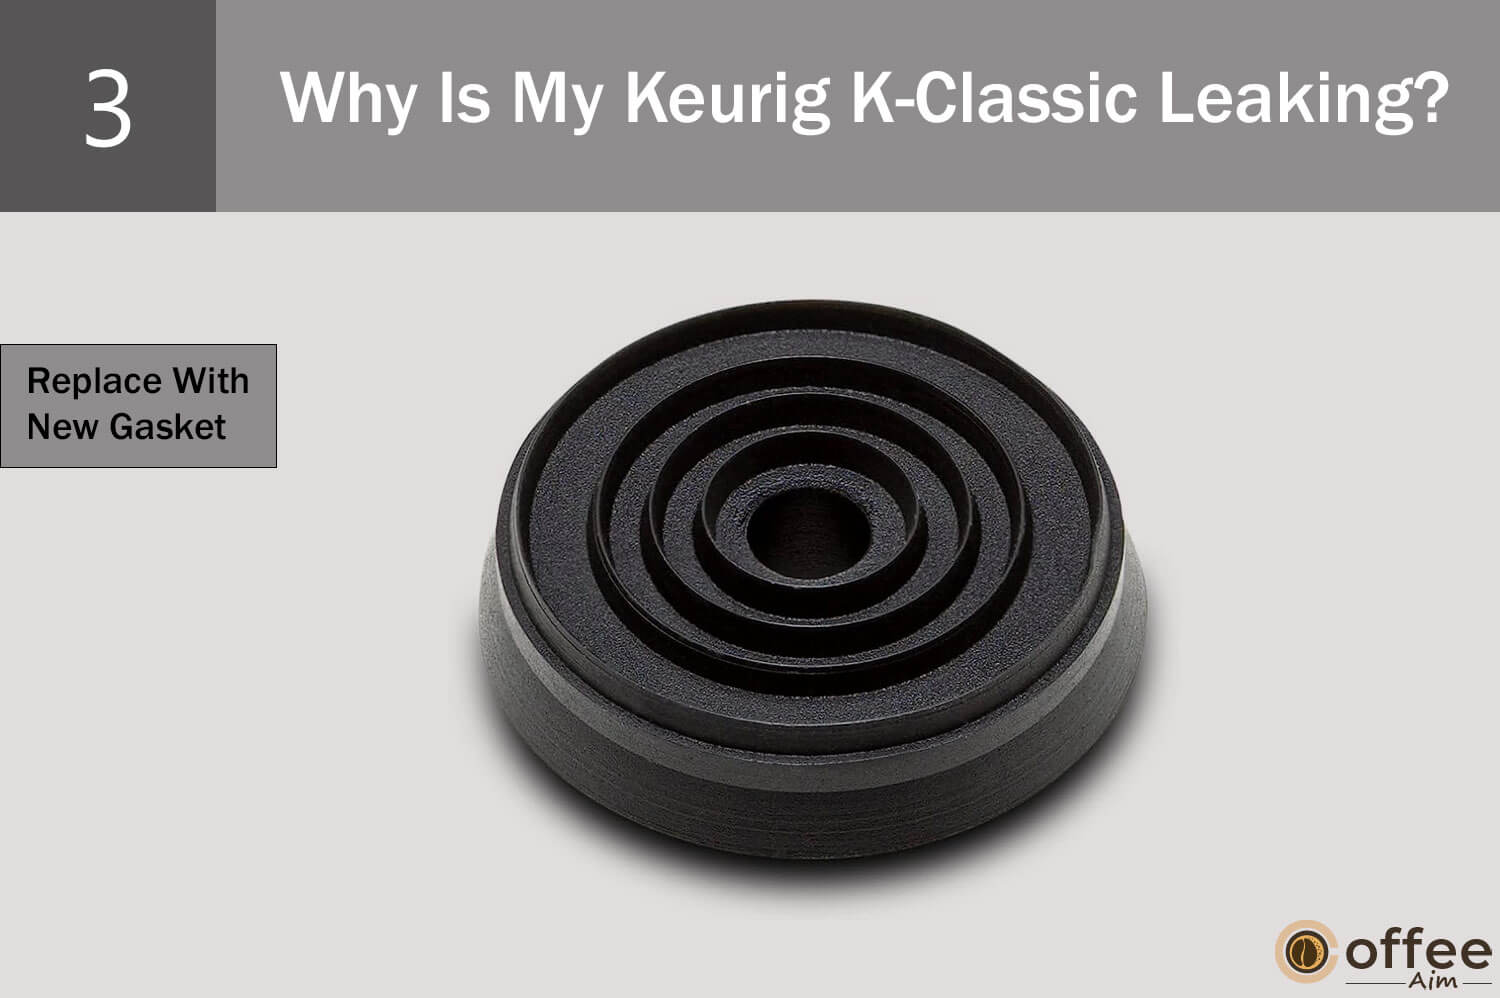
Cause 7: The Upper Gasket Might Be Loose Or Broken
The upper gasket of a coffee maker plays a crucial role in creating a secure seal between the needle and the K-Cup during the brewing process. This seal allows water to flow through the needle and into the K-Cup without leaks. While the needle punctures the K-Cup, the gasket maintains a tight seal to prevent water from escaping. However, if the gasket becomes damaged or loosened, it can fail to create a proper seal, resulting in water leakage from the coffee maker while brewing.
Solution: Repair The Gasket
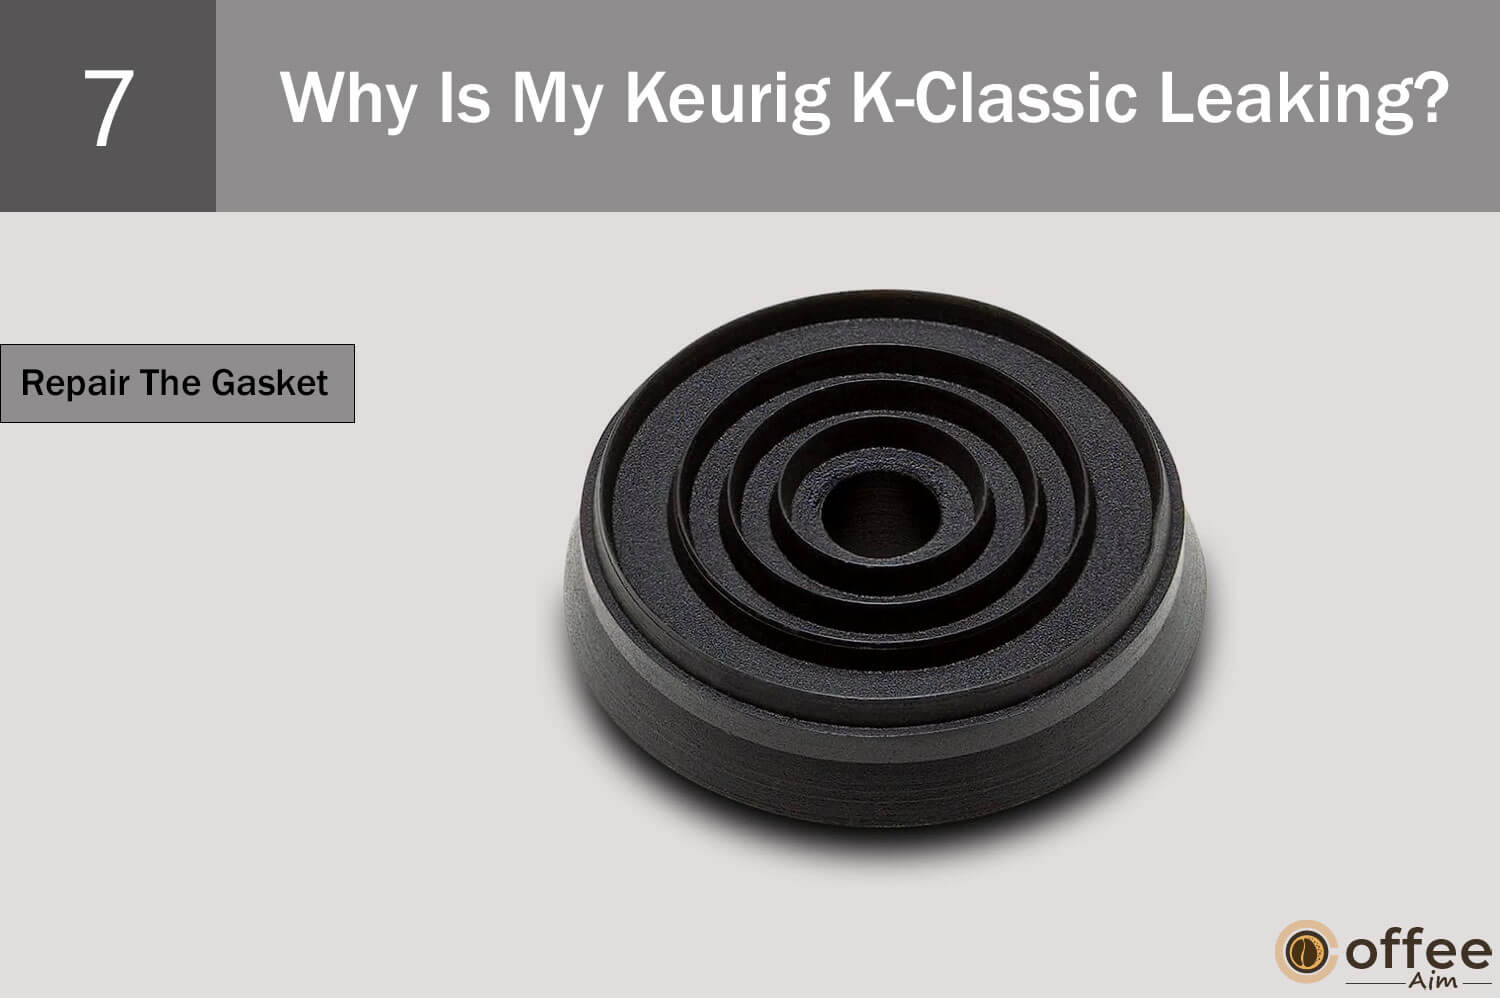
- Remove the water reservoir and reservoir lid from the coffee maker.
- Locate the circular screen at the bottom of the reservoir and use a screwdriver to unscrew the three screws holding it in place.
- Please take note of the O-ring attached to the circular screen and gently remove it using a plastic opening tool.
- Replace the old or damaged O-ring with a new one in good condition. Ensure it is securely positioned to create a tight seal, preventing leaks or other issues.
- Once the new O-ring is in place, reattach the circular screen to the bottom of the reservoir using the three screws.
- Place the reservoir lid back on the water tank and carefully insert the water reservoir back into the coffee maker.
If you require further clarification on these steps, it will be better to seek the assistance of a professional technician who can handle the repair for you. The “When To Seek Professional Help” section provides contact details for such services.
Cause 8: Entrance Needle Is Dirty
The entrance needle in a Keurig coffee maker is essential for puncturing the top of the K-cup during brewing. However, if this needle becomes dirty or gets clogged with coffee grinds or other debris, it may need help effectively performing its task. As a result, water will not be unable to flow into the K-cup, leading to drips from the pod holder area. To address this issue, follow the solution given below.
Solution: Clean The Entrance Needle

To find instructions on how to clean the entrance needle, please refer to the “Cleaning The Entrance Needle” section of the article. This section will provide the necessary steps and guidance to clean the entrance needle and ensure its proper functioning effectively.
Cause 9: Water Reservoir Is Cracked
Another potential cause of a leaking Keurig is a cracked water reservoir. To check for cracks, turn the water tank upside down and visually inspect it for any visible signs of damage. Cracks can vary in size, from large and quickly noticeable to tiny hairline fractures that are more difficult to detect. By thoroughly examining the water reservoir, you can identify if a crack is present that might be responsible for the leakage problem.
Solution: Replace With A New One
If you find any cracks or indications of damage to the water reservoir, it is crucial to replace it as soon as possible. Using a cracked reservoir can lead to additional leaks or other problems with your Keurig coffee maker. Ensure that you promptly obtain a replacement reservoir to maintain the proper functioning of your machine and prevent any further complications.
Having explored various causes and their corresponding solutions for a leaking Keurig, it’s essential to address another potential issue that coffee lovers may encounter with their Keurig K- Classic: Brewer not turning on.
Problem 3: Why Is My Keurig Not Turning On?
Your Coffee cravings are at their peak; then suddenly, you discover that your Keurig K-Classic is not turning; only a coffee lover can understand the desperation this situation can cause. This can ruin the moo-entire day’s mood and eventually affect professional life. Do not worry; in order to get you out of this terrible situation, I have gathered ample information to troubleshoot this issue. Just move forward and get your hands on the causes of this problem and their easy solutions.
Cause 1: Power Connection Problem
The issue you’re experiencing with your Keurig K-Classic could be related to the power transfer. Here are a few methods to troubleshoot this problem and ensure a safe and secure connection.
Solution 1: Check The Power Source
Make sure your Keurig K-Classic is properly plugged into a functioning power outlet. Ensure that the outlet provides a steady power supply by testing it with another device.
Solution 2: Check The Plug For Any Damage
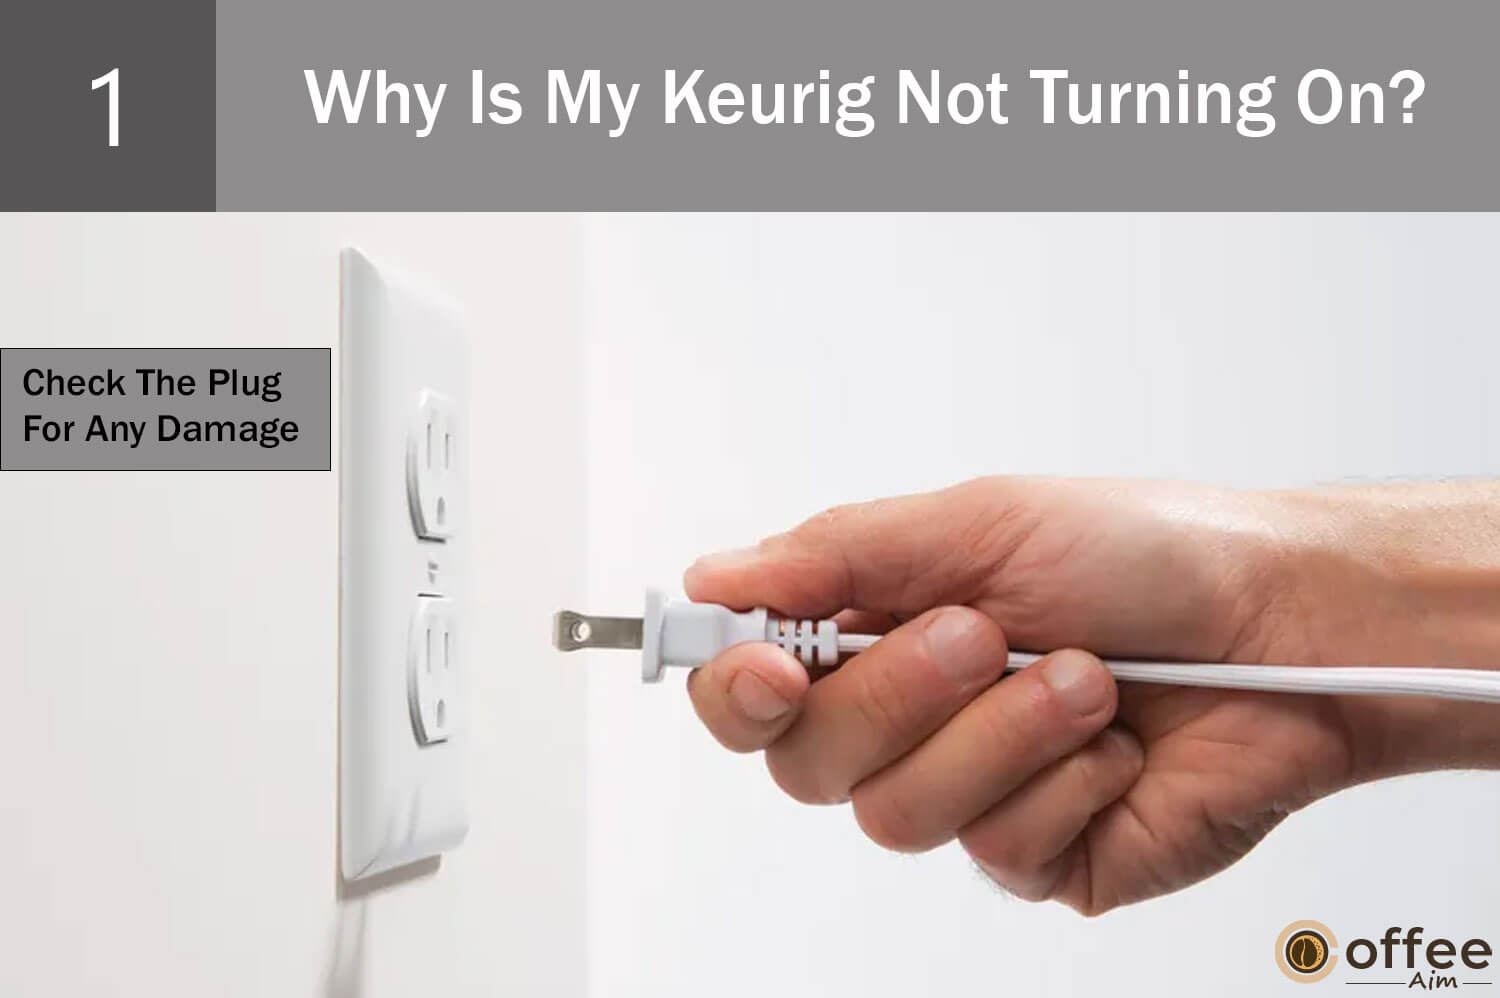
Check the plug that connects your Keurig to the power outlet. Make sure that it is accurately inserted into the outlet. If the plug appears damaged or worn out, then replace it with a new one to have a secure connection.
To maintain a stable power supply for your Keurig, avoid plugging other devices or appliances into the same outlet. When you connect multiple devices to a single outlet, it can result in overloading, leading to power disruptions or tripping that affect the performance of your Keurig.
Cause 2: Brewer Is Malfunctioning
If you have confirmed a stable power transfer to your Keurig brewer by following the steps mentioned earlier, but the brewer still does not turn on, the issue may lie in itself.
Solution: Contact Keurig Customer Care
The best solution is to contact Keurig Customer Care to attain their services. For contact information, you can visit the “When to seek professional Help” section written below in this article.
Let’s focus on addressing another common issue that Keurig users may encounter: Keurig needs to make hot enough coffee.
Problem 4: Why Is My Keurig K-Classic Brewing Hot Enough Coffee?
Are you tired of starting your day with a lukewarm cup of coffee? Does your Keurig K-Classic have lost its touch when brewing that perfect, hot cup of coffee? If so, you’re not alone. Many coffee enthusiasts have faced the frustrating consequence of their Keurig failing to deliver the hot and invigorating brew they crave. The consequences are far-reaching, from missing out on that comforting warmth to compromising the rich flavors a hot extraction brings. But fear not, for in this guide, we will explore the possible causes behind your Keurig’s underwhelming performance and provide actionable solutions to reclaim that delightful heat in your morning cup.
Cause 1: Keurig Is Clogged
The most likely reason your Keurig coffee is warmer than it once was is due to a clogged machine. Over time, the accumulation of clogs and limescale inside the Keurig can hamper the water pump and the heating element from functioning at their optimal levels. This leads to a decrease in the machine’s ability to heat the water to the desired temperature for brewing a hot cup of coffee.
Solution: Clean & Descale Your Keurig

In order to restore your Keurig’s ability to brew hot, delicious coffee, the ultimate solution lies in thoroughly cleaning and descaling the machine. Paying special attention to the needles in the head of the machine is essential. For cleaning and descaling instructions, move towards the” Descaling the Keurig K-Classic,” and “Cleaning the Needles” sections in this article.
Cause 2: Malfunctioned Water Pump
If your Keurig coffee maker fails to brew your favorite cup of joe at the perfect temperature, there’s a possibility that a malfunctioning pump is the reason. When the pump isn’t operating correctly, it disrupts the regular flow of water, triggering the heating element to shut off automatically as a safety measure against overheating. Unfortunately, this interruption in the brewing process prevents the water from reaching the optimal temperature for extracting the full flavors of your coffee. Consequently, you’re left with a less satisfying, lukewarm brew. Now, let’s identify and implement the necessary steps to solve this problem and bring back the joy of a hot, flavorful cup of coffee.
Solution: Repair The Water Pump
Instead of tackling this issue alone, it is advisable to seek assistance from Keurig’s customer service. You may qualify for a replacement if your Keurig is still under warranty. For the contact details of Keurig’s customer service, refer to the “When to Seek Professional Help” section in the article for further assistance. Be sure to reach out to them and let the professionals guide you toward enjoying a piping-hot cup of coffee again.
Cause 3: Use Of Cold Cup
You eagerly pour yourself a cup of freshly brewed coffee from your Keurig, only to feel disappointed as the warmth quickly dissipates upon contact with your cold cup. We’ve all experienced this frustrating situation, especially during colder months when the temperature difference between the hot coffee and the chilly cup is more noticeable. However, fear not! There are solutions to help you maintain that satisfying warmth and enjoy your coffee to the fullest. Let’s explore them.
Solution: PreHeat The Cup
To maximize the temperature and elevate your coffee-drinking experience, consider employing a simple yet effective technique: preheating your cup. This straightforward method reduces heat transfer and helps your coffee stay hot longer. Preheating can be accomplished using one of two convenient approaches.
Microwaving Method:

- Start the process by adding a small amount of water to your cup. The amount should cover the bottom but not fill the cup.
- Place the cup with water in the microwave. Heat the cup for approximately 30 seconds to a minute, adjusting the time based on the power of your microwave. The goal is to warm the cup without boiling the water.
- After heating, exercise caution as the cup may become hot. Remember to use a towel to handle the cup safely and avoid burning.
- Carefully pour out the water from the cup. Be cautious not to spill or splash hot water.
- Now that your cup is preheated pour your coffee directly into the warm cup using your Keurig coffee maker.
Boiling Water Method:

- Start by boiling water separately using a kettle or on the stovetop. Ensure the water is brought to a rolling boil.
- Carefully pour the boiling water into your cup, filling it to the desired level. Take caution not to spill or burn yourself during this step.
- Let the hot water sit in the cup for 30 seconds to a minute. This duration allows the cup to absorb the heat and reach an optimal preheated temperature.
- After the preheating time, carefully pour the hot water from the cup. Ensure you carefully handle the cup to avoid accidental spills or burns.
- Immediately after emptying the cup, brew your coffee directly into the preheated cup using your Keurig coffee maker. The preheated cup helps maintain the coffee’s temperature, preserving its warmth for a more enjoyable experience.
I hope you have resolved the issue of the temperature of your coffee, but what if your Keurig starts brewing slowly? Do you want to see this problem’s troubleshooting methods too? Let’s dive in, then.
Problem 5: Why Is My Keurig K-Classic Brewing Slow?
You likely invested in a Keurig coffee maker for its quick and effortless brewing process. Still, if you’re now experiencing a slower brew cycle, it can be frustrating and defeat the purpose of owning one. However, there’s no need to panic just yet. Most of the time you can identify and resolve the issue causing your Keurig to slow down without diving into a complex disassembly process. Now, we will walk you through a series of simple steps to troubleshoot and diagnose the cause of your slow Keurig.
Cause 1: Clogging
If your Keurig K-Classic is brewing slowly, one possible cause could be clogging. Clogging occurs when coffee grounds or mineral deposits accumulate in the machine’s internal components, such as the needles and the water line. This can stop the water flow and result in a slower brewing process.
Solution: Run A Descaling Cycle.

It is generally recommended to descale your Keurig K-Classic every three months. Detailed instructions on correctly descaling your machine can be found in the “Descaling Your Keurig K-Classic” section of the provided article.
Cause 2: Dirty Needles
Over time, the needle in your Keurig machine that punctures the K-cup can become clogged due to regular use. When this happens, water flowing through the coffee grounds is restricted, causing the brewing process to slow down significantly. If you clean the needle periodically, the clogging can improve and further impede water flow, resulting in an even slower brewing time.
Solution: Clean The Needles.
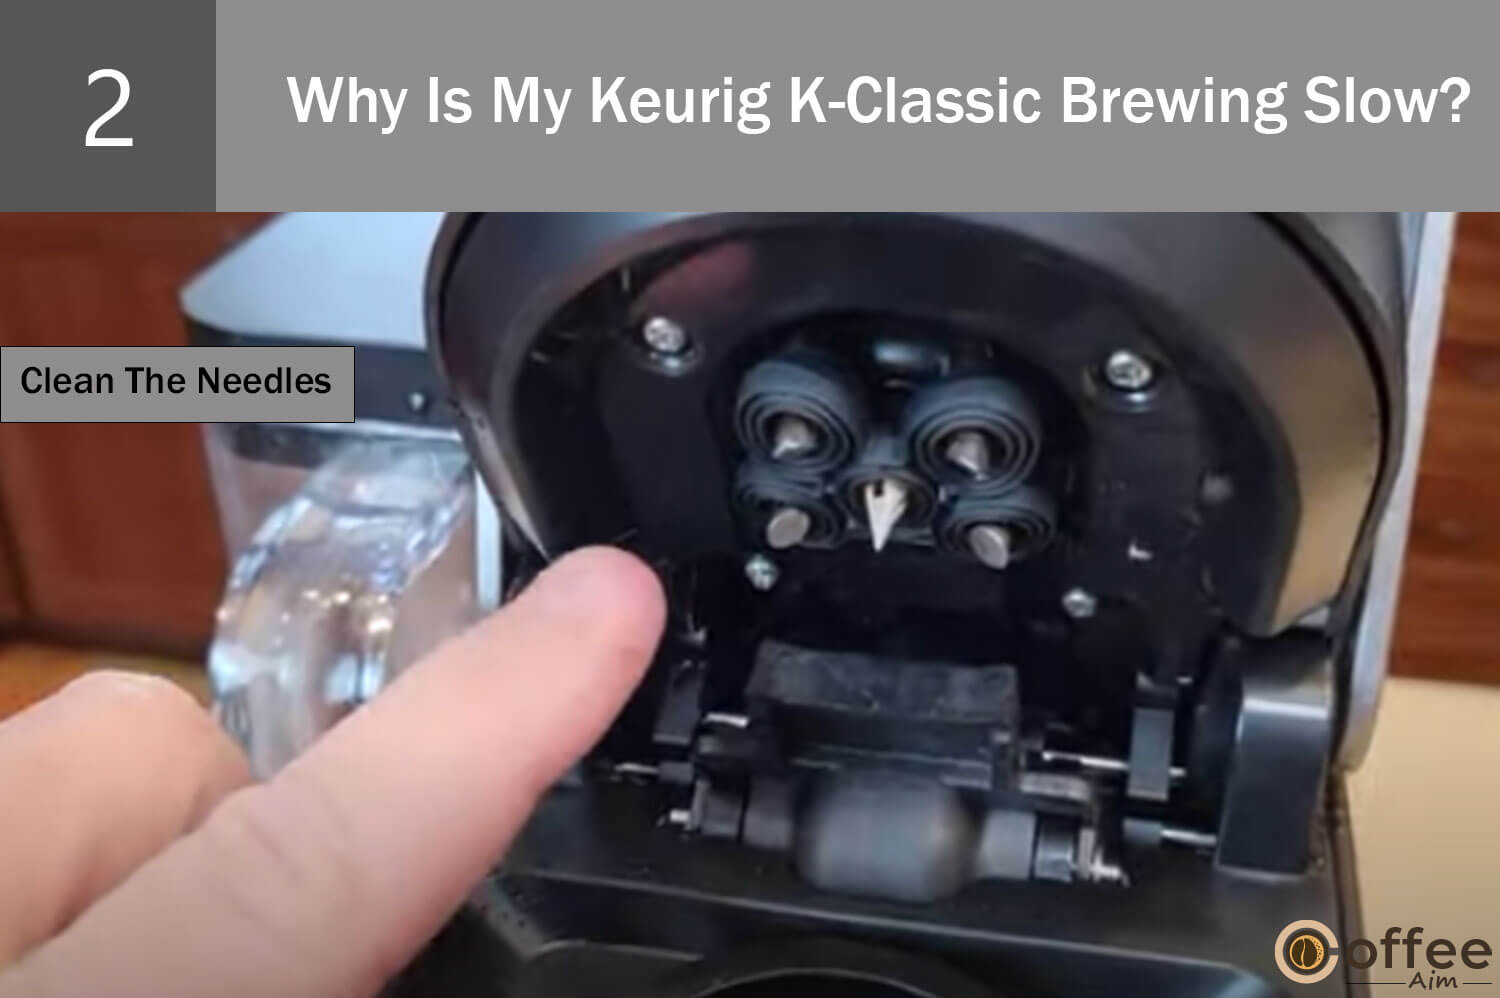
For detailed instructions on cleaning your Keurig’s entrance needle, please consult the “Cleaning The Entrance Needle” and “Cleaning The Exit Needle” sections of the provided article. This section will offer step-by-step guidance and the necessary information to clean the entrance needle effectively.
Cause 3: An Unidentified Problem
If you have diligently cleaned the needle area and descale your Keurig machine, yet it continues to brew slowly, realizing that you may be facing an unidentified problem is disheartening.
Solution: Contact Keurig Customer Center.
In such circumstances, it is recommended to contact Keurig’s customer service for further assistance. Contacting Keurig will allow you to discuss the issue with their knowledgeable support team and explore potential solutions. Suppose your Keurig is still within the warranty period. Then, you may be eligible for a replacement, ensuring that you can once again enjoy the swift and efficient brewing experience you desire. Refer to the “When To Seek Information” Section for Contact information.
Now, let’s shift our attention to another potential concern that Keurig users may encounter: your Keurig shutting off unexpectedly.
Problem 6: Why Is My Keurig K-Classic Shutting Off Randomly During Brewing?
Have you ever experienced disappointment from your beloved Keurig K-Classic over shutting off unexpectedly in the middle of a brewing cycle? It’s a situation that can quickly turn your morning coffee ritual into a morning coffee dilemma. Imagine eagerly waiting for your cup of joe, only to be greeted by a sudden halt in the brewing process. The consequences can range from delayed caffeine satisfaction to the annoyance of having to restart the brewing cycle multiple times. But you do not have to worry, as there are a few potential reasons behind this perplexing issue, and by identifying the cause, you can regain control over your coffee routine and enjoy uninterrupted brewing sessions.
Cause 1: Water Magnet Alignment Is Off
Inside your Keurig water tank is a magnet that detects the water level. Over time, vibrations from brewing can misalign or stick the magnet. When this happens, your Keurig won’t brew because it can’t detect the water level and will shut off instead. Try the solution written below to solve this matter.
Solution: Gently Tab The Water Housing.
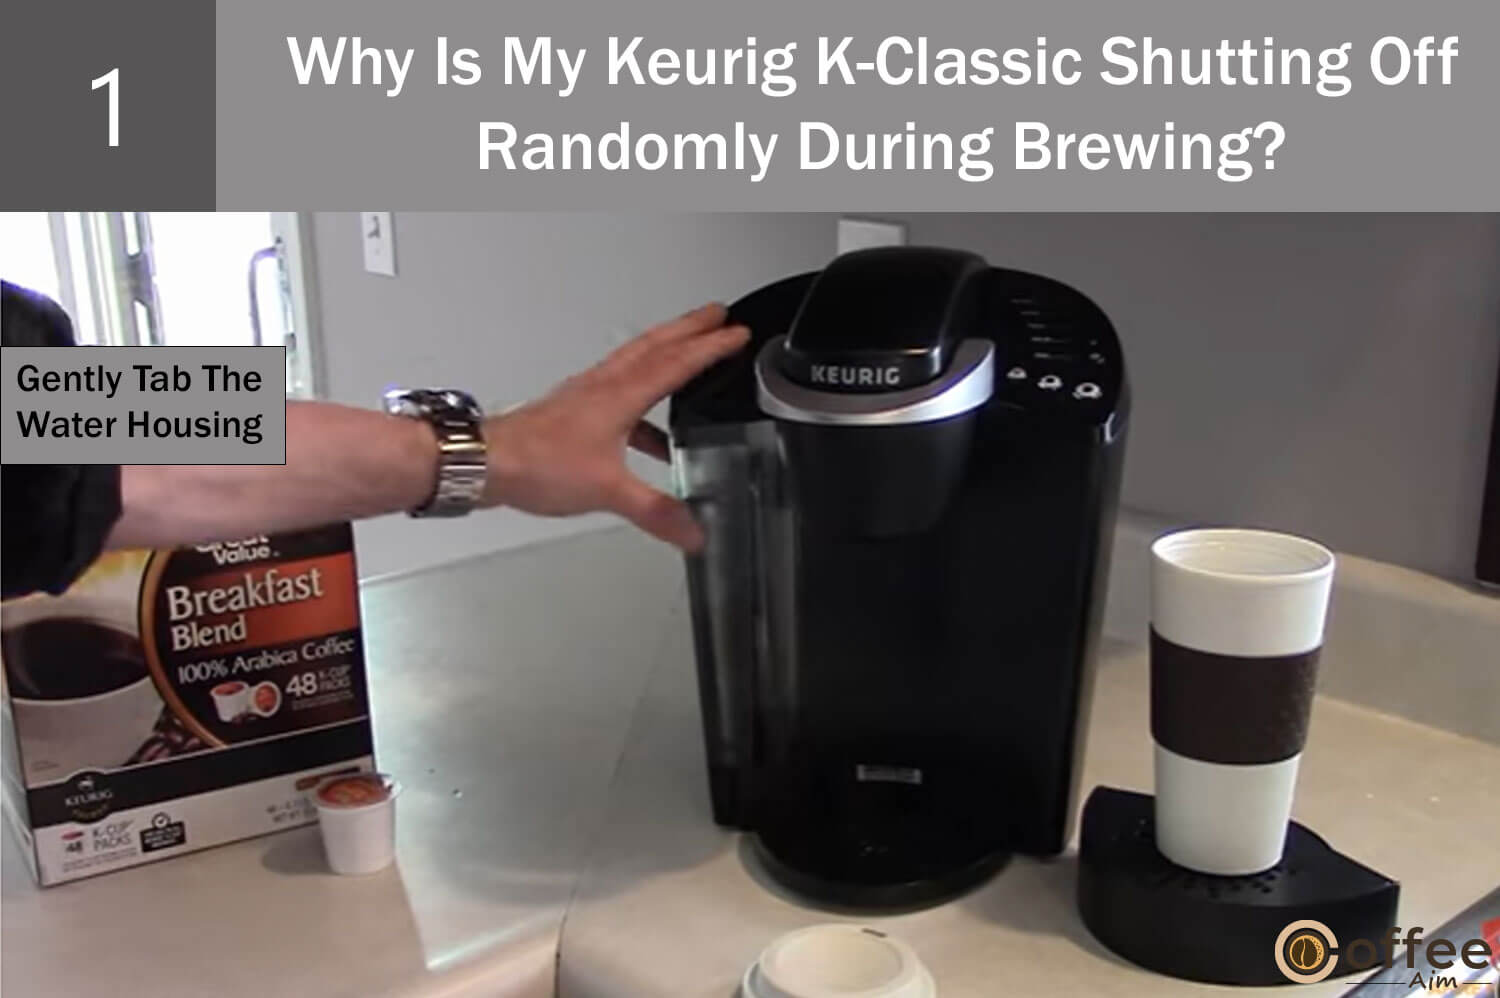
There are a few simple steps you need to perform to address a misaligned or stuck magnet in your Keurig water tank. First, gently tap the tank near the magnet housing. This can help loosen any debris or reposition the magnet. If tapping doesn’t resolve the problem, give the tank a gentle shake to further dislodge the magnet. If the magnet remains stuck even after shaking, empty the water reservoir and clean it using mild soap. After cleaning, refill the water reservoir and check if the magnet is functioning properly. These steps aim to reposition the magnet and ensure it can detect the water level accurately, allowing your Keurig to brew as intended.
Cause 2: The Exit Needle Is Clogged
The Exit needle can become clogged with debris from K-Cups and other coffee residues over time. The accumulation of gunk around the exit needles can lead to clogs and hinder the proper puncturing of the K-Cup’s bottom.
Solution: Clean The Exit Needle

Fortunately, the solution to the problem of your Keurig K-Classic shutting off randomly during brewing is relatively simple. By thoroughly cleaning the exit needle, you can restore a proper water flow in your brewer and overcome this frustrating issue. To learn how to clean the exit needle effectively, please refer to the “Cleaning The Exit Needle” section provided below in the article.
Cause 3: Damaged Needles
Broken or bent needles are one possible cause for your Keurig shutting off during brewing. While this is a less common issue, it can occur if excessive force is applied, such as when using a cup that is too tall for the Keurig machine.
Broken or bent needles can be found in two areas: the top entrance needle, where hot water flows into the K-Cup holder, and the exit needle, through which the brewed coffee flows into your cup.
If your Keurig fails to brew when you press the brew button, it is worth checking the condition of the entrance needle. It should be pointing straight downward. If it is intact, the problem likely lies elsewhere. However, if the needle is bent or broken, you must follow the following solution.
Solution: Replace The Needles

In case you observe that the needle is bent or broken, replacing the corresponding needle gasket with a compatible one for your Keurig will be necessary. The same applies to the exit needle. Replacing these needles will likely address the issue causing your Keurig to shut off unexpectedly during brewing.
Cause 4: Overheating
At times, Keurig coffee makers may unexpectedly shut off due to overheating. This can occur when the machine is excessively utilized, triggering an automatic shutdown mechanism to prevent potential damage. The continuous usage of the brewer can also contribute to overheating by gradually wearing down the coils. Fortunately, several solutions are available to tackle this problem and rejuvenate your Keurig K-Classic.
Solution: Let It Rest.

If you have been using the Keurig continuously or for an extended period, simply turn it off and unplug it to allow it to cool down. Allowing the Keurig to rest and cool off can help it reset itself and mitigate the risk of further overheating.
Solution 2: Replace Or Repair The Coils
If allowing the Keurig to rest doesn’t resolve the issue, the coils may become worn out. Replacing these coils can restore the functionality of your machine, but it’s a complex task that requires technical expertise. In such cases, I recommend contacting Keurig Customer Care for assistance. Their team can offer the necessary guidance and support to help you resolve the problem effectively. The contact information is available in this article’s “When To Seek Professional Help” section.
Cause 5: Faulty Thermostat
The thermostat controls the water temperature, which can cause the Keurig to turn off when it malfunctions. If the thermostat in your Keurig coffee maker malfunctions, it can result in unexpected shutdowns of the machine. You can follow the suggested solution provided below to address this issue.
Solution: Contact Keurig Customer Care.
If you suspect a faulty thermostat in your Keurig coffee maker, it is recommended to contact Keurig’s customer care for assistance. They can provide troubleshooting guidance and discuss options for repair or replacement. If your Keurig K-Classic is still covered under warranty, inquire about the possibility of a replacement or any applicable compensation. Refer to the “When To Seek Professional Help” section for contact information.
Cause 6: Low Water Level In Water Reservoir
When the water level in your Keurig falls below the required amount, the control panel will indicate a “LOW WATER LEVEL” warning by flashing a light. This serves as a reminder to refill the water reservoir before brewing. If Keurig detects an insufficient water level, it will automatically shut off. Now, let’s explore some solutions to address this issue.
Solution: Refill The Water Reservoir

Before brewing your coffee, verifying that the reservoir contains adequate water is essential. When the water level is not as required, or the reservoir is empty, adding water to the MAX FILL level indicated on the reservoir is necessary. Ensuring the reservoir is filled appropriately will help prevent any issues during the brewing process.
Cause 7: The K Cup’s Bottom Is Unpunctured
When the bottom of the K-cup remains unpunctured, it hinders proper coffee brewing, triggering the automatic shutdown. Now, let’s explore the solution to address this issue.
Solution: Contact Keurig Customer.

To obtain the necessary support and guidance, refer to the contact information provided in the “When To Seek Professional Help” section.
Cause 8: Brewing Process Was Interrupted
When your Keurig coffee maker shuts off unexpectedly while brewing, it could be due to an interrupted brewing process. One possibility is a power outage or fluctuation that disrupts the brewing cycle. In such cases, check if there are any power issues or try plugging the Keurig into a different outlet.
Solution: Ensure A Stable Electric Connection
First and foremost, ensure that your coffee maker is directly plugged into an electrical socket without the use of an extension cord. Power strips or extension cords can introduce additional connections and increase the risk of an unstable power supply. These additional connections may weaken the electrical connection between your Keurig and the power source, potentially leading to sudden shutdowns during operation. This simple step can help maintain a consistent power supply to your Keurig, reducing the likelihood of unexpected shutdowns and enhancing your overall brewing experience.
Now, let’s delve into addressing another concern that might arise with your Keurig machine – unusual loud noises.
Problem 7: Why Is My Keurig K-Classic Making Loud Or Unusual Noises During Operation?
Have you ever found yourself enjoying a peaceful morning, eagerly awaiting your cup of freshly brewed coffee, only to be startled by loud and unusual noises emanating from your Keurig K-Classic? Instead of the soothing sounds of a brewing machine, you’re greeted with clanks, hisses, or rattles that make you question the well-being of your beloved coffee companion. These unexpected noises can leave you wondering what could be causing the commotion and whether it’s a sign of a more serious problem. So, grab your mug, settle in, and uncover why your Keurig K-Classic is making loud or unusual noises during the operation.
Cause 1: Keurig K-Classic Is Clogged
Over time, the accumulation of minerals can pose problems for your Keurig coffee maker. The buildup of minerals can cause water to flow through narrow passages, creating turbulence and generating unexpected sounds.
Solution: Descale
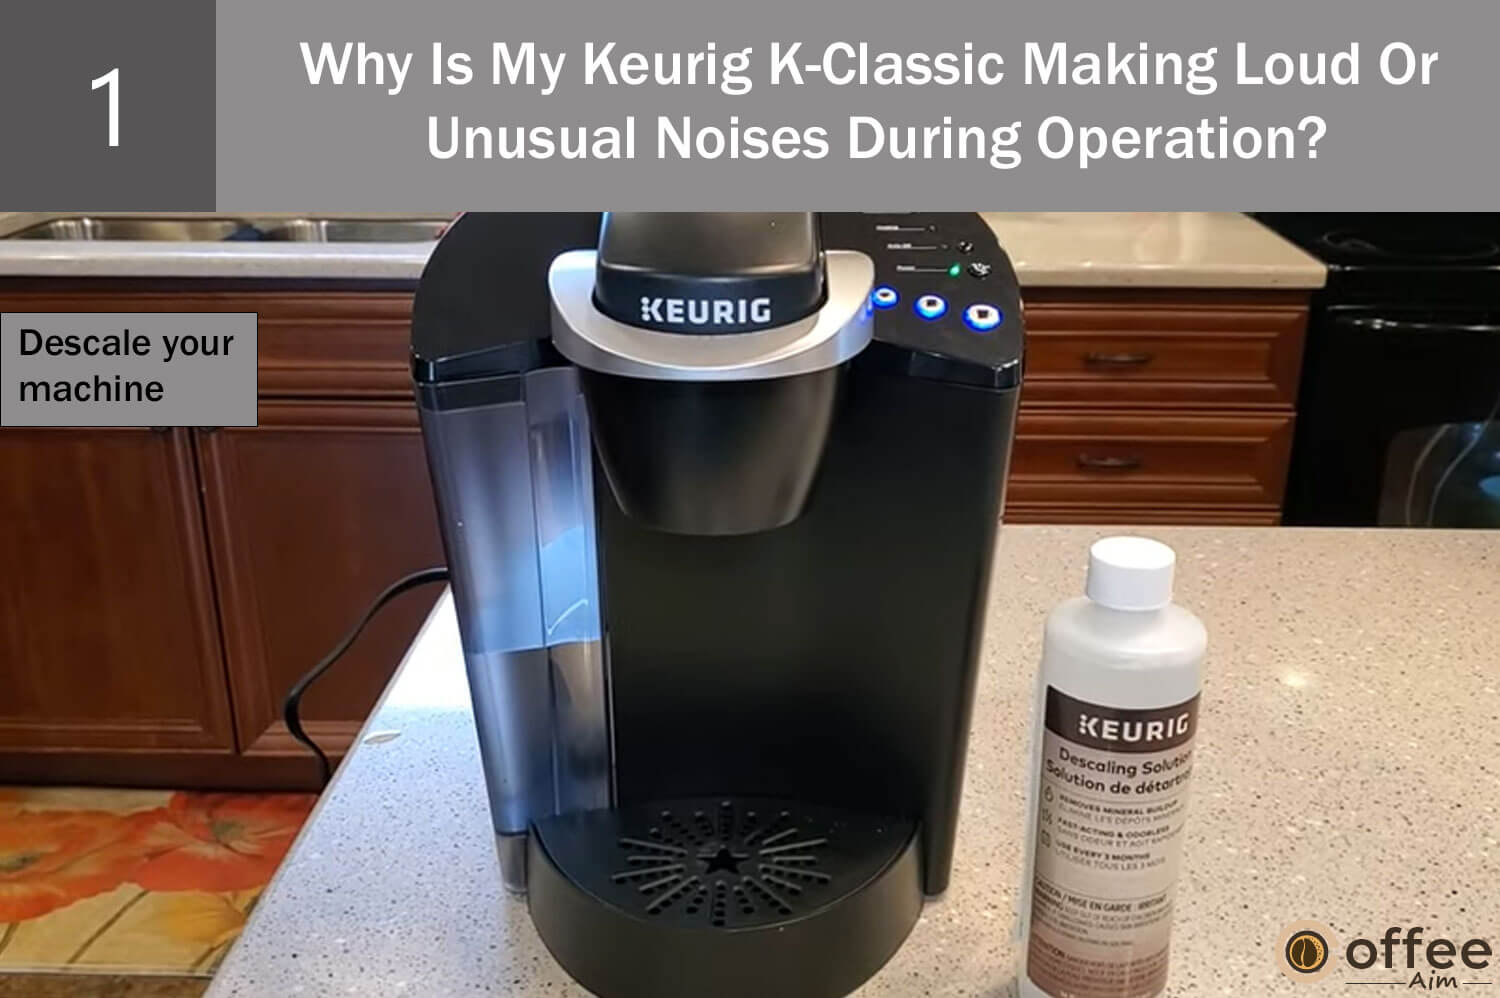
For detailed instructions on how to descale your Keurig K-Classic, please refer to the “Descaling Your Keurig K-Classic” section provided below. This comprehensive guide offers step-by-step directions to ensure a successful and thorough descaling process.
Cause 2: Wrong Placement
The placement of your coffee machine can significantly impact the noise level it produces during operation, with the type of surface it sits on playing a crucial role. If your Keurig K-Classic is placed on an uneven or unstable surface, it can lead to increased vibrations and amplify the noise produced by the machine. These vibrations can cause the components to rattle or resonate, resulting in a louder brewing process.
Solution: Place It On A Steady Surface

When it comes to solving the noise problem of your Keurig K-Classic, there is one simple rule to follow: always place the machine on a stable surface. Opt for a sturdy kitchen slab or table that provides a solid foundation for your coffee maker. Ensuring a stable placement can minimize vibrations and prevent the machine from rattling or resonating, resulting in a quieter brewing experience.
Cause 3: The Entrance Needle Is Dirty
If you’re perplexed by a clicking noise from your Keurig K-Classic, one potential culprit could be a dirty entrance needle. This needle is crucial for puncturing the K-Cup during brewing, allowing the water to flow smoothly. However, coffee grounds and debris can build up as time passes, leading to a clogged needle and the unsettling clicking sound during operation. Do not stress, as you can handle this issue by thoroughly cleaning the entrance needle.
Solution: Clean The Needle
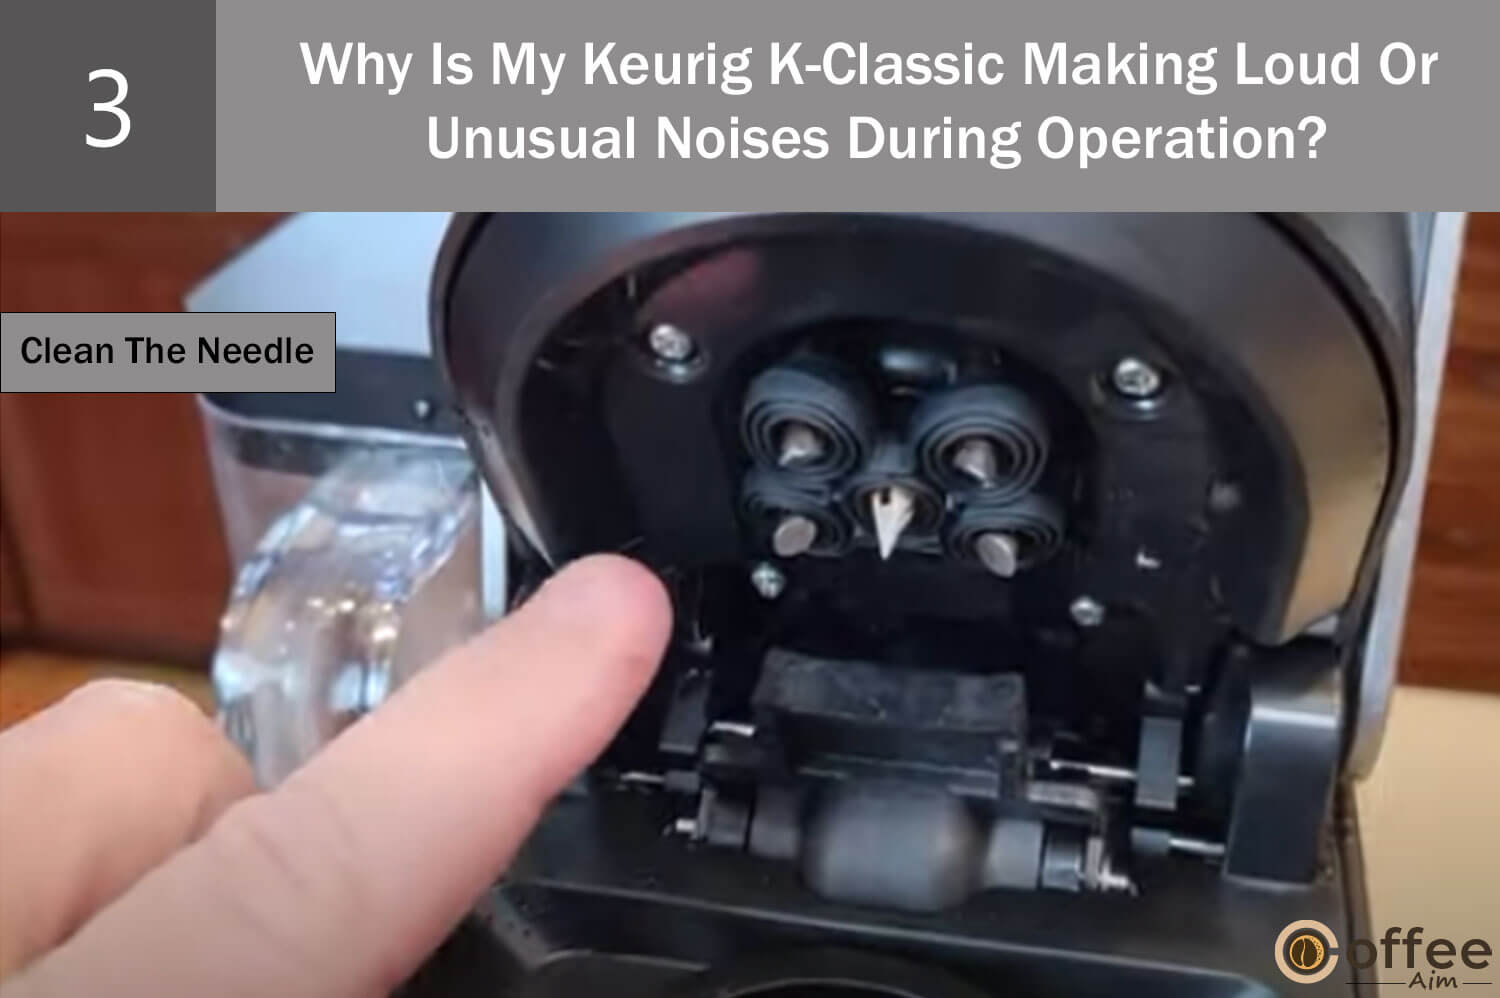
For detailed step-by-step information on how to clean the entrance needle effectively, please consult the “Cleaning the Entrance Needle” section of this article. This section provides:
- Step-by-step guidance.
- Allowing you to maintain a clean and well-functioning entrance needle.
- Resulting in a seamless brewing experience with your Keurig K-Classic.
Cause 4: Broken Water Pump
At the heart of your coffee maker, the water pump plays a crucial role in extracting water from the tank and circulating it throughout the machine for brewing. However, if the water pipe or pump becomes damaged, it can lead to more than unusual noises during operation. It can halt your beloved coffee maker with no water flow and a non-functional machine. So, let’s explore the importance of a well-functioning water pump and how to tackle potential problems to keep your coffee maker running smoothly.
Solution: Repair The Water Pump
Seeking professional help from their customer care team will allow you to request expert support in repairing or replacing the water pump. To find the appropriate contact information for Keurig Customer Care, refer to this article’s “When To Seek Professional Help” section. By contacting Keurig Customer Care, you can ensure that your coffee maker receives the necessary attention and expert guidance to resolve the issue with the water pump, ultimately restoring your machine’s functionality and the pleasure of a satisfying coffee brewing experience.
So, after applying the above solutions, you can troubleshoot the problem of loud, weird noises, but what if your coffee starts tasting like plastic?
Problem 8: Why Does My Coffee Taste And Smell Like Plastic?
Have you ever sipped your morning coffee only to be greeted by an unpleasant plastic-like taste and smell? It can be a jarring experience, dampening the enjoyment of your favorite brew. The presence of a plastic taste and odor in your coffee can stem from various factors, each with its consequences. Understanding the reasons behind this off-putting experience is key to reclaiming the true essence of your coffee. So, let’s dive into the causes and consequences of why your coffee may taste and smell like plastic and uncover ways to restore the purity and deliciousness of your daily cup of joe.
Cause 1: Dirty Machine
If you’ve been neglecting the maintenance of your Keurig Coffee Maker, it’s high time to give it a thorough cleaning. This simple step is often the key to diagnosing and resolving many issues with your machine, including the problem of coffee tasting like plastic. Over time, mineral deposits, bacteria, mold, and the hot water itself can affect the plastic components of your Keurig, resulting in an undesirable plastic taste in your coffee.
Solution: Clean The Machine
The solution is straightforward: cleaning your machine. Once you’ve cleaned and refreshed your Keurig, you’ll likely find that your coffee tastes just right again. So, take a moment to give your machine the care it deserves, and you’ll be back to enjoying delicious, plastic-free coffee in no time. For thorough Cleaning Processes, refer to the “Cleaning Of Keurig K-Classic” written below in this article.
Cause 2: There Is A Need To Change The Filter
Keurig coffee makers often come with an optional charcoal filter designed to remove impurities from the water used for brewing. This filter helps improve the taste of the coffee by reducing any unpleasant flavors, including a plastic taste that may be present in the water or the coffee machine itself.
However, the charcoal filter becomes saturated with impurities over time, and its effectiveness in removing the plastic taste diminishes. If you don’t replace the filter regularly, you may not realize that it is helping to reduce the plastic taste in your coffee. Instead, you might attribute the taste solely to the quality of the coffee or other factors.
Solution: Change the Water Filter

To get back to the normal taste of your coffee, you need to change your charcoal filter. You can easily purchase one from Amazon. If, currently you do not own one.
Here is how you can change the filter.
- Soak the charcoal filter cartridge in fresh water for 5 minutes.
- After soaking, rinse the cartridge for 60 seconds to ensure it is clean.
- Locate the filter handle of your Keurig and find the tabs on both sides of the base at the bottom.
- Press in the tabs simultaneously and pull down to separate the handle.
- Insert the filter cartridge into the handle.
- Reattach the bottom part of the handle to secure the filter cartridge in place.
- Put the handle with the inserted filter cartridge into your Keurig’s empty, removable water reservoir.
- Make sure to firmly push down the handle until it is fully attached to the inside of the water reservoir.
- Your Keurig is now equipped with a water filter and ready to brew fresh, filtered coffee.
Cause 3: Low-Quality K-Cups
It’s important to note that the plastic taste issue can also extend to the K-Cup itself. This is particularly relevant when using non-reusable, plastic-based K-Cups, as most are made from plastic materials. While some of these third-party options offer excellent quality, it’s worth noting that cheaper K-Cup alternatives may utilize lower-quality plastic, increasing the likelihood of imparting a plastic taste to your brewed coffee.
Solution 1: Use Original Keurig K- Cups

To minimize the risk of encountering a plastic taste in your coffee, opting for higher-quality K-Cups from Keurig is advisable. These K-Cups are typically made with better-grade plastics designed to minimize potential taste interference. Reusable stainless steel K-Cups can also be a viable option, as they eliminate the use of plastic, allowing you to enjoy your coffee without any plastic taste concerns.
Solution 2: Use BPA K-Cups
You can also try using Bba Free K-Cups available in the market. The regular k-cups contain BPA (Bisphenol A), a chemical commonly found in certain plastics. BPA has the potential to leach into hot liquids, including coffee, and can impart an unpleasant plastic-like taste and odor. The BPA-free and stainless steel k cup introduced by Keurig can save your day. You can buy them from Amazon.
After summing up the problem of coffee tasting like plastic, Let us now see how you can deal with the presence of coffee grounds in your coffee.
Problem 9: Why Is There Presence Of Grounds In My Brewed Coffee?
Discovering bitter coffee grounds in every sip from your Keurig machine is like stumbling upon an unexpected plot twist in a captivating story. It diminishes the pleasure of savoring a delicious brew and raises concerns about your coffee maker’s overall quality and performance. In order to regain the full enjoyment of your coffee experience, it is essential to delve into the real reason for this problem and take prompt action to address it. So, let’s embark on an exploration to uncover the secrets behind this unwelcome twist and restore the magic of your coffee brewing journey.
Cause 1: Exit Needle Is Dirty
This unwelcome scenario often occurs due to a blockage in the exit needle of your Keurig. Over time, coffee grounds or tea residue can accumulate, resulting in clogs and compromising the quality and flavor of your brews. Curious to learn how you can reclaim the perfect cup? Discover the possible solutions below and journey to reclaim the delightful coffee experience you deserve.
Solution: Clean The Exit Needle
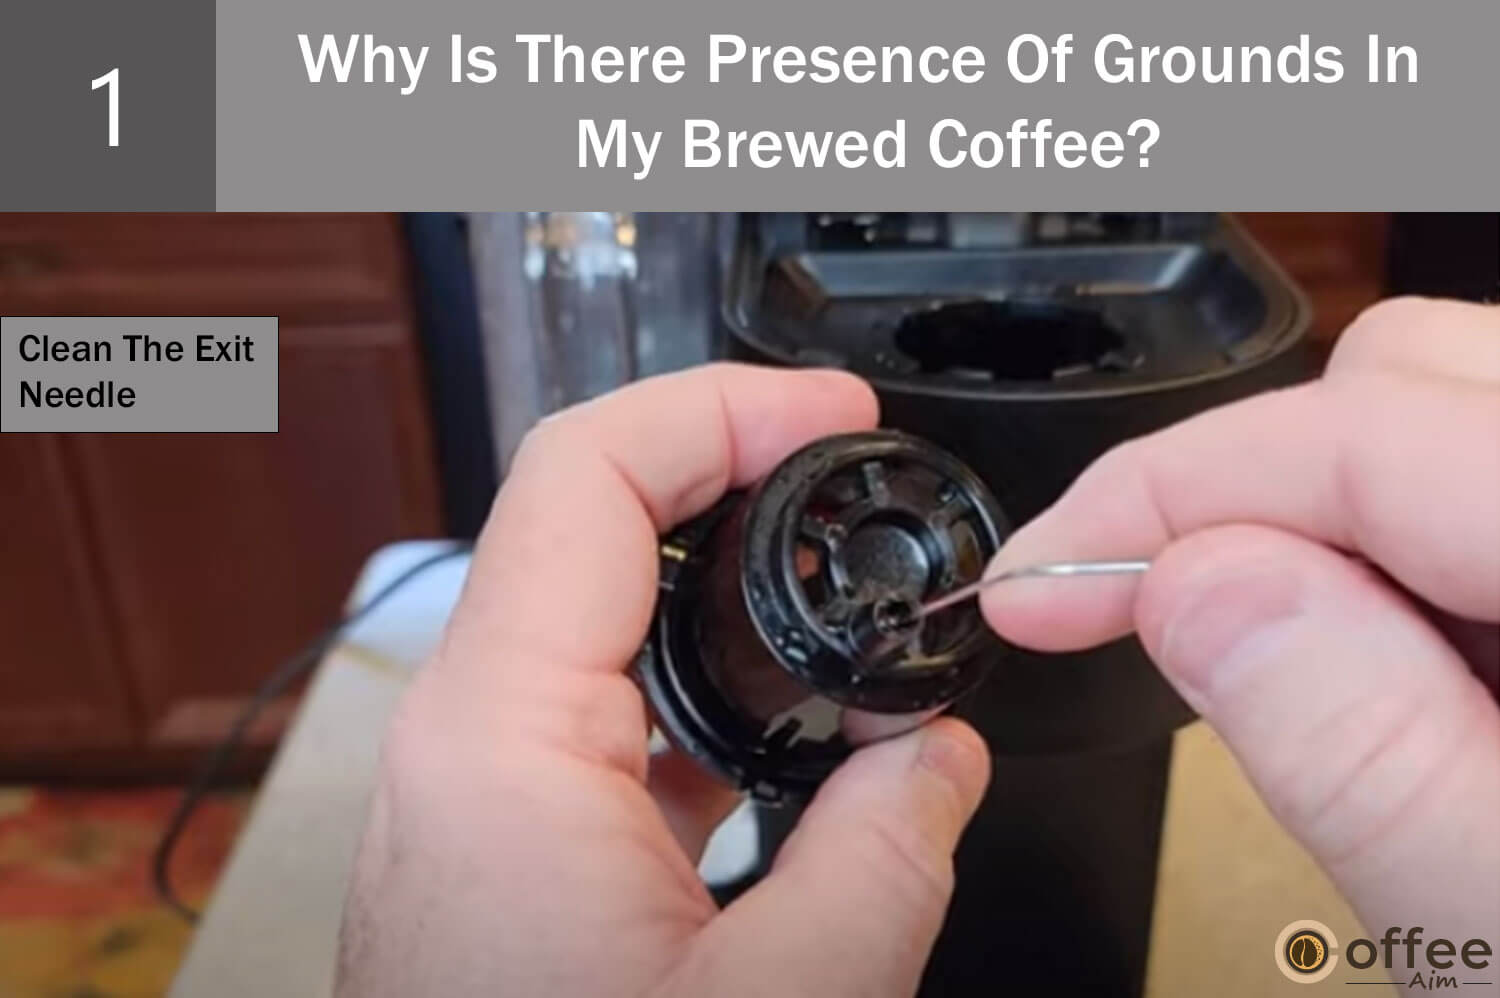
In order to restore the magic of your coffee moments, it’s crucial to address this issue by clearing the blockage in the exit needle. For The entire cleaning process, refer to this article’s “Cleaning The Exit Needle” Section.
Cause 2: Keurig Is Clogged
When a blockage occurs in the exit needle of your Keurig, it can also lead to clogging and result in a buildup of coffee grounds. This accumulation of grounds can then find its way into future brews, significantly impacting the quality and flavor of your coffee. The clogged system hampers the smooth water flow through the machine, leading to an undesirable mixture of coffee grounds in your cup.
Solution: Run A Descaling Cycle
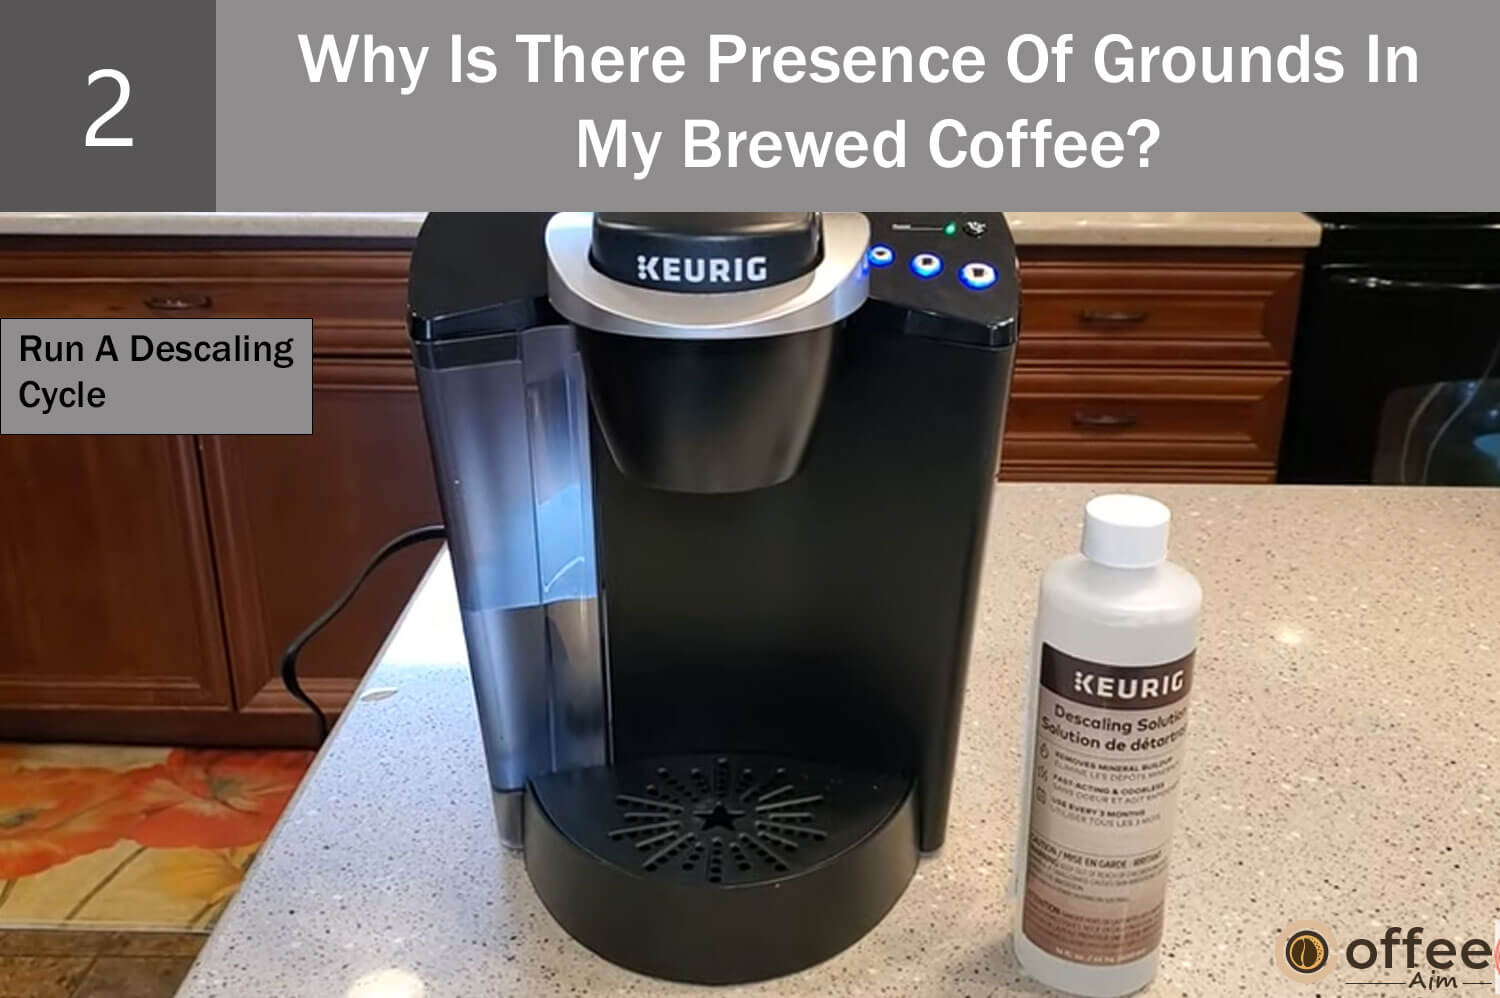
For detailed instructions on how to effectively descale your Keurig K-Classic, please refer to the “Descaling The Keurig K-Classic” section in this article. Following the step-by-step guide will ensure a thorough descaling process, helping to restore the optimal performance of your Keurig and eliminate any lingering issues.
After exploring the causes and solutions of the presence of coffee grounds in your coffee, it’s time to explore the meaning behind the flashing of lights displayed on the control panel of Keurig K-Classic.
Problem 10: Why Are The Lights On Keurig K-Classic Flashing?
The Keurig K-Classic coffee maker boasts a sleek and user-friendly control panel on the top, adorned with various buttons and lights. They serve more than just their physical purpose; they also communicate valuable information to the user through blinking signals. Each blinking pattern carries a unique meaning, providing essential clues for the coffee maker’s operation. Let’s unravel the secrets of these blinking signals and decipher their significance, ensuring a seamless and intuitive brewing experience with your Keurig K-Classic.
Cause 1: Low Water Level
When the Keurig K-Classic detects a low water level in its reservoir, the ADD WATER indicator light on the control panel will illuminate. This serves as a timely reminder to replenish the water supply. Let’s delve into the solutions that can effectively address this issue and ensure uninterrupted brewing with your Keurig K-Classic.
Solution: Fill The Water Reservoir To The Max Fill.

To extinguish the illuminated ADD WATER light on the control panel of your Keurig, simply replenish the water reservoir until it fills up to the required MAX FILL level. This marked line acts as a visual guide, ensuring you fill the reservoir to the appropriate level. After filling it to the MAX FILL line, the light on the control panel will promptly deactivate, allowing you to resume the brewing process without any interruptions.
Cause 2: Need Descaling
When the Keurig K-Classic identifies significant mineral deposits or scale buildup within the machine, it will promptly notify you by illuminating the “DESCALE” light on the control panel. This informative light clearly indicates that your coffee maker is due for descaling. Now, let’s embark on the journey of exploring the potential solutions to effectively address this issue.
Solution: Desacle
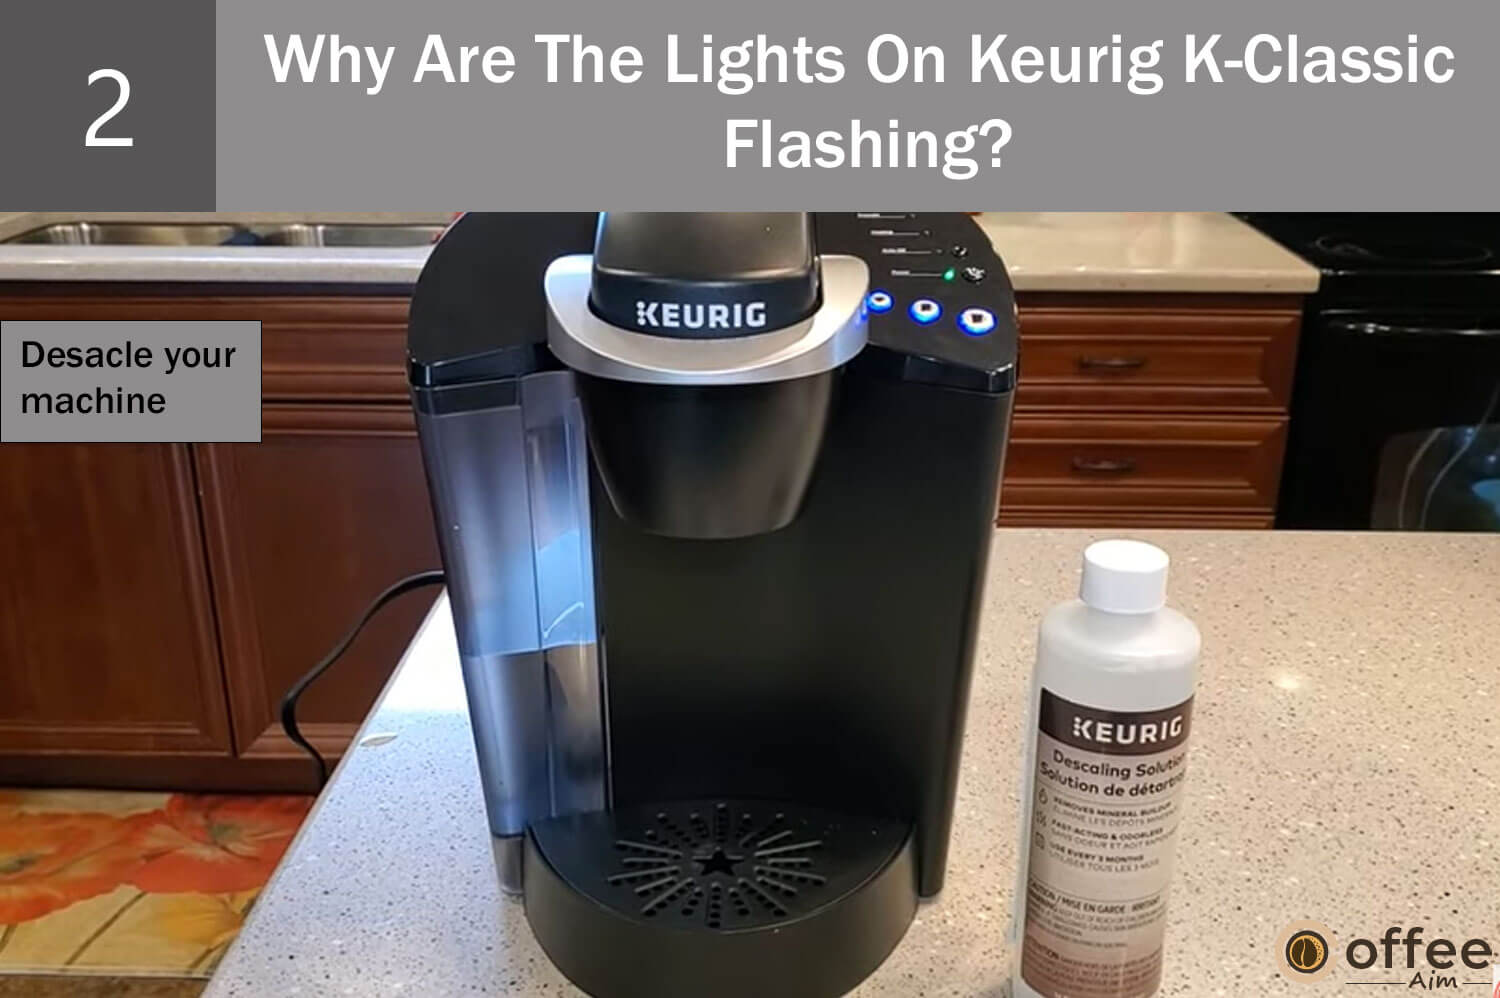
To extinguish the illuminated “DESCALE” light on the control panel of your Keurig K-Classic, it is necessary to run a descaling cycle. You can find comprehensive instructions tailored specifically to your model in this article’s “Descaling The Keurig K-Classic” section. By following the detailed step-by-step guide provided, you can successfully descale your coffee maker, effectively eliminate the descaling lights, and ensure the continued optimal performance of your Keurig K-Classic.
After discussing this problem thoroughly, it is time to Shift our attention to a different concern. Let’s explore the troubleshooting approaches for K-Classic brewing partial cups.
Problem 11: Why Is My Keurig K-Classic Brewing A Partial Cup?
It can be an incredibly frustrating encounter when your Keurig machine needs to improve in brewing a full cup of coffee despite your diligent efforts to press the brewing button. This disappointing issue serves as an omen of a malfunction lurking within the machine, effectively diminishing your satisfaction and overall enjoyment during your cherished
coffee-drinking ritual. By promptly troubleshooting the underlying cause and restoring the machine’s ability to deliver a complete cup of coffee, you can reclaim the delightful experience of savoring your favorite brew to the fullest.
Cause 1: Keurig Is Clogged
One possible cause for your Keurig machine’s inability to brew a full cup of coffee is the buildup of mineral deposits or water scaling within the device. These deposits can obstruct the water line, disrupting the smooth flow of water and ultimately leading to an incomplete brewing cycle. To tackle this issue head-on, let’s explore some effective solutions.
Solution: Run A Descaling Cycle.

Please refer to this article’s “Descaling The Keurig K-Classic” section for detailed instructions.
Cause 2: Dirty Needles
Sometimes, more than thoroughly cleaning your Keurig may not suffice to address the problem of brewing an incomplete cup of coffee. The culprit could be clogged needles responsible for puncturing the K-Cup. Debris like foil from the K-Cup and coffee residue might accumulate in these needles, forming blockages that hinder water flow. Consequently, the machine may struggle to extract sufficient coffee from the K-Cup, leading to an inadequate brew. But fear not! Eliminating a dirty needle can be a breeze if you follow the solution outlined below.
Solution: Clean The Needles
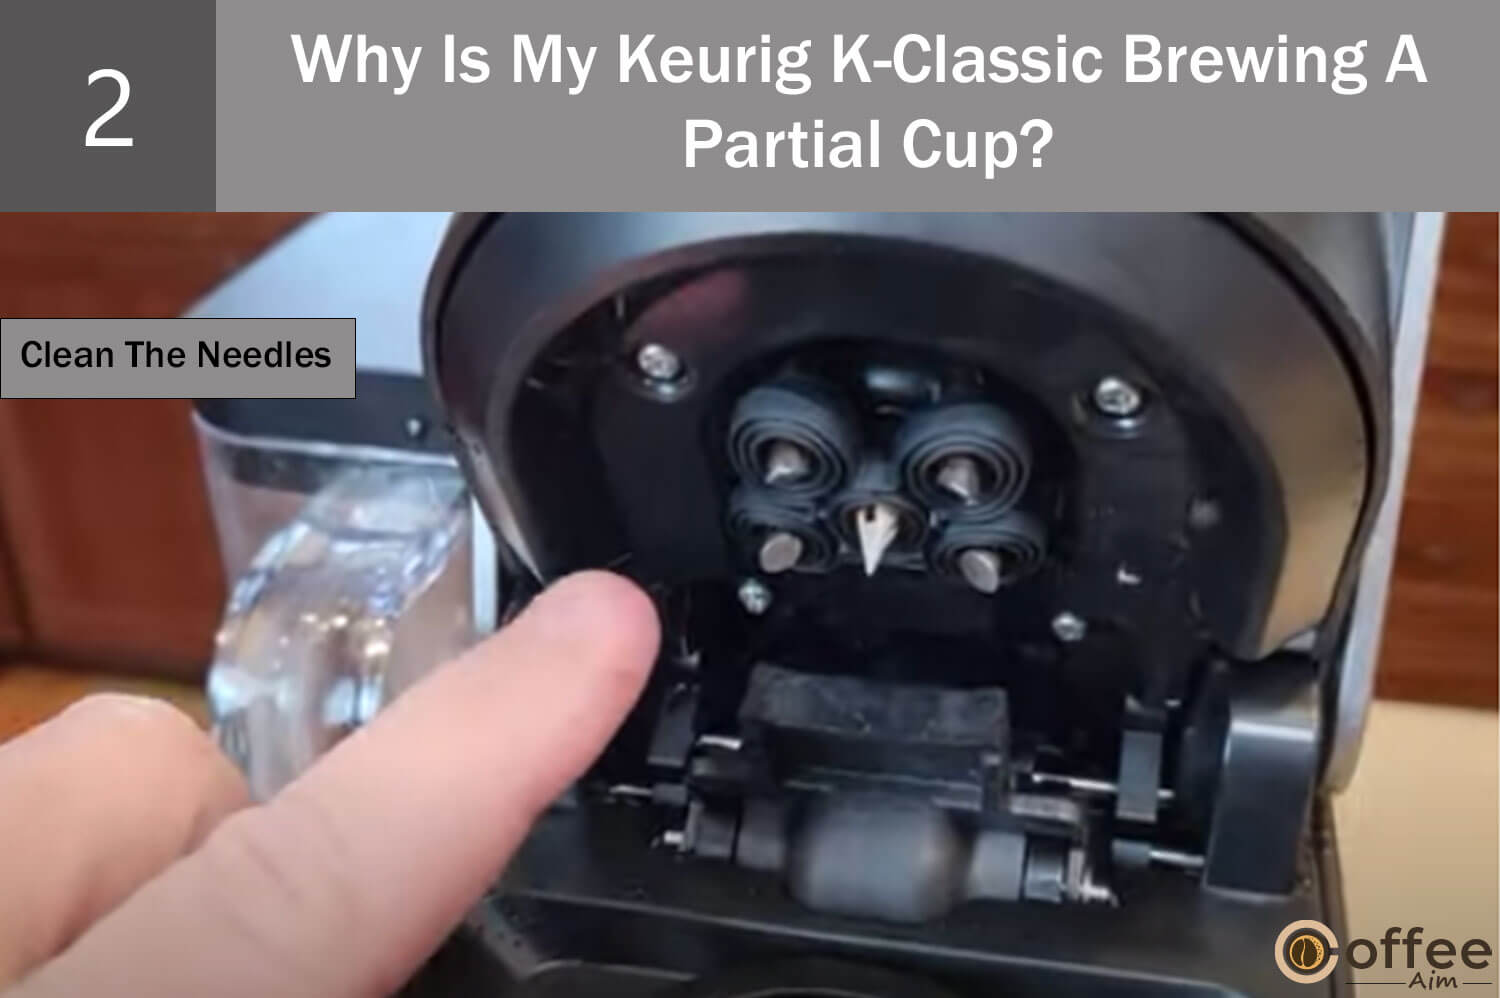
For detailed instructions on how to effectively clean the exit and entrance needles, please refer to the “Cleaning The Exit Needle” and “Cleaning The Entrance Needle” sections under the “How to Clean The Keurig K-Classic” heading in this article.
Cause 3: Water Reservoir Tube Is Blocked
In addition to descaling, an incomplete cup brewing with your Keurig can also be attributed to an obstruction in the tube connecting the reservoir to the machine. If descaling doesn’t resolve the issue, further troubleshooting is necessary to know the reason for the obstruction and determine the appropriate steps for rectifying it.
Solution: Remove The Blockage
- Swirl the water around the reservoir and clean the area where it connects to the machine using a cloth to remove debris.
- Use a high-pressure tool, such as a turkey baster, to force water into the tubing, dislodging any obstructions and improving water flow.
- To clear any blockages, first empty the reservoir, then employ a can of compressed air to blow air through the tube.
- Ensure the pathway remains unobstructed for a smooth brewing process and coffee.
Cause 4: Air Locked
When a brewing cycle is accidentally started with insufficient water in the tank, air can enter the water tubes. This air influx can cause a blockage within the system, impeding Keurig’s ability to pump water and brew coffee effectively.
Solution 1: Remove The Air Bubble.
To eliminate air bubbles from your Keurig, follow these steps:
- Disconnect the brewer from its power source.
- Remove the water reservoir and the drip tray.
- Firmly grip the Keurig with both hands.
- Vigorously shake the Keurig to dislodge any trapped air bubbles inside.
Note: While this method may seem unconventional, shaking the Keurig helps to expel any trapped air bubbles, resulting in smoother operation.
Solution 2: Use The Finger Method
Alternatively, you can use the following method, known as the “Finger Method,” to clear clogs in your coffee maker’s water lines:
- Open the water reservoir of the coffee maker.
- Use your finger to cover the connection or opening hole of the coffee maker and the water tank.
- Initiate a water-only brew cycle without inserting any coffee pod.
Maintain pressure by keeping your finger on the water hole throughout the process.
- This will compel the brewer to pump water through the lines, effectively pushing out any air bubbles causing the clog.
Descaling Your Keurig K-Classic
As every machine needs regular care and maintenance for its long-lasting functionality, the Keurig K-Classic also demands some maintenance that will promise prolonged productivity. Keurig recommends every user to descale Keruig brewer every 3 to 6 months. Following this maintenance routine will ensure prolonged productivity and reliable operation of the Keurig K-Classic.
Descaling Procedure
To start the descaling procedure for your Keurig K-Classic, gather the following items.
- A large ceramic mug
- Freshwater
- Keurig Descaling Solution
- Have access to a sink
Some Precautions You Need To Take Before Proceeding
- It’s important not to use a paper cup for this process.
- Before proceeding, ensure no beverage pod is in the K-Cup pod holder.
- If the Auto Off feature is enabled on your brewer, disable it.
- The descaling procedure typically takes around 45 minutes to complete.
- Remove the water from the reservoir, ensuring it is empty.
Now Let us move forward toward the real procedure.
STEP 1: Descaling Solution Rinse
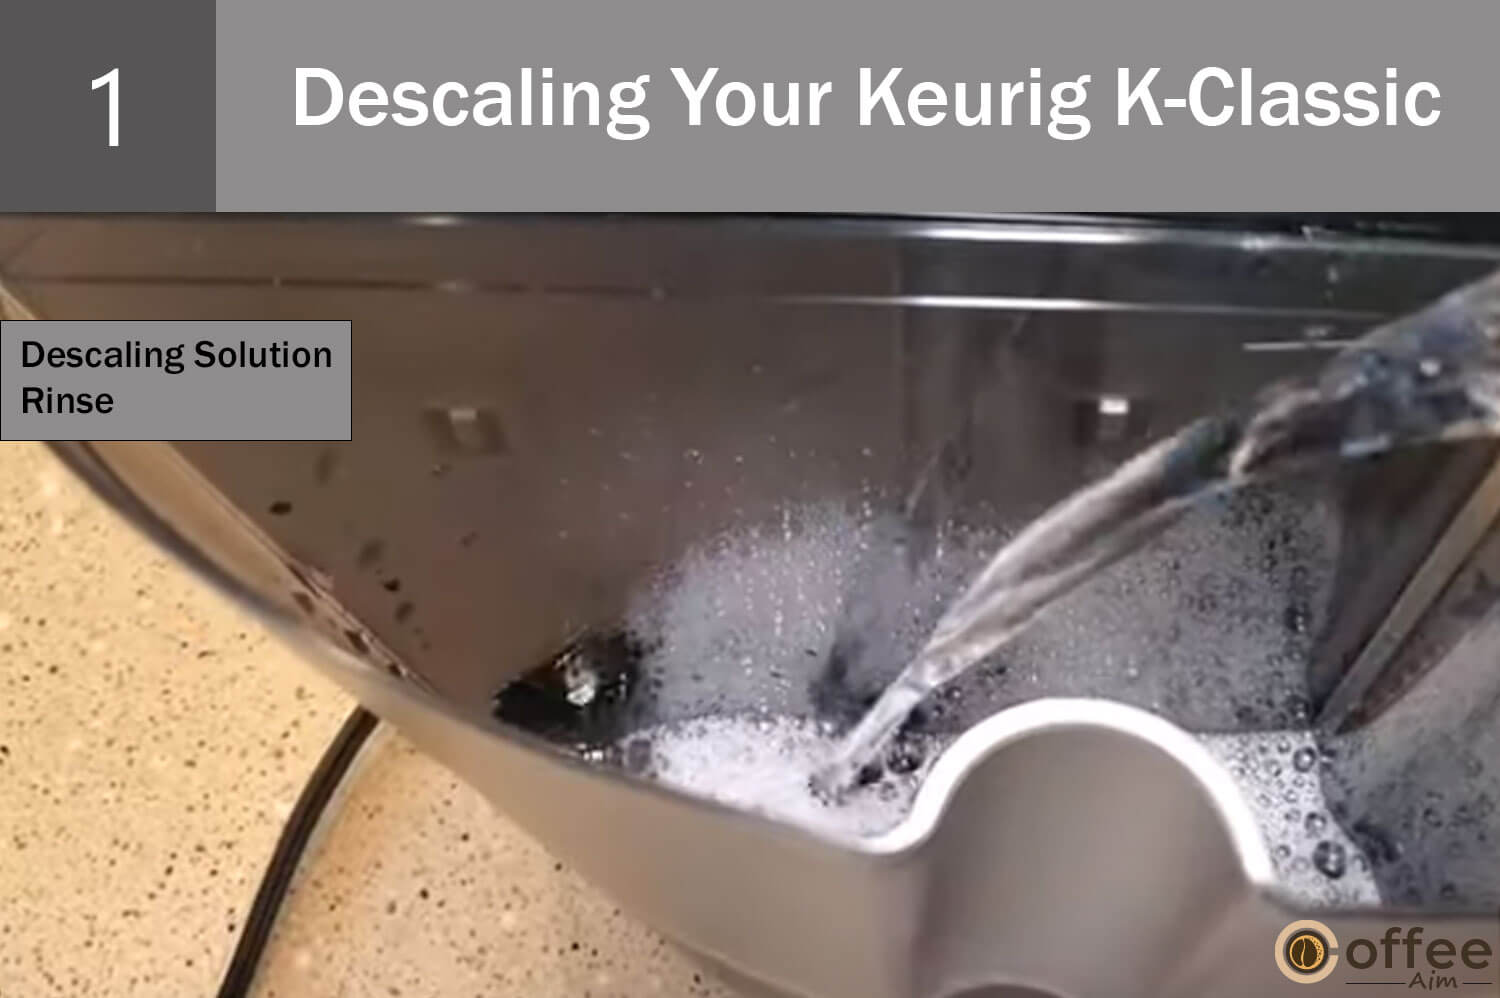
Follow the steps to start the descaling process in Keurig K-Classic.
- Turn off the brewer by pressing the power button.
- Empty the water reservoir.
- Empty the water reservoir and proceed to pour the entire contents of the Keurig Descaling Solution bottle into it.
- Next, fill the empty bottle with water and pour the water into the reservoir.
- Turn on the brewer by pressing the power button.
- Position a large mug on the drip tray.
- Raise and lower the brewer’s handle.
- Choose the largest brew size to start a rinsing brew.
STEP 2: Descaling Rinse & Repeat

Now, let us move toward the 2nd step of the descaling procedure, rinsing.
- Repeat the rinsing brew process by lifting and lowering the handle and selecting the largest brew size.
- Continue repeating the rinsing brew process until the “add water” light is illuminated.
- Remember not to use a K-Cup pod during this process.
- Once the “add water” light is illuminated, allow the brewer to stand for a minimum of 30 minutes while ensuring it remains turned on.
- Once the 30 minutes have passed, carefully discard any remaining solution from the water reservoir.
- Rinse the water reservoir thoroughly to remove any residual solution.
STEP 3: Fresh Water Rinse

- Fill the water reservoir with fresh water, ensuring that you do not exceed the MAX FILL line.
- Now Place a large cup on the drip tray plate.
- Run a rinsing brew using the largest brew size, but make sure not to use a K-Cup pod.
- Empty the contents of the mug into the sink.
- Repeat the brewing process for a minimum of 12 rinsing brews, using the largest brew size each time.
- You might need to refill the water reservoir at least once during this process.
Cleaning The Keurig K-Classic
Regular cleaning of the components of your Keurig K-Classic is paramount and even more crucial than descaling alone. While descaling helps remove mineral deposits and scale buildup, regular cleaning ensures that other contaminants, such as coffee residues and oils, are thoroughly removed more often from various parts of the machine. Below are the cleaning methods of different components of Keurig K-classic.
Cleaning The Water Reservoir
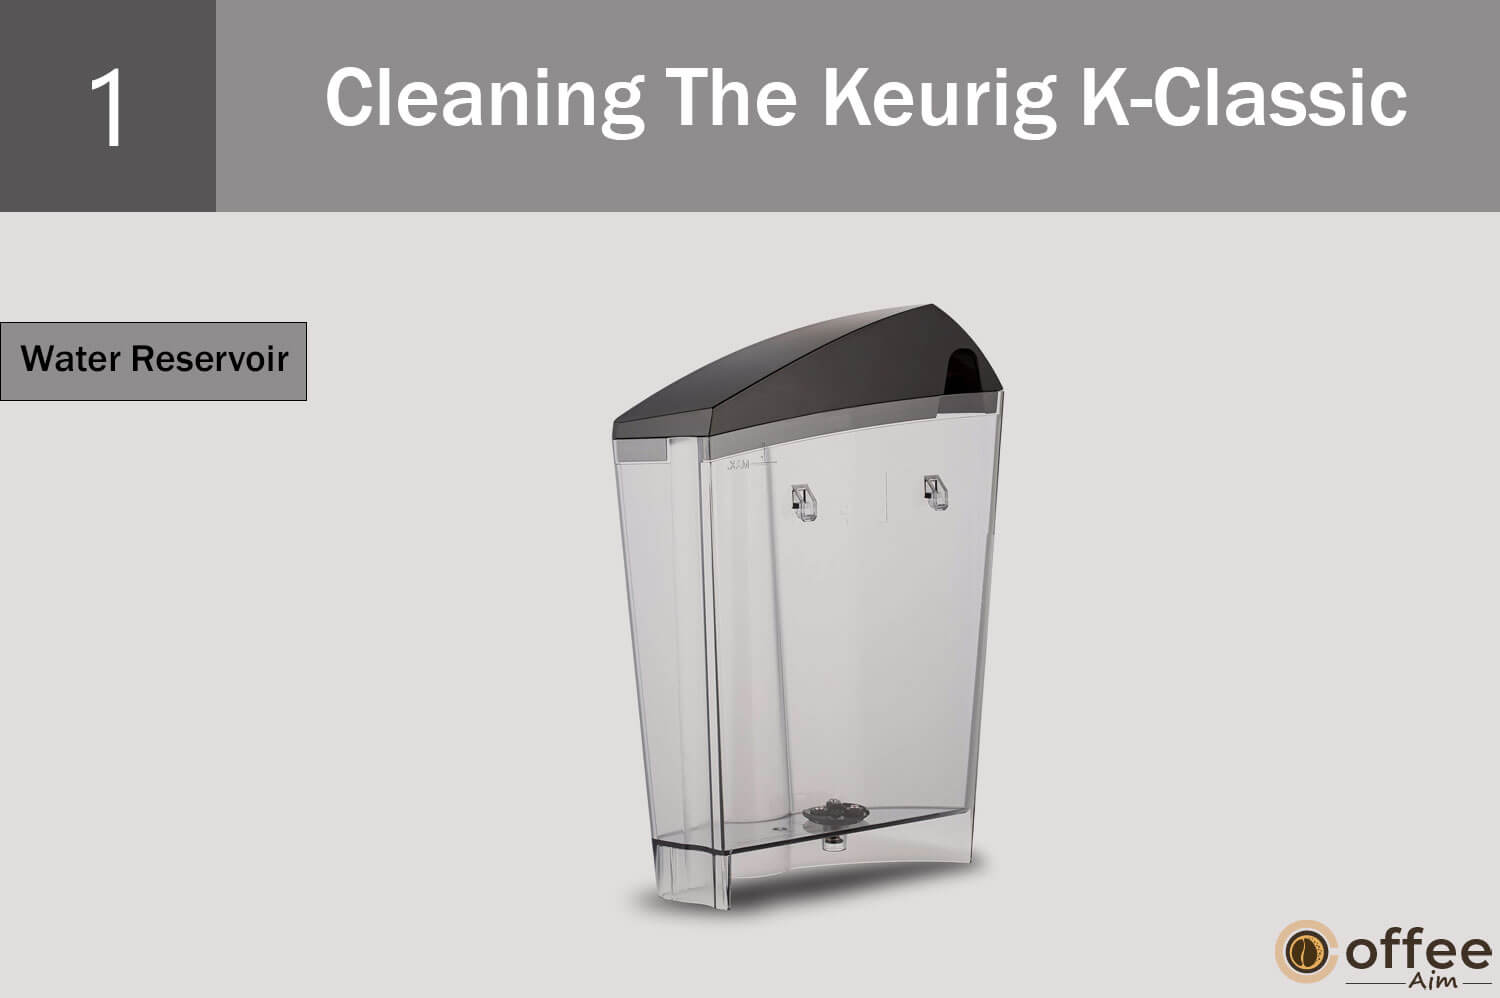
To maintain cleanliness, your Keurig’s lid and water reservoir should be periodically wiped clean using a damp, soapy, non-abrasive cloth, followed by thorough rinsing. It is imperative that the lid and water reservoir should be placed outside the dishwasher. Additionally, avoid drying the inside of the water reservoir with a cloth, as it may leave behind lint particles.
Cleaning The Filter Screen

Start by emptying the reservoir and removing any water filter inside. You can then proceed with one or all of the following methods:
- Rinse the filter screen thoroughly using a strong stream of water from your faucet.
- If you have a sprayer attachment, direct the water spray at the filter screen for more effective cleaning.
- Fill the water reservoir with about two inches of clean water and gently agitate or shake the reservoir. To maintain your Keurig machine, empty the water reservoir and refill it with fresh, clean water before placing it back into the brewer. If needed, you can repeat these steps as necessary. If necessary, you can repeat these steps.
By following these procedures, you can effectively clean the filter screen and ensure the proper functioning of your Keurig machine.
Cleaning The Exit Needle
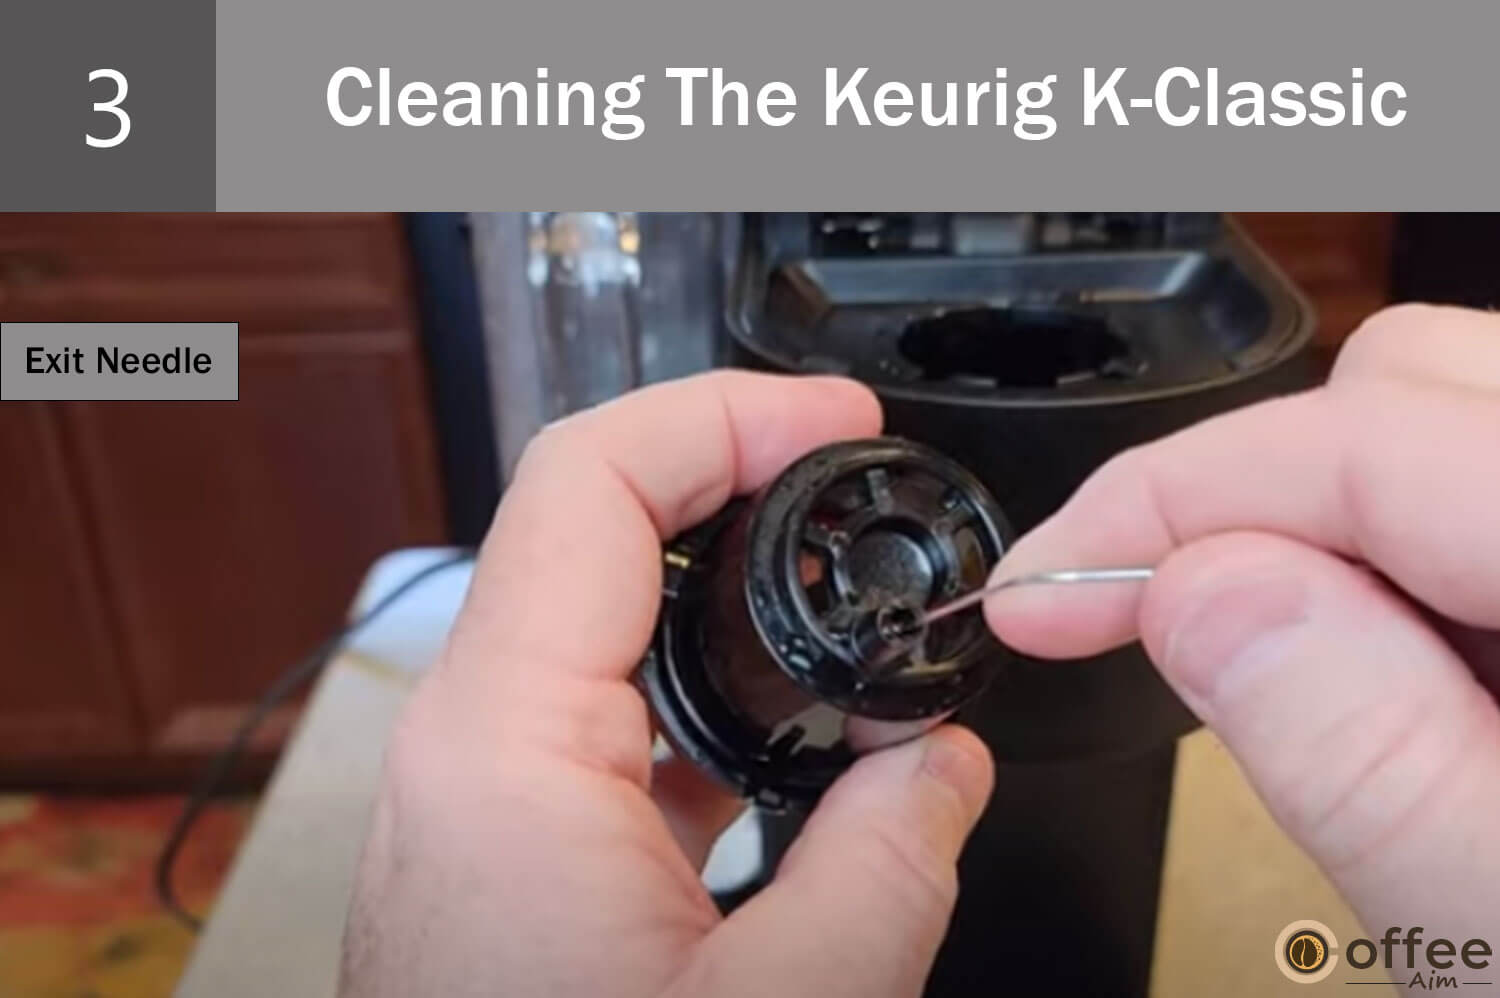
To clean the Exit Needle, knowing how to remove the funnel is a prerequisite. Follow the steps to remove the funnel from Keurig K-Classic.
- To remove the funnel from the K-Cup pod holder, pull on it until it pops off.
- When you want to replace the funnel, simply snap it back onto the K-Cup pod holder.
- Find the exit needle located inside the funnel.
- Take a straightened paper clip and insert it into the exit needle to loosen and remove any clogs.
Cleaning The Entrance Needle
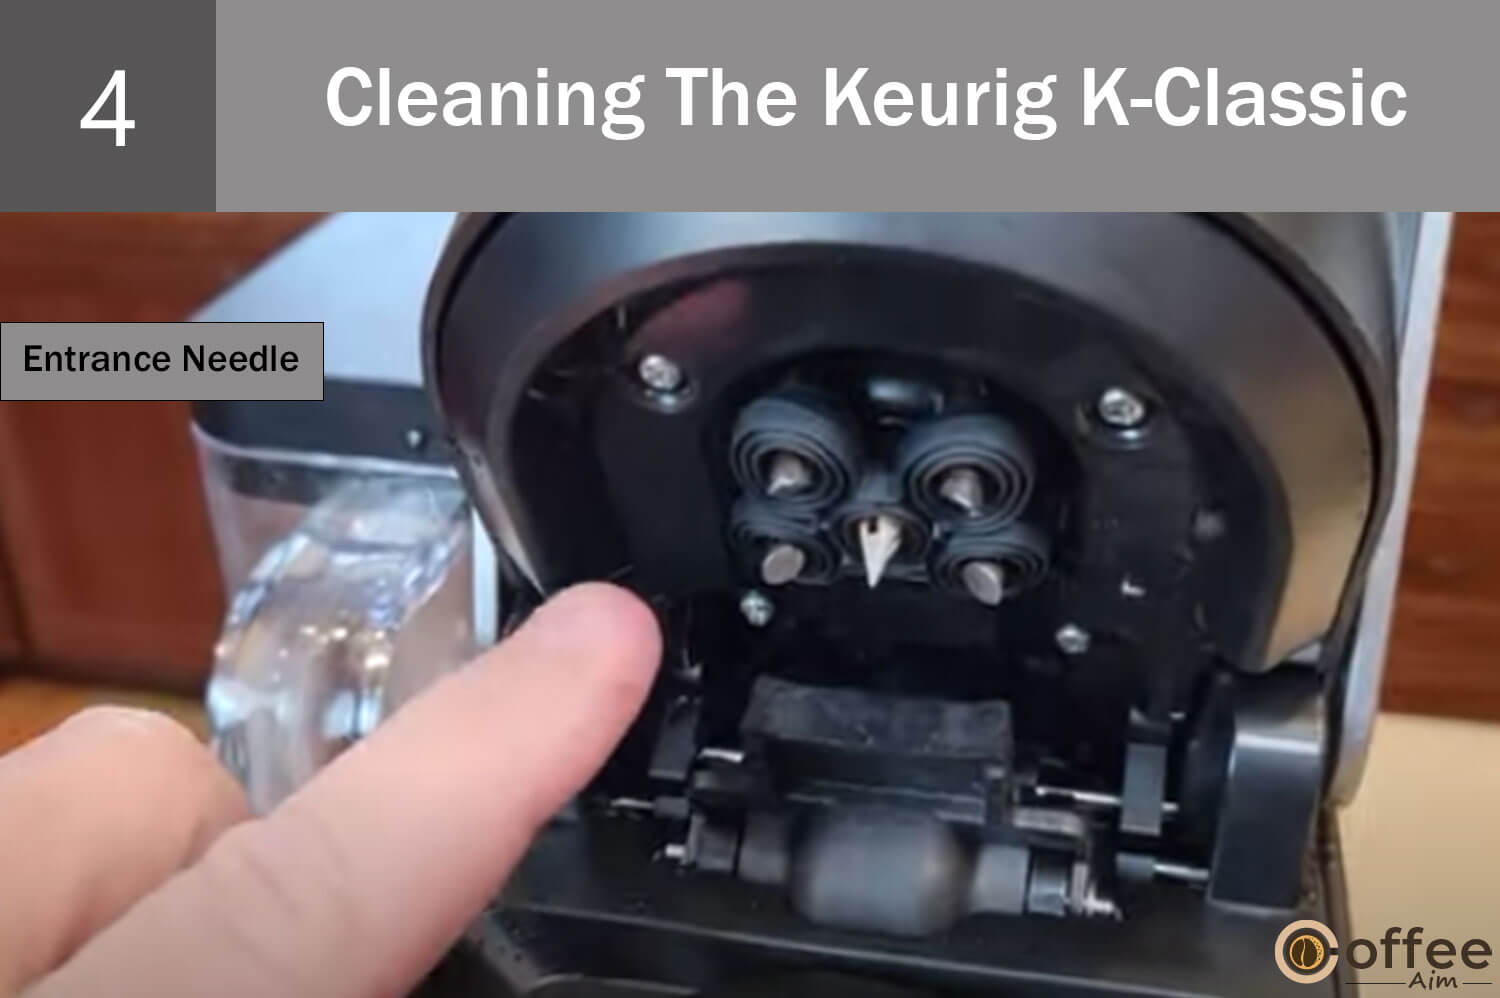
- Lift the brewer handle and observe the underside of the lid to locate the entrance needle.
- Hold the brewer handle in the upward position.
- With your other hand, take a straightened paper clip and carefully insert it into both holes of the entrance needle.
- Gently move the paper clip around within the holes to loosen any trapped coffee grounds.
- Lower the handle back down to its original position.
- Run two brew cycles using only water. Do not insert a K-Cup pod.
- Allow the brewer to complete the water-only brew cycles to help flush out any remaining residue or debris.
Maintenance Tips
Now that you have a handle on troubleshooting the problems that can arise with your Keurig K-Classic, let’s talk about the importance of regular maintenance. By taking a proactive approach and incorporating simple cleaning and maintenance practices into your routine, you can prevent future issues and ensure your coffee maker stays in good working condition. So, let’s dive into some easy tips to keep your Keurig K-Classic running smoothly:
- Clean the removable parts: Regularly remove and clean the water reservoir, drip tray, and K-Cup holder. Wash them with warm, soapy water and rinse thoroughly. This helps remove any residue, oils, or coffee grounds that may accumulate over time.
- Descaling: Mineral deposits from hard water can clog your Keurig and affect its performance. Follow the manufacturer’s guidelines for descaling, using either a Keurig-approved descaling solution or a mixture of vinegar and water. Regular descaling helps maintain optimal water flow and brewing temperature.
- Clean the needle: The needle that punctures the K-Cup can become clogged with coffee grounds. To clean it, turn off and unplug the machine, remove the K-Cup holder, and gently insert a cleaning tool or paperclip into the needle to dislodge any debris.
- Wipe the exterior: Use a clean, damp cloth to wipe the exterior of the machine regularly. This helps remove any spills, stains, or dust that may accumulate.
- Use filtered water: Using filtered water can help prevent mineral buildup in your Keurig. If your tap water is hard, consider using a water filter or bottled water to improve the taste and performance of your coffee.
- Keep the brewer in a clean environment: Avoid placing your Keurig K-Classic in dusty or greasy areas. Keeping the surrounding area clean helps prevent debris from entering the machine and affecting its operation.
By incorporating these simple maintenance practices into your routine, you can enjoy consistently great-tasting coffee from your Keurig K-Classic and extend its lifespan. Taking proper care of your Keurig machine can have a significant impact on its performance and longevity. However, if incorporating maintenance practices fail to manage a problem with your Keurig K-Clssic, then seeking professional help is a must!
When To Seek Professional Help
While troubleshooting and basic maintenance can resolve many common problems with the Keurig K-Classic, there may be instances where seeking professional help is necessary. Here are a few scenarios where it is advisable to turn to experts for assistance:
- Persistent issues: If you have followed the recommended troubleshooting steps, but the problem continues to persist, it is a clear indication that there may be an underlying issue that requires the expertise of professionals.
- Internal repairs: Opening up the Keurig K-Classic and attempting internal repairs can be complex and potentially void your warranty. If you suspect a problem with internal components or wiring, it’s best to leave it to the professionals.
- Warranty coverage: If your Keurig K-Classic is still under warranty, it’s wise to reach out to the manufacturer or authorized service centers specified in the warranty documentation. Attempting repairs yourself could nullify the warranty.
When seeking professional help for your Keurig K-Classic, it’s important to find reputable repair services that specialize in Keurig coffee makers. Here are a few well-known repair service options in the USA:
- Keurig Customer Support: For Keurig customer support, you can access assistance with troubleshooting and warranty-related inquiries by visiting their website or contacting their customer service hotline at 866-901-BREW (866-901-2739).
- Authorized Keurig Service Centers: Keurig has authorized service centers across the country that specialize in repairing Keurig coffee makers. Check Keurig’s official website or contact their customer support to find a service center near you.
- Local Appliance Repair Services: You can also consider reaching out to local appliance repair companies that offer services for Keurig coffee makers. Ensure that they have experience repairing Keurig machines and positive customer reviews.
Remember to check the contact details and availability of these repair services, as they may vary. It’s always recommended to inquire about repair costs, warranty coverage, and turnaround time before proceeding.
When your Keurig K-Classic encounters complex issues or falls outside the realm of basic troubleshooting, seeking professional help can save you time, effort, and potentially costly mistakes. Reach out to the experts to ensure your coffee maker receives the specialized care it needs.
Conclusion
Congratulations, coffee aficionado! You have completed our comprehensive guide on troubleshooting common problems faced by Keurig K-Classic owners. Before you embark on your journey to resolve any issues, let’s recap the key takeaways:
- Knowledge is power: By understanding the common problems, you can easily recognize and address potential issues with your Keurig K-Classic.
- Troubleshooting is your ally: Many problems can be resolved by following the simple troubleshooting steps provided in this guide. It is advisable to invest time in going through the troubleshooting process and making an attempt to resolve the issue independently. Good luck on your troubleshooting adventure, and may your Keurig K-Classic continue to brew delicious coffee
- Maintenance matters: Regular cleaning and maintenance are essential to keep your Keurig K-Classic in good working condition. Follow the maintenance tips provided to prevent future problems and enjoy consistently great coffee.
- Professional help when needed: If you’ve exhausted the troubleshooting steps or suspect a more complex issue, it’s wise to seek professional help. Refer to the manufacturer’s customer support or authorized service centers for assistance.
Remember, don’t be afraid to take matters into your own hands and try troubleshooting the issues before seeking professional help. With the information and tips shared in this guide, you’re well-equipped to tackle common problems and get your Keurig K-Classic brewing like a champion once again.
Now, go forth, coffee connoisseur, and may your Keurig K-Classic continue to bring you joy with every delicious cup of coffee it brews!
FAQs
What Is The Most Common Problem With Keurig?
One of the frequently reported issues by Keurig owners is brewing incomplete or weak coffee, which can be quite frustrating when you anticipate a robust and flavorful cup. There are several factors that can contribute to this problem, including clogs in the needle or brewing system, scaling caused by mineral deposits, incorrect brew size selection, or even a malfunctioning machine.
However, it’s important to note that the Keurig brand has made significant improvements over the years to address these issues, and newer models have enhanced performance and reliability. If you encounter this problem with your Keurig, following the troubleshooting steps outlined in the manufacturer’s guide or seeking professional assistance can help resolve the issue and ensure a satisfying coffee experience.
What Is The Life Expectancy Of A Keurig Machine?
The lifespan of a Keurig coffee maker can vary depending on factors like usage, maintenance, and model. Typically, with proper care and regular maintenance, a Keurig machine can last around three to five years. In order to prolong the life of your Keurig, it’s crucial to perform routine cleaning and descaling to prevent mineral buildup and clogs that can impact its performance. Adhering to the manufacturer’s guidelines, such as using compatible K-Cups and not overfilling the water reservoir, is also important.
The average lifespan of a Keurig machine can vary based on factors like usage, maintenance, and the specific model. Generally, a well-maintained Keurig machine can last around 3 to 5 years. However, it’s important to remember that this estimate is not universal, and individual experiences may differ. To increase the lifespan of your Keurig machine, regular cleaning, descaling, and proper maintenance are crucial. Following the manufacturer’s guidelines and recommendations, such as descaling every few months, can help keep your machine in good working condition. Other factors that can impact the lifespan include the quality of water used, frequency of usage, and potential mechanical issues. If you encounter significant problems with your Keurig or notice a decline in performance, it may be a sign to consider a replacement or seek professional assistance. Ultimately, the longevity of your Keurig machine depends on various factors. By taking proper care of it, you can maximize its lifespan and continue enjoying your favorite cups of coffee.
Why is My Keurig Suddenly Not Working?
If your Keurig suddenly stops working, there are several potential factors to consider when troubleshooting:
- Power supply: Verify that the machine is properly plugged into a functioning electrical outlet. Test the outlet using another device to ensure it has power. If the outlet is not supplying power, try a different outlet or reset the circuit breaker.
- Water reservoir: Ensure the water reservoir is correctly positioned and filled with water. Some Keurig models have sensors that prevent operation if the reservoir is empty or improperly placed.
- Descaling required: Over time, mineral deposits from hard water can accumulate and affect the machine’s performance. If you haven’t descale your Keurig recently, it might be causing the issue. Follow the manufacturer’s descaling instructions using a descaling solution.
- Clogged needle: The needle responsible for puncturing the K-Cup can get clogged with coffee grounds or debris, leading to brewing problems. Turn off and unplug the machine, remove the K-Cup holder, and clean the needle using a cleaning tool or paperclip.
- Brew size settings: Verify that the selected brew size matches your desired cup size. If the machine is set for a small cup, but you want a larger one, it may appear as if there is a problem with the machine.
- Internal malfunction: In some cases, internal components of the Keurig may malfunction or wear out over time. If none of the above troubleshooting steps resolve the issue, it may be necessary to contact Keurig customer support or seek professional assistance.
Remember, these are general troubleshooting steps, and the specific solution may vary based on the model of your Keurig. Consulting the user manual or contacting Keurig’s customer support can provide more tailored guidance for your specific situation.