Quick Navigation
Whether you are a newbie, a seasoned barista, or those who have lost their manual, this guide will be perfect for every coffee lover. So, let me guess, the main issue that all of you have is “how to use Your Keurig K-Mini” like a professional. So, I’ll say to you that look no further! In this guide, you’ll discover a comprehensive compilation of information to make coffee. From placing a cup to the right temperature and brewing time, this guide will cover everything you need to start. So grab your favorite mug, get your beans ready, and let’s start brewing!
Safety Precautions Of Using Keurig K-Mini
Do you have a fondness for morning coffee? Coffee machines can make brewing coffee quick and easy, but it’s important to remember that safety should always come first. While it may seem simple, coffee machines can pose several risks, including burns, electric shock, and fire.
Taking the precautions mentioned below allows you to enjoy your coffee without any worries. So, go ahead and brew that perfect cup, but remember to prioritize safety first!
- Use only clean, cold water: It’s essential to use clean and cold water to prevent any damage to the machine. Avoid using hot or distilled water, which can cause the machine to malfunction.
- Don’t overfill the water reservoir: Overfilling the water reservoir can cause spills, leaks, or even damage the machine. Strictly follow the instructions on the machine for the appropriate water level.
- Please don’t touch the brewing area: It contains boiled water during brewing, so avoiding touching it while the machine is in use is essential.
- Don’t use abrasive cleaners: Avoid using abrasive or harsh chemicals to clean the Keurig K-Mini. Instead, clean the machine with a damp cloth or a Keurig-approved descaling solution.
- Unplug your Keurig K-Mini when not in use: To prevent any electrical hazards, unplug it when it’s not in use. Unplugging will also help conserve energy.
By following these precautions, you can enjoy your Keurig K-Mini with peace of mind, knowing you are taking steps to ensure your well-being and optimize the machine’s durability.
Related: Keurig K-Mini Precautions.
Keurig K-Mini Specifications
| Product Line/System | K-Mini |
| Brew Sizes | Any size 6 oz/ 177.4 ml -10 oz/ 295.7 ml |
| Water Reservoir Capacity | 10 oz |
| Display | Button controls Single button for Brew |
| Temp Control | No |
| Strength Control | No |
| Dimensions | 4.5″ W 11.3″D 12.1″H |
| Weight | 4.6 lbs |
| Removable drip tray | Yes |
| Brew size selector | No(Instead, fill the reservoir with the volume you want, and it brews it all) |
| High Altitude setting | Yes |
Keurig K-Mini Amazing Features
Technology has revolutionized every aspect of today’s life, and coffee machines are no exception. Gone are the days when making coffee involved grinding beans by hand and boiling water on a stove. With Keurig K-mini, you can enjoy a delicious, café-quality cup of coffee from the comfort of your home with just a button. From sleek designs to cutting-edge features, the Keurig K-mini has fantastic features that make brewing coffee a breeze. Let’s get into them!
Auto Off
For energy conservation, the auto-off system automatically shuts off your coffee maker 90 seconds after the last brew.
Cord Storage
It keeps countertops neat and easy to carry around your coffee machine.
Friendly To Travel Mugs
To place a travel mug, remove the drip tray.
What Will You Find Inside The Box?
The anticipation of unboxing a new appliance, especially a coffee maker, can be exciting. Inside the box of a Keurig K-Mini, you’ll find the items to make your coffee-making dreams a reality. Every item has been carefully curated to ensure that your experience with the Keurig K-Mini is hassle-free and enjoyable. When you receive your parcel, if any of these parts is missing, return it using the return policy and get all the parts. So, let’s look at what you’ll find inside the box!
1. Keurig K-Mini Coffee Maker

The coffee maker itself is the main item in the box. It is a fantastic machine that can brew a single cup of coffee for you in just minutes.
2. User Manual
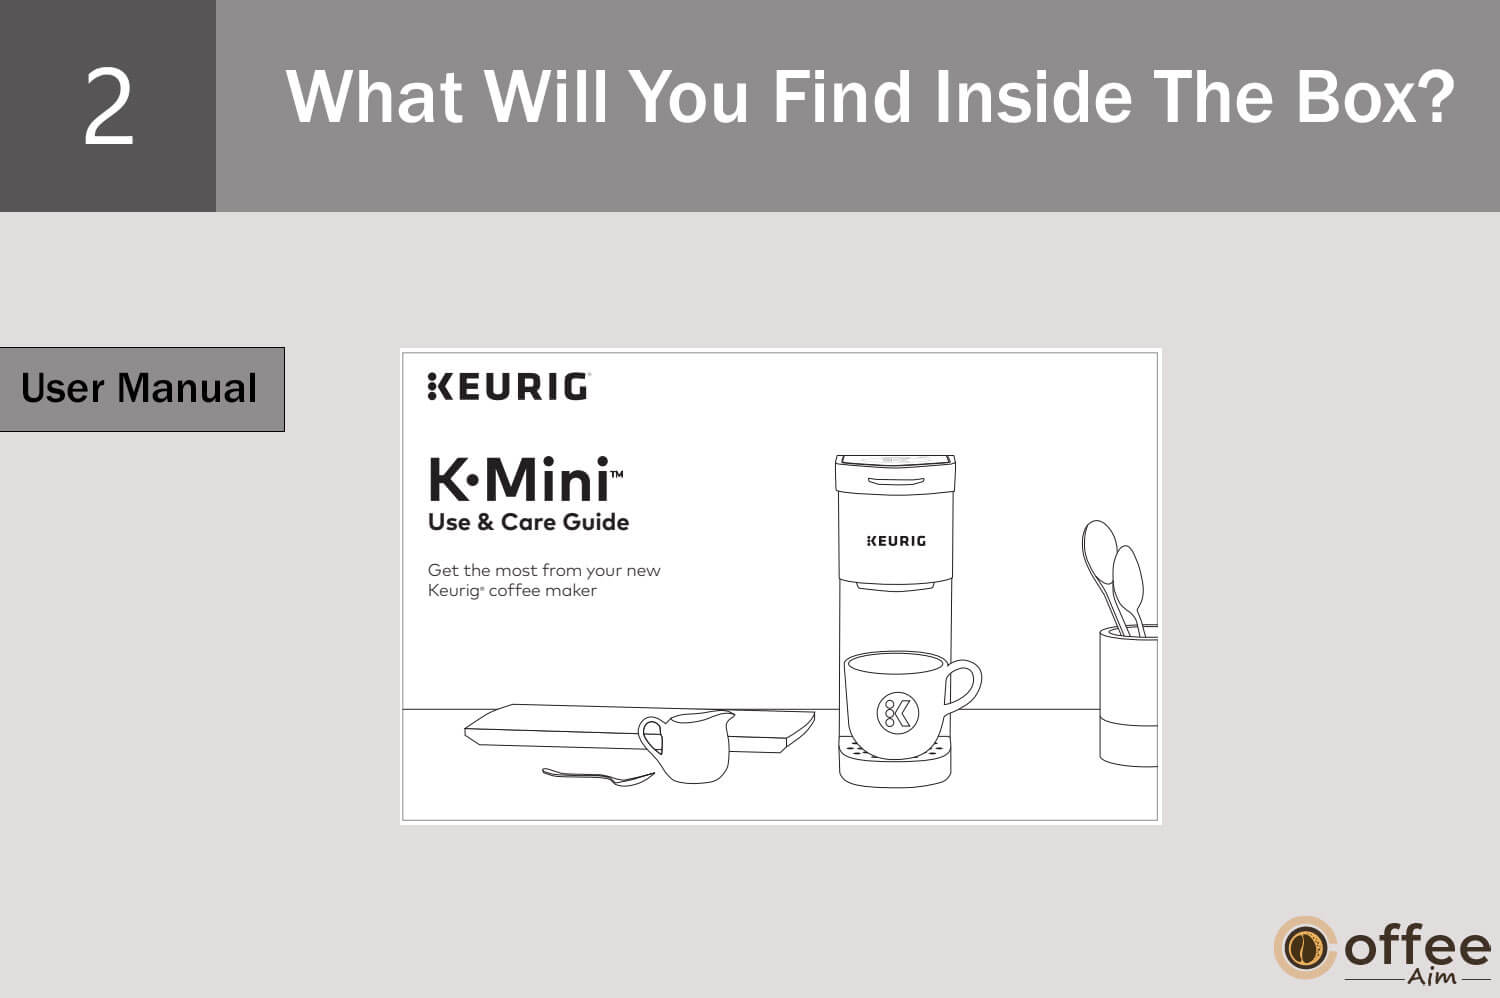
The user manual gives knowledge on how to set up and use the Keurig K-Mini, as well as important safety information.
3. Warranty Card

The box also contains a card on the warranty for the Keurig K-Mini, including the duration and terms of the warranty.
Unpacking Instructions Of Keurig K-Mini
Unpacking your Keurig K-Mini coffee maker is an exciting moment, as it’s the first step to enjoying a delicious cup of coffee. Following the unpacking instructions below will ensure your Keurig K-Mini coffee maker is set up correctly and ready to use. Here are the unpacking instructions for the Keurig K-Mini:
- Place the Brewer box on the floor or a big, stable surface (such as a table or countertop). Open the box.
- Take the included materials out.
- Side-swipe the box so that the front is facing down.
- Reach inside the box and take hold of the Brewer-containing plastic bag.
- Carefully remove the plastic bag from the box by pulling it carefully toward you. The Brewer will remain on its side and enclosed in the polyfoam.
- Remove the top polyfoam packing.
- Carefully remove Brewer from the polyfoam at the bottom and set it upright on a stable, flat surface.
- Remove the plastic bag from Brewer.
- For this Brewer, note the serial number. The serial number is located on the Brewer’s Box bottom or, if the Drip Tray has been removed, on the Brewer itself behind the tray.
- Position the Brewer vertically on a stable, flat surface. Untape Water Reservoir.
I advise you to keep all packaging materials if the product needs to be shipped again.
Keurig K-Mini Parts
When brewing coffee, the Keurig K-Mini has everything you need in a compact package. It is packed with powerful and efficient components, making it a joy. Let’s look at the parts of your coffee maker that make up this mighty machine!
1. Handle

One of the significant parts of your Keurig K-Mini is its handle, which is located on its top. This handle serves a crucial role in the brewing process, as it is used to lift and lower the brew basket that holds the K-Cup pod.
2. K-Cup Pod Holder

The K-Cup pod holder is another essential component of your Keurig K-Mini. The K-cup pod holder is part of the coffee maker that holds the K-Cup pod in place during the brewing process, and it’s located inside the brew basket. The K-Cup pod holder is designed to be compatible with all K-Cup pods, ensuring you can enjoy your favorite coffee flavors and roasts easily.
3. Funnel
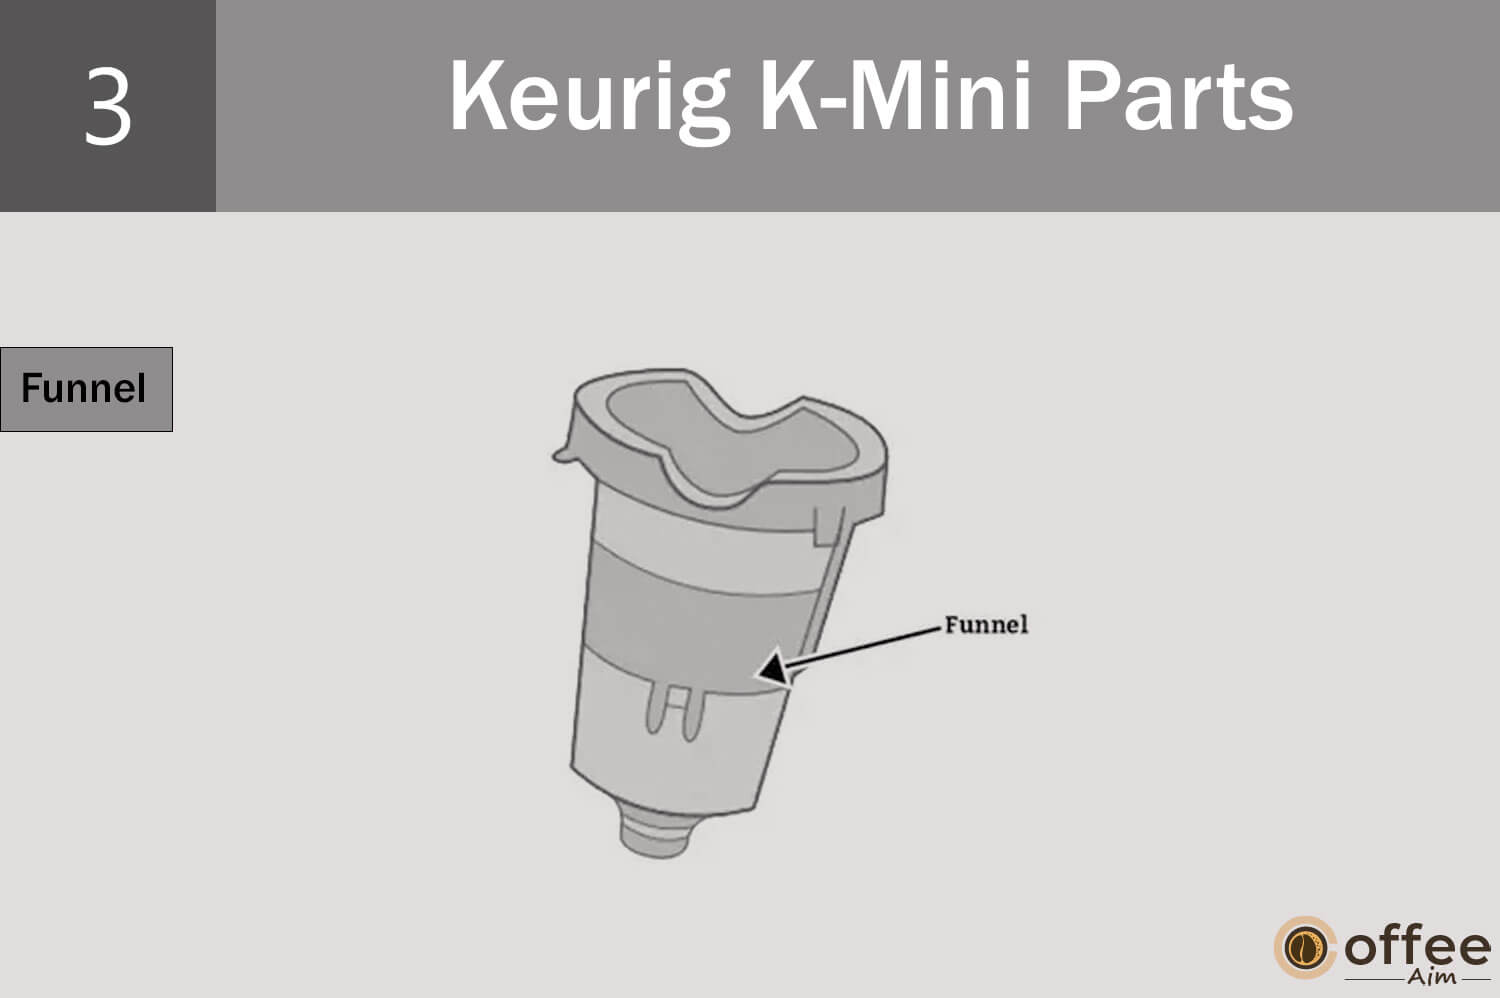
The Keurig K-Mini also features a funnel, a small plastic piece on top of your brewer. The funnel guides the hot water through the K-Cup pod and into your coffee cup, ensuring the brewing process is smooth and efficient.
4. K-Cup Pod Assembly Housing

The K-Cup Pod Assembly Housing is an essential component of the Keurig K-Mini, as it securely stores and supports the K-Cup pod during brewing. This component is at the top of your coffee maker, and it’s designed to ensure that the K-Cup pod is seated correctly and punctured by a brewer’s needle.
5. Drip Tray Plate
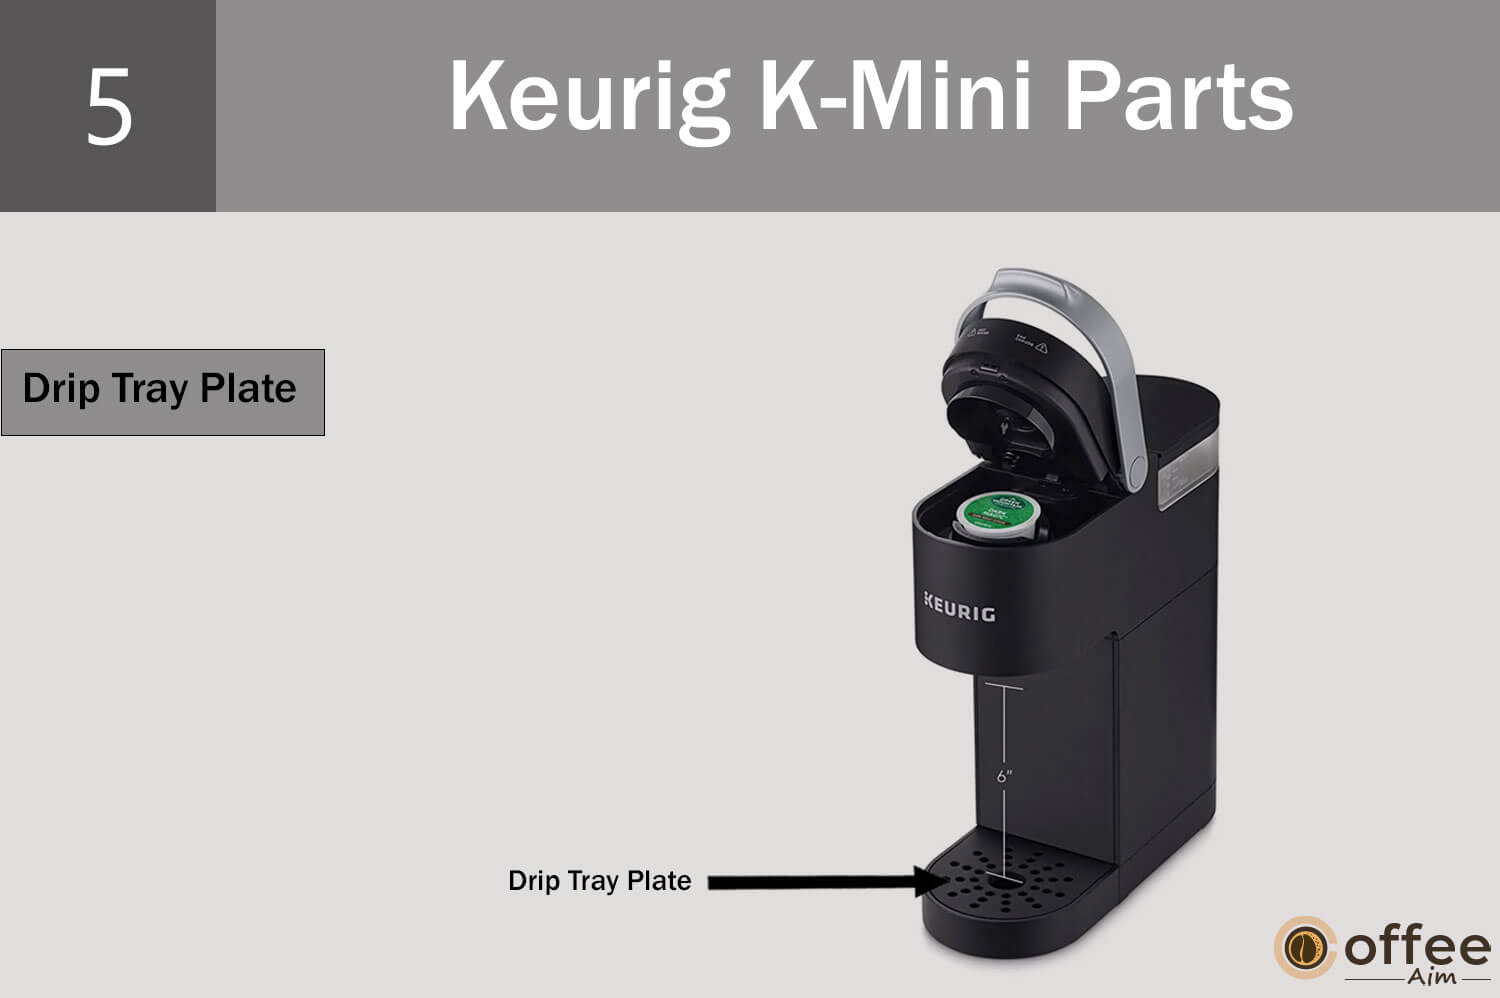
The Keurig K-Mini features a drip tray plate at the bottom of the coffee maker, underneath the K-cup Pod Assembly Housing. This component is designed to catch any excess coffee or water that may drip during dispensing, helping keep your countertop clean and dry. The drip tray plate is also used to place the cup.
6. Drip Tray
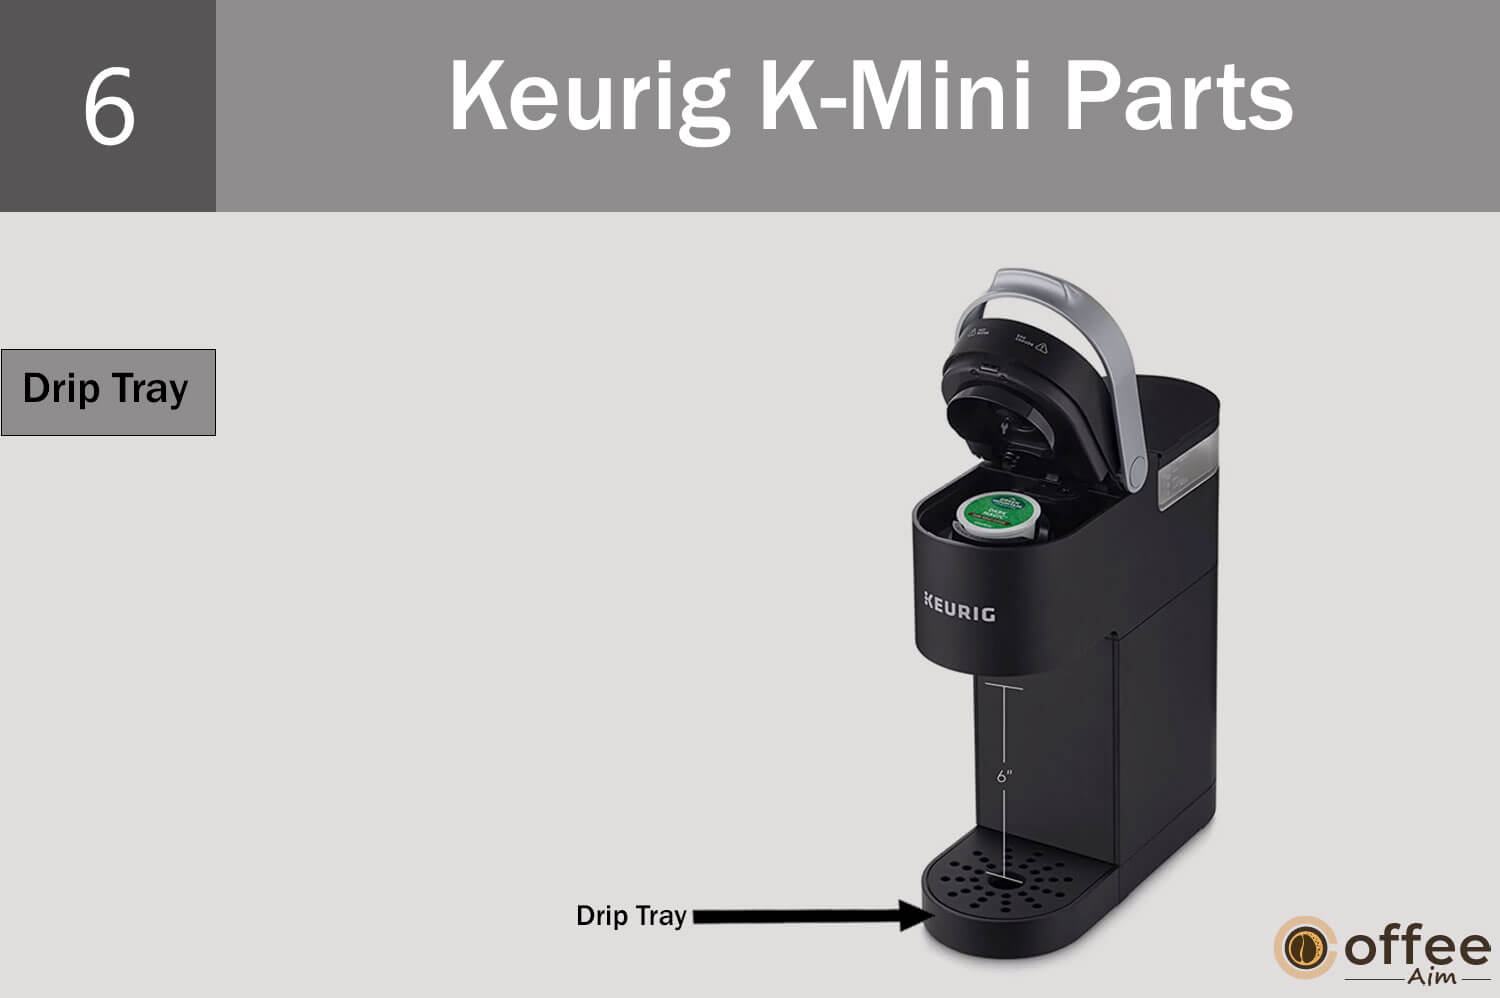
The Keurig K-Mini also features a drip tray beneath the brew basket and the drip tray plate. The drip tray is designed to store any excess coffee or water that may spill or overflow during dispensing, preventing it from making a mess on your countertop.
7. Drip Tray Base
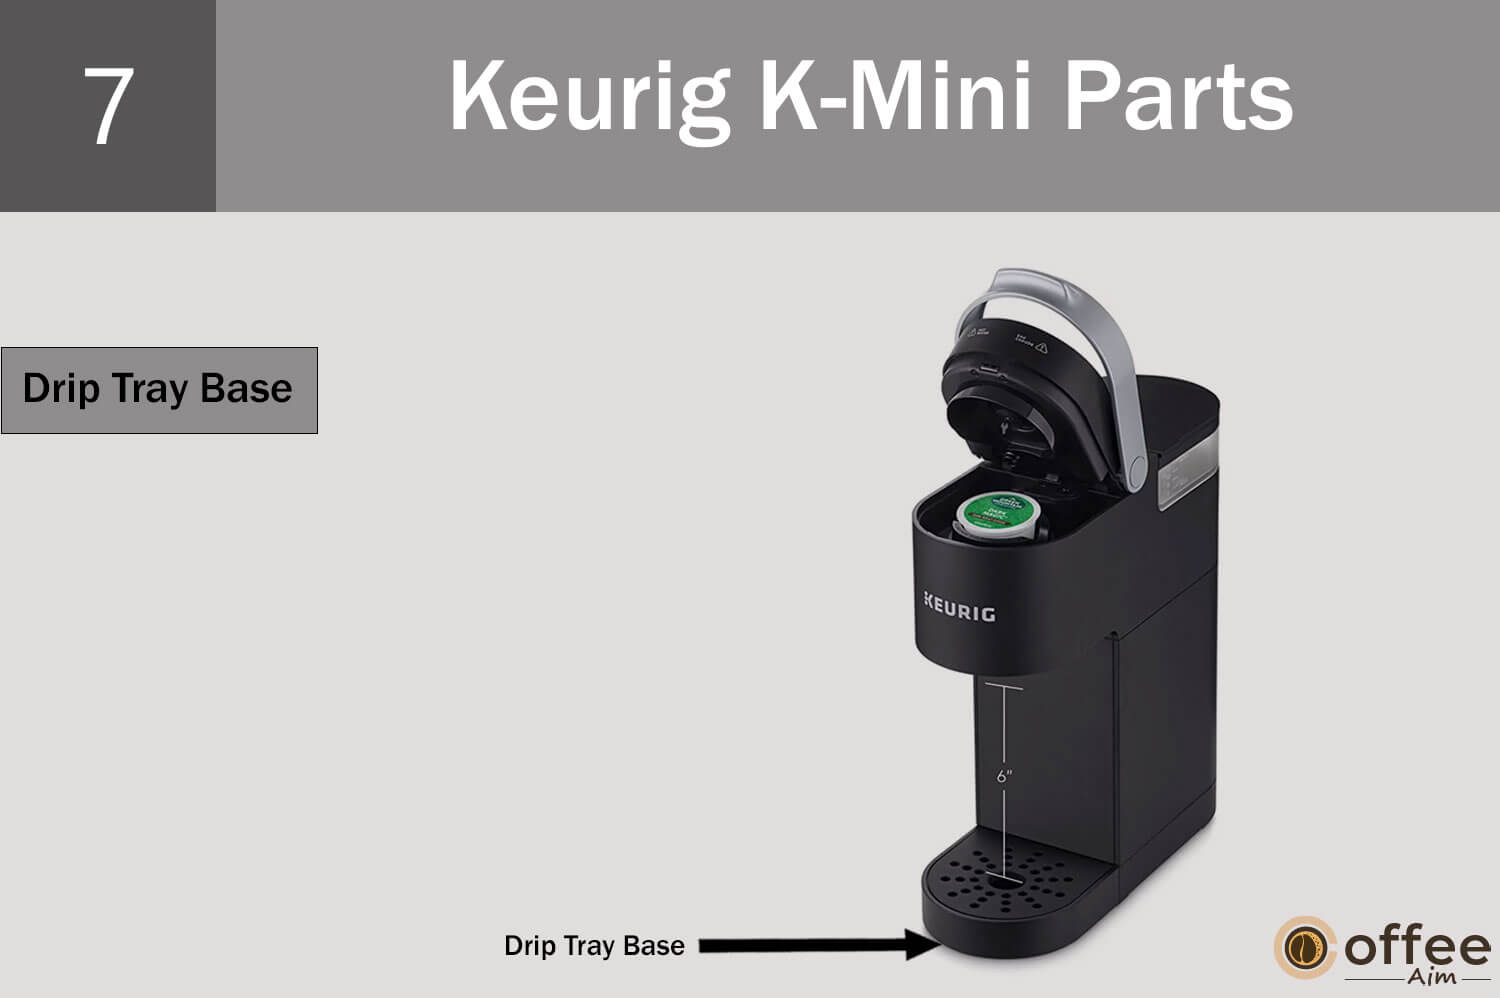
The Drip Tray Base is another essential Keurig K-Mini component that is used to place tall mugs. In case you want to use a tall mug to brew coffee, remove the drip tray to place the mug on the drip tray base. This part is located beneath the drip tray and is the foundation for the entire assembly.
8. Water Reservoir Lid

The Water Reservoir Lid is an essential component of the Keurig K-Mini that covers and seals the water reservoir, preventing any debris or contaminants from entering the water tank.
9. Water Reservoir

The Water Reservoir is a vital component of your Keurig K-Mini that stores the water used to brew your coffee. This part is at the back side of the coffee maker and can hold up to 12 ounces of water at a time.
10. Power Cord
The Power Cord is a core element of your Keurig K-Mini that allows you to connect your coffee maker to an electrical outlet and power it up. This part is at the lower back of the coffee maker and features a standard 2-prong plug that can fit into any standard electrical socket. (part J is the power cord).
11. Cord Storage
The Cord Storage is a convenient feature of your Keurig K-Mini that lets you keep the Power Cord out of the way and organized when not in use. This part is at the lower back of the coffee maker and features a simple and efficient design that allows you to wrap the Power Cord around it for neat storage. (part K is cord storage)
Steps Before Brewing First Cup Of Coffee Or After A Storage Period
Coffee goes beyond being a simple beverage; it’s a ritual, a culture, and a way of life for some. The aroma of freshly ground beans, the sound of boiling water, and the first sip of a hot, flavorful cup can awaken the senses and set the tone for the day. Follow the below instructions to know what to do before brewing your first cup of coffee. So, let’s get started!
1. Plug In The Power

Take out the tape from the coffee machine. Remove the plug and extend the cord from the cord storage area at the back of the coffee maker. Connect the plug to a grounded outlet. Activate the power switch. There will be a light on the power button.
2. Place And Fill
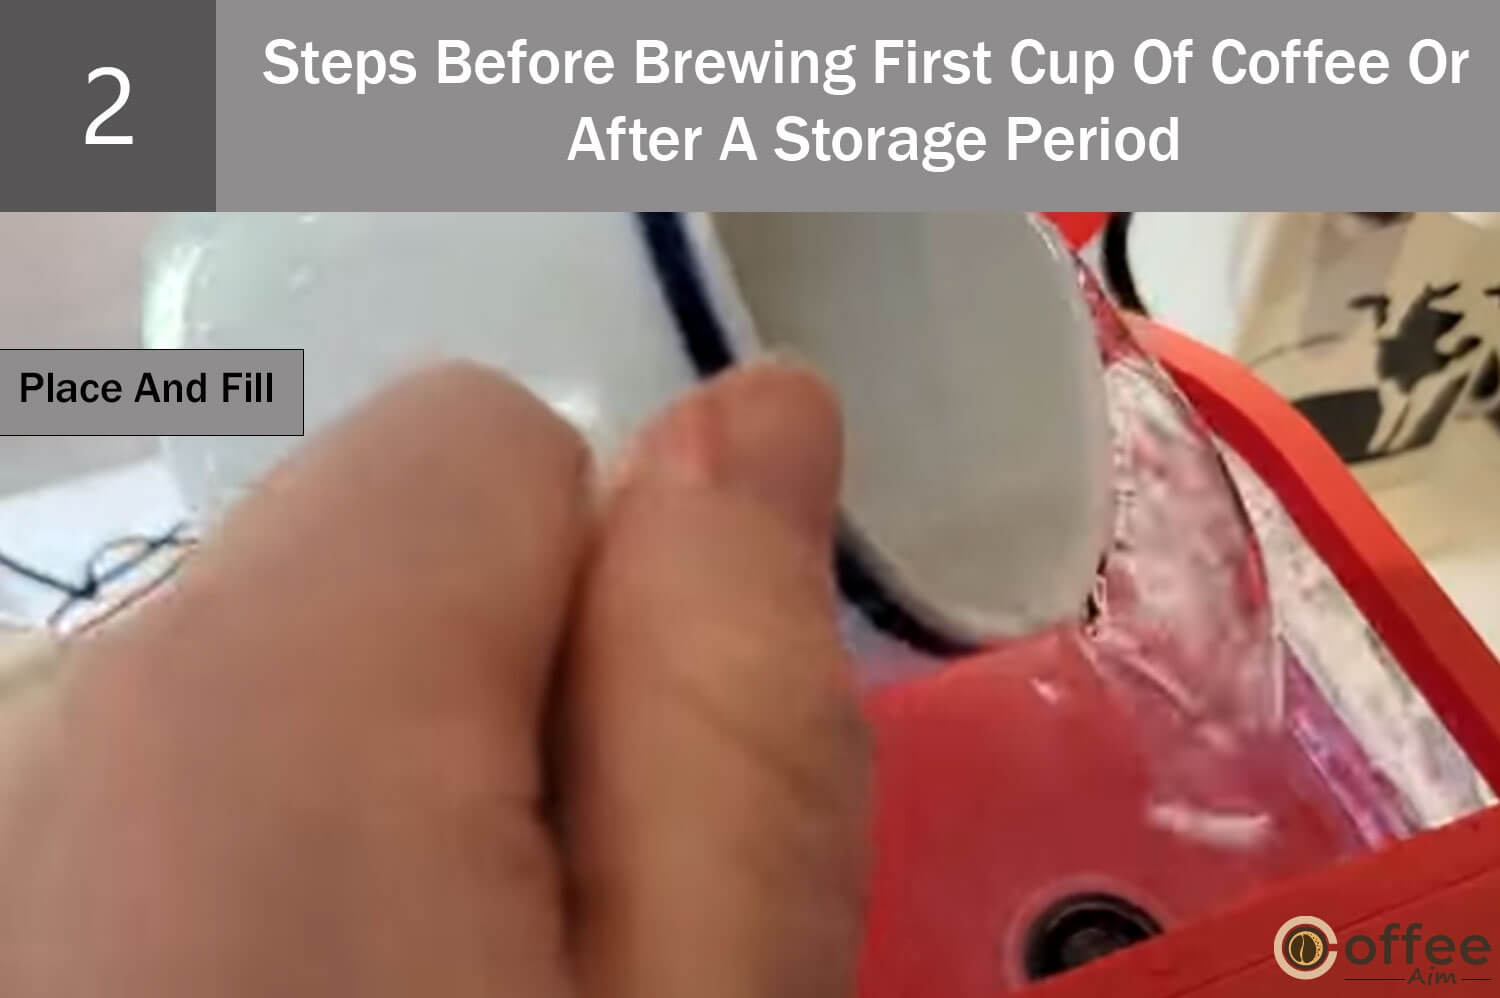
Fill a mug with 1 cup (237 ml/8 oz) of water. Lift the water reservoir’s lid and pour the water from the mug into the reservoir. Never fill more than the MAX fill line or less than the MIN fill line. Empty your mug on the drip tray and then lower the lid.
Note: Distilled water should not be used.
3. Lower And Lift

Elevate and lower the handle. Never put it in a K-Cup® pod.
The coffee maker’s indicator light will flash when it’s prepared.
Cleansing Brew
Hit the “brew” button. As the coffee maker heats up, the brew indicator light will first glow steadily before starting to pulse. The brew indicator light will turn solid again after around two minutes, at which point the water will dispense. Fill the sink with the hot water from the mug.
You are now prepared to brew after completing the one-time setup procedure.
Make Your First Coffee With Keurig K-Mini
Ah, the first cup of coffee of the day. It’s a magical moment that sets the tone for the rest of your day. The aroma, the flavor, the warmth – everything about that first sip is pure blissful. Have you ever thought about how that perfect cup of coffee comes to be? It’s not just pouring water or beans and hoping for the best. Making great coffee is an art that requires attention to detail, precision, and a little bit of science.
Let’s get through the steps you must follow to make a divine cup of coffee every time. So, grab your mug, and let’s get started!
1. Fill And Set Mug

In a mug , pourthe necessary amount of water (177 ml or 6 ounces, up to 355 ml or 12 ounces). Lift the water reservoir’s lid and fill the reservoir with water from the mug. Never fill more than the MAX fill line or less than the MIN fill line. Place the mug on the drip tray and then lower the cover.
2. Lift And Place Pod
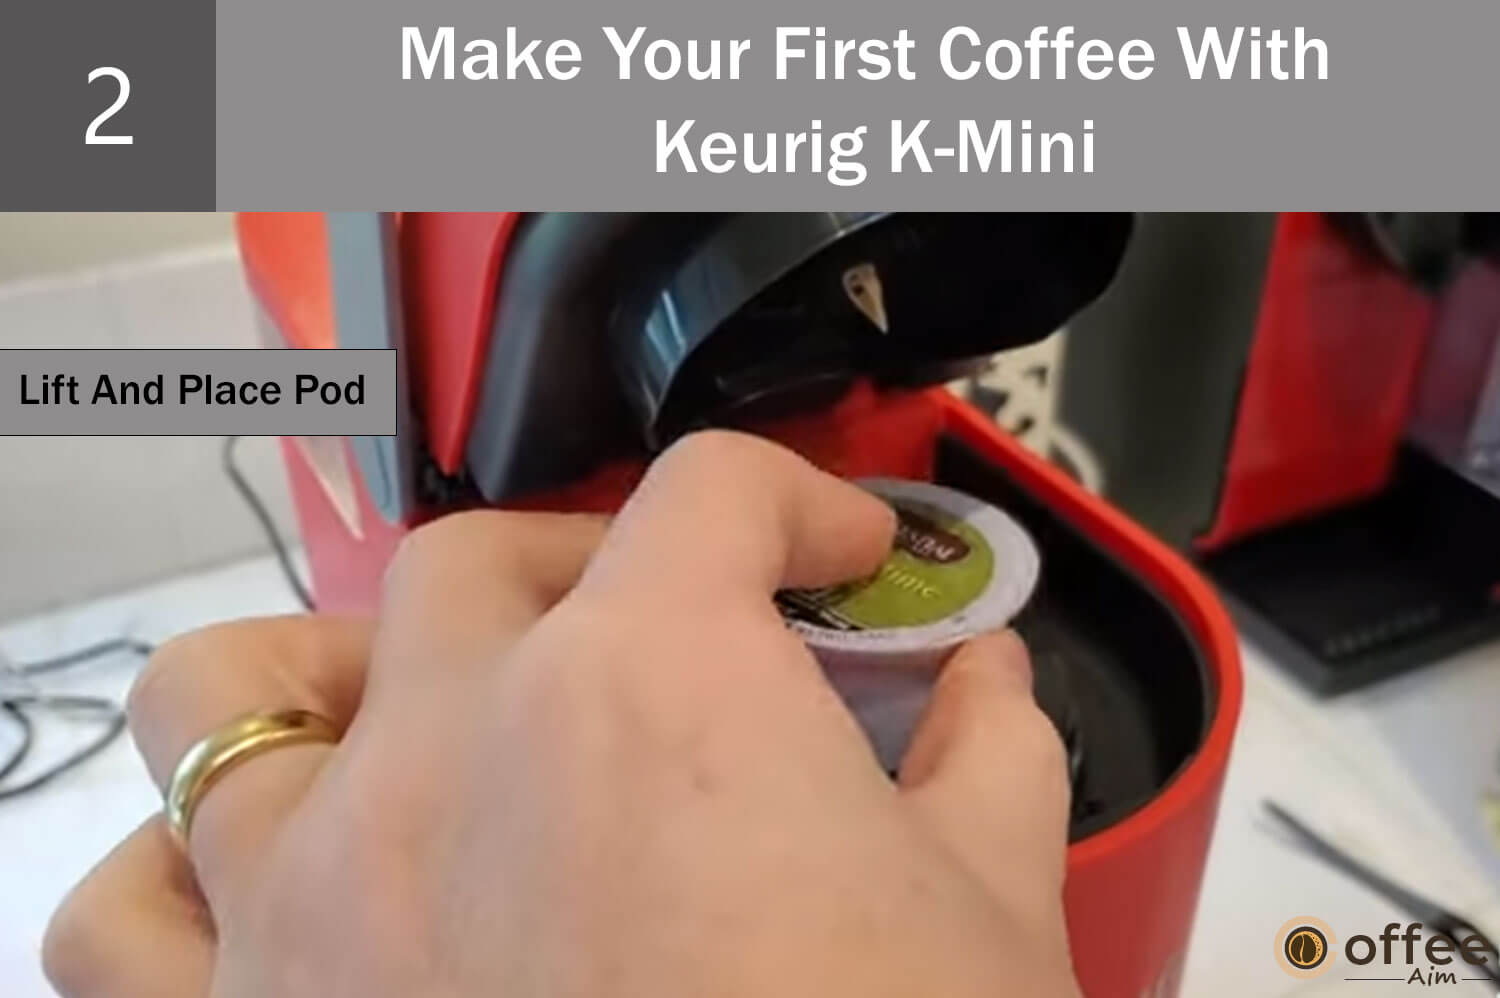
Lift the handle. Put a K-Cup® pod in the K-Cup® pod holder. To close the lid, fully lower the handle. When the coffee maker is ready, the brew indicator light will flash. The foil lid of the K-Cup® pod should not be removed.
Brewing at a High Altitude: When brewing at a high altitude, slowly press down on the K-Cup® pod until the exit needle punctures the bottom of the pod while holding the coffee maker handle up.
3. Brew And Enjoy

Hit the “brew” button. As the coffee maker heats up, the brew indicator light will first glow steadily before starting to pulse. The beverage will start to dispense, and the brew indicator light will illuminate solid once more after around two minutes. When the brew indicator light goes out, the brewing process is finished. Lift the lever after recycling the discarded K-Cup® pod in 3 simple steps.
Warning: While the coffee is brewing, the water in the K-Cup® pod holder is boiling. Do not lift the handle while the brewing occurs to prevent injury.
Recycling
In selected locations, Keurig K-cup pods are currently recyclable. For more information, visit Keurig.ca\Recycle. How can you do this? See below:
- Peel the lid and Dispose of
- Empty the contents; the filter can remain.
- Recycle.
Caring For Your Keurig K-Mini
Cleaning your coffee maker keeps the coffee maker in good working order. Before cleaning, always switch off and unplug your coffee machine. Let’s start cleaning!
1. The Exterior Of Your Coffee Maker

Periodically Cleaning the outside of your Keurig® coffee maker will keep it looking its best. Use a damp, soapy, lint-free, non-abrasive cloth to clean. Never let water or other liquids touch the coffee machine.
2. Drip Tray

The drip tray can store up to 237 ml/8 oz of overflow. That’s why it must be periodically emptied and cleaned. To remove it, slide it away from your brewer while keeping it level to prevent spills. Use a moist, soapy, lint-free, non-abrasive cloth to rinse and clean.
3. Water Reservoir
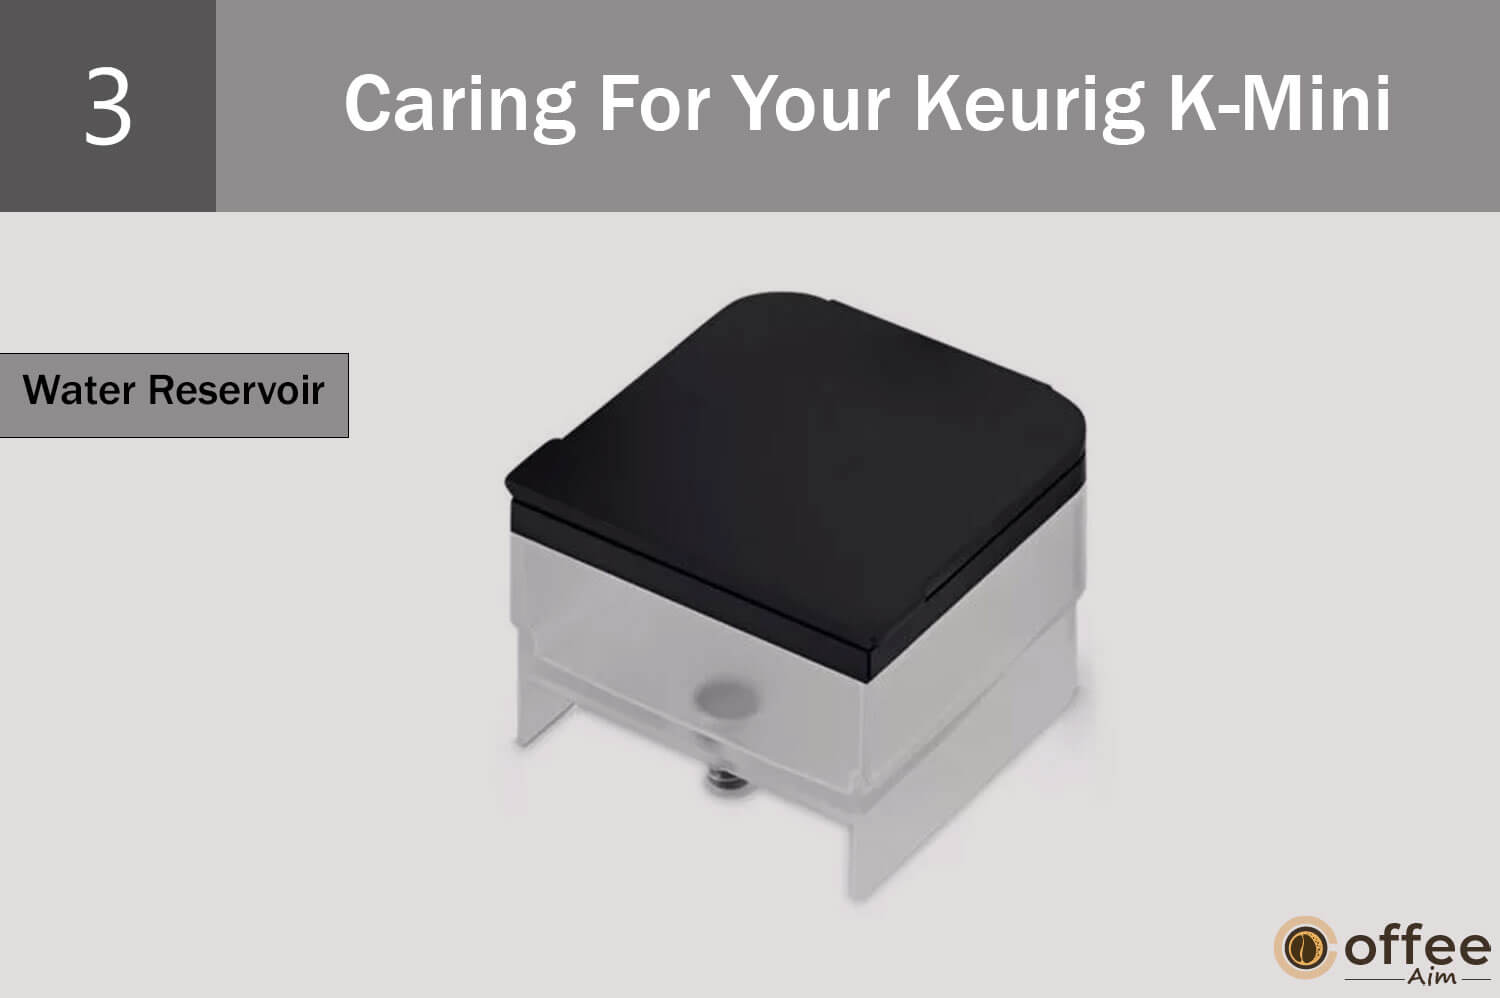
The water reservoir should be cleaned periodically with a damp, non-abrasive,
lint-free cloth by wiping the reservoir’s inside and the lid’s underside. The water reservoir’s interior should not be dried with a cloth, as lint may be left behind. Allow the reservoir to dry completely.
4. K-Cup Pod Holder

Lift the handle, grab the top of the K-Cup® pod holder with one hand, and press up on the bottom until it releases from the coffee machine. After cleaning, use the two front ribs as a guide to line up the K-Cup® pod holder with the opening, and then snap it into place from the top.
Caution: Sharp needles pierce the K-Cup® pod present above the K-Cup® pod holder and at the bottom of the K-Cup® pod holder. Do not insert your fingers into the K-Cup® pod holder to reduce the risk of harm.
Note: After brewing, always discard the used K-Cup® pod.
5. Funnel

Cleaning the funnel guarantees a hygienic beverage experience. The funnel’s regular washing should be performed, and for this purpose, remove the funnel from the K-Cup® pod holder by pulling it until it comes off. To replace it, just connect it back onto the K-Cup® pod holder while positioning the snaps to the indentation.
6. Exit Needle

Detach the funnel and the pod holder assembly. You will see the exit needle at the K-Cup® pod holder’s inside bottom. To remove coffee grounds, insert a paperclip into the exit needle.
7. Entrance Needle
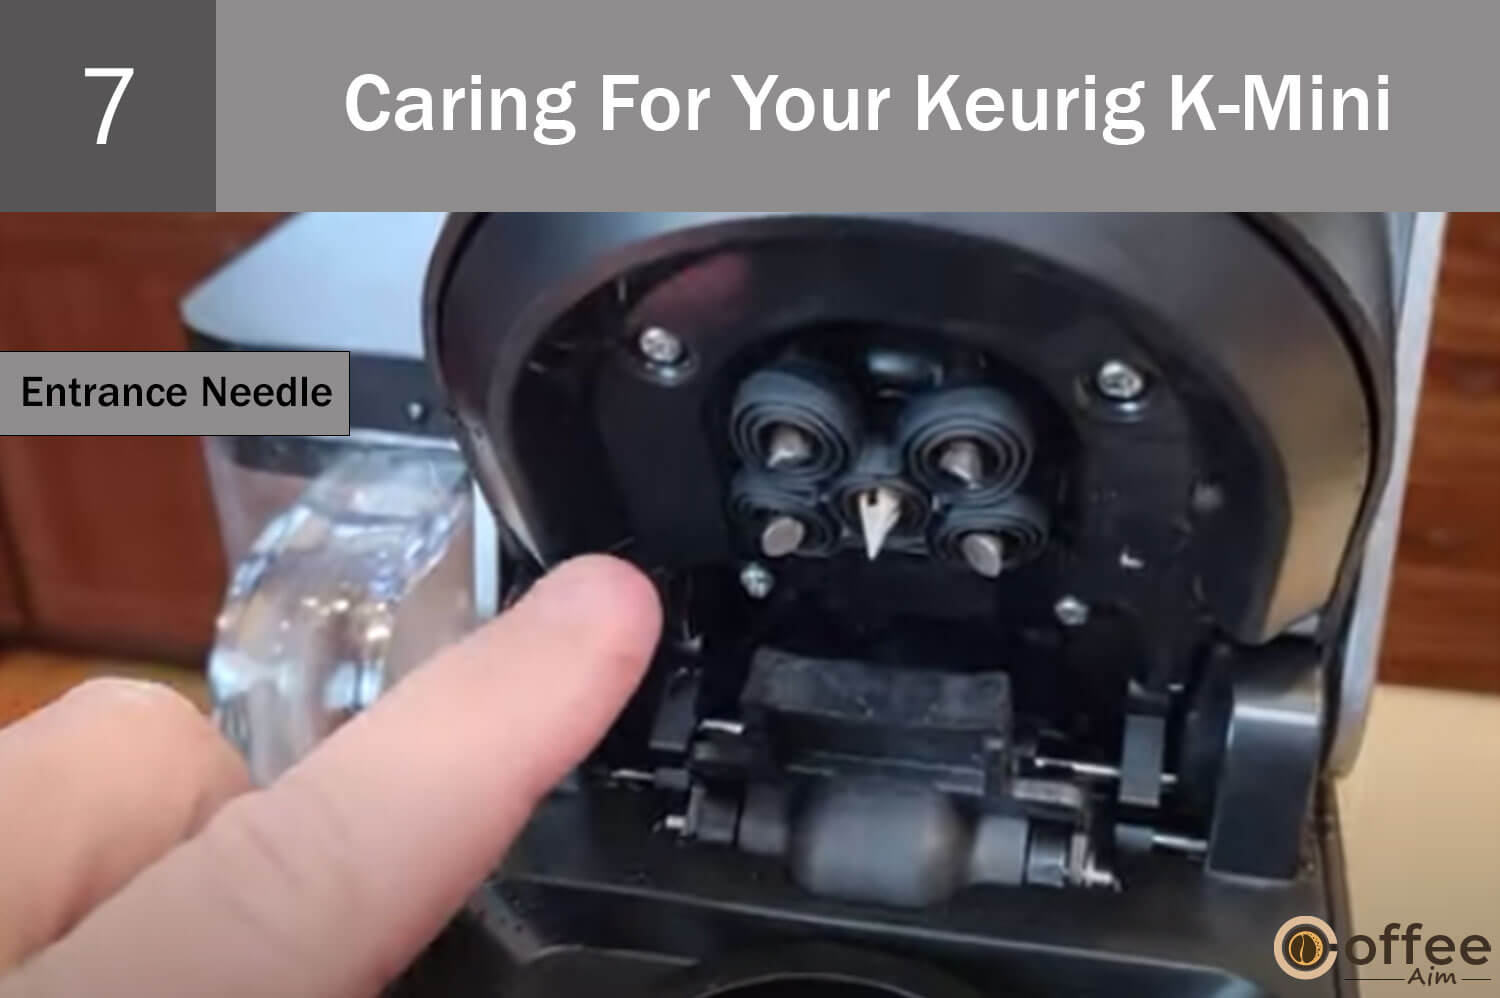
The entrance needle can be found on the bottom of the lid if you lift the coffee maker’s handle. To clean the needle’s two holes, hold the coffee maker handle up and carefully place a straightened paper clip into both holes with your other hand. To remove the coffee grounds, gently move the paper clip around, lower the handle, and run two water-only brew cycles without the K-cup pod.
Tip: For video instructions on how to clean the entrance/exit needles, see keurig.ca.
Descaling Your Keurig K-Mini
Nothing is like the fragrance of freshly brewed coffee in the morning. It’s essential to care for your coffee maker to ensure it continues producing high-quality coffee. One crucial aspect of coffee maker maintenance is descaling, which involves removing mineral buildup that accumulates over time.
Every three to six months, you should descale your coffee maker. Your coffee machine may develop calcium deposits or scale depending on the mineral composition of your water. Although the scale is non-toxic, it can affect coffee maker performance if not removed. The heating element and other internal components that come into touch with water are maintained with regular descaling of your coffee maker every 3 to 6 months. Calcium deposits could form more quickly, requiring more frequent descaling. Get started!
Items Require For Descaling
You will need a large ceramic cup, access to a sink, fresh water, and Keurig® Descaling Solution before you start. Avoid using paper cups. Verify that the K-Cup® pod holder is empty of any beverage pods. For the descaling procedure, please allow 45 minutes.
Step 1: Descaling Solution Rinse

Power on the coffee maker. Add fresh water to 296 ml (10 oz) and Pour 136 ml (4.6 oz) of the Keurig® Descaling Solution into the water reservoir. On the drip tray plate, the large ceramic cup should be placed.
Without putting in a K-Cup® pod, lift and lower the handle.
Hit the “brew” button. Pour the contents from the cup of the dispensed solution into the sink.
Step 2: Internal Tank Soak

Repeat step 1, but this time click the power button as soon as the brew indicator light solidifies and the coffee maker begins to pour.
Give the coffee maker at least 30 minutes to stand.
Keep the brew button pressed until the solution dispenses. Hold the button until the entire solution has been dispensed.
Then, fill the sink with the mug’s contents.
Step 3: Rinse With Fresh Water

Repeat step 1 using only 355 ml/12 oz of fresh water. Keurig® Descaling Solution should not be added. Repeat this procedure two more times. You might need repeated fresh water rinse cycles if any flavor remains.
Note: A “foam” may be dispensed from the coffee maker due to the cleaning action of the Keurig® Descaling Solution. It is expected because the solution is reacting with the scale is reacting. After adding the descaler, a highly scaled coffee machine might not fill correctly. If this happens, you might observe little to no output discharged and hear air blowing out afterward.
If this happens, follow the steps below:
- Unplug and turn off the coffee maker.
- If there is a Keurig® Descaling Solution in the water reservoir, empty it, thoroughly rinse it and then replace it with water.
- Re-plug the coffee machine, turn it on, and repeat Step 3. While the solution is being rinsed out and the scale is being eliminated, the coffee maker should start operating normally. If the issue still exists, leave the coffee maker unplugged for at least 30 minutes before performing the rinse.
Troubleshooting The Common Problems Of Keurig K-Mini
The K-Mini lets users enjoy fresh and hot coffee at home or on the go. However, like any electronic device, the K-Mini may encounter issues affecting its performance and function. In this section, we’ll look at some common troubleshooting tips and solutions for the Keurig K-Mini, so you can keep your coffee maker running smoothly and enjoy a perfect cup of coffee every time.
Grounds In Your Coffee
Grounds may have accumulated in the exit or the entrance needles and can be cleared using a straightened paper clip or a similar tool.
• Clean the K-Cup® pod holder’s exit needle. Consult the care instructions for the exit needle above in this article.
• Clean the entrance needle of the coffee machine. Consult the instructions for caring for the entrance needle above in this article.
Coffee Maker Won’t Brew
Brewing requires at least 177 ml (6 oz) of water. To ensure the minimum fill level is met, add 59 ml/2 oz of water to the reservoir before pressing the brew button. Continue until the coffee maker starts to brew.
Making A Partial Cup Of Coffee:
- Push the power button. Hold the brew button of your brewer for 5 seconds until all the water has been dispensed. Discard the liquid into the sink. To restart, press the power button.
- The exit needle can be obstructed. Refer to the care guidelines for the exit needle above in this article.
- To clean the K-Cup® Pod Holder, refer to the care instructions for the K-Cup® Pod Holder above in this article.
- Descale the coffee maker if necessary. Contact customer service if your coffee maker is still only producing a partial cup after you have performed the descaling on it twice.
The Coffee Maker Loses Power Or Turns Off:
- Make sure to switch on the power switch.
- The coffee machine should be plugged into a grounded outlet. Your coffee maker cannot work correctly if the electrical circuit is overburdened with other appliances. The coffee maker automatically shuts off 90 seconds after the final brew for energy conservation.
- The coffee maker should be run on its circuit, away from other appliances. To restart, press the power button.
- Contact customer service if the coffee machine is still without electricity.
Practical Advice
There is a vast range of water quality. I advise using bottled or filtered water if you detect an unfavorable flavor in your beverage (such as chlorine or mineral flavors). Use non-distilled water.
Service
Beyond these suggested maintenance and cleaning methods, this coffee maker cannot be serviced by the user. Please refer to this guide’s Warranty section for information on service.
Storage
Before storing or transporting, empty the water reservoir, and always ensure storing your coffee maker in a secure, free-of-frost atmosphere. Before using it after the storage period, I advise rinsing the water reservoir with fresh water and descaling your coffee maker. Please turn off your coffee maker, unplug it, and empty the water reservoir before moving it to a new position. Please wait at least two hours for your coffee maker to warm up to room temperature if it has been exposed to temperatures below freezing.
Have inquiries?

For detailed videos on descaling, cleaning, and other topics, go to keurig.ca.
Need assistance yet?
Please call 1-800-361-5628.
One-Year Limited Warranty
Keurig Green Mountain, Inc. (Keurig) warrants that your coffee maker will be free of manufacturing flaws(For one year) when used in a standard home setting. It is advised to register your coffee maker on keurig.ca/welcome so that the details of your purchase will be kept in the Keurig database. Upon receiving documentation of the purchase date, Keurig (at its own expense) will replace or repair a damaged coffee maker without charging you.
If a replacement coffee machine is required to fulfill this warranty, it may be brand-new or reconditioned. If a replacement coffee maker is delivered, a fresh, limited one-year warranty will be applied to it.
Only coffee machines used in the United States and Canada are covered by this guarantee. You have certain legal rights, which differ across different states and from province to province (in the case of Canada), and you may also have other rights in addition to those provided for by this guarantee.
Your Keurig® coffee maker will only operate appropriately and last as long as you use K-Cup® brand pods and accessories. Using accessories and non-Keurig® pods may cause your coffee maker to malfunction or sustain damage not covered by this warranty. If the malfunction or damage is found to have been caused by such usage, you may also be charged a service fee.
What Does The Limited Warranty Not Cover?
ANY CONSEQUENTIAL OR INCIDENTAL DAMAGES, INCLUDING PROPERTY DAMAGE AND OTHER LOSSES, ARE NOT COVERED BY THIS WARRANTY.
EVEN IF FORESEEABLE, IT DOES NOT COVER INCIDENTAL COSTS AND EXPENSES DUE TO ANY BREACH OF THIS WARRANTY. The limitation mentioned above or exclusion may not apply to you according to the state or province where the transaction was made because some states and provinces do not permit the exclusion or limitations of incidental or consequential damages. The use of accessories and non-Keurig® pods or services rendered by parties other than Keurig or its authorized service providers, the use of non-Keurig® parts, or outside factors like abuse, misuse, improper power supply, or acts of God is also not covered by this warranty.
Other Limitations
ANY OTHER EXPRESS WARRANTY, WRITTEN OR ORAL, IS REPLACED BY THIS WARRANTY, WHICH IS EXCLUSIVE.
APART FROM THE IMPLIED WARRANTIES OF MERCHANTABILITY AND FITNESS FOR A PARTICULAR PURPOSE, KEURIG HERE EXPRESSLY DISCLAIMS ALL OTHER WARRANTIES CONCERNING YOUR KEURIG® COFFEE MAKER. According to the state or province where you made the purchase, some states or provinces restrict the exclusion of such implied guarantees or limit how long such implied warranty lasts. As a result, the restriction mentioned above might not apply to you.
How Are Warranty Services Obtained?
Coffee machines made by Keurig® are high-quality devices that should last for many years with regular maintenance.
However, if warranty servicing is required, contact Keurig Customer Service at 1.800.361.5628. Please call Keurig Customer Service to get a Return Materials Authorization (RMA) number before returning your coffee maker for service. Without an RMA number, Keurig® coffee makers will be returned to the sender unserviced.
Conclusion
In conclusion, the Keurig K-Mini coffee maker is a perfect choice for one who wants a convenient, easy-to-use, and efficient coffee maker. This guide presents an in-depth exploration of the Keurig K-Mini coffee maker and how to use and get the best out of it. Refer to the oceans of coffee knowledge by clicking on CoffeeAim.
Frequently Asked Questions(Faqs)
How Much Time Can A Cup Of Coffee With Keurig K-Mini Brew?
The Keurig K-Mini coffee maker is designed to brew a cup of coffee in under 2 minutes. This is perfect for people who want their coffee quickly without sacrificing quality.
Can I Use My Own Coffee Grounds With Keurig K-Mini?
No, the Keurig K-Mini is designed to use K-Cup pods only. The coffee is perfect every time, without any guesswork or messy cleanups.
What Is The Water Reservoir Capacity Of Keurig K-Mini?
The water reservoir of the Keurig K-Mini can hold up to 12 ounces of water. This is enough to brew a single cup of coffee, which is perfect for those individuals who reside alone or are the sole lovers of coffee in their household.
Does Keurig K-Mini Have An Auto-Off Feature?
Yes, the Keurig K-Mini coffee maker has an auto-off feature for energy-saving that turns the machine off after 90 seconds of inactivity. This helps save energy and ensures that the machine doesn’t stay on when it’s not needed.
Is Keurig K-Mini Easy To Clean?
Yes, the Keurig K-Mini is easy to clean. The drip tray can be cleaned and removed to avoid spills and messes, and the water reservoir can be easily detached for filling and cleaning.
What Is The Size Of The Keurig K-Mini?
The Keurig K-Mini coffee maker is compact in size, with dimensions of 12.1 x 4.5 x 11.3 inches. This makes it easy to store and perfect for small kitchens, dorm rooms, or offices.
What K-Cup Pod Brands Are Compatible With Keurig K-Mini?
The Keurig K-Mini coffee maker can be used with all K-Cup pod brands, giving you a wide variety of flavors to choose from. This includes popular brands such as Starbucks, Dunkin’ Donuts, and Green Mountain Coffee.
Can I Adjust The Brew Size Of The Keurig K-Mini?
Yes, the Keurig K-Mini coffee maker allows you to adjust the brew size according to your needs. You can choose between 6, 8, or 10-ounce cup sizes, depending on your preference.
How Often Should I Descale Keurig K-Mini?
It is recommended to descale the Keurig K-Mini. The duration can range from three to six months, depending on the frequency of use. This helps remove mineral buildup and ensures that the machine runs smoothly and efficiently.
What Is The Warranty Period Of Keurig K-Mini?
The Keurig K-Mini coffee maker comes with a one-year warranty, which covers defects in materials or workmanship. This provides peace of mind for buyers and ensures that any issues with the machine are addressed promptly.