Quick Navigation
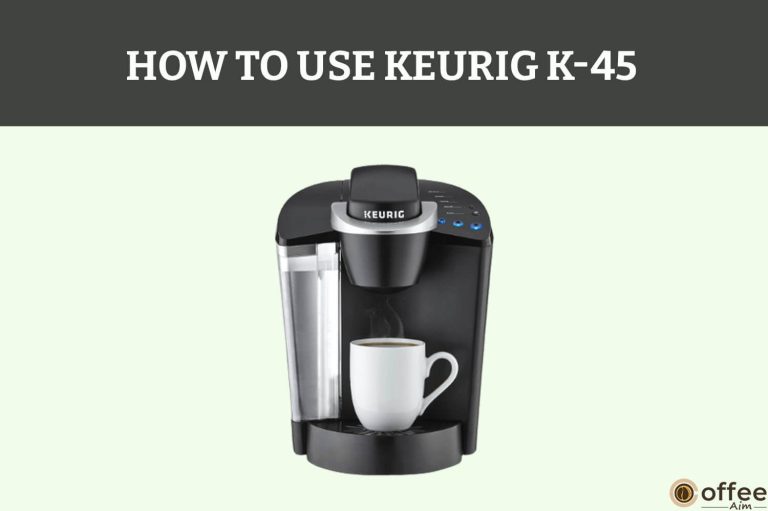
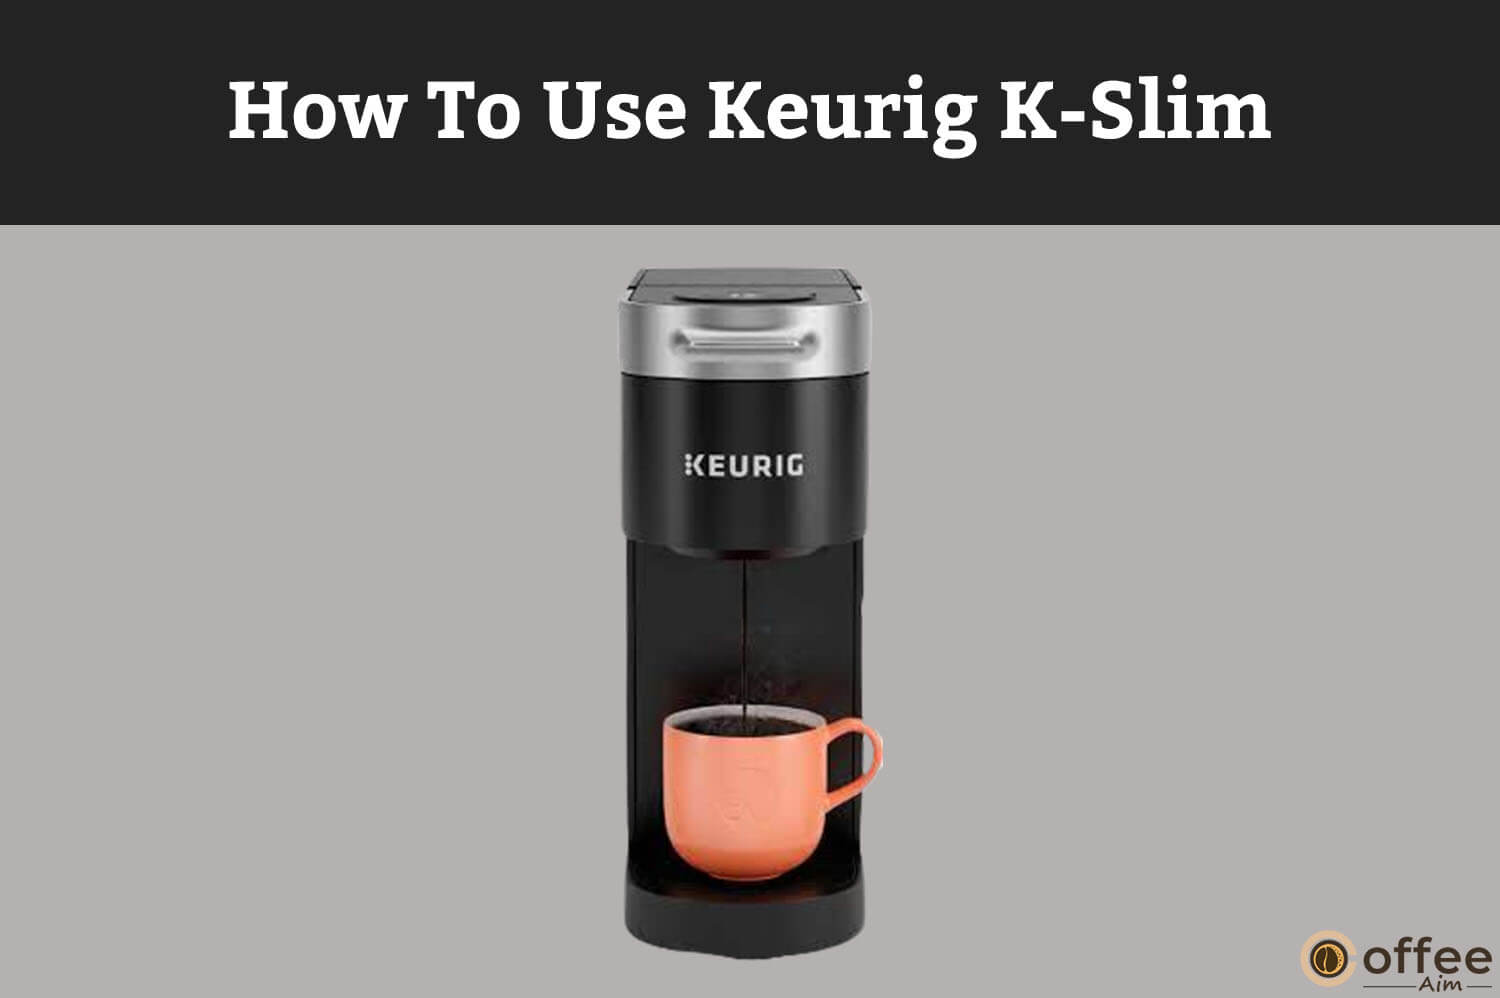
If you guys have bought Keurig K-Slim and are now searching for guidelines to use this accurately, even if you have a guide already there on the table, but it only explains some of the procedure. If you still have confusion, then I say welcome to all of you because you guys are in the right place at the right time. I will give a complete and well-explained guidelines about how to use Keurig K-Slim.
Keurig K-Slim Precautions
Why is it important to read about the precautions before using Keurig K-Slim? Is it necessary to read all the precautionary measures?
This is very important to read about the precautions before using Keurig K-Slim because what if you do not know how to use it and you push the wrong button at the wrong time and destroy Keurig K-Slim and, most importantly, you lose the opportunity to have a sip of a tasty coffee which is recently made from a newly bought Keurig K-Slim. That is horrible for coffee lovers, as I know that losing the opportunity to drink coffee is more devastating and gloomy for them(coffee lovers) than losing anything else.
Also, if you use it without reading the precautions, it can harm (electric shock, etc.) you. So make sure that you have read all the precautions before using it.
You can click on the link below to read the precautions.
Insert link
Wait! Don’t start thinking that Keurig K-Slim will harm you if you misuse it without reading precautions and conclude that it is dangerous. This is really very funny. Because I think it is necessary for the user of every appliance to read its precautions first.
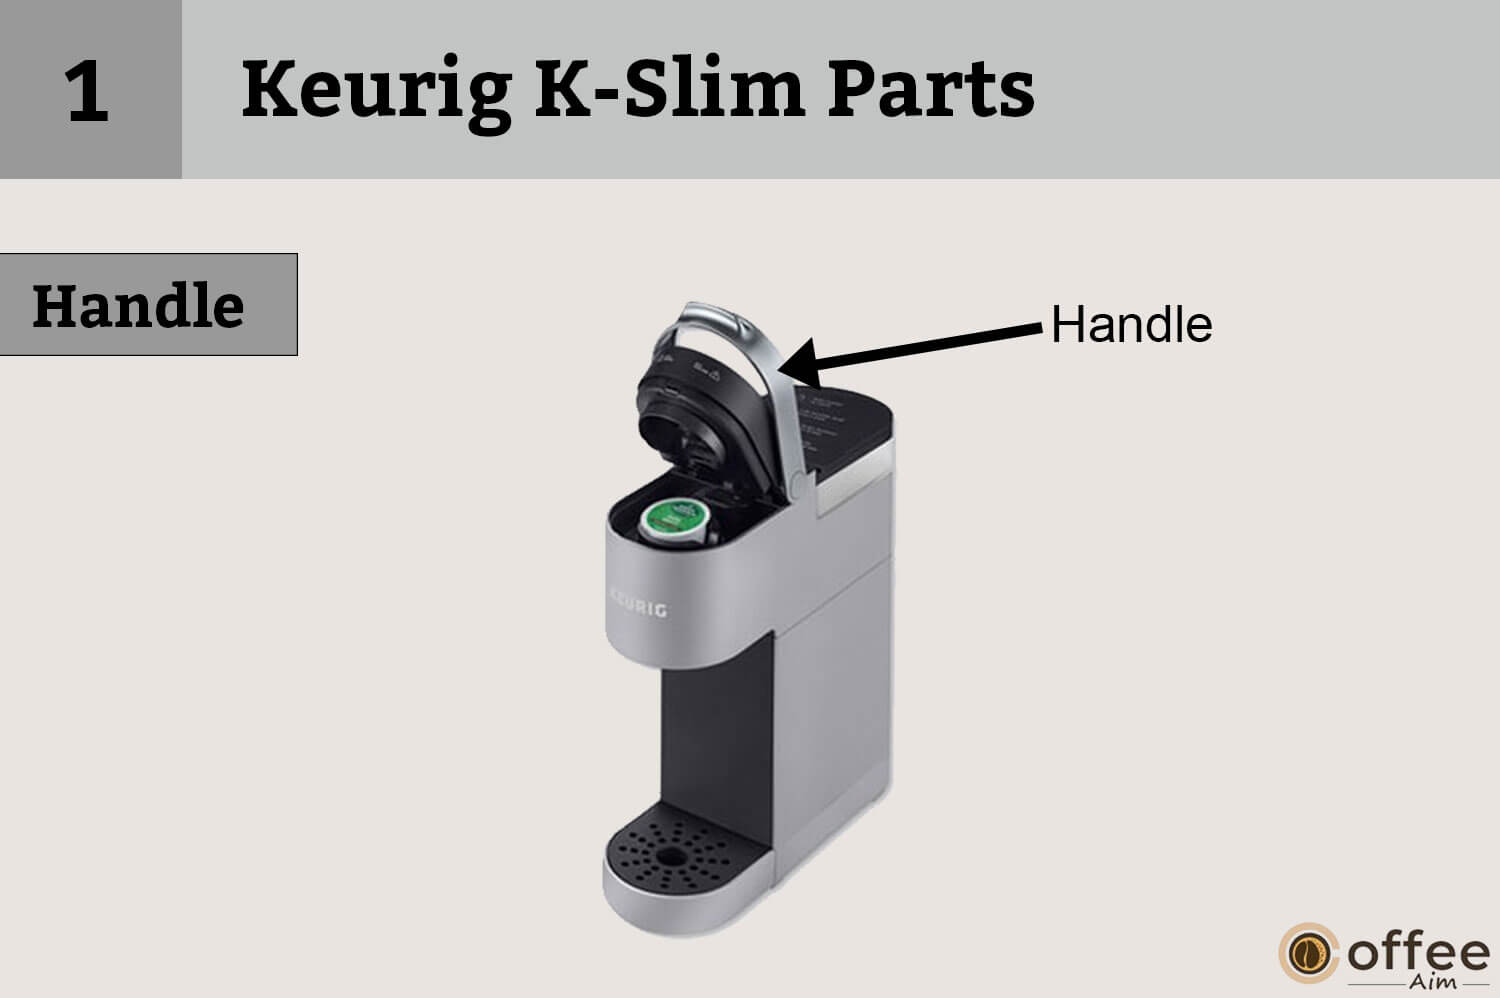
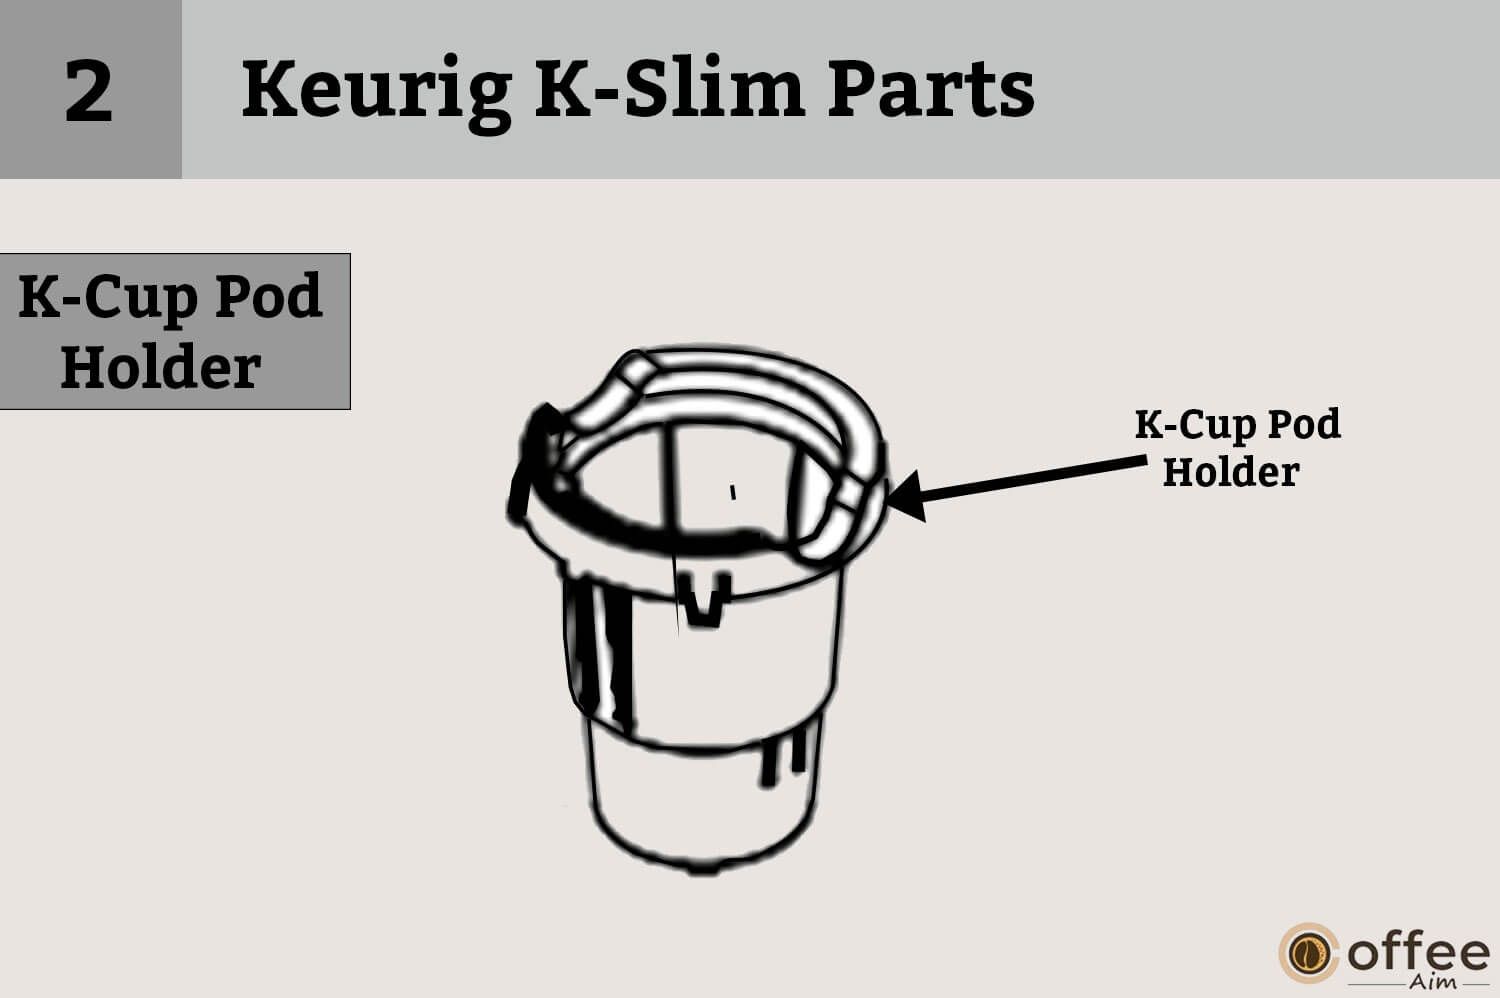
So before directly jumping into the method and procedure of using it, I think it is compulsory to have a little bit of knowledge about the parts of Keurig K-Slim. Because if you have knowledge of the parts of Keurig K-Slim, then It will become easy for you to understand the procedure. It will take very little time of yours.
And it is quite interesting to call the name of a part before using it.
Keurig K-Slim Parts
1. Handle
2. K-Cup Pod Holder
3. Funnel
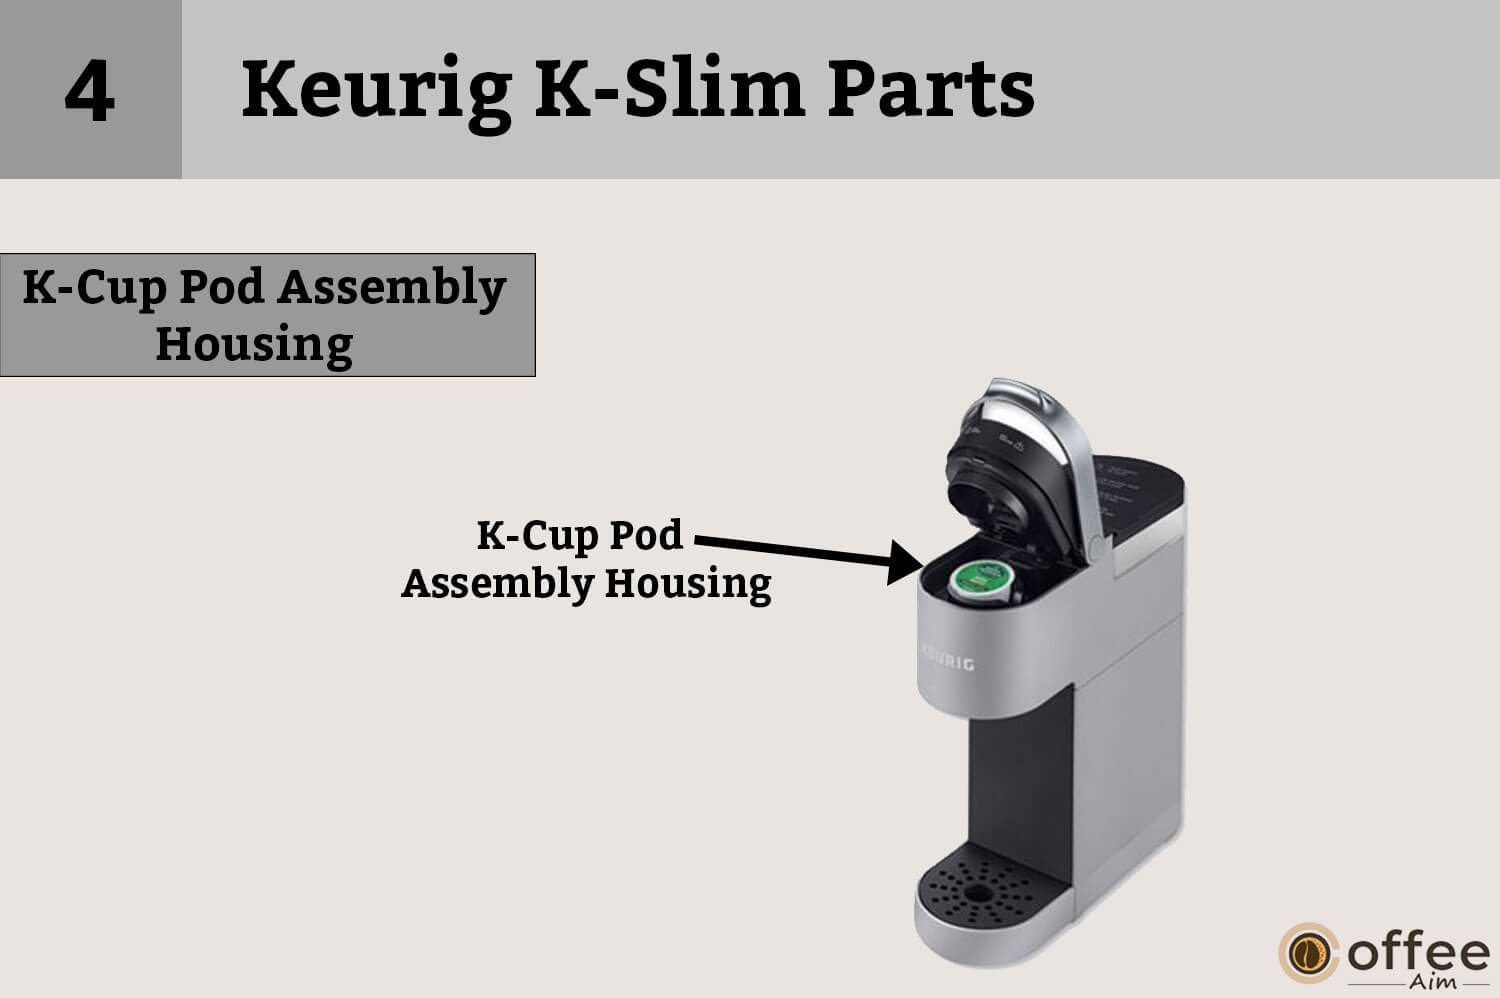
4. K-Cup Pod Assembly Housing
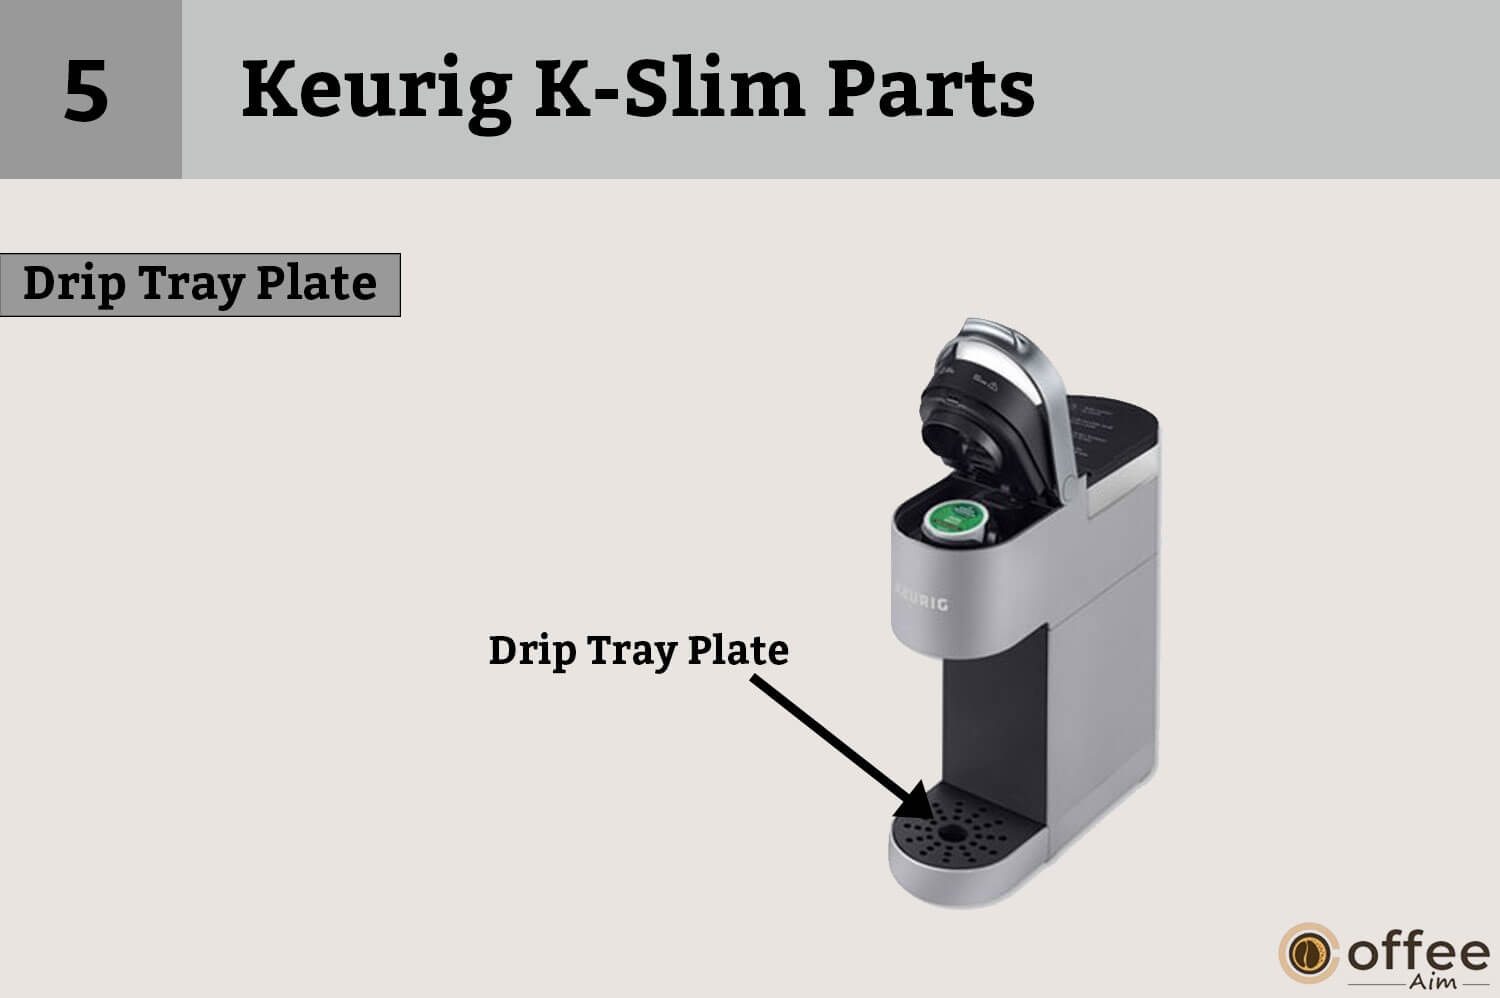
5. Drip Tray Plate
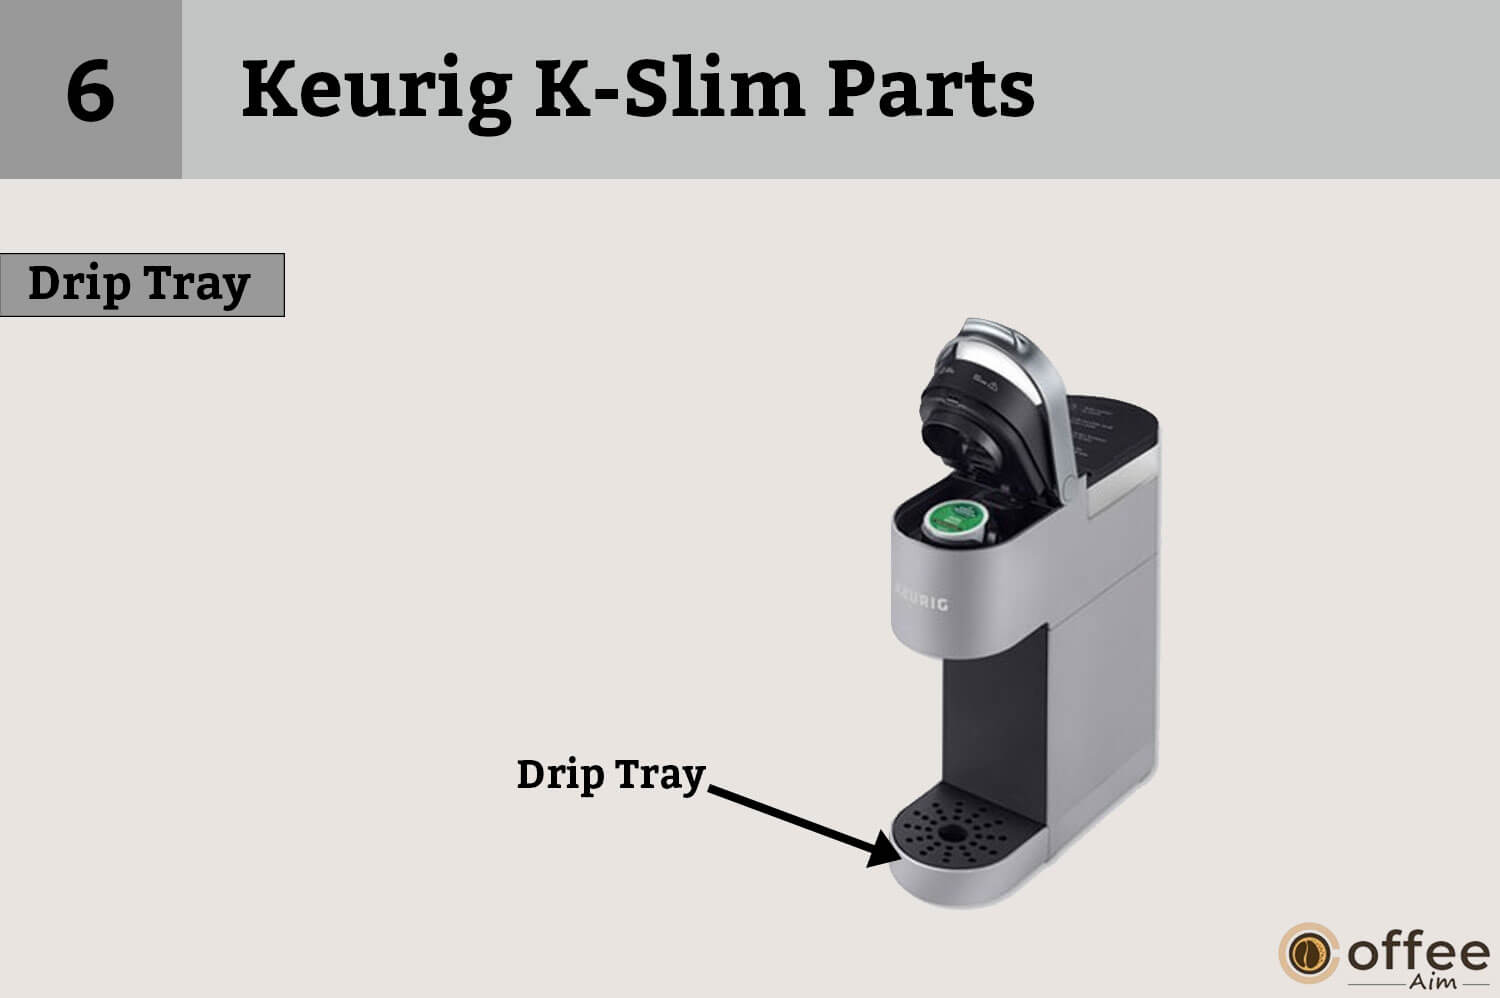
6. Drip Tray
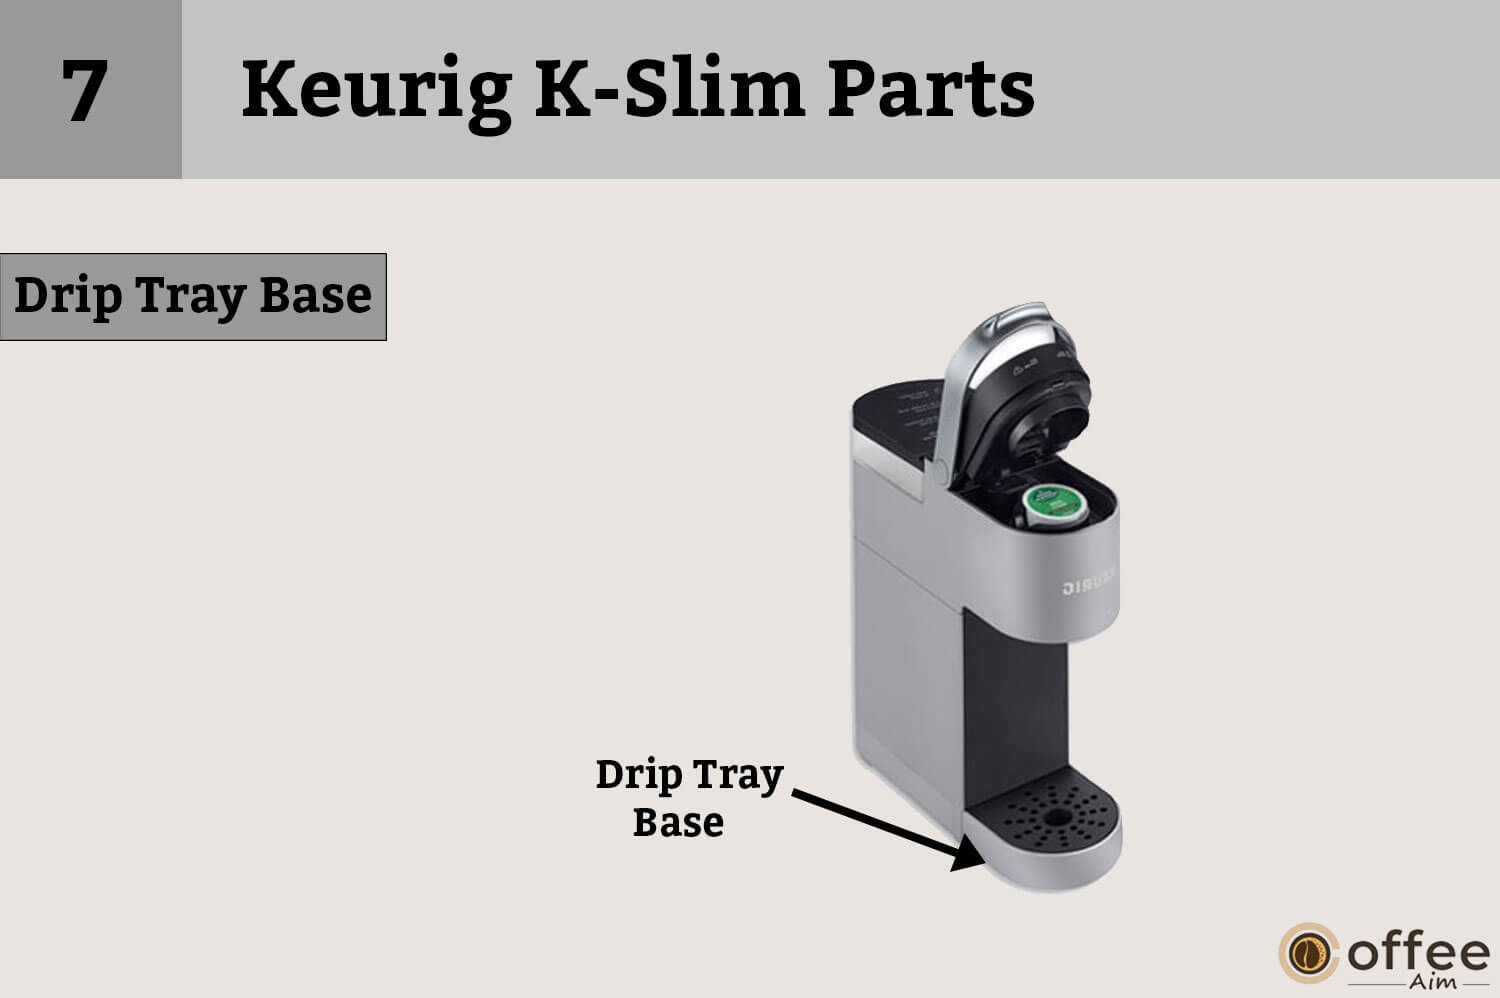
7. Drip Tray Base
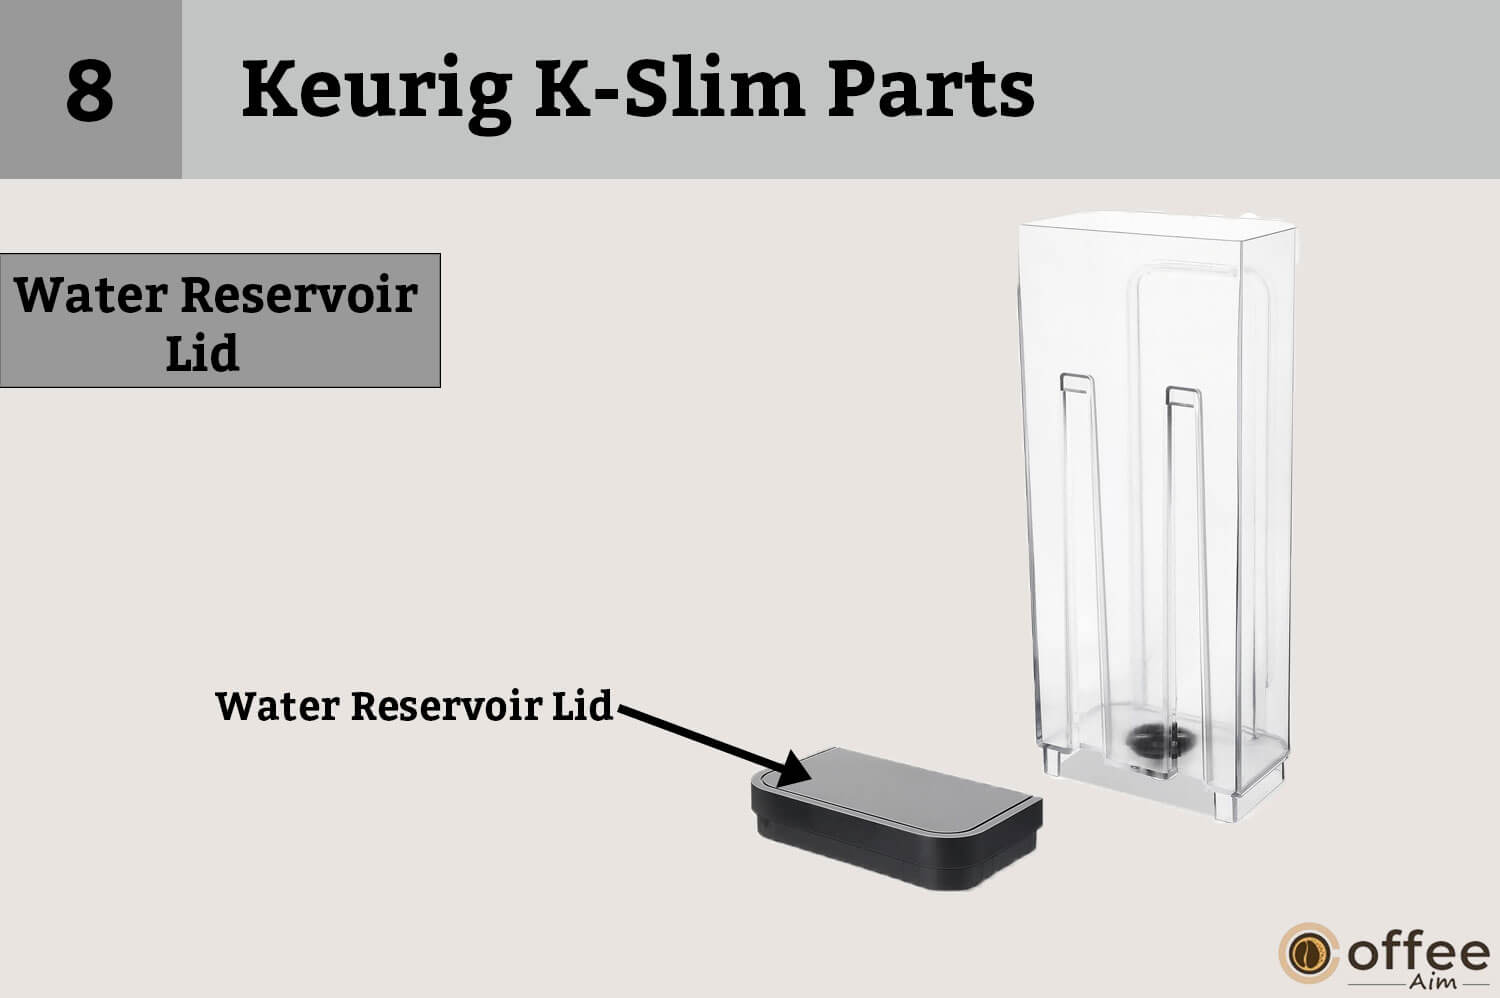
8. Water Reservoir Lid
9. Water Reserve

Cleaning of Keurig K-Slim Before Your First Brew
I know you guys are searching for its method of use, but what would you do after making a tasty cup of coffee from Keurig K-Slim? Will you leave it when Keurig K-Slim needs you to clean it? Or are you going to wash it in the way you do with other utensils and let it go to waste in just 2-3 weeks?
I can surely say that you guys are good guys, and all of you will clean it in a better way and spend a little more time with the Keurig K-Slim and enjoy its coffee. So you don’t need to be thankful because I am going to tell you the most appropriate and easy way to clean it.
Just follow the steps, and you will get your Keurig K-Slim cleaned.
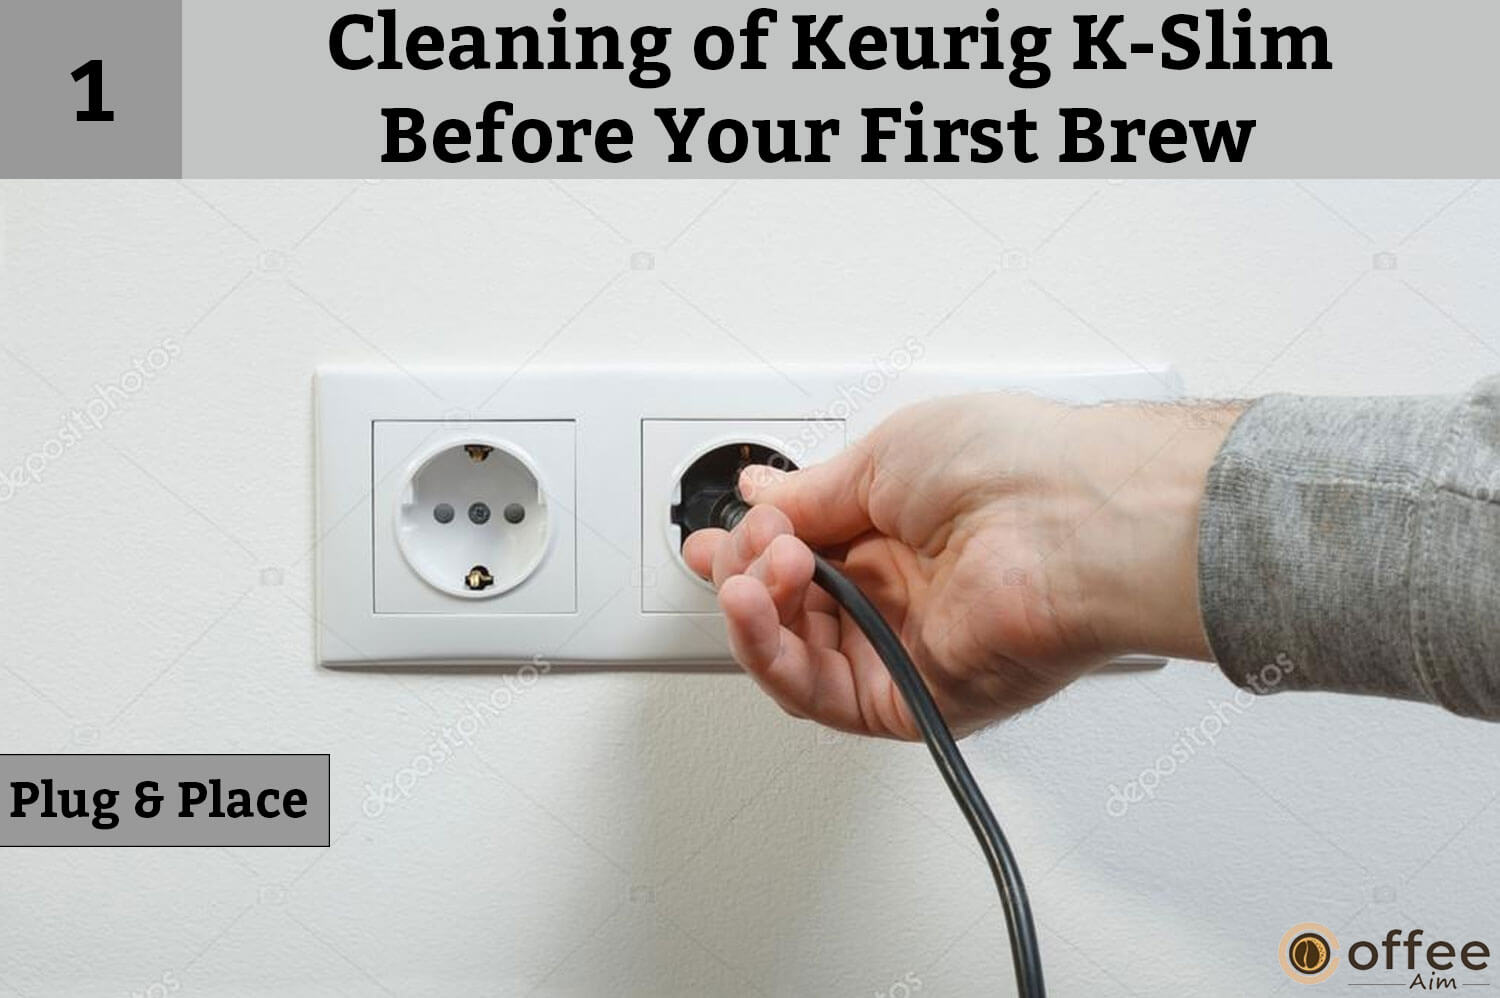
Step 1:Plug & Place
The first step is to sit and place the Keurig K-Slim in front of you and remove the sticker and feel happy (if you are using it for the first time; otherwise, be serious). Now plug into a grounded outlet. Then place the mug on the drip tray (the tray on the lower side of the Keurig K-Slim on which the cup or mug is to be placed).
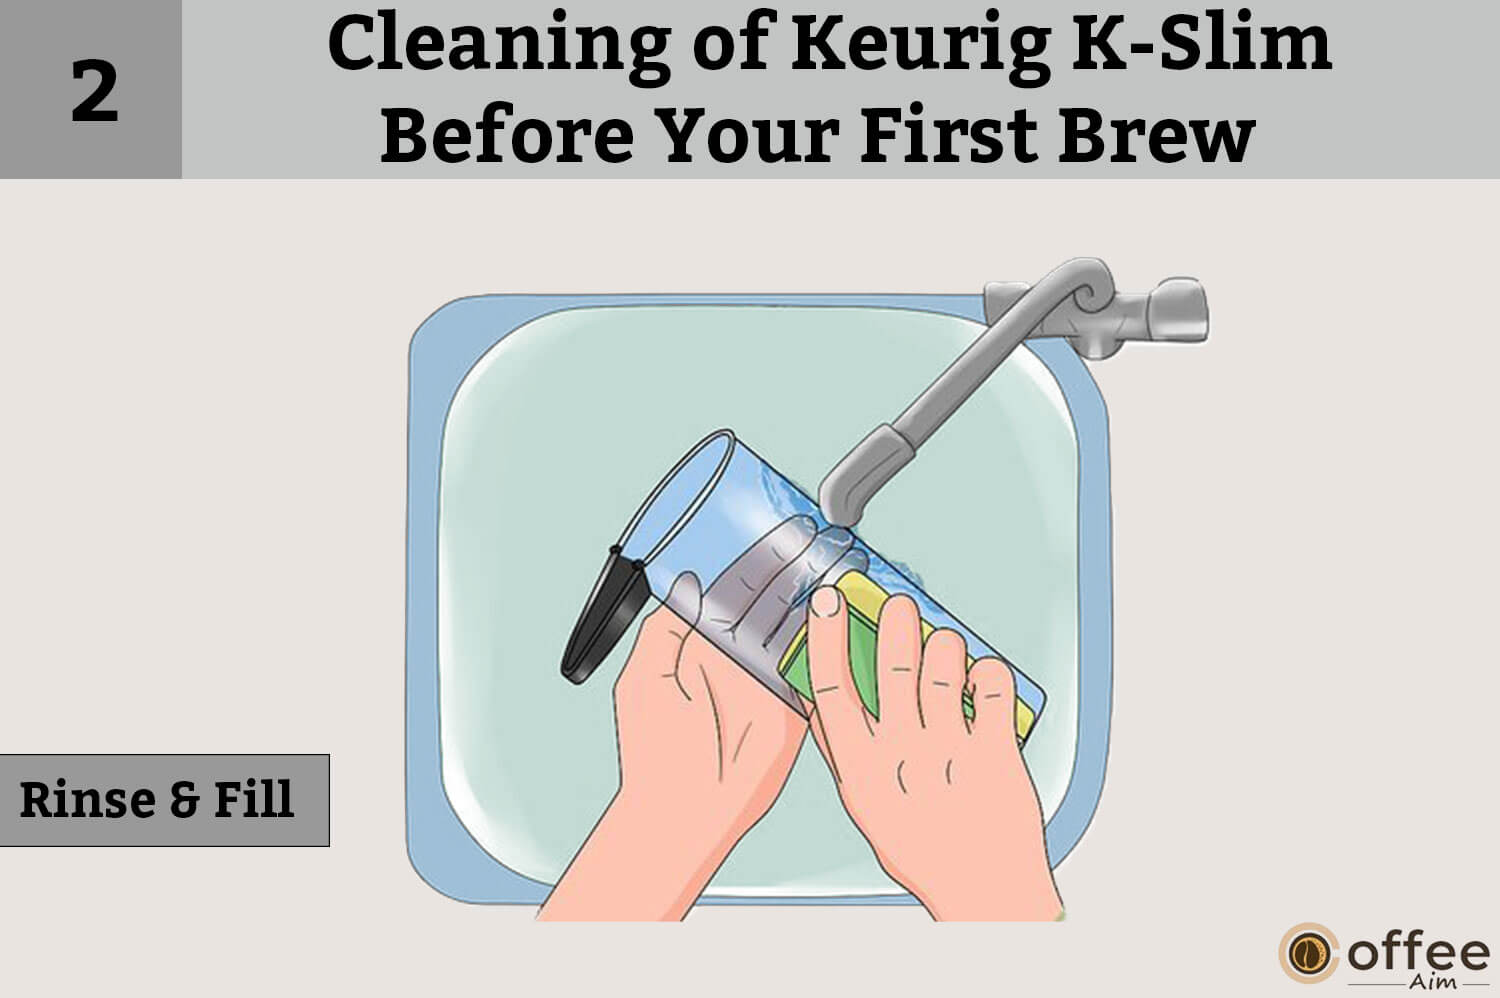
Step 2: Rinse & Fill
In the second step, just look behind the Keurig K-Slim, and there will be a water reservoir. Remove the lid of the water reservoir. Lift the reservoir straight up to remove it. You cannot remove it by just pushing it back because it is designed in the way to make it firmly gripped with the Keurig K-Slim and easy to use. This feature will also help you keep your house and clothes neat and clean, which others appliances often take as their duty to make them dirty.
Now rinse the reservoir and fill water into it up to the Max Fill line. Replace the water reservoir and ensure the lock tabs engage with the brewer. Then replace the lid.
Note: Do not use distilled water.
However, if you want to use filtered water, you can order this separately because I think there is a facility for separate filter tubes for those who want to use filtered water.
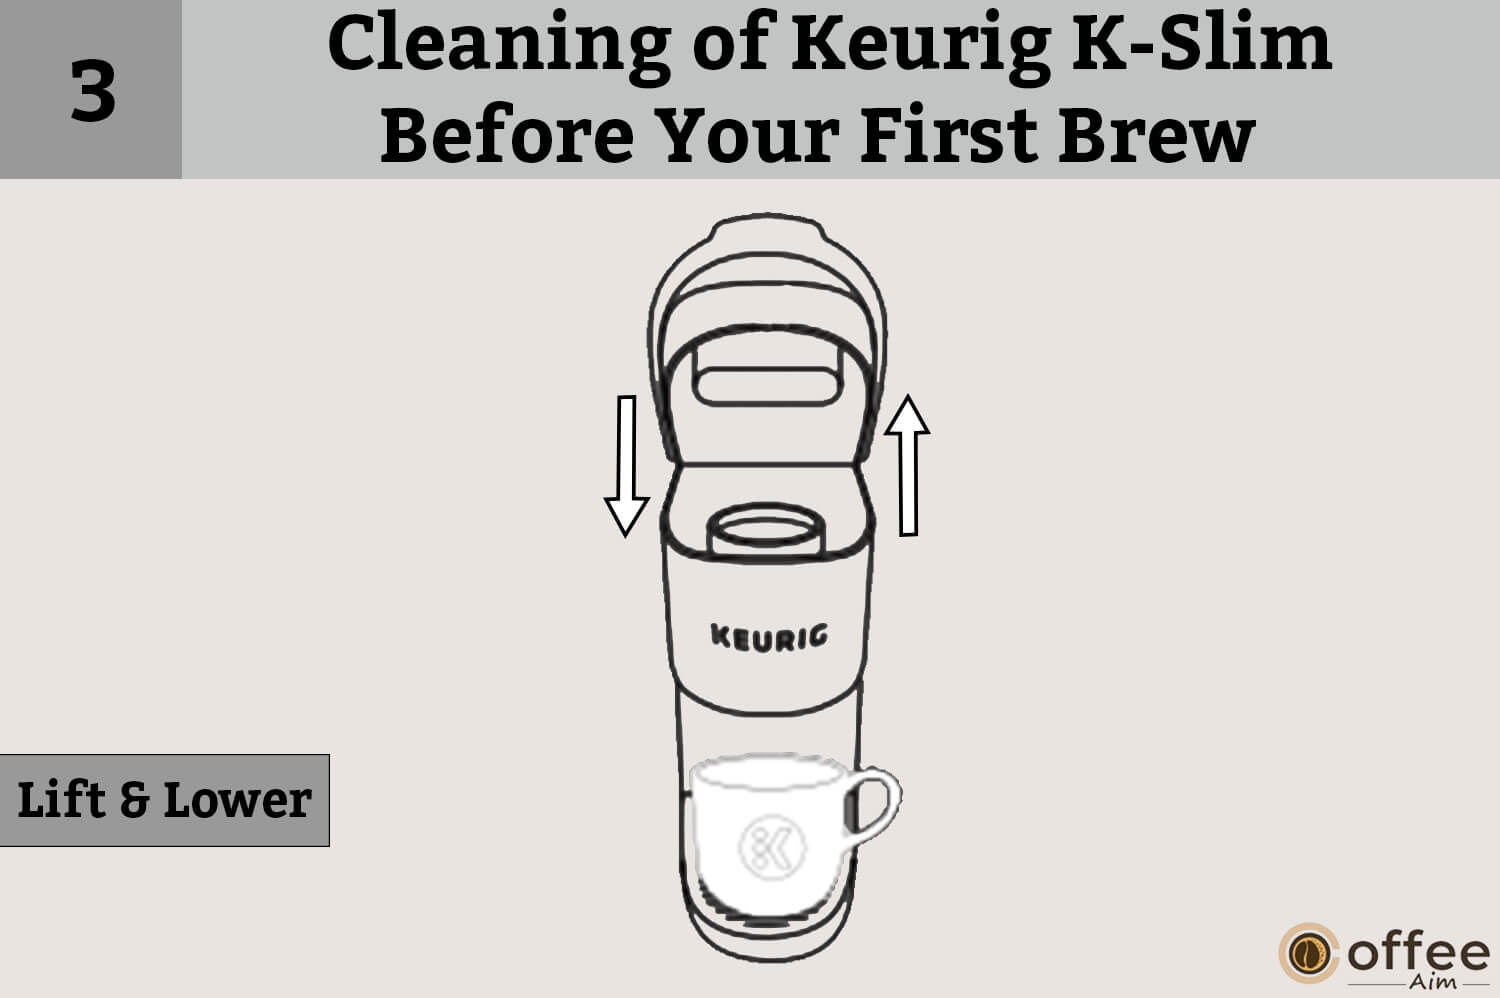
step 3: Lift & Lower
Now just lift the lid and lower it, and you will see the Keurig K-Slim turned on automatically. It is very interesting as you don’t have to push a button to turn it on. As of now, you’re just cleaning it, so you don’t have to put a K-Cup® pod.
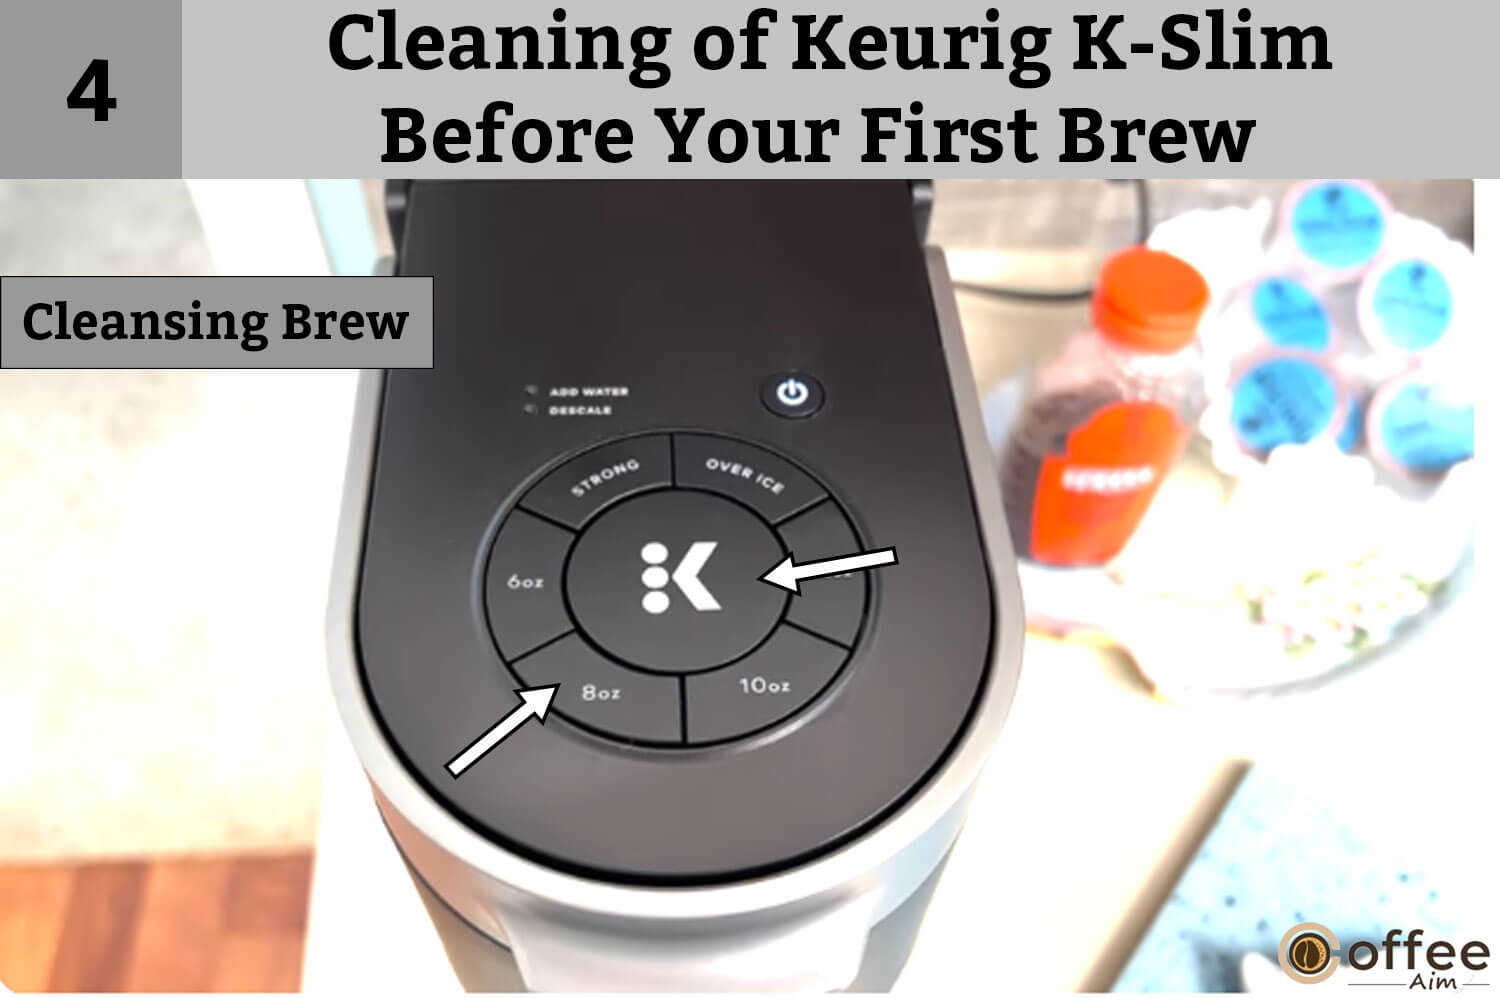
Step 4:Cleansing Brew
Now plug in the Keurig K-Slim (if you have not plugged it in before). You will see the cup-size buttons blinking. In order to do the cleansing of Keurig K-Slim (after lowering the lid), push the 8 oz button. However, you can also use other cup-size buttons too (but only cup-size buttons, not the ‘add water button’ and ‘descale button’). Then click the blinking brew button. This brew button will keep on blinking even after pressing it. Place anything to collect the water coming out of the Keurig K-Slim. The water will be hot, so don’t try to touch it; otherwise, you can have the cleansing of your hands too (this would be a buy one get one free offer). It was just for fun, but please don’t try to do that.
Congratulations! To all of you guys, our cleaning process is now completed, and now we are on the way to brew.
So without wasting time, let’s get straight into it.
Brewing (making coffee)
I am happy that you guys are struggling so much to have knowledge about all this to enjoy a cup of coffee made from Keurig K-Slim. But the time is over, and now I will tell you to brew your first cup without making any mistakes.
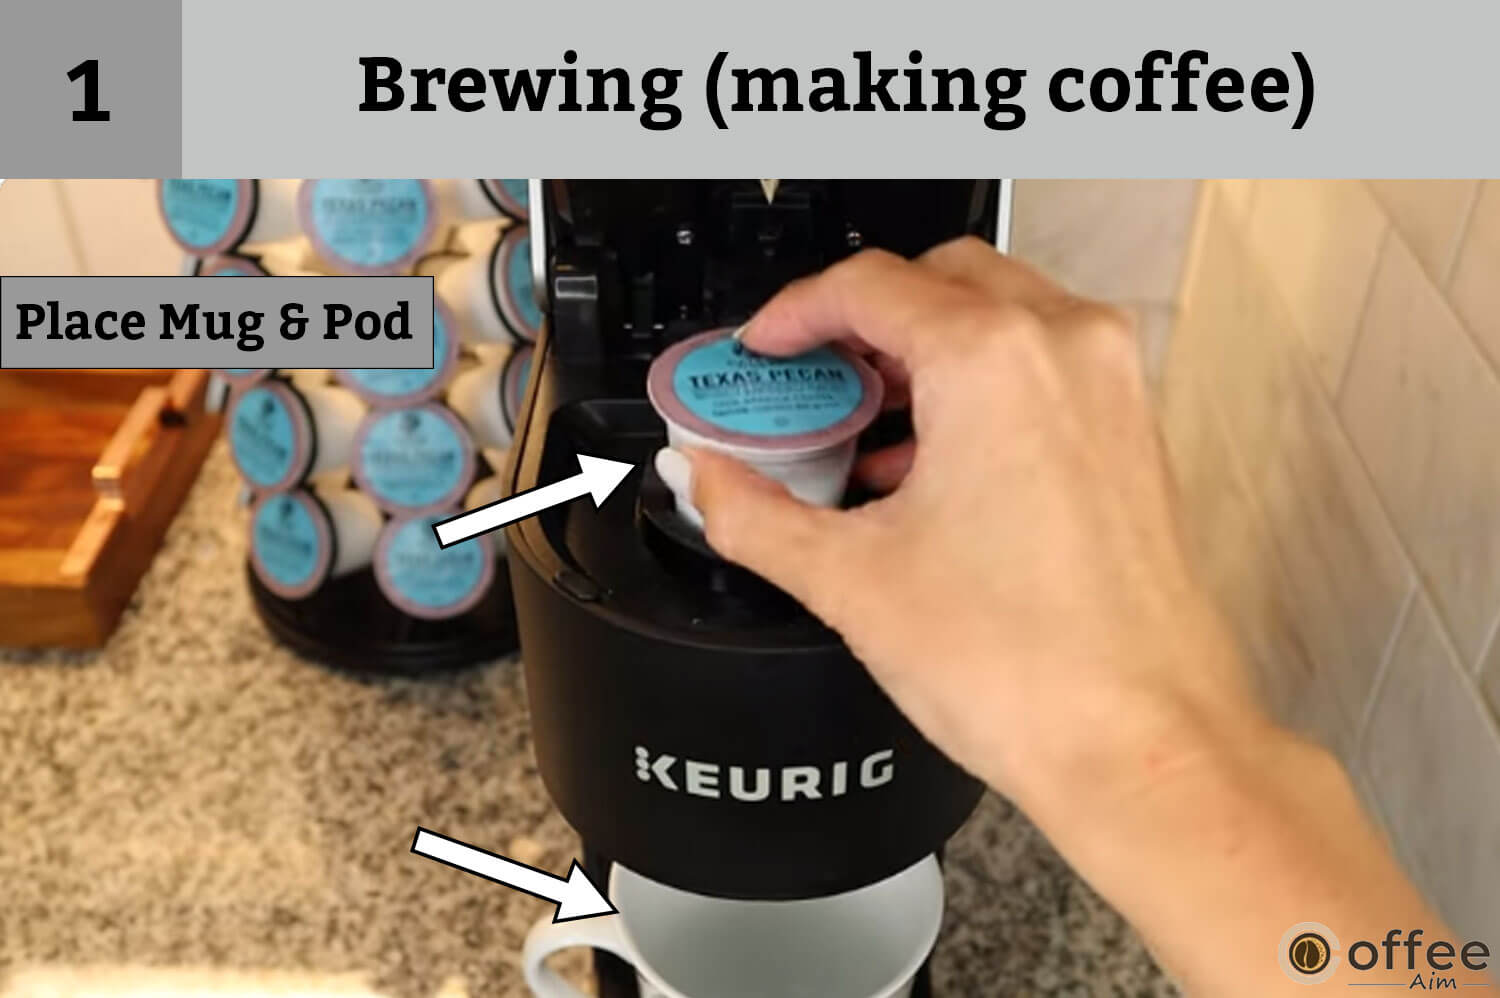
Step 1: Place Mug & Pod
Place the mug or a cup on the drip tray. There is also a facility for those who have a travel cup. They can just place their travel cup on the drip tray base by removing the drip tray first. Lift the handle and place a K-Cup® pod in the K-Cup® pod holder. Lower the lid to close it completely.
If you guys do not know, then let me tell you that the K-Cup® pod is placed in a K-Cup® pod holder, which is designed on the upper side of the machine; if you still cannot understand, then, in other words, it is present above the drip tray. You can place it in the holder by lifting up the lid, and you can easily see the exact place for the K-Cup® pod.
Also, most importantly, do not remove the foil lid on the K-Cup® pod. Because there is already a system present in the machine to open the foil lid of the K-Cup® pod. If you want to see this, then it is easily apparent to you as a needle in the lid ( when you open the lid).
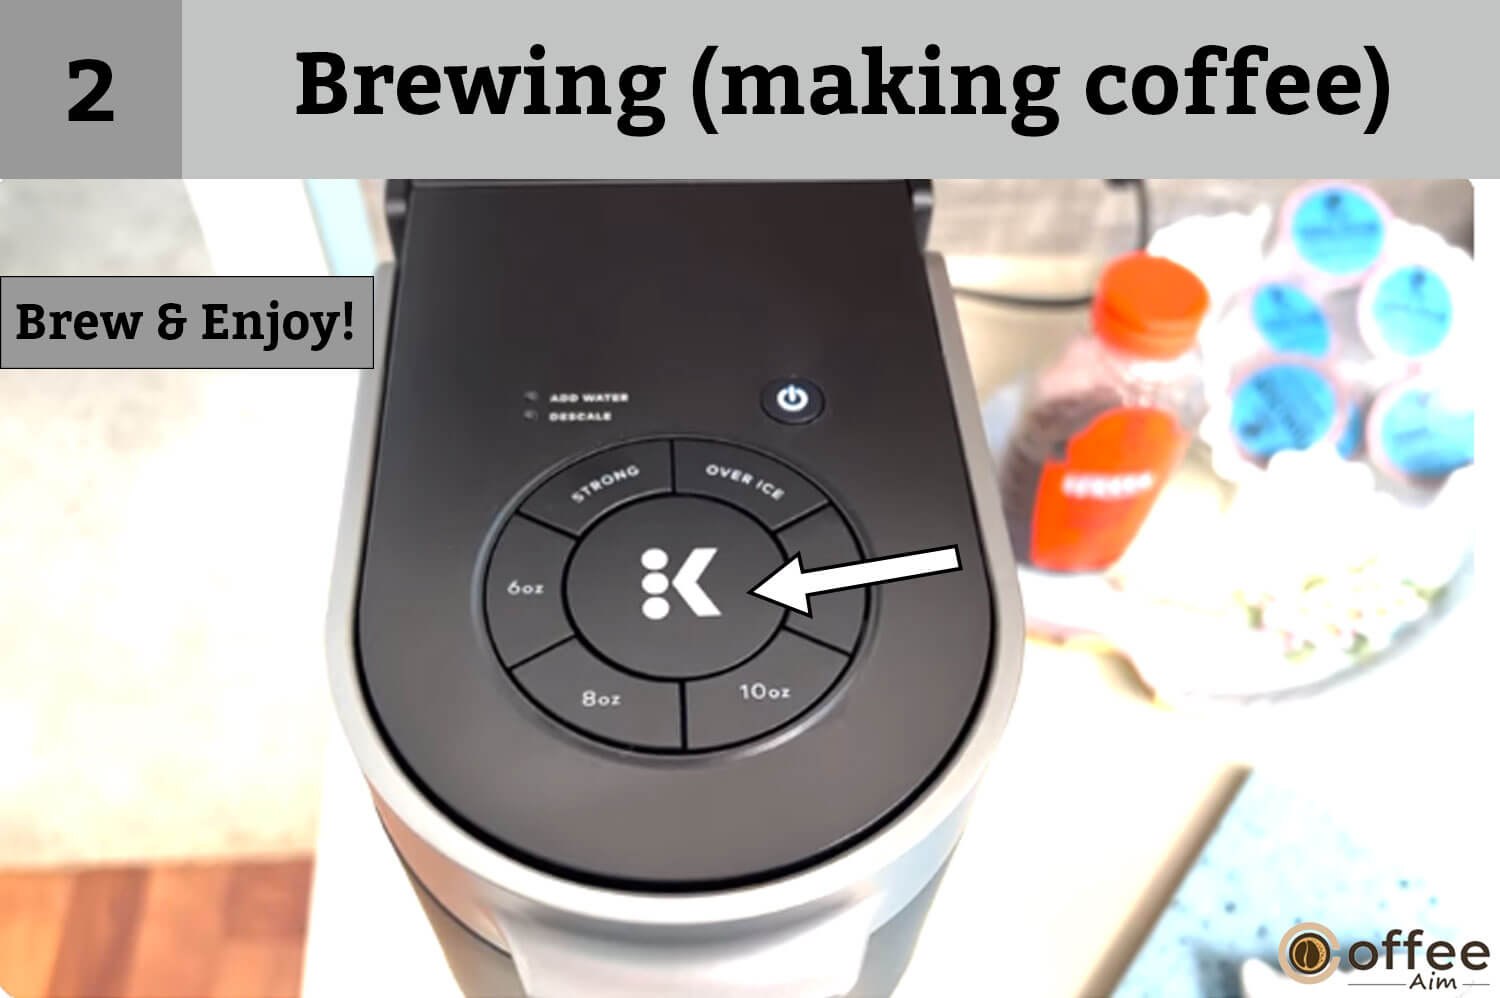
Step 2: Brew & Enjoy!
After placing the cup on the drip tray and putting the K-Cup® pod in the K-Cup® pod holder, now is the time to push the button and let the Keurig K-Slime make a fantastic coffee for you while you sit on a sofa and watch the TV. However, if you take it seriously and really begin to watch the TV, then you will be at a loss, as the Keurig K-Slim will take only 10-15 sec to prepare your coffee. If you do not wait for 10-15 seconds, then the temperature of your coffee will decrease, and you will get your coffee cooled. If we go more scientifically, then particles of your coffee will keep on colliding with each other and will lose their energy and become cool (just like a very calm and cool person). But in reality, you will become too hot when your expectations of drinking hot coffee are spoiled. So it is my personal advice to wait there until your cup becomes full of coffee.
When you have closed the lid of Keurig K-Slim, you will see some buttons blinking over the lid(as I had already told you in the beginning ). These buttons will be of different capacities. You can choose one of them according to your choice. In order to explain it to you, we choose the 8oz button and push that. After doing that, there will be a “brew” button. The brew button will also be flashing. Just put that button. The brew button will keep flashing even after pushing it (so you do not need to be worried if Keurig K-Slim is destroyed, nahhh ).
It will take almost 10 seconds to heat the water, and after some time, you will see the coffee coming out of the Keurig K-Slim. Almost after 7-8 seconds, your mug will be filled with the coffee for which you have been struggling for a long time.
Although this is a lengthy article (if you consider it to be), if you want to know about something in detail, then you have to put your efforts into getting the best results.
And don’t start measuring the time according to the time list that I have told you because there could be a time difference but just some seconds. You should stand by the Keurig K-Slim because there is again a facility for you which is it will turn off by itself after the brewing has completed.
CAUTION: While brewing, there is extremely hot water in the K-Cup® pod holder, so do not even try to lift the lid and also the handle during the process. If you do so, then you will get that ‘buy one get one free’ offer as your hands will get a cleansing free of cost (but this can be very destructive).
Brewer Features
Keurig K-Slim has very interesting features. It heats and brews very easily. You can turn it on by just lifting the handle, which may ultimately lift the lid of Keurig K-Slim. Then you put the K-Cup® pod in its place and can get the coffee very easily (as you know, the Keurig K-Slim will heat and start brewing itself).
There is also a system for automatically turning it off after 5 minutes of the last brew in order to save energy. It is our duty to save energy, and Keurig K-Slim helps you in this case.
If you are using it at a higher altitude (5000 feet ), then make sure to enable the high altitude setting by pressing and holding the brew button and 8oz button for three seconds.
Keurig K-Slim is also very easy to transport and store because of its structure and design.
As Keurig K-Slim has helped you in the hour of need by making you able to drink a cup of hot coffee, now it is your turn to help Keurig K-Slim when it has to be cleaned and kept with great care. Carefully read out all the rules and measures for the care of Keurig K-Slim.
Care of the Keurig K-Slim
It is time to clean Keurig K-Slim. I know everybody likes cleanliness and neatness of everything, and I can say with surety that nobody would like to make coffee again in a dirty and dilapidated coffee maker.
Are you guys thinking about how to take care of it in a better way than only keeping it in a specific place and cleaning the dust from it daily? Don’t you worry about this. Just relaxxxx . Because I am also teaching you the way to take care of it.
Just follow the rules and take care of Keurig K-Slim.
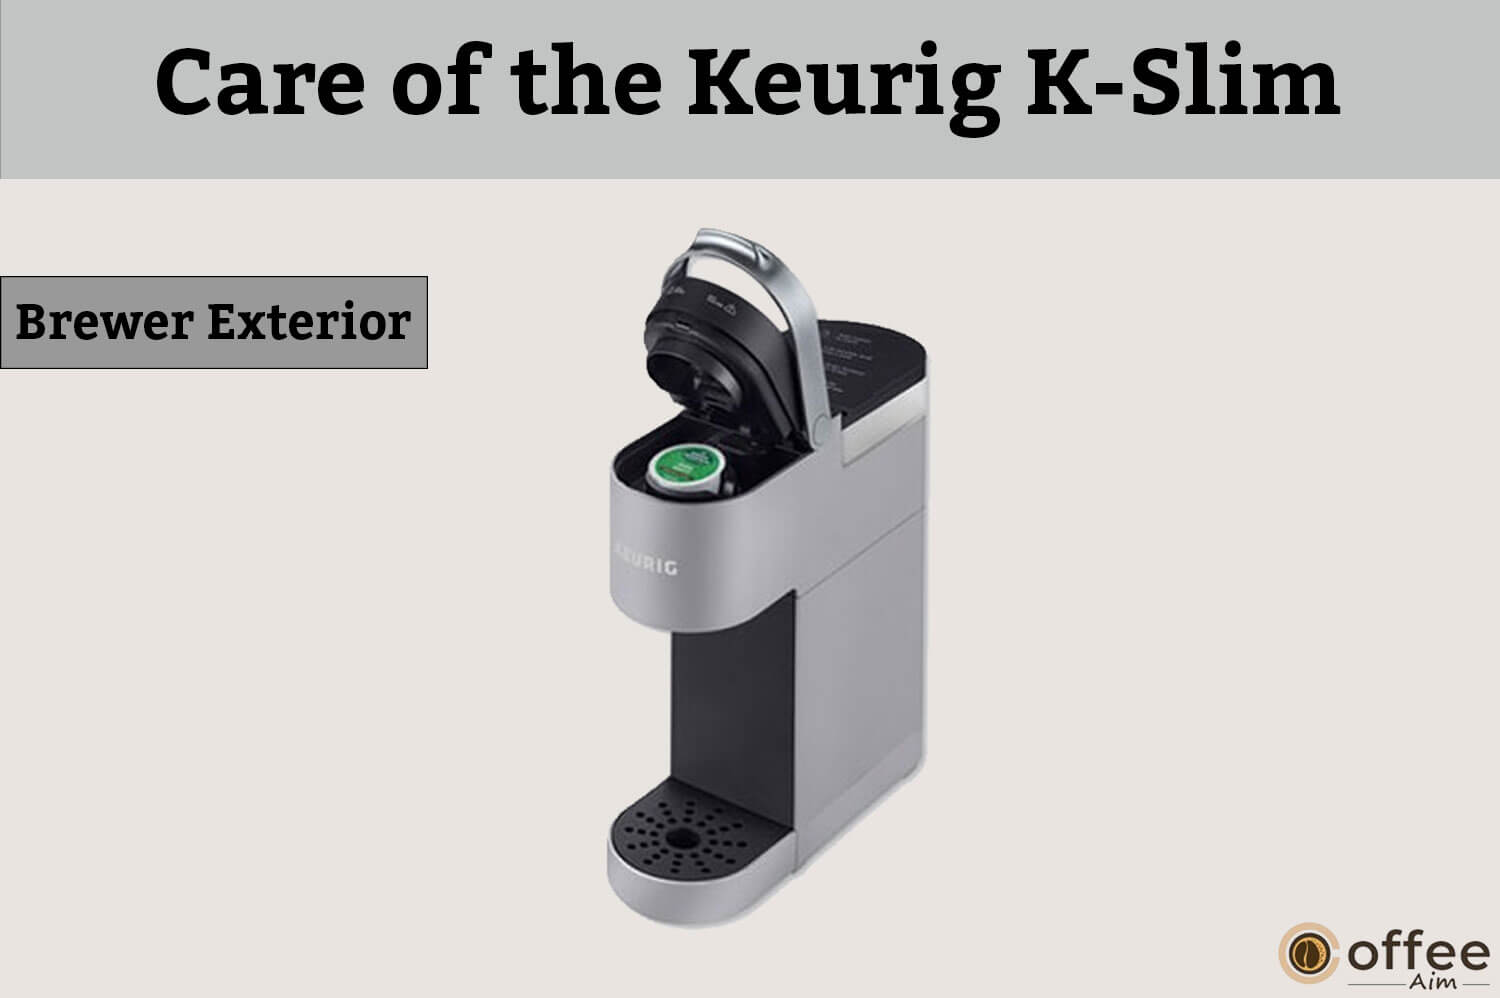
Brewer Exterior
Cleaning the exterior from time to time will make it look very attractive and captivating. But don’t ever be too much of a cleaning lover that you put the Keurig K-Slim in water or other liquid in order to clean it from the depths. Never do so. Actually, the cleaning process is not difficult. This is very simple. You can clean it with a damp, soapy, lint-free, non-abrasive cloth.
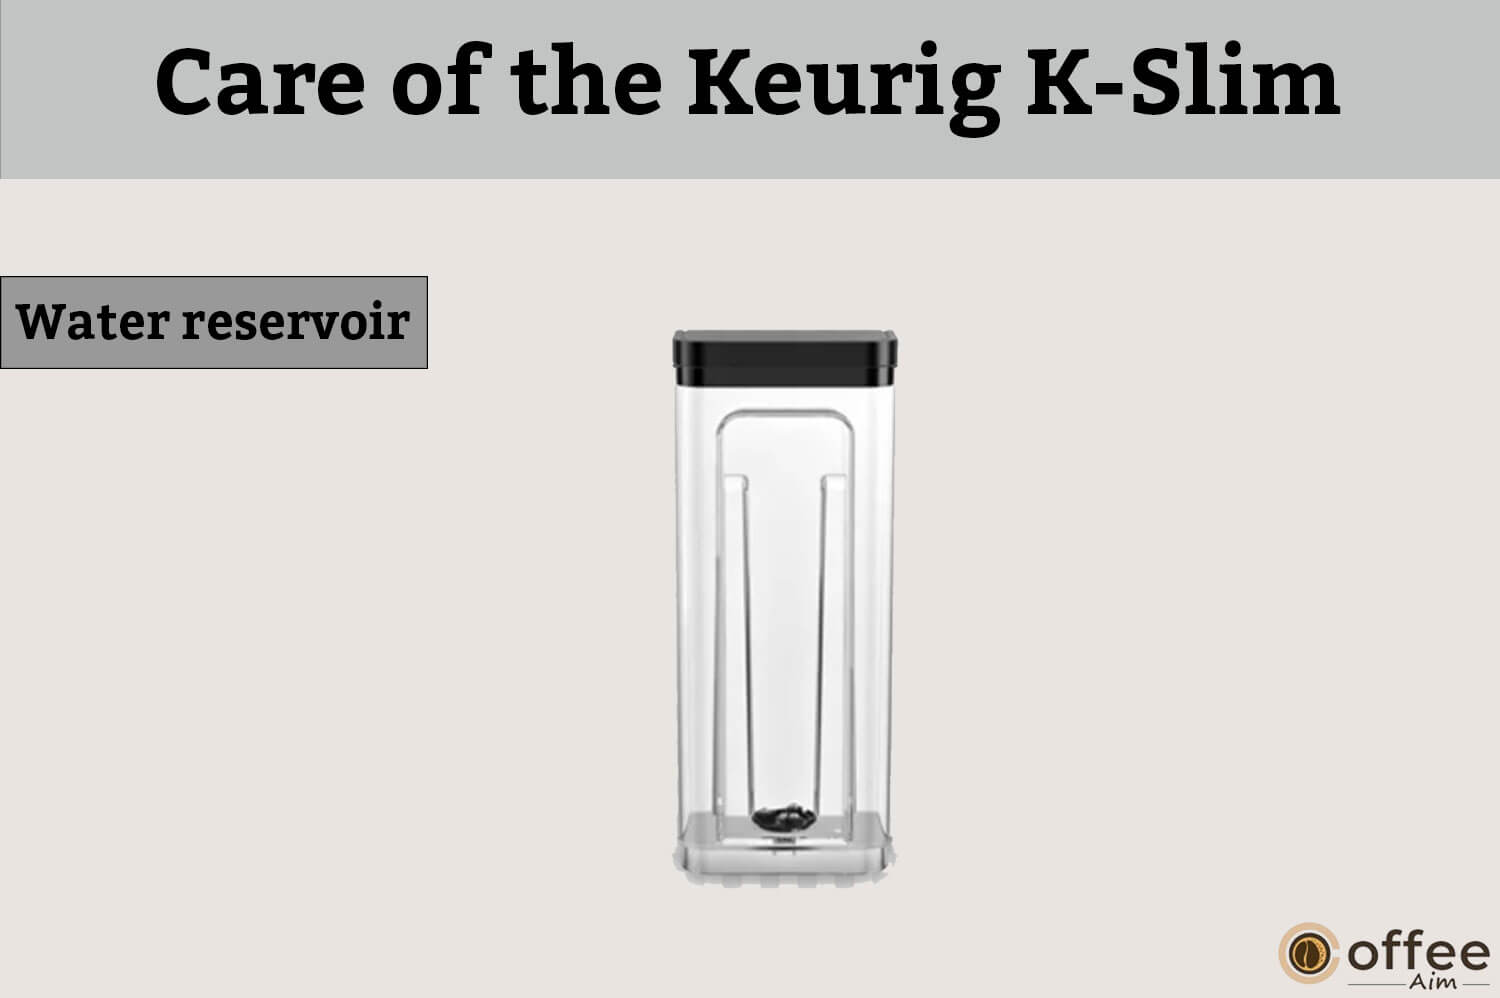
Water reservoir
Here you can use water and can clean the inside of the water reservoir by wiping it and can clean the underside of the lid with a damp, non-abrasive, lint-free cloth. It could be possible that some pieces of cloth or lint may remain inside, so avoid drying the inside of the water reservoir with a cloth. Let it dry itself. However, the water reservoir should be cleaned periodically or regularly.
Drip Tray
The drip tray can hold up to 8 ounces, and it should be emptied and cleaned regularly. You can rinse and clean with a damp, soapy, lint-free, non-abrasive cloth very easily. Also, keep its level maintained to avoid spilling coffee and sliding it toward you.
I am explaining everything in very simple words and explaining all these things in detail so no one can have a problem understanding anything. But if you guys still have any kind of problem, then you can ask your questions in reviews, and if it is not possible, then you can ask your questions on the website.
I hope everything will be clear.

K-Cup Pod Holder
K-Cup pod holder can be removed by opening the lid and then trying to pull out the K-Cup® pod holder by grasping it from the top with your one hand and pushing it from the underside of it with the help of the other hand. After cleaning, you can place it on its place by using the two front ribs as a guide and then push it back to its place.
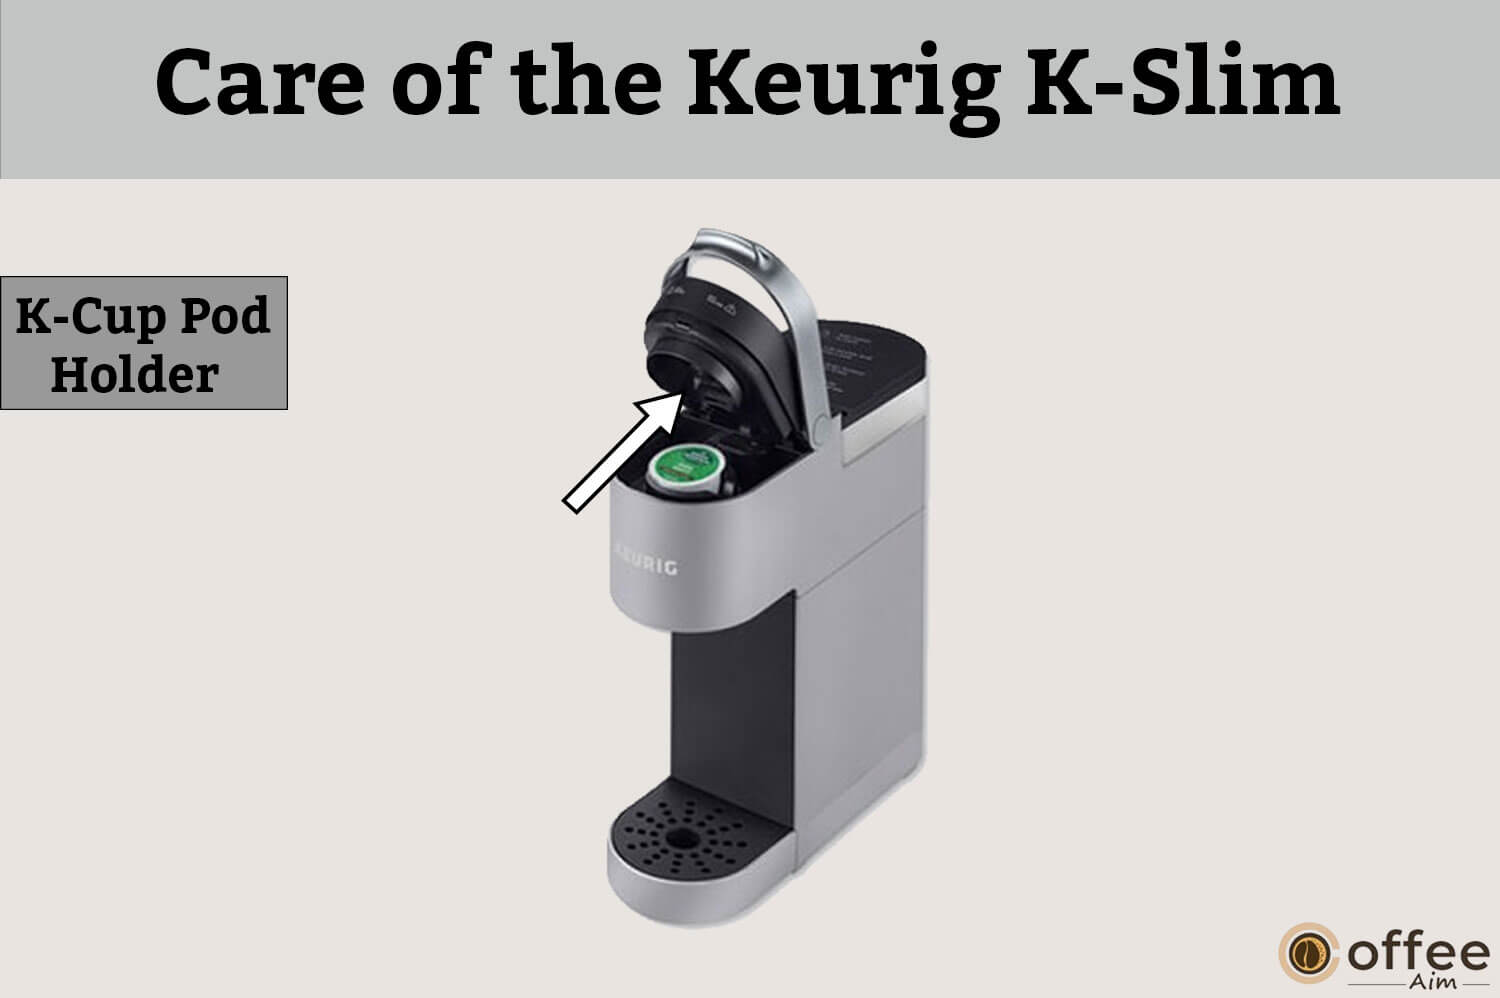
CAUTION: Be careful because there is a needle on the inside of the K-Cup® pod holder. It may harm you if you put your finger in the holder. Its purpose is to puncture the K-Cup® pod in the K-Cup® pod holder. Let me tell you that there is another needle above the K-Cup® pod holder.
Note: Always remove and dispose of the used K-Cup® pod for the sake of your health. Because the K-Cup® pod will not give you the same taste if it is used again and again. However, I would like to tell you that if you want to use some loose tea leaves(coffee not in the K-Cup® pod), then you can order a Keurig My K-cup Reusable Filter. It is also very easy to use. I will explain this in some other article.
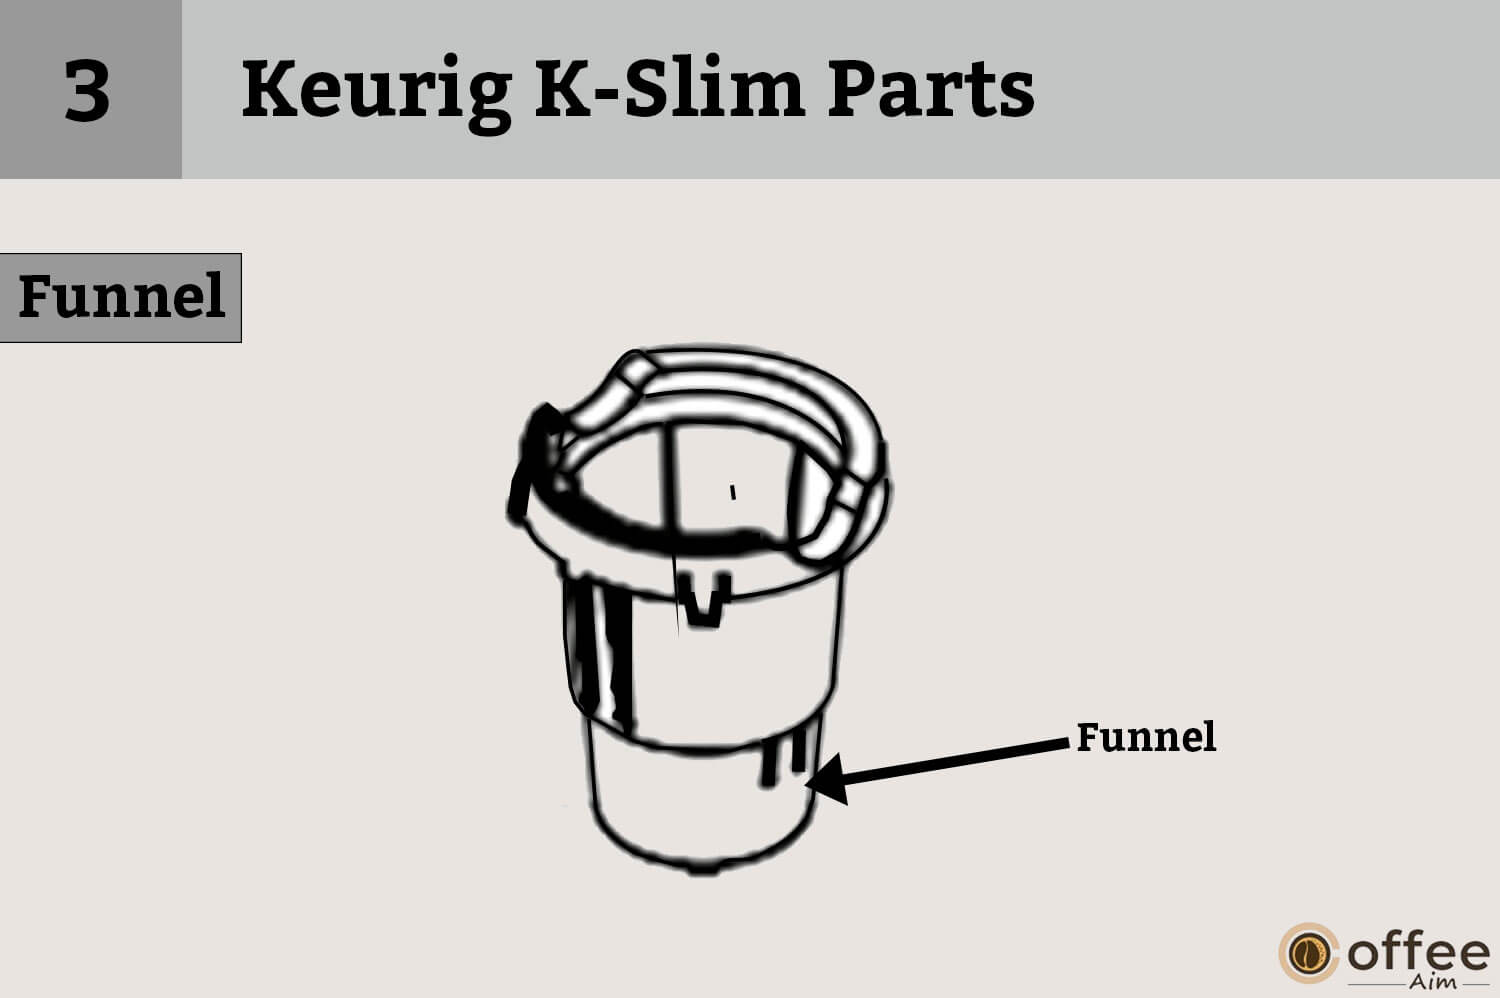
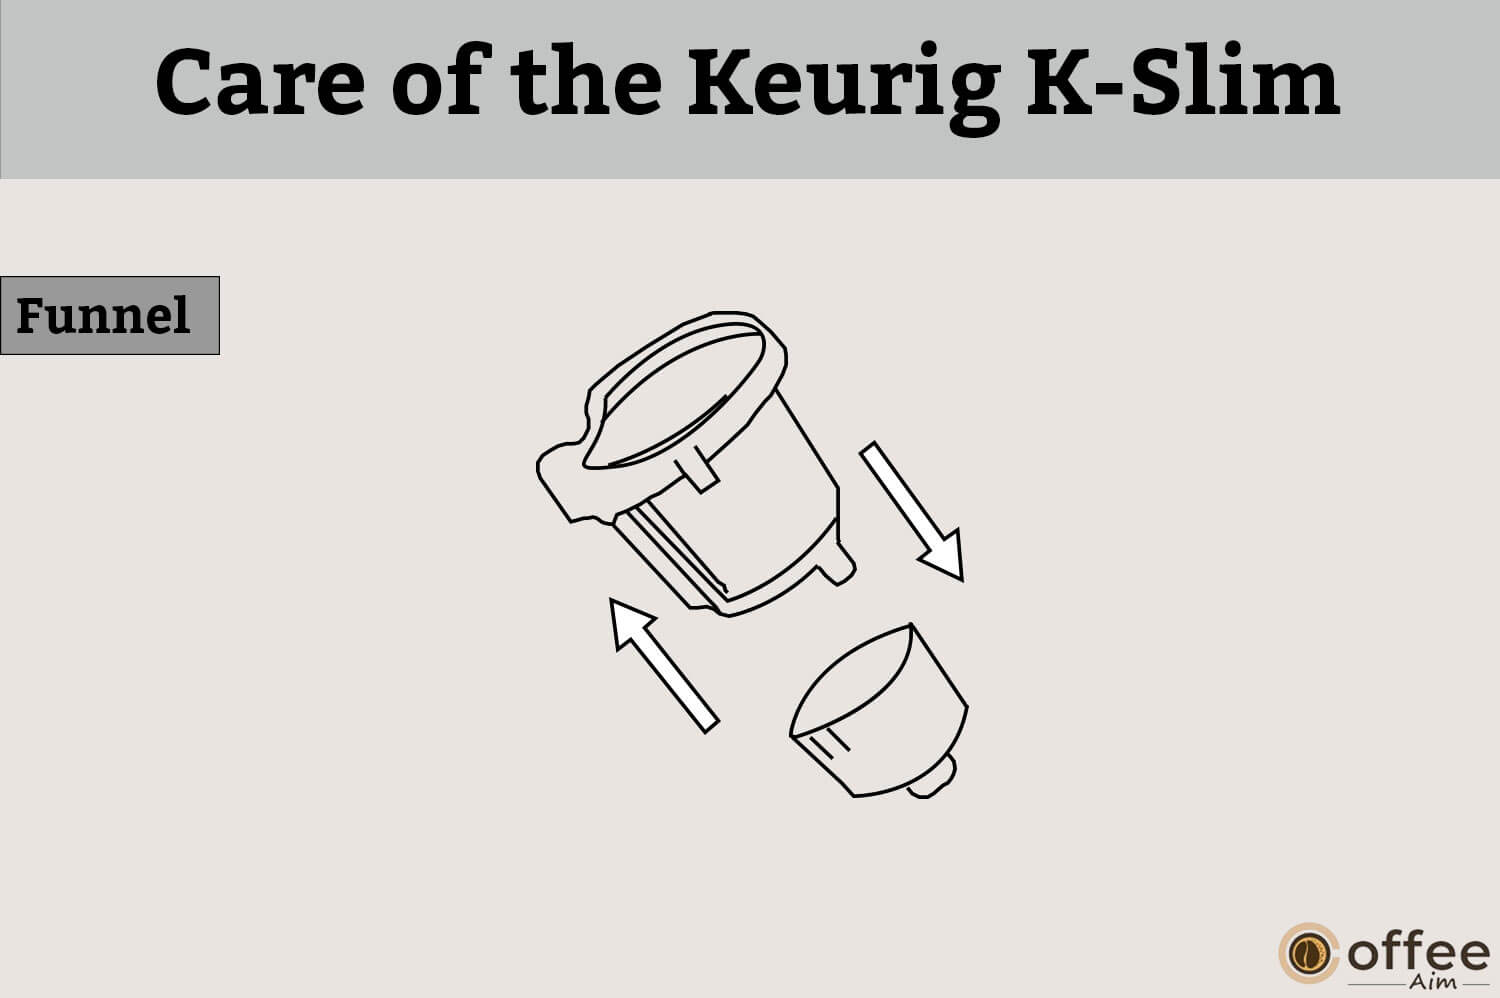
Funnel
The funnel should be cleaned periodically to make sure to enjoy a fresh coffee. To clean it, you can just pull it off and, after cleaning, snap it back into the K-Cup® pod holder. Make sure that you are placing it in the right orientation. Otherwise, it may cause some trouble in getting fit in the holder.
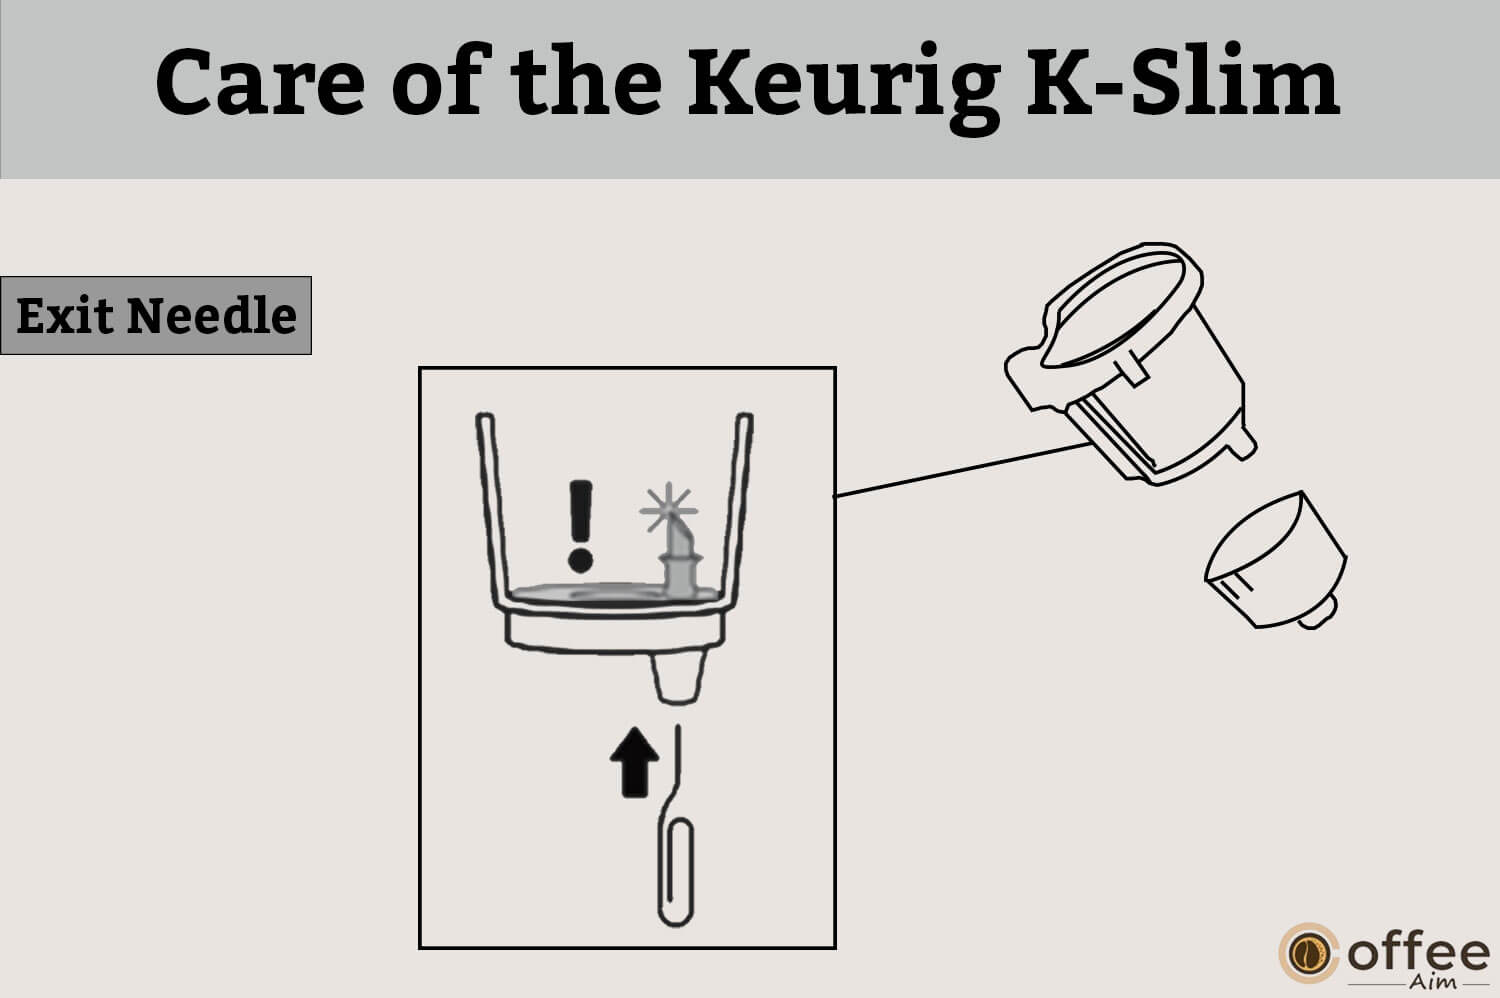
Exit Needle
After removing the pod holder assembly and detaching the funnel, you can locate the exit needle in the pod holder. It is located on the inside of the pod holder at the bottom. To remove any coffee grounds from this, insert a straightened paper clip into the exit needle.
Entrance Needle
The entrance needle is located on the underside of the lid. To visualize that, lift up the lid, and the needle will appear to you. There will be two holes, and to clean them both, put the straight paper clip into them and gently move around to remove any coffee ground completely. To do this, you have to hold the handle with one hand and clean it with the other hand.
Now lower the handle and close it completely. Without placing a K-Cup® pod, complete two brew cycles by using water only. This procedure will completely clean it.
Descaling Of Keurig K-Slim
What is descaling? What is scale? Who does this scale build up in the Keurig K-Slim?
Answers to all these questions are over here. I don’t want to leave any confusion in the minds of my readers. Therefore first I will give answers to all these questions.
Let’s start with the first one. Descaling is to remove the scale which is built up in the brewer.
Now let’s talk about scaling. Scaling is actually the calcium deposition. This deposition of calcium is known as scale build-up in the Keurig K-Slim. It is not toxic at all, but if it remains unattended, then it can cause many troubles in the performance of Keurig K-Slim.
Descaling should be done after every 3 months for its proper performance.
Descaling Procedure
Before starting, a large ceramic mug, fresh water, Keurig® Descaling Solution, and access to a sink are required.
Keurig K-Slim is also helping you in the way that If you forget to descale it, then the descaling button will turn on by itself. If the “descale button “turns on before the 3 months, then do descale that. It is a kind of alarm for descaling.
Make sure that there is no K-Cup® pod in the holder. The whole process will take 10-15 minutes.
STEP 1: Descaling Solution Rinse
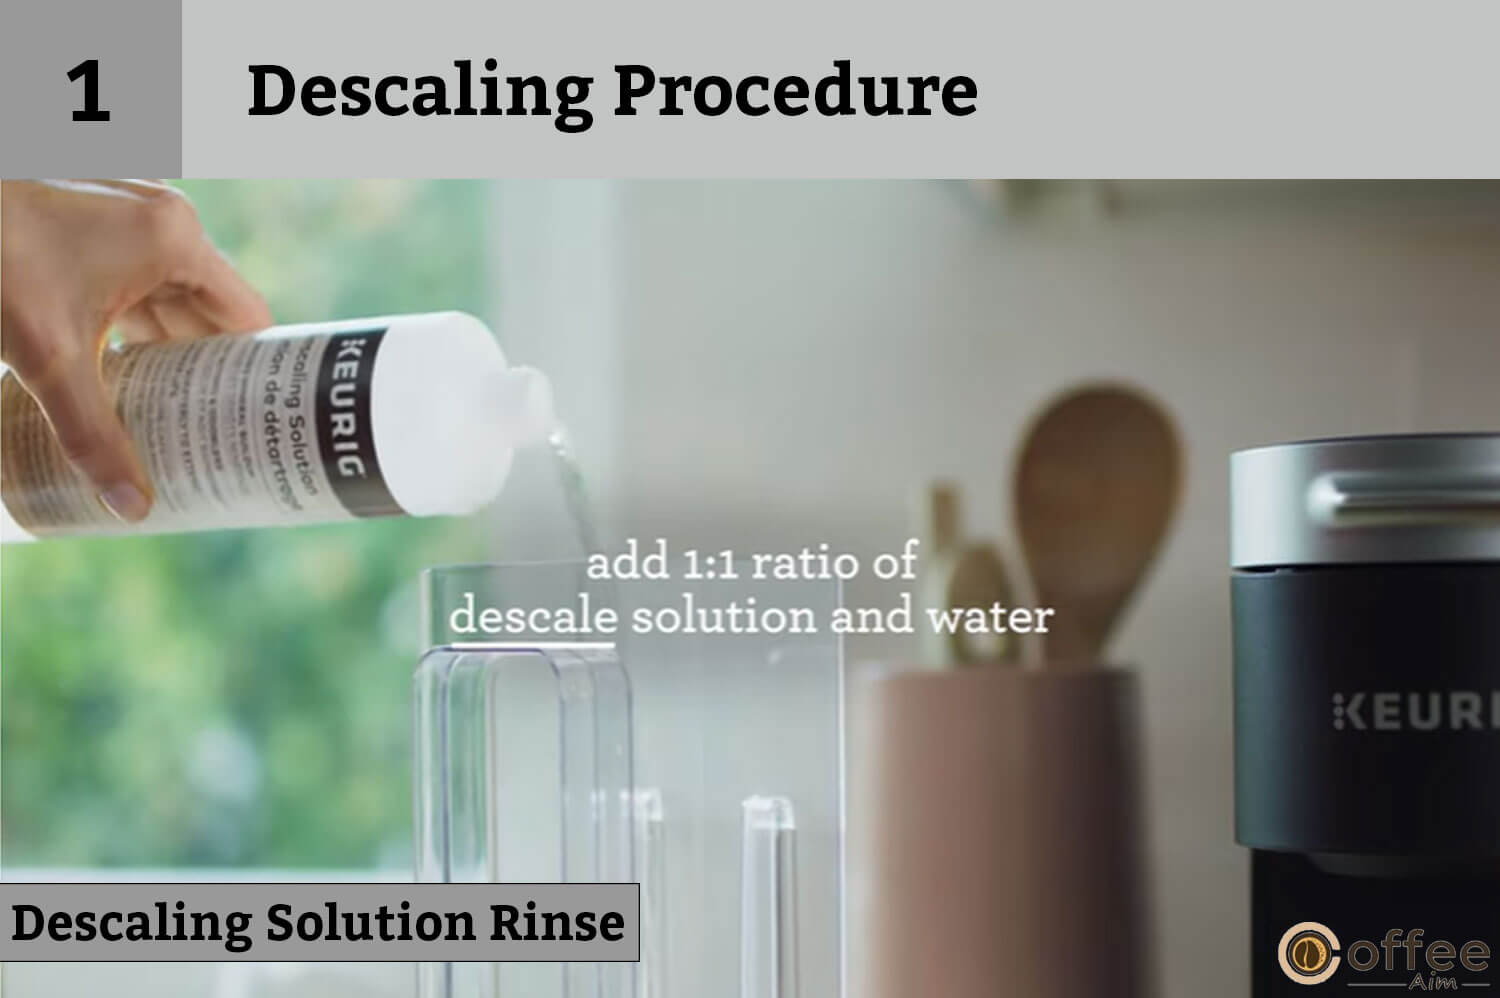
Pour the entire bottle of Keurig Descale Solution into the water reservoir. If you don’t have a Keurig® Descale Solution bottle then you can also order this. Now pour water into this bottle of Keurig® Descale Solution so that you can use it completely, and pour this water also into the water reservoir. Place the water reservoir in its place and turn off the Keurig K-Slim. Keeping Keurig K-Slim turned off, press the 8oz and 12oz buttons together and hold them for almost 3 seconds until the descaling button turns on. After some time the brew button will also start flashing.
Press the brew button, and the descaling process will start. Make sure to place a mug on the drip tray to collect the hot water. Drain the hot water in the sink. Continue to repeat the process until the “Add Water” button begins to display light.
STEP 2: Rest & Rinse
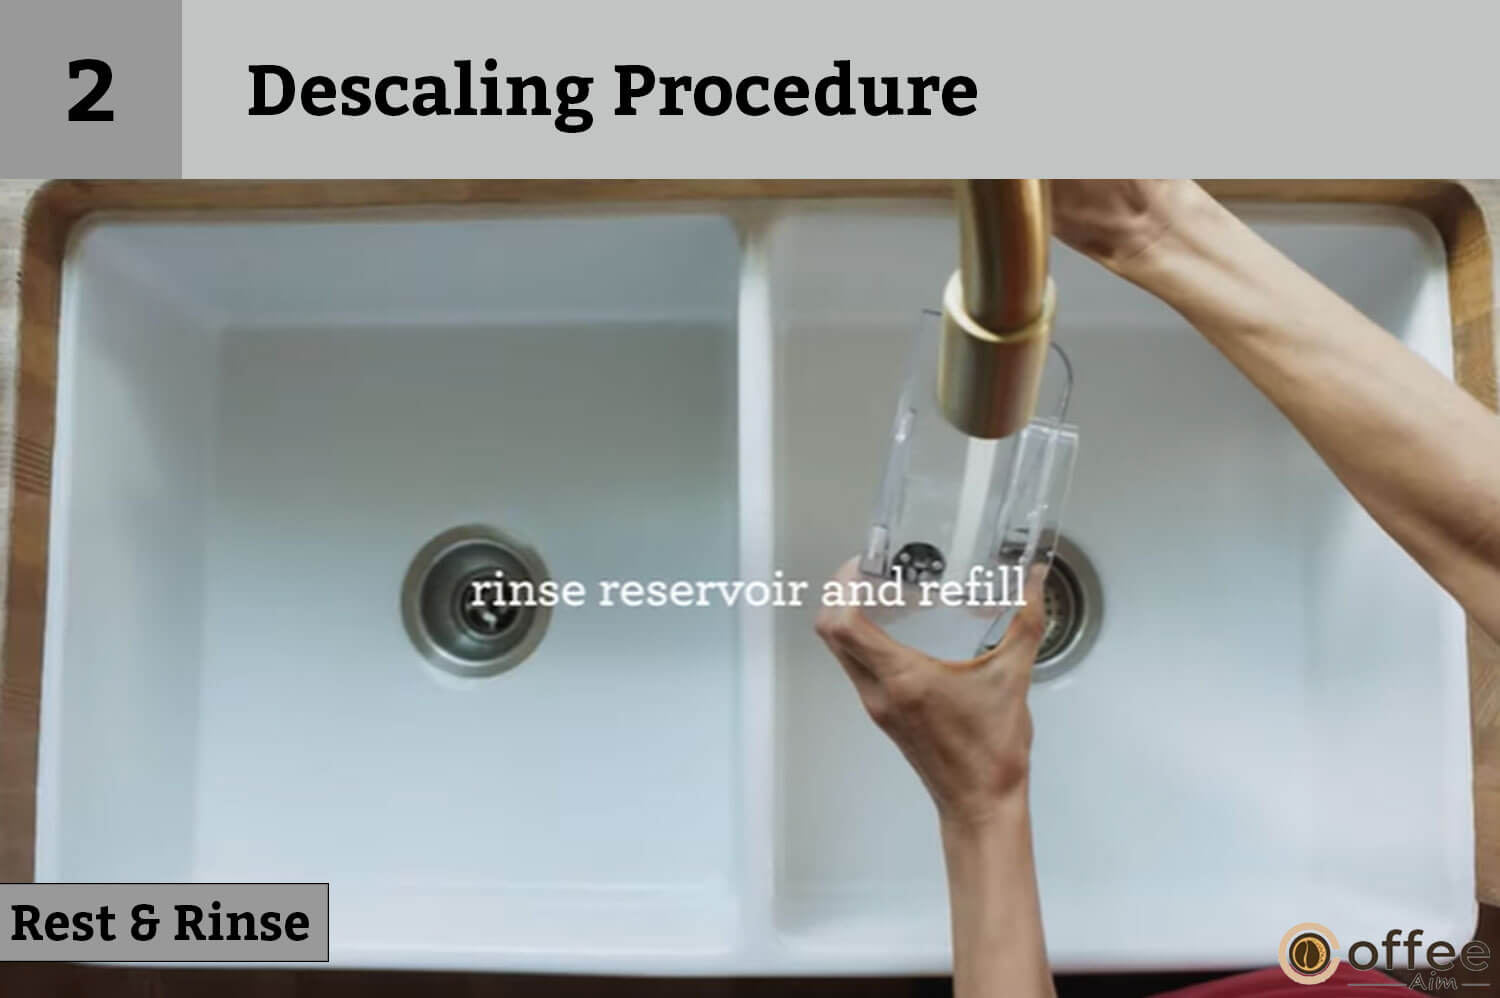
Now remove the water reservoir and pour fresh water into it. Still, you don’t have to use the K-Cup pod.
STEP 3: Fresh Water Rinse
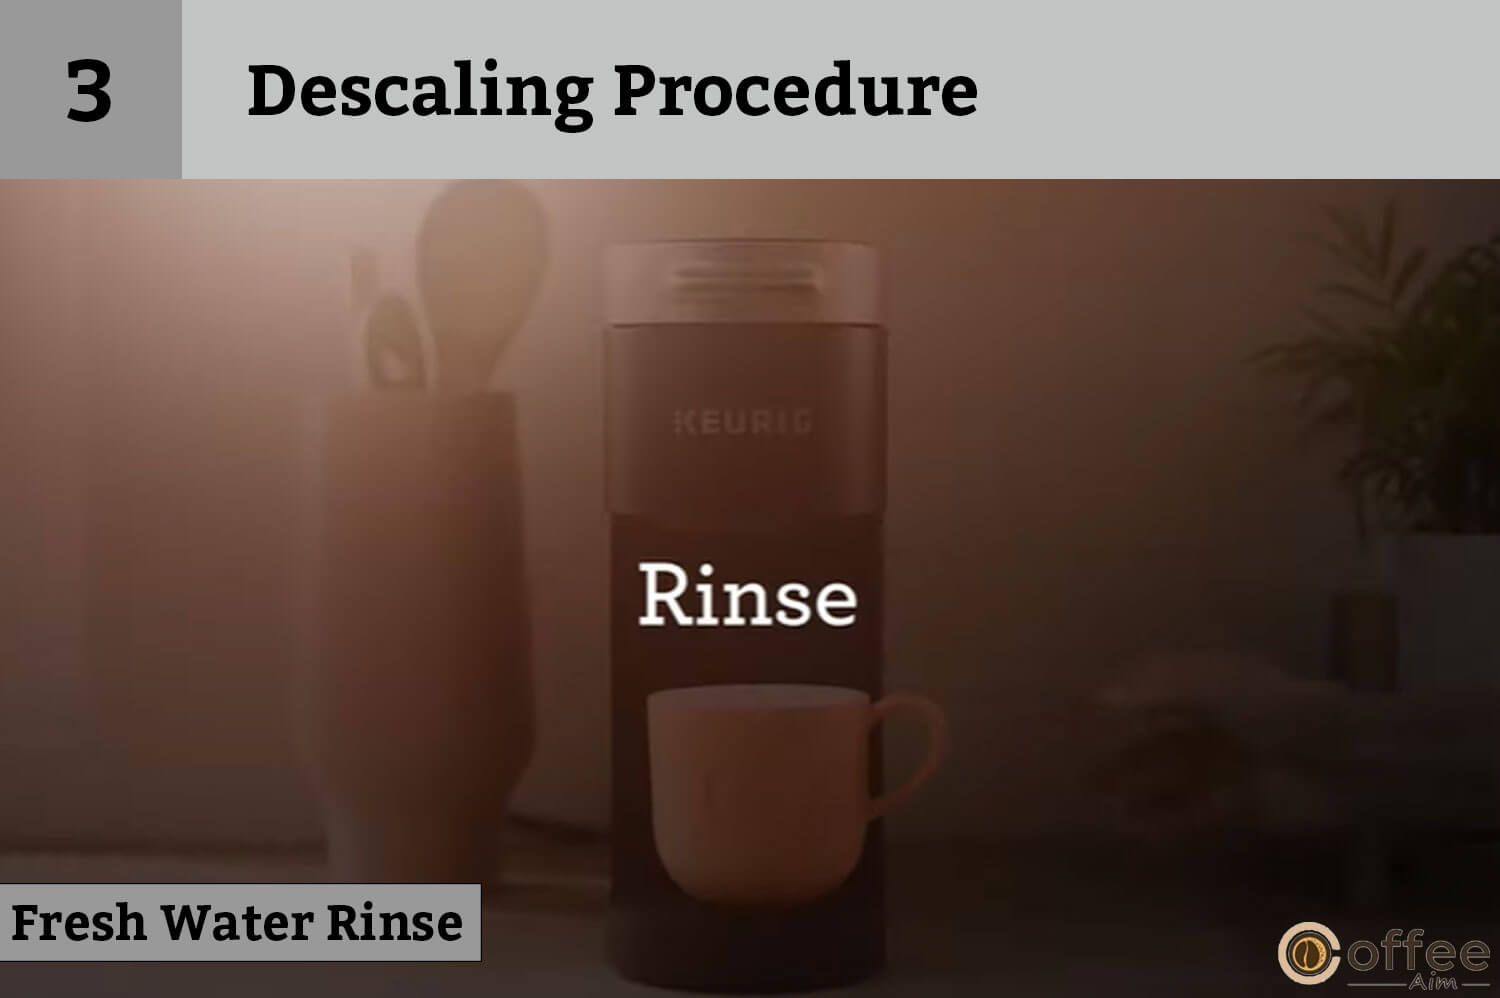
When you pour the fresh water into the water reservoir, the brew button will start illuminating. Press the brew button. Do not put the K-Cup® pod in the pod holder. Again repeat the process until the “Add Water” button illuminates.
At this, the process of descaling will be completed, and the Keurig K-Slim will exit the descaling mode. After all this, Keurig K-Slim will be ready for use.
NOTE: The cleaning action may result in a foam dispensed from the Keurig K-Slim. Don’t be afraid of this, as this is quite natural because the solution is reacting with the scale inside. But if the brewer does not function properly and you see nothing dispensing out of the Keurig K-Slim, then it is indicating that there is a lot of scaling build-up inside. It will be followed by the sound of the blow coming out. If this occurs then following rules should be followed;
- First of all, turn off Keurig K-Slim and unplug it.
- Discard the content by removing the descaler solution and then refill the water reservoir with fresh water.
- Plug the Keurig K-Slim back and turn it on. Repeat step#3 of “Fresh Water Rinse”. You will see that the Keurig K-Slim will begin to function normally. This will happen because the scale is now removed, and the solution is rinsed out. But don’t worry if the problem still persists because I am here to solve every problem. Now listen to me carefully! If the problem still persists, then unplug the Keurig K-Slim for at least 30 minutes before treating it with the rinse. After that retry to do this and I am sure that you will succeed in the end.
Problems/Troubleshooting
I am writing this again only for your convenience. As I know there are some people who have some specific issues for which they only want to know about the solutions. Therefore I am making a separate heading for this so that they can get the solution to their problems with a click.
Grounds in Your Coffee
If some grounds are present in your coffee, then most probably there are grounds in the exit needle(which is located on the inside of the holder at the bottom) or entrance needle (located in the lid). You can see the entrance needle by lifting the handle. These grounds can be removed by using a straight paper clip. However, you can also use some other thing(preferably a needle ).
- Clean the exit needle by using a paper clip. For detailed information, you can have a look at the care for the exit needle.
- Clean the entrance needle. For more details (how to clean) check the care for the entrance needle.
I am not explaining all these things again because I have told you about this before in the care of Keurig K-Slim.
Brewer Will Not Brew
A minimum of 6oz of water is required to brew but if Keurig K-Slim is still not working then add 2oz or more water to guarantee that the minimum water level which is required to start the Keurig K-Slim is acquired. If the Keurig K-Slim begins to dispense, then the minimum level is met.
Brewing a Partial Cup
If your Keurig K-Slim starts brewing a partial cup then following one of the rules given below can resolve it. However, if you are not confirmed about the exact problem, then you have to follow all the rules until the problem is finished.
- First of all, power off the Keurig K-Slim. Press and hold the brew button and 12oz for 5 seconds until water starts dispensing out. Then let the water purge and discard the content into the sink. Press the power button to restart Keurig K-Slim.
- There is a possibility of clogging the exit needle. Use the straightened paper clip for the removal of grounds.
- It could also happen that there are grounds in the entrance needles. So remove them by using a straight paper clip or some other suitable instrument.
- Keurig K-Slim may need descaling. Do descale Keurig K-Slim. But wait! If it is still descaling, then it is better to contact Customer Service.
Brewer Does Not Have Power or Shuts Off
Is your Keurig K-Slim shutting off after some time? Or does it not have power? If you are facing such contradictions, then do follow the following instructions.
- Make sure that the Power button is on.
- Sometimes Keurig K-Slim is overloaded due to other appliances, and it does not function properly. In this case, plug the Keurig K-Slim into its own outlet. Keurig K-Slim should be operated on its own circuit. Under such circumstances, it cannot work along with other appliances.
- Keurig K-Slim turns off after 5 minutes of the last brew to save energy. To restart Keurig K-Slim press the power button.
- Still, is there any problem? Just relax and contact Customer Service.
Helpline
I have explained everything. For any further inquiry about this, you are provided with this service.
Helpful Hints
Are you guys having a different taste in coffee ( something like chlorine or other minerals)? Calm down. I’m not sure that this change of taste is because of Keurig K-Slim. Actually, there is a great variation in the quality of water. I will recommend bottled or filtered water. Do not use distilled water for your coffee.
Service
In spite of these maintenance and cleaning procedures, Keurig K-Slim is not user serviceable. For service, you can have guidance from the warranty section of my guidance.
Storage
Empty the water reservoir either before storing it or transporting Keurig K-Slim. There are no hard and fast rules for its storage, although the thing to take into consideration is, do not to put it in place whether e the temperature is lower than the freezing point. Suppose you had put Keurig K-Slim in such a place, then I advise you to warm it to room temperature for at least two hours.
After storage, I would prefer to rinse it before use, as explained in the descaling of the Keurig K-Slim section. You can have guidance from there (the descaling procedure is written on the above pages).
Do you want to change the location of Keurig K-Slim?
If you want to do so, then turn it off, unplug the Keurig K-Slim and empty the water reservoir. This is all you need to do.
Have Questions?
I am here to help you in case of your questions. You can visit support.keurig.com for step-by-step videos on cleaning, descaling, and diminishing your confusion.
If you still need help, then contact the number given below;

Warranty
Warranty is the most important thing about any instrument or appliance. Keurig K-Slim also offers a warranty of a whole year. It does not mean that you break it on your own and then take Keurig K-Slim to the shop and say, “Sir! Give me a new one as it is broken now and it has a guarantee of one year”. I will laugh at this. Do you? For more details, look down(on the screen).
LIMITED ONE-YEAR WARRANTY
Keurig Green Mountain, Inc. (Keurig) warrants you that Keurig K-Slim will remain unharmed under normal use for a whole year. It means they are assuring us that not a single part is going to be defective in a year. This time limit of the year will start from the day of purchase. I will recommend you register your brewer on keurig.com/new so the system can have a record of yours.
The very captivating thing about the warranty is, if there is a defect in any of the parts then Keurig is responsible for this, and it is up to Keurig to either give you a new one or replace the defective part. The charming thing is it will be free of cost. It does not matter how many times the part is defective; Keurig will repair it free of cost. The repaired or new brewer will have its own date of purchase, and the time of warranty will be counted from that day of purchase (of a new one). Hence a limited one-year warranty will be applied to the replaced Keurig K-Slim.
This warranty is applicable only in the US and Canada. This warranty gives some rights to you, which vary greatly from state to state. If I talk about Canada, then these rights vary from province to province.
Wait!!! If you guys are thinking of using some other products for brewing through Keurig K-Slim then be careful because if it causes any damage to the Keurig K-Slim, Keurig will not be responsible for that. It will result in some service fee charges if this damage is identified to be caused by some non-Keurig® pods and accessories. A warranty of the whole year will not cover such damage. Therefore prefer to use Keurig products to ensure the proper working of Keurig K-Slim and avoid its malfunctioning.
WHAT IS NOT COVERED BY THE LIMITED WARRANTY?
Consequential or incidental damages ( such as property damage ) and incidental costs and expenses resulting from any breach of this warranty ( even if foreseeable) are not covered by this limited warranty. But there is an exception related to this. As I have told you before about the variation of rights between the states, in the same way this rule can also vary between different states. Some states do not allow these limitations. Hence if you belong to those specific states or provinces, then these rules are not applicable to you.
This warranty also does not cover the damages caused by the use of non-Keurig products such as the non-Keurig® pods or other accessories. Nor does it cover the loss caused by anyone else (other than Keurig or its authorized providers) or from the use of the parts of Keurig K-Slim other than its genuine parts or external causes( including misuse, inappropriate power supply, or God’s acts ).
OTHER LIMITATIONS
Any other express warranty, written or oral, is replaced by this warranty, which is exclusive.
Furthermore, Keurig thus expressly disclaims all liability.
All other warranties, including any implied warranty of merchantability or fitness for any particular purpose, with respect to your Keurig® brewer.
The aforementioned limitation may not apply to you because certain states or provinces do not permit the exclusion of such implied warranties or limitations on how long such implied guarantees last.
It depends upon the country or region where the purchase was made.
HOW DO YOU OBTAIN WARRANTY SERVICE?
Keurig K-Slim is a high-quality appliance that provides a satisfying performance for a year. However, if the need arises for warranty services, do not try to send Keurig K-Slim without calling Keurig Customer Service through the toll-free phone number 1.866.901.BREW (2739). On doing so, you will receive your Keurig K-Slim unchecked. So make sure to call before sending Keurig K-Slim for warranty services.
Please contact Keurig Customer Service for a Return Materials Authorization (RMA) number before returning your brewer for service. Brewers from Keurig® brands that are returned without an RMA number will be sent back to the sender unserviced.
This was all about Keurig K-Slim. I left no stone unturned in explaining everything(which you can see from the length of this article) but still, for your confusion and any question (about the use of Keurig K-Slim), you can contact the helpline and can get the answers to all of your questions in no time. The helpline number is written above, in the portion of ‘helpline’.
Conclusion
In this article, I have explained everything to you. I am really glad that you have visited this article to seek guidance from it. And I am sure that there will be no further confusion in your minds. But even if you guys are facing any problems, then let us know. We will always be available for your help. I will be very happy to answer your questions and make you feel relief from the tension. But I will give you some advice; in case of confusion, you should read the related paragraph twice because I hope that no confusion will be left behind on reading the related paragraph for the second time. I have explained everything in this article.
FAQs
How do you use Keurig slim?
I use Keurig K-Slim just according to the method explained above. I first read thoroughly the guide that was given to me. Actually, I got the thing briefly written over there, but I still had some confusion. All my confusion was resolved by using the Keurig K-Slim and making attempts to use it in a very appropriate way. But it is possible that some people could understand what is written in the guide as most of the time, everything is not well-explained, and they make mistakes. These kinds of mistakes can sometimes cause serious loss, such as damage to Keurig K-Slim, or can cause any body damage. Therefore I have written this article for complete explanations of every step. However, there are also videos available for complete tutorials about the use of Keurig K-Slim.
Why is my Keurig K Slim not brewing?
It is a bit difficult for me to answer very abruptly. Because I do not know in which condition you have put Keurig K-Slim. As there are many possibilities of causes for its malfunction. Firstly I think that you should read the cleaning method and descaling method of Keurig K-Slim. So if there is any problem related to this then it will be resolved automatically. Make sure to clean it properly and do the descaling of it. Hence any ground may not remain. If you still have any problem, then you contact Keurig Contact Service(which is already mentioned above in the helpline heading).
How do you use the reusable K-cup in the Keurig slim?
I will explain to you how to use the Keurig K-Cup Reusable Coffee Filter. With that reusable K-cup, there will be a grey adapter, but it will depend upon your Keurig K-Slim model if it needs the adapter or not. This grey adapter is used with the 2.0 Keurig model. Now turn it in counterclockwise to unlock and pull off the grey mesh basket. Put some loose coffee leaves into it and then put the basket back into the black holder. Turn the lid in a clockwise direction to lock. Put the reusable K-Cup in the Keurig K-Cup holder.
Further, if some people see the red removable plug under the lid, then I am explaining this to only those people. It is just for your convenience. As the new models have more needles in the lid of Keurig K-Slim instead of only one so the lid of the Keurig K-Cup Reusable Coffee Filter is built in this way that if you guys have the new model of it, then you can remove this red plug; otherwise, don’t remove this plug if there is only one hole in the lid.
How do you use a Keurig for the first time?
For the first time, I wish to have a guide that explains everything about the use of Keurig K-Slim, but unfortunately, this was not the case. Then, first of all, I read the guide available to me easily. And after that, I began to analyze everything. I made some attempts to use that, and I was successful. But still, I had some confusion that was resolved by watching tutorial videos about the use of Keurig K-Slim. Finally, I was able to use it perfectly.