Quick Navigation
Welcome, the Lovely reader!
Are you also one of those Keurig B–77 users who still buy coffee from the nearest shop because they don’t know how to use their Keurig B–77? But the exciting thing is that all your problems will be solved in this guide. All aspects of how you should use your brewer are explained below.
So scroll down!
What are the Safety Measures for Using Your Keurig B–77?
While electronics have made our lives much easier due to modernity, even a slight mistake can lead to significant damage. For example, your children may get a deep shock if they accidentally plug it in with wet hands or if a slight mistake during brewing causes water to splash on the brewer. So it could be a considerable risk for you and your brewer.
Similarly, there are many other pitfalls that you may face, but don’t panic; just quickly read the precautions given below carefully and be safe from such traps. Click the link below to read the Keurig B–77 precautions.
Keurig B–77 Precautions
Note 1: You can get injured by putting your fingers in the K–Cup Pod Assembly because two Sharp needles puncture the K–Cup portion pack. One arrow is above the K–Cup Holder; the second can be found at the very bottom of the K-Cup Holder. So be careful.
Note 2: Never try to lift the Handle or open the K–Cup Assembly Housing during brewing because boiling water in the K–Cup Holder can burn your hands, or you may be injured. So avoid this risk.
Warning: Your brewer contains certain chemicals, including lead, which in California is known to cause Birth Defects, Cancer, and other Reproductive Harm. Besides this, please don’t remove the bottom cover because it can cause Fire and electric shock. Repair of your brewer should be done by authorized service personnel only because No user Serviceable parts are inside.
Specifications Of Your Keurig B–77
As you may know, every appliance has some specifications, so your Keurig B-77 also has these features. I know you checked everything when you ordered your brewer, but still, check its details once to ensure it meets your standards. If it doesn’t match your needs, return or replace it quickly. Let’s see Keurig B-77 specifications instructions!
| Specifications | Details |
| Product Line/System | Keurig 1.0 Platinum |
| K-Cup Compatibility | Unlicensed K-Cups, Keurig 2.0 licensed K-Cups, and ground coffee with the My K-Cup |
| Brew Sizes | 4 oz (118.3 ml)6 oz (177.4 ml)8 oz (236.6 ml)10 oz (295.7 ml) |
| Water Reservoir Capacity | 72 oz (2.1 L) |
| Water Filter | Included |
| Display | Blue backlit LCD with Brew button |
| Temp Control | Yes |
| Strength Control | No |
| Dimensions | 10.3″ (26.2 cm) W 13.8″ (35.1 cm) D 13.0″ (33.0 cm) H |
| Weight | 12.0 lbs |
| Quiet Brew Technology | Yes |
| Auto-On | Yes |
| 24-hour digital clock | Yes |
| Programmable favorites | Yes |
| Removable drip tray | Yes |
| Auto on | Yes |
What Is Inside The Box?
Now it’s time to open your Keurig B–77 package. Inside, you’ll find essential items that you will need to operate the coffee machine. Please carefully examine the package and make sure you have everything. If something is not there, make sure to ask for a replacement. Let’s see what’s inside together.
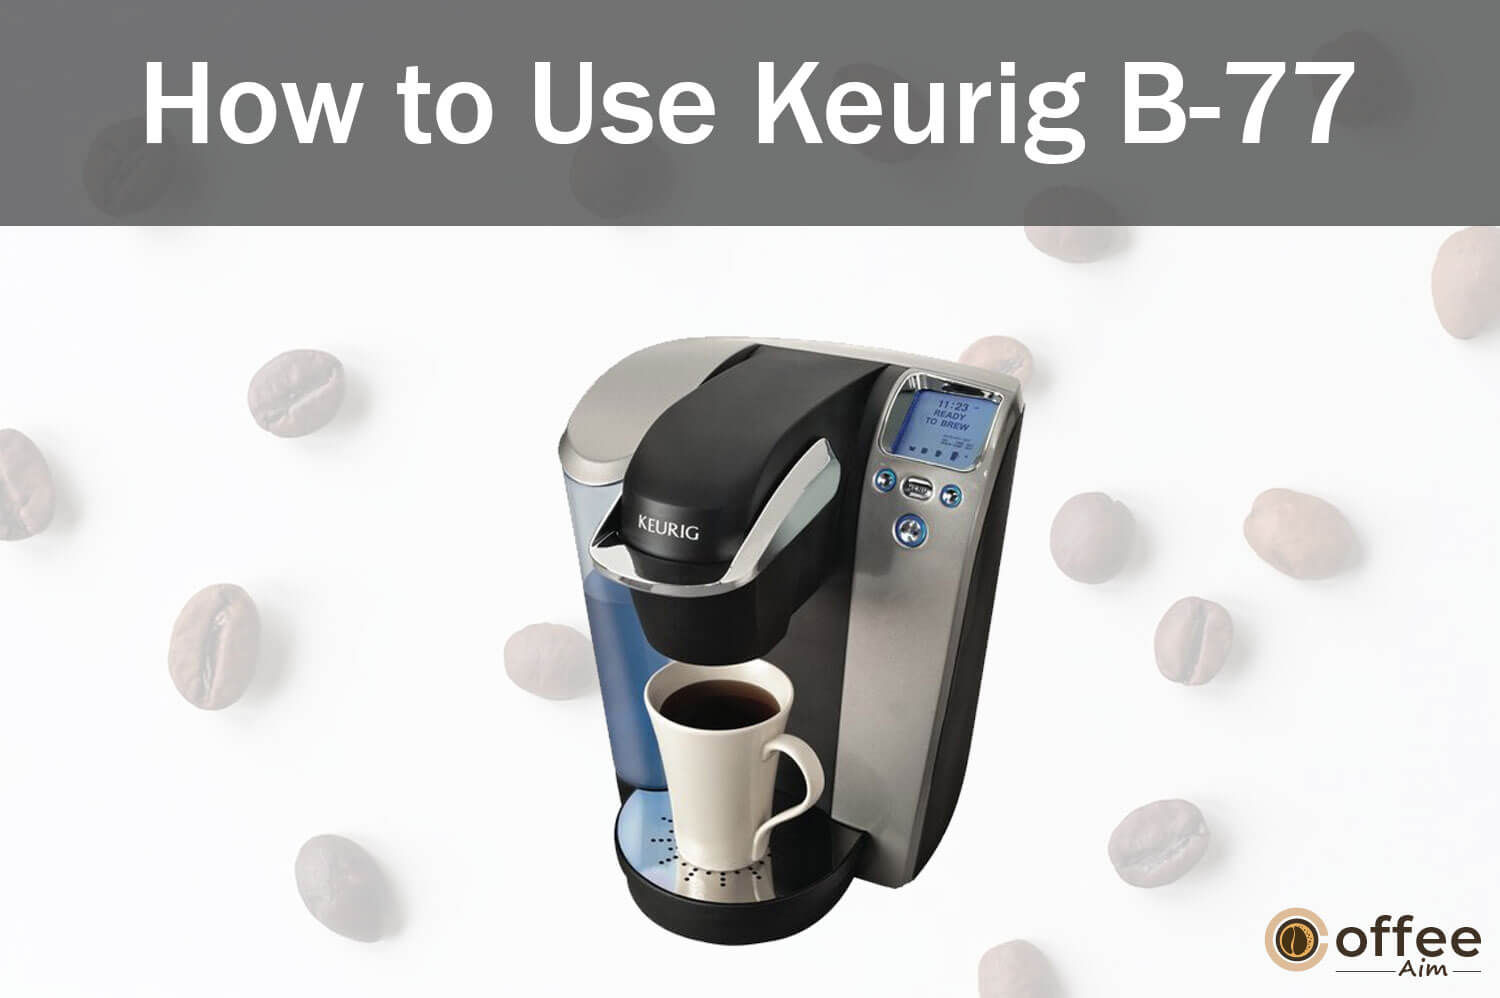
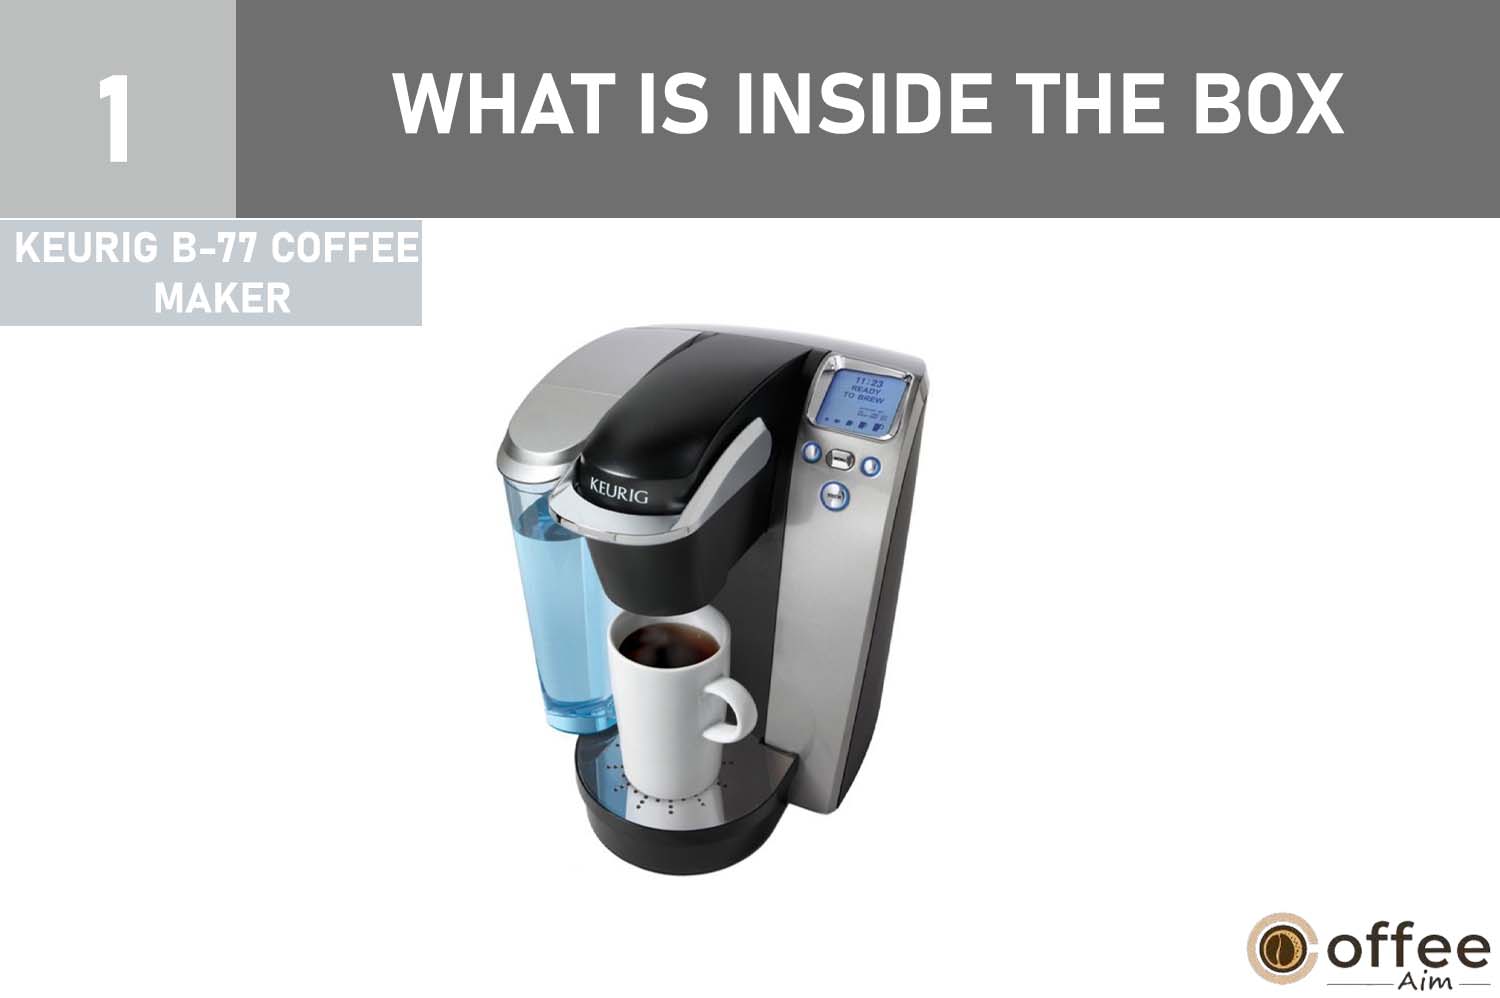
Keurig B-77 Coffee Maker
The most important thing you receive is your Keurig B–77. With this machine, you can enjoy tasty coffee whenever you like.
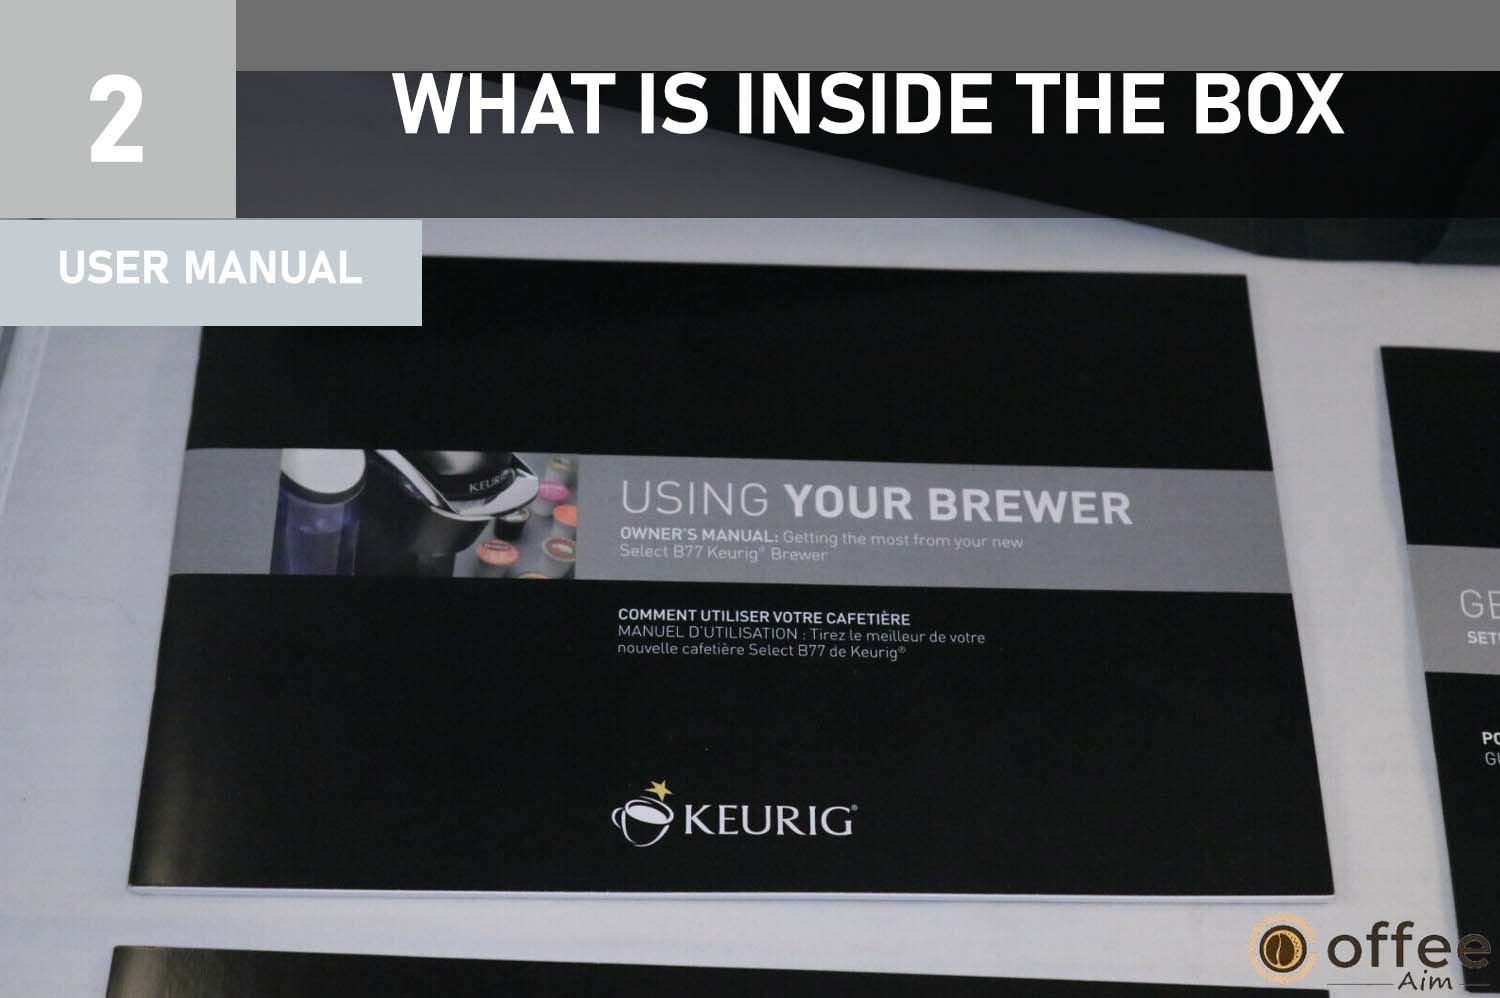
User Manual
Included with your Keurig B–77 is a user manual containing comprehensive operating instructions that will assist you in effectively using your machine by providing accurate guidance.
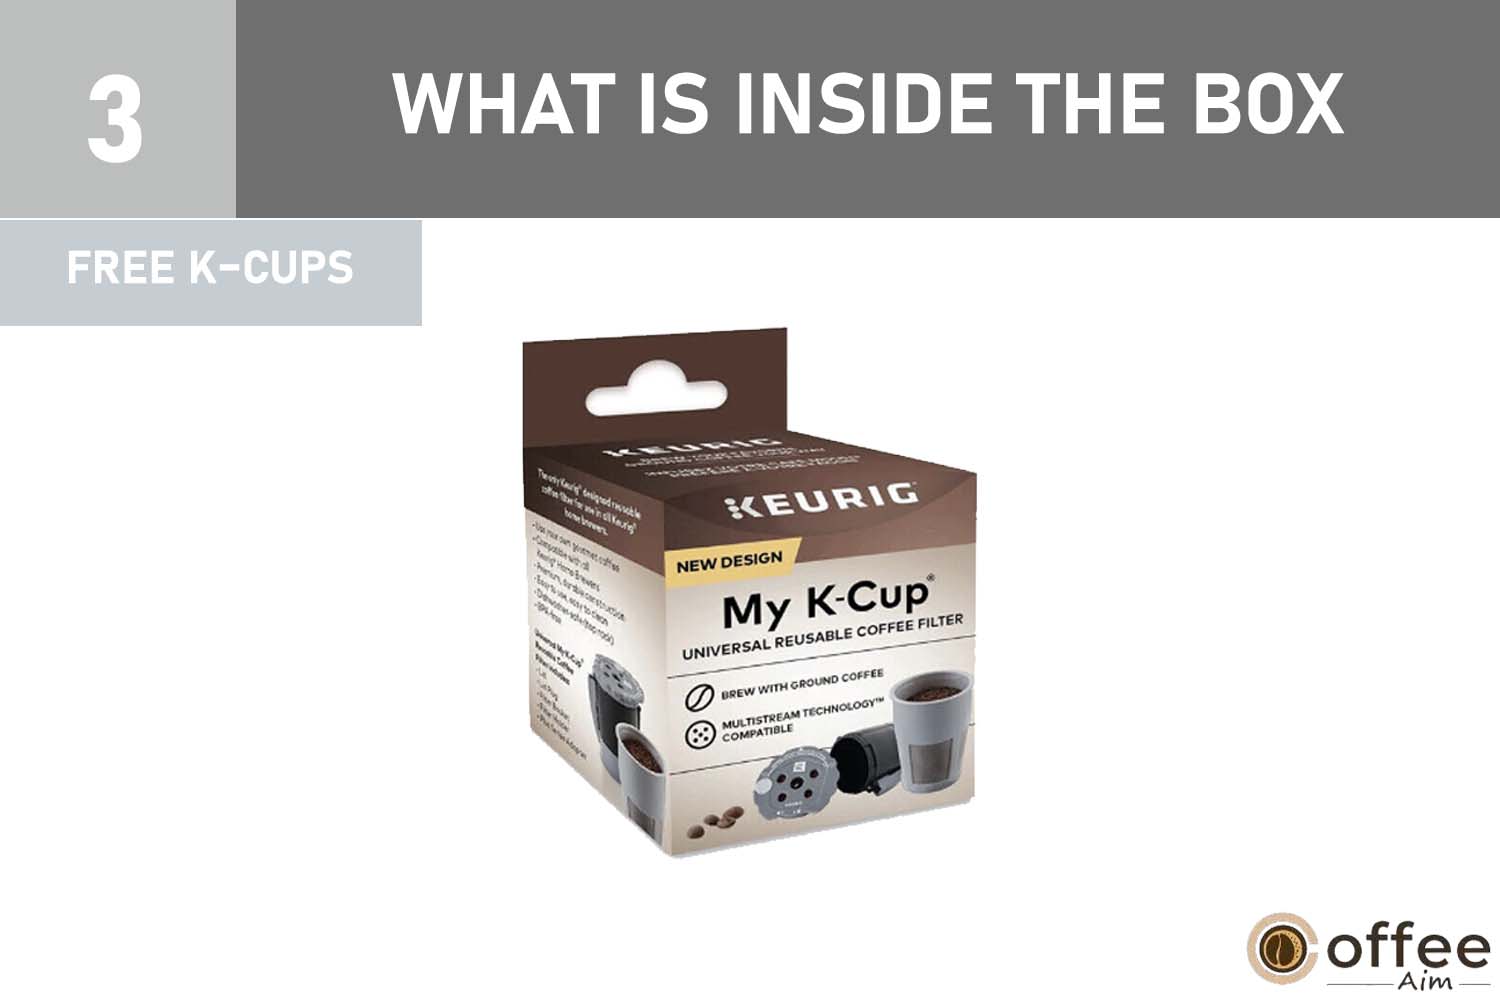
Free K–Cups
Here is a complimentary pack of K-Cups, including six cups, each containing a unique flavor. You can enjoy these flavors without purchasing additional K-Cups for your first brew.
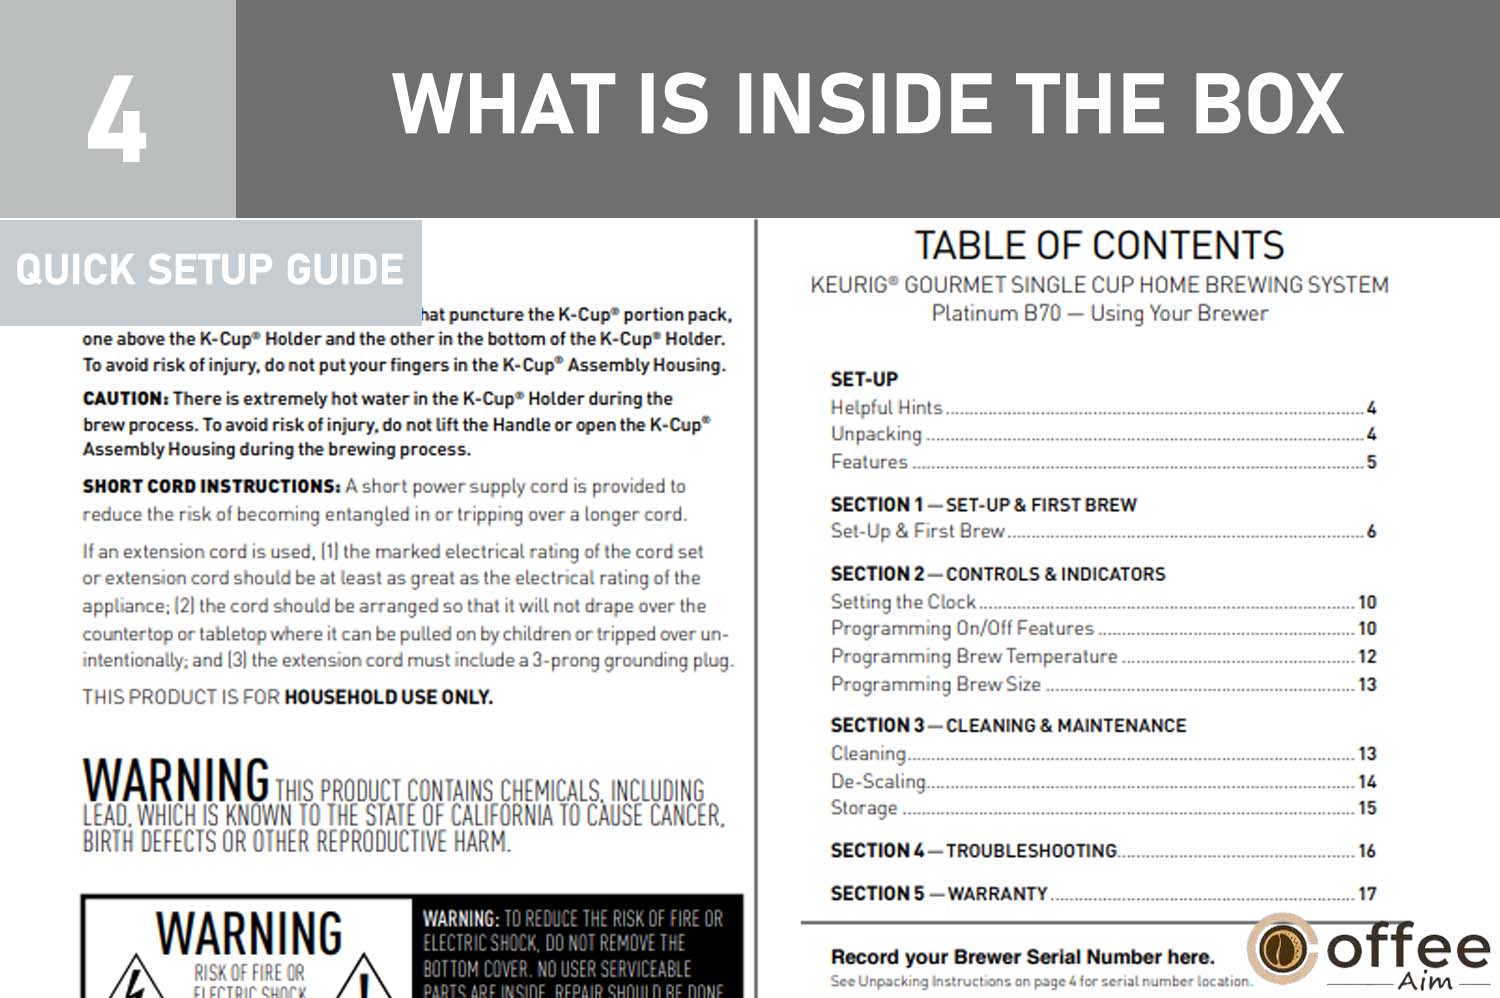
Quick Setup Guide
Inside the box is a mandatory setup guide providing detailed instructions for correctly setting up your Keurig B–77 brewer. This guide will assist you in the proper installation process.
Keurig B–77 Unpacking Instructions
You have a Keurig B–77 in your hand. I know you are having trouble with how you will unpack it or not get any friction. Don’t panic but read the below points carefully and unbox them calmly.
- Place your Brewer’s box on a flat surface, Such as a table, countertop, or floor. Then open the box۔
- Remove the attached literature or instructions.
- Now turn the box to the side of the one in front of which the box is facing down.
- Grab the plastic bag from inside the box that contains your Brewer.
- Carefully pull the plastic bag and packaging material out of the box and toward you. The Brewer will remain in the polyform and stay on its side.
- Remove the top packaging material, which is made of Polyform.
- Carefully lift the Brewer from the bottom polyform and place it upright on a smooth, flat surface.
- Carefully lift the plastic bag from the Brewer.
- Record the serial number of the Brewer, which is found in this guide. If you ever lose this serial number, don’t worry; you’ll find it on the bottom of the brewer box or behind the drip tray when you remove it.
- Place the Brewer upright on a smooth, flat surface. Remove the tape to hold the water reservoir in place.
Note: Sometimes, future product shipping is necessary; you don’t lose the packaging material and save all the packaging material.
Warning: Keep all plastic bags out of reach of children.
Key Parts Of Your Keurig B-77
It is essential to understand the machine’s different parts and functions during the brewing process. Familiarizing yourself with each component’s role will enable you to make a better cup of coffee. Let’s examine the different components of your Keurig B-77 coffee machine in simpler terms and how they work together to brew your first cup of coffee.
A. Water Reservoir Lid
The water reservoir lid is the cover that goes on top of the reservoir to keep the water inside safe and prevent it from spilling. You need to clean the reservoir or refill it with water.

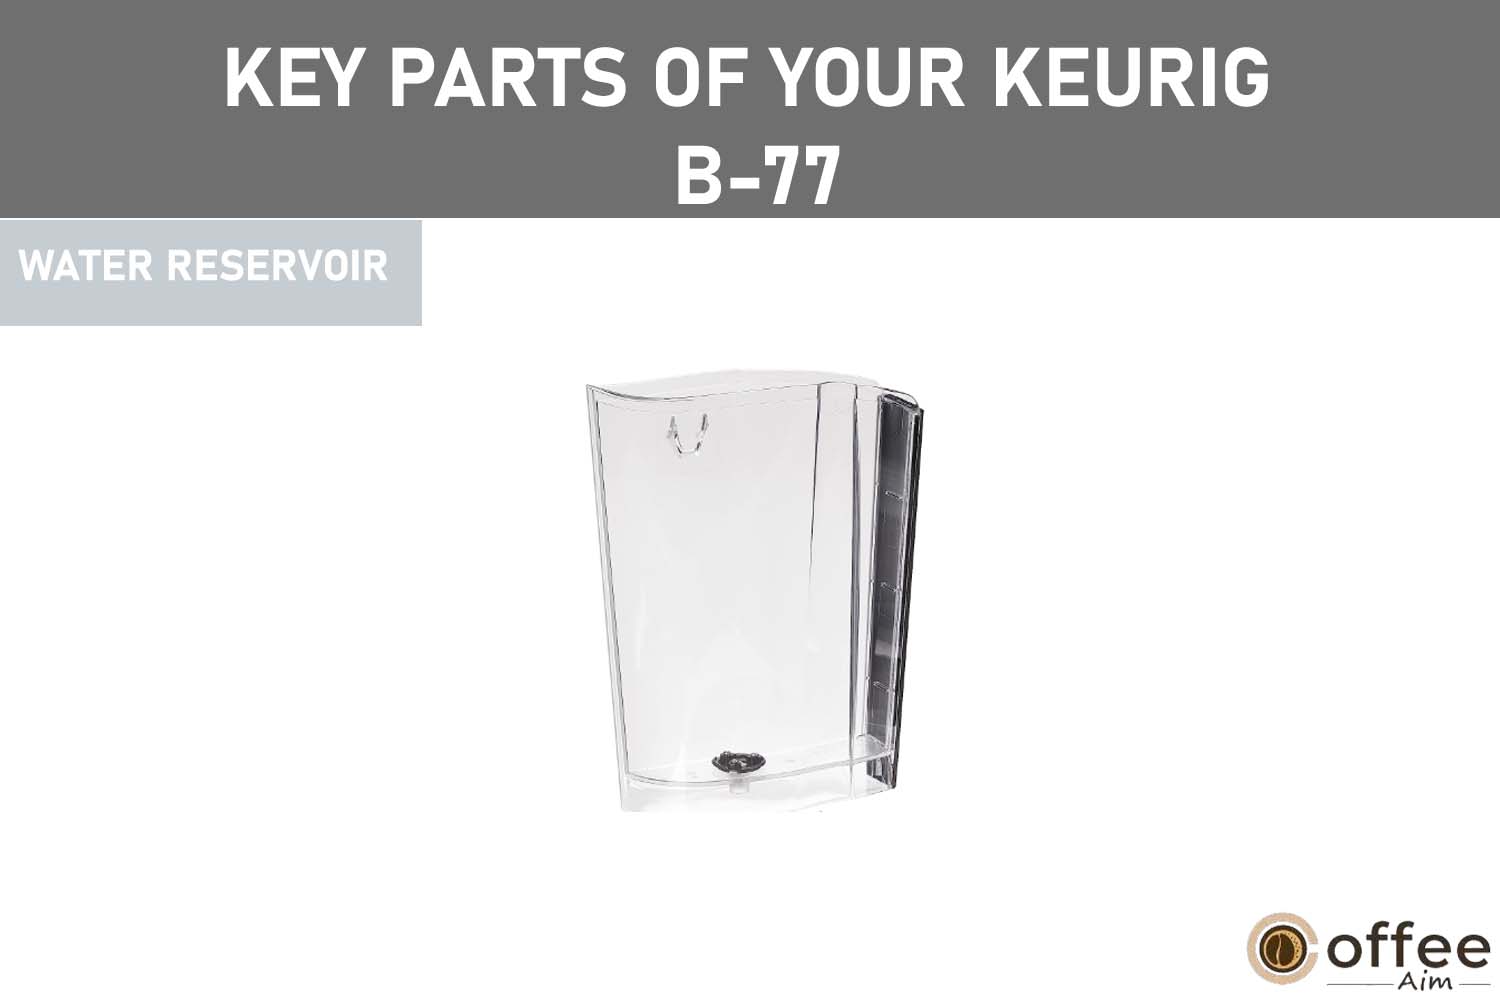
B. Water Reservoir
The water reservoir in the Keurig B-77 is a removable container that holds up to 72 ounces of water. It’s at the back of the coffee maker and can easily be removed for cleaning or refilling. The water reservoir in the Keurig B-77 can be removed when it needs to be refilled, fill it with water, and then return to its place on the coffee maker.
C. Water Reservoir Lock Tab Slot
The water reservoir lock tab slot in the Keurig B-77 refers to a small opening or indentation on the back of the water reservoir that corresponds to a locking tab on the coffee maker’s base.
When the reservoir is appropriately positioned on the base, the locking tab will slide into the slot, securing the reservoir and allowing water to flow into the machine. If the tab is not aligned correctly with the slot, the reservoir will not lock into place, and the Brewer will not operate.

D. Handle
The Keurig coffee brewer handle is the part you use to open and close the brewing chamber. It is an essential component that ensures the K-Cup is securely held during brewing.
Lift the handle to access the brewing chamber and insert a K-Cup. Once the K-Cup is in place, lower the handle to close the brewing chamber. The handle on a Keurig is typically made of plastic.

E. Funnel
The funnel in the Keurig B-77 is part of the Brewer that directs the water flow from the reservoir into the K-Cup. Maintaining a clean funnel is essential for ensuring a smooth water flow and proper brewing of coffee.

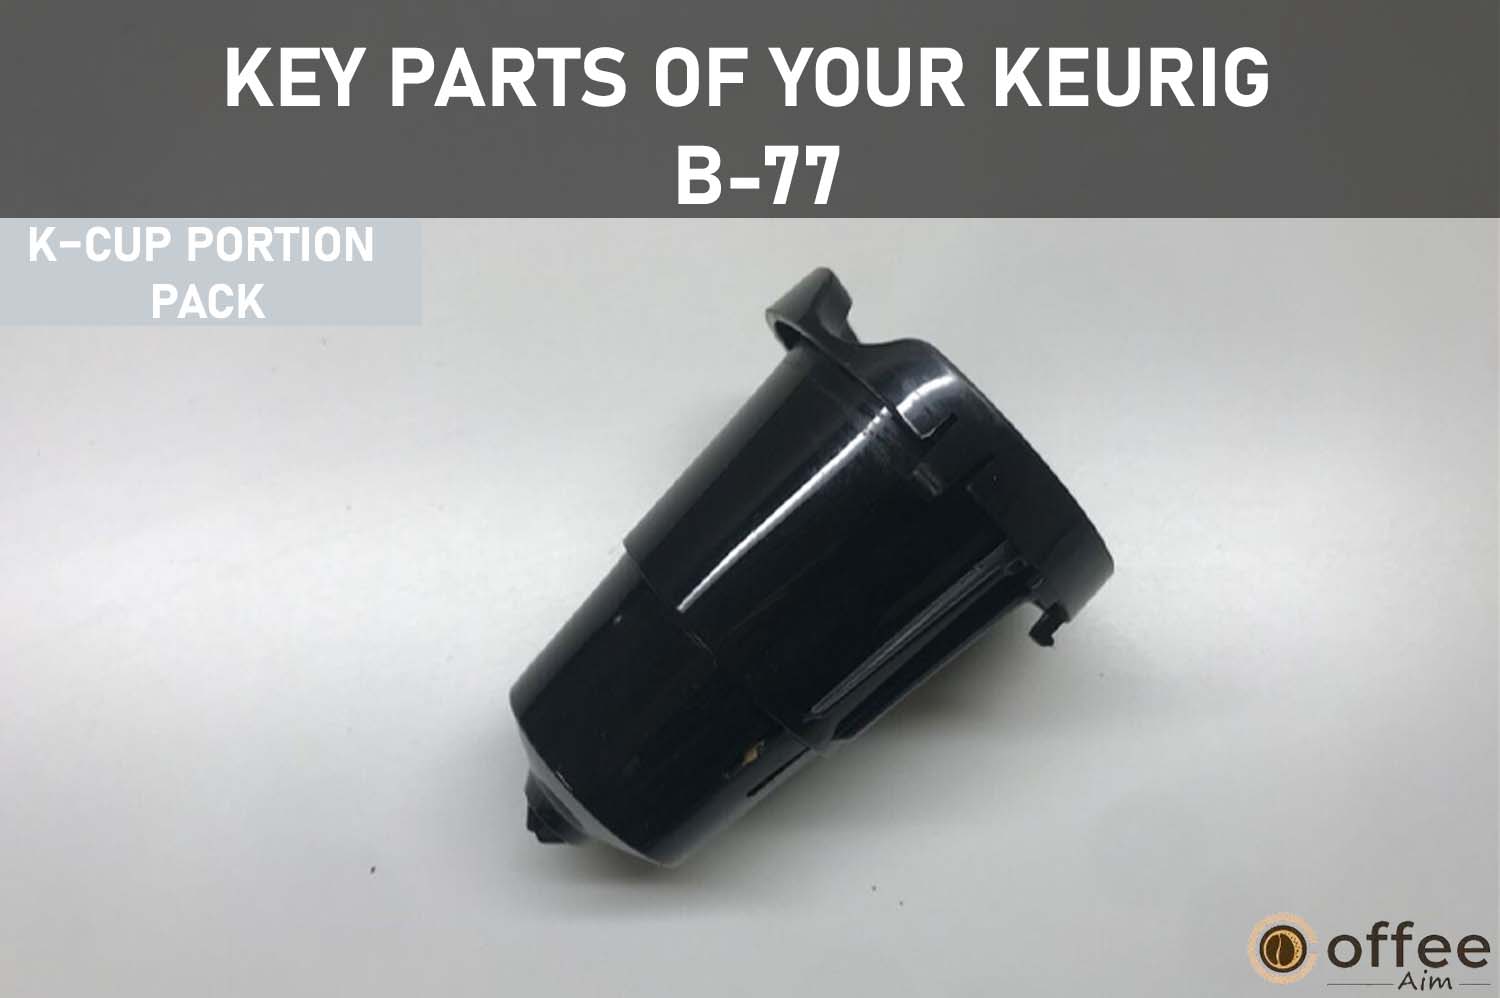
F. K–Cup Portion Pack(E And F Are The K-Cup Holder Assembly)
The K-cup portion pack holder is part of the Brewer that holds the K-cups and punctures them to allow hot water to flow through and brew the coffee. K–Cup portion Pack is a small, plastic, removable piece that sits inside the brewing chamber of the Keurig B-77. When a K-cup is placed in the holder and the brewing cycle is initiated, the holder punctures the foil lid of the K-cup and guides hot water through the grounds to brew a cup of coffee.
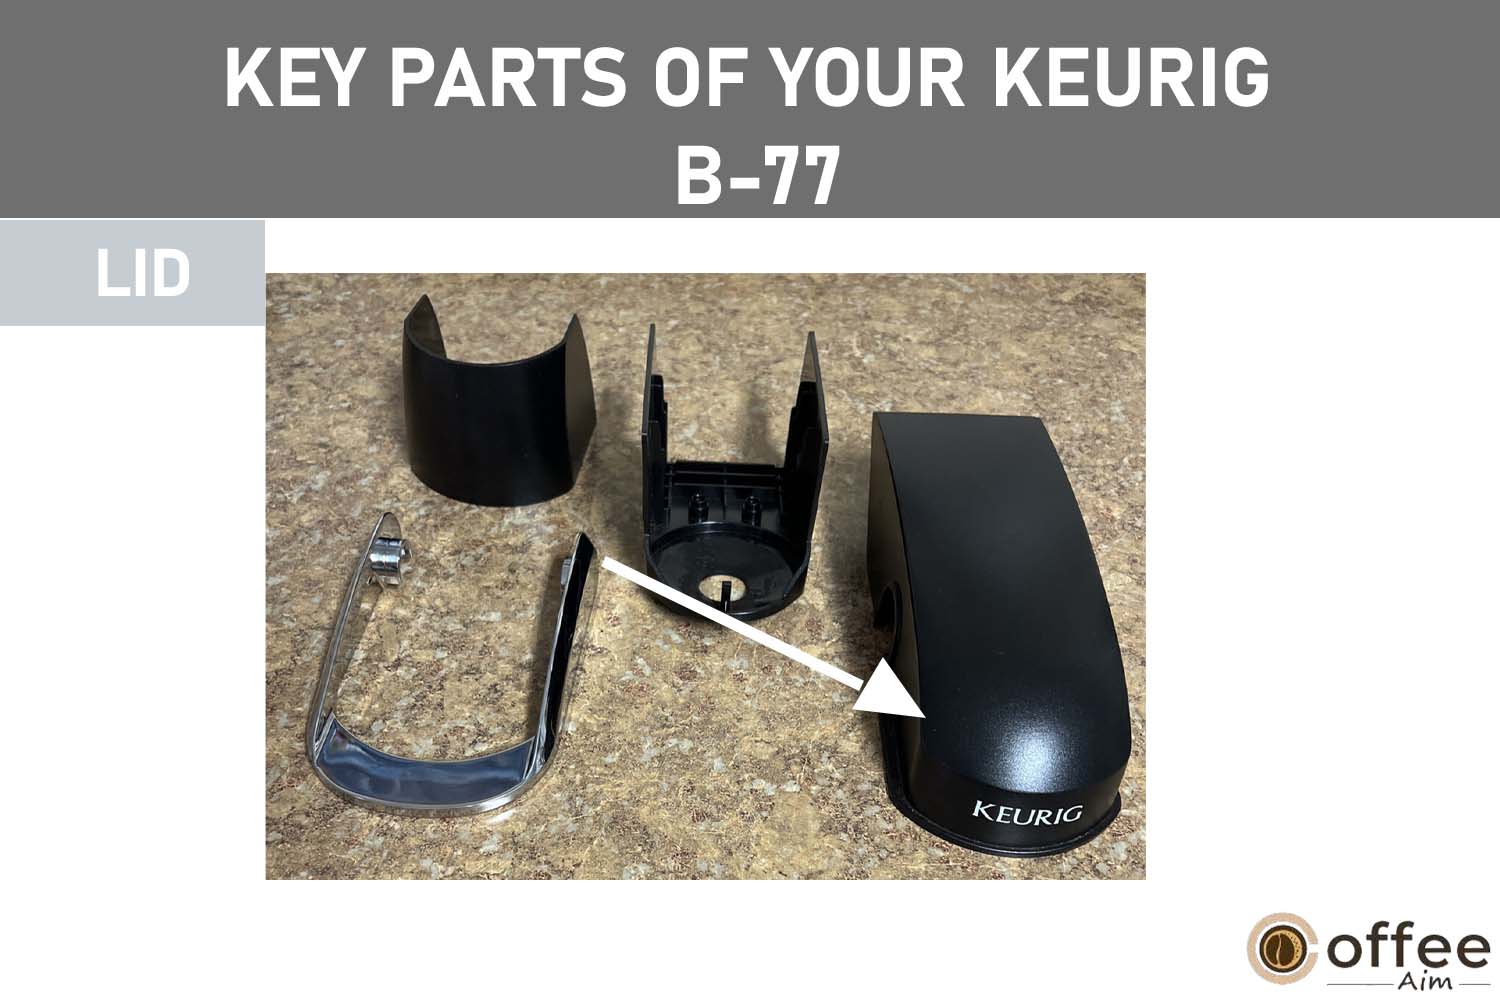
G. Lid
The lid, which covers the K-Cup Pack holder, is located at the top of the K–Cup holder assembly. You can lift the top using the provided handle to access the holder.
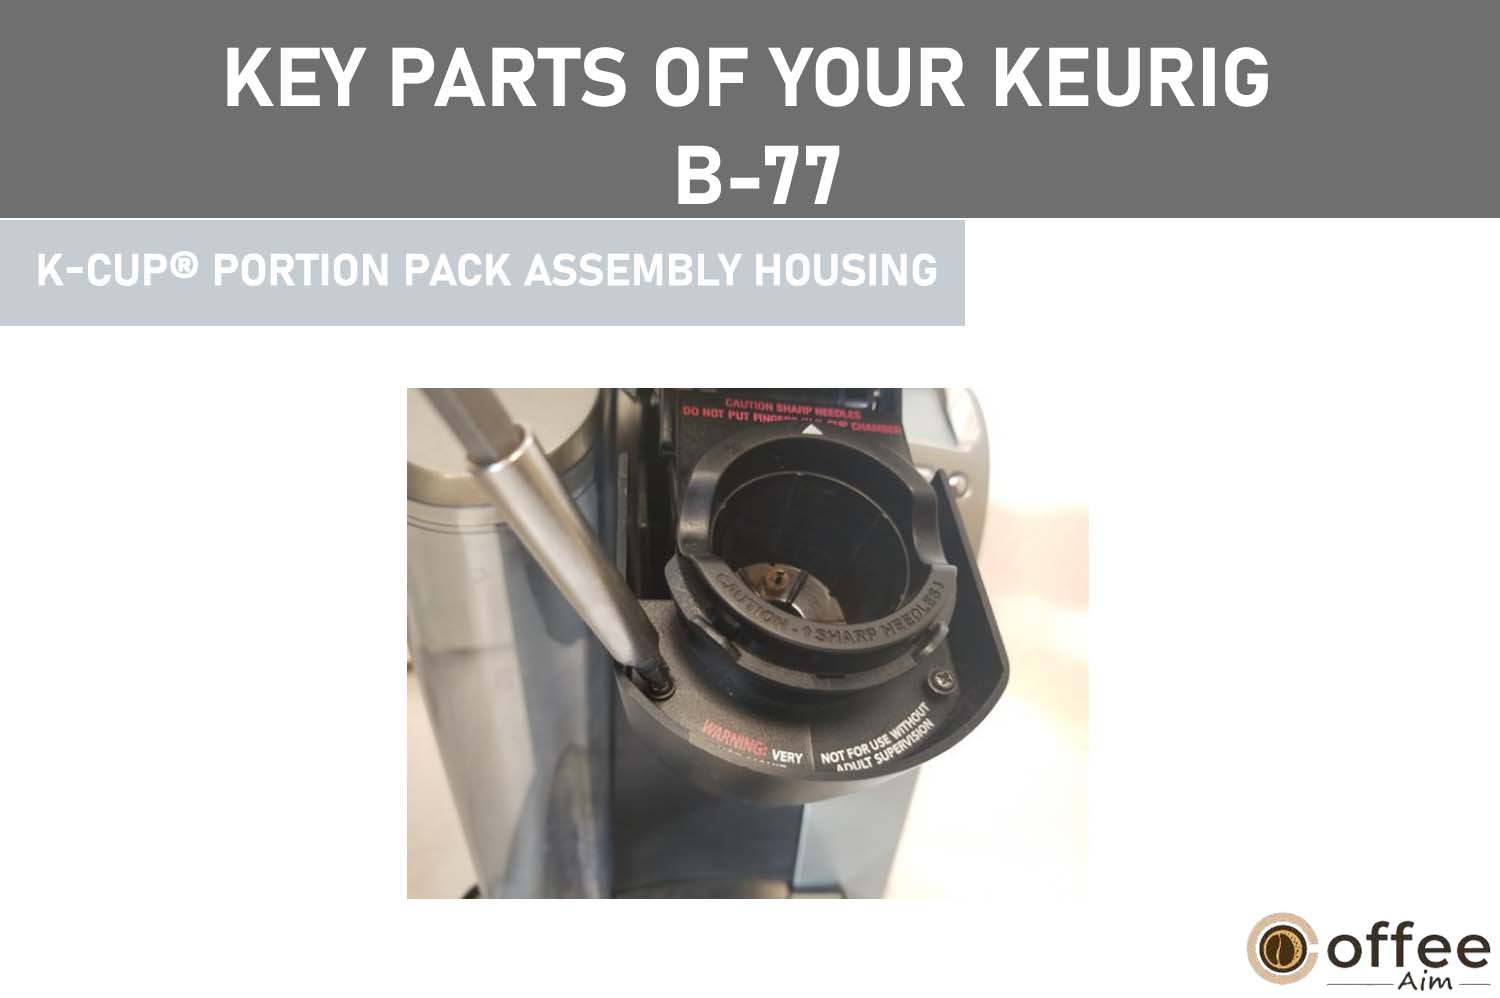
H. K-Cup® Portion Pack Assembly Housing
The K-cup portion pack assembly in the Keurig B-77 is part of the coffee maker holding the K-cup portion pack holder in place. It sits at the bottom of the brewing chamber and has a circular opening in the center where the portion pack holder fits snugly. When you close the lid of your Keurig B-77 and press the brew button, the assembly housing is responsible for guiding the hot water from the water reservoir through the K-cup and into your coffee mug.
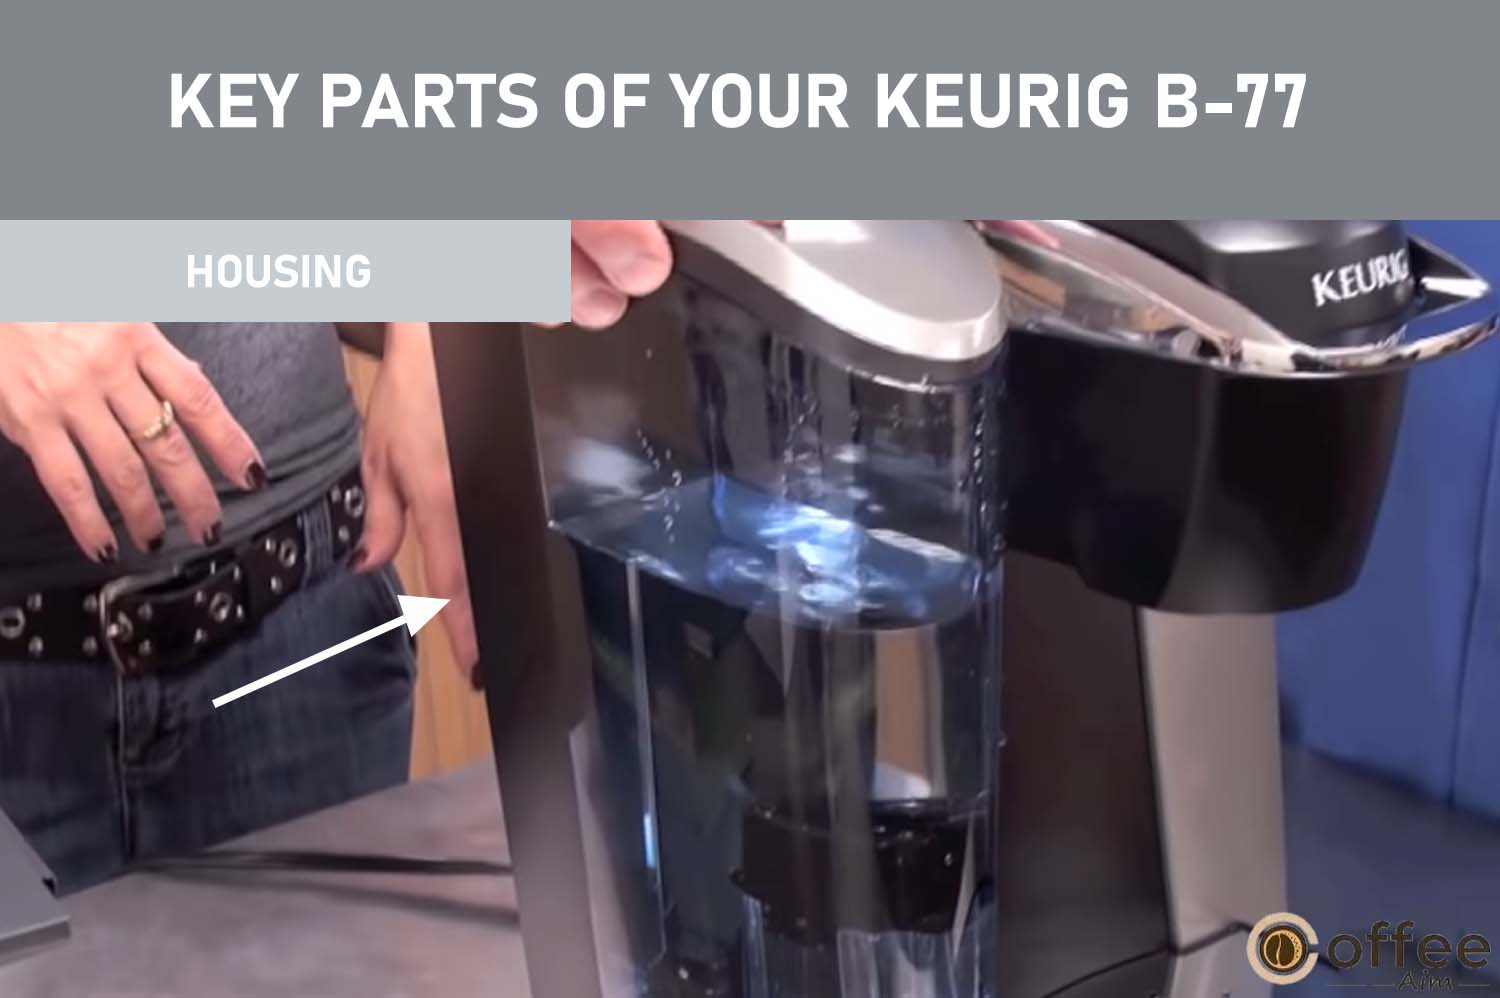
I. Housing
In your Keurig B-77 coffee maker, housing refers to the outer shell or casing of the machine. It is the part that encloses and protects the internal components of your coffee maker.
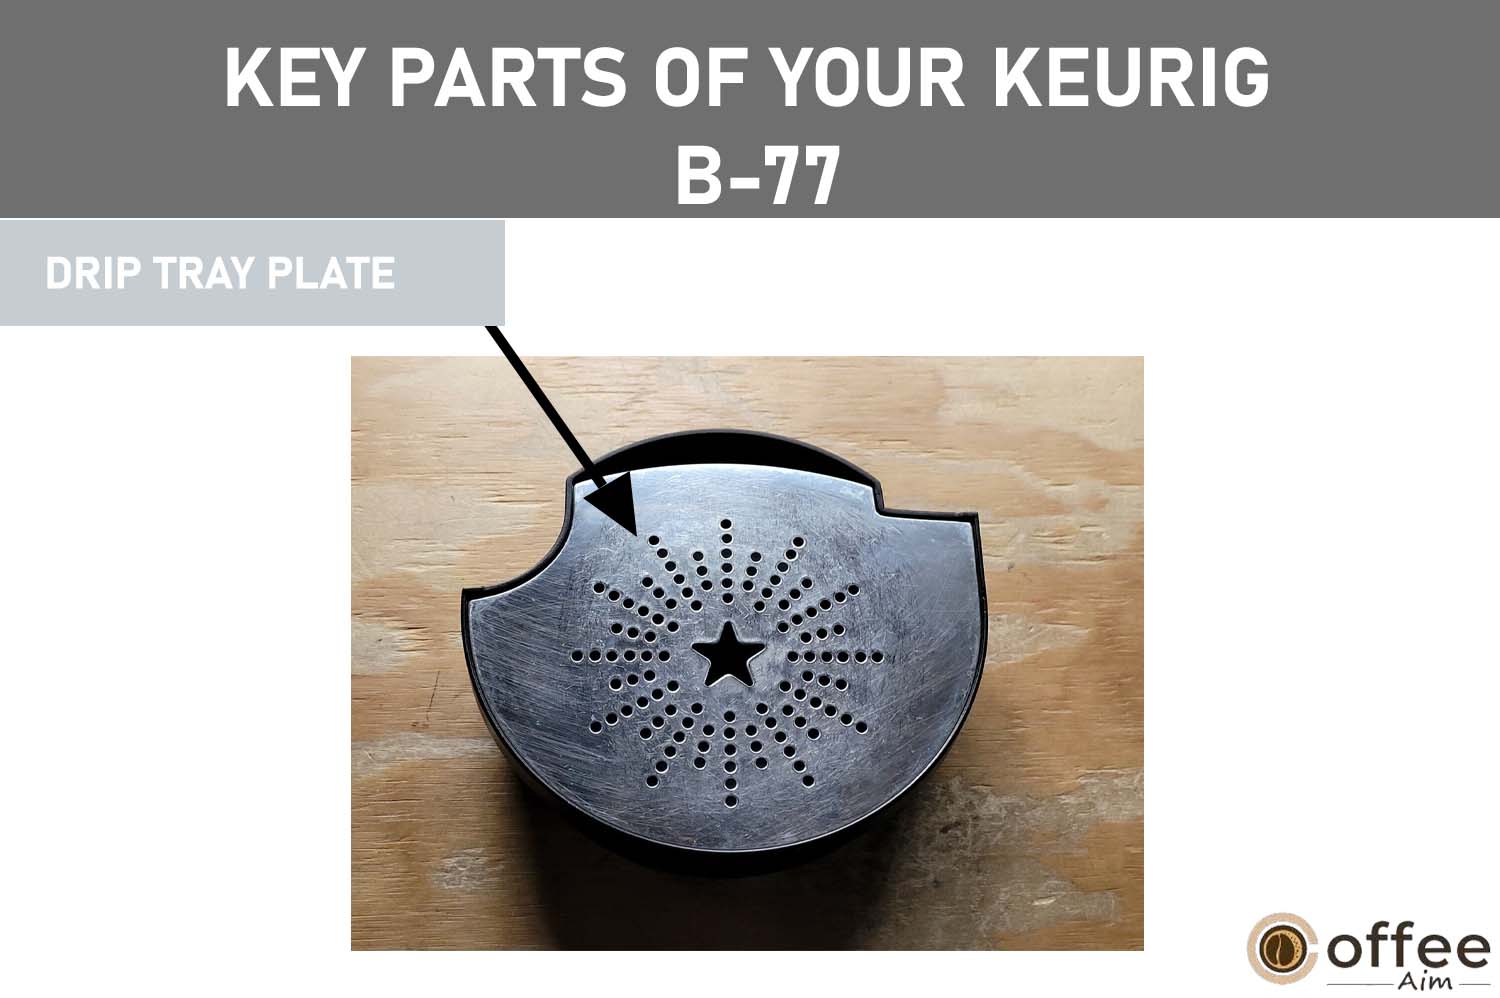
J. Drip Tray Plate
The drip tray plate is a component of the drip tray assembly in your Keurig B-77 coffee maker. It is a small, flat plastic piece that sits on the drip tray and directs any drips or spills toward the center of the tray. The drip tray plate has a sieve-like structure.
K. Drip Tray
In your Keurig B-77, there is a plastic tray at the bottom, the drip tray. It is specifically designed to store a liquid that might accidentally drip or spill while brewing coffee. This tray is easily removable, so you can clean it easily.

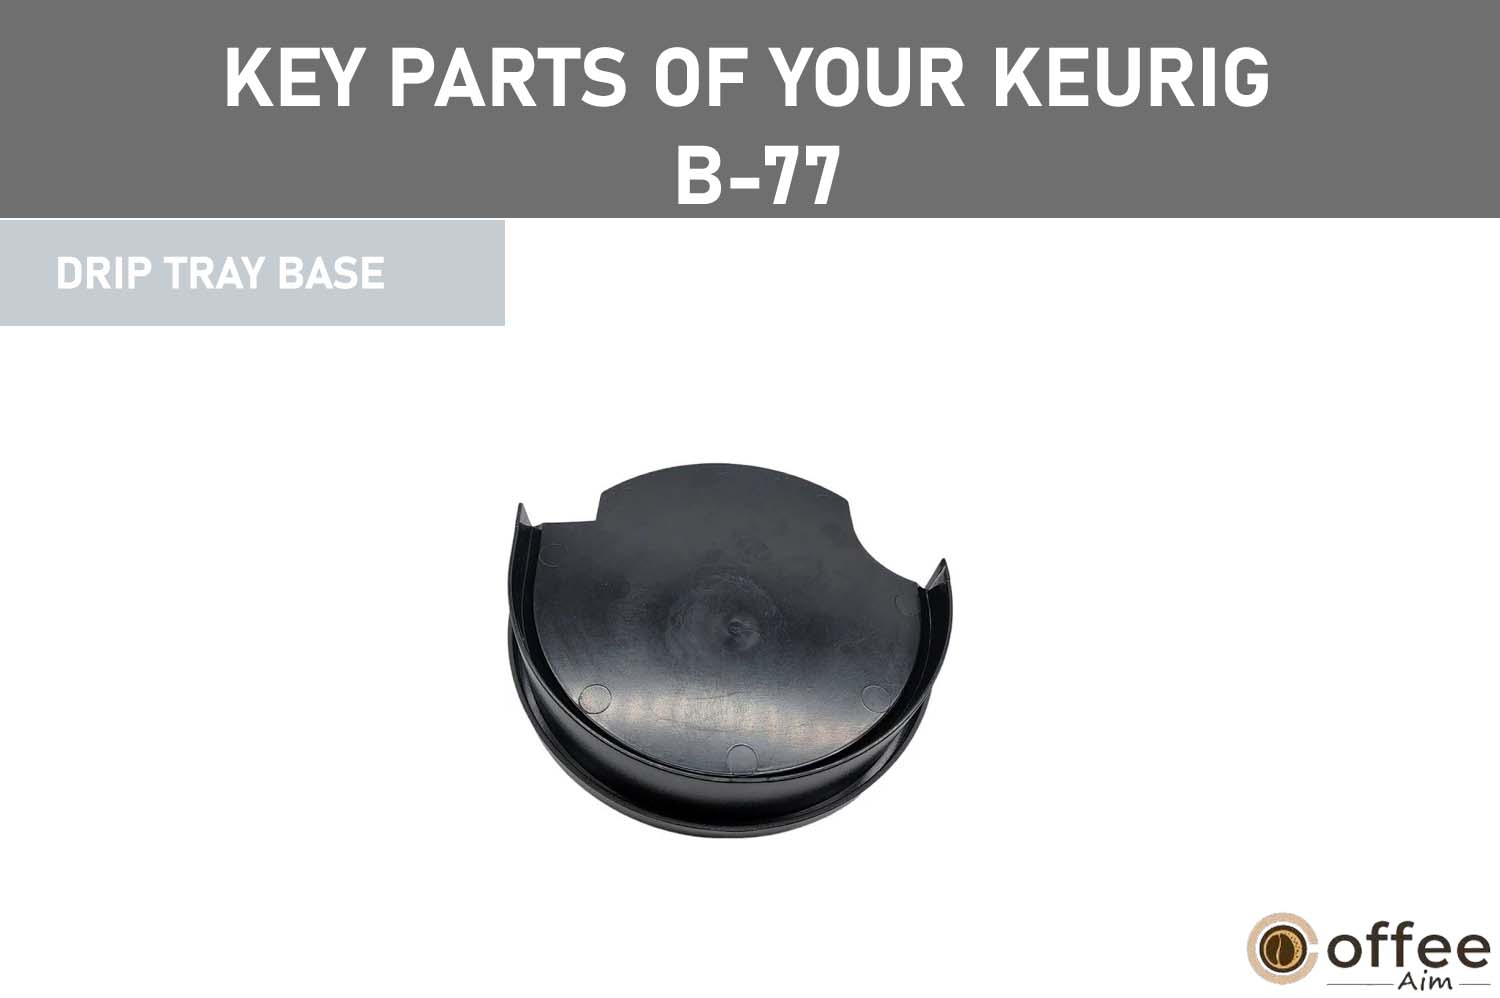
L. Drip Tray Base
The drip tray base is the lower portion of the drip tray assembly in your Keurig B-77. It is a larger plastic piece that serves as the drip tray’s foundation and supports tall mugs.
M. Vent
The vent is a small opening located at the top of your coffee machine. It allows heat to flow out of the coffee maker to prevent overheating during brewing, which is necessary to prevent pressure buildup and ensure proper brewing.

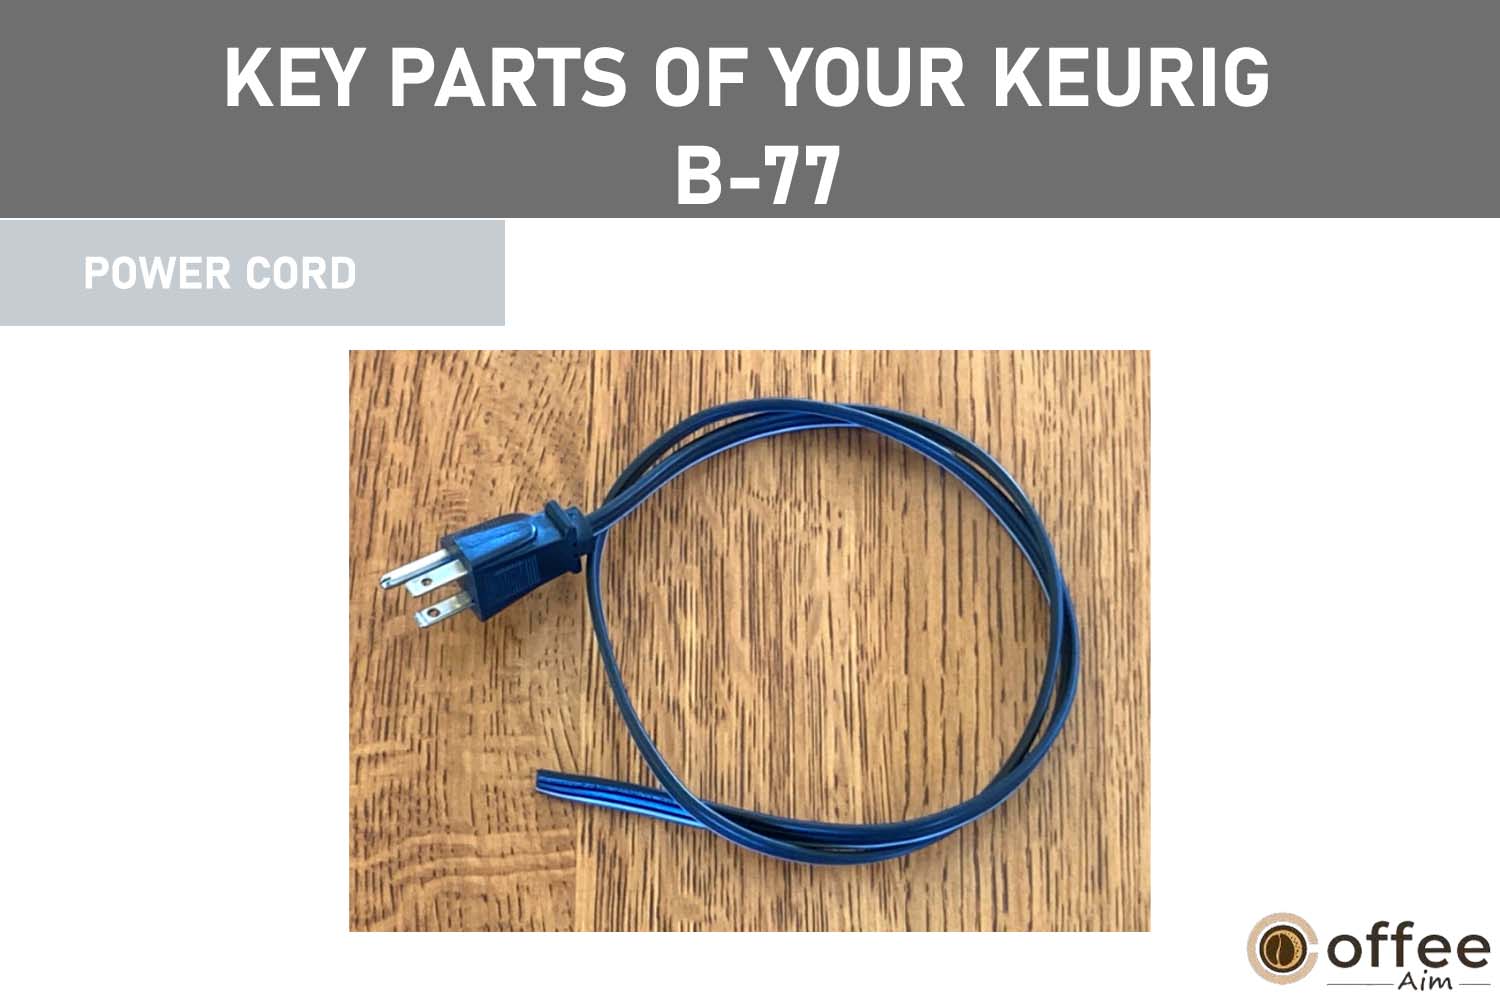
N. Power Cord
The primary electrical cable used to connect a machine to a power source to activate it is commonly called the “power cord.”
O. Power Switch
The switch is located on the rear right side of your Keurig B–77. The power switch turns the coffee maker on and off, and it controls the flow of electricity from the power source to the machine. When the power switch is activated, the coffee maker begins to heat the water and prepare the coffee maker for use. When the switch is turned off, the coffee maker stops heating and returns to standby mode.

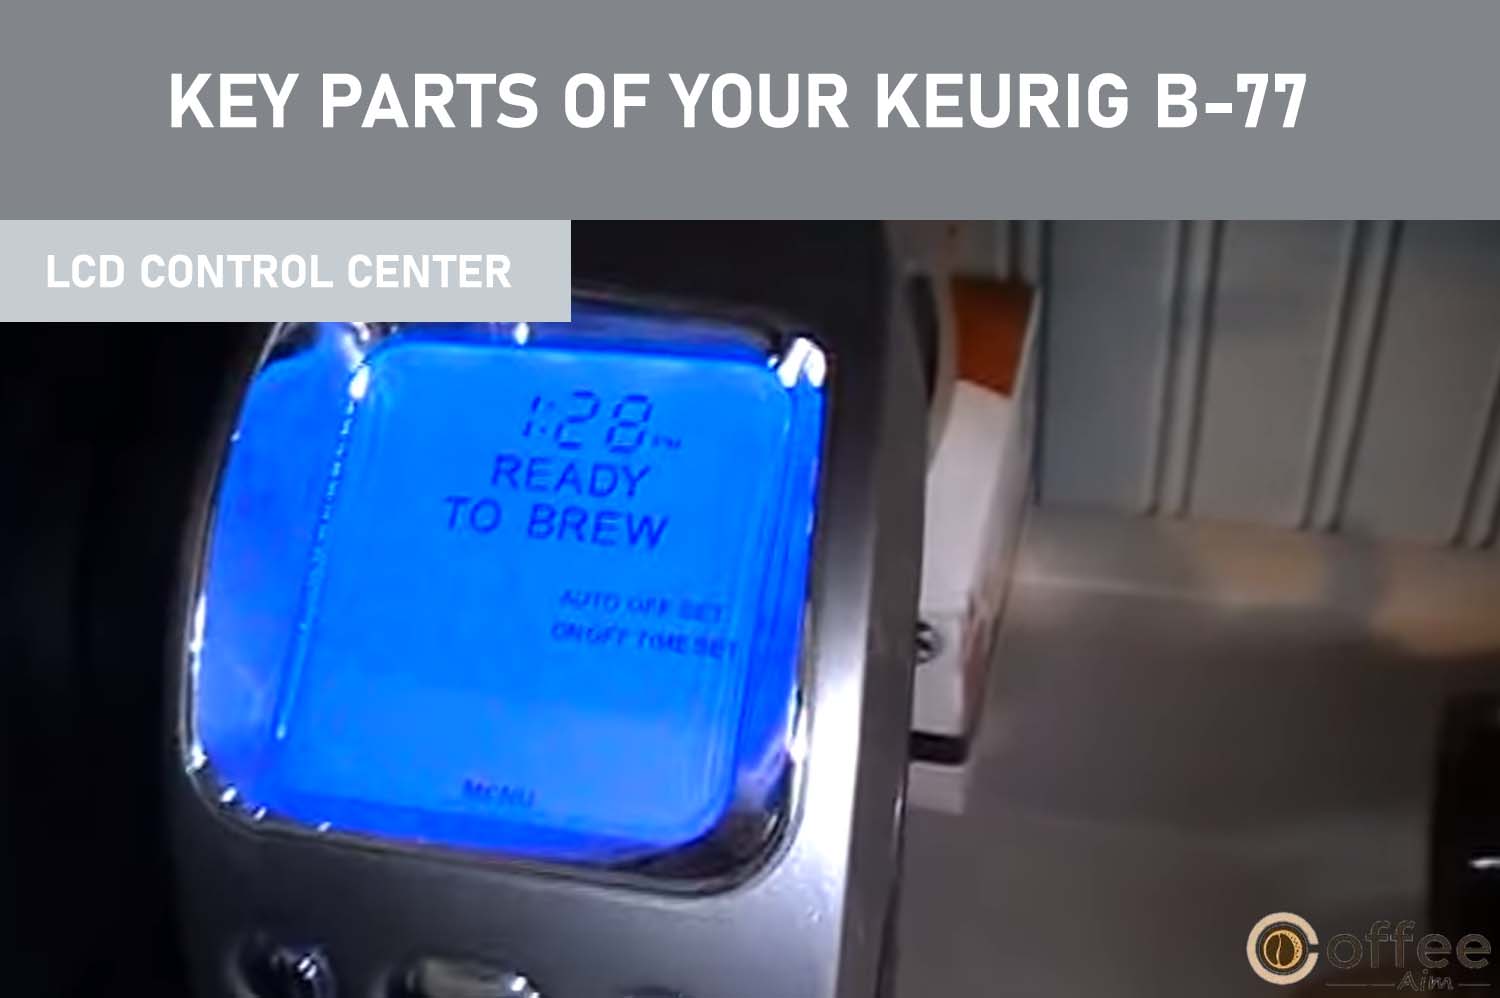
P. LCD Control Center
The LCD control center in Keurig B-77 is a feature that shows all the options and activities. On the machine’s front side, you’ll find an LCD control centre equipped with multiple buttons, enabling you to modify the brew temperature, brew size, and coffee strength.
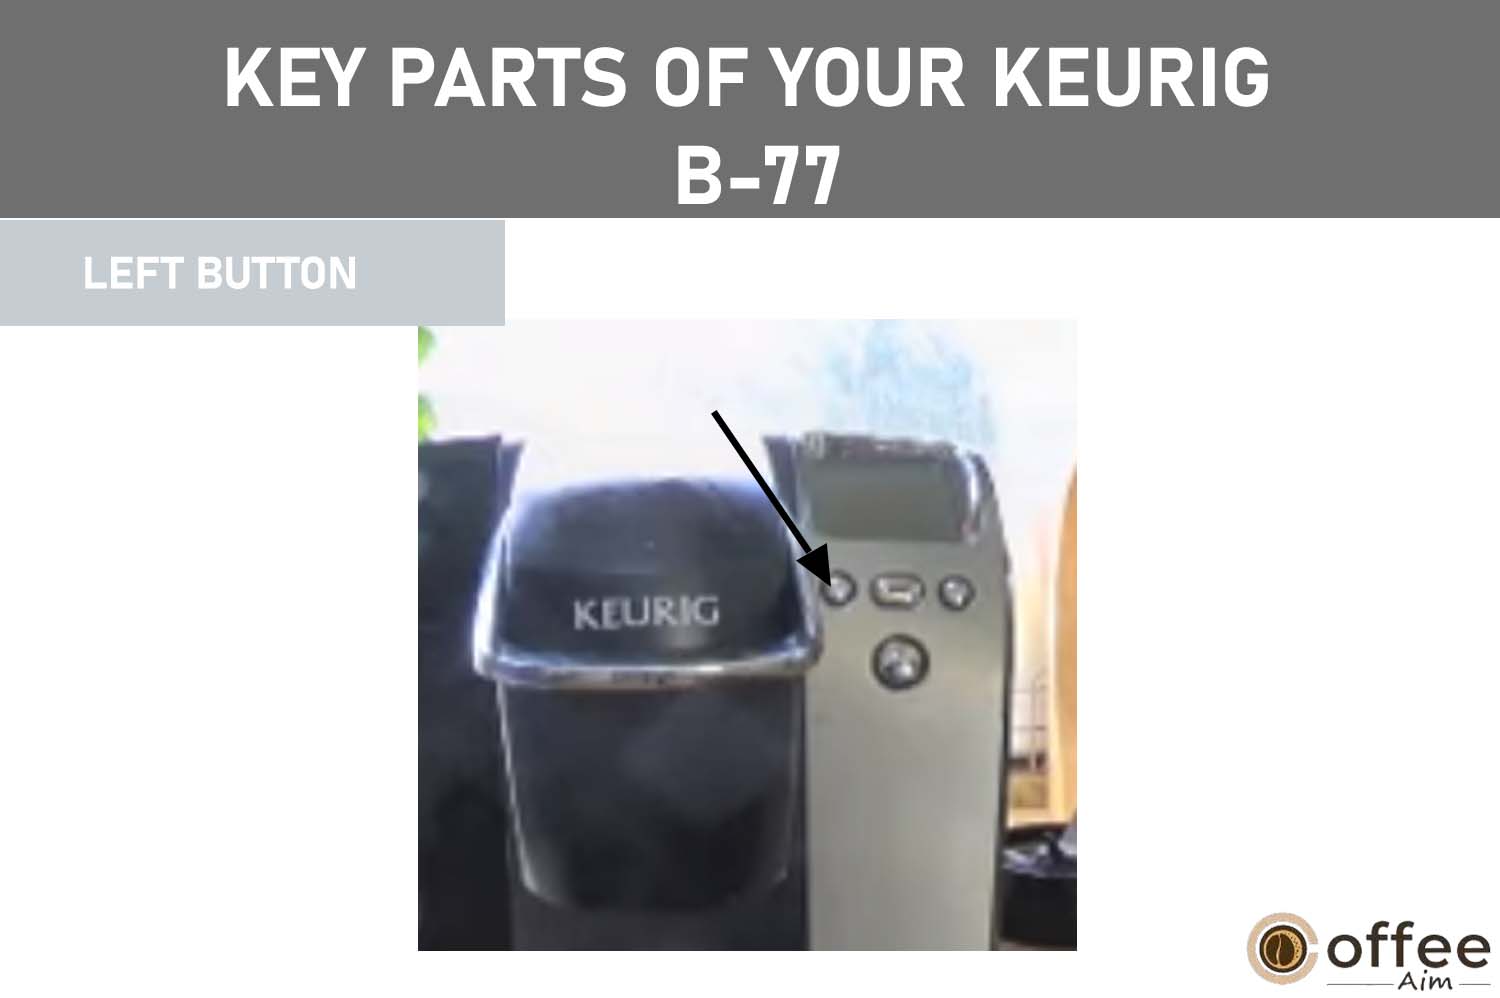
Q. Left Button
The left button is typically used to control your coffee’s brew size or water volume. By pressing the left button, you can cycle through different brew size options, such as 4 oz, 6 oz, 8 oz, and 10 oz. Besides brew sizes, it is also used to navigate different options.
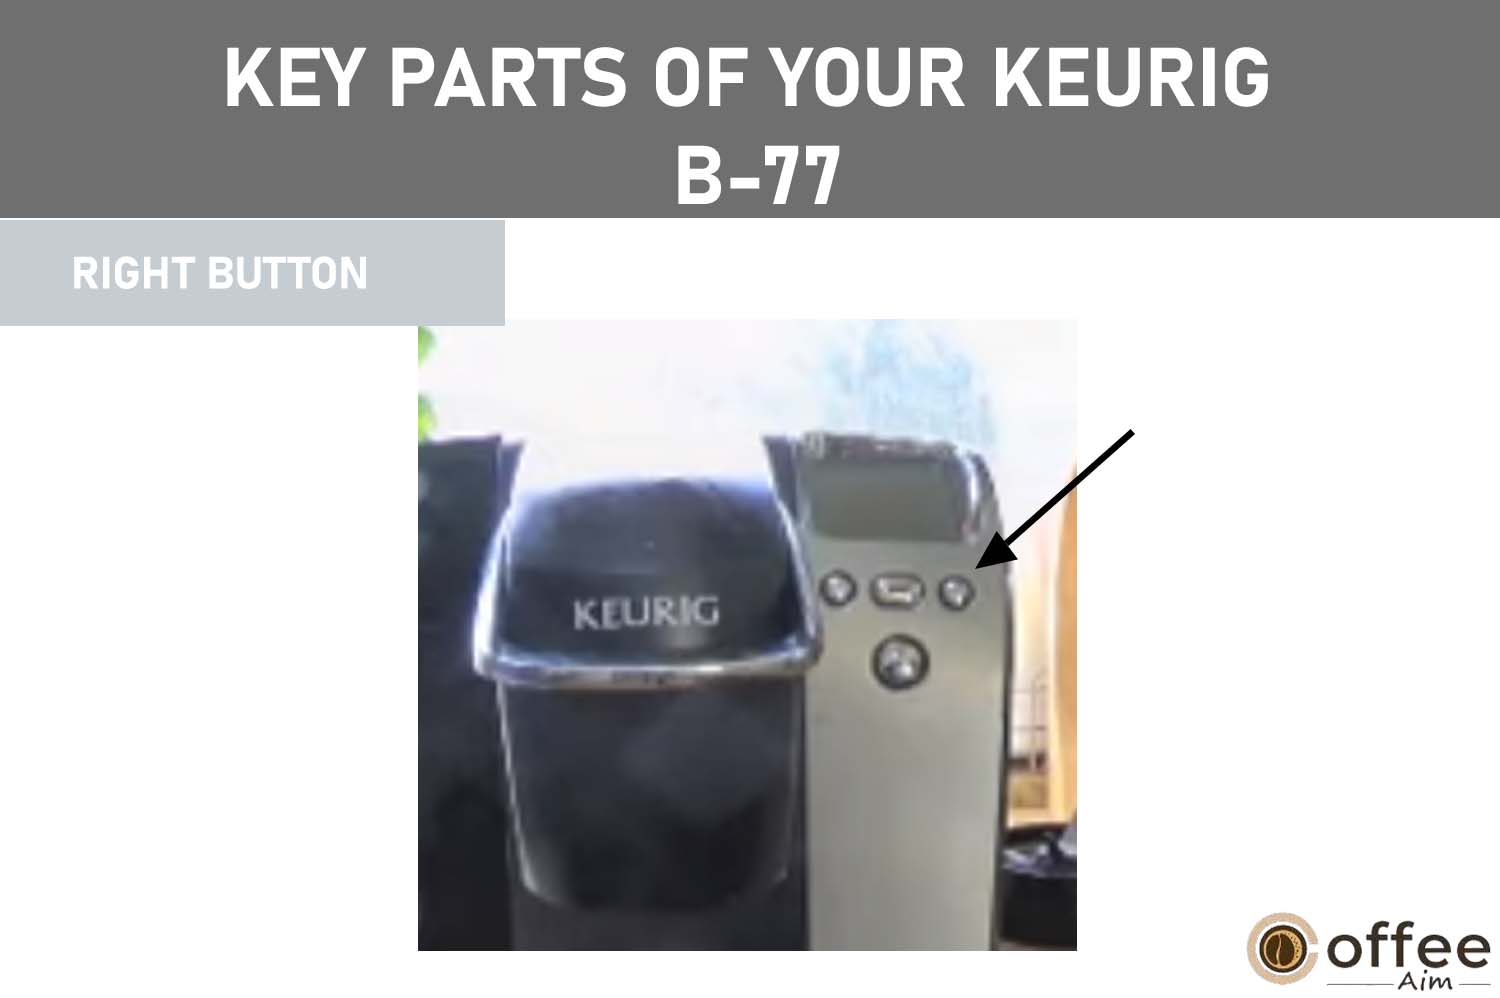
R. Right Button
The Right button on your Keurig B-77 serves as a navigation control, allowing you to scroll through menu options or adjust settings with a single press. It provides a convenient way to navigate and make selections on the Keurig B–77 display panel.
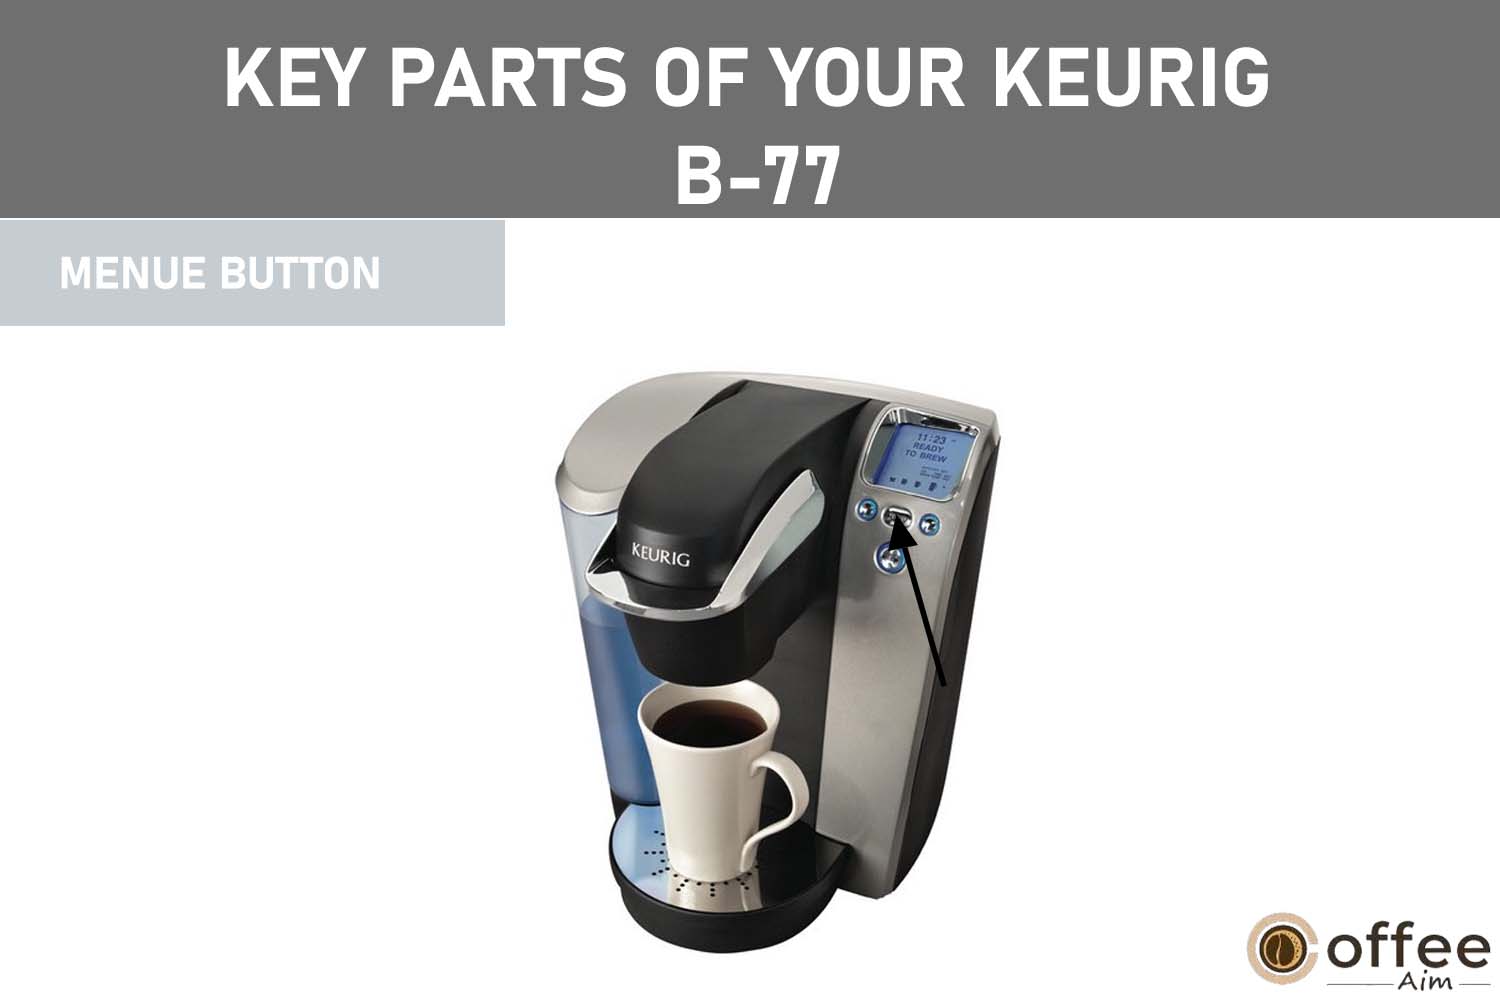
S. Menu Button
The menu button is used to access different menu options and settings. You can access settings such as auto-off, clock, and language preferences by pressing the menu button.
T. Brew Button
To initiate the brewing process, the brew button is pressed. After choosing your preferred brew size and temperature, press the brew button to initiate the coffee-making procedure.

Keurig B–77 Related Helpful Instructions
You may wonder if your Keurig B–77 has all the qualities to match your routine.
If you had these thoughts in mind, rejoice because this Brewer’s functions suit your daily lifestyle. Apart from that, the basic things that enhance your coffee taste explanation of each point are given below. Read it keenly.
Experience Fresh Brew Continuously by Keeping your Brewer Turned On
You want your coffee, tea, and hot cocoa to be freshly brewed and delicious. So for that, keep the Brewer turned on.
But if you want it to turn on and off according to your schedule automatically, you can set it exactly to your purpose because it is fully programmable.
Or, if you prefer that your Brewer turn off automatically after some time, read the simple Auto On/off instructions below in this guide to make your brewing process easier.
Use Bottled or Filtered Water for Best Tasting Gourmet Coffee, Tea, or Hot Cocoa.
Water quality profoundly affects the taste of your coffee, and it varies from place to place. Sometimes when you don’t get the taste of your coffee as desired, for example, it starts to taste like minerals or chlorine. So, you should be careful about the quality of your water. Instead, I suggest always using bottled or filtered water so that the taste of your coffee does not deteriorate.
The Size, Flavour, and Brew That’s Perfect for you Customize it.
It is the wish of every user that his coffee maker should perform the process of brewing according to his mood, and it is evident that you also want the same. Your Keurig brewer offers a wide array of choices to tailor your beverage to your liking, allowing you to adjust the size, flavor, and brewing process according to your preferences. Because the Keurig B-77 has 200 varieties of K–cups and four brew sizes.
- Iced Beverage-3.25 oz
- Small Cup-5.25 oz
- A Small Mug-7.25 oz
- A Large Mug-9.25 oz
Note: Remember that the smaller your brew size, the more intense flavor will be in your cup. Similarly, the larger the brew size, the less bitter your cup tastes.
The Brewer Must be Plugged into its Own Grounded Outlet.
Sometimes your Brewer stops functioning correctly; one of the main reasons is that your electrical circuit is overloaded with other appliances, and the current does not reach the Brewer properly. Therefore, you should operate the Brewer separately from other devices on its electrical circuit.
You can Brew in a Travel Mug
The process of brewing using a travel mug is easy to follow. First, take out the drip tray assembly and then position the travel mug onto the base of the drip tray. Now, you can savor your freshly brewed beverage straight from your travel mug.
Descale your Brewer Regularly
The Brewer needs descaling every three months to keep it working correctly. The descaling method is described below in this guide, “How Will You Descale Your Brewer?” you can refer to it.
Let’s Set Up Keurig B–77 Before the First Brew or After a Storage Period
I know you are impatiently waiting to brew your first cup, but you must wait a little longer. Because setting up your Keurig brewer remains to be done. So you must set up your Brewer first. The procedure is described below, but kindly read the important note before proceeding.
Note: If your Brewer has been exposed to temperatures below freezing, leave it to room temperature for at least 2 hours before brewing. A frozen or excessively cold brewer will not work.
Let’s dive into Keurig B-77 priming instructions!
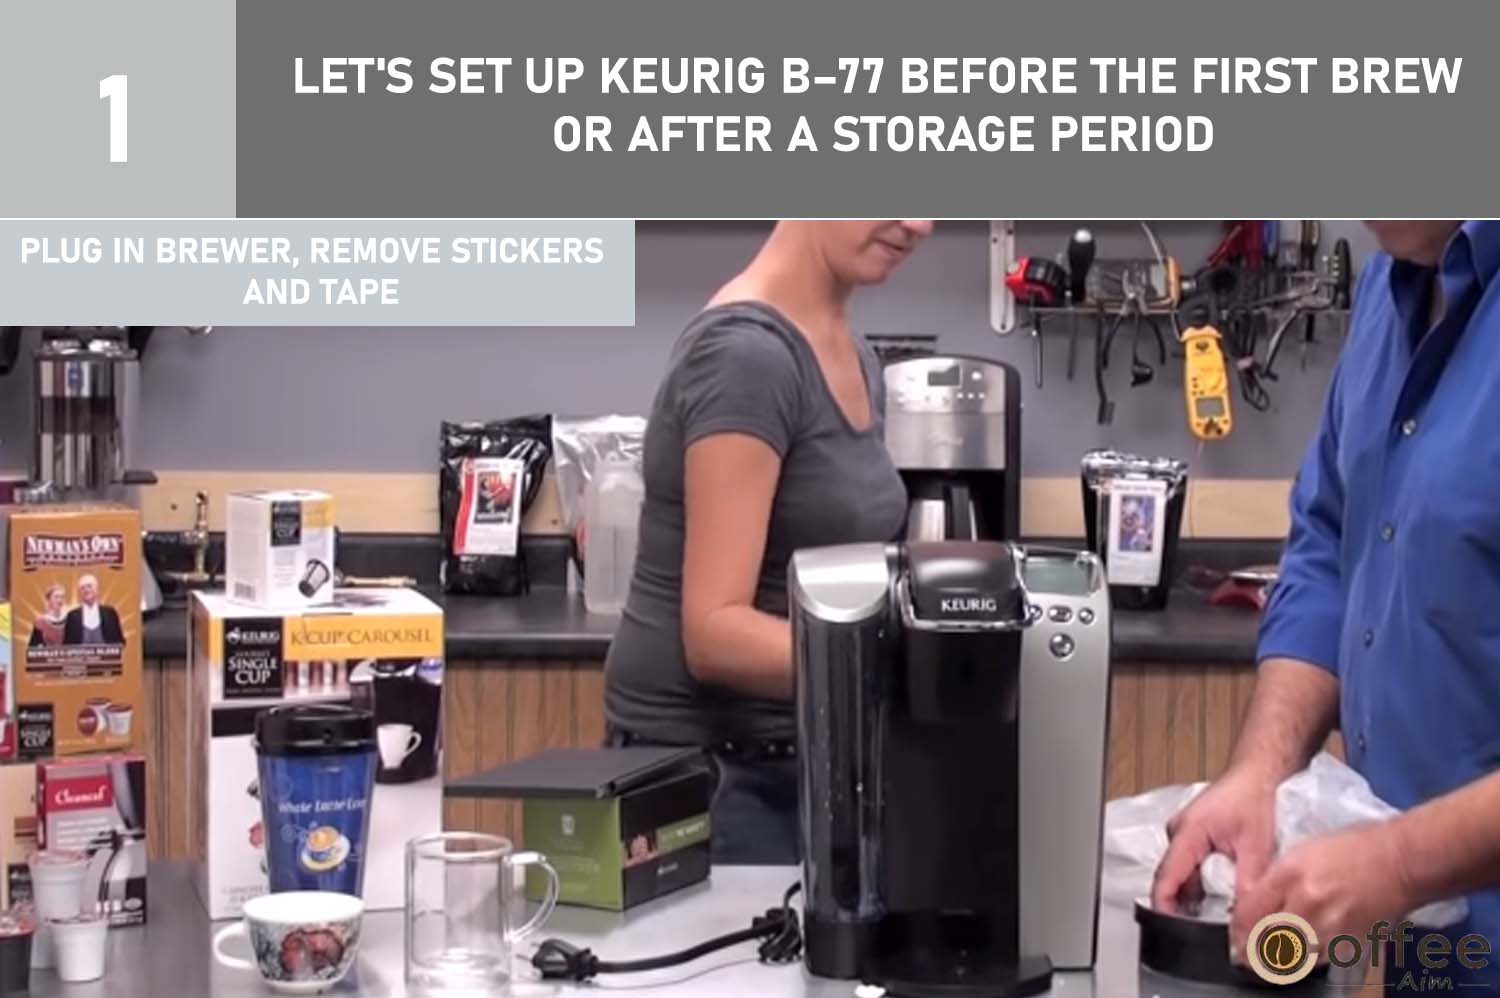
- Untie the cord and plug the Brewer into a grounded outlet. Clear the plastic stickers from the LCD and remove all the Packing tape pieces.
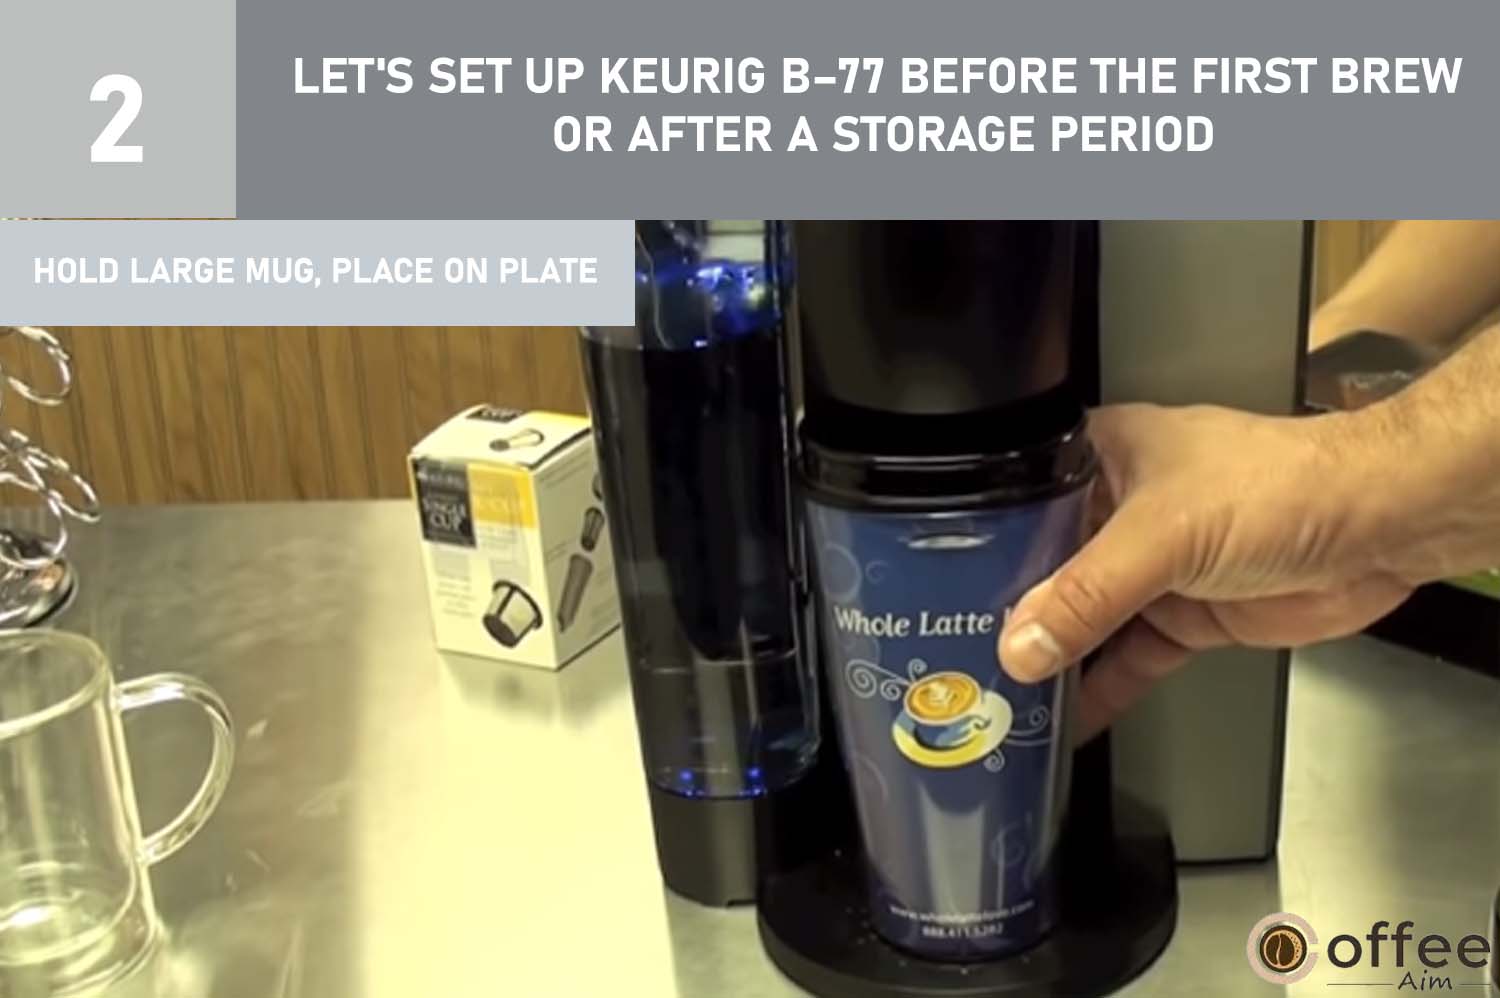
- Hold a large mug (10 oz. minimum) and place it on the drip plate.
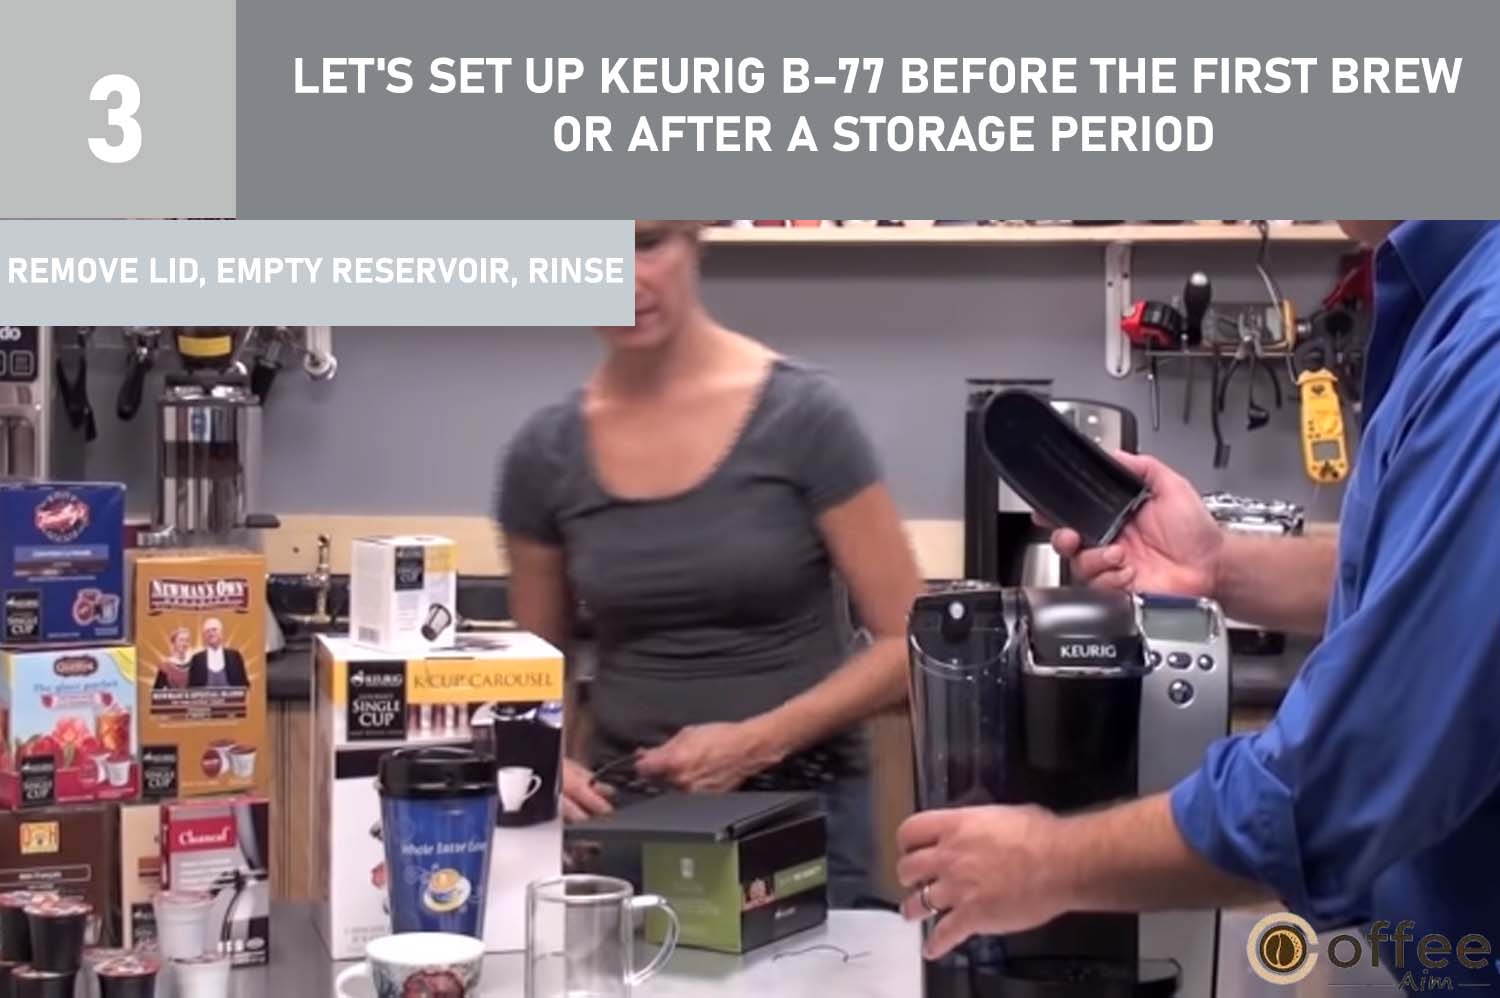
- First, remove the water reservoir’s lid and empty the water reservoir from the water. To remove the Reservoir from the Brewer, lift it straight up and towards the front of the Brewer, which may require some effort due to a tight fit. After removing the Reservoir, rinse it thoroughly with fresh water.
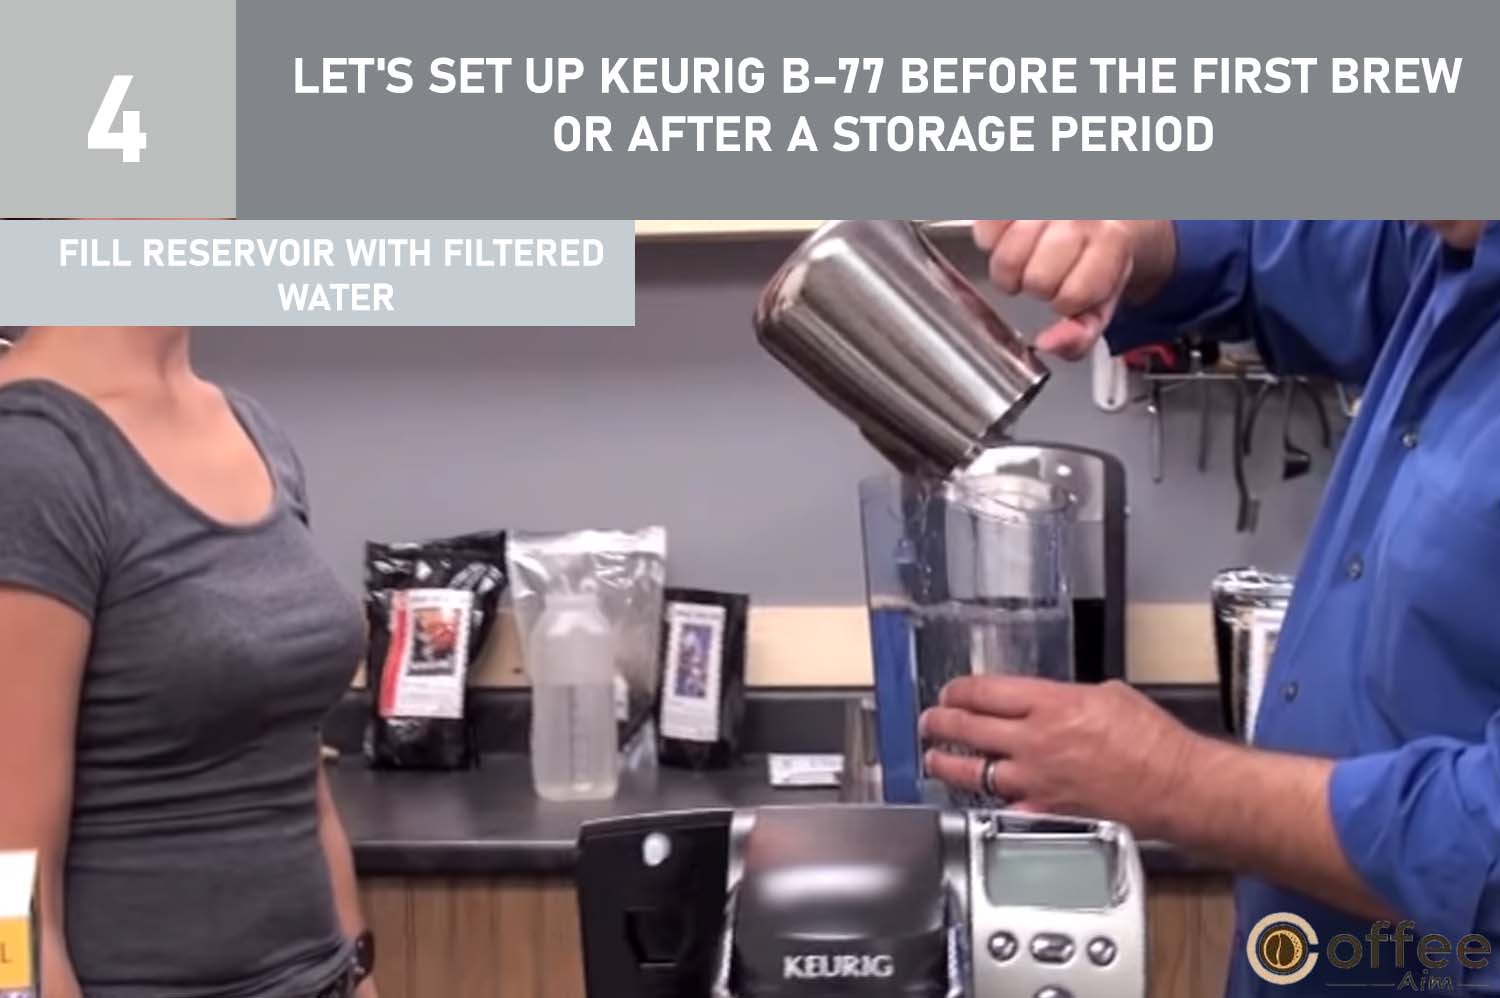
- Use filtered or bottled water to fill the water reservoir so that the water level is just below the upper edge of the Reservoir.
- Place the base of the water reservoir on the left side of the Brewer and ensure that the lock tab engages with the Brewer. Put back the lid of the water reservoir.

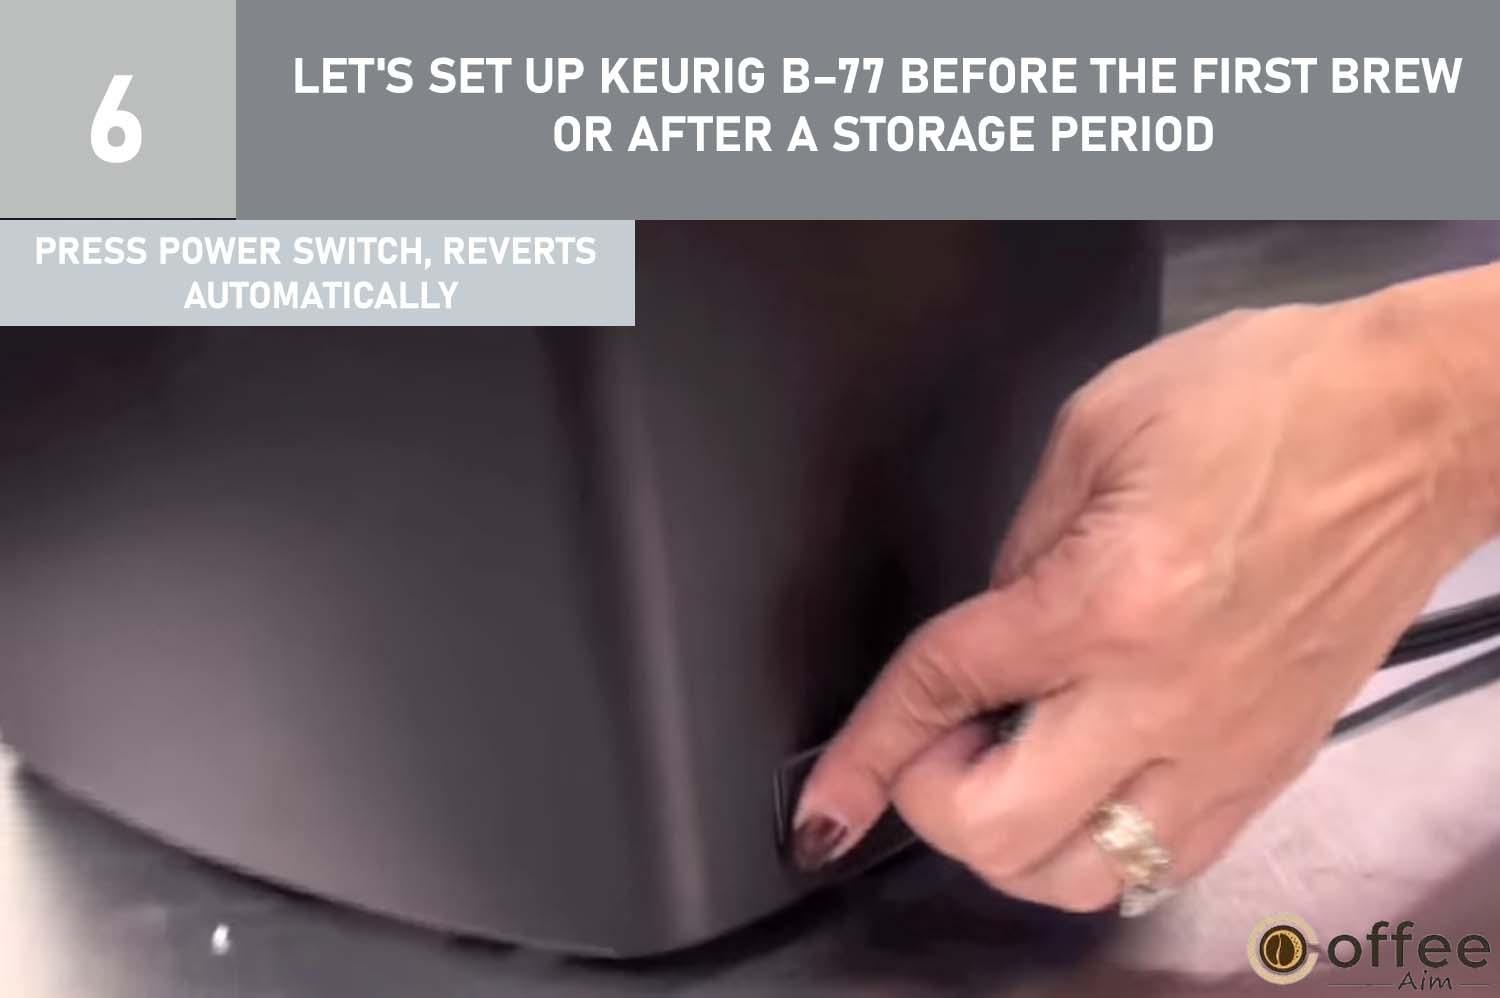
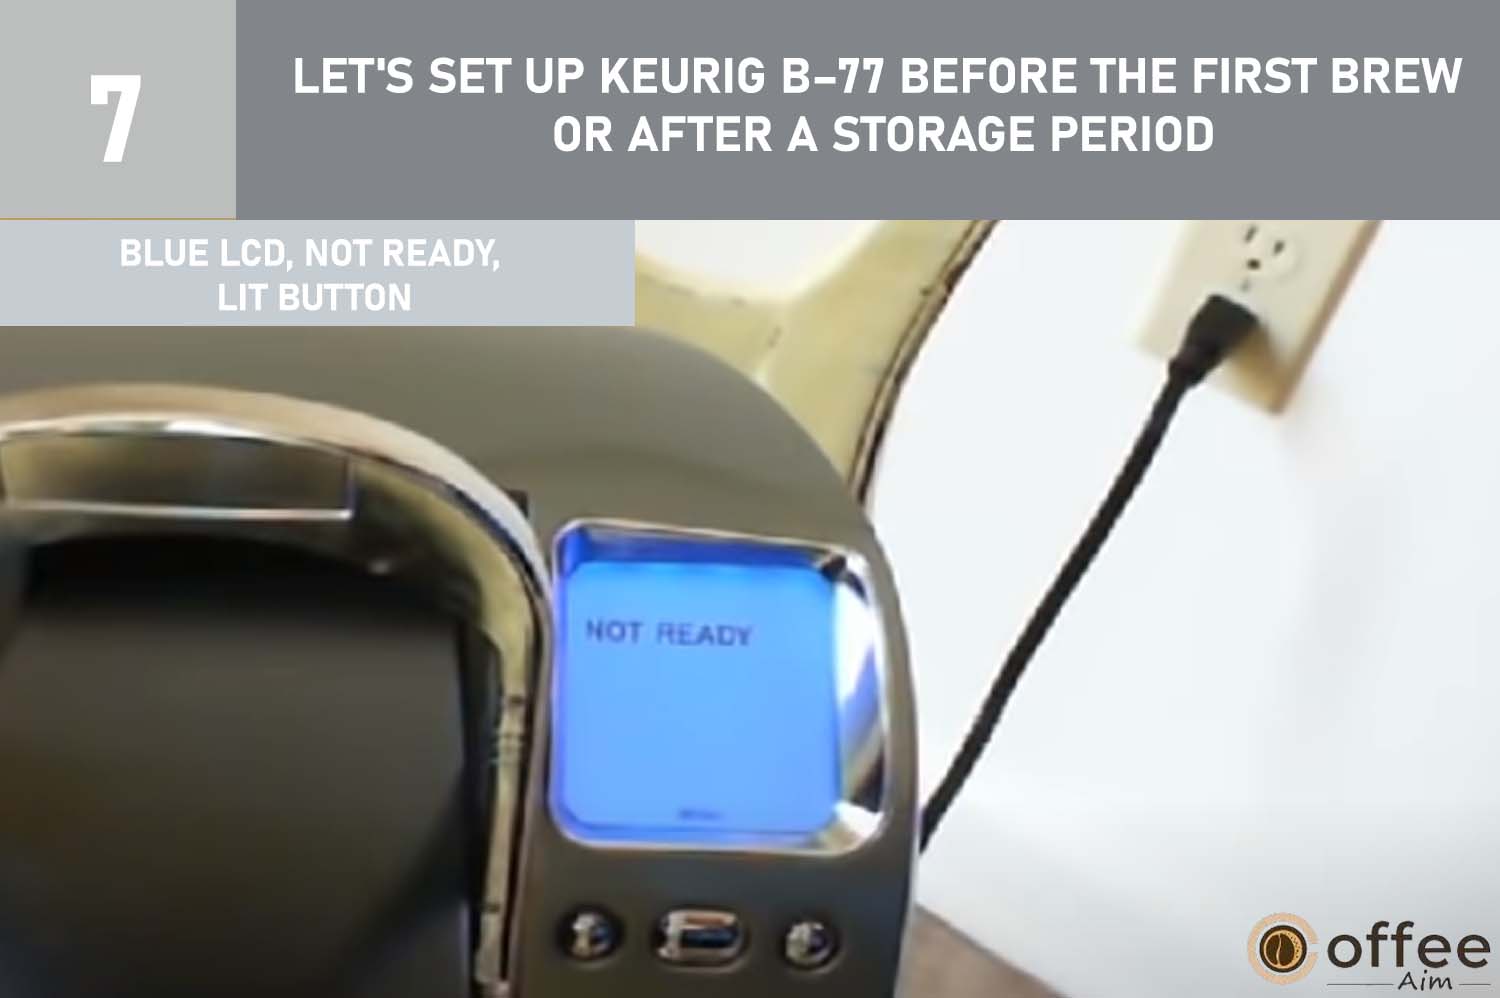
- Press and release the power switch, which is found directly behind the Brewer. Due to its spring-loaded mechanism, the switch will revert back to its initial position.
- The Blue LCD Control will appear and indicate “NOT READY,” and the Brewer button will light up.
- Note: You shouldn’t use a K–Cup for this sequence.
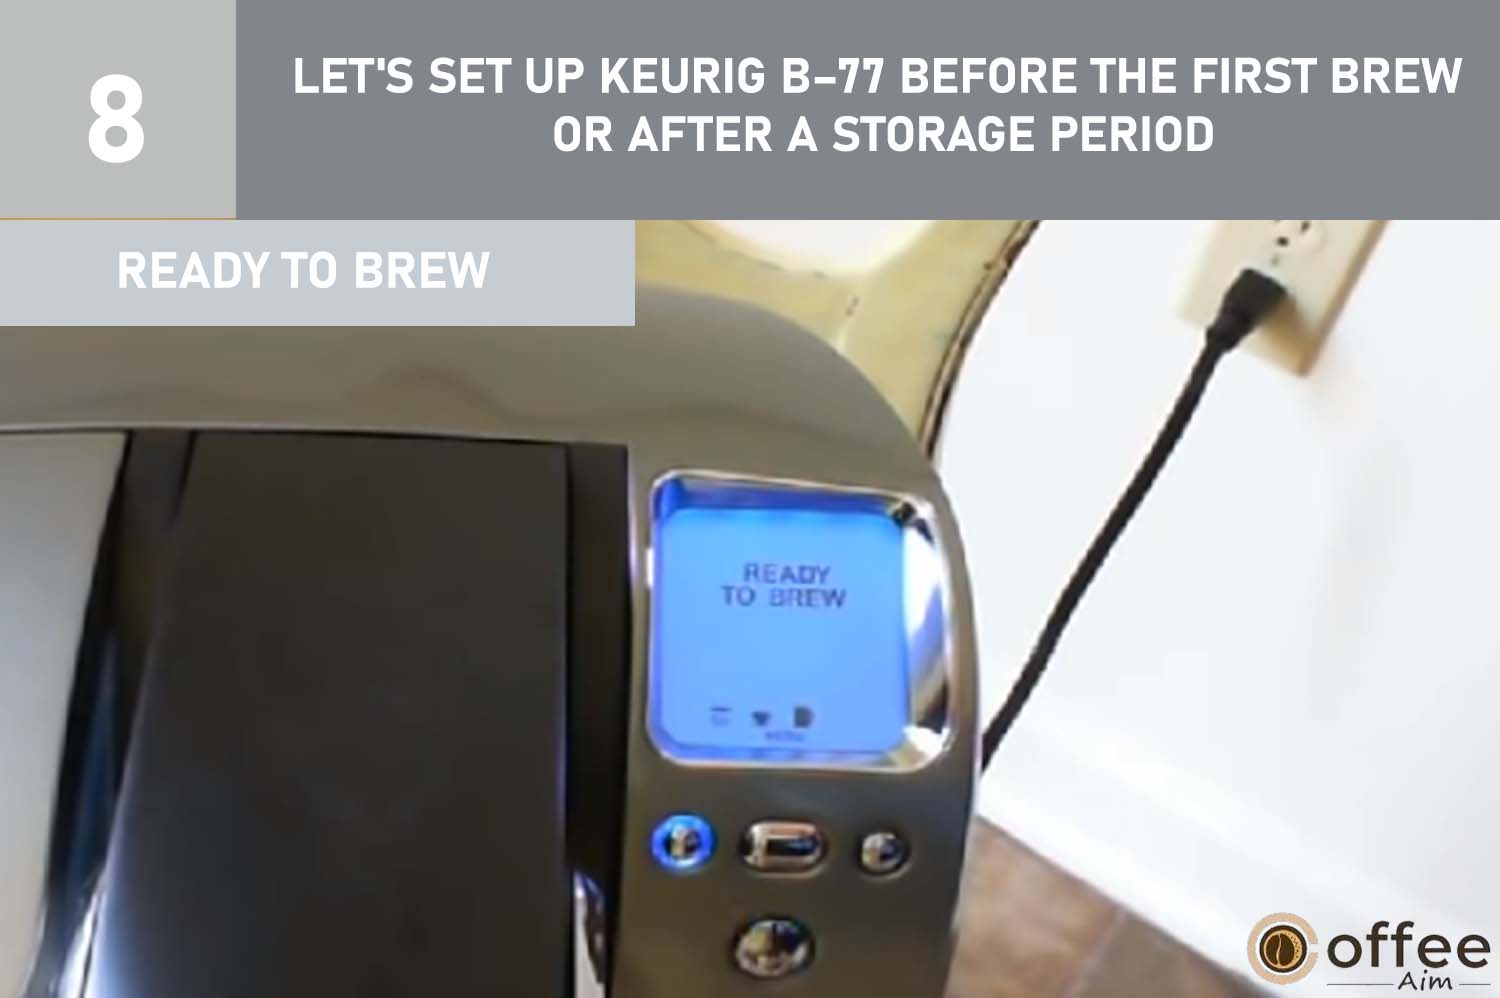
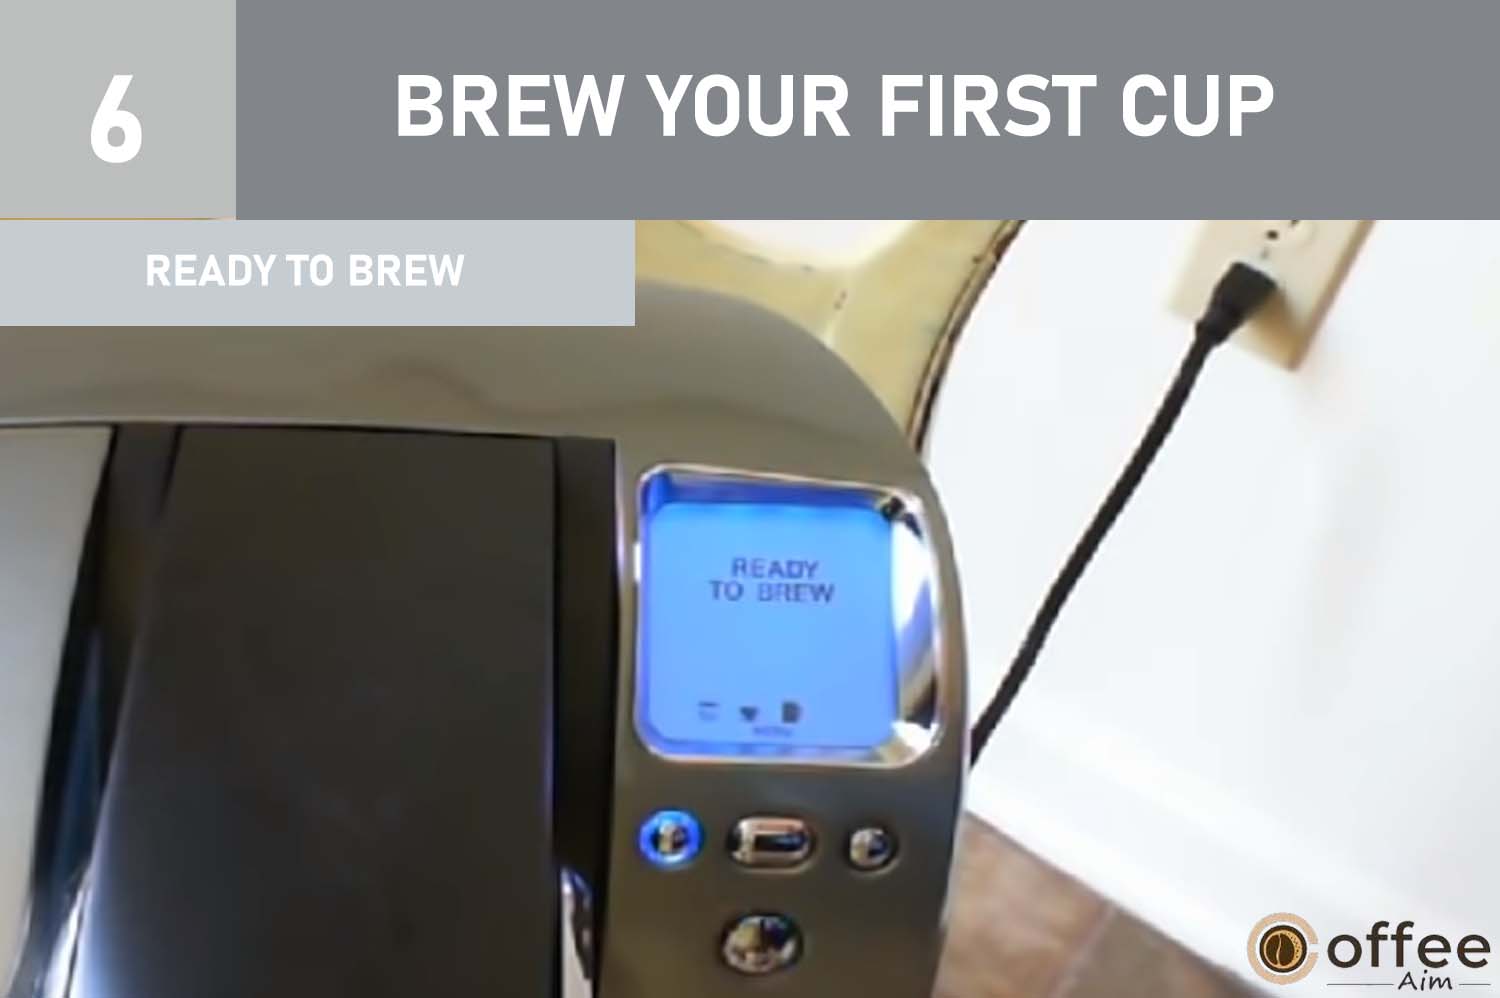
- The internal tank will automatically be filled with water by the Brewer, and the water will be heated. Only 4 minutes will be consumed here. The LCD control center will display ” NOT Ready ” during heating. “READY TO BREW” will be shown as the water is heated. The Brew button will flash too.
Note: During the heating process and subsequent brews, It is typical to notice small amounts of water flowing out of the vent and trickling into the Reservoir.
- To initiate a cleaning brew without a K-Cup, press the BREW button and discard the hot water into the sink. It is important to note that a K-Cup should not be used during this process.

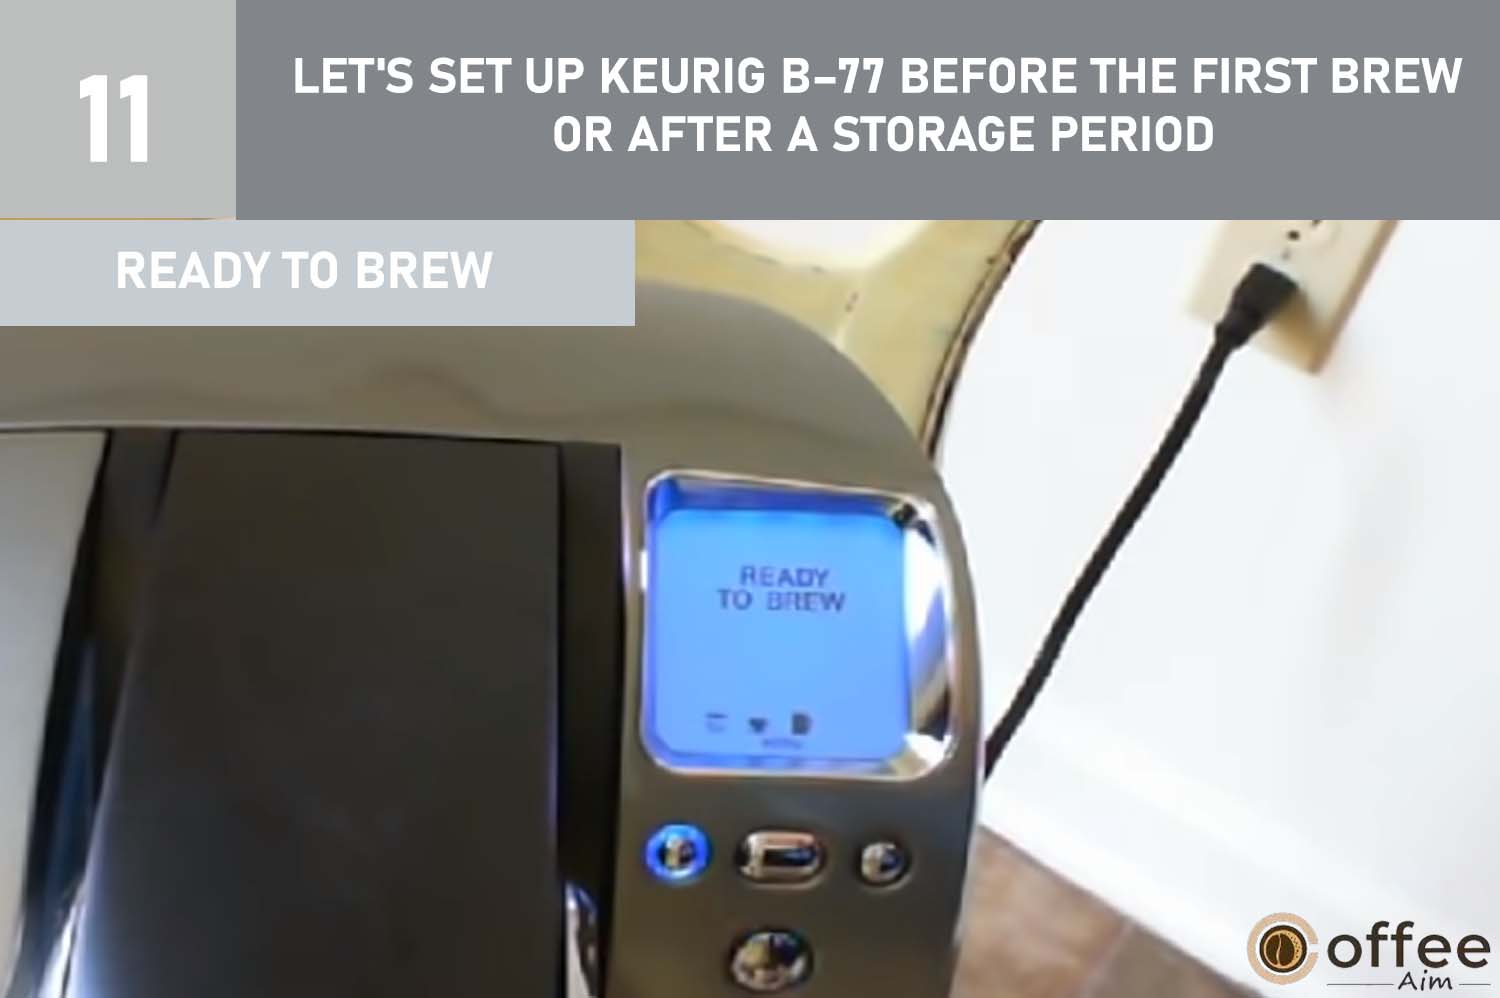
- After completing this one-time setup process, you are fully prepared to begin brewing. Please be aware that the Brewer may require 15-30 seconds between brews, and once it is ready, the message “READY TO BREW” will appear on display.
Brew your First Cup
Now the setup process is complete, so without any further delay, brew your first cup. See the below points to Brew your delicious first cup. Let’s dive into the first brewing instructions!
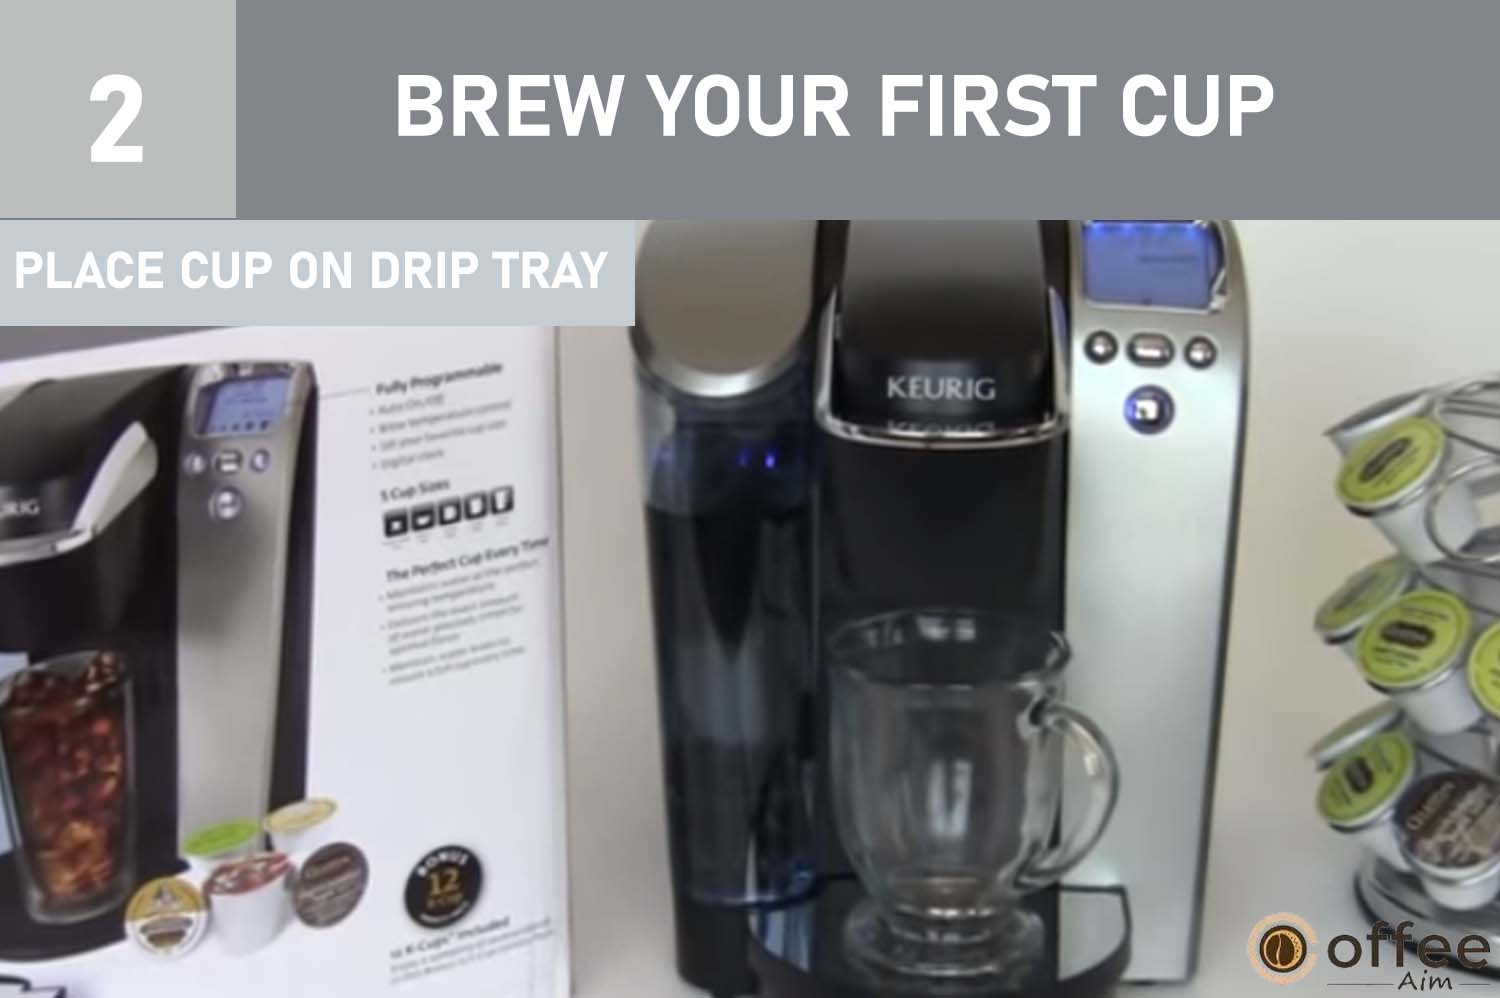
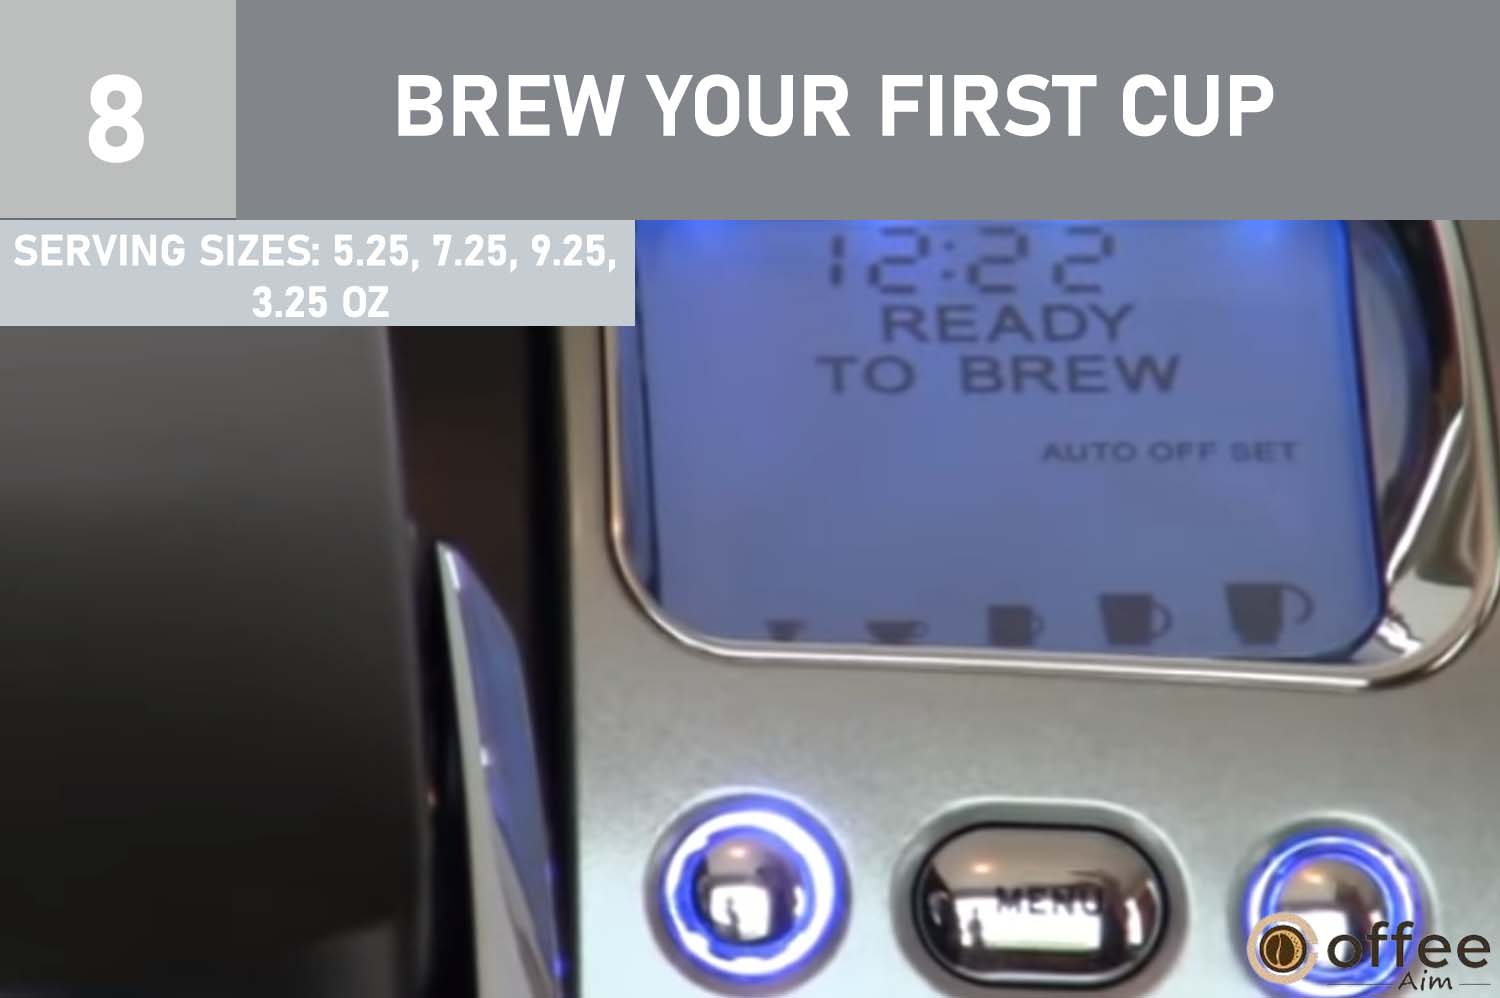
- The LCD Control Center will display the message “READY TO BREW” to indicate that the machine is ready for use.

- Position a cup or mug on the Drip Tray Plate to prepare for brewing.
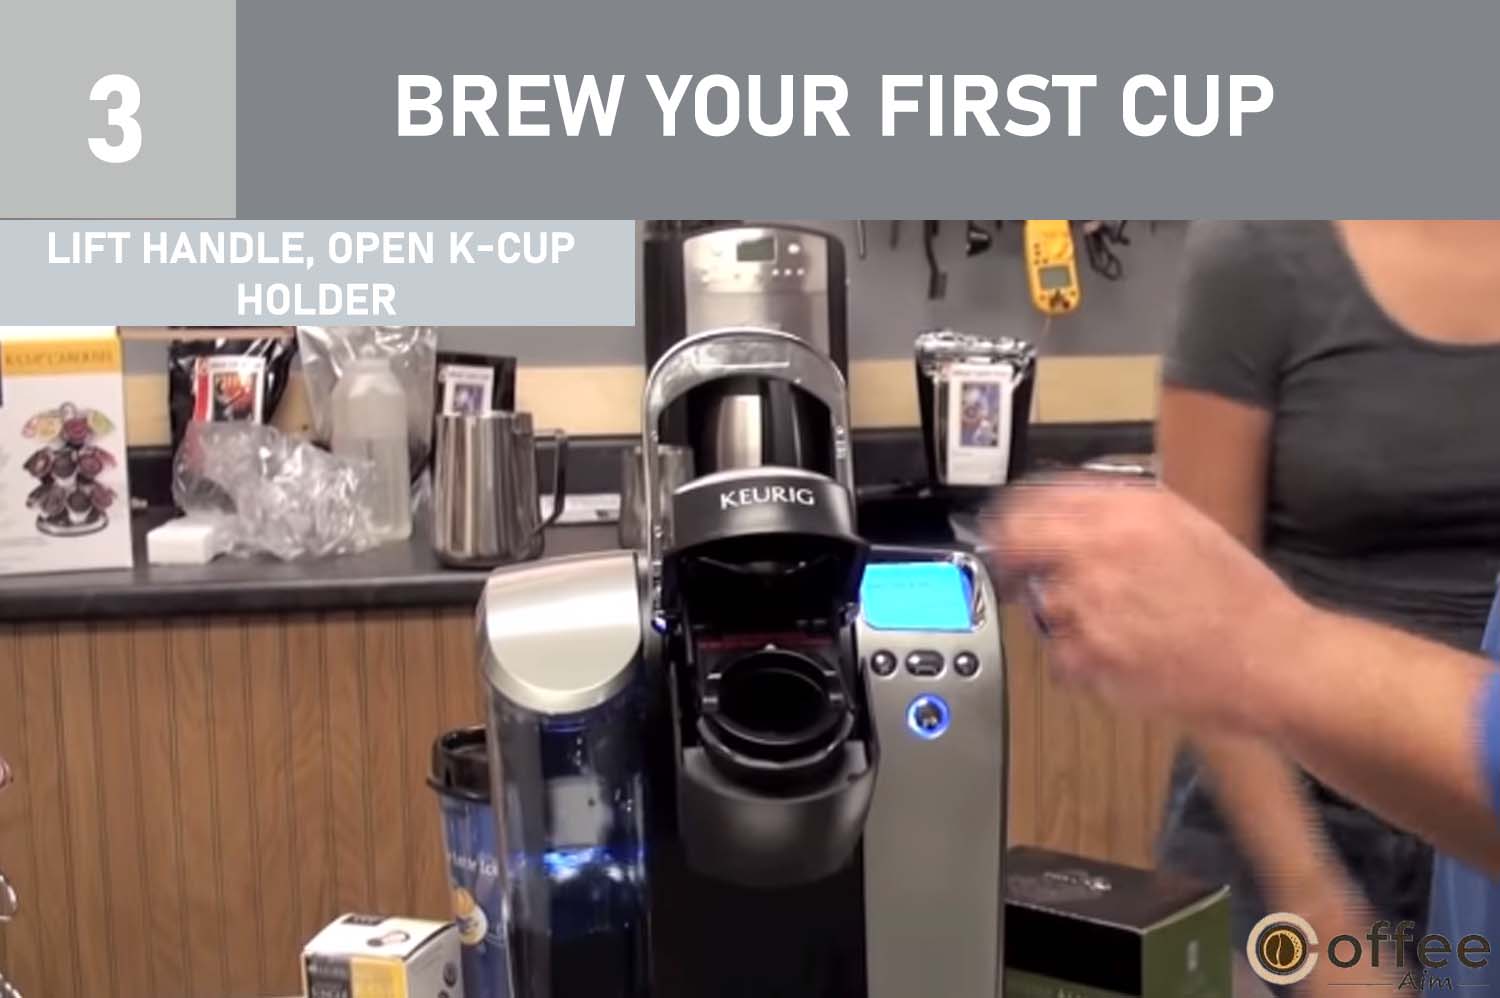
- To access the K-Cup holder, lift the handle, which will cause the K–Cup holder to be open towards you, as shown in Figure 5.
- Choose a K-Cup portion pack to use for brewing.
Note: Please refrain from removing the foil lid or puncturing the K-Cup. Doing so may cause hot water and coffee grounds to escape and could result in injury or damage to the coffee maker.
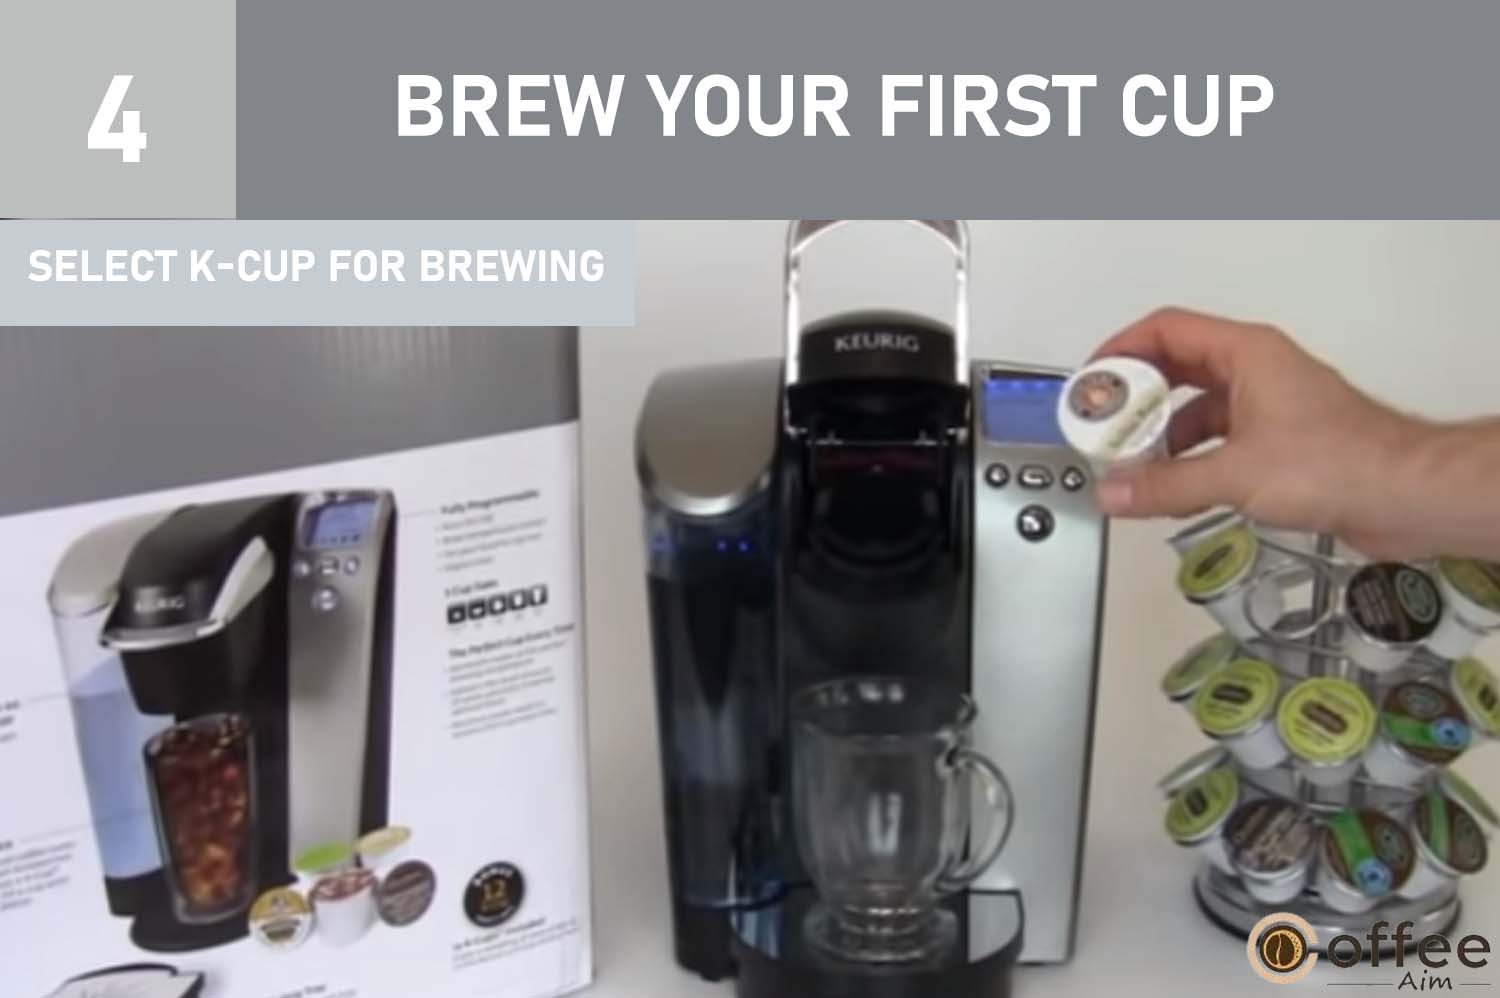
- To use your coffee maker with a K-Cup portion pack, carefully insert the K-Cup into the K-Cup holder located on the machine (as shown in Figure 6).

Note: It is crucial to acknowledge that two pointed needles exist that perforate the K-Cup, with one located above the K-Cup holder and the other at the bottom of the same holder. Please exercise caution and avoid placing your fingers or other objects inside the K-Cup assembly housing to prevent potential injuries. Always make sure that the K-Cup is appropriately inserted into the holder before starting the brewing process.
- Lowering the handle to close the lid over the K-Cup holder would be best. Once the cover is completely closed, the LCD Control Center will show “READY TO BREW,” both the Left and Right Buttons will be illuminated while the BREW Button flashes for up to 60 seconds.
- The default brew size icon, representing the Small Mug that serves 7.25 ounces, will be flashing(fig.7) while all the other brew size icons are illuminated. To select a different brew size, you can use the Left Button to decrease or the Right Button to increase the size. If you want to program and save your preferred brew size, you can follow the “Program Your Brew Size” instructions in this guide.

- These include a stronger Small Cup serving size of 5.25 oz., a Small Mug serving size of 7.25 oz., a Large Mug serving size of 9.25 oz., or an Iced Beverage setting with a serving size of 3.25 oz.
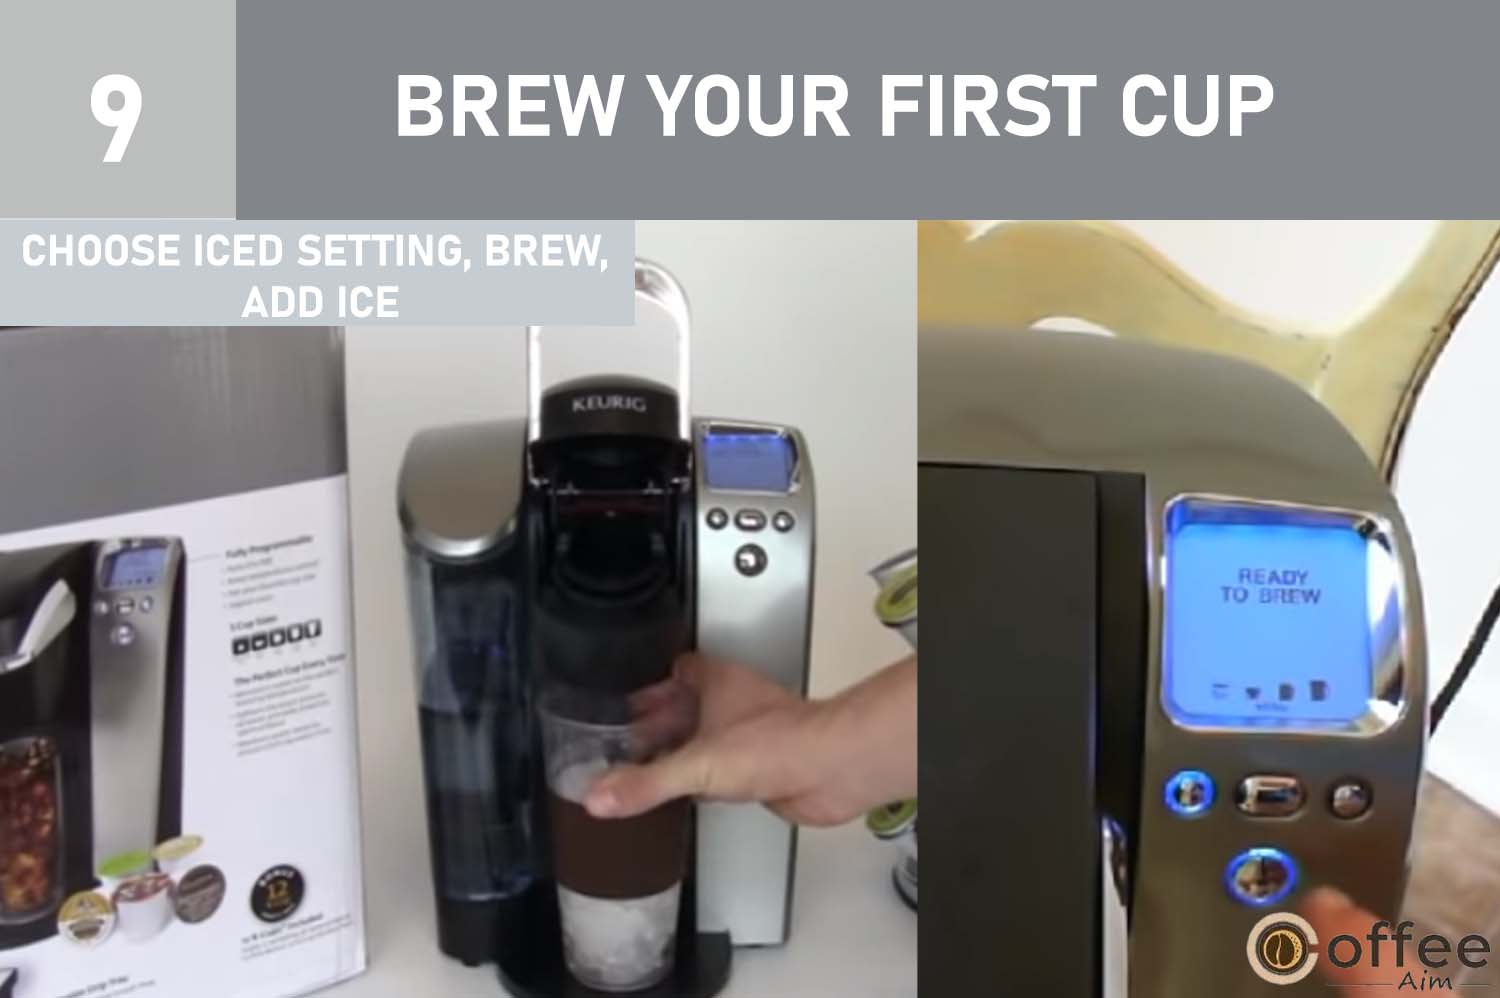
- If you prefer the Iced Beverage setting, you can start by placing a tall glass filled with ice on the Drip Tray base. Choose your preferred K-Cup and select the Iced Beverage brew size of 3.25 oz. Press the brew button to initiate the brewing process. After the brewing, you can add more ice to the glass if needed. Finally, if you prefer, you can add cream and sugar to your taste.
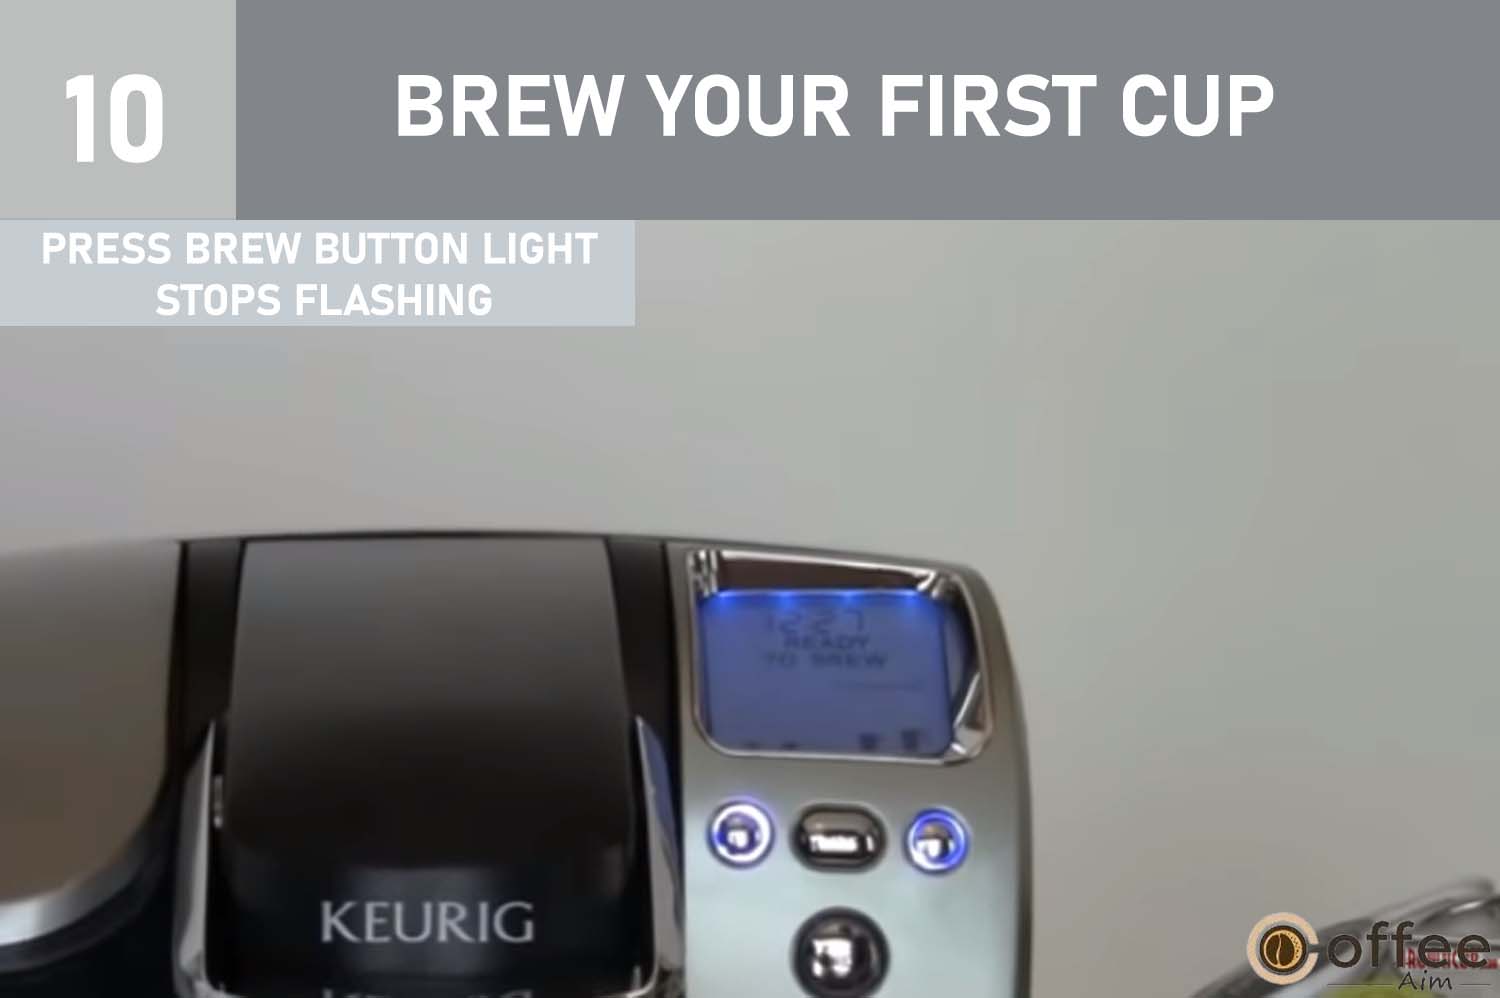
- After selecting your desired serving size, press the BREW Button. The BREW Button will stop flashing; this will cause the flashing light on the BREW button to stop, the Left and Right Buttons will no longer be lit, and icons of brew size will be lit.
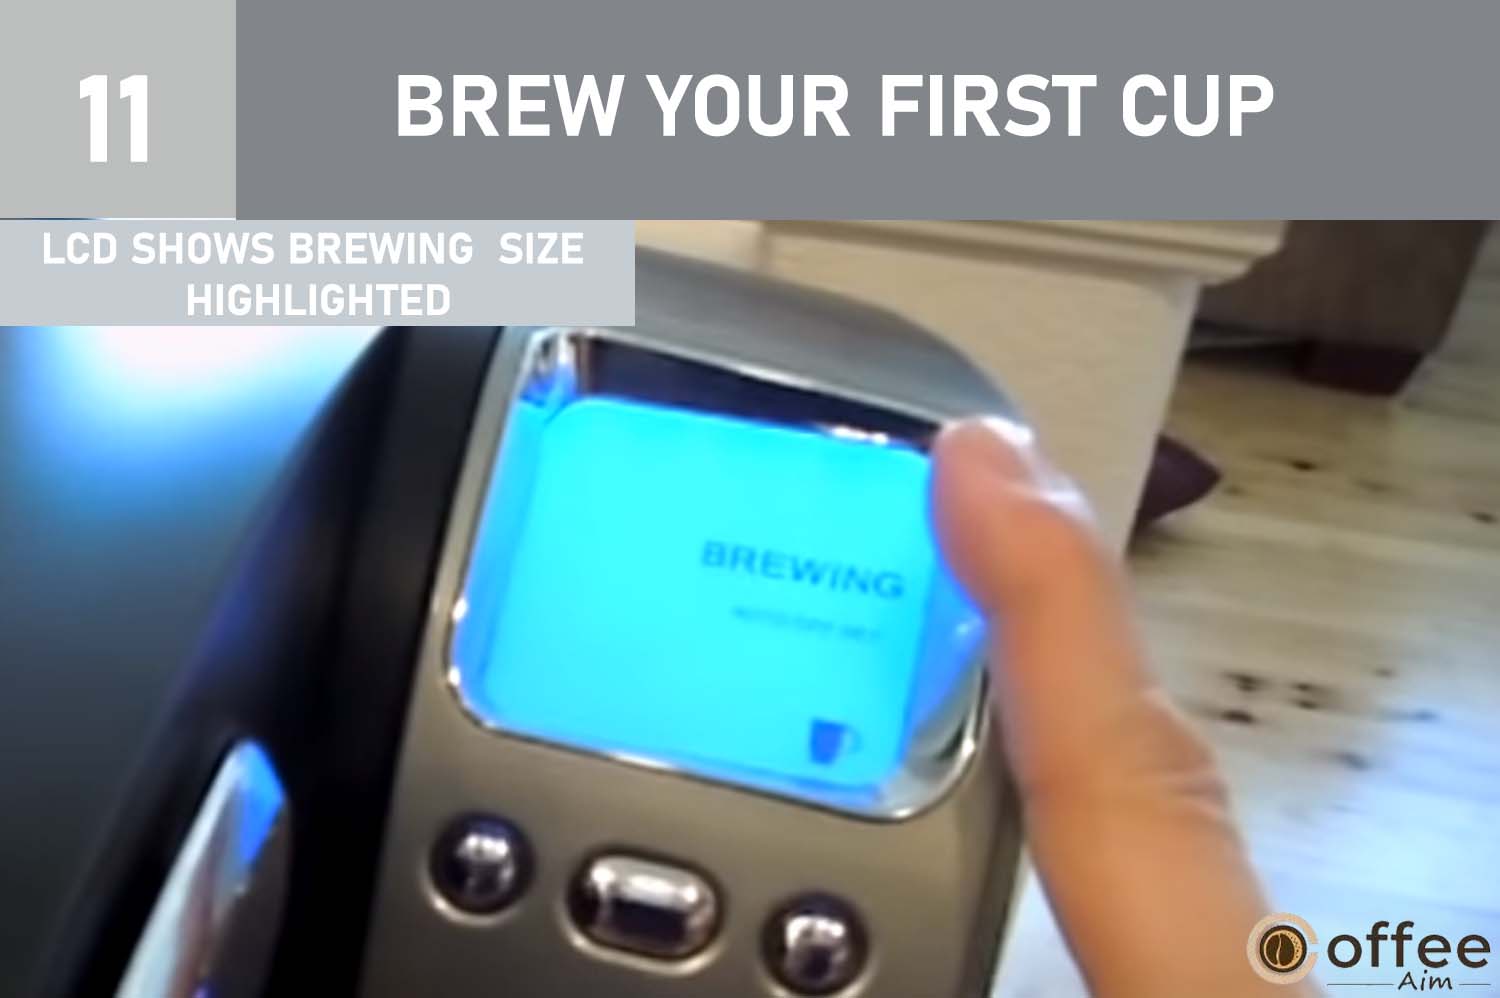
- During brewing, the LCD Control Center will show the word ‘BREWING,’ and the selected serving size will be highlighted on the LCD screen (refer to Fig 8).
Caution: There will be hot water in the K-Cup Holder while the brewing process is underway. Therefore, to prevent any potential risk of injury, you are strongly advised to refrain from lifting the handle or opening the K-Cup Assembly Housing while the brewing process is ongoing.
- The coffee may experience a slight delay before it is dispensed from the Brewer. The entire brewing process typically takes around 1 minute to complete, and it finishes with a burst of air that removes any remaining liquid from the K-Cup.

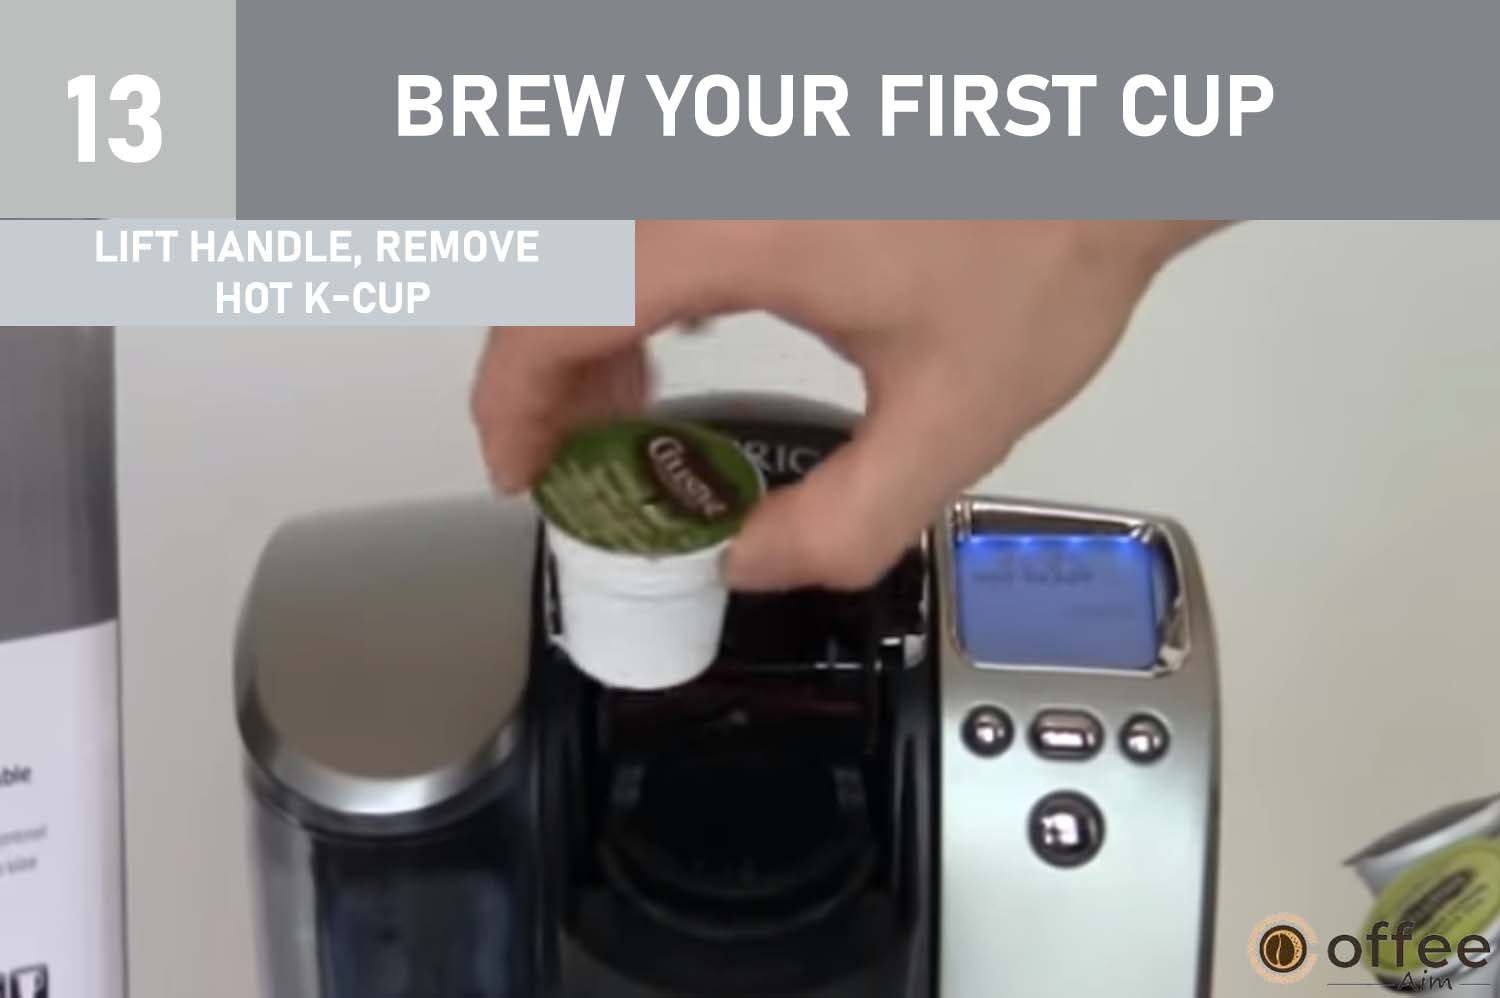
- After brewing your coffee using a K-Cup, use caution when handling the K-Cup, as it will be hot. First, lift the Keurig machine’s handle to remove and dispose of the used K-Cup. Then, carefully grab the sides of the K-Cup and lift it out of the brewing chamber. Be sure to dispose of the used K-Cup properly and safely, such as in a designated waste bin.
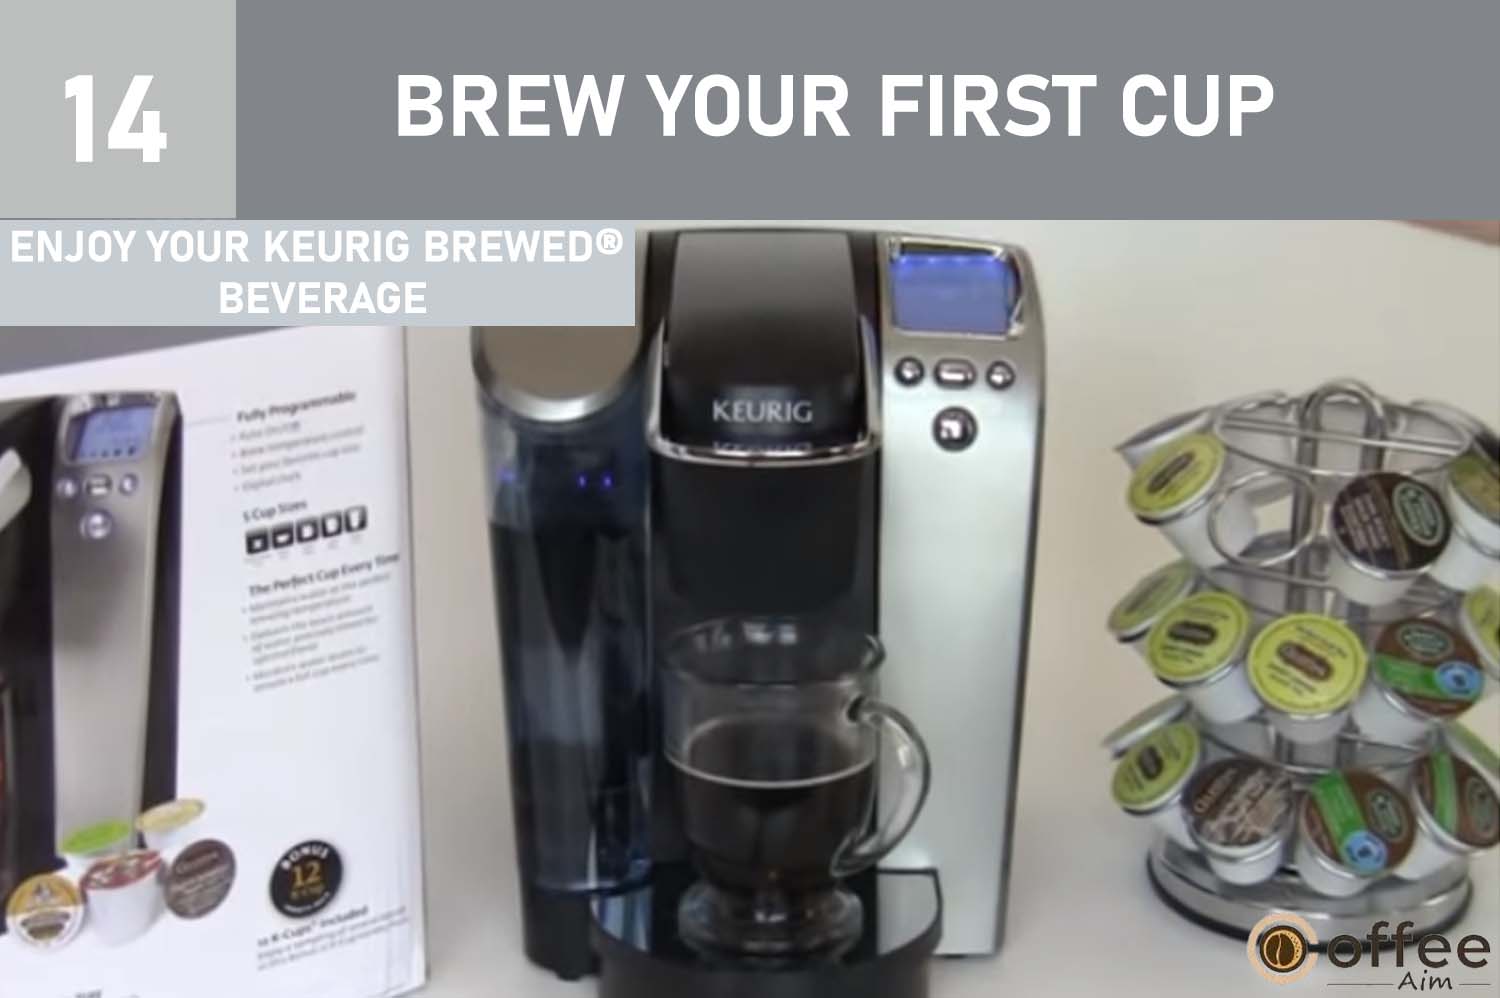
- Savour the delicious taste of your first cup of Keurig Brewed® gourmet coffee, tea, or hot cocoa.
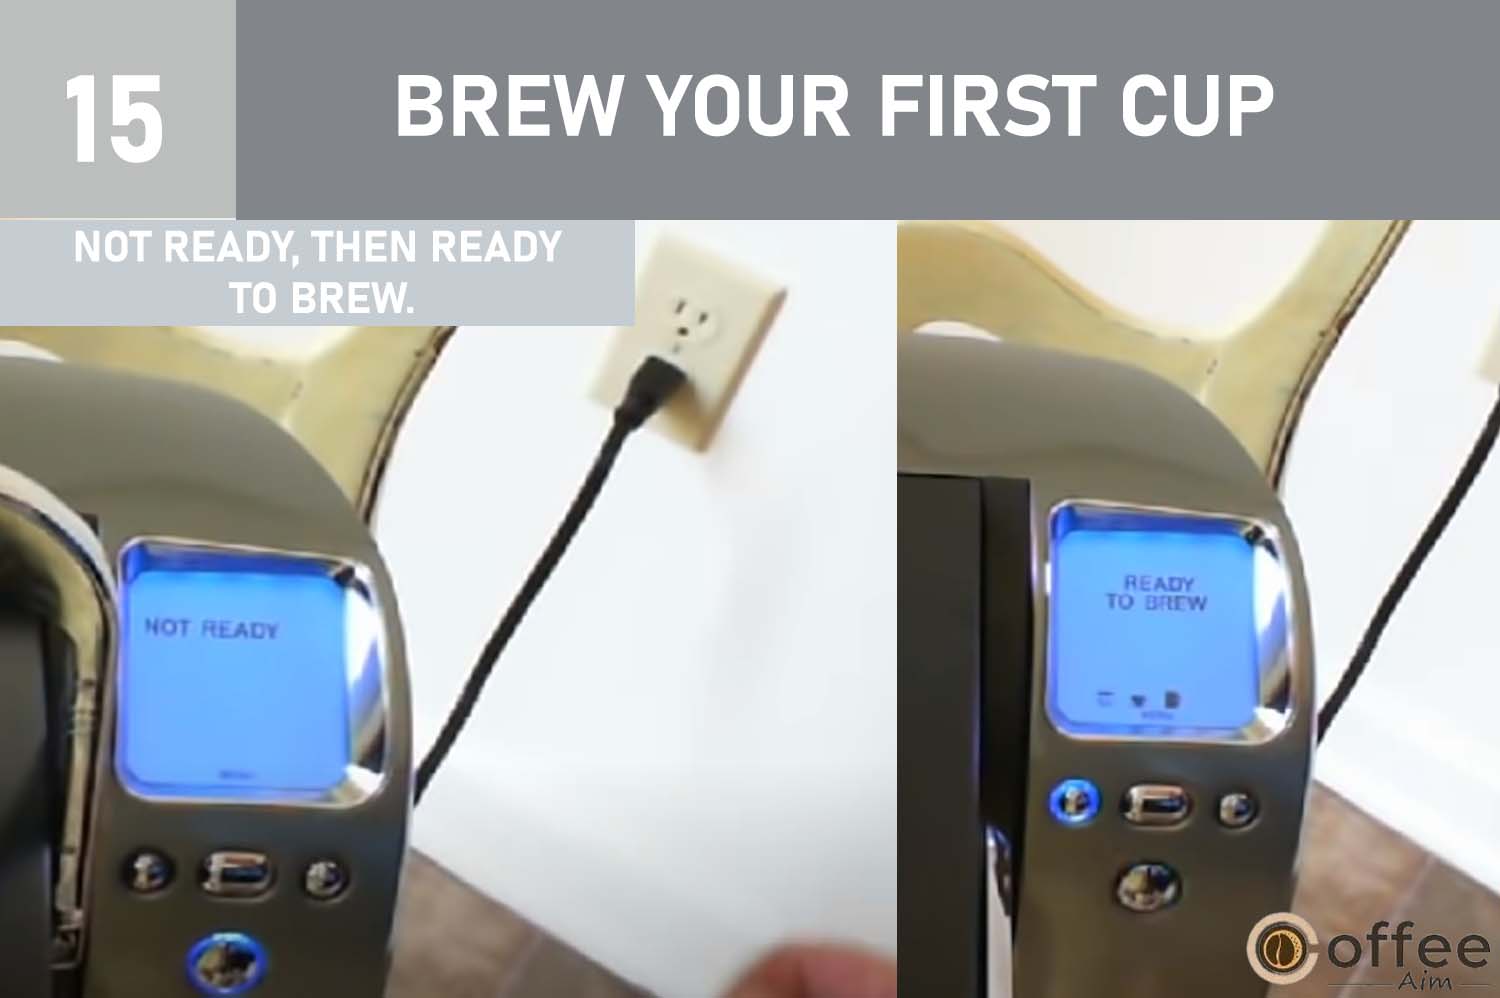
- When your Brewer is heating water for the next brew cycle, it may show a message saying “NOT READY” on the LCD Control Center. However, after approximately 15 seconds, the display will change back to “READY TO BREW” once the water has reached the appropriate temperature.
How Will you Stop the Brewing Process?
To stop the brewing process after it has started, press and release the Power Switch, which will turn the Brewer off. This process will immediately halt the coffee, tea, or hot cocoa flow, and the heating element will shut off. Additionally, the blue lights that indicate the status of the LCD Control Center and Water Reservoir will disappear.
Important Note:
Understanding that ending the brewing process prematurely may result in a smaller quantity of coffee, tea, or hot cocoa in your cup than intended. To prevent this, conducting a cleansing brew using only water after stopping the brewing process is advisable. This practice guarantees that your subsequent brew will provide the desired full volume.
Adding Water
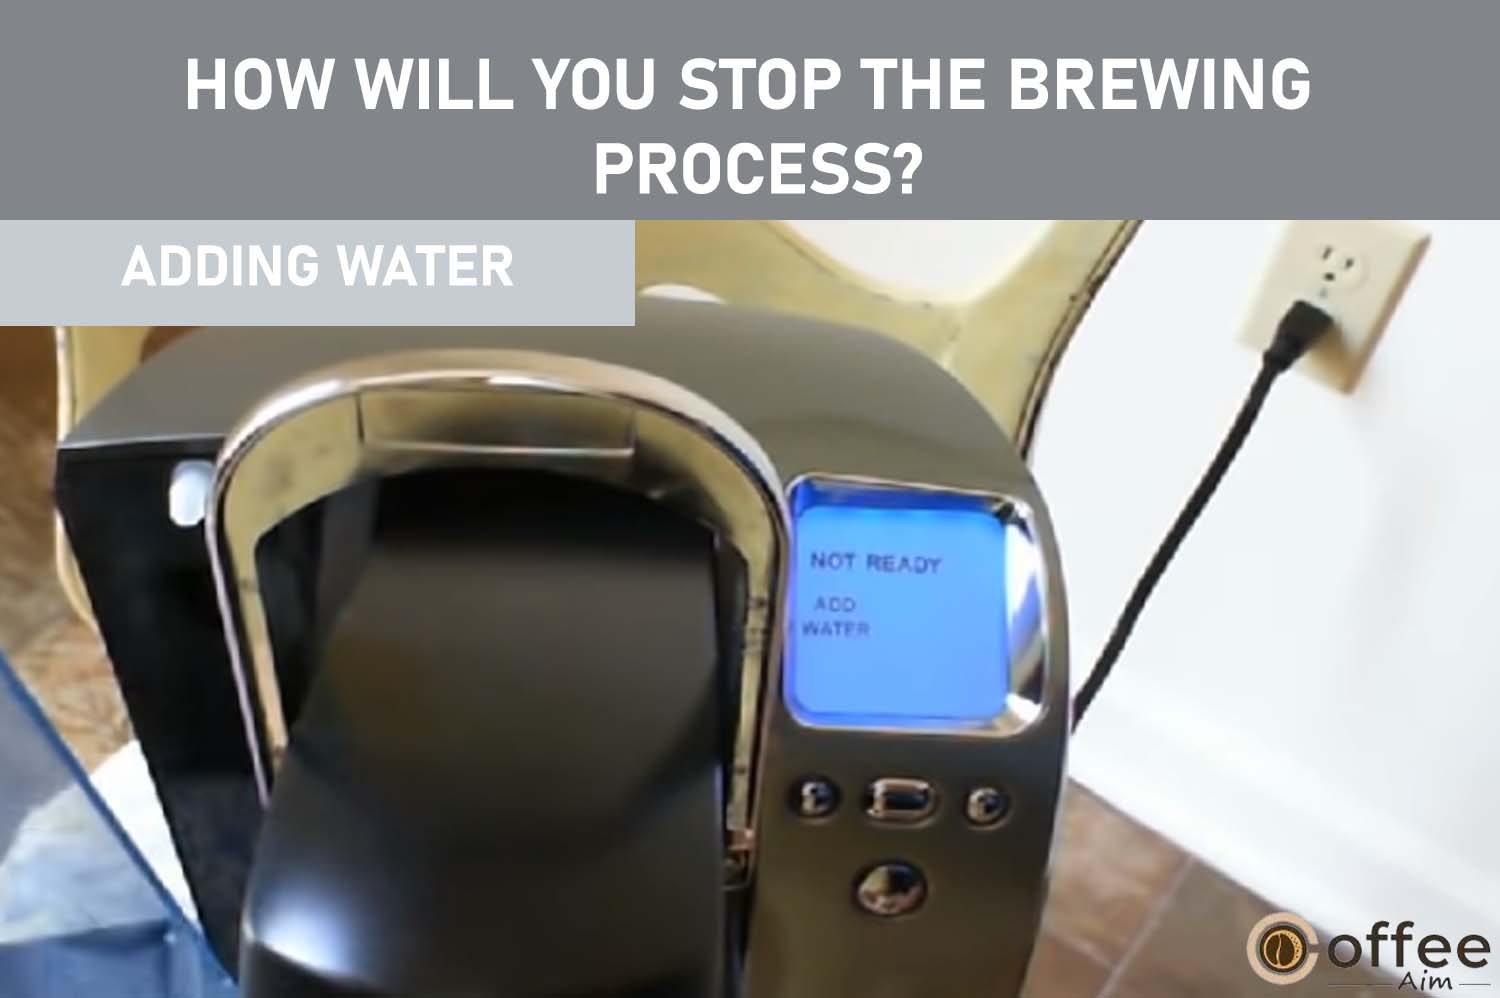
If the water level in your Brewer’s tank is low or the Water Reservoir has been removed, the LCD Control Center will notify you by displaying the message “ADD WATER” (shown in Figure 9). In addition, the blue light in the Water Reservoir will blink to indicate that water needs to be added. The Brewer is designed to prevent brewing when the “ADD WATER” message is displayed (Figure 9).
There are two methods for filling the Water Reservoir:
- You can pour water directly into the Reservoir while it is attached to the Brewer by lifting off the Reservoir Lid and replacing it after filling.
- Alternatively, you can remove the Reservoir from the Brewer by first removing the lid, lifting it straight up and toward the front of the Brewer, filling it with water, then placing it back onto the Brewer and replacing the lid.
Important: The Water Reservoir should be kept while the Brewer is in the process of brewing.
Brewing Hot Water
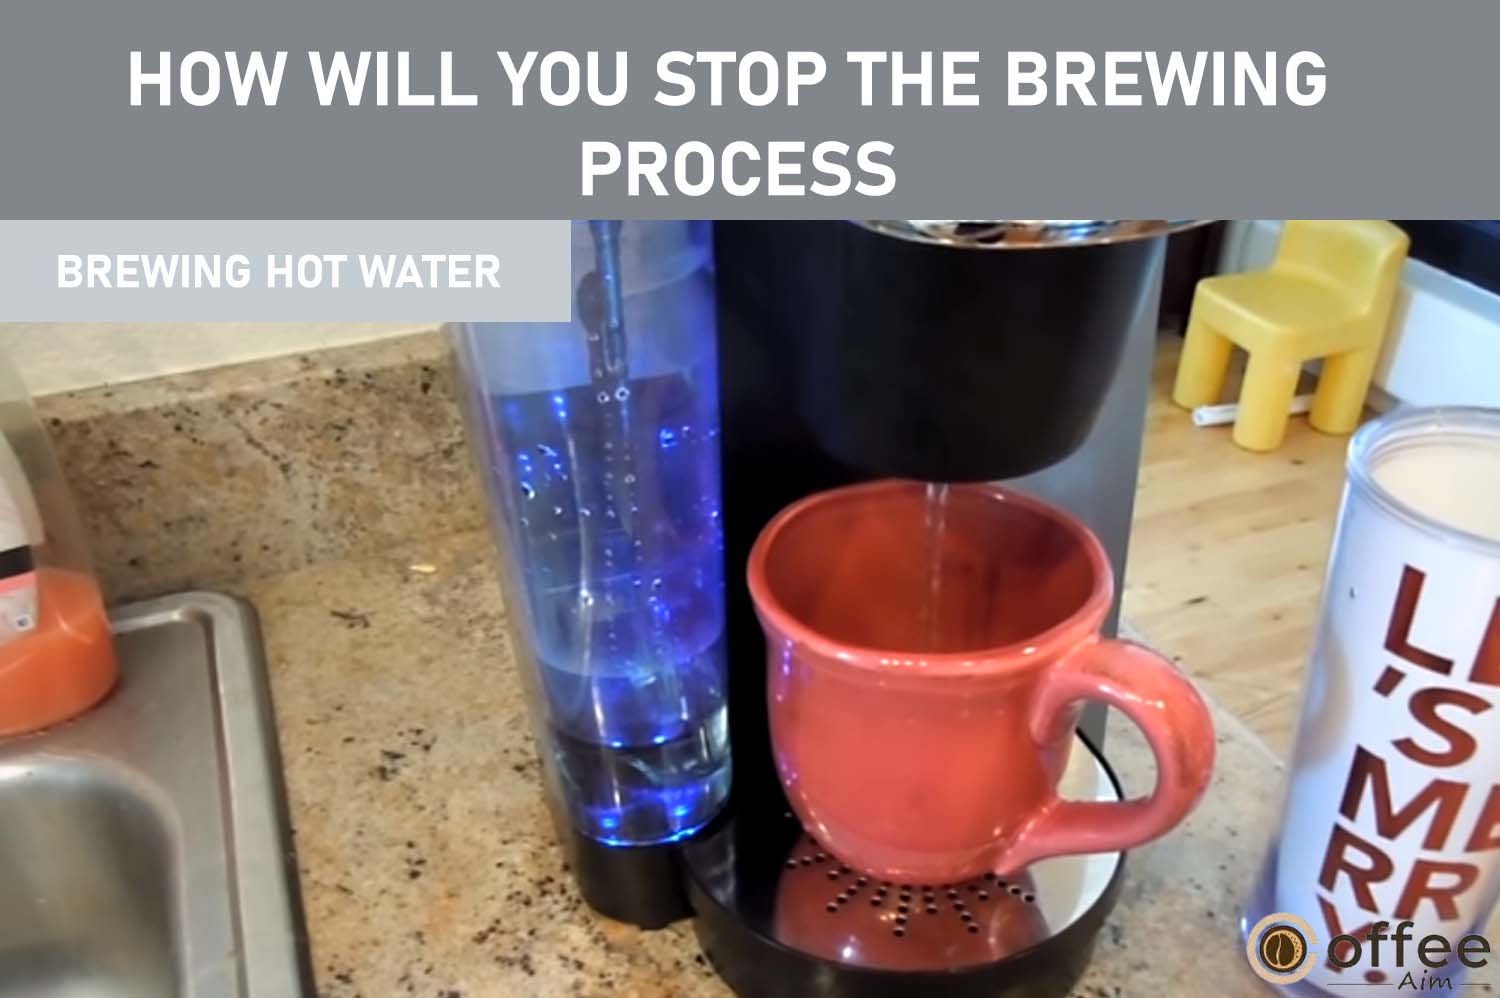
The Brewer can dispense hot water for various purposes, such as making hot cocoa from a packet, cooking, or making soups. To do so, follow the manual’s “Brew Your First Cup” instructions but without inserting a K-Cup.
Important Note: Running a hot water brew cycle without a K-Cup after brewing a hot cocoa K-Cup is advisable. It helps ensure that any residual cocoa residue is thoroughly flushed out of the system, preventing it from affecting the taste or quality of subsequent hot water dispensed by the Brewer.
Purging Keurig B–77
To maintain your Brewer’s optimal performance, removing any stagnant water from the inner tank is recommended if the machine has been unused for more than a week.
- To refill the Water Reservoir, remove the lid and lift it straight up and away from the Brewer, but only if there is water in it. Discard the old water and rinse the Reservoir before refilling it with fresh water. Once the Reservoir is filled, please put it back in place on the Brewer and secure it with the lid. If there is no water in the Reservoir, refill it without removing it from the Brewer.
- Make sure that the Brewer is powered on. Lift and lower the Handle of the Brewer without inserting a K-Cup.
- The LCD Control Center on the device indicates that it is prepared for brewing to brewing a 9.25 oz. Serving water, utilize a Large Mug, but refrain from using a K-Cup.
- To remove all the water from the inner tank, please repeat steps 2 and 3 two additional times.
Note: If you encounter difficulties with your Brewer, please contact our Customer Service team by dialing 1.866.901.BREW (2739).
Controls and Indicators (LCD Control Center)
In your Keurig B–77, controls are the buttons and switches that allow you to operate the Brewer and customize the brewing process according to your preferences. It includes on/off switches, programmable timers, brew-strength selectors, and temperature controls. Control indicators work together to provide you with a way to customize the brewing process and monitor the machine’s status as it brews your coffee. Let’s scroll down to learn about the controls and indicators!
Setting the Clock
If you plan on utilizing the Auto On/Off Time programming feature, it is essential to set the clock beforehand, as this feature requires accurate time settings to function correctly. However, setting the clock is optional if you do not intend to use this feature, although the time will not be displayed on the LCD Control Center if it is not set.
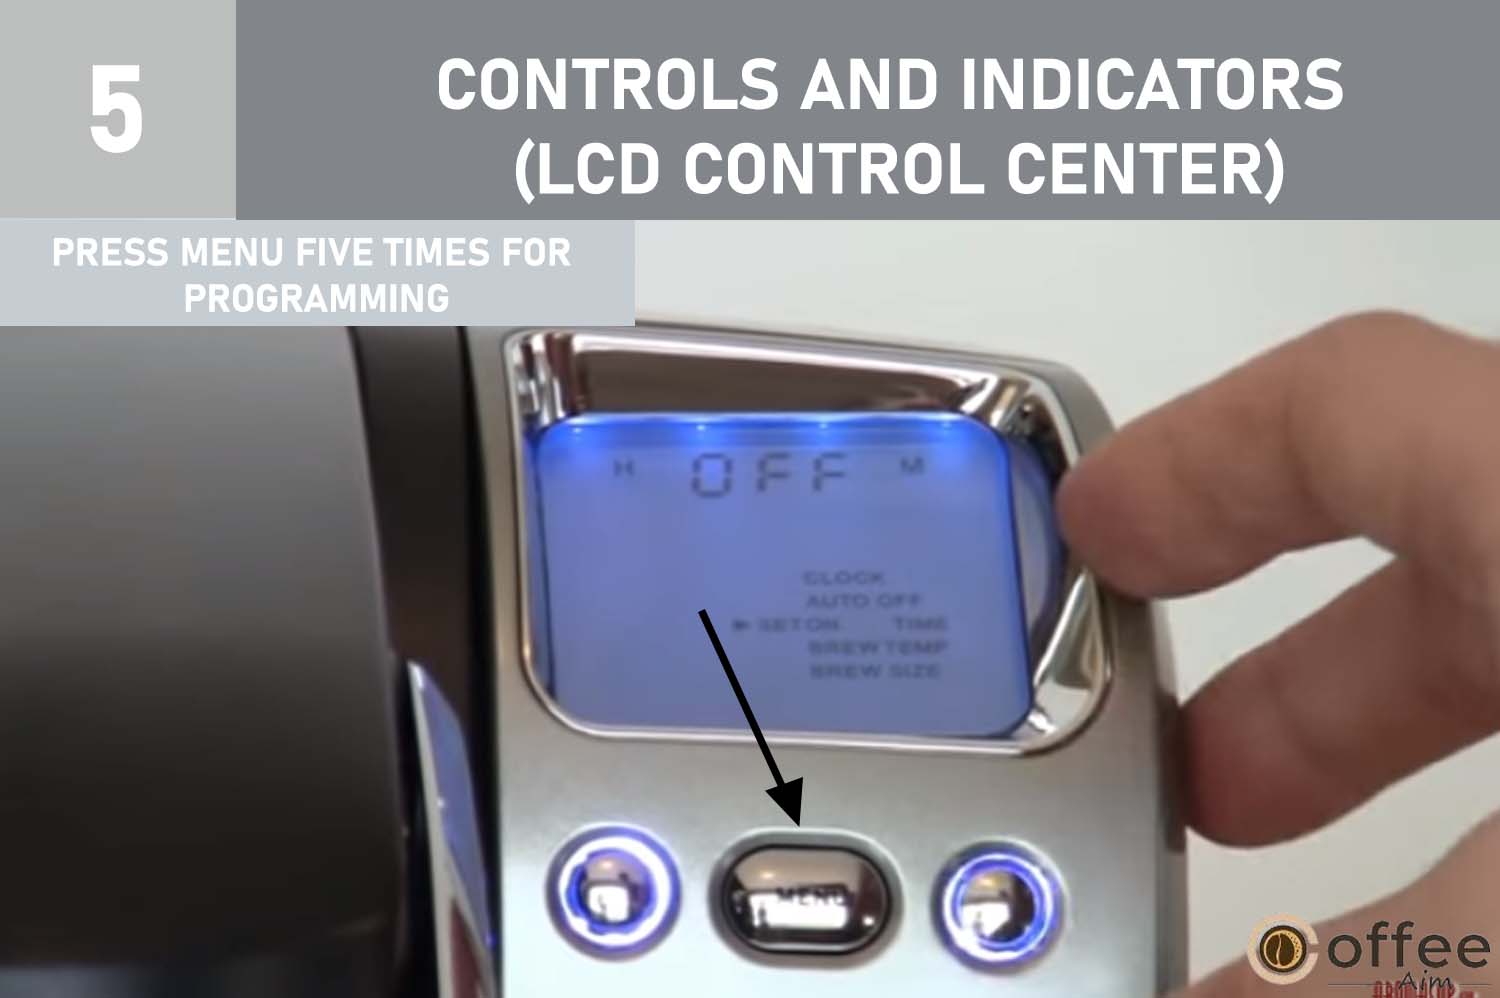
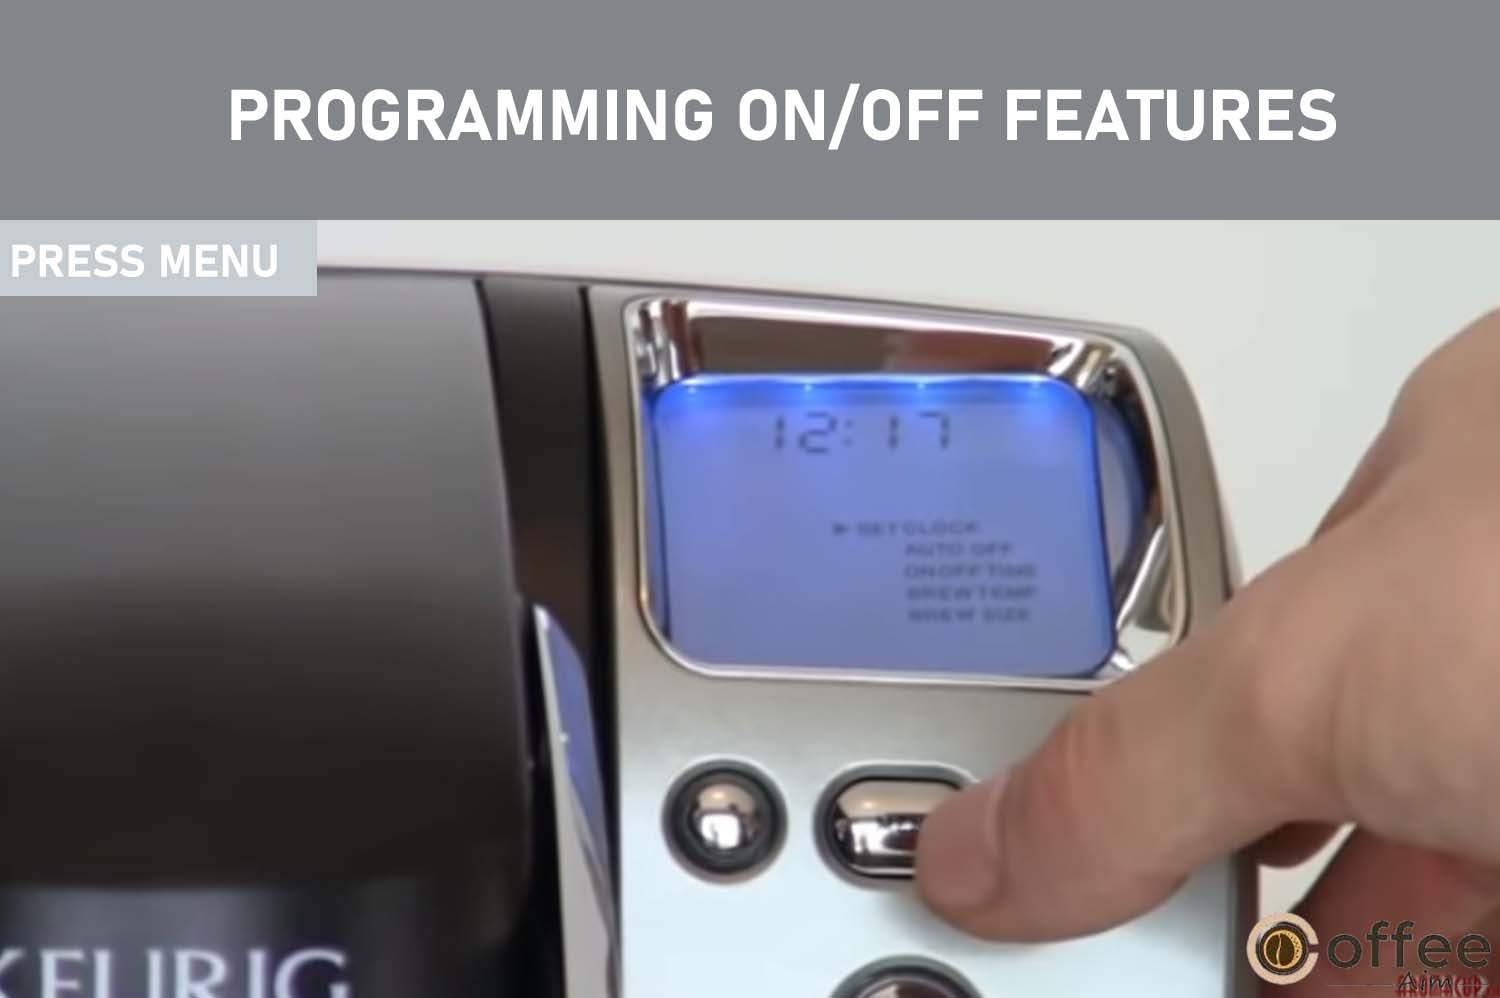
- To bring up the menu, please press the “MENU.”

- When the clock is not set, the letters’ OFF’ will be displayed at the top of the LCD Control Center (Figure 10). To access the programming options, a small arrow will point to the ‘SET CLOCK’ option on the display. The Left Button will have the label “H” (Hour) above it, while the Right Button will have the label “M” (Minute) above it. These labels and icons for “H” and “M” and the Left and Right Buttons will blink.

- To set the appropriate hour, press the Left Button beneath the flashing “H” until you reach the desired hour. If the selected hour is the afternoon, “PM” will be displayed.

- To set the minutes, press or hold the right button underneath the flashing “M.”

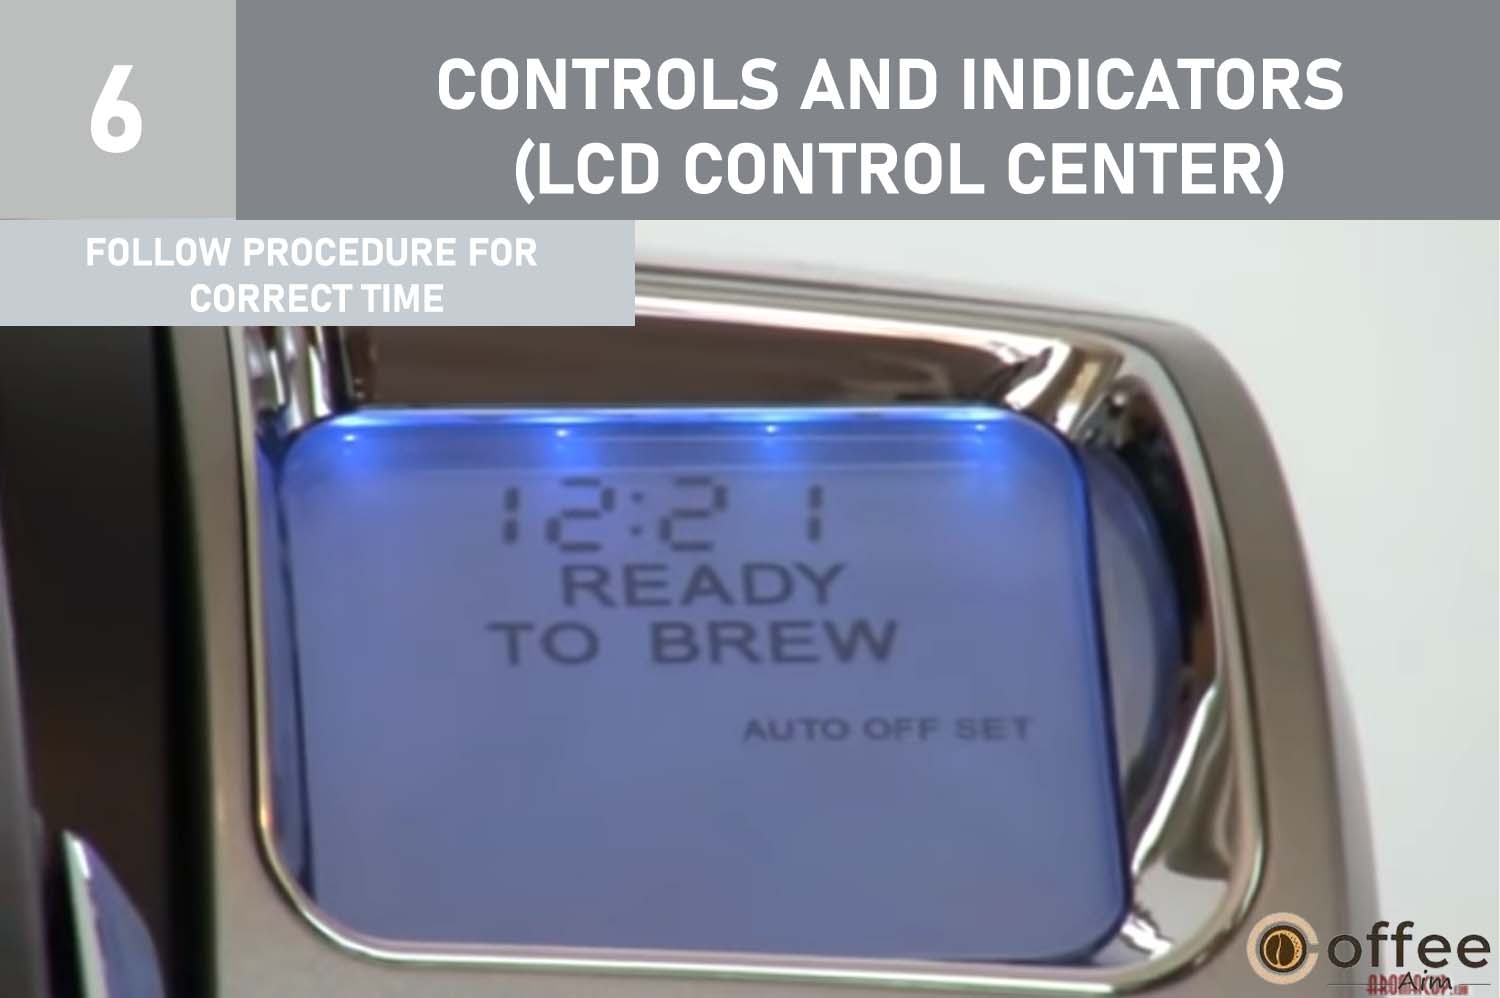
- After you have set the correct minutes, press the MENU button five times to scroll through the remaining programming steps.
- It is essential to follow the procedure outlined above to ensure that the correct time is displayed in the LCD Control Center. It should be noted that if power is lost or interrupted by the Brewer, such as by unplugging it, the clock will only be visible once the time is reset. However, the Brew size setting will still be remembered and restored automatically. Other settings will be converted automatically after the clock is set. Therefore, resetting the time as soon as possible is vital to ensure that the Brewer is functioning correctly.
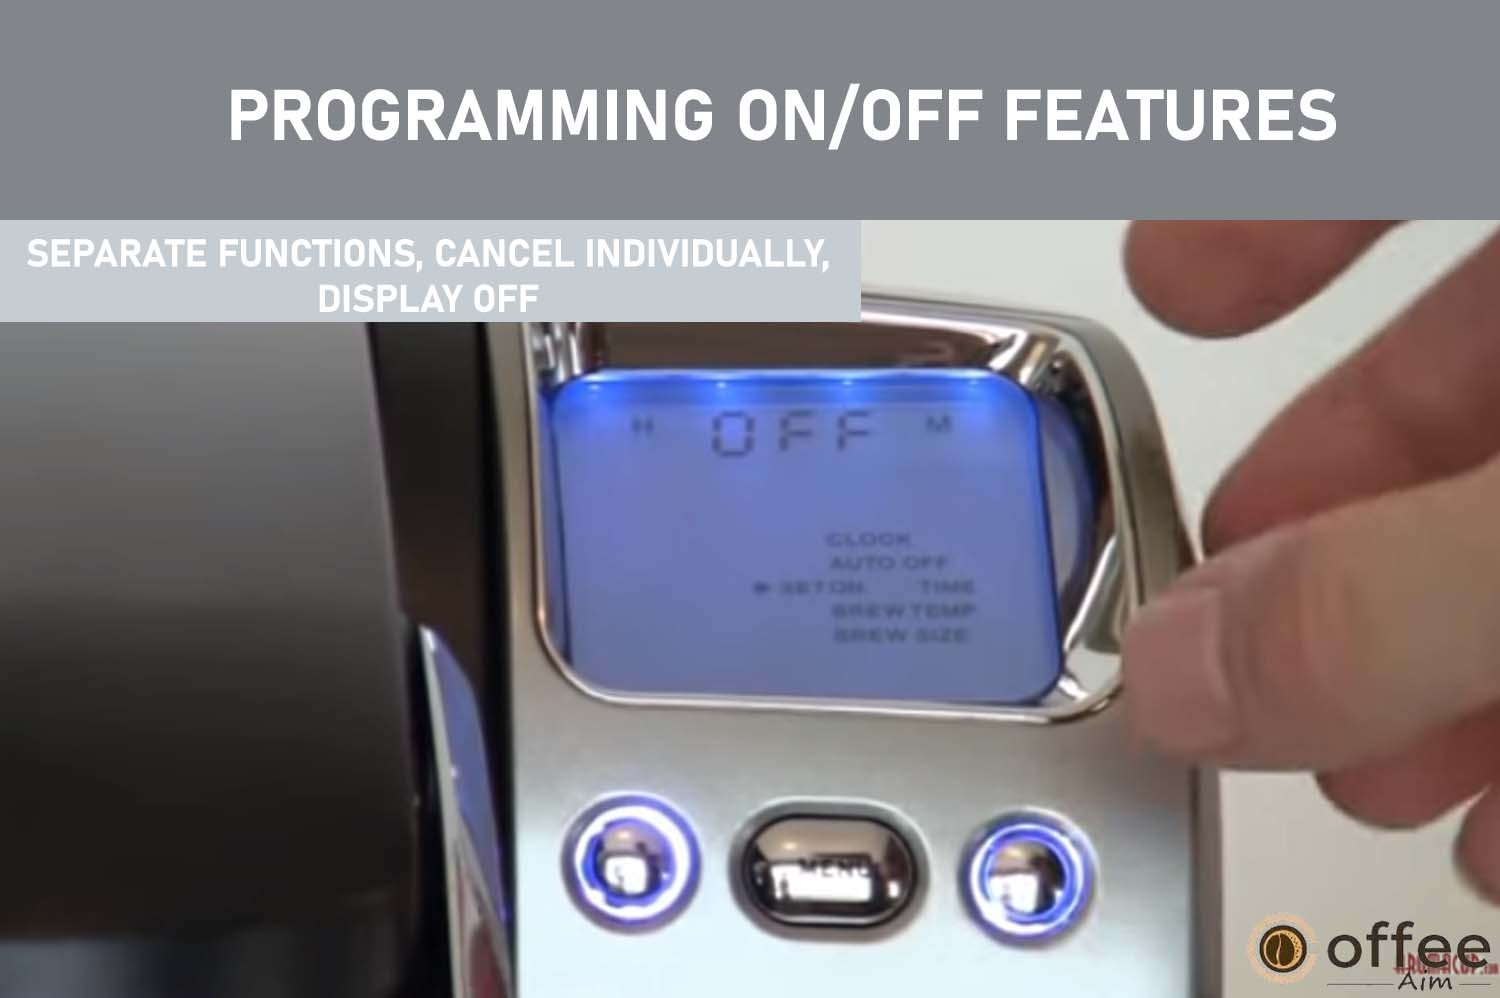
Programming On/Off Features
The Brewer offers three modes for brewing gourmet coffee, tea, or hot cocoa at your convenience. By programming the Brewer to turn on automatically each morning, you can avoid the hassle of waiting for it to warm up before brewing a delicious cup of coffee. It typically takes about 4 minutes for the Brewer to reach the optimal temperature for brewing from room temperature. Kindly read the programming features below.
- Keep it Turned on Continuously
The Brewer is designed to be left on continuously so that it is always prepared to brew a fresh cup of gourmet coffee, tea, or hot cocoa whenever you desire. Suppose you want to turn off the Brewer, press and release the Power Switch. However, please note that although the clock may remain on, you cannot brew a cup of coffee, tea, or hot cocoa when the Brewer is turned off. To restore power to the Brewer, press and re-release the Power Switch. Remember to wait for the water to heat up again before the Brewer is ready to brew another cup.
- Configure the Brewer to Automatically Turn Off After a Set period has Elapsed Since the Last Brew Using the “AUTO OFF” Feature.
- To activate the Auto Off feature, press the MENU button twice. It will bring up the programming options on the LCD Control Center, with a small arrow next to the “SET AUTO OFF” option (refer to Fig. 11).

- To increase the time by one hour, press or hold down the Left Button below the flashing “H.” It can be done repeatedly, up to a maximum of nine hours.

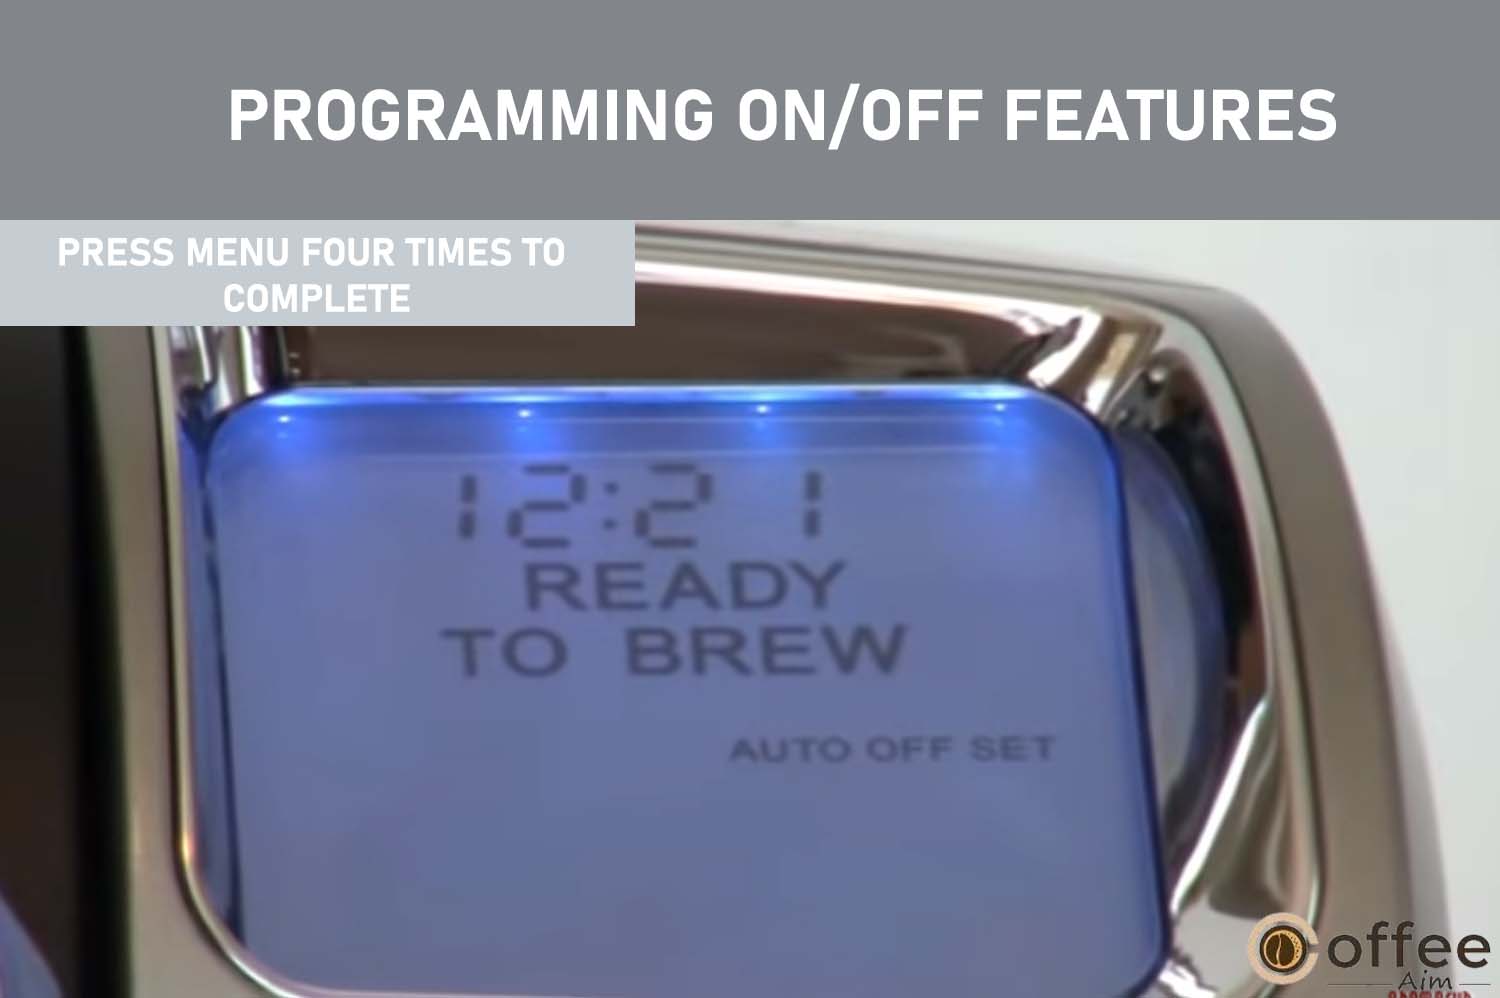
- Once you have chosen your desired Auto Off time, you must press the MENU Button four times to navigate the remaining programming options and exit the programming mode. The display will now show “AUTO OFFSET” (figure 12), indicating that the setting has been successfully configured.
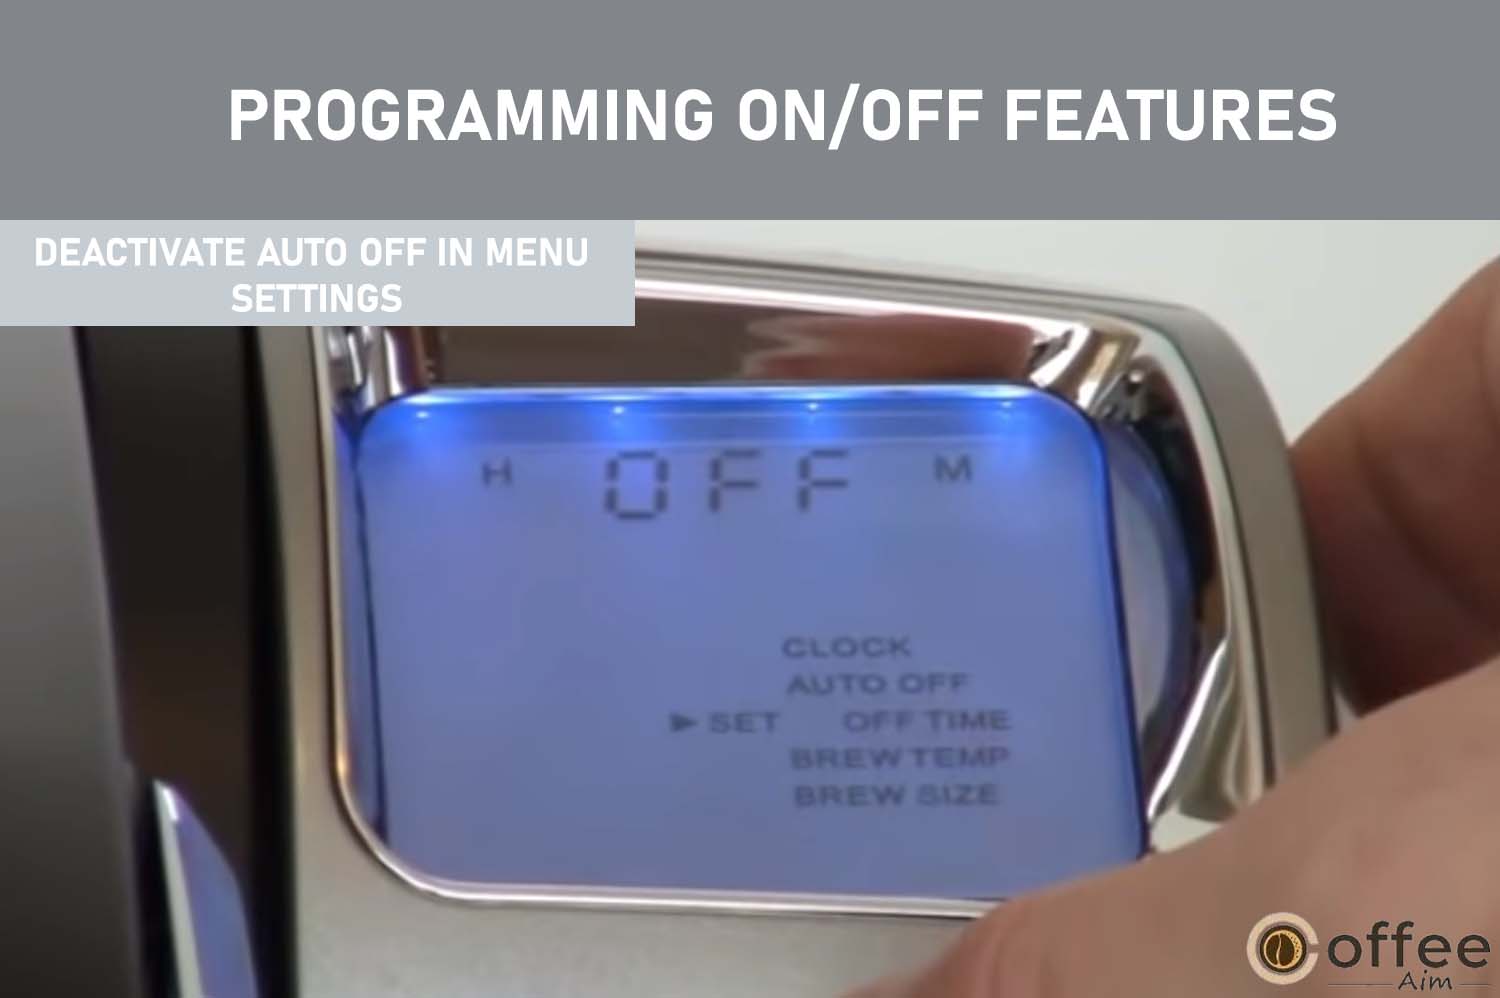
- If you want to deactivate the Auto Off function, you can access the “AUTO OFF” programming mode via the MENU Button and then press the blue Left Button under the flashing “H” button. By pressing and releasing it repeatedly, you can advance the time by one hour at a time until “OFF” is displayed, indicating that the Auto Off feature has been canceled.
- Program your Brewer for a Specific On/Off Time.
- You can select the On Time feature by pressing the MENU Button three times. The LCD Control Center will display the available programming options, with a small arrow pointing to “SET ON TIME” (Figure 13). It indicates that you’re in the programming mode for setting the On Time feature.

- You’ve set your desired On Time hour; you can use the Left Button below the “H” button. By pressing and holding it, you can scroll through the available hours until you reach the hour you want to set as your On Time. It allows you to customize the On Time feature according to your preferences.
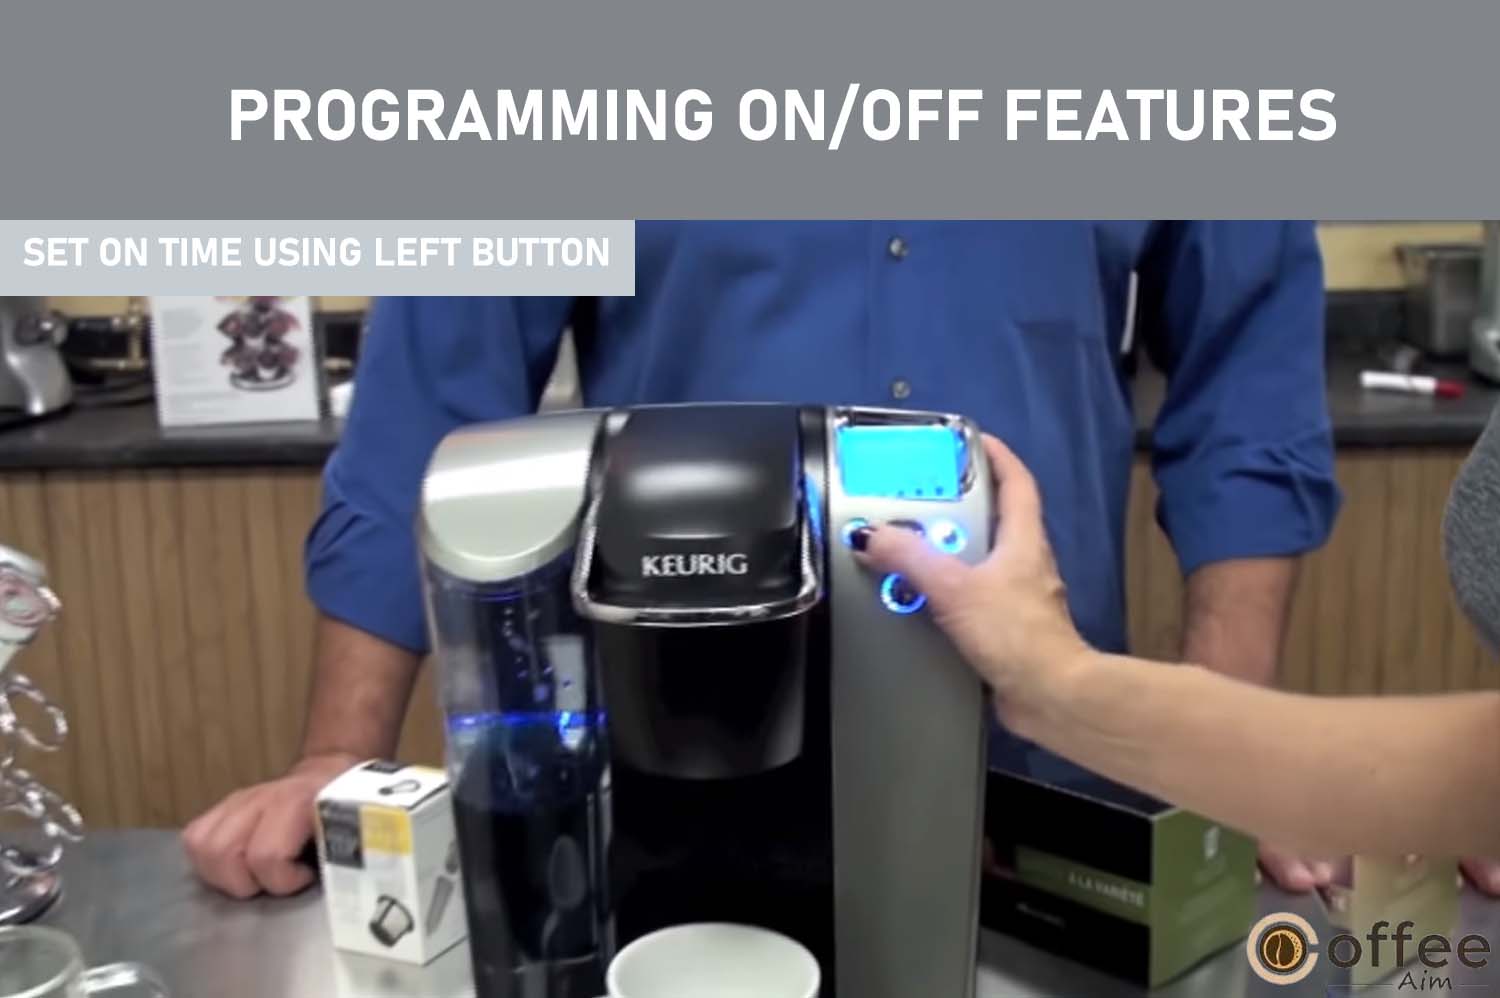
- Press the Right Button under the “M” to scroll through the minutes until you reach your desired “ON TIME” minutes.

- Once you have set the desired time, press the MENU Button to save the “ON TIME” and move to the “SET OFF TIME” (fig. 14).
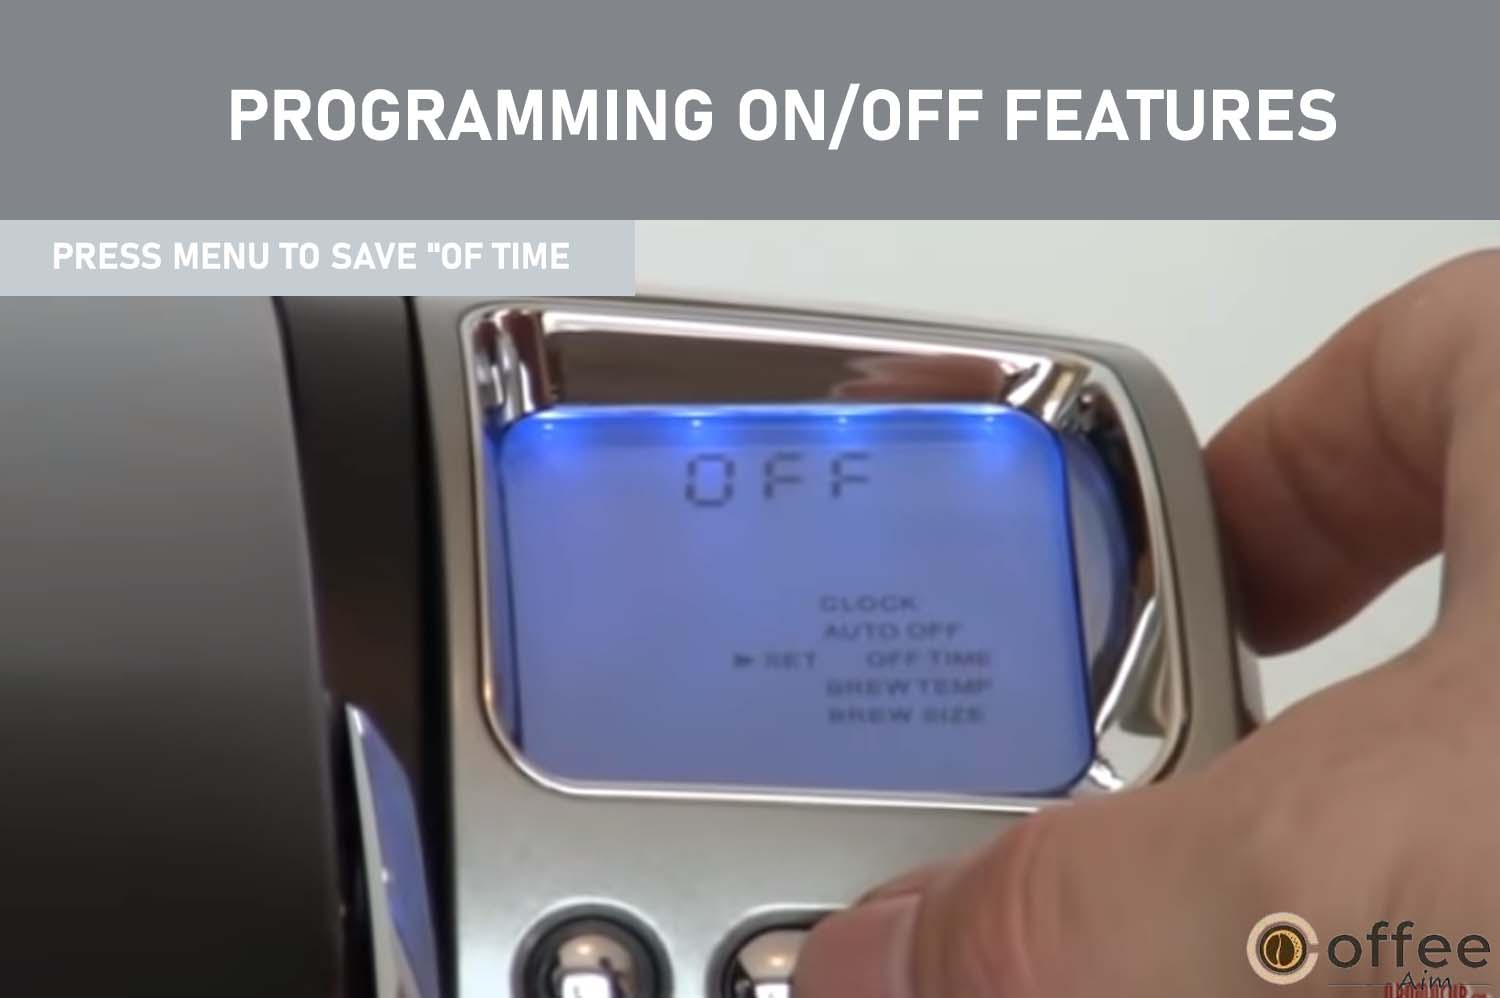
- To set the “OFF TIME,” Follow the same procedure in steps b and c to select your desired “OFF TIME” (fig. 14).

- To exit the programming mode, press the MENU Button two more times. Once you’ve done that, the Control Center will display the options you have set.
- If you want to cancel either set function, you should utilize the “H” and “M” buttons to move the time display to midnight. Confirm that the “M” button is set to “:00,” and then adjust the “H” button as required. When the time display reads midnight, the Control Center will display “OFF,” indicating that the function has been deactivated.

Example!
Suppose you set the “On Time” to 6:55 AM and the “Off Time” to 10:00 PM. During this period, the Brewer will maintain hot water in the tank and remain in a “READY TO BREW” state so that you can quickly brew your coffee anytime within this time frame. If you wish to make coffee outside this preset window, press the Power Button and wait for the water to heat up. You can start brewing once the “READY TO BREW” indicator is displayed on the LCD Control Center.
Important Note
It is important to note that the “On Time” and “Off Time” functions work separately and can be canceled independently. To disable these functions, use the “H” and “M” Buttons to advance to midnight, and the Control Center will display “OFF,” indicating that the function is disabled (fig. 15).
Furthermore, the “Auto Off Timer” and “On/Off Time” programming options can be used independently or together. For instance, you can set the “On Time” function to turn on the Brewer at 7:00 AM and then program the “Auto Off Timer” function to turn off the Brewer two hours after the last brew.
Programming your Brew Size
By default, the Brewer is set to brew the Small Mug size (7.25 oz.). It is done to simplify the brewing process for users who frequently choose this size. However, if you prefer a different brew size, you can change the default setting as follows:
- Press the MENU Button five times to access the settings menu.
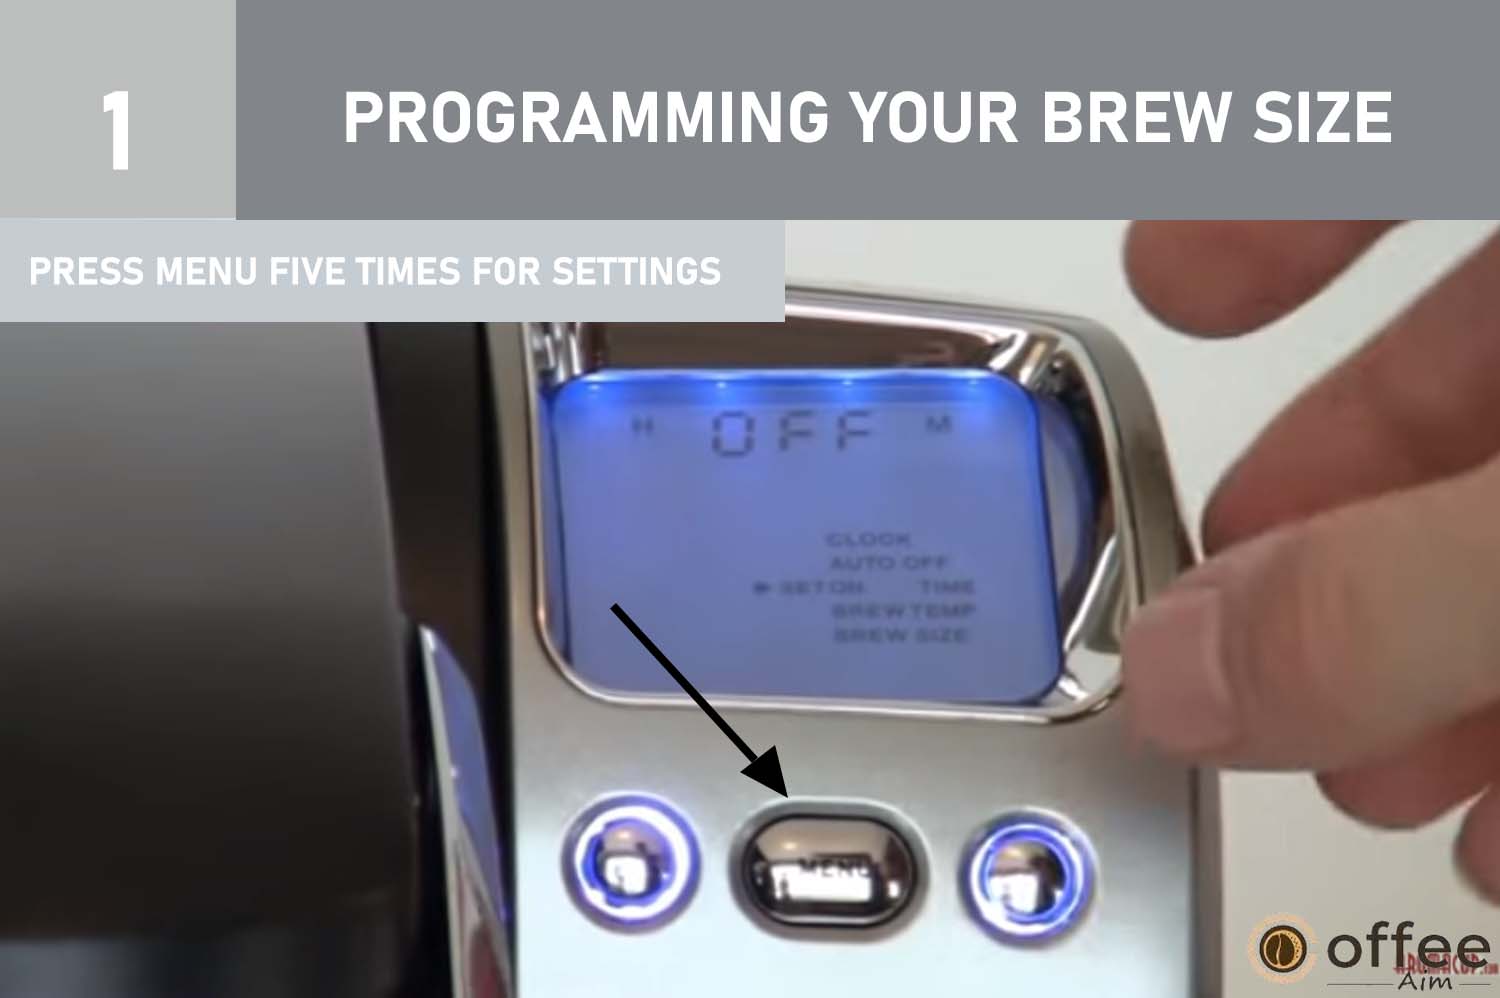
- Use the Left and Right Buttons to select your desired default brew size from the options displayed on the LCD screen.

- Once you have selected your desired size, press the MENU Button once to exit the settings menu. The LCD screen will display the new default brew size set.

Cleaning and Maintenance of Keurig B-77.
“Your coffee maker needs regular cleaning”.
I know very well that your daily routine is very tough. But when you can take time out of your schedule to brew coffee, why not clean the Brewer? So it would be best to clean your Brewer regularly; how to clean it is explained below.
How should you Clean the External Parts?
I recommend cleaning your Brewer’s external Parts regularly to maintain your Brewer’s performance. Follow the given points below.
- The Housing and other external parts should be cleaned with a soapy, moist, and non-abrasive cloth.
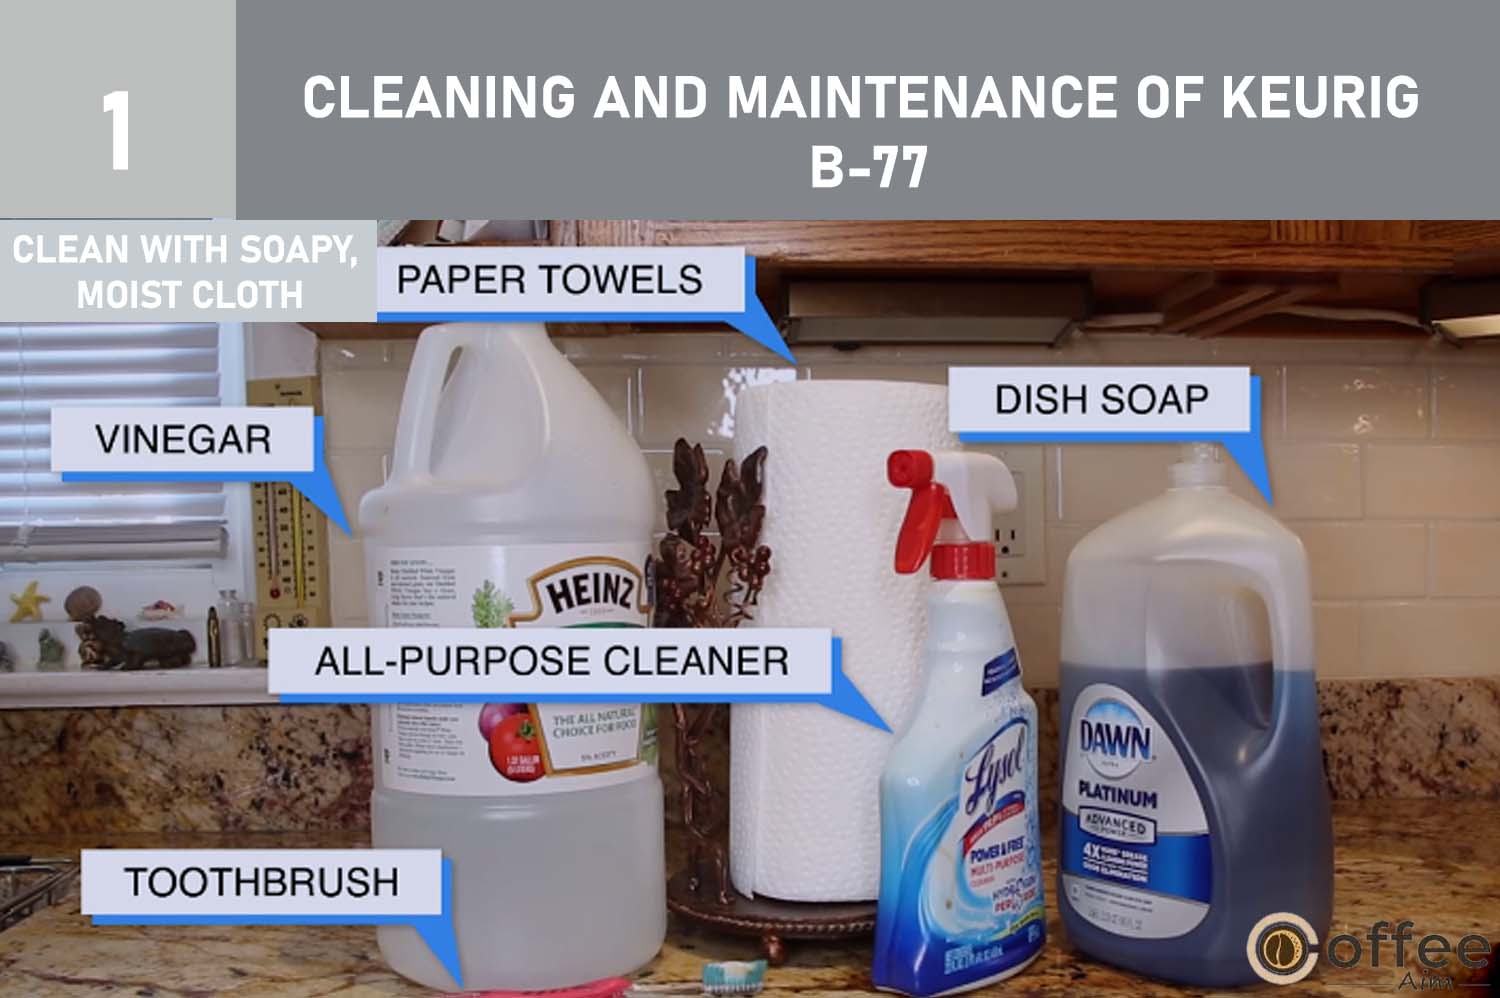
- Avoid submerging the Brewer in water or other liquids.
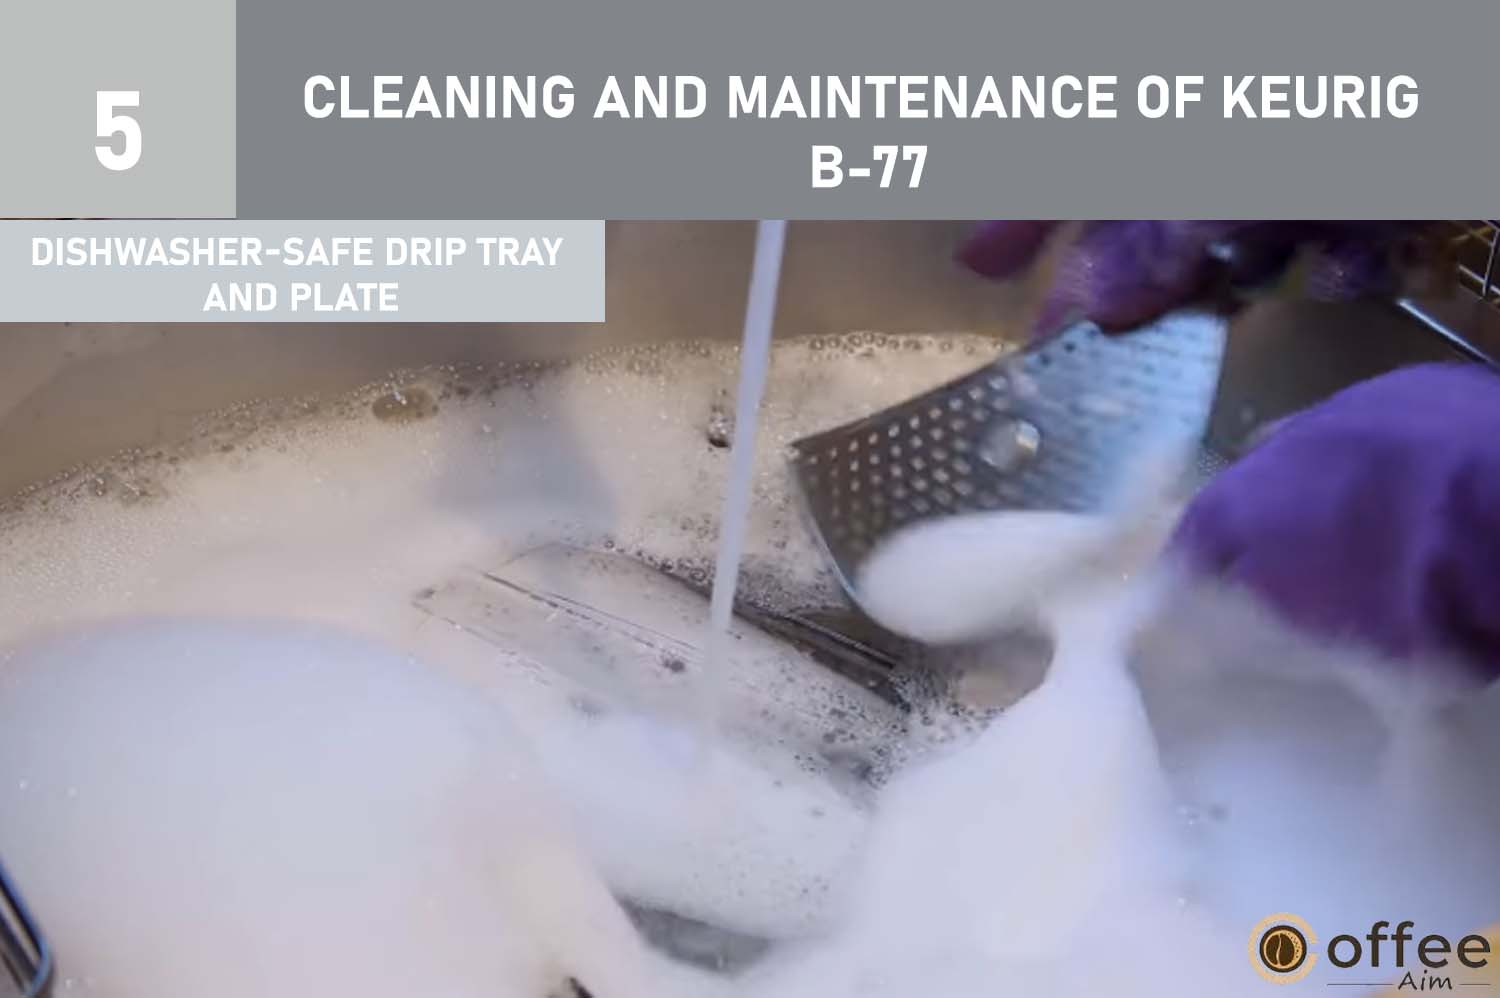
- The drip tray can amass up to 12 ounces of overflow, so the Drip Tray and Drip Tray Plate should be examined and cleaned frequently.
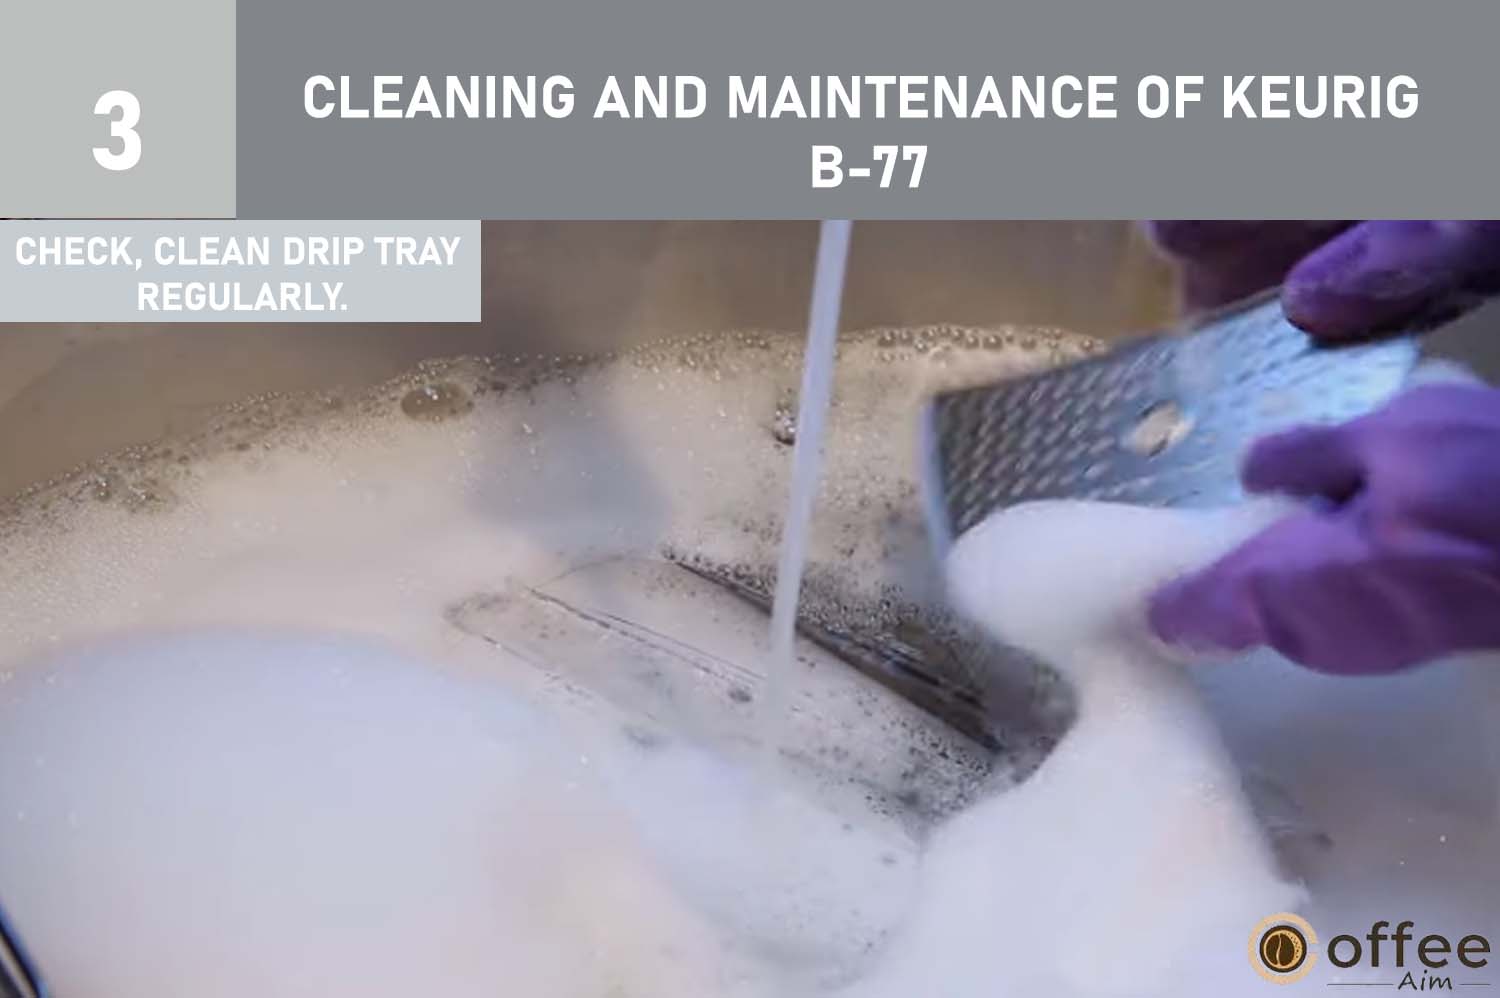
- Slide the Drip Tray Assembly toward you to remove it. To avoid spilling, you should keep it level every time.
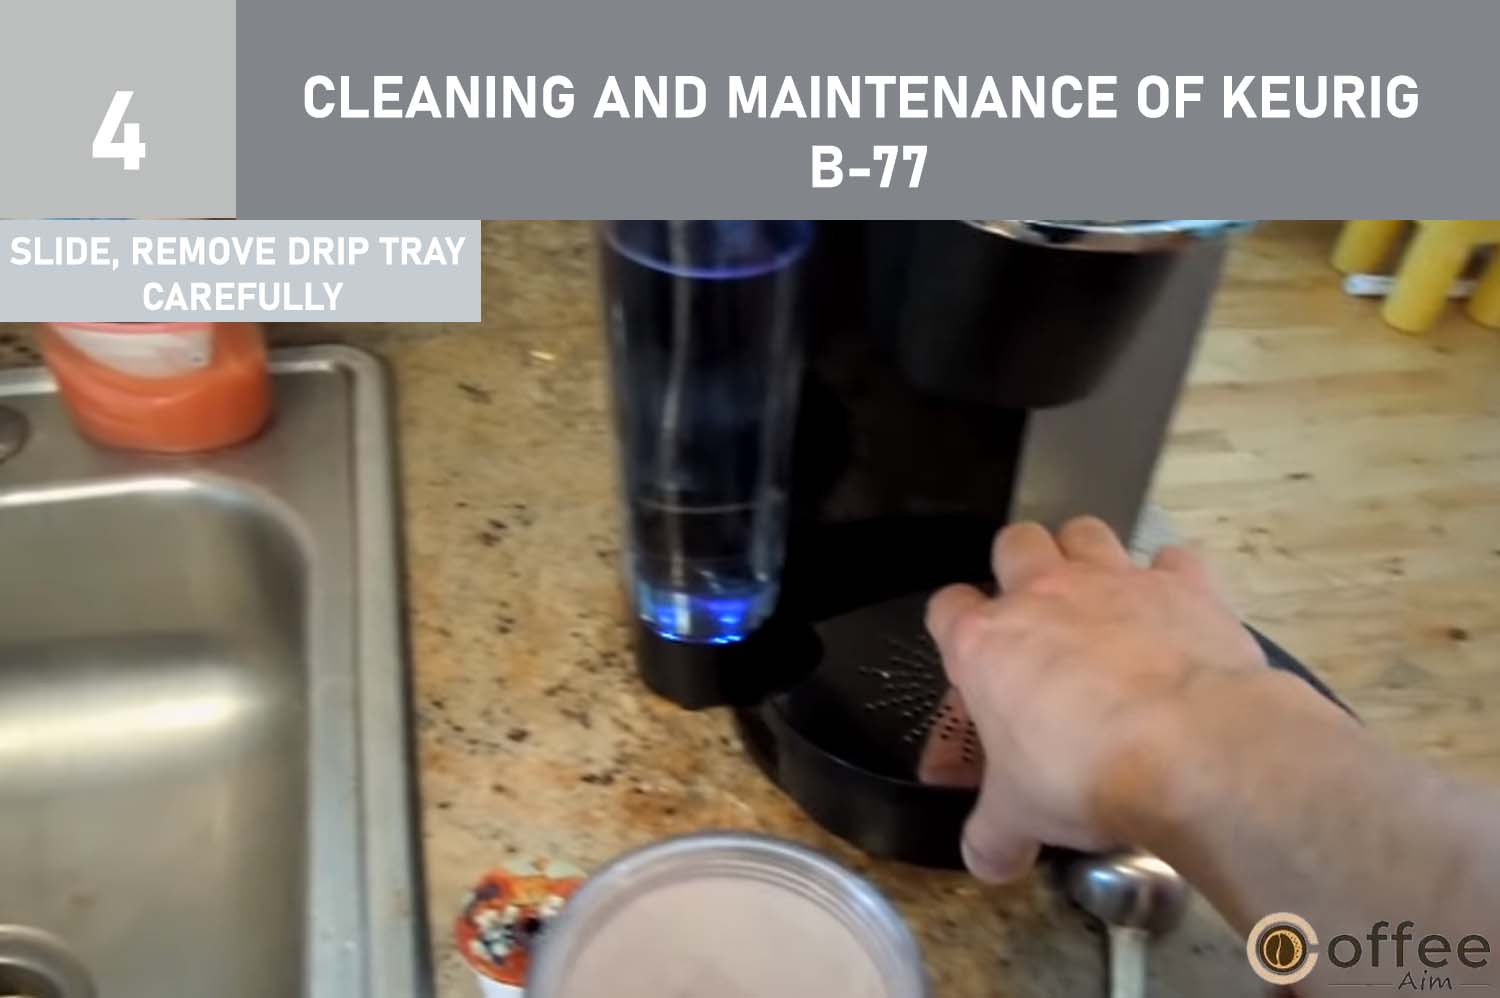
- The Drip Tray and Drip Tray Plate can be safely washed in a dishwasher.
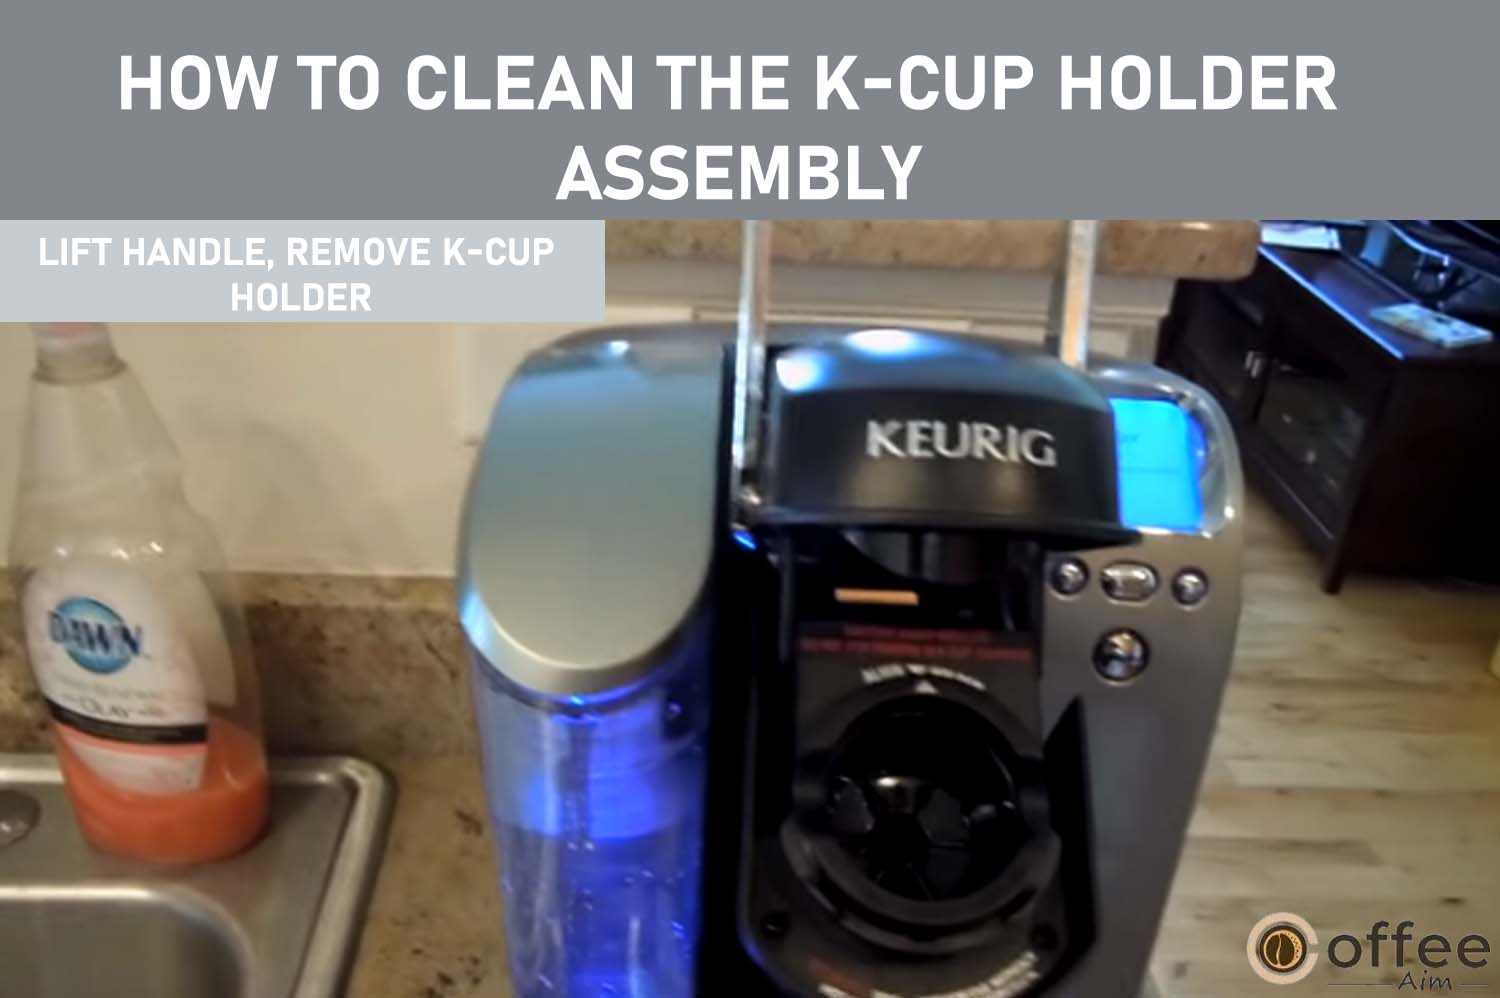
How to Clean the K-Cup Holder Assembly?
I know you are looking for the procedure to clean your Brewer’s K–Cup Holder Assembly; see below.
- You can place the K–Cup Holder Assembly onto the top shelf of a dishwasher.

- Open the lid by lifting the K–Holder Assembly handle to remove it from the Brewer.
- Use one hand to grasp the top of the K–Cup Holder while, with the other hand, push up the bottom of the K–Cup Holder from underneath until K–Cup Holder Assembly releases.
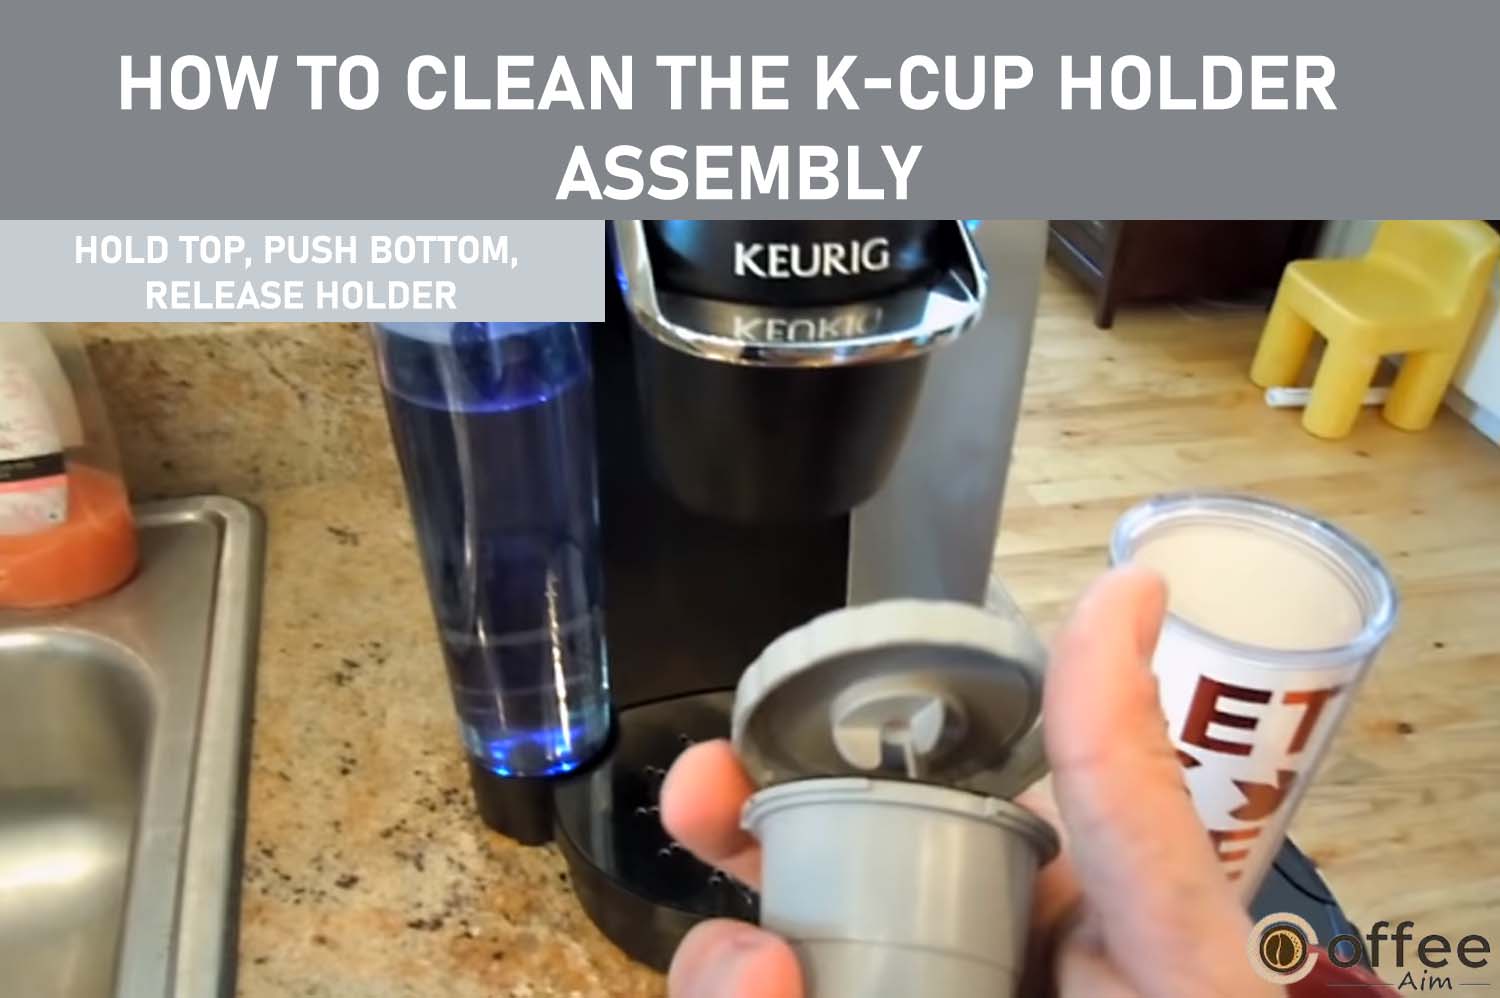
- After cleaning the K–Cup Holder, align it with the opening using the two front ribs as a guide.

- Finally, snap into place from the top.
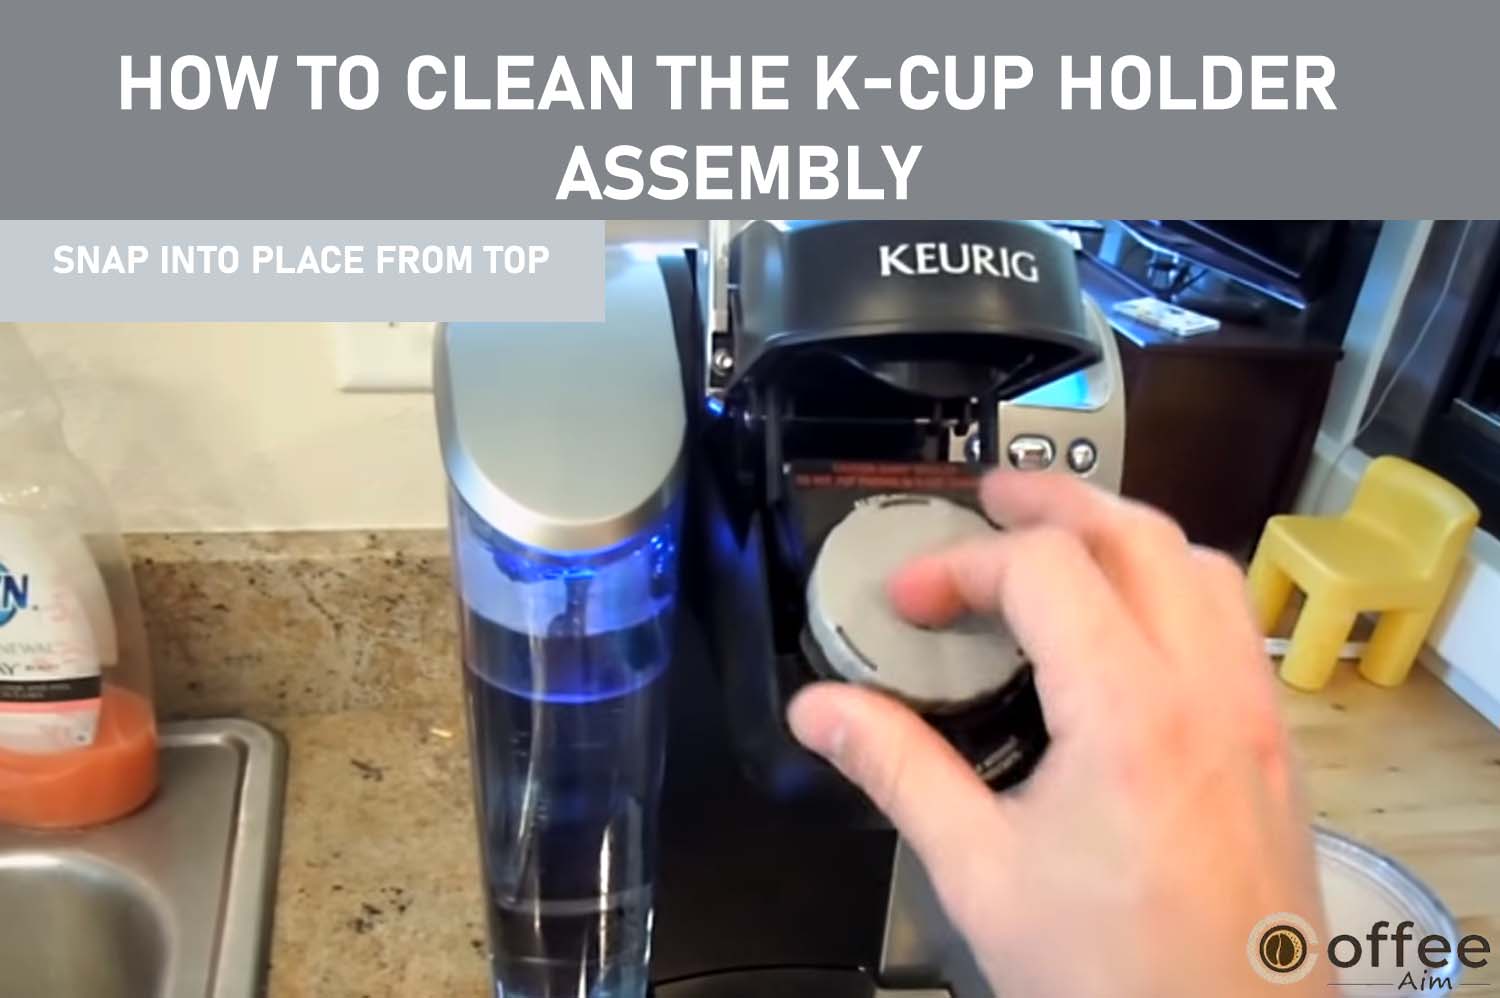
Important Note: You should use low-temperature cycles in the dishwasher.
Cleaning the Funnel?

Cleaning the funnel is as necessary as your coffee taste. For cleaning the funnel,
you can remove it from the K– cup holder.
To remove it, Pull on it until it pops off.
Snap it back onto the K–Cup Holder Assembly to replace it.
Note: It is dishwasher safe.
Cleaning the Exit Needle

The exit needle is located under the K-Cup holder assembly. A clog occurs due to coffee grinds which can spoil your coffee taste but doesn’t worry. It can be removed with a paper clip or a similar tool. Remove the K-Cup holder assembly and detach the funnel. Insert a paperclip clip in the needle to loosen the clamp and push it out.
Note: The K-Cup Holder is dishwasher safe.
CAUTION: K–Cup Holder Assembly has sharp needles that puncture the K–Cup above the K–Cup holder and in the bottom of the K–Cup Holder. So you should take care of your fingers by putting them inside the K–Cup Holder Assembly Housing because it is so much risk of injury.
The simple do not put your fingers inside it.
Cleaning the Water Reservoir Lid and Water Reservoir
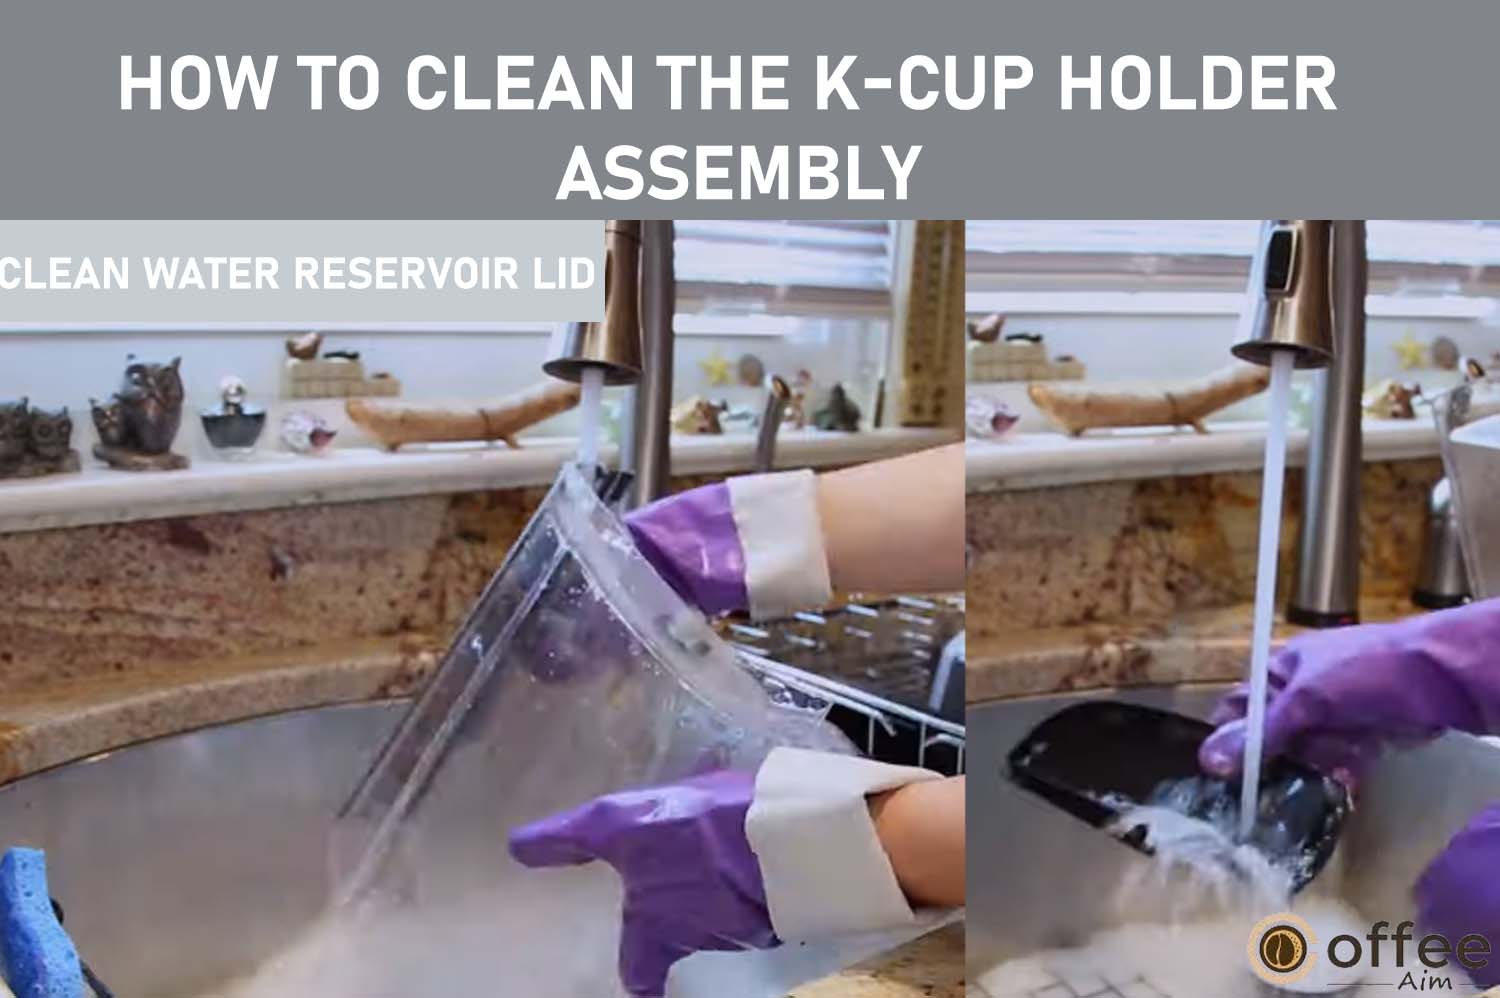
Regular maintenance of your Brewer’s water reservoir and lid is crucial. To ensure their cleanliness, it is essential to follow these guidelines:
- Avoid placing the water reservoir and lid in the dishwasher. Instead, opt for manual cleaning.
- Use a damp cloth that is non-abrasive and soapy to clean both the water reservoir and lid.
- Thoroughly rinse the reservoir and lid after cleaning to remove any soap residue or particles.
Note: After cleaning the water reservoir, please rinse it entirely with the freshwater because sometimes cleaners or cleaning solutions remain in this area, which may contaminate the water supply. So ensure that your Water Reservoir is completely Clean and neat.
How will you Descale your Keurig B-77 ?
Descaling is the method used to eliminate mineral deposits like calcium and lime buildup from the internal parts of a Keurig B-77 machine. With time, these deposits can obstruct the machine’s internal components and impact the performance, taste, and quality of the coffee it brews. Descaling involves utilizing a descaling solution and eliminating the mineral buildup from the machine’s internal components. The frequency of descaling depends on the frequency of usage and the hardness of the water in your location. Keurig recommends descaling your Brewer every three to six months to maintain optimal performance. Keurig Brewer has a feature that can detect if a buildup of scale is affecting its performance. When this happens, a ” DESCALE ” message will appear on the control center’s LCD screen. However, even if you don’t see this message, it’s still recommended that you descale your Brewer every 3-6 months to keep it functioning correctly.
Important Note!
If you see the message “DESCALE” on the LCD Control Center of your Brewer, you must take prompt action to descale it. Ignoring this message could lead to a scale buildup that may eventually cause damage to your Brewer. Although your Brewer may continue to function, failure to descale could result in serious injury, indicated by the blinking of the “DESCALE” message. Therefore, following the descaling procedure as soon as possible is crucial to prevent any potential harm to your Brewer.
Follow the following procedure to Descale your Keurig B–77.
1. Prepare:
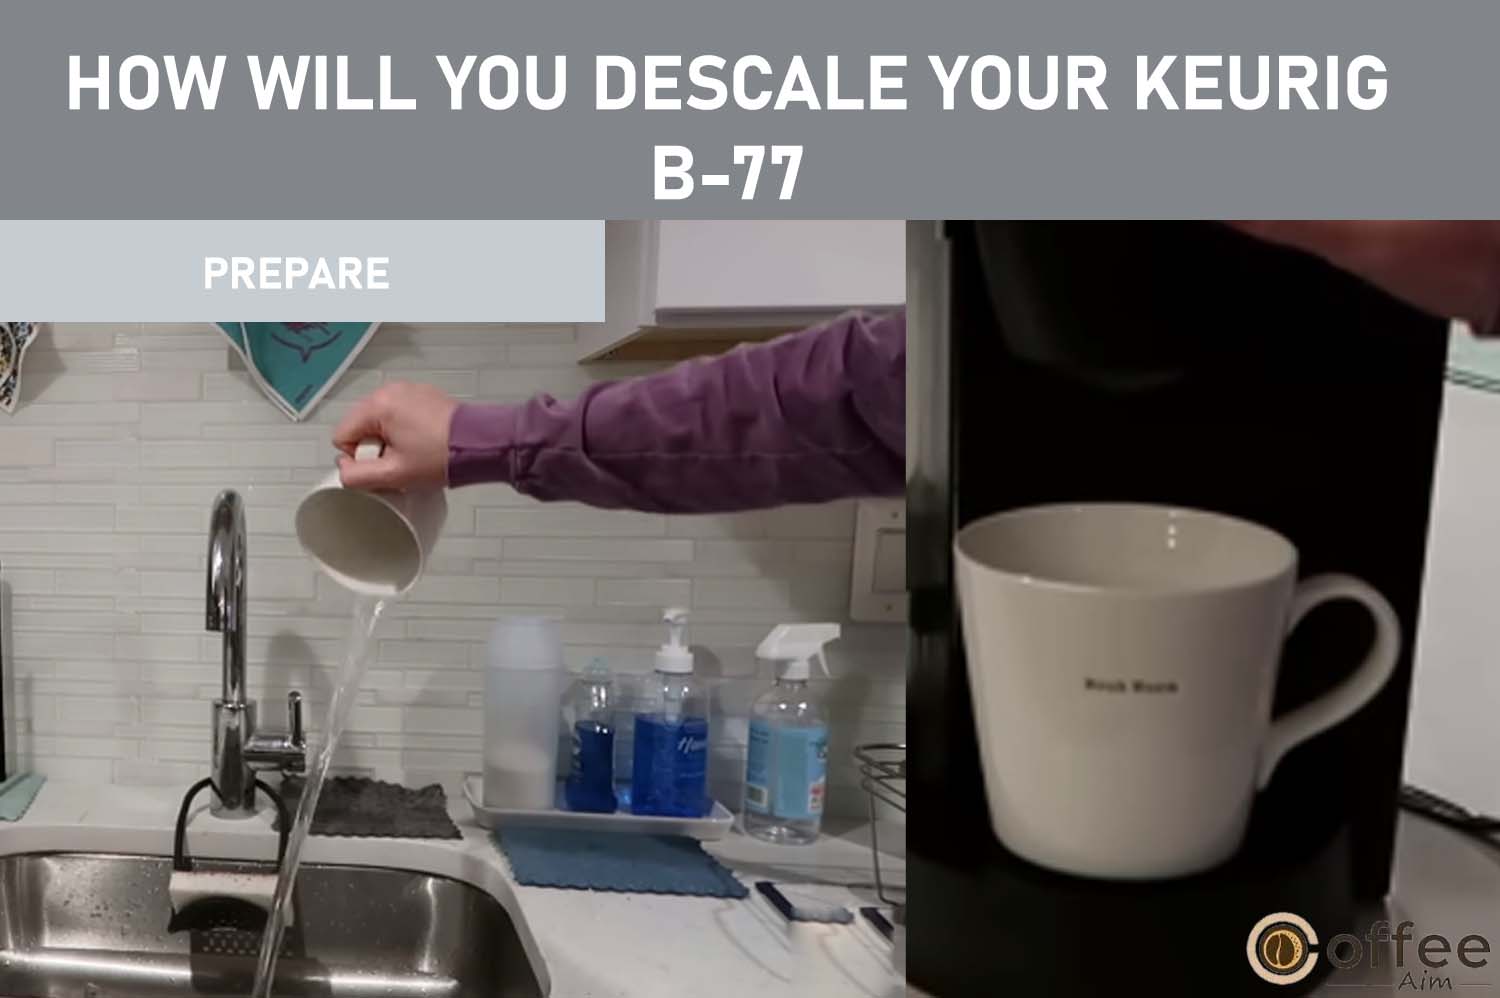
- Ensure you have a minimum of 48 fluid ounces of undiluted white vinegar readily available. Also, ensure an empty sink and a generously sized ceramic mug (avoid using a paper cup).
- Thoroughly drain the Water Reservoir of all its water.
- Deactivate the “Auto-Off” function.
2. Fill And Clean:
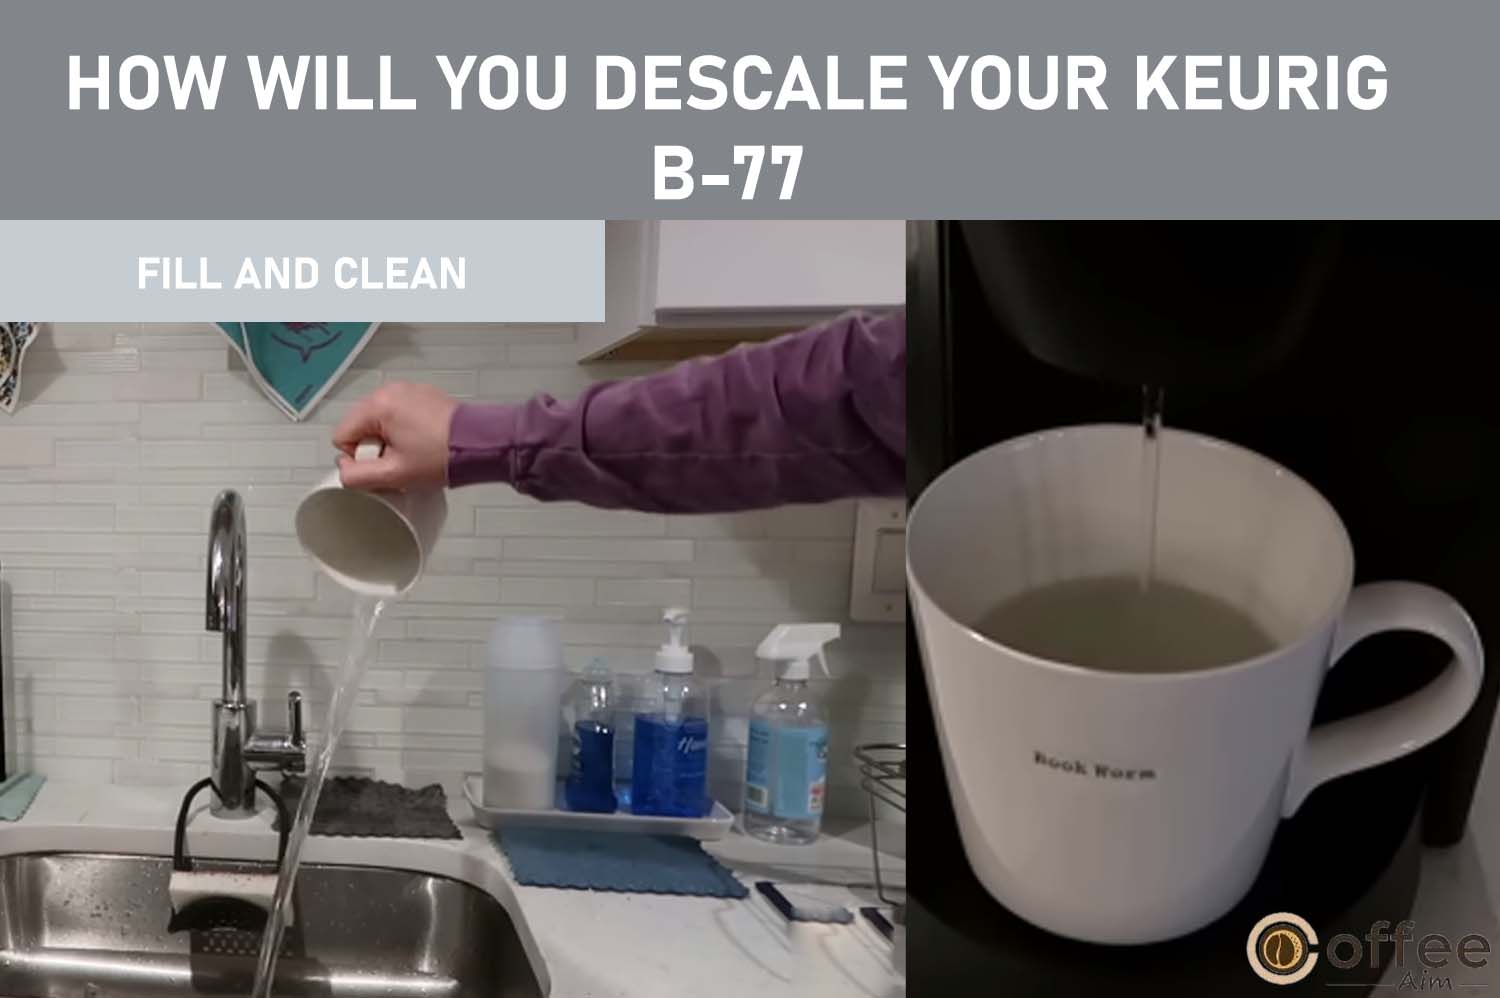
- Add vinegar to the Water Reservoir and fill it up completely.
- Next, position a sizable mug on the Drip Tray Plate. Make sure not to use a K-Cup for this process. Instead, select the Large Mug brew size and run a water brew cycle. Once the cycle is complete, take the contents of the large mug and dispose of it by pouring it into the sink.
- Execute the brewing process thrice.
- Subsequently, leaving the Brewer to settle for a minimum of 4 hours while it continues to operate.
3. Rinse:
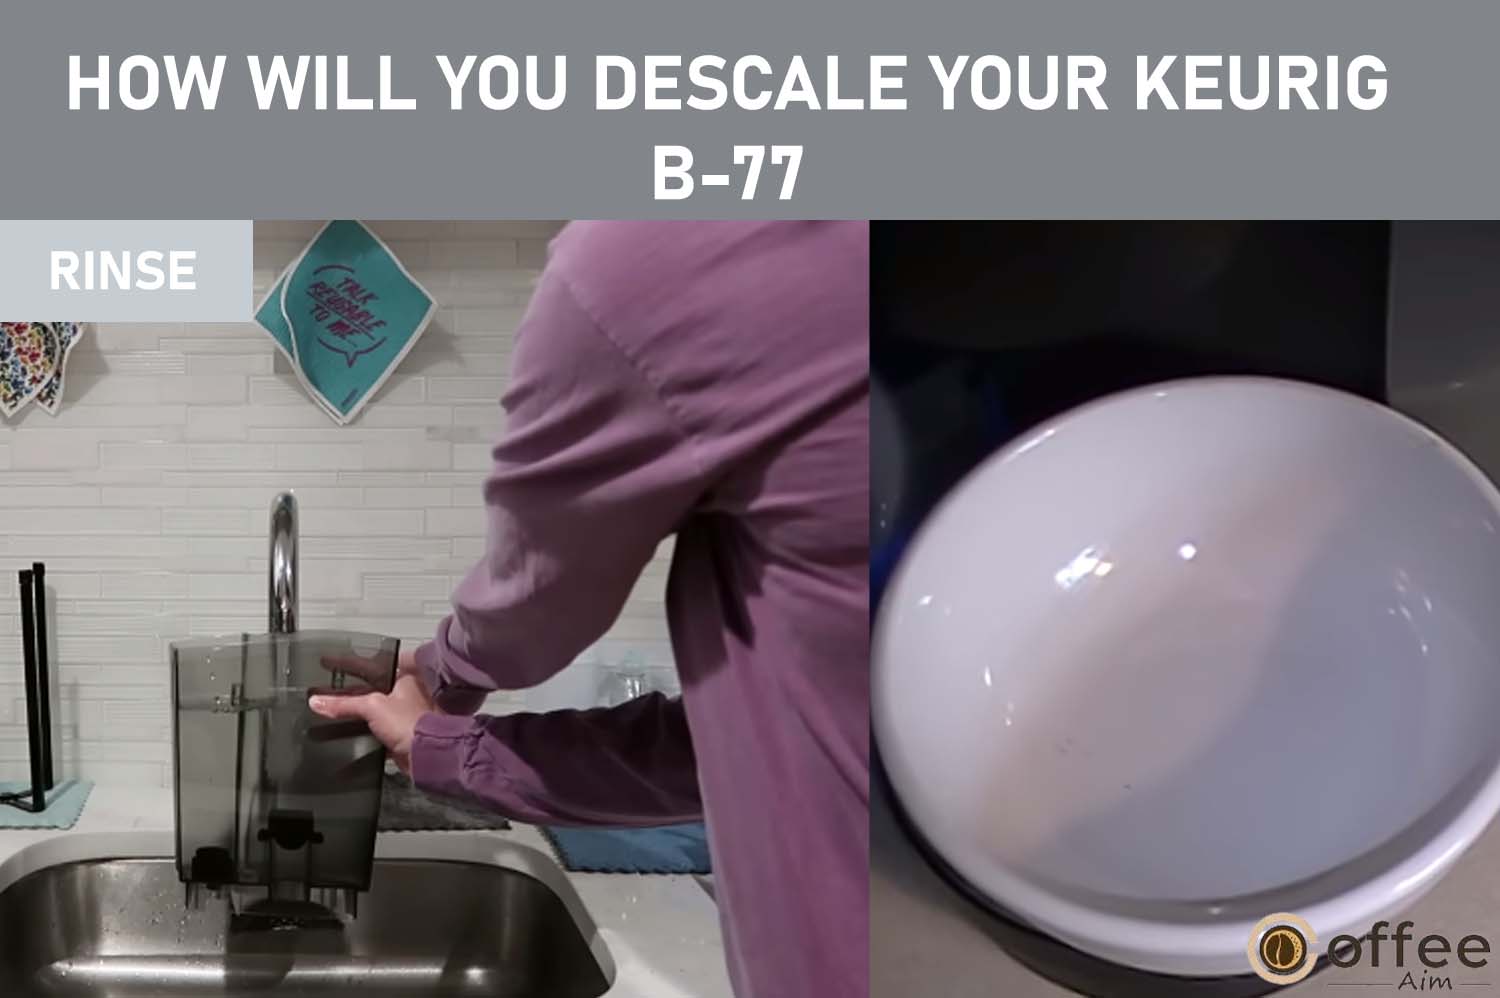
- Make sure that the Water Reservoir is filled with clean, fresh water.
- Put a large mug on the Drip Tray Plate and start a brewing cycle. Empty the contents of the oversized mug into the sink. Keep repeating the brewing process until you’ve used up all the water in the Water Reservoir.
- Suppose you detect any lingering taste or odor in your coffee after completing the steps above. You may need to perform additional brewing cycles with clean water until the odorant is gone.
Note: if you see the message “DESCALE” still being displayed on the LCD Control Center even after finishing the descaling process described earlier, you will have most of the same descaling procedure.
Keurig B-77 Troubleshooting Instructions
Troubleshooting your Brewer involves identifying and resolving problems that prevent the Brewer from functioning properly. If you are facing issues such as leaks, slow brewing, insufficient coffee output, or malfunctioning parts, follow the given troubleshooting steps to resolve these problems.
| Situation | Solution |
| The Brewer has no power. | To address this issue, several measures can be implemented.Firstly, it’s recommended to plug the Brewer into a separate power outletEnsure that the connection is secure. If the problem persists, trying a different outlet or resetting the circuit breaker in the house may help. Finally, ensuring that the Power Switch is turned on and the LCD lights are illuminated is crucial.By following these steps, the power issue with the Brewer can be addressed, and it should be able to brew as intended. |
| Brewer is not Brewing. | Before brewing your coffee using the K-Cup, ensure that the K-Cup is placed properly in the K-Cup Holder, and push the handle down firmly. Check that the LCD Control Center displays “READY TO BREW” with the flashing Left, Right, and BREW Buttons, then choose one of the buttons to start brewing.If the LCD Control Center shows “ADD WATER,” fill the Water Reservoir with water or confirm that the Reservoir is properly seated in its base.If the Exit Needle is blocked, please refer to the Cleaning of Exit Needle section for instructions on unclogging it.If you have refilled the Water Reservoir and the LCD Control Center still displays “ADD WATER,” please contact Customer Service at 1.866.901.BREW (2739). |
| Brewing a partial cup | The Exit Needle may be obstructed. (refer to cleaning the Exit Needle)If required, wash the K-Cup Holder and rinse it using a faucet (please see how to clean K–Cup Holder for reference). Please reinstall the Water Reservoir that may have been inadvertently removed during brewing. Once the reservoir is in place, brew a cup of water without using a K-Cup.Additionally, it may be helpful to “descale” the Brewer. If you have already performed the descaling process twice and the issue persists where the Brewer only produces a partial cup, don’t hesitate to contact Customer Service at 1.866.901.BREW (2739) for further assistance. |
| The time is not displayed on the LCD Message Center | If the power to the Brewer is interrupted, you must reset the clock by following the clock setting procedure again. Which is given in “Setting The Clock” Kindly refer to it.The time will only be displayed on the LCD with setting the clock. |
| Brewer shuts off or turns on automatically | To ensure that the Brewer does not shut off or turn on automatically, it is important to check the settings of the Auto Off Timer and On/Off Time features. It can be done by pressing the MENU button below the word “MENU” and scrolling through the programming options. Look for Auto Off Timer and On/Off options, and ensure that “OFF” is displayed for both settings. If “OFF” is not shown, refer to the user manual for instructions on resetting the settings to disable automatic shut-off or turn-on. |
| The blue light in Water Reservoir is flashing | If the water level in the Water Reservoir is low, it may not be possible to brew a full cup of coffee. To resolve this issue, add more water to the Water Reservoir. If the problem continues or you experience other matters, don’t hesitate to contact Customer Service at 1.866.901.BREW (2739) for assistance |
Service
Despite cleaning and maintenance instructions, your Keurig B-77 is not user-serviceable. The manufacturer of Keurig B-77 does not recommend or allow you to perform repairs or maintenance on the Brewer. It is essential to have any servicing or repairs carried out by a qualified professional or an authorized service center. They have the expertise to diagnose the problem accurately and perform the necessary maintenance or repairs on your Brewer. Attempting to repair or service the Brewer yourself may cause further damage or void any existing warranties or guarantees. Refer to the owner’s manual or manufacturer’s website for information on servicing and maintaining your Keurig B-77 coffee maker. You can also refer to the warranty section of this guide.
Keurig B-77 Storage Instructions
These are the few Steps you can follow to store your Keurig B-77:
- Turn off and unplug the machine: Ensure the Keurig B-77 is turned off and opened from the electrical outlet. It will prevent potential electrical hazards or damage to the device during storage.
- Empty the water reservoir: Remove the Reservoir from the machine and empty any remaining water. Wash the water Reservoir with clean water and dry it thoroughly before storing it.
- Tidy up the machine: The machine must be cleaned meticulously. Before storing it to ensure that it is in good condition for future use. It can be done by running several water cycles through the machine, cleaning the exterior, and brewing components with a damp cloth.
- Remove any coffee pods: Remove unused coffee pods from the machine to prevent them from becoming stale and potentially clogging the machine.
- Wrap the machine: Consider wrapping it in a cloth or cover to safeguard your Keurig B-77 from dust and debris.
- Choose a storage location: Keep the machine cool and dry, ensuring it is shielded from direct sunlight and any heat-emitting objects.
- By following these steps, you can safely store your Keurig B-77 and ensure it is in good condition for future use.
Limited One-Year Warranty of your Keurig B-77
Keurig® provides a one-year warranty for your Brewer against defects in materials or artistry when used for regular home use. Filling out and returning the enclosed warranty card to store your purchase information is recommended. Keurig will repair or replace the Brewer for free with proof of purchase. If a replacement Brewer is needed, it may be new or reconditioned and will have a new one-year limited warranty. This warranty only applies to Brewers used in the US and Canada. Your legal rights may vary by state or province.
Other Limitations
This warranty takes precedence over all other express warranties, regardless of whether they are written or spoken. Keurig explicitly denies any other warranties associated with your B77 brewer, including any implied warranties of merchantability or fitness for a specific purpose.The extent to which this limitation applies to you may be influenced by the laws of the state or province in which you made the purchase, as some jurisdictions may not permit such disclaimers of implied warranties or limitations on their duration.
How do you Obtain the Warranty Service?
If you encounter any issues with your Keurig Brewer, don’t hesitate to contact Keurig Customer Service at 1.866.901.BREW (2739) for warranty servicing. Only send your Brewer for servicing by obtaining an Authorization to Return (ATR) number from Keurig Customer Service. Please bring an ATR number to ensure your Brewer is returned to you with servicing. Keurig’s high-quality appliances are designed to provide years of satisfactory performance with proper care.
Keurig, Incorporated
55 Walkers Brook Drive
Reading, MA 01867
1.866.901.BREW (2739)
Conclusion
In this guide, I have provided a comprehensive overview of Keurig B–77 use. I am sure you now have no difficulty using your Keurig brewer. If you’re interested in learning more about coffee machines and coffee pods, our website Coffee Aim is a valuable resource that can provide additional information and insights. Now that you understand the Keurig B–77, it’s time to put it to use! Please select your favorite coffee pod, insert it into the Brewer, and let it do its magic. With its advanced features and customizable settings, you’re sure to brew a delicious cup of coffee tailored to your specific tastes. Please proceed to savor your just-prepared cup of coffee. Thank you for reading! I
FAQs
How do I Operate a Keurig Coffee Maker?
Here are the steps to operate a Keurig coffee maker:
- Fill the Reservoir with cold water and place it back on the machine.
- Insert the Keurig machine’s plug into an electrical socket and initiate it by pressing the power button.
- Lift the handle to open the Keurig machine and insert a K-cup into the holder. Ensure that the K-cup is properly seated in the holder.
- Close the handle to puncture the K-cup and secure it in place.
- Position the mug on the drip tray and indicate your desired cup size by pressing the relevant button.
- Wait for the Keurig machine to heat up and brew your coffee.
- Once brewing is complete, remove the mug and dispose of the used K-cup.
How do you Turn on a Keurig B–77?
To turn on a Keurig B-77, follow these steps:
- Connect the Keurig B-77 to a grounded outlet.
- Access the device by initiating it with the power button located on the top right. The button will light up in blue, indicating that the machine is now turned on.
- Allow approximately 4 minutes for the Keurig to heat up. During this time, the heating indicator light will blink, and once the machine is ready to brew, the light will remain steady.
- Lift the front handle of the Keurig and place a K-Cup into the holder.
- Close the holder by lowering the handle, ensuring the K-Cup is punctured.
- Select the cup size you desire by pressing the appropriate button on the control panel.
- The brewing process will begin automatically. After completion, lift the handle again to remove the used K-Cup.
- Congratulations! Your Keurig B-77 is now prepared for use.
Why won’t my Keurig B–77 turn on?
If your Keurig B–77 fails to power on, ensure it is securely plugged into a working outlet. If the outlet is functional, but the machine remains unresponsive, try the following step: unplug the Keurig and leave it disconnected for a couple of minutes before plugging it back in. If the issue persists, refer to the user manual or contact Keurig’s customer support for further guidance.
How do you use a Single-Serve Keurig?
Using a single-serve Keurig coffee maker is a quick and easy process. Here are the general steps to follow:
- Fill the water reservoir: Lift the lid of the Keurig and pour water into the Reservoir. Ensure that the liquid does not go over the maximum fill line.
- Preheat the machine: Switch on the Keurig and give it some time to preheat. Once the machine is preheated, the indicator light will turn solid.
- Insert the K-cup: Lift the handle at the top of the machine and insert the K-cup into the pod holder. Make sure the K-cup is seated correctly in the pod holder.
- Brew your coffee: Choose the desired cup size, and press the appropriate button on the machine to start the brewing process. The coffee will begin to brew and dispense into your cup.
- Remove the K-cup: Once the brewing process is complete, lift the handle and remove the K-cup from the pod holder.
- Discard the used K-cup: Dispose of the used K-cup in a waste bin.
- Enjoy your coffee: Add any desired cream or sugar to your coffee, and enjoy!