Quick Navigation
Hy, coffee lover!
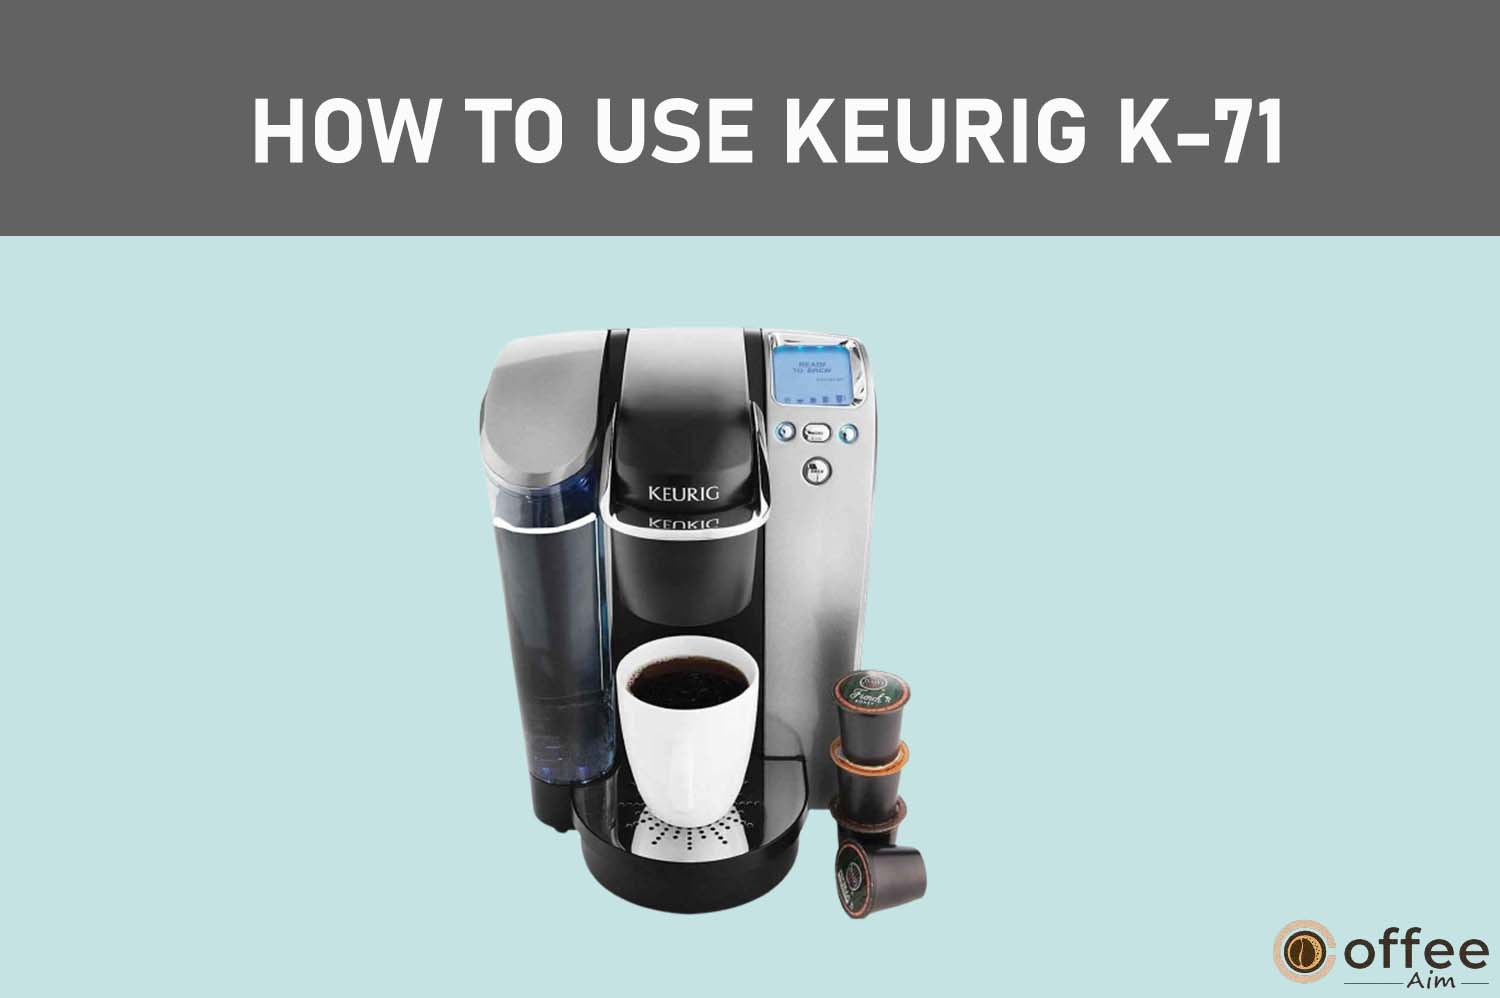
The help is here! Have you recently bought your Keurig K-71 because you find it easy to use? But now the problem is “How to use Keurig K-71”. No problem! Here I have bought for you an amazing and easy-to-understand guide, and after reading this guide, operating your brewer will no longer remain a hard nut to crack. So, let’s begin!
Wait! What? You have a long-time companionship with your Keurig K-71, but now it has refused to work for you. You must have misbehaved with it. LOL! No worries, as here you will learn how to handle the mood swings of your beloved coffee maker. So, let’s start this journey!
Precautions Of Keurig K-71
Every coffee machine has its own set of safety measures you should take before using it; the Keurig K-71 is no exception. Your negligence can lead to severe outcomes such as fire eruption, physical injury, etc. Therefore, better is to first overview the safety precautions of Keurig K-71 before heading towards its use. By following these simple precautions, you can ensure the safe and effective use of your Keurig K-71 coffee maker for years to come.
Specifications Of Keurig K-71
It’s time to overview the amazing specifications of your Keurig K-71. What?? Have you known these specifications? However, it’s better to have a detailed overview of your Keurig K-71 so that you don’t miss any of them. And if you feel that any of these specifications are not a good match for you or your home, then it is better to return your brewer before using it. So, let’s start it!
| Product Line/System | Keurig 1.0 Platinum |
| K-Cup Compatibility | Unlicensed K-Cups, Keurig 2.0 licensed K-Cups, and ground coffee with the My K-Cup |
| Brew Sizes | 4 oz, 6 oz, 8 oz, 10 oz, 12 oz |
| Water Reservoir | 72 oz |
| Water Filter | Compatible but not included |
| Display | Blue backlit LCD with Brew button |
| Temp Control | Yes |
| Strength Control | No |
| Dimensions | 10.3″ W x 13.8″D x 13.0″H |
| Weight | 12.0 lbs |
| Other Features | Quiet Brew TechnologyAuto-On/Off24-hour digital clock Programmable favoritesRemovable drip tray |
What Will You Find In Keurig K-71 Box?
Do you know what will be present inside your Keurig K-71 box? No? Whenever you purchase Keurig K-71 from any online store such as Amazon, it comes with some mandatory items. Keep in mind if any item of them is missing, then contact the seller and ask for a replacement brewer. Let’s check out the items that must be present in your box!
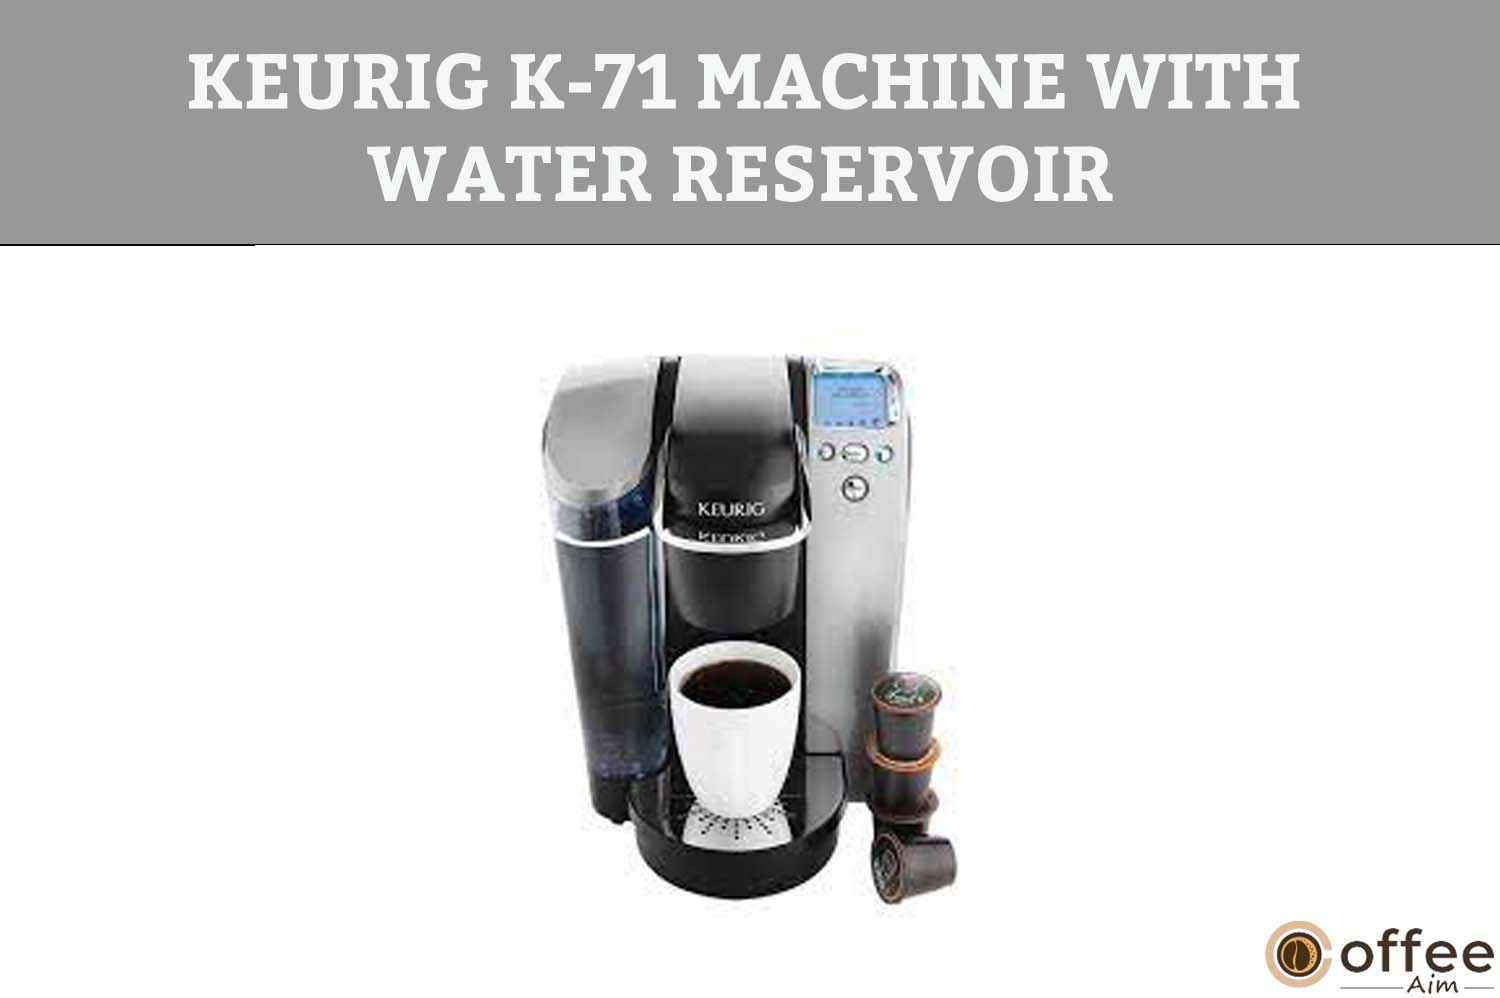
Keurig K-71 Machine With Water Reservoir
The main part of your parcel is the “Keurig K-71 machine”. Now, set it in your kitchen and prepare your favorite coffee with this amazing appliance.
“Finding Your Taste” Booklet
It is basically an instructional booklet that contains information about the different available K-cups in the market. So, you can brew anything like tea, hot cocoa, and more according to your taste.

A Setup Guide
This manual will guide you on how to unpack and install your Keurig K-71 machine. Always follow the instructions in the manual; otherwise, you may damage any part.

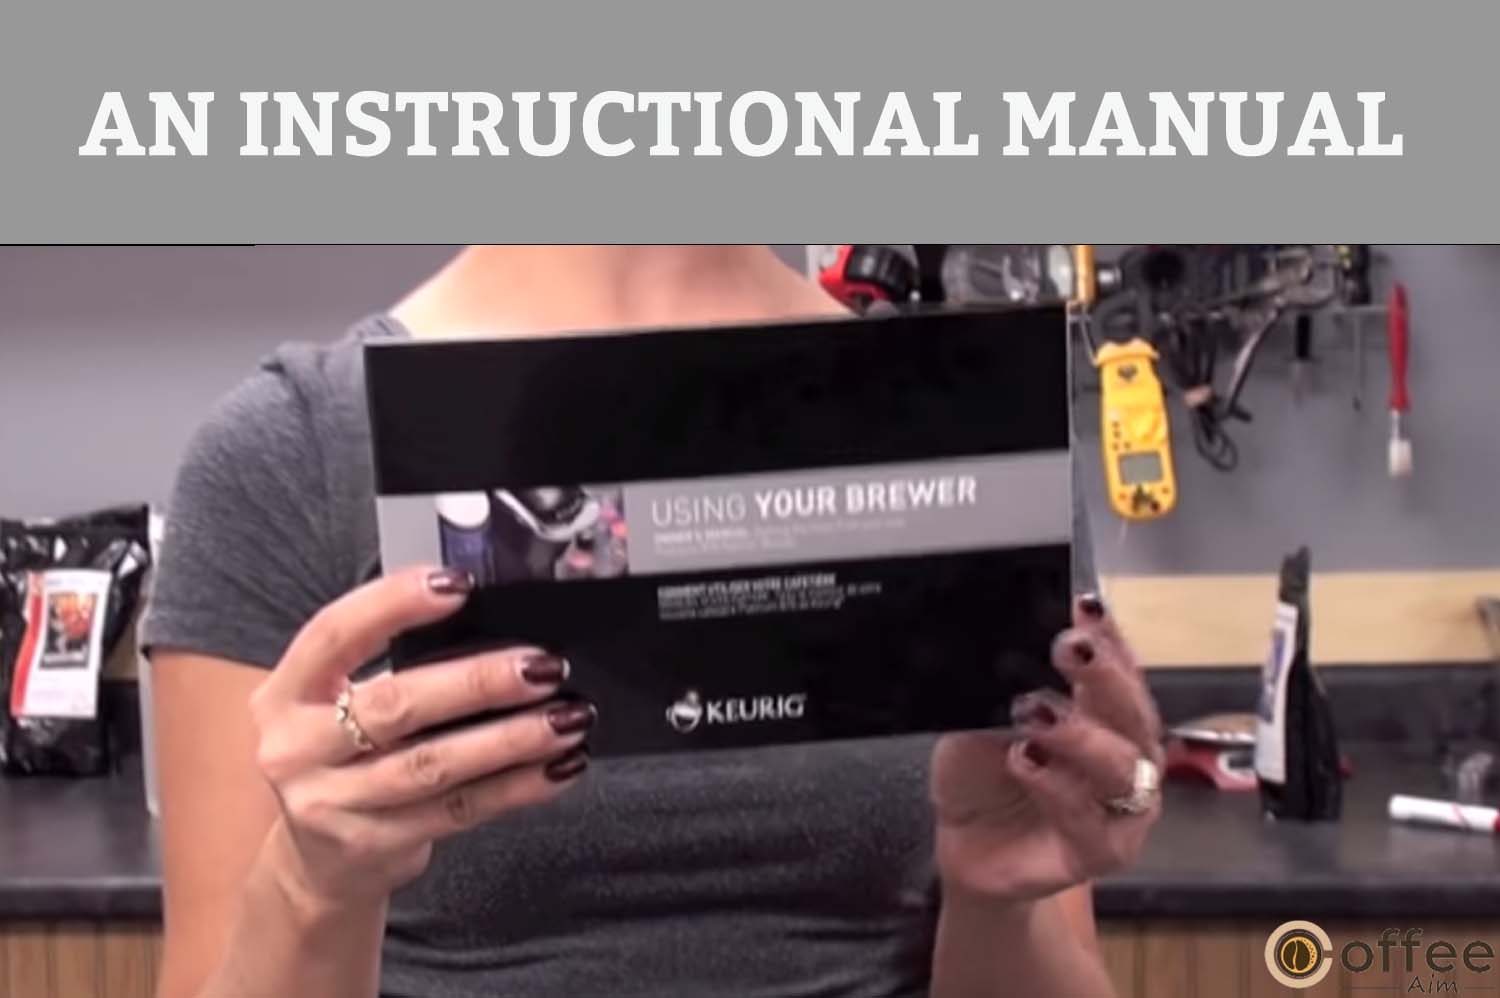
An Instructional Manual
In this manual, you will find a detailed description of all its parts, their use, and different programming setups.
A K-Cup Pack
Here you will get a pack of different flavored K-Cups as a gift. Brew the k-cup pod of your choice and enjoy!
Unboxing Instructions
Unboxing any device or appliance is a big challenge. I know you are mad about coffee, so it is necessary to unbox your coffee maker carefully. Here I am giving tips for unboxing your product so that it may be safe. Follow the following:
- Position the Brewer box on a sizable, stable surface (such as a table or countertop) or the ground. Open the box.
- Remove the literature inside.
- Position the box so the front faces downward.
- Reach into the box and take Brewer’s plastic bag in your hands.
- Pull the plastic bag from the box by pulling it towards you. The Brewer will remain on its side and enclosed in the polyfoam.
- Remove the top layer of the polyfoam packing.
- Gently remove Brewer from the polyfoam at the bottom and set it upright on a stable, flat surface.
- Remove the plastic bag from the Brewer.
- Note Brewer’s serial number that can be seen on Brewer’s box bottom or on the Brewer itself, behind the Drip Tray (when removed).
- Set the Brewer horizontally on a stable, flat surface. You should remove Water Reservoir’s mounting tape.
I advise keeping all packaging material if further product shipping is required.
WARNING: Keep all plastic bags away from children.
Parts Of Keurig K-71
One step ahead! It’s time to know about the parts. I know it is exciting for a buyer to know about each part of the appliance before using it. Go forward and learn about your Keurig K-71 coffee maker in detail!
1. Water Reservoir Lid
It is the cover of the water reservoir that safe the water present inside the reservoir from dust and also prevents splashing while your machine is operating.

2. Easy-Fill Lid
It allows for convenient refilling of the water reservoir without removing it from the machine. You can flip/lift half part of the lid to pour water into the reservoir.

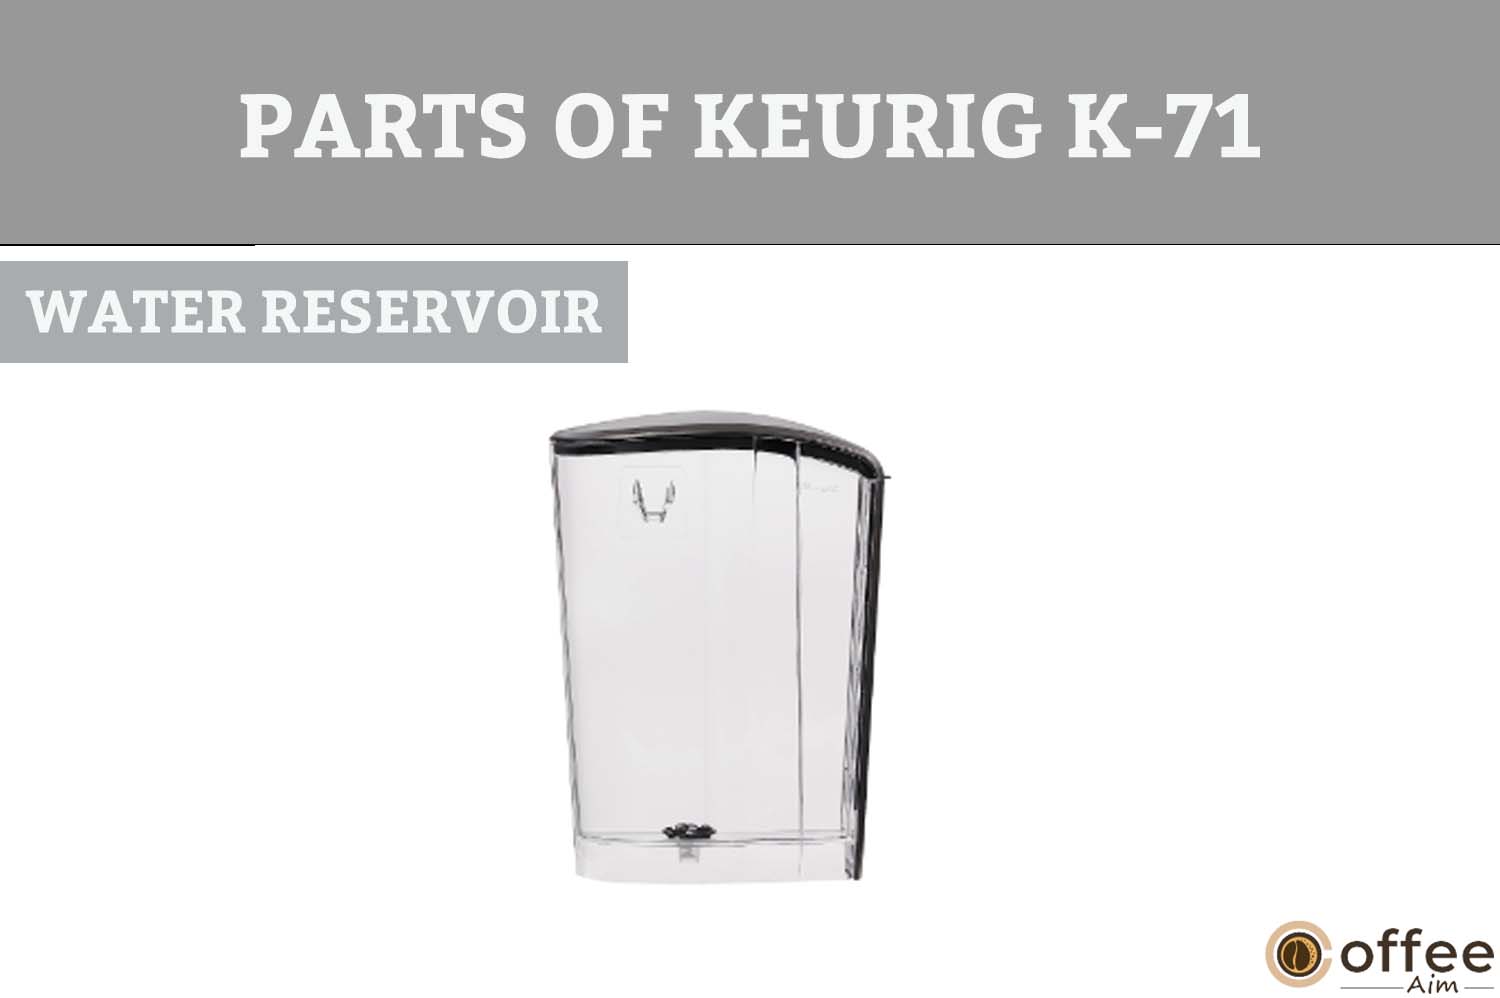
3. Water Reservoir
It holds water for brewing and has a MAX FILL line on it which make it possible to avoid overfilling. The capacity of the water reservoir is 72 oz.
4. Lock Tab Slot

This slot is present on the brewer where the water reservoir will attach. It secures the water reservoir in place and prevents it from moving.
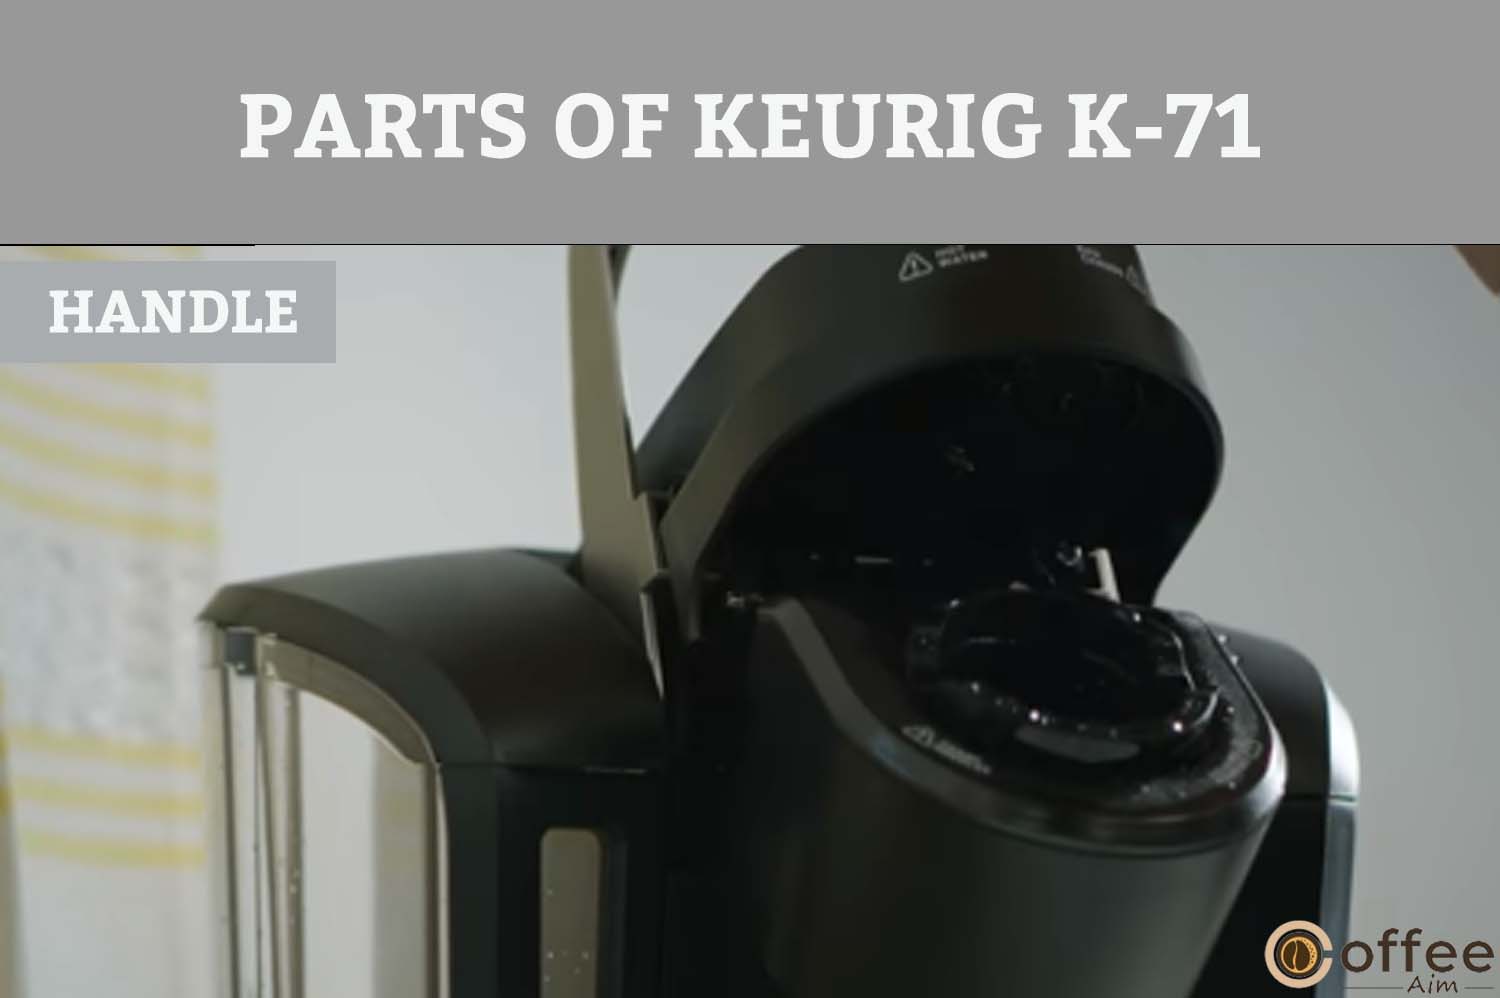
5. Handle
The handle has two functions; one is to carry the brewer, and the second is to reach the pod holder. You just have to hold the handle and lift it up to open the pod holder.
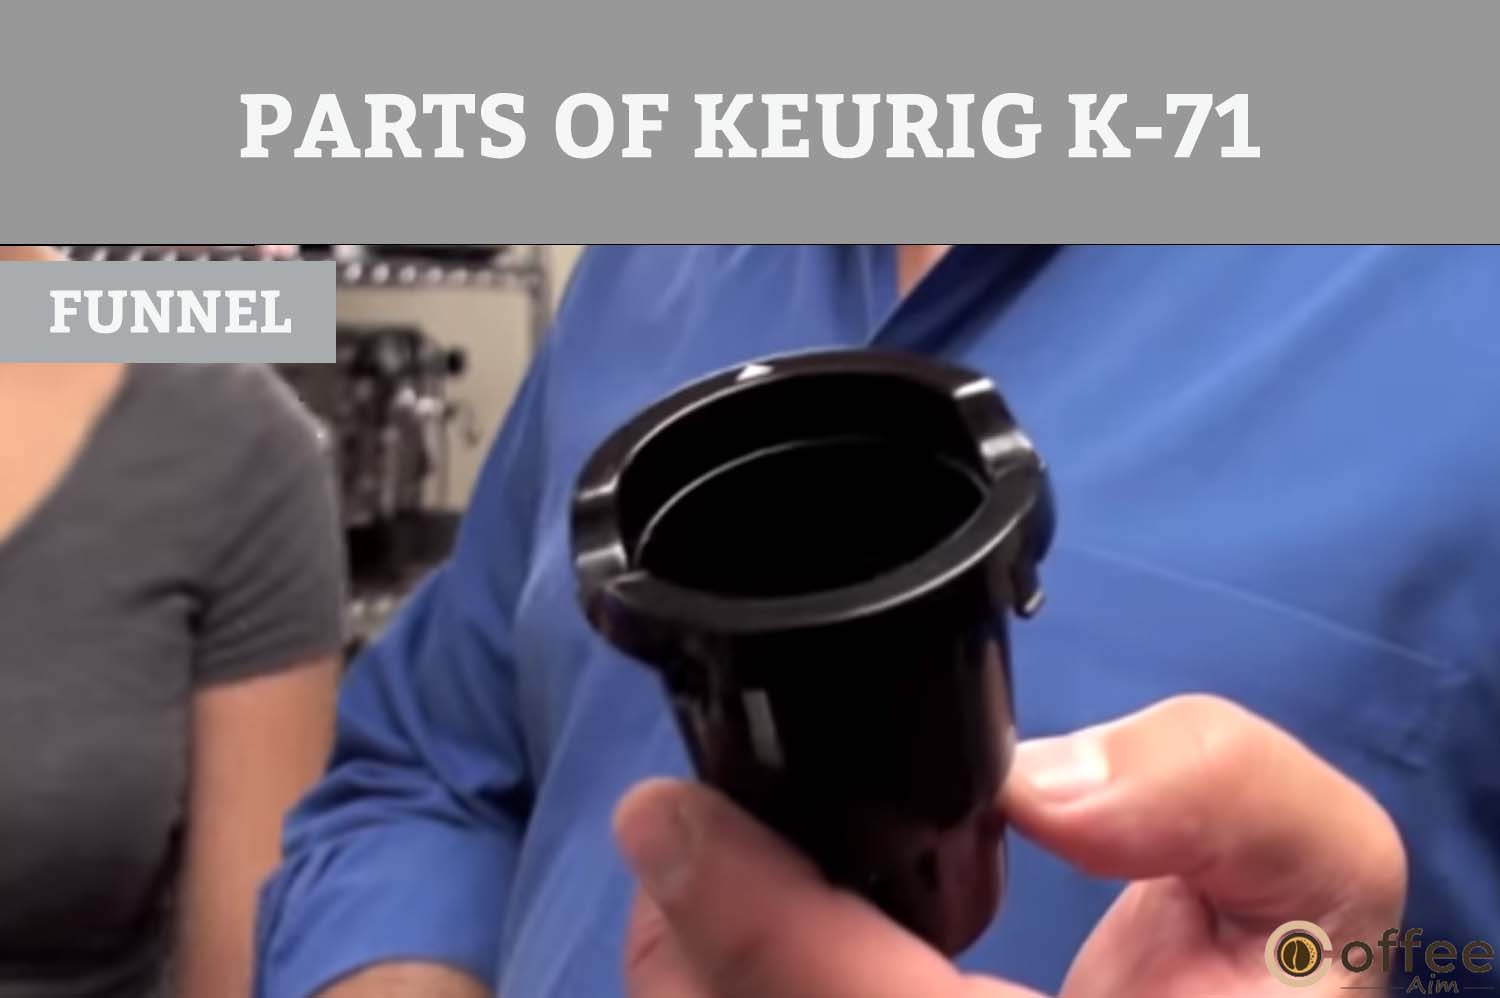
6. Funnel
It guides brewed coffee from the pod holder to the coffee spout and finally into your mug.
7. K-Cup Portion Pack Holder
It holds the K-Cup portion pack during brewing.

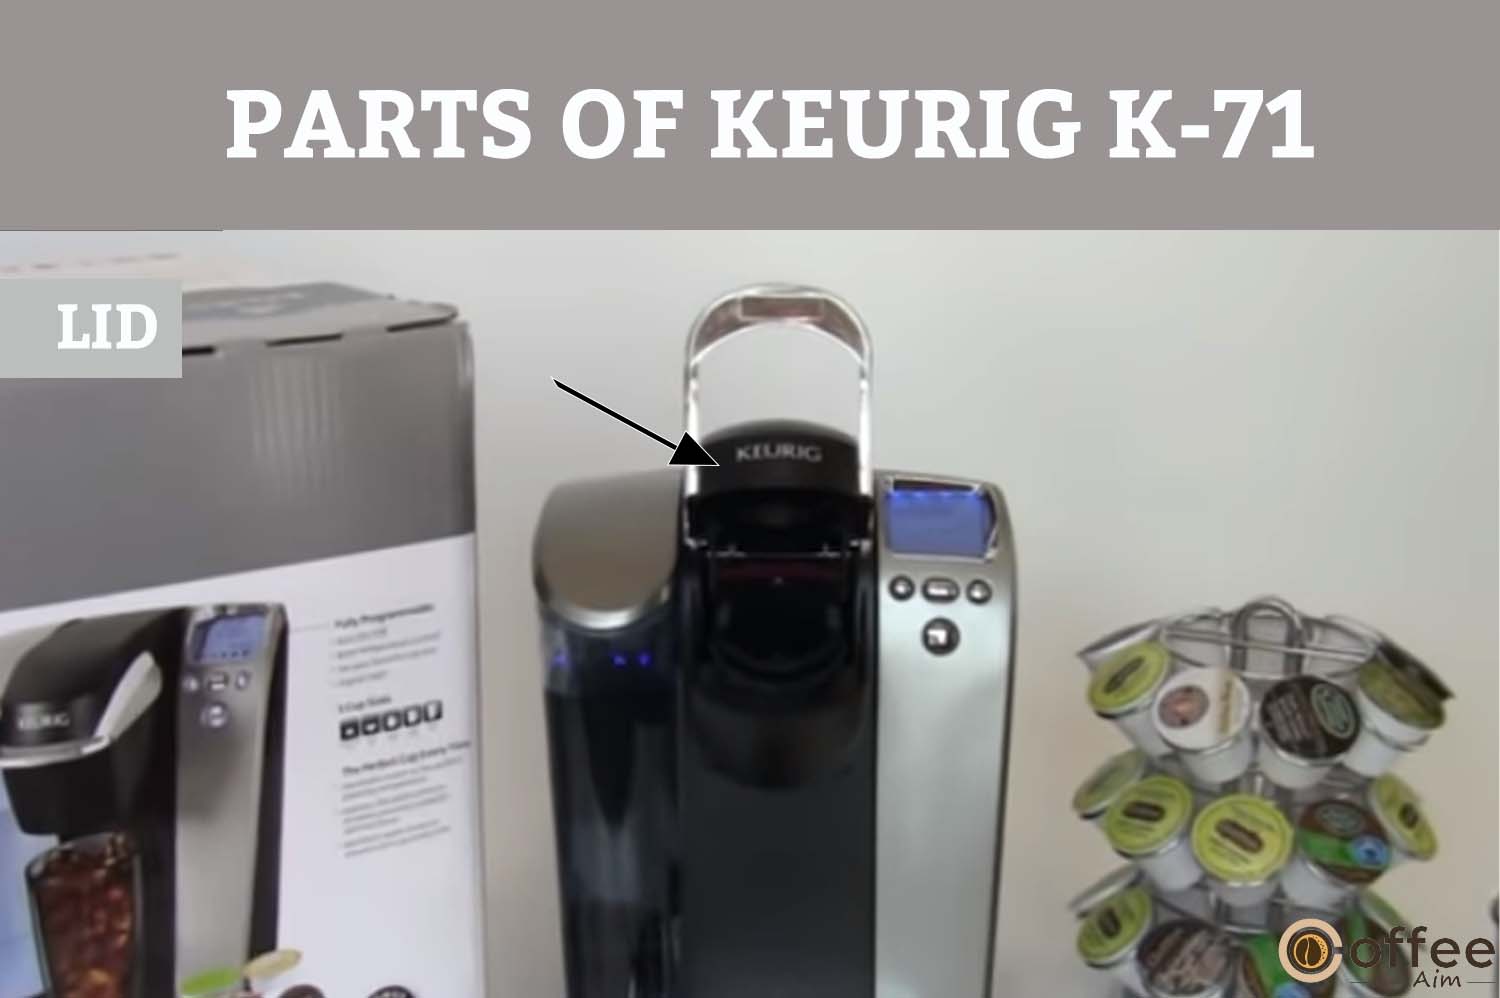
8. Lid
It is present above the K-Cup pod holder assembly to protect it from dust.
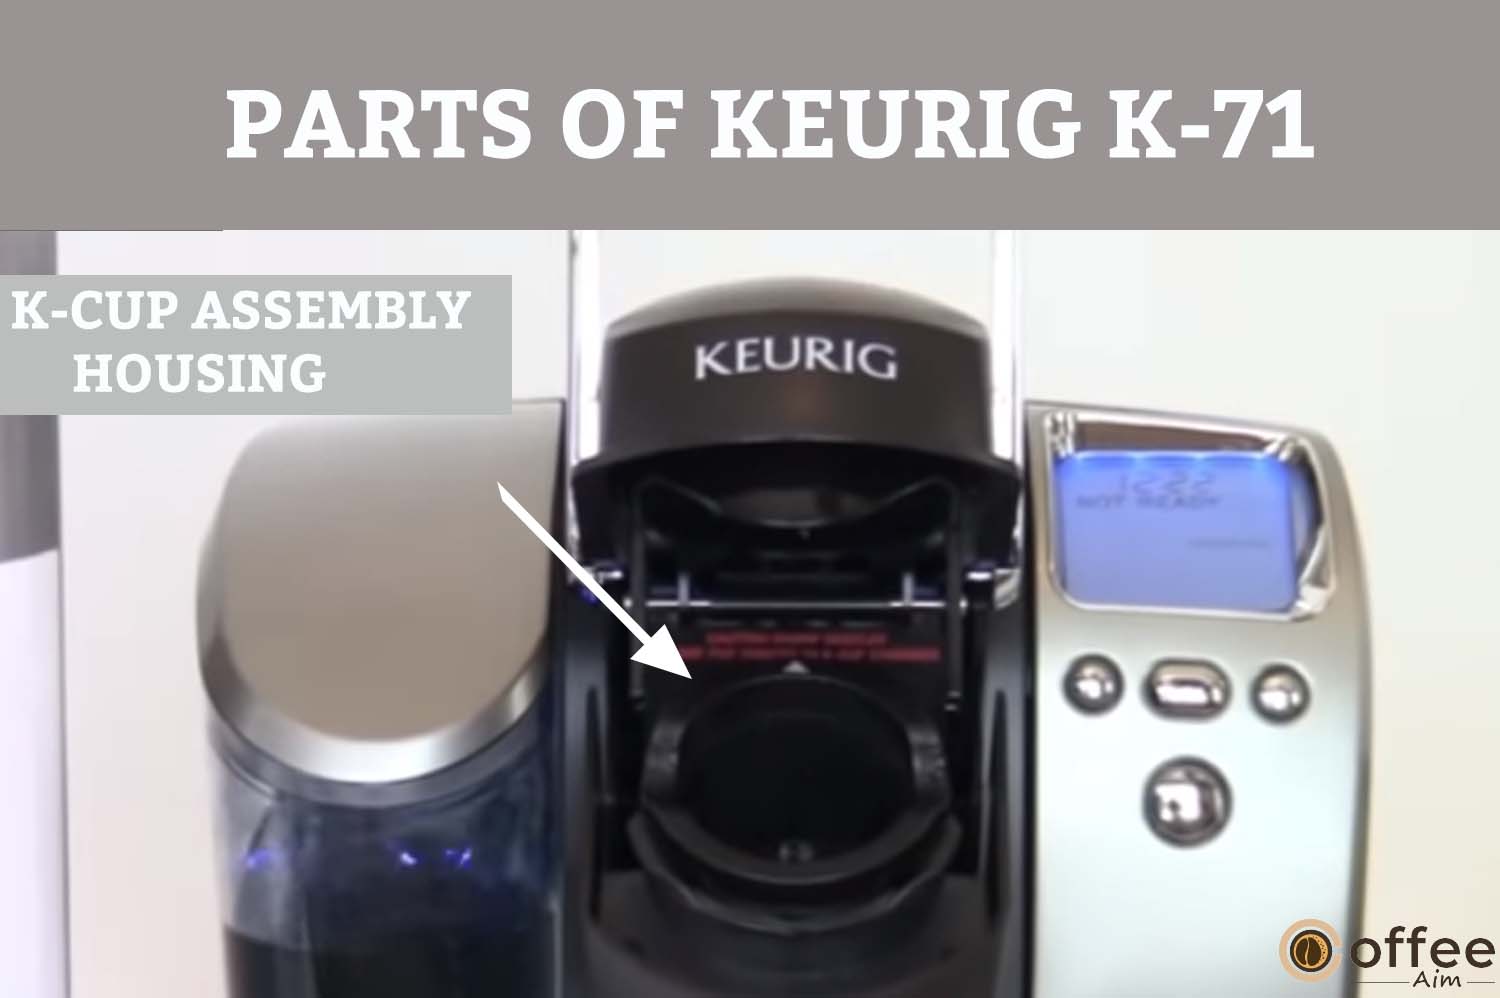
9. K-Cup Portion Pack Assembly Housing
The pod holder and the funnel are collectively known as the K-Cup pod holder assembly. The K-Cup portion pack assembly housing is the compartment of your brewer where the -Cup pod holder assembly is adjusted.
10. Housing

It encloses the internal components of the machine.
11. Drip Tray Plate
This plate is present on the drip tray. Its function is to cover the drip tray, hold the coffee cup, and also catch the coffee/hot water spills during brewing. The drip tray plate is removable and easy to clean.

12. Drip Tray
It is present at the bottom of your brewer. It is a container that holds the excess water and coffee spills. The drip tray plate can hold up to 12 oz of liquid. It is also removable.
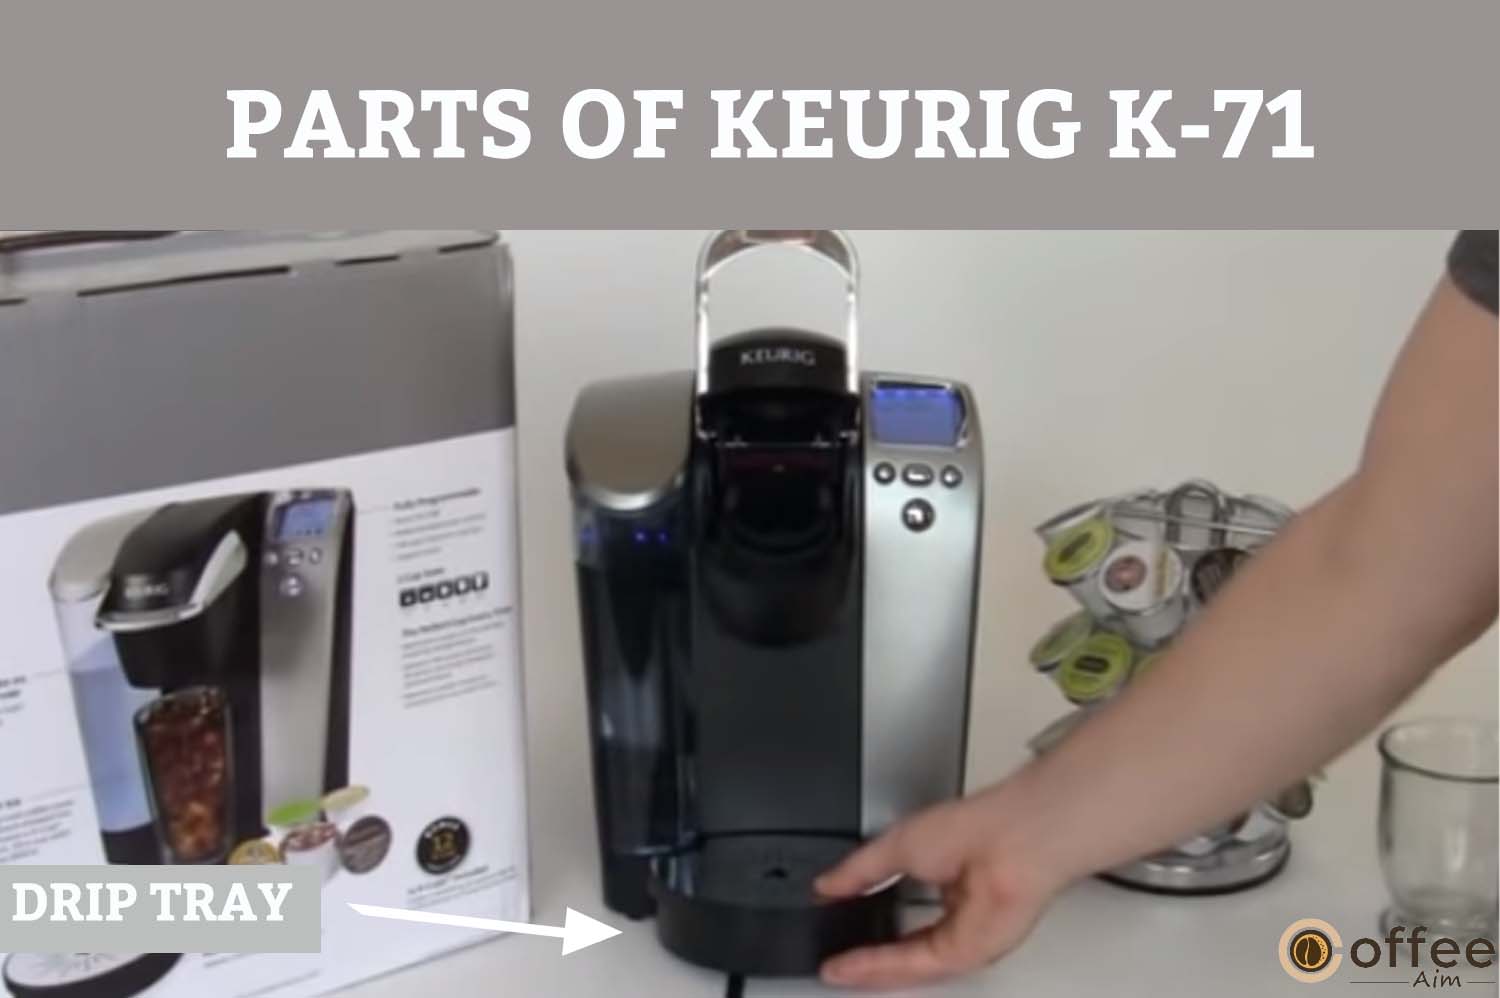
13. Drip Tray Base
The drip tray base is present below the drip tray. Its function is to accommodate the tall/large mug, such as the travel mug. So, if you want to dispense your coffee in a travel mug, then remove the drip tray and place it directly on the drip tray base.

14. Vent

It releases hot air during brewing to manage the temperature of the brewer and prevent overheating.
15. Power Cord
The wire that is attached to your brewer and its function is to supply electricity to the machine after plugging in an outlet.

16. Power Switch

This switch is located on the rear right side of your brewer. It used to turn the machine on and off.
Controls And Indicators
Want to communicate with your Keurig K-71? Let’s learn the language of control and indicators. The Keurig K-71’s controls & indicators make it easy to use and change the brewing settings. The indicators tell you valuable things, like how much water is in the tank and what maintenance is needed. To get the most out of the machine, you must understand both. Let’s start!
1. LCD Control Center
The screen where all the messages and settings options will be displayed.

2. Left Button
This button allows you to traverse the LCD menu and select different choices. This button is also used to decrease the temperature in the “temperature setting.”

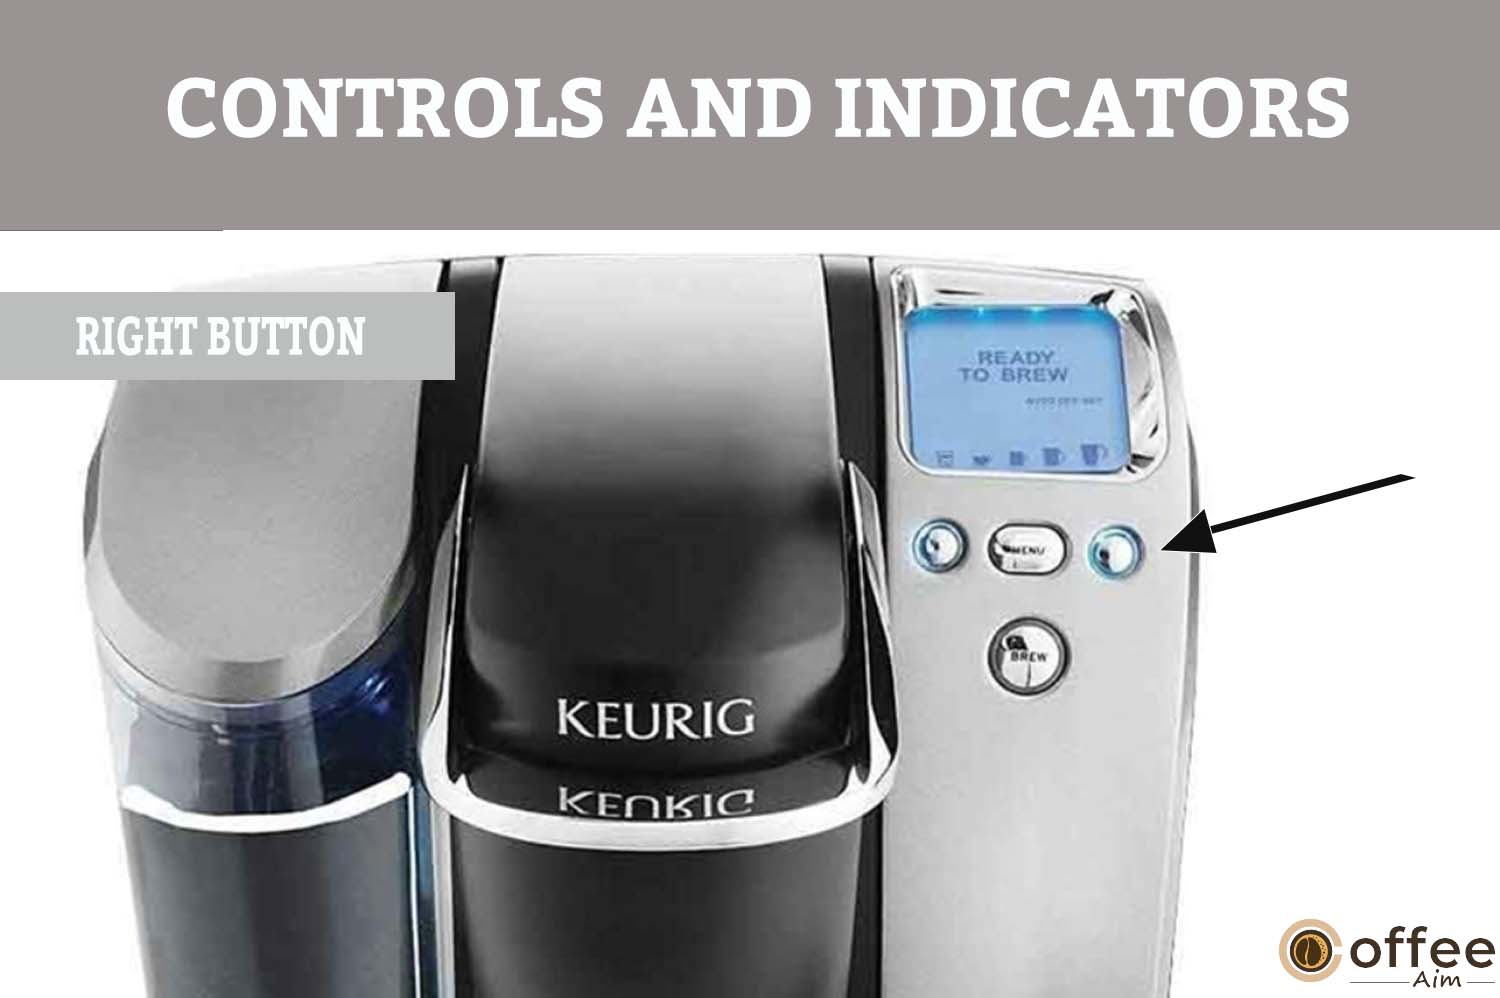
3. Right Button
The choices on the LCD menu can be navigated through the selected options. This button is also used to decrease the temperature in the “temperature setting.”
4. MENU Button
The button present between the right and left buttons is called the “Menu button” Pressing this button lets you enter the LCD menu and change the settings. Press this button to move from one option to other on the screen.

5. BREW Button
Press this button to begin the brewing process and savor your perfect cup of coffee.

Helpful Hints For SET UP Of Your Keurig K-71
Finally! It’s time to set up your Keurig K-71 in the kitchen. Can’t wait? Let’s start it!
But before that, keep one thing in mind read all the safety precautions first and follow the instructions mentioned below to avoid any mishap.
Connect The Brewer On Separate Electrical Circuits.
Your brewer might not work correctly if the electrical circuit is overloaded with other appliances. The Brewer needs to be run on a separate course from other machines.
Keep Your Brewer Switched On.
Keep your brewer turned “on” at all times if you want to brew a fresh cup of coffee, tea, or hot cocoa whenever you desire, anytime without delay. The brewer may, however, be fully programmed to switch on and off automatically following your schedule. Instead, if you’d rather, set the brewer to shut off automatically after a certain period.
Keurig Recommends Using Bottled Or Filtered For The Best-tasting Gourmet Coffee, Tea, Or Hot Cocoa.
Every region has a different quality of water that contains different ratios of mineral content, such as calcium and magnesium. These minerals can build up inside your appliance and interrupt its working abilities. So, consider utilizing bottled or filtered water.
Find The Perfect Size, Flavor, And Brew For Yourself.
Your Keurig Brewer gives you countless possibilities to prepare the size, taste, and brew that’s ideal for you, with a selection of over 200 different K-Cup portion packs and 5 brew sizes;
- Extra-Small Cup-3.25 oz.
- Small Cup-5.25 oz.
- Small Mug-7.25 oz.
- Large Mug-9.25 oz.
- Travel Mug-11.25 oz.
Choose an Extra Bold K-Cup (up to 30% more ground coffee than ordinary) and brew it in the appropriate size for a full, robust cup. The flavor in your mug will be stronger the more negligible the brew size. The flavor intensity in your cup decreases as the brew size increases.
Remove The K-Cup Portion Pack After Use.
After brewing, remove the K-Cup portion pack from the pod holder.
Brewing In A Travel Mug.
Remove the drip tray assembly to brew in a travel mug and set the cup on the drip tray base.
Regularly Descale Your Brewer.
Mineral quantity in water varies in different regions. Scale or calcium deposits may accumulate in your brewer, depending on the mineral concentration of the water in your area. Although the scale is non-toxic, if it is not removed, it can affect the brewer’s efficiency. Your brewer’s heating element and other internal components that come into contact with water can be maintained by de-scaling it.
The Brewer should be descaled every three to six months to maintain peak results.
How To Use Keurig K-71 For First Time & After A Long Period Of Non-Use
Wait is over! Time to start your Keurig K-71 and brew a delicious cup of coffee for you and enjoy. So, without any further delay, let’s start the process!
Note: You can’t operate your Keurig K-71 before setting it up properly.
Important: If you are using your brewer after it has been stored at a temperature below freezing, then allow your brewer at least 2 hours to reach room temperature before operating it. An extremely cold or frozen brewer will not work.
1. Unwrap Brewer’s cord and insert it into a grounded outlet. Take off the clear plastic sticker and all bits of packing tape from the LCD.

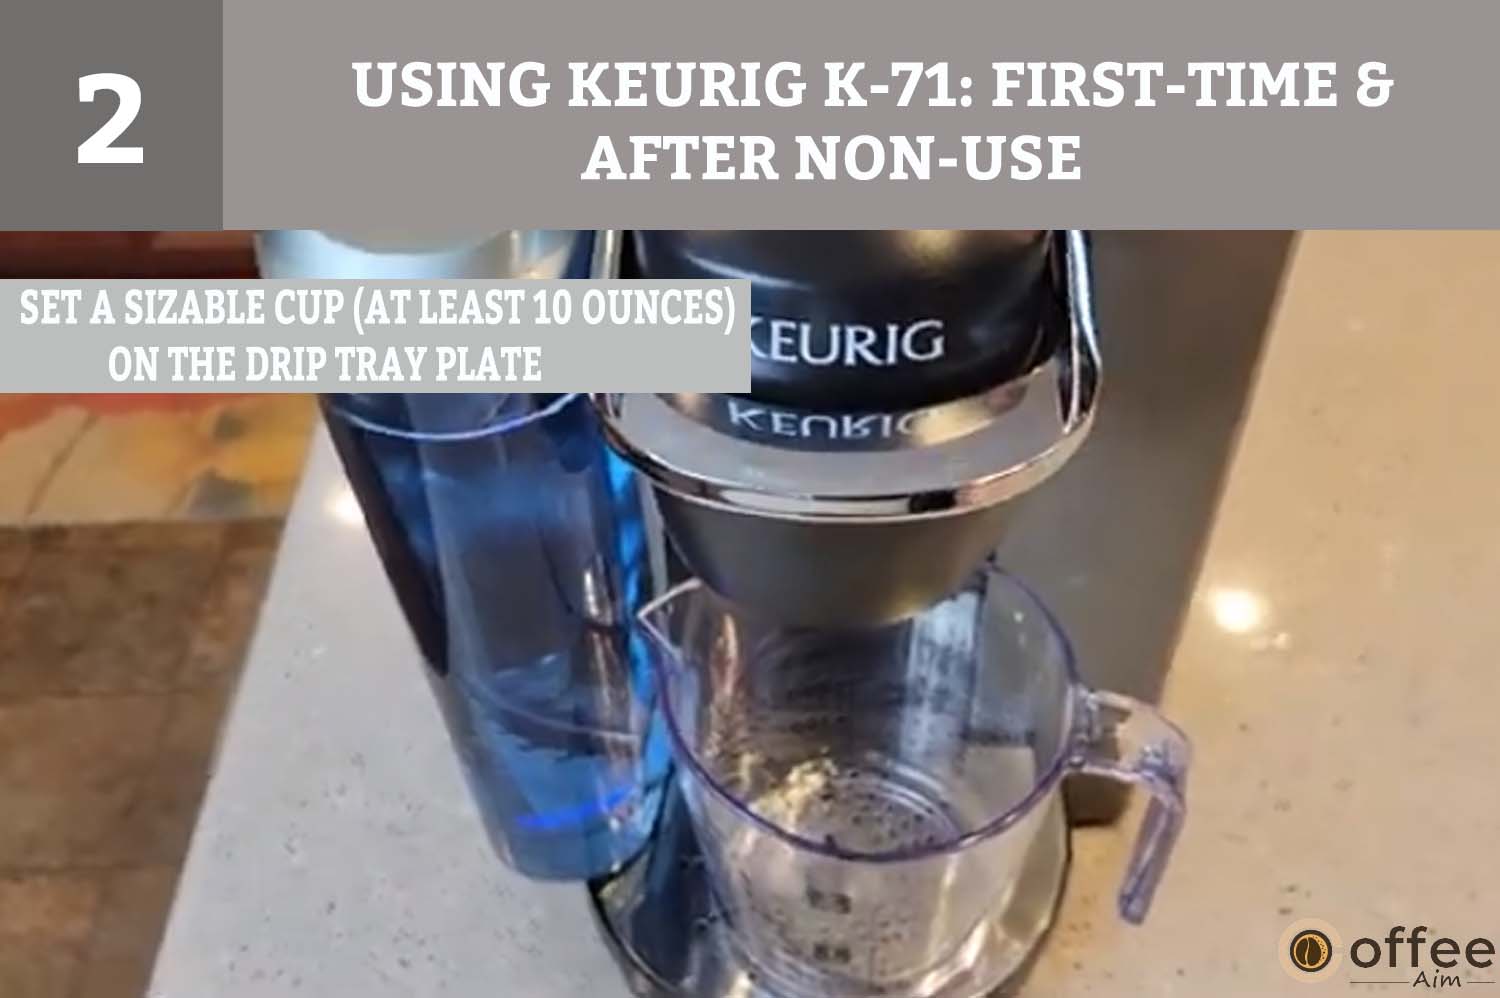
2. Set a sizable cup (at least 10 ounces) on the drip tray plate.
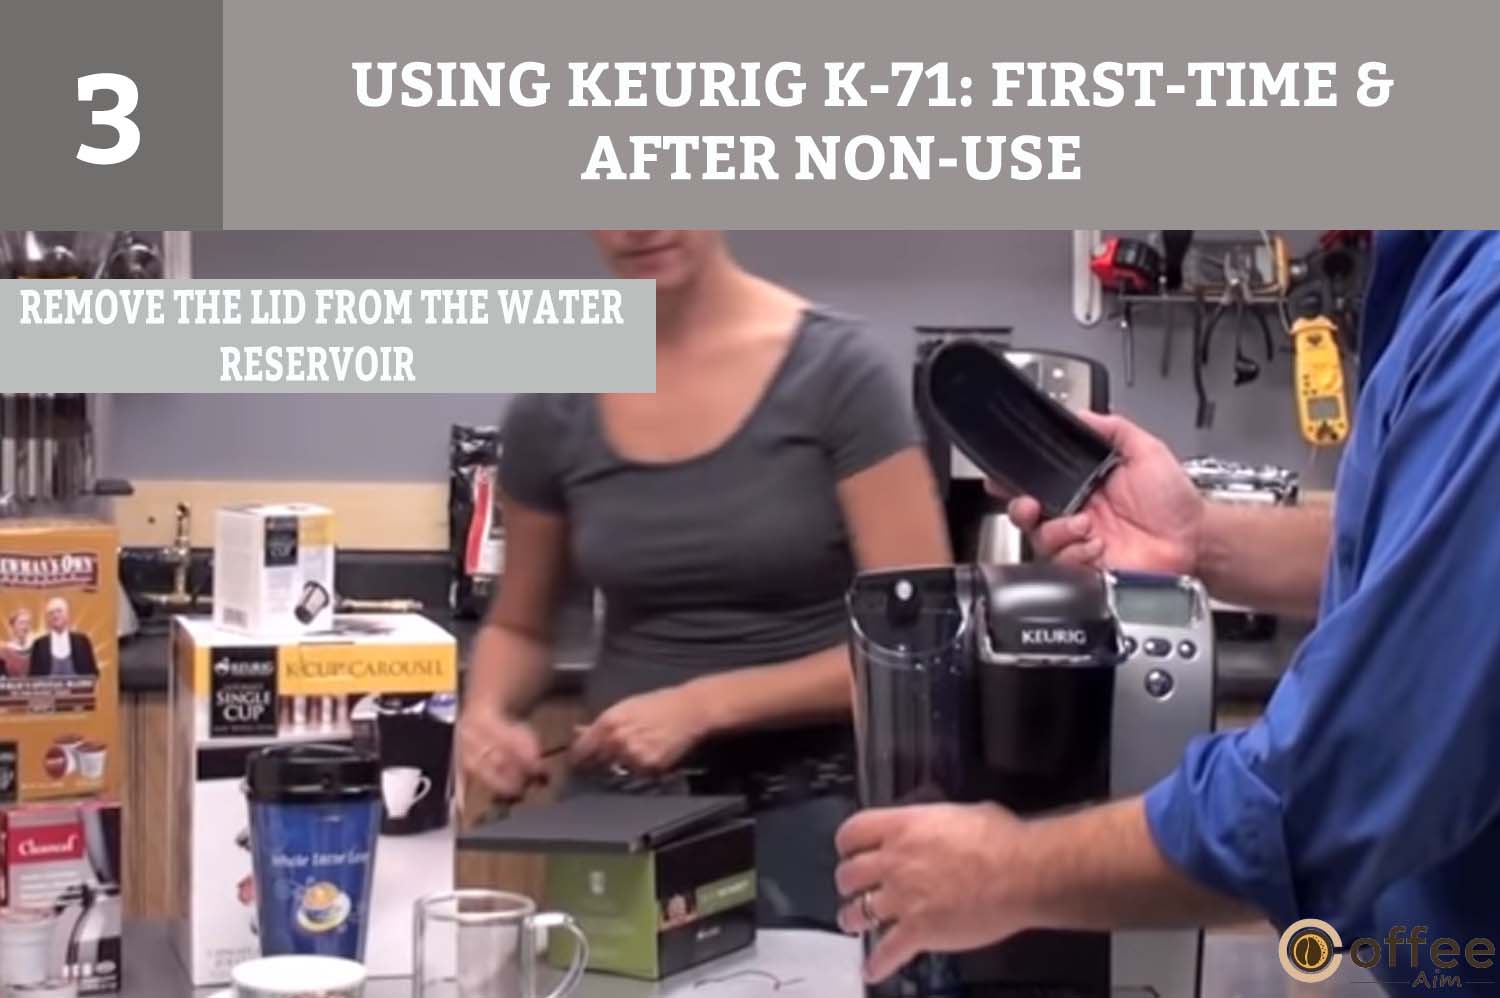
3. First, remove the lid from the water reservoir.
4. To remove the water reservoir from the brewer, open the lid, then lift it straight up and in front of the brewer (it might be tight). Use fresh water to rinse.

5. Pour bottled or filtered water into the Water Reservoir until the water level is slightly below the top edge of the reservoir.

- Make sure the Water Reservoir Lock Tab is in contact with the Brewer before inserting the Water Reservoir base into the left side of the Brewer. Change the lid on the water reservoir.
NOTE: Please ensure that the Water Reservoir is properly seated, with the back of the Water Reservoir flush with the Brewer.
7. Press and release the Power Switch present at the rear right side of your Brewer. The switch is spring-loaded and will return to its original position.
8. The Blue LCD Control Center will indicate “NOT READY” after switching it on.

9. The Brewer will automatically fill the internal tank with water before heating it. This will take approximately 4 minutes.
During the heating process, the LCD Control Center will display “NOT READY.”
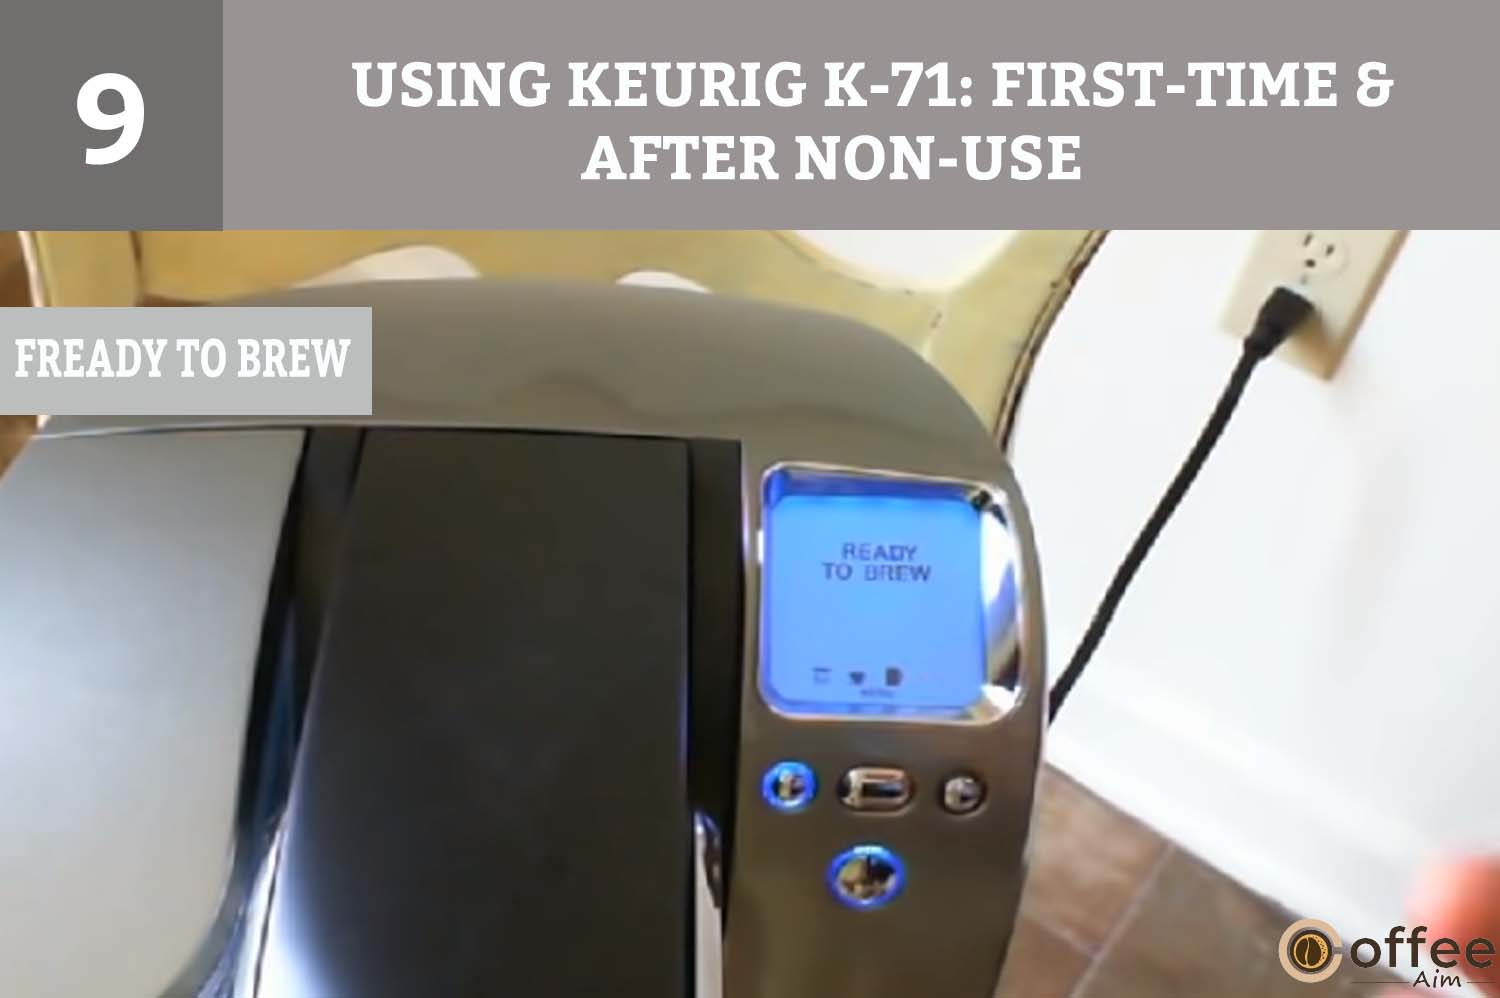
The message “READY TO BREW” appears when the water is heated, and the BREW Button will illuminate. Now, place a container on the drip tray plate.
Note: During this ‘heating period,’ do not lift the Brewer Handle as there presents extremely hot water.
NOTE: During this and subsequent heating, you may notice small amounts of water coming from the Vent and dripping into the Water Reservoir. —this is normal.
10. Move the Handle up and down. Press the flashing BREW Button to start a cleansing brew without a K-Cup. Pour the hot content from the container into the sink.

NOTE: You should not perform this sequence with a K-Cup.
11. The initial setup is complete, and you are ready to brew!

NOTE: The Brewer may take 15-30 seconds between brews before displaying “READY TO BREW.”
Ready To Brew Your First Cup
The best part has arrived! I can smell the sweet odor of freshly brewed coffee. I can’t wait for it. So, let’s start! Brewing coffee with your Keurig K-71 is quick and straightforward and allows you to enjoy your favorite coffee flavor anytime. Here’s how to do it!
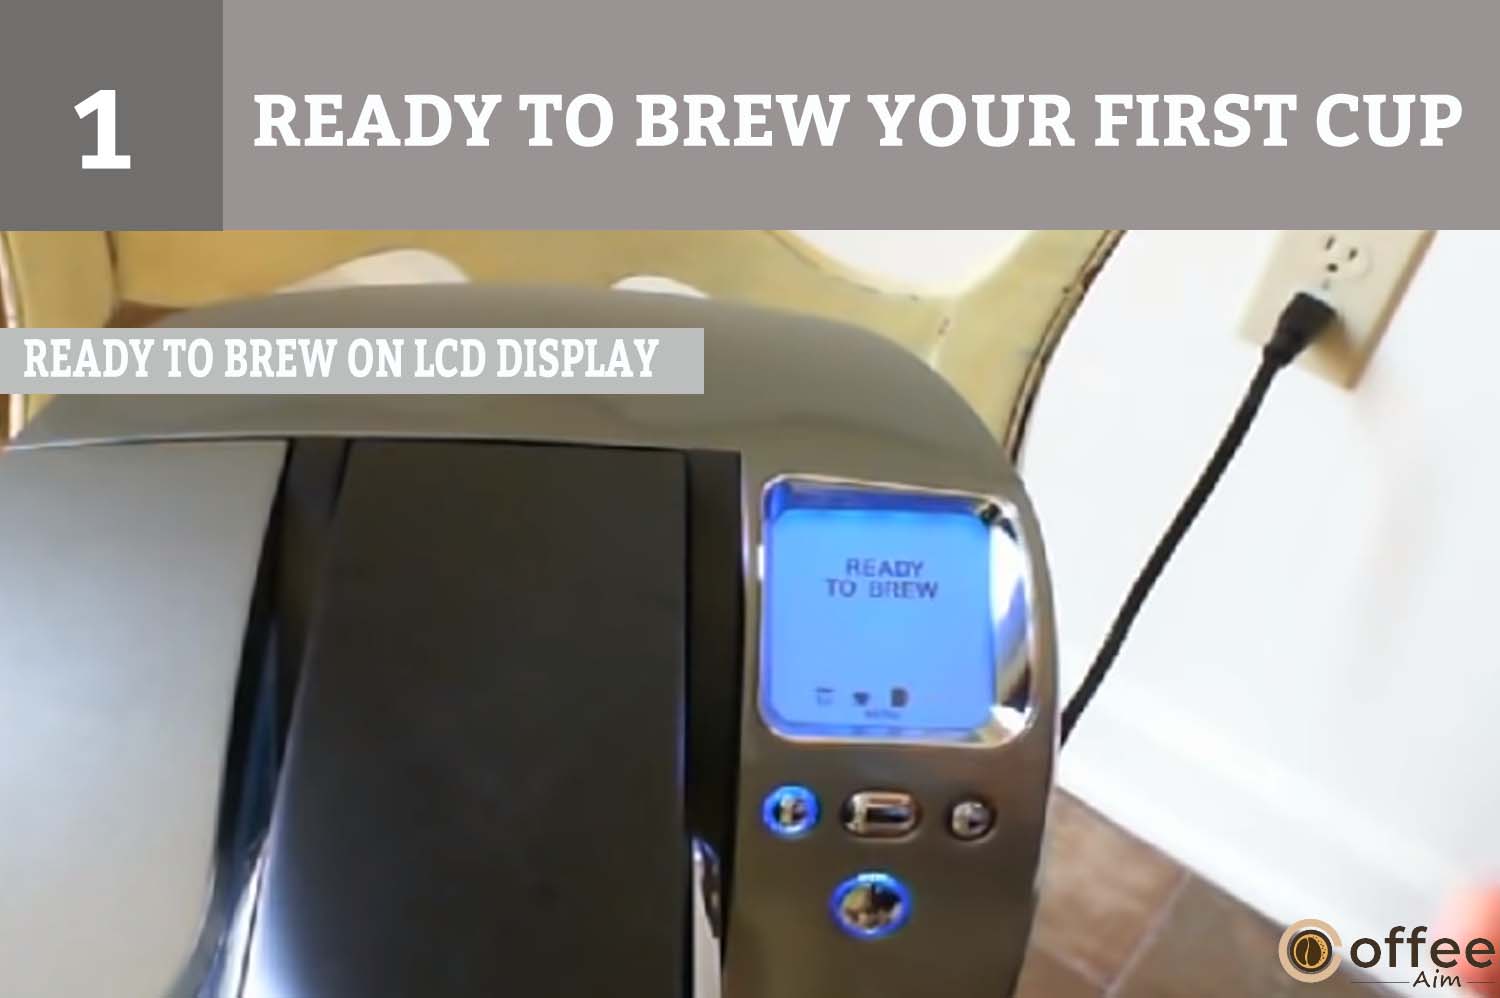
1. “READY TO BREW” will display on the LCD Control Center of your brewer.
2. Set a cup or mug on the Drip Tray Plate.

3. When you lift the Handle, the K-Cup Holder will open towards you.

4. Choose a K-Cup portion pack.
NOTE: Do not attempt to remove the foil lid or puncture the K-Cup.

5. Insert a portion pack of K-Cup into the K-Cup Holder.

WARNING: The K-Cup is punctured by two sharp needles, one above the K-Cup Holder and the other at its base. Do not stick your fingers into the K-Cup Assembly Housing to reduce the risk of injury.
6. Drop the handle to cover the K-Cup Holder with the lid. (The LCD Control Center will display “READY TO BREW” when fully closed. The BREW Button will flash for up to 60 seconds while the Left and Right Buttons are illuminated.)

REMINDER: The Small Mug is the pre-programmed setting for brewing.
- All brew size icons are illuminated with the flashing default size. Use the Left Button to go up in size or the Right Button to go down in size to select a different size.
- A more vital Extra-Small Cup (3.25 oz. serving), Small Cup (5.25 oz. serving), Small Mug (7.25 oz. serving), Large Mug (9.25 oz. serving), or Travel Mug (11.25 oz. serving) are your options.
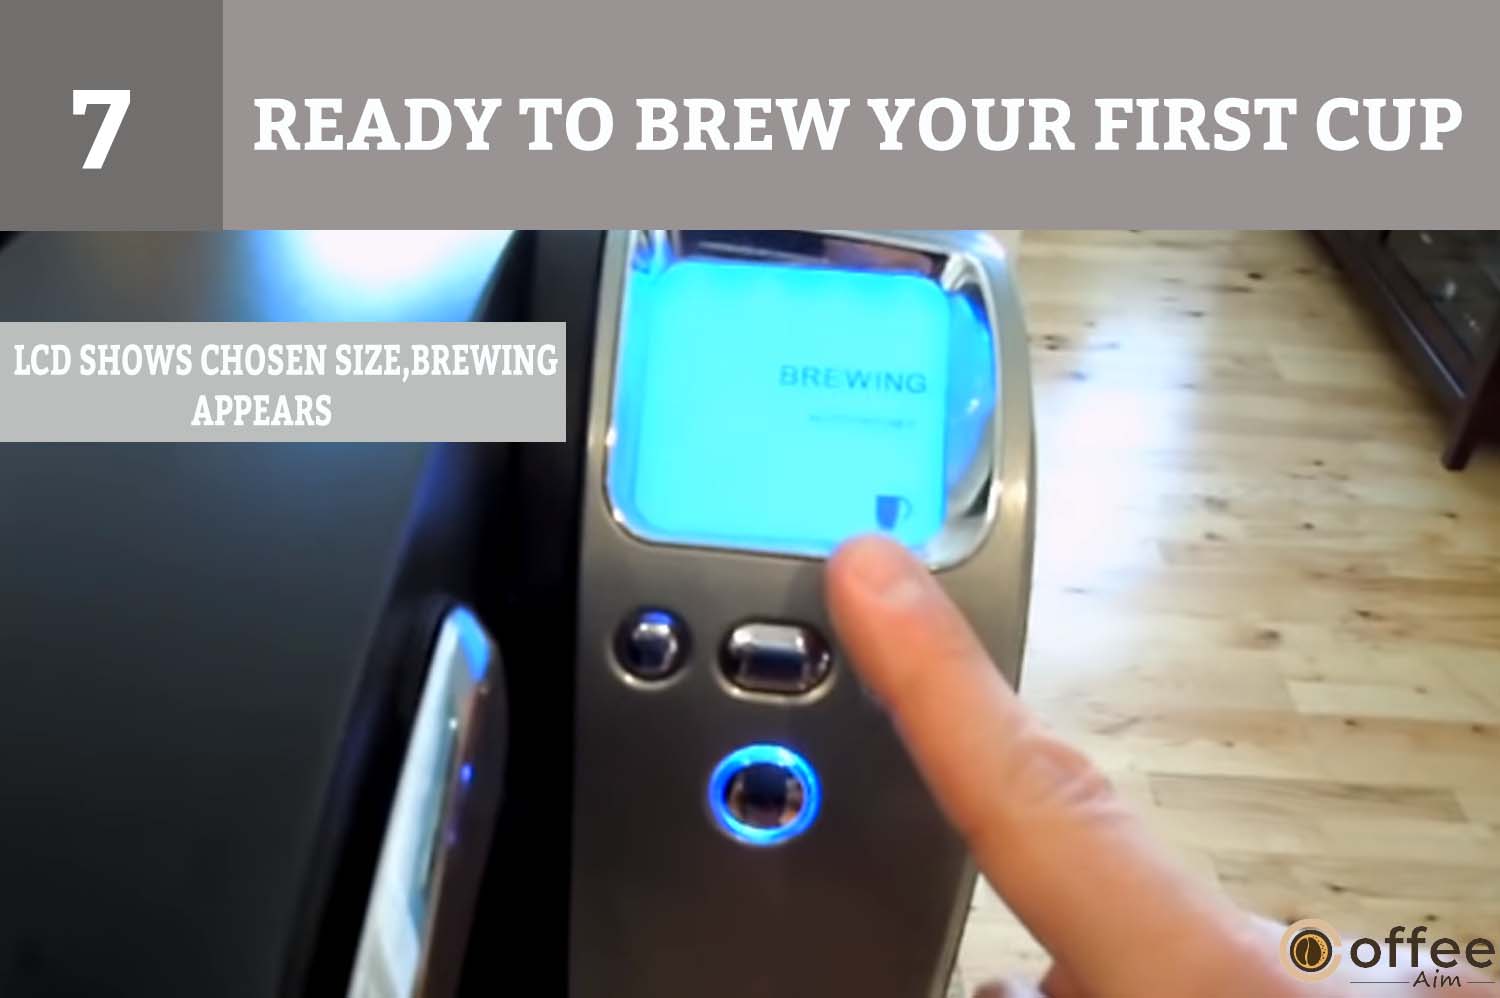
3. After selecting the size, press the BREW button. The BREW Button will stop blinking, the Left and Right Buttons won’t light up anymore, and the icon for the brew size will come on.
7. The serving size you chose will now be illuminated on the LCD, and the phrase “BREWING” will appear in the LCD Control Center.
WARNING: While the K-Cup Holder is brewing, boiling water is present. Lifting the Handle or opening the K-Cup Assembly Housing while the machine is brewing poses a danger of injury.
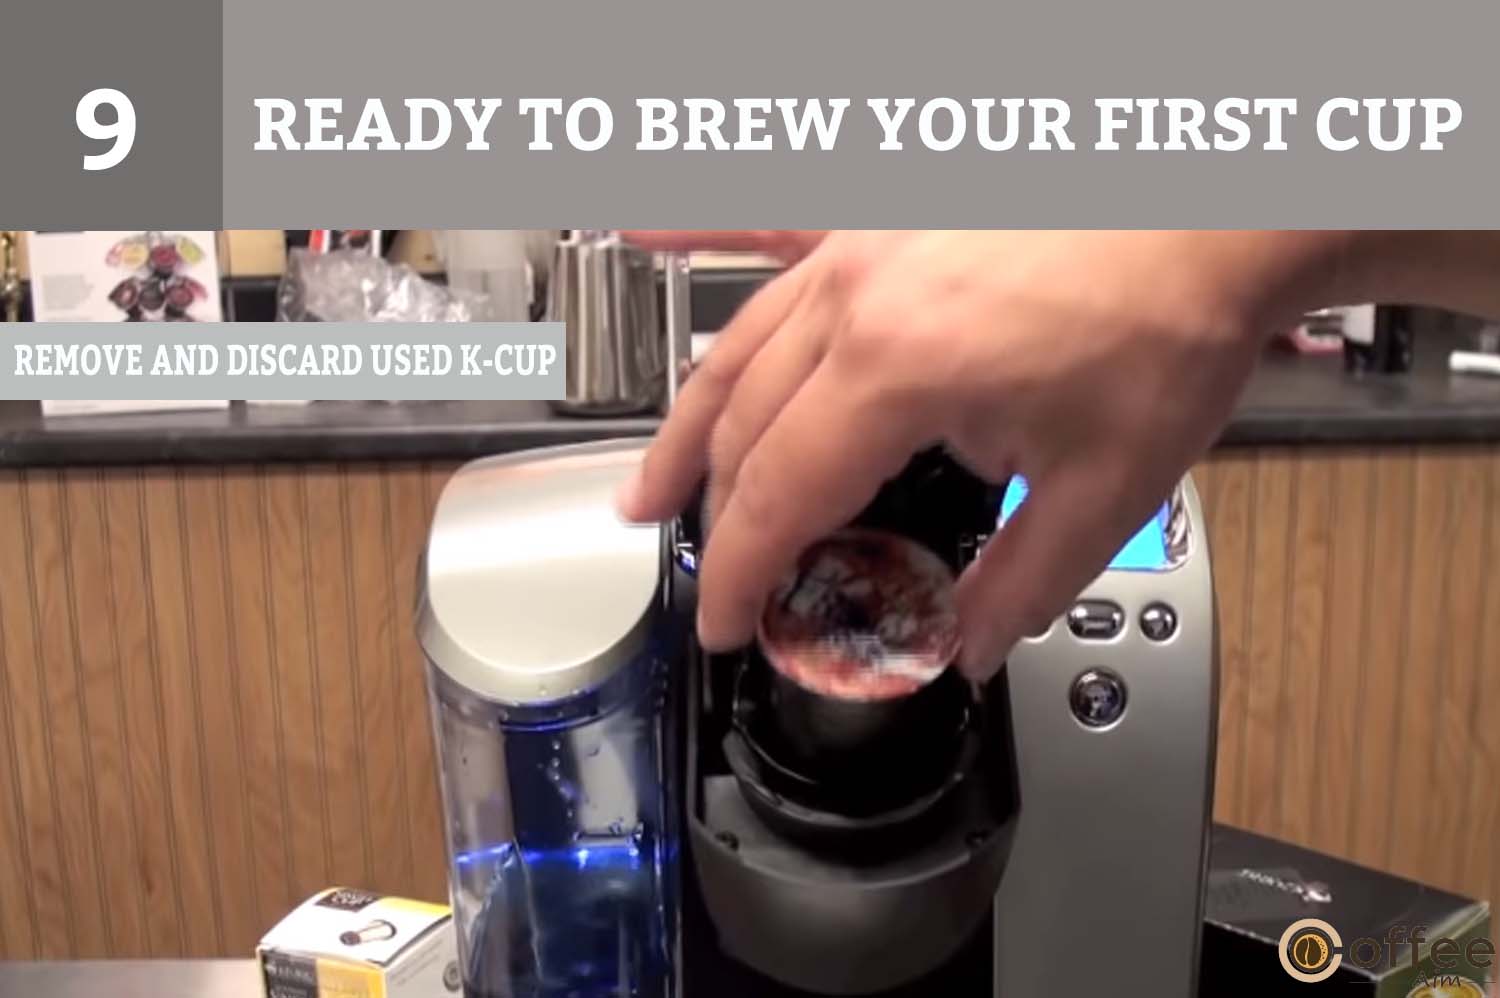
8. There can be a short pause before the coffee is served. The K-Cup is empty of liquid after the brewing process, which takes around one minute, is completed with a burst of air.
9. Lift the Handle, remove the used K-Cup, and dispose of it.
NOTE: K-Cup will be pretty hot.
10. Take delight in your first cup of premium Keurig Brewed gourmet coffee, tea, or hot cocoa!
11. Your Brewer may display “NOT READY” as it heats water for the next brew cycle. The “READY TO BREW” indication will return to the LCD Control Center in about 15 seconds.
How To Stop The Brewing Process?
If you need to stop the brewing process after it has started, press and release the Power Switch to turn the Brewer “OFF.” The coffee, tea, or hot chocolate will stop coming out, heating element, and the blue lights illuminating the water reservoir and LCD will also disppear.
NOTE: With the next brew, you might have more coffee, tea, or hot chocolate in your cup. After a finished brew, I advise you to do a cleansing brew using simple water. The volume you have chosen will then be used for your NEXT brew.
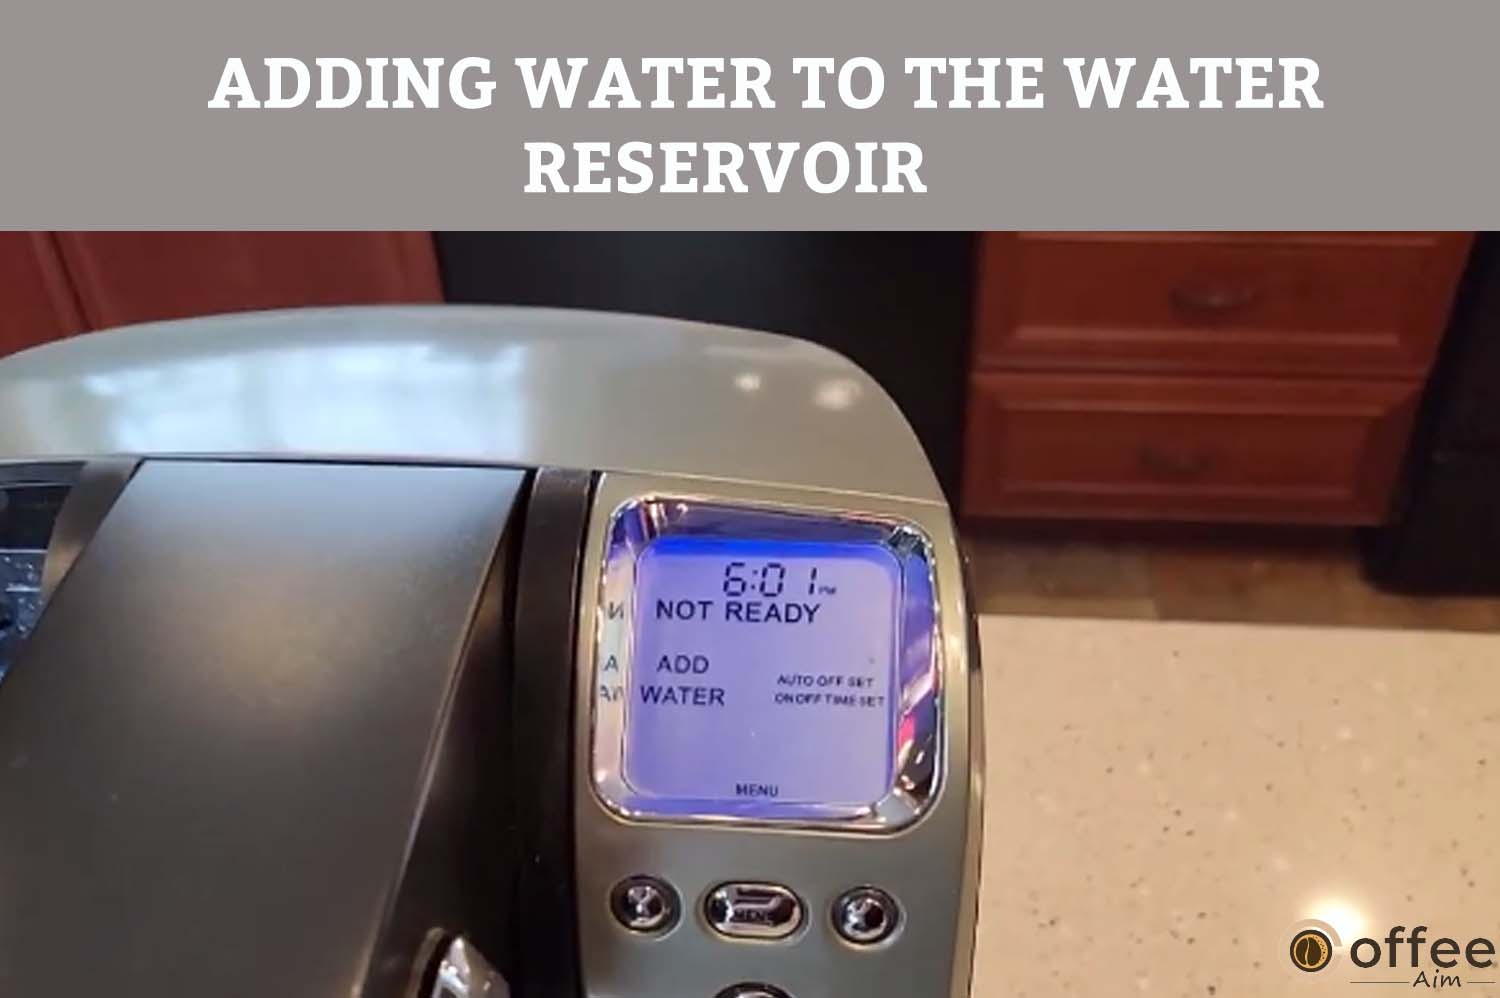
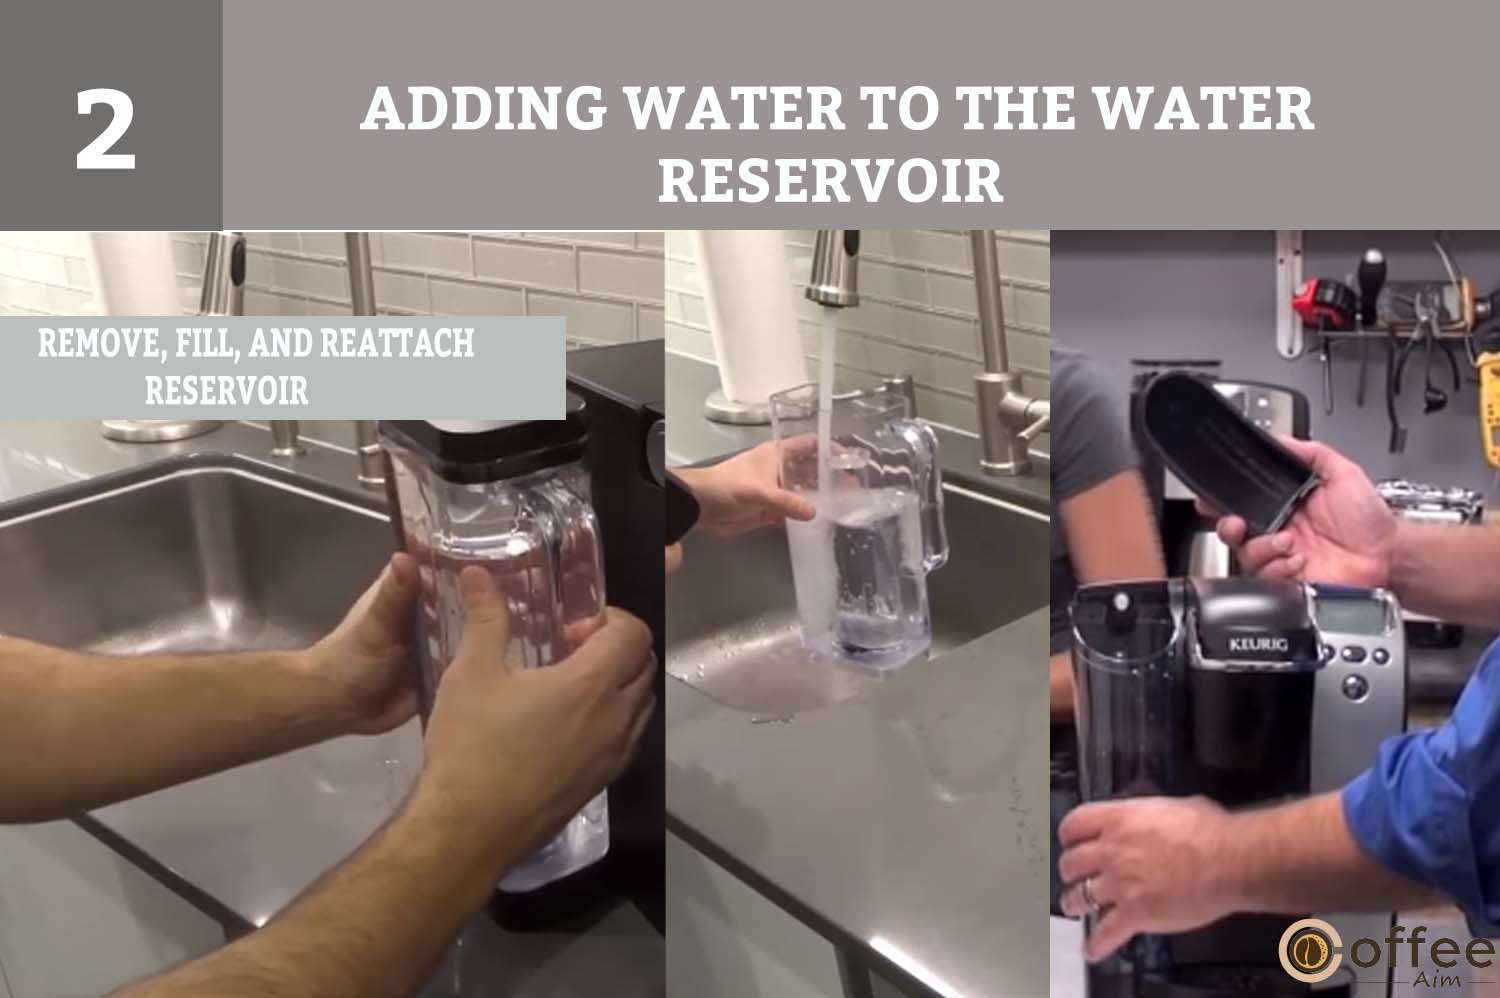
Adding Water To The Water Reservoir
When the water level in the tank is low or if the water reservoir has been removed, your Brewer’s LCD Control Center will let you know through a message on the LCD screen.
The “ADD WATER” will be displayed when the water reservoir has not had enough water or it has been detached from the brewer; the blue light in the water reservoir will also blink as an indicator. The Brewer won’t let you brew when “ADD WATER” is displayed.
There are two ways to fill the water reservoir.
1. While the Water Reservoir is still connected to the Brewer, open the Easy-Fill Lid, pour water into the water reservoir, and close it. If desired, the lid of the water reservoir can be removed entirely.

2. Remove the Water Reservoir from the Brewer by first removing the lid of the Water Reservoir and then lifting it straight up and towards the front of the Brewer. Put water in. Put the water tank back on the brewer and put the lid back on.
Important: Keep the water reservoir in place when brewing.
Brew Iced Beverages With Keurig K-71
Your iced tea and coffee taste best when they are made fresh and poured over ice.
Place an ice-filled tall cup on the Drip Tray Plate to test it out (the Drip Tray Assembly can be removed to fit taller cups). Choose the brew size, select your preferred K-Cup® portion pack, and push the BREW button. Moreover, watch for the Brew Over IceTM icon on K-Cup® portion packs made just for brewing over ice!
Important: Avoid brewing in a glass cup. This could result in the glass breaking or cracking.
Brew Hot Water
Your Brewer can produce hot water for making hot cocoa from a packet, cooking, making soups, etc. “Ready To Brew Your First Cup” even if you don’t use a K-Cup®.
NOTE: I recommend running a hot water brew cycle without a K-Cup after brewing a hot cocoa K-Cup.
How To Purge Your Keurig K-71
If you haven’t used your Brewer in over a week, you should drain the water from the inner tank.
- If the Water Reservoir has water in it, take off the Lid and lift the Water Reservoir straight up and away from the Brewer. Throw away the water, rinse, and fill it up again. Put the Water Reservoir back on the Brewer and change the top. (If the Water Reservoir is empty, just fill it up again.)
- Verify that the Brewer is switched on. Without putting a K-Cup in the Brewer first, move the Handle up and down.
- The “READY TO BREW” message will appear on the LCD Control Center.
Brew 11.25 ounces of water in a Travel Mug (don’t use a K-Cup®).
- To thoroughly remove all water from the inner tank, repeat steps 2 and 3 twice.
If you are experiencing problems with your Brewer, please contact Customer Service at 1.866.901.BREW (2739).
Controls & Indicators (LCD Control Center) Of Keurig K-71
You have seen controls and indicators on your Keurig K-71 after unboxing. I know you are excited to know about this. How is it possible that I will skip this topic? This section will walk you through the Keurig K-71 and how to set different features.
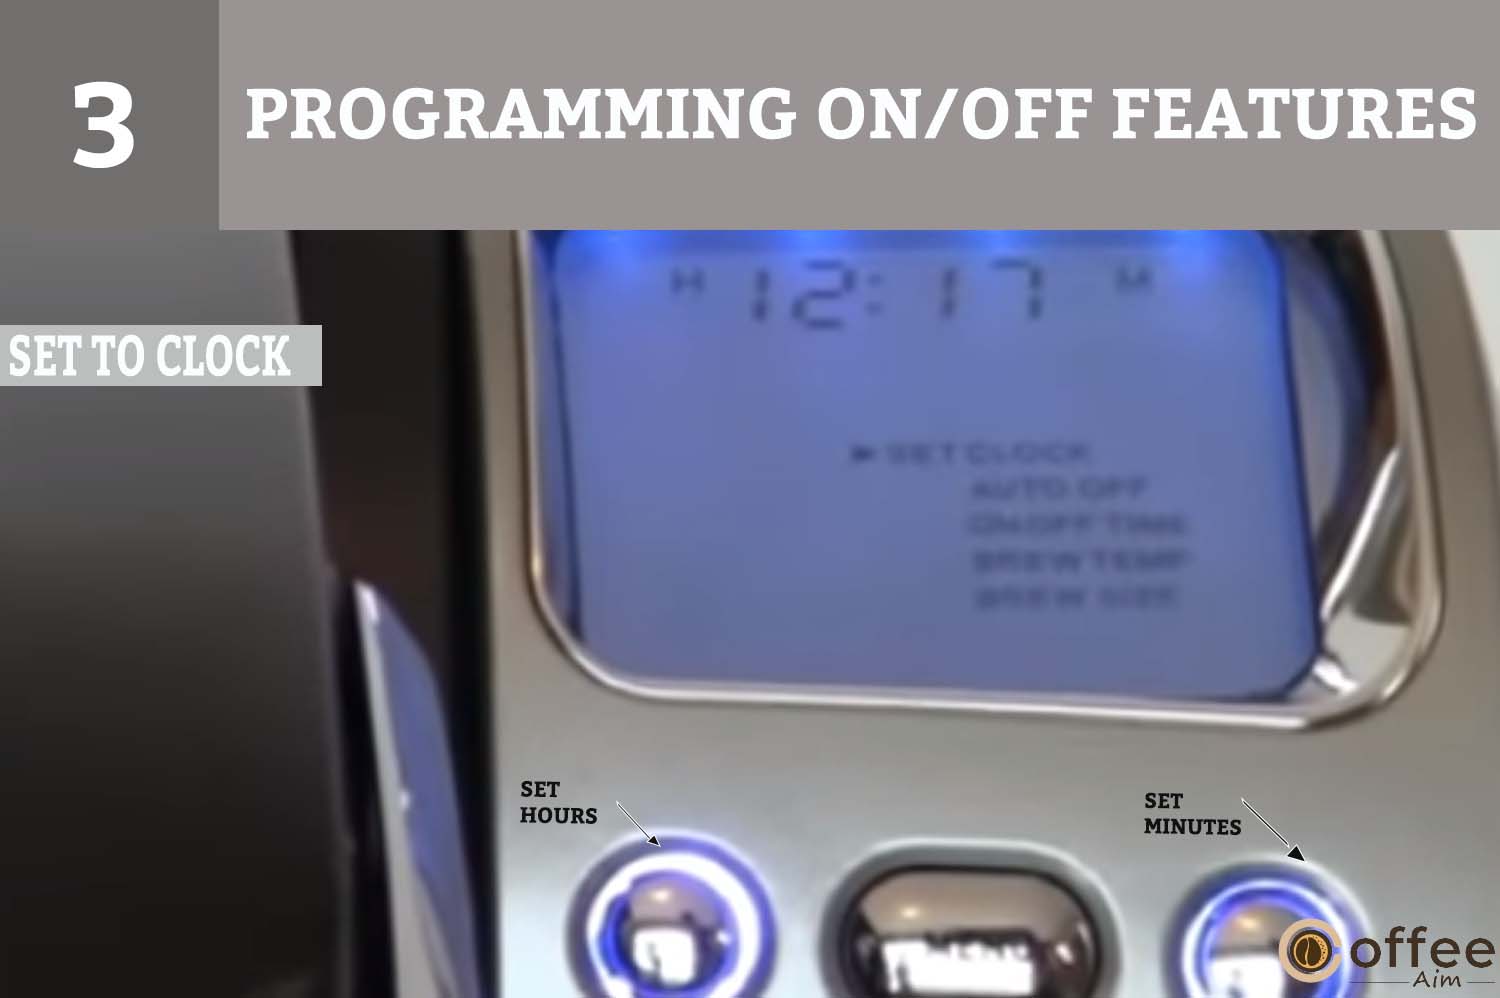
Setting The Clock
It is optional to set the clock. When you select the clock, the time will appear in the LCD Control Center.
NOTE: If you intend to use the Auto On/Off Time programming feature, you must first set the clock.
1. Push the MENU option.

2. To indicate that the clock is not set, the word ‘OFF’ will appear at the top of the LCD Control Center (fig. 10). The programming options will display on the LCD Control Center, along with a small arrow pointing to ‘SET CLOCK.’ The letters “H” (Hour) will appear above the Left Button, and the letters “M” (Minute) will appear above the Right Button. The “H” and “M” icons and the Left and Right Buttons will flash.

3. Press the Left Button under the flashing “H” until the appropriate hour is reached. If the hour has passed, “PM” will display.
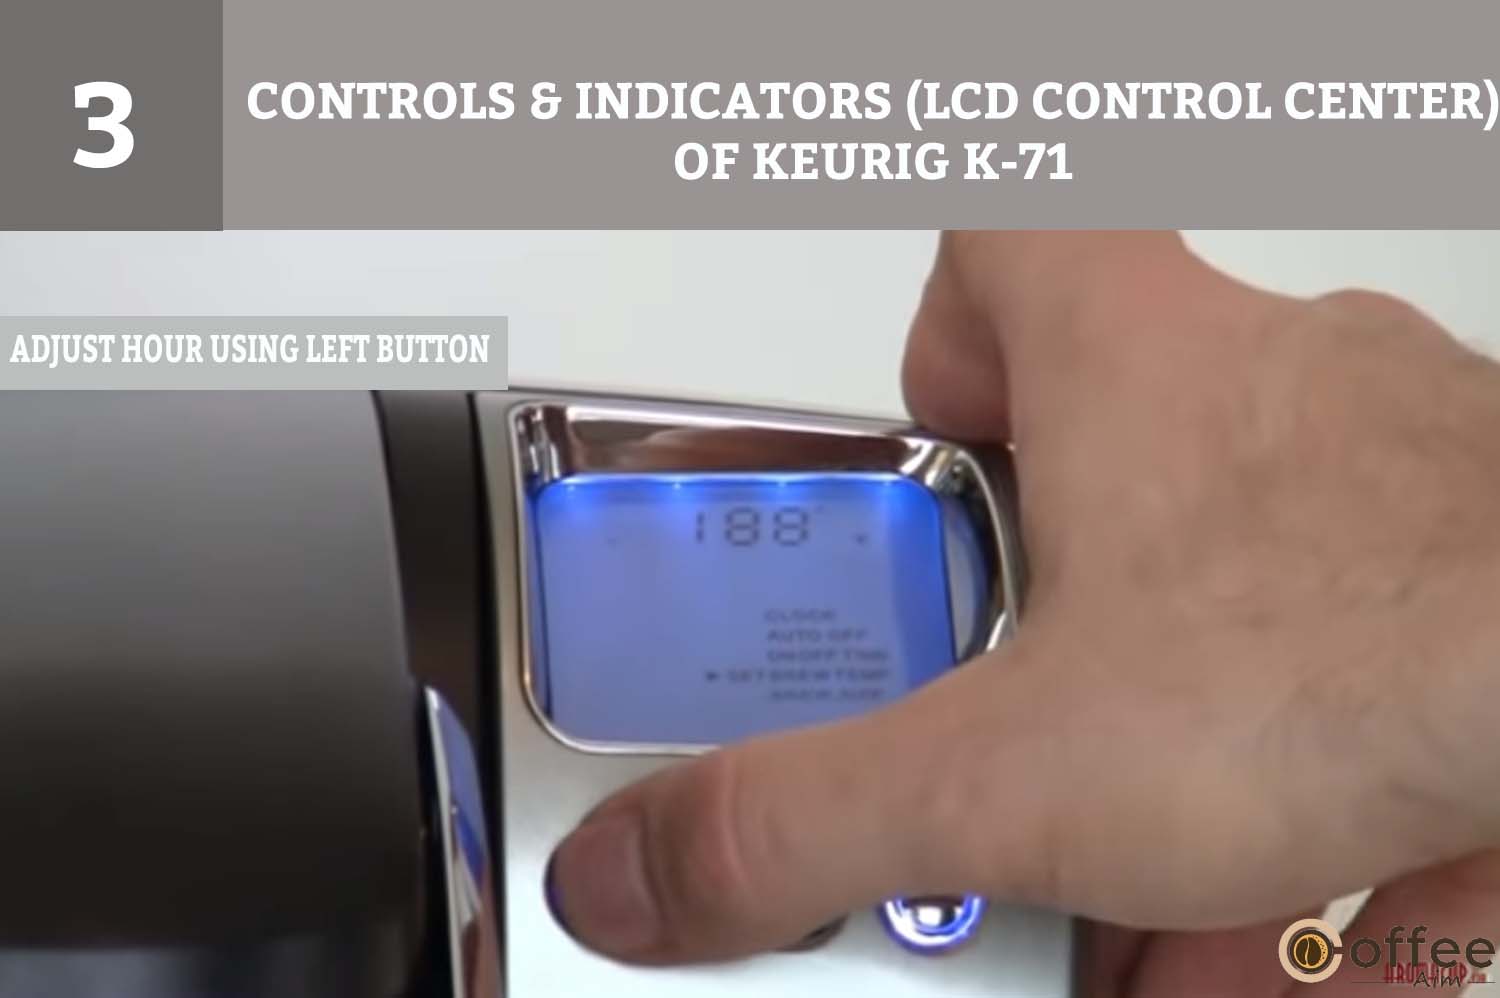
4. To set the minutes, press the Right Button under the flashing “M” for a few seconds.

5. Once you’ve reached the correct time, press the MENU Button six times to complete the remaining programming steps.
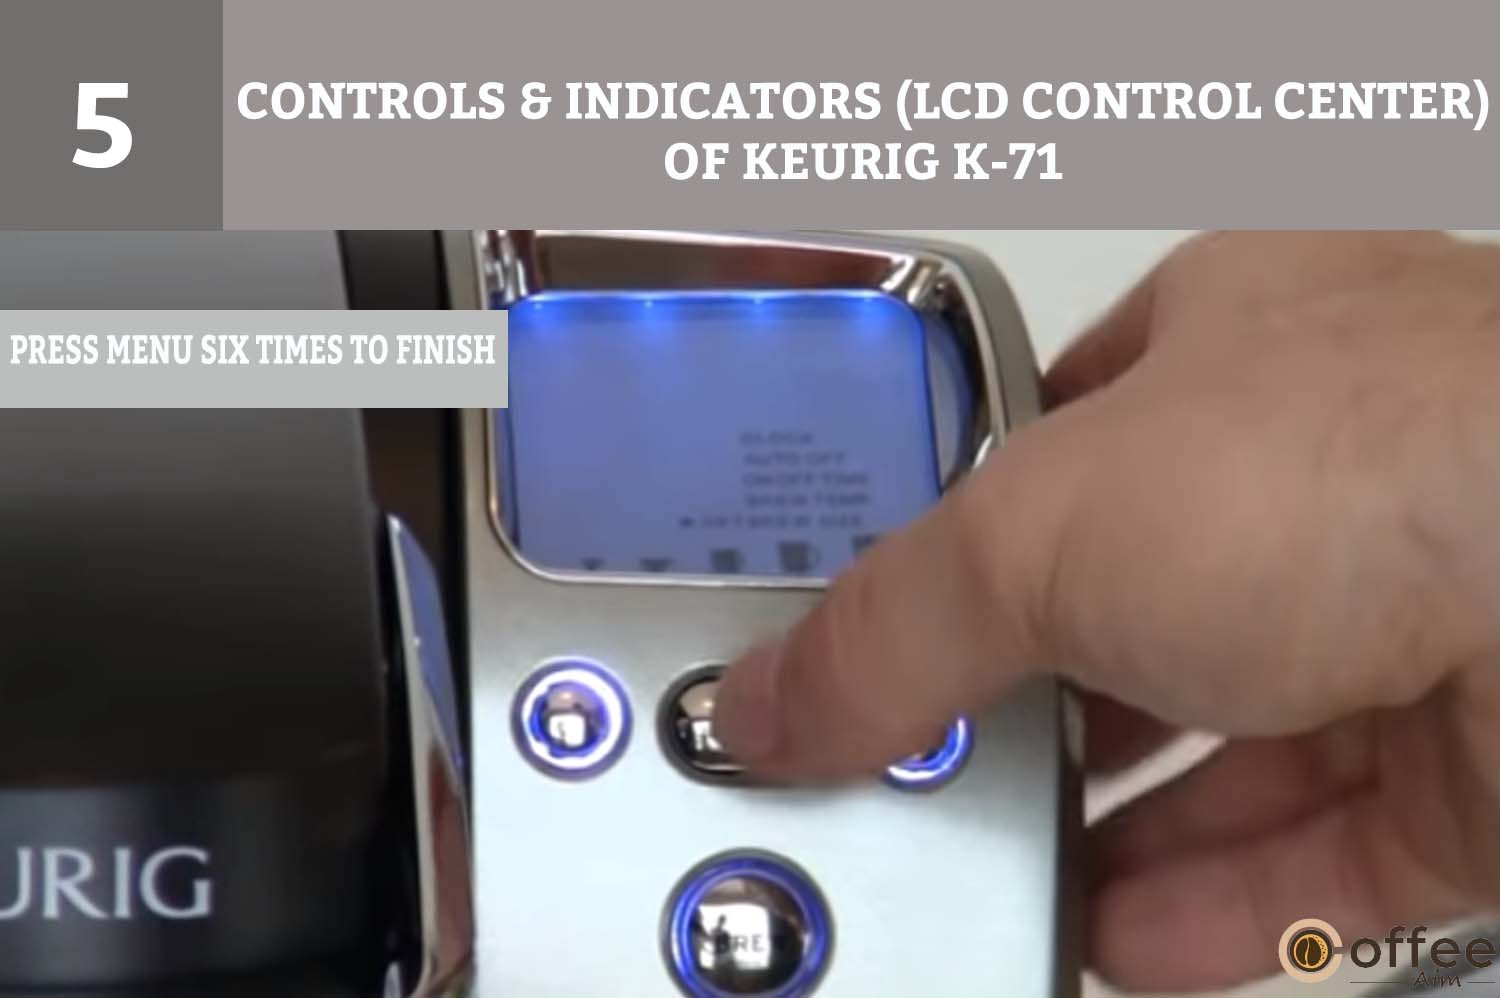
6. The LCD Control Center should display the correct time now.
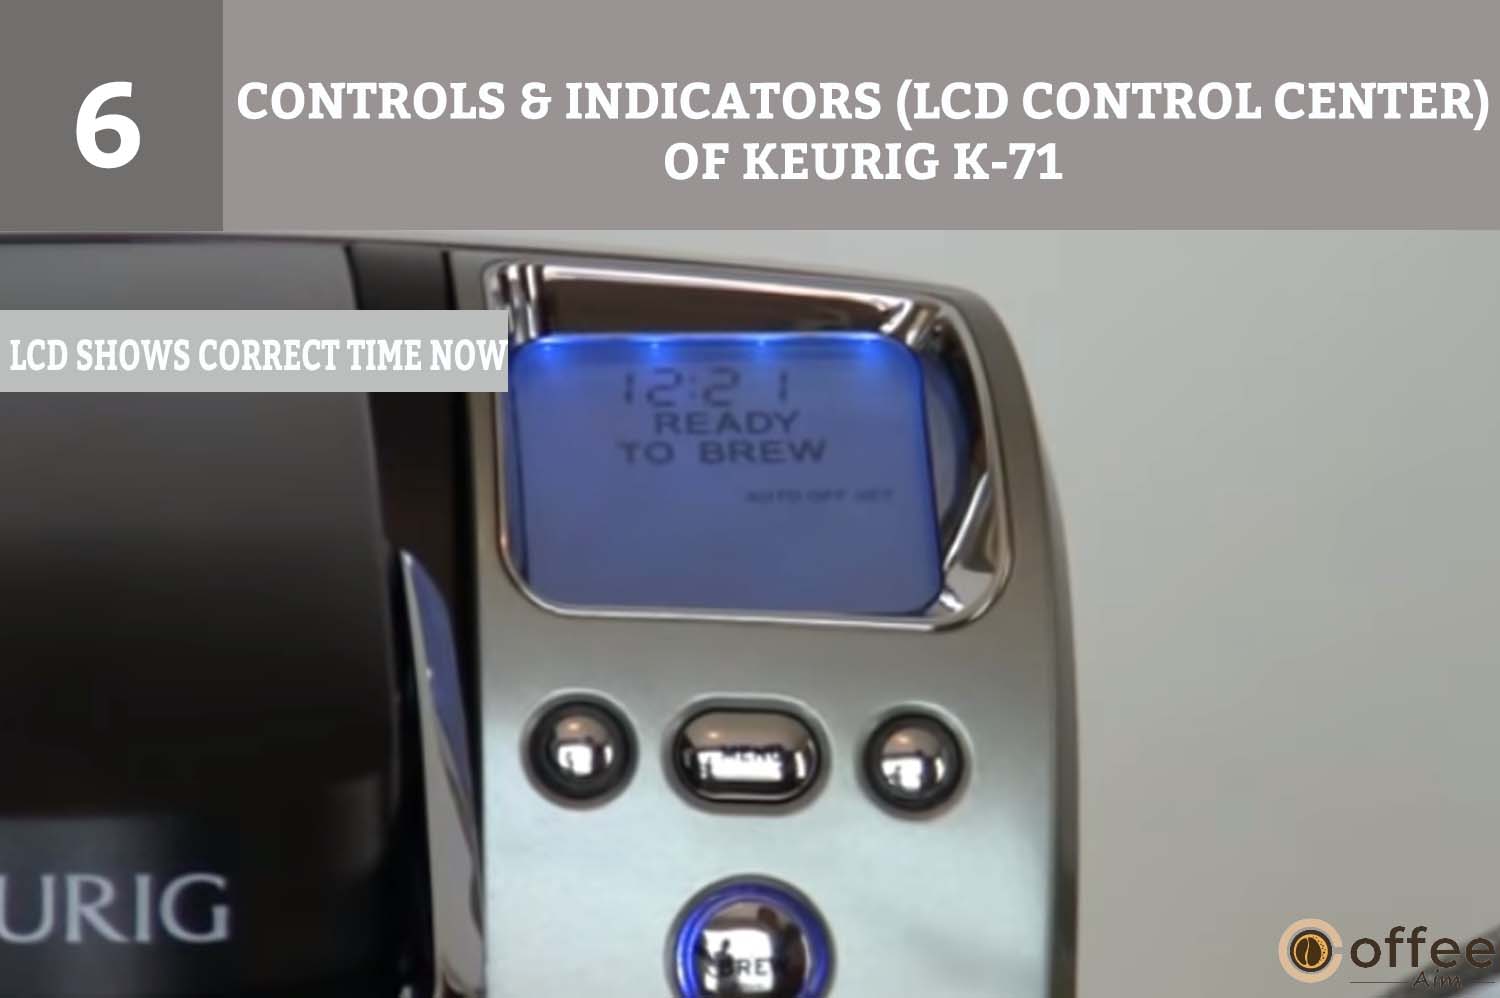
NOTE: If power is interrupted to the Brewer by unplugging it or if power is lost, repeat the procedure above to reset the time, as the clock will not be visible until it is set. Menu settings for brew size and brew temperature are remembered and restored automatically. After the clock is set, all other settings are automatically restored.
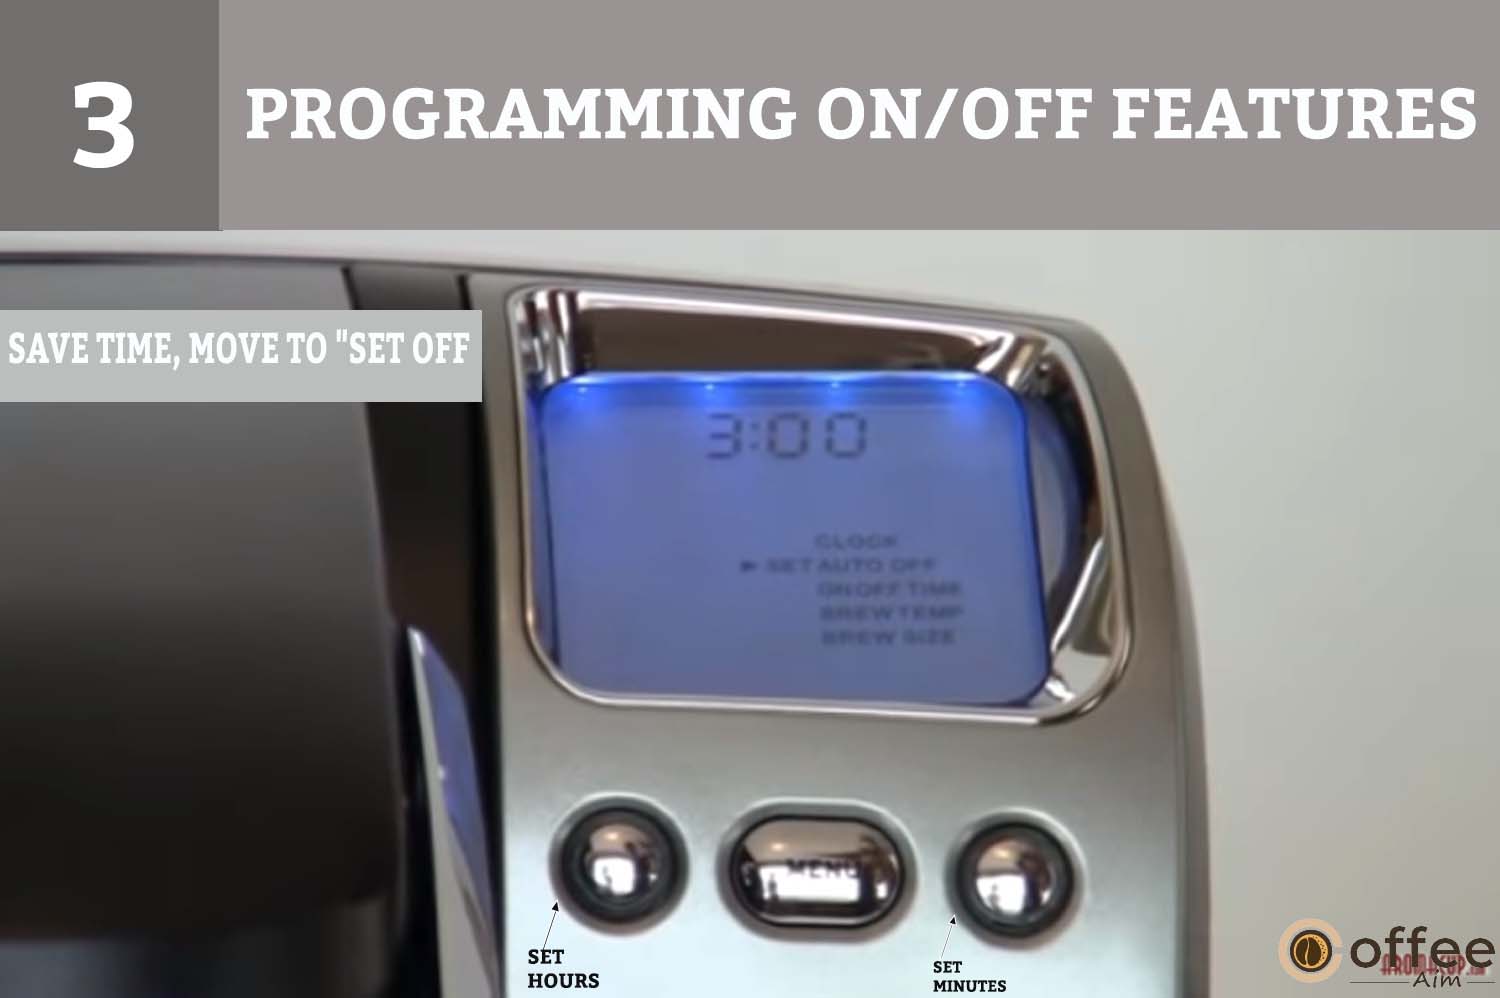
Programming On/Off Features
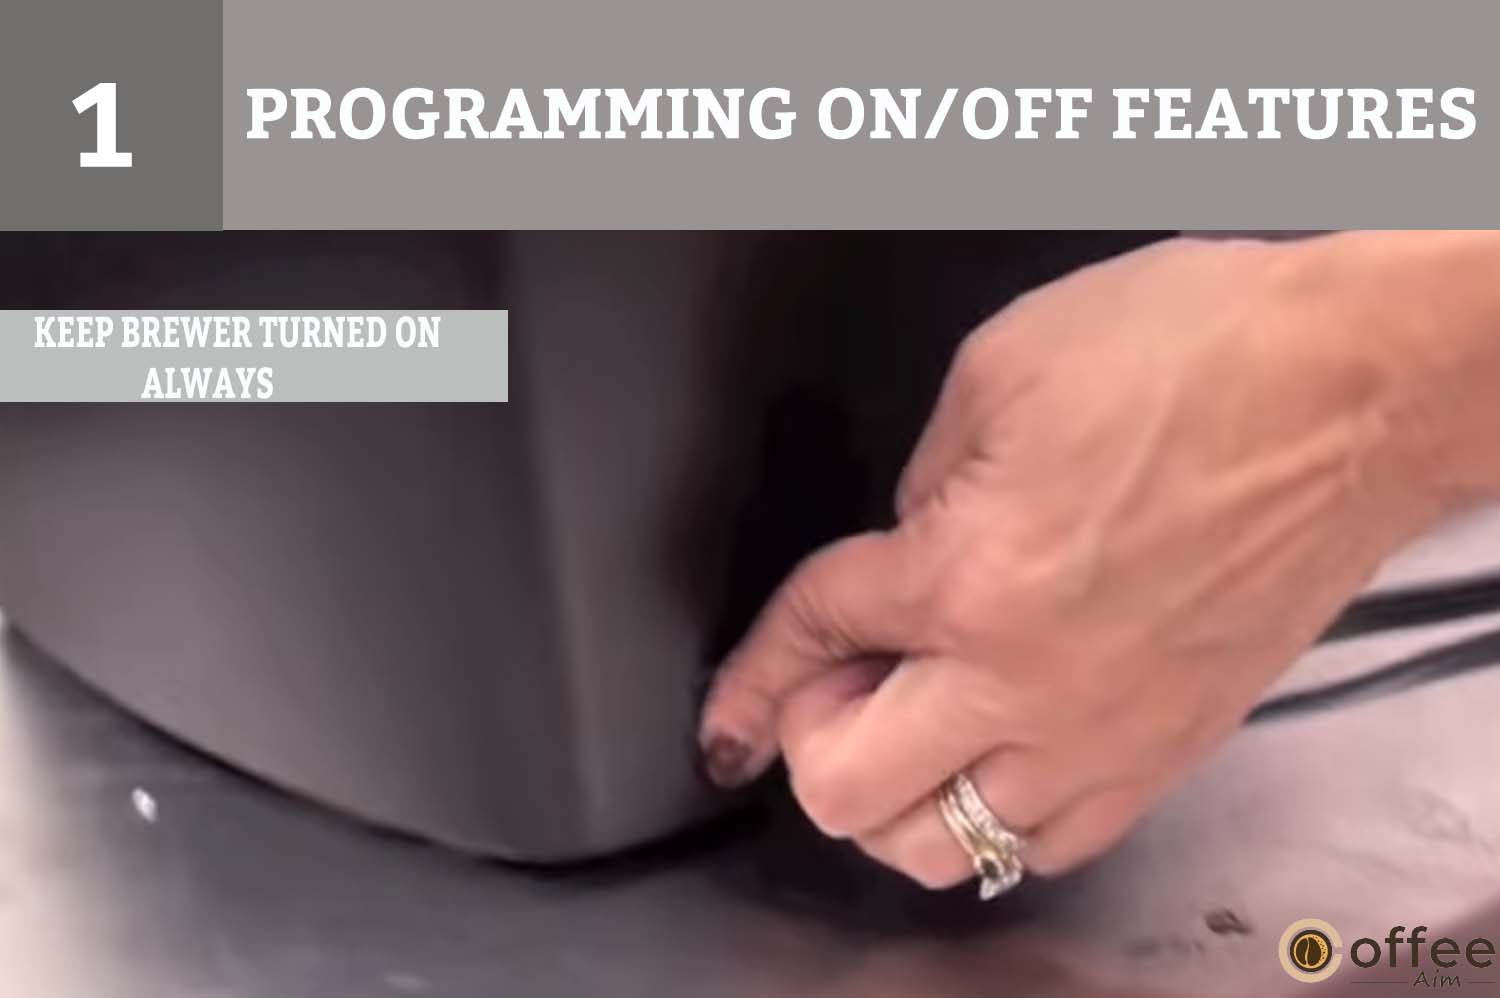
The Brewer has three modes, allowing you to enjoy gourmet coffee, tea, or hot cocoa on time. By automatically turning your Brewer on every morning, you will never have to wait for it to warm up before brewing a gourmet cup of coffee. The Brewer will take about 4 minutes to warm up from room temperature.
- Always Leave Your Brewer Turned On.
The Brewer can always be left on to brew a fresh cup of gourmet coffee, tea, or hot cocoa whenever you want. Simply press and release the Power Switch to turn off the Brewer anytime.
NOTE: Although the clock remains on, you cannot brew a cup of coffee, tea, or hot cocoa if it is set. To restart the Brewer, press and release the Power Switch once more. Before the Brewer can brew, you must wait for the water to heat up.
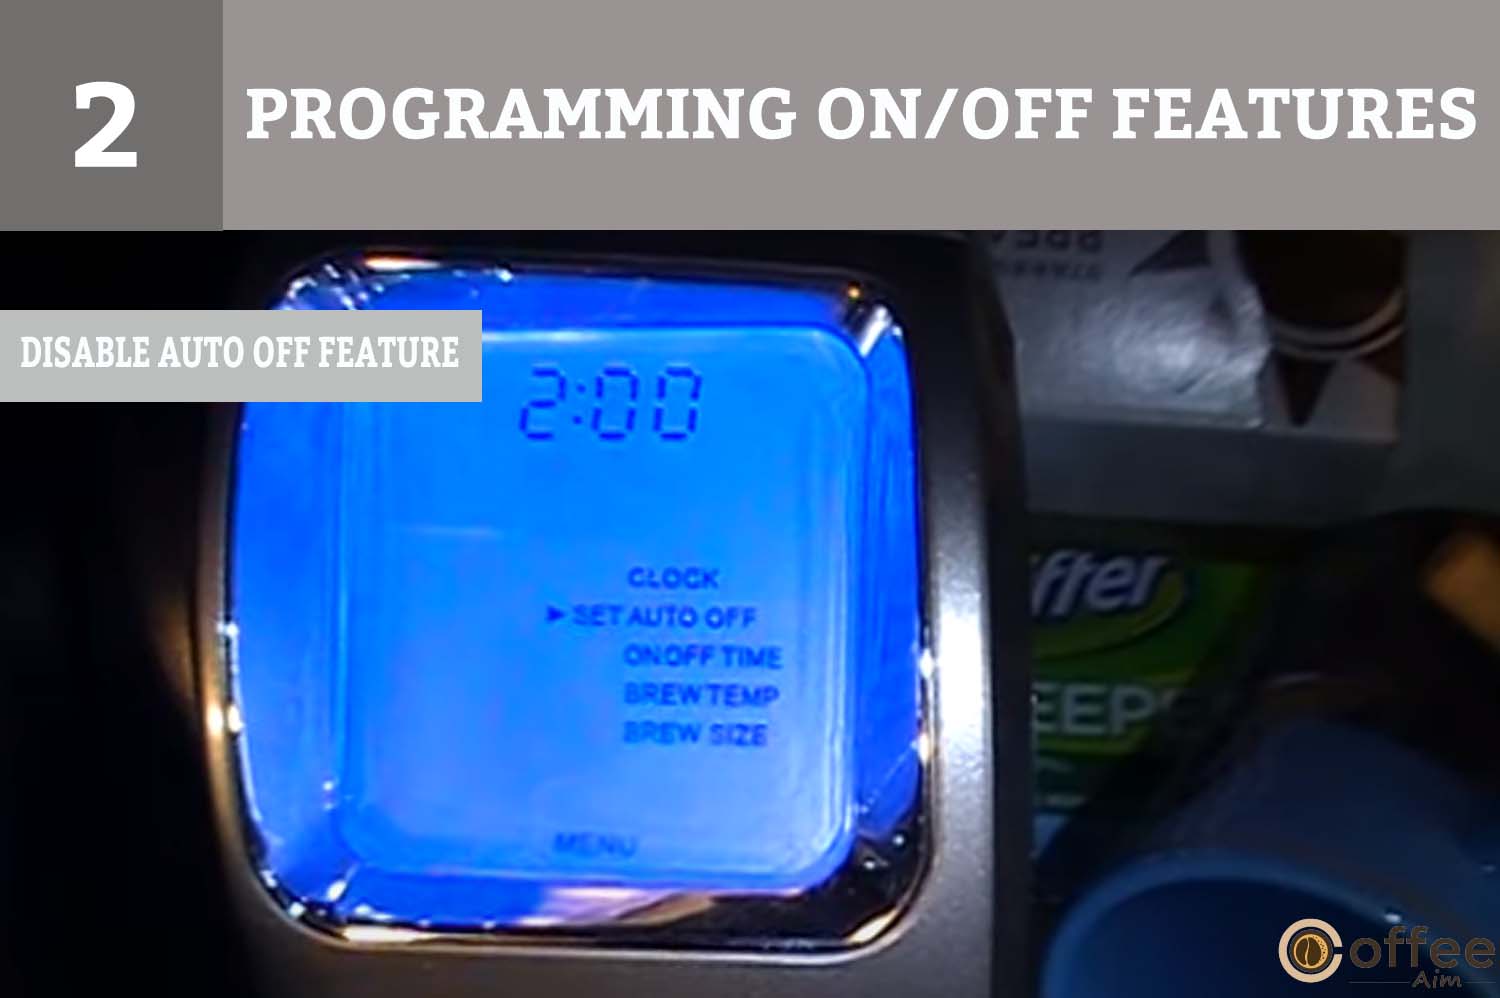
2. Set The Brewer To “Auto Off” After A Predetermined Time Since The Last Brew.
- To program the Auto Off feature, press the MENU Button twice. The programming options will now be displayed in the LCD Control Center, with a small arrow next to “SET AUTO OFF.”
- Press or hold the Left Button under the blinking “H” for up to 9 hours to advance one hour at a time.
- Once the desired Auto Off time has been set, press the MENU Button five times to scroll through the remaining options and exit the programming mode.
- The phrase “AUTO OFF SET” will now indicate that it has been set.
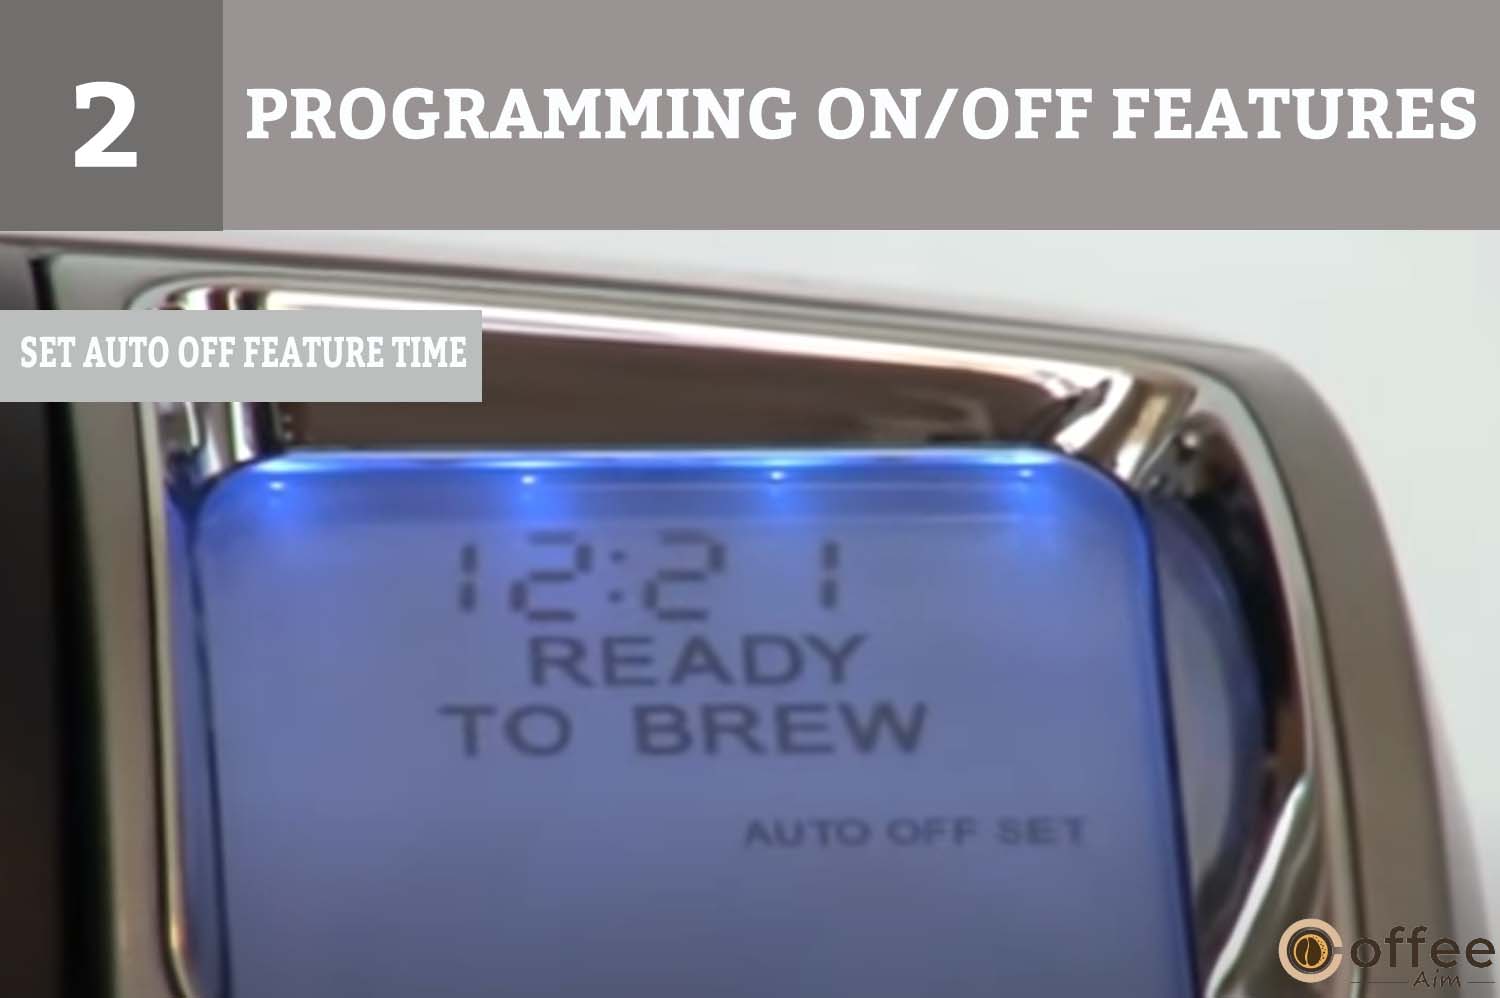
- Press the MENU Button twice to enter the “AUTO OFF” programming mode to cancel the Auto Off feature. To advance one hour at a time, press and release the blue Left Button under the blinking “H” until “OFF” is displayed.
3. Set Your Brewer To Turn On And Off At A Specific Time.
NOTE: The clock must be set to the correct time to use this programming feature. It will only be displayed if the time is set.
- Once the correct time has been set (required), press the MENU Button three times to program the On Time feature. The programming options will be displayed in the LCD Control Center by a small arrow next to “SET ON TIME.”

- Hold the Left Button under the “H” to scroll through the hours to the desired “ON TIME” hour.
- Press the Right Button under the “M” to scroll through the minutes to the “ON TIME” minutes you want.
- Once the desired time has been set, press the MENU Button to save the “ON TIME” and move to the “SET OFF TIME.”
- To set an “OFF TIME,” repeat the procedure in steps b & c above to select your desired “OFF TIME.”
- To finish, press the MENU Button three times more to exit the programming mode. The Control Center will now display the options you’ve selected.
- The Auto On and Auto Off functions work independently of one another. Follow the steps below to cancel either set function. Use the “H” and “M” Buttons to advance to 12:00 AM. Change the “H” Button after ensuring that the “M” Button is set to:00. When you reach 12:00 AM, the Control Center displays ‘OFF,’ and the function is disabled.
NOTE: The On and Off time functions operate independently. To cancel either function, follow the steps above and use the “H” and “M” Buttons to advance to 12:00 AM. When you reach 12:00 AM, the Control Center will display ‘OFF,’ and the function will be disabled (fig. 15).
EXAMPLE: The Auto Off timer and the On/Off Time programming options operate independently but can also be programmed to work together. For example, you can set the On Time function to turn on at 7:00 AM and then set the Auto Off timer function to turn off the Brewer two hours after the last brew.
Programming Brew Temperature (187°–192º F)
The Brewer brews at a preset temperature of 192°. Adjust this temperature by 5 degrees if you prefer a cooler cup of coffee, tea, or hot cocoa. Simply follow the instructions below.
- Press the MENU Button on the LCD Control Center five times to program the Brew Temperature feature.
- The LCD Control Center will display the programming options with a small arrow next to “SET BREW TEMP.” Also, the temperature 192° (initial setting) will be displayed at the top of the LCD Control Center to indicate the current temperature setting.

- A minus sign will appear over the Left and/or a plus sign over the Right Button. Use these Buttons to raise or lower the temperature one degree at a time.
- Once you have reached your desired brew temperature, press the MENU Button twice to exit the programming mode. “BREW TEMP SET” will be displayed in the LCD Control Center if you have changed it from 192°.
- To change the brew temperature again, repeat steps 1 through 3 to change the temperature up or down, remembering that the temperature can only be between 187° and 192°.
NOTE: If boiling occurs at high altitudes (over 5,000 feet), use the temperature adjustment (+0 and -5 degrees) to lower the temperature.
Programming Your Brew Size
The Small Mug (7.25 oz.) is the default brew size on the Brewer. The user can avoid scrolling by using the default brew size.
If a particular size is frequently chosen, cycle through the brew sizes.
To change the default brew size to your preferred one, follow these steps:
- Press and hold the MENU Button six times.
- Choose your preferred default brew size using the Left and Right Buttons.

- Once the desired default brew size is selected, press the MENU Button once to exit. The brew size will be displayed on the LCD.
Cleaning & Maintenance Of Keurig K-71
The work towards a long-lasting coffee maker has begun. Do you know what that is? Yes, Of course, it is the cleaning and maintenance of Keurig K-71. Keeping your Keurig K-71 coffee maker clean and well-maintained is vital to ensuring it brews consistently delicious coffee. Here’s what you need to do!
Cleaning External Parts
The external parts of the Brewer should be cleaned regularly.
- Never submerge the Brewer in liquids, including water. With a non-abrasive, soapy cloth, you can clean the Housing and other external parts.
- The Drip Tray has a 12-ounce capacity for overflow. The drip tray and plate must be inspected and cleaned up regularly. Slide the drip tray assembly towards you to remove it and keep it level to prevent spills. You should leave the drip tray and plate out of the dishwasher. After cleaning, they should be adequately washed with a damp, soapy, non-abrasive cloth.
1. Cleaning The K-Cup Holder Assembly
To clean the K-Cup Holder Assembly on your Keurig K-71, just take it out and wash it with warm, soapy water. Rinse it well and dry it before putting it back on the machine.
- Cleaning The Parts
The K-Cup Holder Assembly can be cleaned in the dishwasher on the top shelf.
NOTE: Use low-temperature cycles in the dishwasher.
To remove the cover from the Brewer, lift the Handle. Grasp the top of the K-Cup Holder with one hand while pushing up from underneath the bottom of the K-Cup Holder with the other until it releases. After cleaning, align the K-Cup Holder with the opening and snap it into place from the top, using the two front ribs as guides.

2. Cleaning The Funnel
To remove the Funnel from the K-Cup Holder, pull on it until it pops off. The Funnel can be washed in the dishwasher. Simply snap it back onto the K-Cup Holder Assembly to replace it.

3. Exit Needle Cleaning
The Exit Needle is found on the inside bottom of the K-Cup Holder Assembly. Coffee grinds can cause clogs but can be cleared out with a paper clip or similar tool. Remove the K-Cup Holder assembly and Funnel. Insert the paper clip into the Needle to loosen and push the clog out. The K-Cup Holder can be washed in the dishwasher.
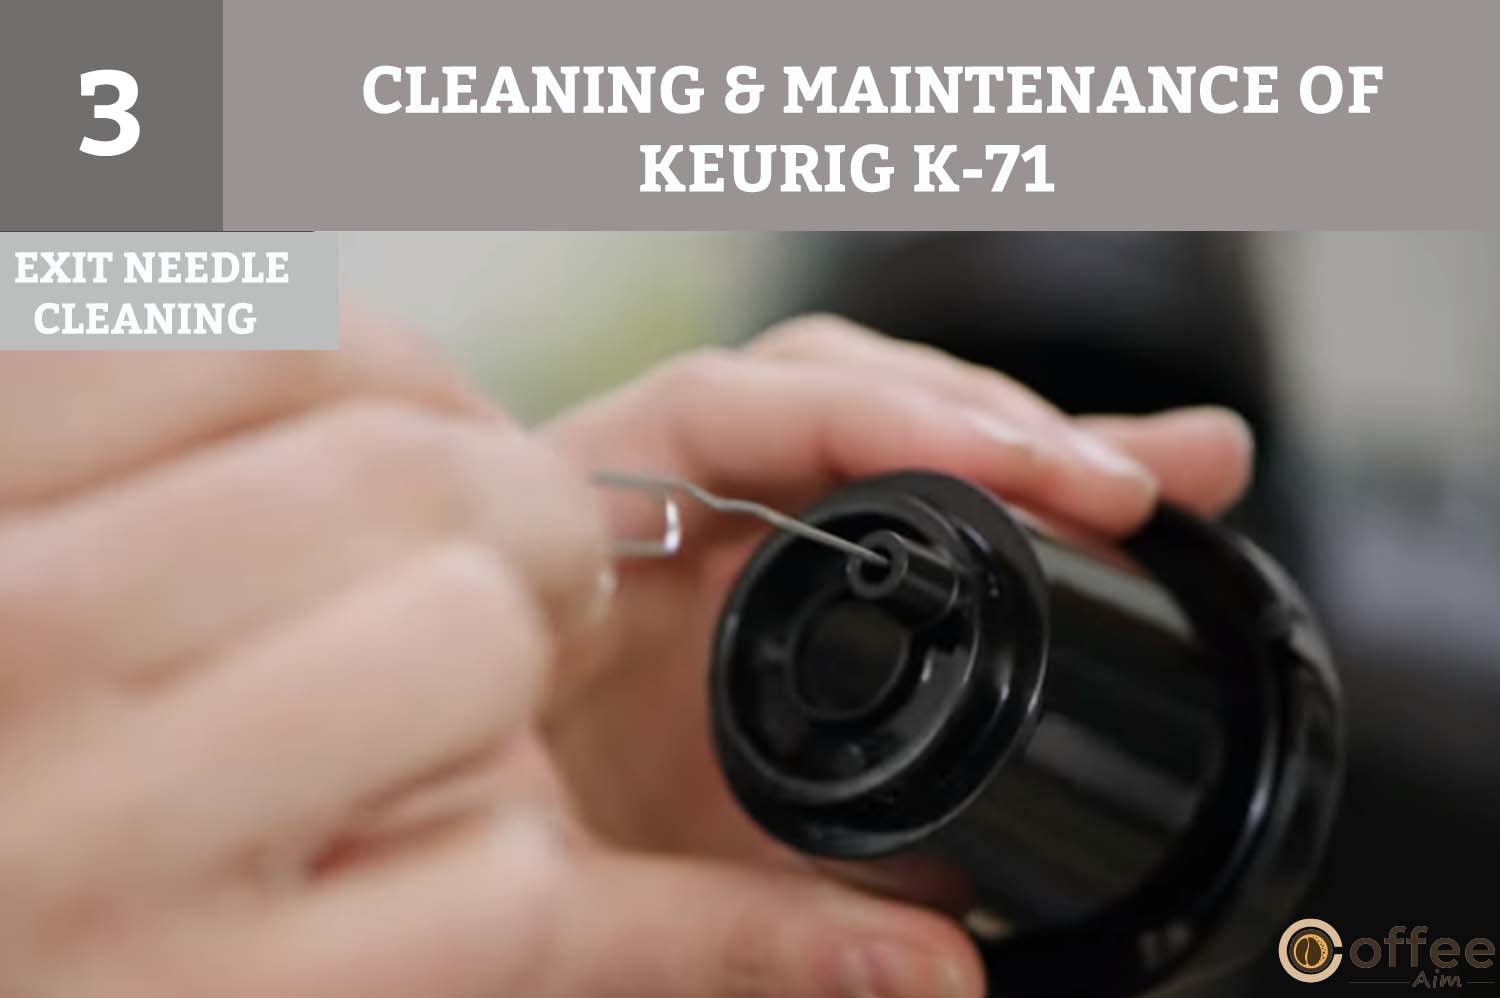
Warning: Sharp needles may puncture the K-Cup. These needles lie above the K-Cup Holder and in the K-Cup Holder’s bottom. Do not put your fingers in the K-Cup Assembly Housing to avoid injury.
Cleaning The Water Reservoir & Water Reservoir Lid
The water Reservoir Lid and Water Reservoir should be inspected and cleaned regularly. The Water Reservoir Lid or Water Reservoir should never be placed in the dishwasher. They should be thoroughly cleaned with a damp, soapy, non-abrasive cloth. Do not use a cloth to dry the inside of the Water Reservoir, as lint may remain.
To clean the filter screen at the bottom of your Water Reservoir, empty it and perform one or more of the following procedures;
NOTE: If a water filter is installed inside the Water Reservoir, remove it before cleaning.
- Rinse the filter screen thoroughly using your faucet’s powerful water pressure.
- Aim at the filter screen if you have a sprayer.
- Fill the Water Reservoir with approximately two inches of clean water and agitate (shake) it.
Empty the Water Reservoir, fill it with clean water, and return it to the Brewer. Repeat the preceding steps if necessary.
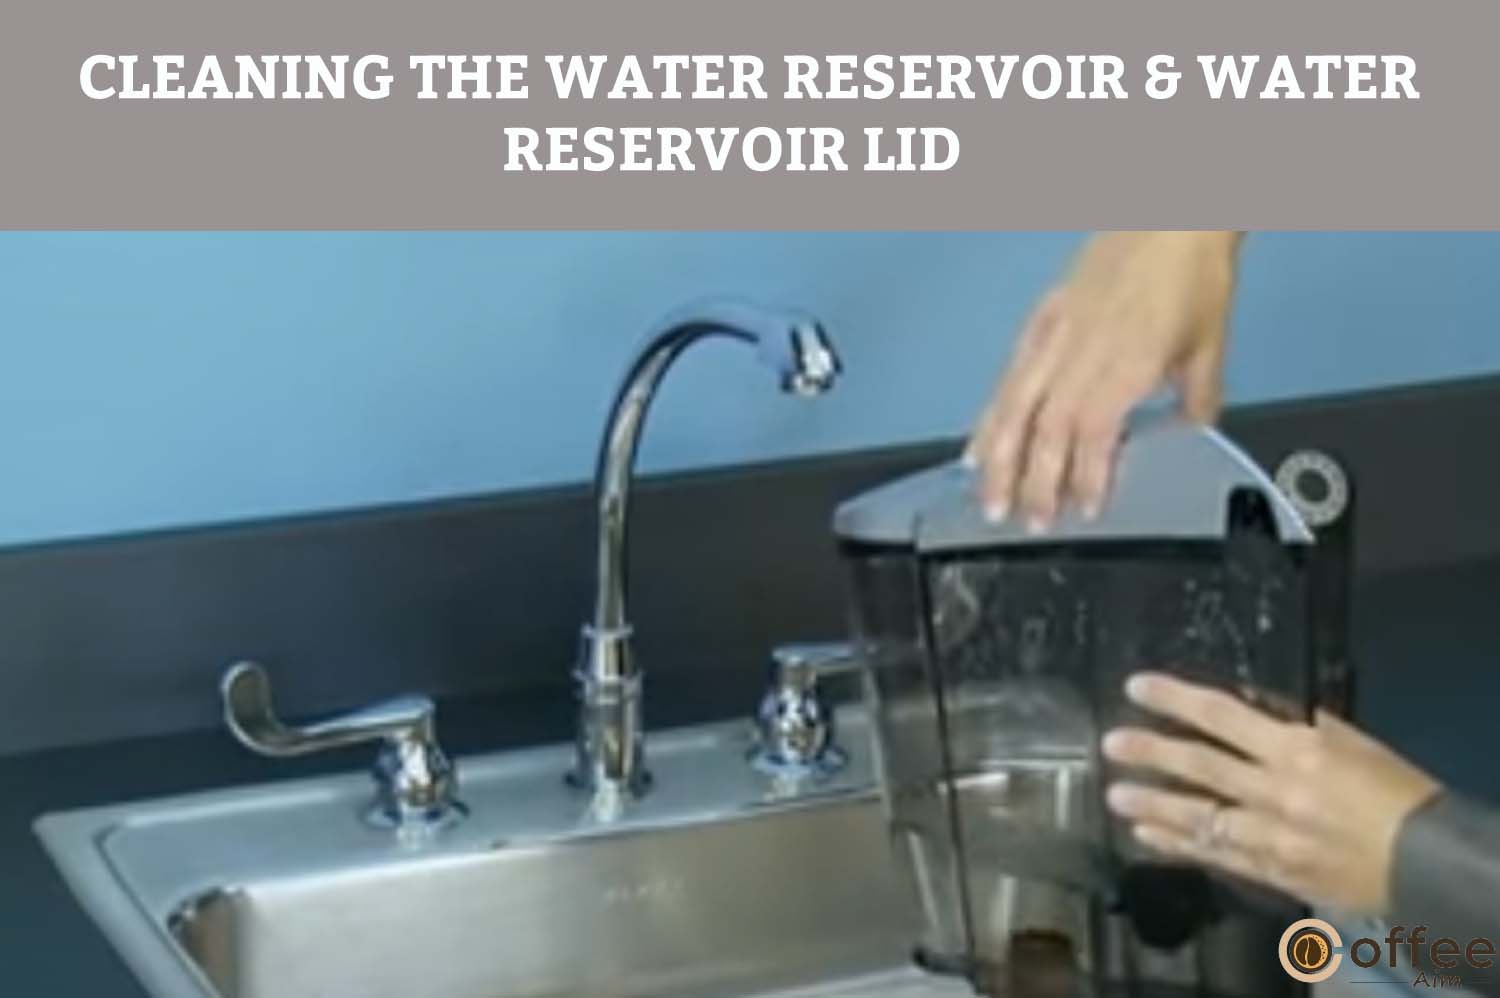
CAUTION: After cleaning, thoroughly rinse the Water Reservoir to ensure that no cleaners or cleaning solutions remain, as they may contaminate the water supply in the Brewer.
De-Scaling Your Keurig K-71
Water in different locations has different mineral contents. Scale or calcium deposits may accumulate in your Brewer, depending on the mineral concentration of the water in your area. Although the scale is not harmful, but if it is not removed, it can impair Brewer’s function. Your Brewer’s heating element and other internal components that come into contact with water can be maintained by de-scaling it. The Brewer should be descaled every three to six months to guarantee optimum performance. Calcium deposits can form more quickly, requiring more frequent de-scaling. If the LCD Control Center shows “DE-SCALE,” you should immediately descale.
You should still descale your brewer every 3-6 months even if the word “DE-SCALE” is not visible.

De-Scaling Instructions_Step-By-Step Guide
Descaling is the process of removing calcium and lime deposits that build up over time in the water lines inside your Keurig. These deposits can slow down the way your Keurig works or make the coffee it makes taste less good than it should. Descaling your Keurig is necessary to make sure it keeps working well and gives you a great cup of coffee every time.
1. Get Ready:

- To begin, you will need the following items:
- A minimum of 48 ounces of undiluted white vinegar,
- Access to an empty sink,
- An oversized ceramic mug (do not use a paper cup)
- Drain the water from the reservoir.
- Turn off the “Auto Off” features.
2. Fill And Clean:
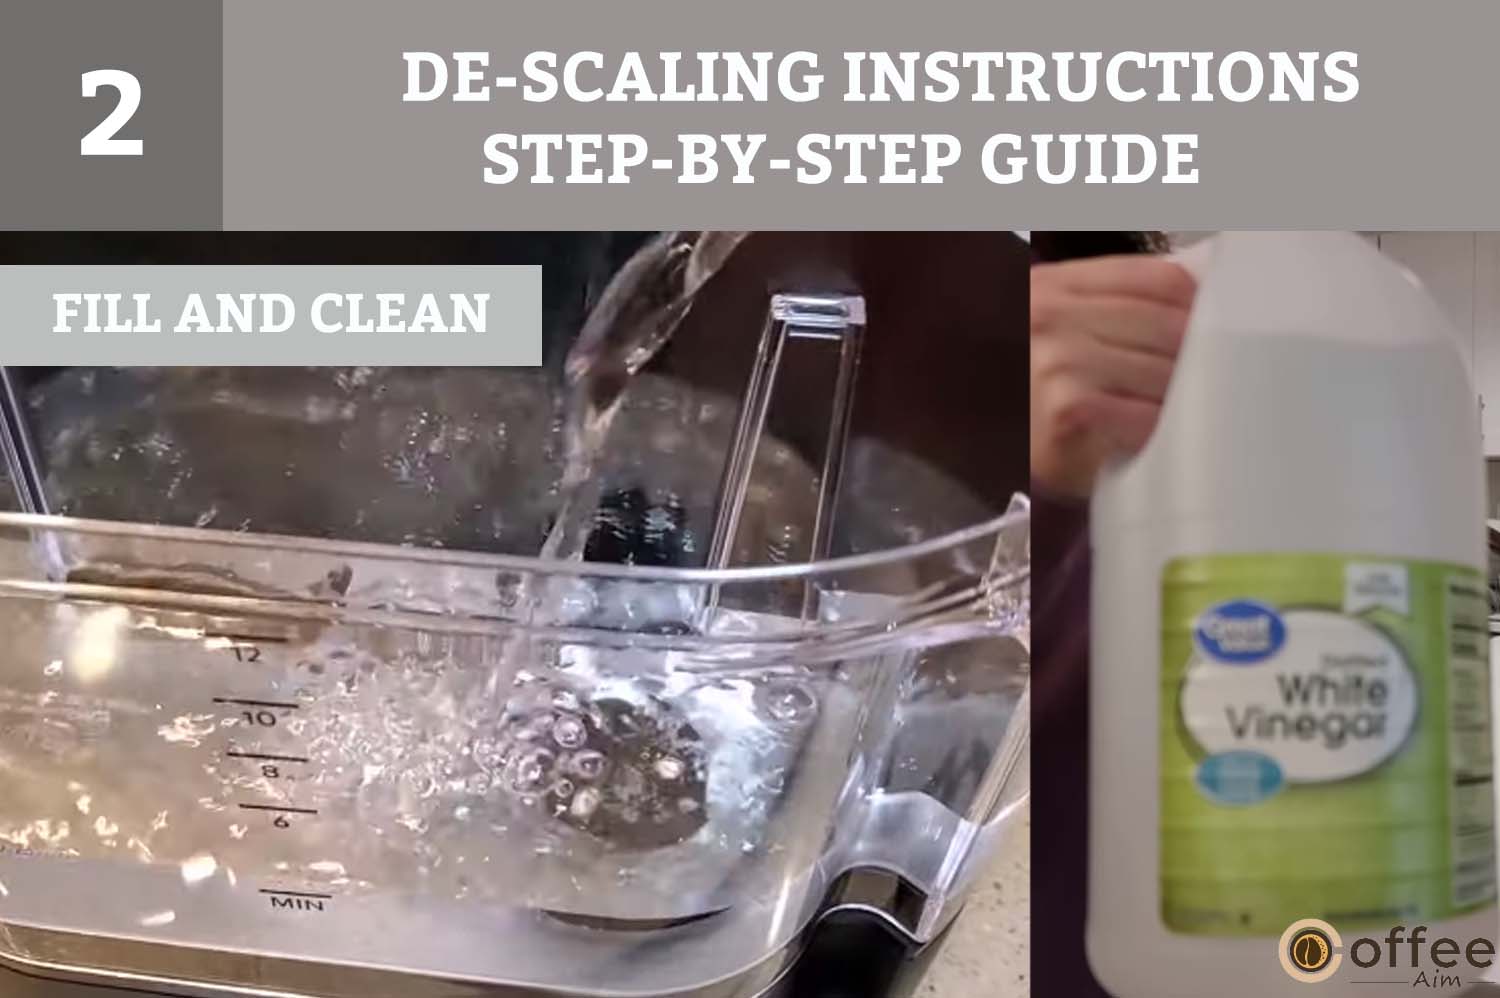
- The first step is to add about 48 ounces of vinegar to the water reservoir.
- Set a sizable cup on the drip tray plate and begin brewing.
- Simply push the BREW Button; DO NOT USE A K-CUP PORTION PACK.
- Put the content from the mug into the sink.
- Continue brewing until “ADD WATER” is shown without using a K-Cup.
- Leave the Brewer on for at least 4 hours.
- Remove any remaining vinegar and thoroughly rinse the water reservoir.
3. Rinse:
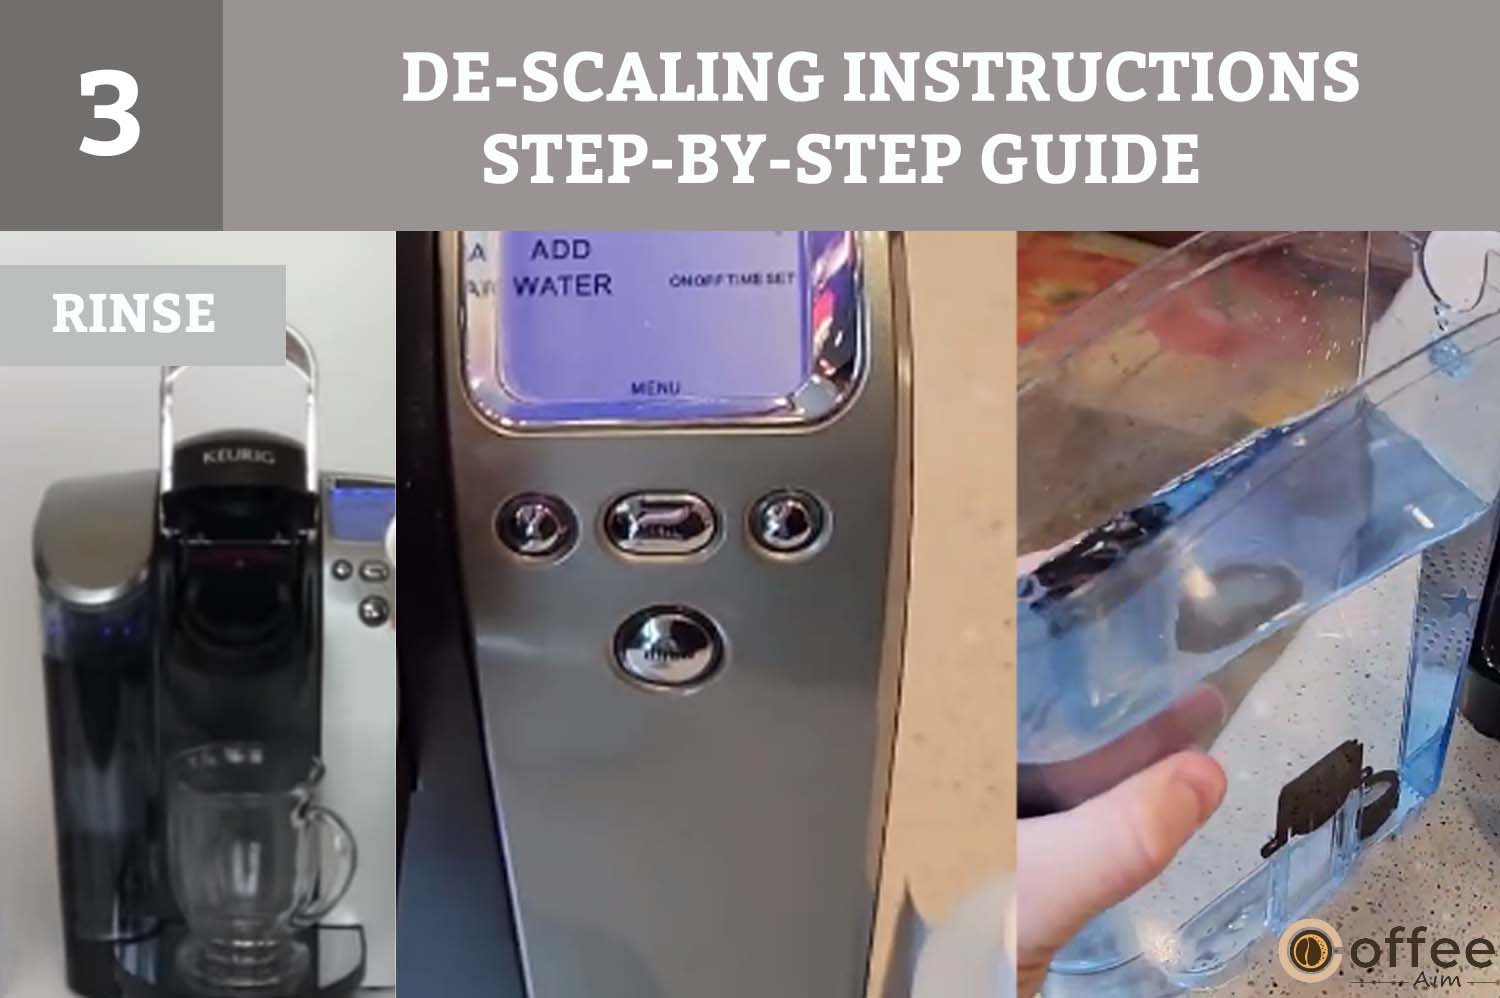
- First, ensure fresh water has been filled into the reservoir.
- Set up a water brew cycle and set a sizable cup on the drip tray plate.
The giant mug’s contents poured into the sink.
- Continue the brewing process in Step 3 until “ADD WATER” is displayed.
- You should run more water brew cycles if you still taste something.
NOTE: Repeat de-scaling if “DE-SCALE” is still visible after the procedure.
Service
The Keurig Brewers are high-quality devices that must last for years with careful maintenance but these are not user serviceable. Therefore, if warranty service is required, just contact Keurig Customer Care.
How To Store Keurig K-71?
Drain the Water Reservoir before storing and keep your Brewer in a safe, frost-free area. Please store your Brewer upright to prevent water leaks from the inner tank. You face the danger of water freezing within the Brewer if you keep it in a chilly climate, which could lead to harm. We advise washing the Water Reservoir with fresh water and brewing three cleansing brews without a K-Cup before using it for the first time after storing it. Turn off your brewer, unhook it from the wall, and empty the water reservoir before moving it to a new place. Please wait at least two hours for your Brewer to warm up to room temperature if it has been exposed to temperatures below freezing.
Transport the brewer upright to ensure the inner tank does not leak through the vent.
Troubleshooting Common Issues With The Keurig K-71
Sometimes, appliances stop working up to the mark due to our negligence or any other reason. At that time, we got worried. And it often happens that no technician is available at the time. Ahh! It is enough to make a coffee lover frustrated. But don’t lose heart as I am here to troubleshoot such common issues and also find their solutions. Let’s get started!
Brewer Does Not Have Power:
- Plug Brewer into an independent outlet.
- Check to be sure that it is plugged in securely.
- Plug into a different outlet.
- Reset your home’s circuit breaker if necessary.
- Ensure the Power Switch is turned on and LCD lights are illuminated.
Brewer Will Not Brew:
- After placing the K-Cup in the K-Cup Holder, ensure the Handle is pushed down securely, and the LCD Control Center reads “READY TO BREW” with the Left, Right, and BREW Buttons flashing, then press the Left, Right, or BREW Button.
- If the LCD Control Center indicates “ADD WATER” add water to the Water Reservoir or ensure it is seated properly in its base.
- If the LCD Control Center indicates “ADD WATER” even after refilling, contact Customer Service at 1.866.901.BREW (2739).
- The Exit Needle may need to be unclogged.
- If the LCD Control Center indicates “PRIME” and the blue light in the Water Reservoir is flashing, see below.
LCD Control Center Indicates “PRIME,” And The Blue Light In The Water Reservoir Is Flashing:
- Altogether, remove the Water Reservoir and thoroughly clean it.
- Ensure the Water Reservoir is filled with water. Return it to the Brewer and ensure it is seated properly.
- If you have completed the procedure two times and this situation persists, contact Customer Service at 1.866.901.BREW (2739).
Brewing A Partial Cup:
- The Exit Needle may need to be unclogged.
- Clean the K-Cup Holder Assembly if necessary and rinse under the faucet.
- The Water Reservoir may have been removed during brewing. Replace the Water Reservoir and perform a water brew without a K-Cup.
- “De-Scale” the Brewer.
- If you have repeated the de-scale procedure on your Brewer two times and it is still only brewing a partial cup, contact Customer Service at 1.866.901. BREW (2739).
The Time Is Not Displayed On The LCD Control Center:
- The time will only be displayed if you have not set it.
- If power is interrupted to the Brewer, you must set the clock again. Follow “Programming On/Off Features” in this article.
Brewer Shuts Off Or Turns On Automatically:
- Ensure that the Auto Off timer and/or On/Off time features are not set. To do this, press the MENU Button below “MENU” and scroll through the programming options. “OFF” should be displayed for Auto Off timer and On/Off. If “OFF” is not indicated, follow the directions in “Programming On/Off Features”.
The Blue Light In Water Reservoir Is Flashing:
- The water level is low, and a full cup cannot be brewed. Add water to Water Reservoir.
- If the LCD Control Center indicates “PRIME,” please see the situation to the left (LCD Control Center shows “PRIME,” and the blue light in the Water Reservoir is flashing).
If any problems persist, contact Customer Service at 1.866.901.BREW (2739).
Limited One-Year Warranty
Keurig, Incorporated warrants that your Brewer will be free of defects in materials or quality under everyday home use for one year from the date of purchase. You should complete and return the warranty card enclosed with your Brewer so your purchase information can be saved in our system. Keurig will repair or replace the Brewer free of charge upon receipt of proof of purchase. If a replacement Brewer is required to get serviced under this warranty, the replacement Brewer may be new or reconditioned. If a replacement Brewer is sent, a new one-year limited warranty will be applied to the replacement Brewer.
This warranty is only valid for Breweries in the United States and Canada. This warranty provides you with specific legal rights, and you may also have other rights that differ from state to state and, in the case of Canada, from province to province.
What Is Not Covered By The Limited Warranty?
This warranty does not cover incidental costs and expenses or consequential or incidental damages, such as property damage, caused by any breach, even if foreseeable, of this warranty.
The limitation mentioned above or exclusion may not apply to you, depending on the state or province where the transaction was made. Certain jurisdictions or regions do not permit the exclusion or limitations of incidental or consequential damages.
Moreover, this warranty does not cover harm brought on by services rendered by parties other than Keurig or its approved service providers by using components other than genuine Keurig components or by outside factors, including overuse, abuse, improper power supply, or acts of God.
Other Limitations
This warranty is exclusive and supersedes all other express warranties, written or oral. Additionally, Keurig disclaims all other warranties, including any implied warranty of merchantability or fitness for a particular purpose for your K-71 brewer. Because some states or provinces do not allow implied warranty disclaimers or limitations on how long an implied warranty lasts, the above limitation may not apply to you, depending on the state or province of purchase.
How Do You Obtain Warranty Service?
Keurig Brewers are high-quality devices that, with essential maintenance, should last many years with good performance. Call Keurig Customer Service if warranty service is required, nevertheless, immediately. Please only send your Brewer back for repair if you first contact Keurig Customer Service and have the Authorization to Return number (ATR). Without an ATR number, Keurig Brewers will be returned to the sender unserviced.
Keurig, Incorporated
55 Walkers Brook Drive
Reading, MA 01867
1.866.901.BREW (2739)
Conclusion
Finally! You have overcome all your fears related to operating Keurig K-71. after reading this guide, using the Keurig K-71 will now be a simple and convenient way to brew your favorite coffee, tea, or hot cocoa for you. With its user-friendly interface and customizable settings, you can enjoy a hot beverage within minutes without the hassle of traditional brewing methods.
Thank you for taking the time to read this guide and I hope you found it helpful and informative. But if you are confused about any point better to read again. Furthermore, if you want to know about coffee machines or beans then visit Coffeeaim.
Happy brewing!
FAQs
How Do I Use My Keurig K-71 For The First Time?
Congratulations on the purchase of your new Keurig K-71 coffee maker! Here’s a simple step-by-step guide to getting you started:
- Fill the reservoir halfway with cold water. The reservoir is at the back of the machine and can be easily removed for filling.
- Press the power button to turn on the machine.
- Lift the handle on the machine’s top to access the coffee pod slot.
- Select your favorite coffee pod and place it in the slot. Ascertain that it is properly seated.
- Select your desired cup size using the button controls on the machine’s front.
- Place a cup or mug on the drip tray beneath the coffee dispenser.
- To begin brewing, press the brew button.
- Remove your cup from the drip tray after brewing your coffee.
- Remove the used coffee pod and thoroughly rinse the drip tray and coffee pod holder.
That’s it! You can now enjoy a delicious cup of coffee made by your Keurig K-71 coffee maker. With its simple controls and user-friendly design, you’ll be brewing the perfect cup quickly. To ensure optimal performance and longevity, keep your machine clean and well-maintained. Have fun brewing!
Why Is My Keurig Not Brewing?
If your Keurig is not brewing, there could be a few reasons. Here are some common issues and solutions:
- The water reservoir needs to be filled or seated correctly. Make sure the water reservoir is filled with water and securely in place.
- The machine needs to be descaled. Mineral buildup can clog the machine’s internal components and prevent it from brewing correctly. Try descaling the machine according to the manufacturer’s instructions.
- The K-cup holder is clogged. Remove the holder and clean it with a paper clip or a toothpick to remove any obstructions.
- The machine needs to be reset. Unplug the appliance, wait a few minutes, and then plug it back in.
- The machine is experiencing a mechanical issue. The machine could have a mechanical issue if none of the above solutions work. Contact the manufacturer’s customer service at 1.866.901.BREW (2739) for further assistance.
Always follow the manufacturer’s instructions and safety precautions when troubleshooting your Keurig. With some troubleshooting, you can usually get your machine brewing again and enjoy your favorite coffee in no time!