Quick Navigation
Do you enjoy coffee? And your affection compelled you to purchase the Keurig B-150p machine?
Don’t worry if you need help with your Keurig B-150p machine and need help finding the manual. I will give you a detailed tutorial on how to use Keurig B-150p. It is a multi-purpose coffee machine that can make a variety of hot and cold beverages such as coffee, lattes, cappuccinos, and iced drinks. In this guide, I’ll take you through the steps of operating your machine so you can enjoy your favourite beverages easily. So, let’s get this party underway!
Precautionary Measures
While reading through safety precautions may appear exhausting; however, it is critical to prioritise your safety and the correct operation of your machine. Failure to do so may cause considerable inconvenience or even death.
Please read and comprehend the preventive measures before using your Keurig B-150p to ensure safety. Taking the time to do so will not only help avoid accidents. Still, it will also ensure that your machine operates at peak efficiency and produces the best cup of coffee possible.
By following these easy safety precautions, you can enjoy your Keurig B-150p with confidence, knowing that you’ve done everything possible to protect yourself and your machine.
Related: Safety Measures of Keurig B-150p.
Specifications Of Keurig B-150p
I understand you are accountable and should have read the specs before purchasing your Keurig B-150p. However, allow me to provide you with more detail of specifications so you can determine whether it is a suitable fit for your home. If you think it is unsuitable for you and your home, you must return it before using it. Let’s get into the specs!
| Specification | Details |
| Product Line/System | Keurig 1.0 Commercial |
| K-Cup Compatibility | Unlicensed K-Cups, Keurig 2.0 licensed K-Cups |
| Brew Sizes | 4 oz (118ml)6 oz (177ml)8 oz (236ml)10 oz (296ml) 12 oz (355ml) |
| Water Reservoir | 90 oz (3L) (direct water line compatible) |
| Water Filter | Compatible but not included |
| Display | Colour touch LCD screen with Brew button |
| Temp Control | Yes |
| Temp Control | No |
| Strength Control | No |
| Dimensions | 10.4″ W x 13.9″D x 14.0″H |
| Weight | 18.0 lbs (8.6kg) |
| Other Features | UL Commercial listedQuiet Brew Technology24 hours programmable clockAuto-On/OffNSF certified for use in foodservice outlets Removable drip trayBilingual instructions on colour touch display |
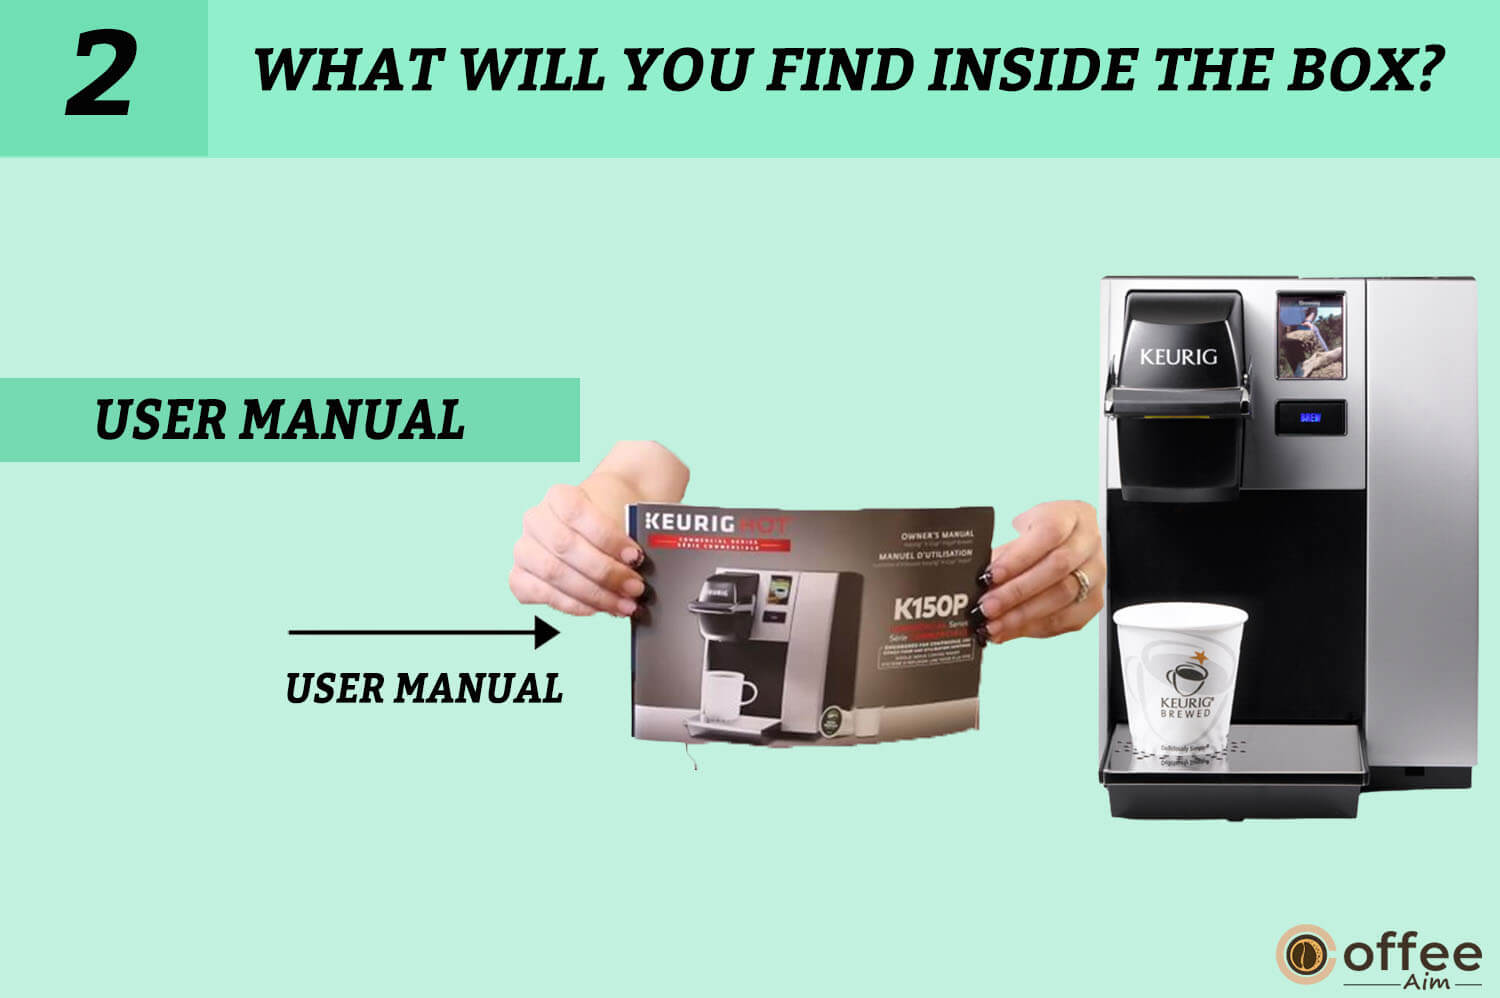
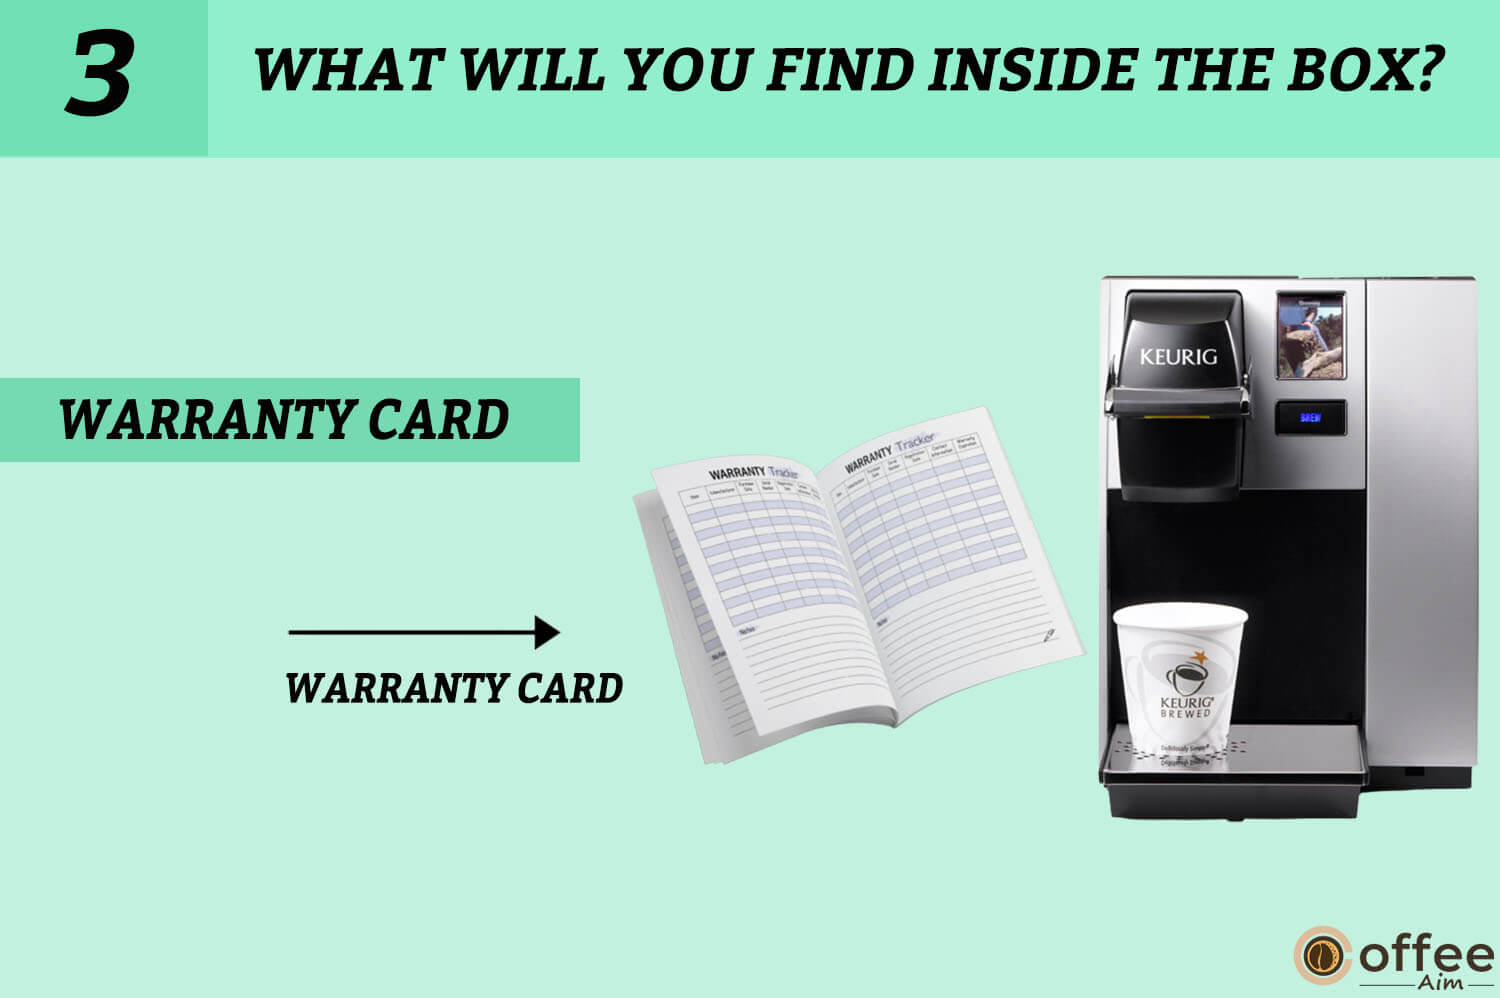
What Will You Find Inside The Box?
The Keurig B-150p is a fantastic coffee machine that uses Keurig K-Cups to produce delicious cups of coffee. When you receive a Keurig B-150p commercial coffee machine, the following items come in the box. Let’s uncover these items!
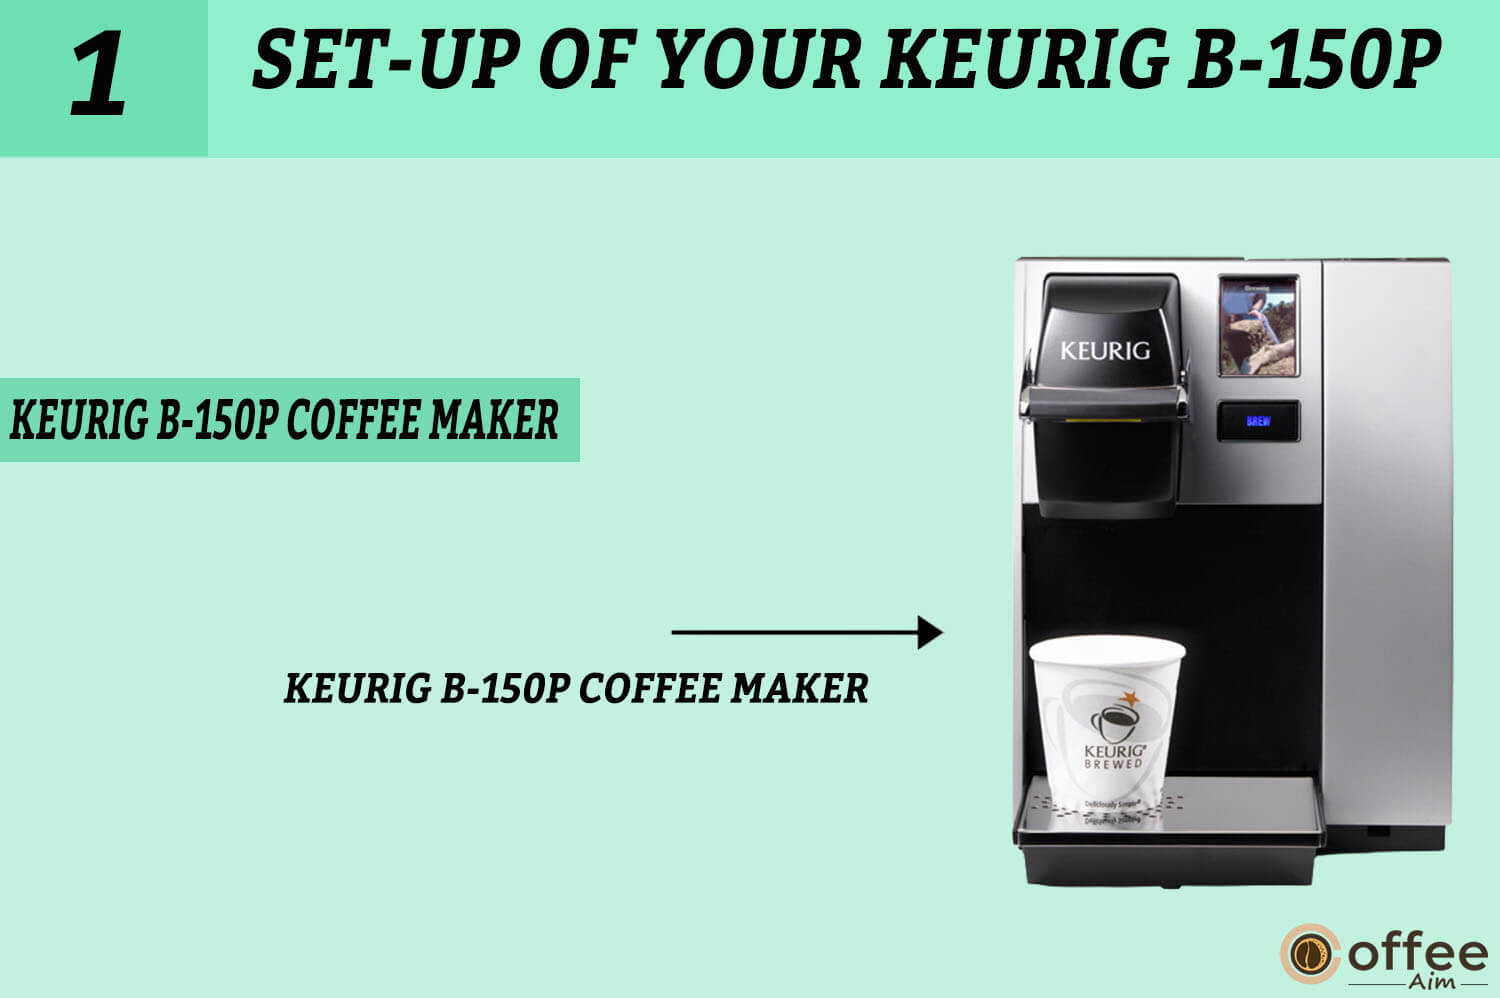
The Keurig B-150p Coffee Maker
This is considered the primary component inside the package and will be used for making coffee. The Keurig B-150p is a well-constructed and durable coffee maker made for commercial use. Maintaining and cleaning is simple, making consistent, high-quality coffee with little work.

User Manual
A user manual is a booklet that contains directions for assembling and operating a coffee maker. It typically includes instructions on filling the water reservoir, inserting the K-Cup, brewing coffee, and taking care of the coffee machine.
Warranty Card
The warranty card included with the coffee machine package describes the manufacturer’s warranty and includes registration steps. The warranty includes material and workmanship defects, and the length of coverage differs depending on the model and region.
Important: It is critical to thoroughly inspect the package upon arrival to ensure all required components are included. Because missing items can delay the coffee-making process, it’s best to request a replacement as soon as possible. Checking everything twice ensures the coffee maker is in good functioning order and ready to use.
Set-up Of Your Keurig B-150p
You might wonder where to begin if you’re new to using a Keurig machine. The setup process is an essential step in using your coffee machine and can directly affect the quality of your coffee. In this section, I’ll show you how to set it up, so you can brew a delicious cup of coffee in a flash.
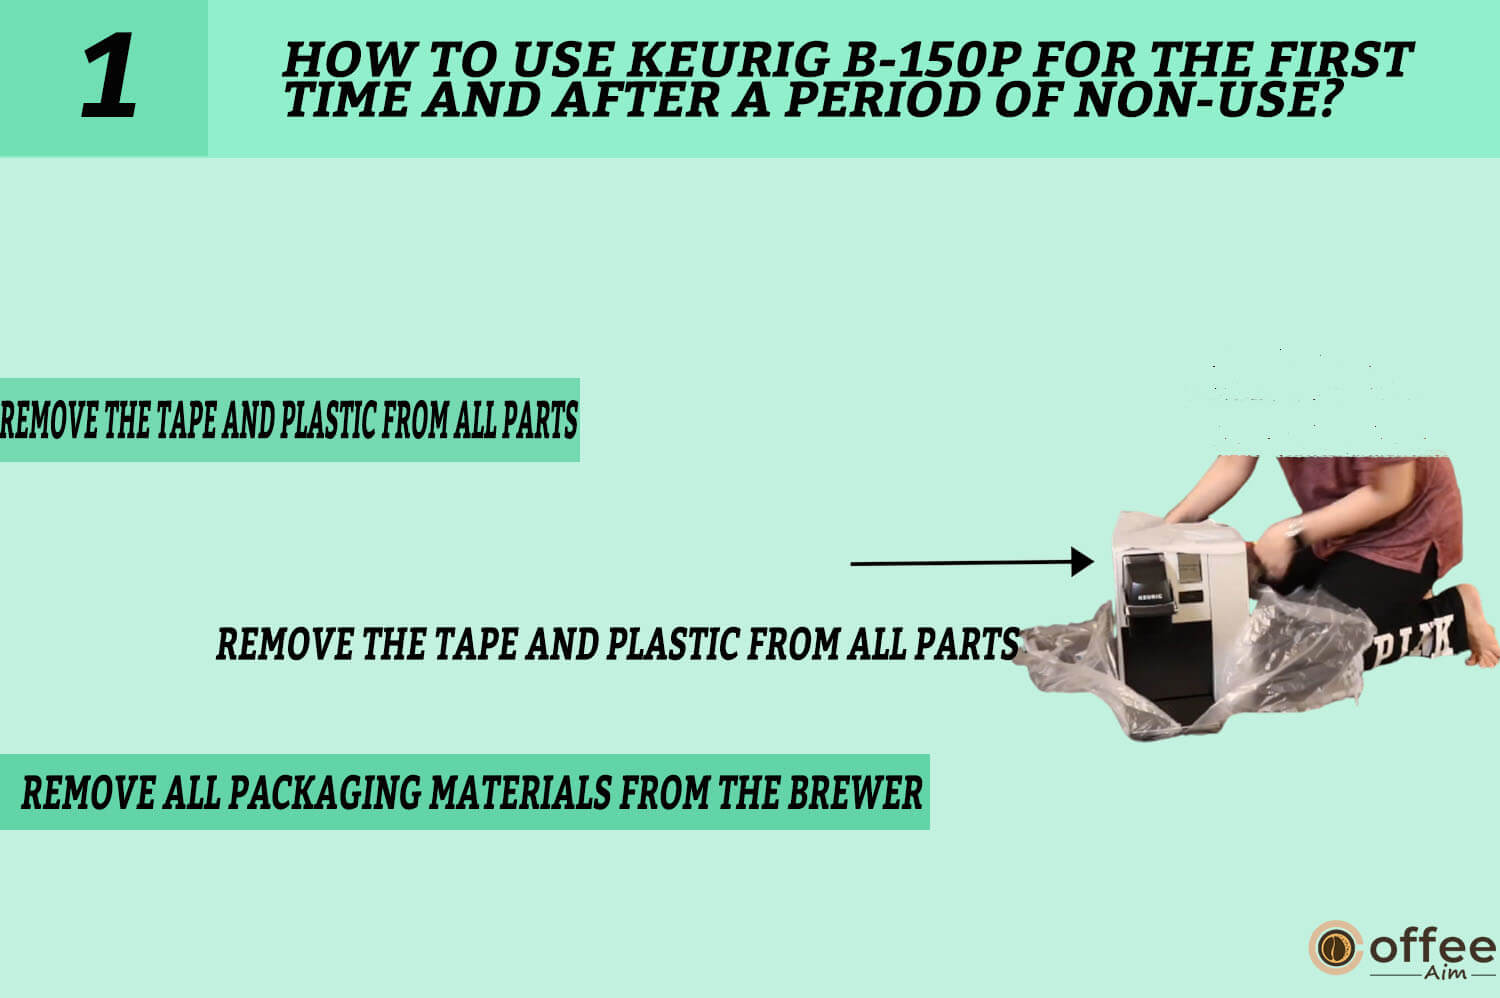
Unpacking Instructions
Unpacking your Keurig B-150p can be thrilling, but it’s essential to carefully follow the instructions to avoid any machine damage or missing parts. In this section, I’ll take you through the process of unpacking, including identifying all of the required components and ensuring everything is in excellent working order. Following these directions, you can easily set up your machine and enjoy your favourite hot beverages.
- It is critical to closely follow the instructions to ensure you unpack your Keurig B-150p securely and effectively.
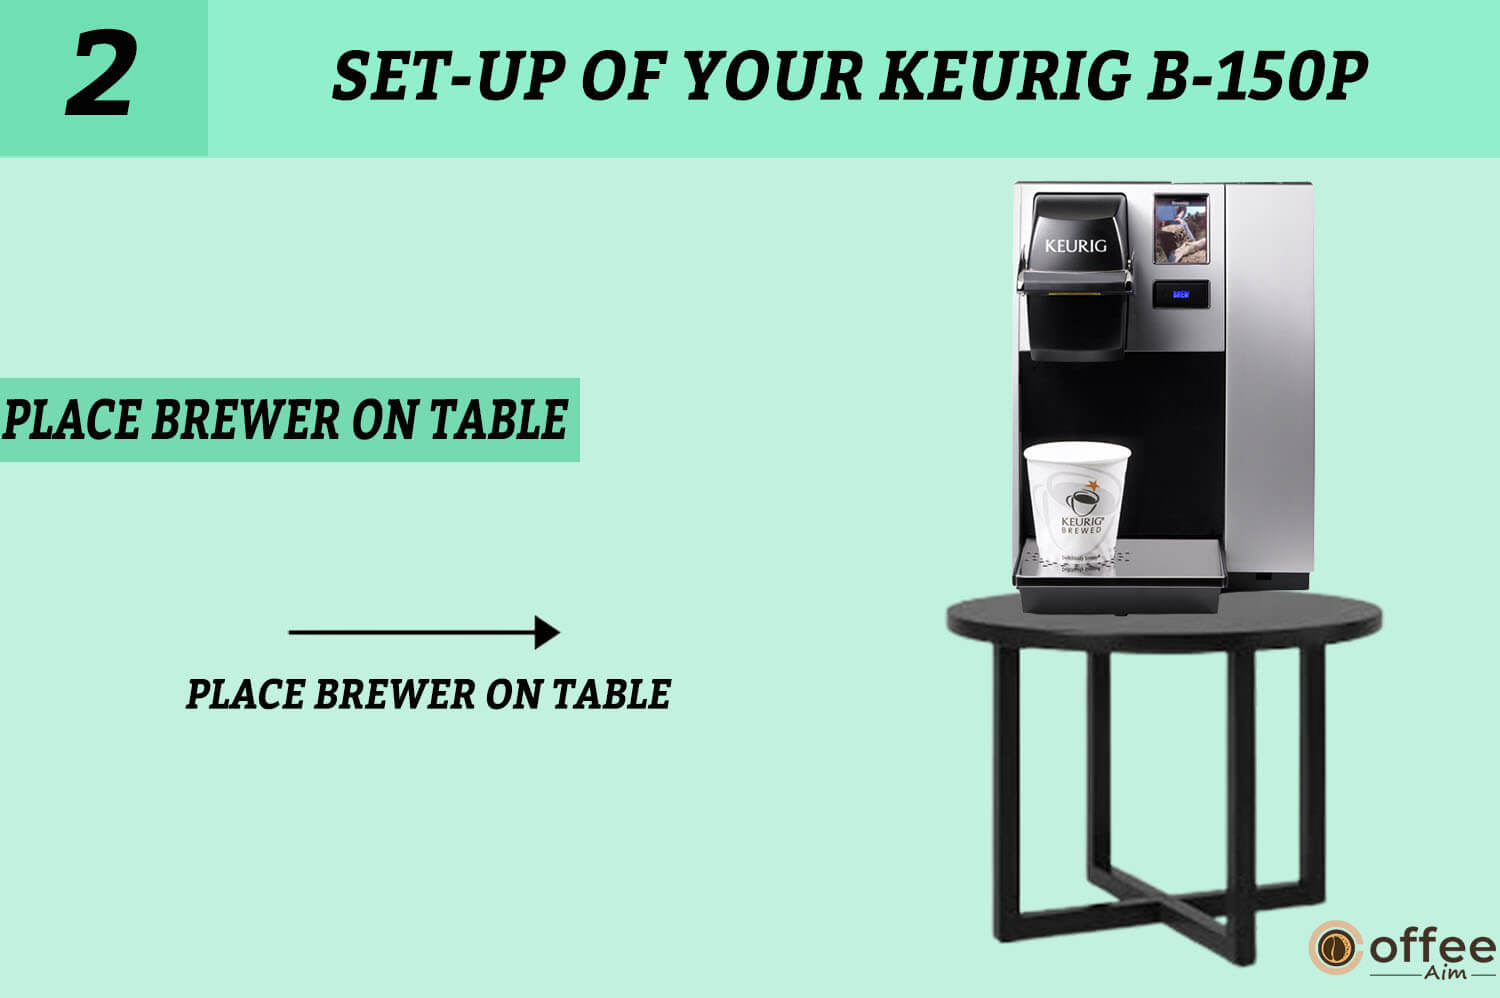
- Place the Brewer box on a broad, firm surface, such as a table or countertop, and then open it.
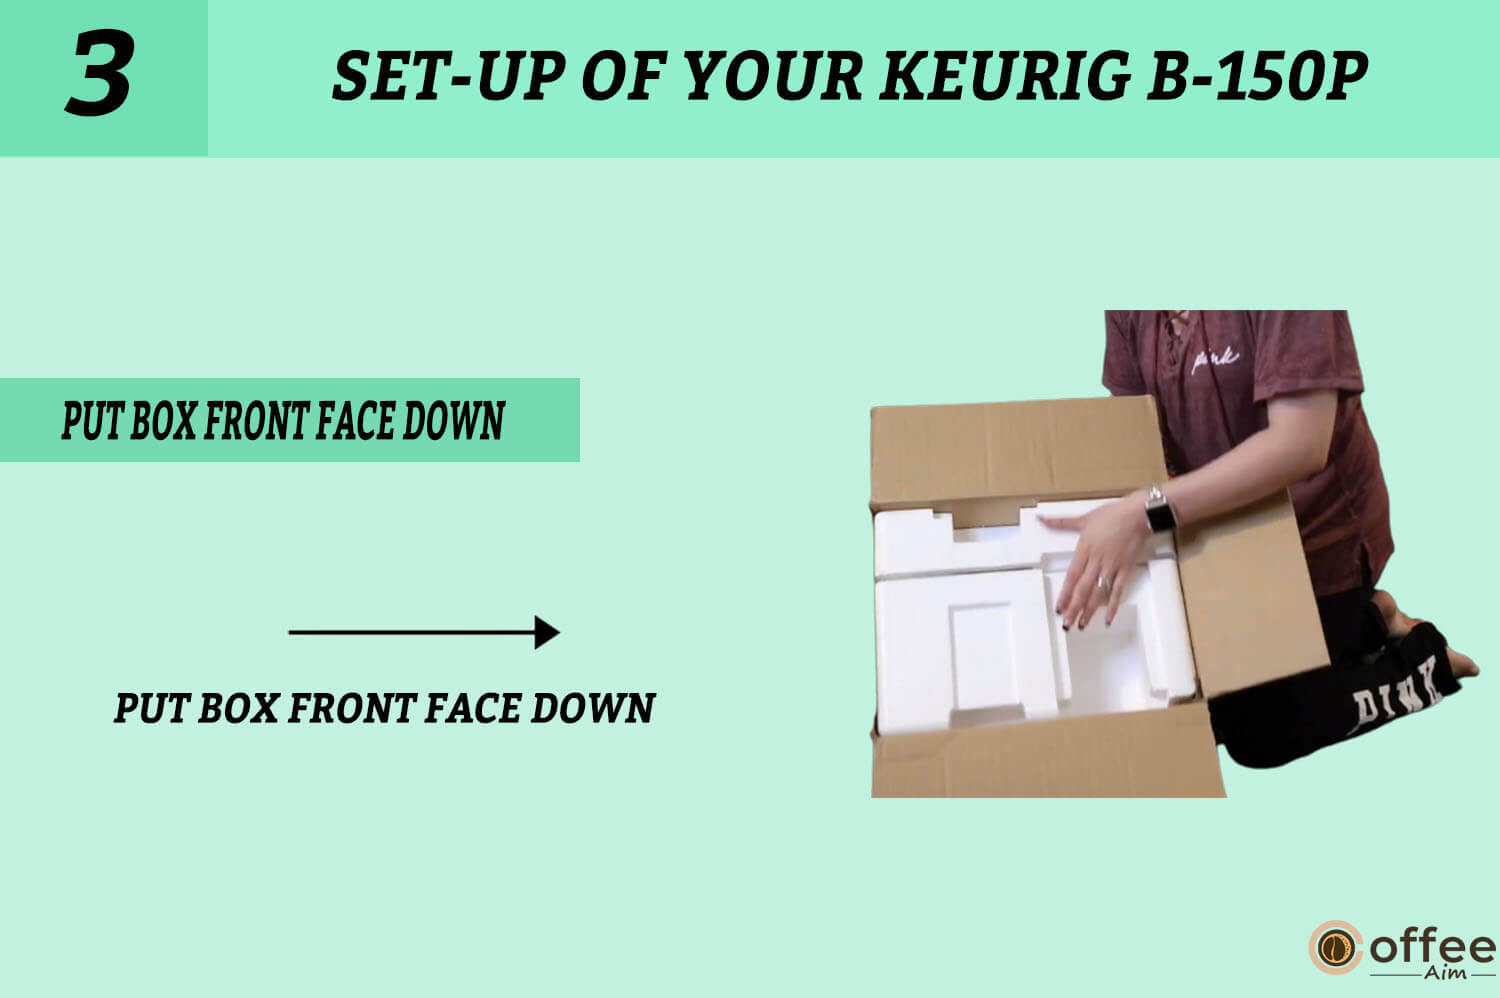
- Before turning the box on its side, with the front face down, remove all enclosed material.
- Carefully remove the poly foam containing the Brewer, then remove the top poly foam packaging material, lift the Brewer off the bottom polyfoam, and place it on a level or stable surface.
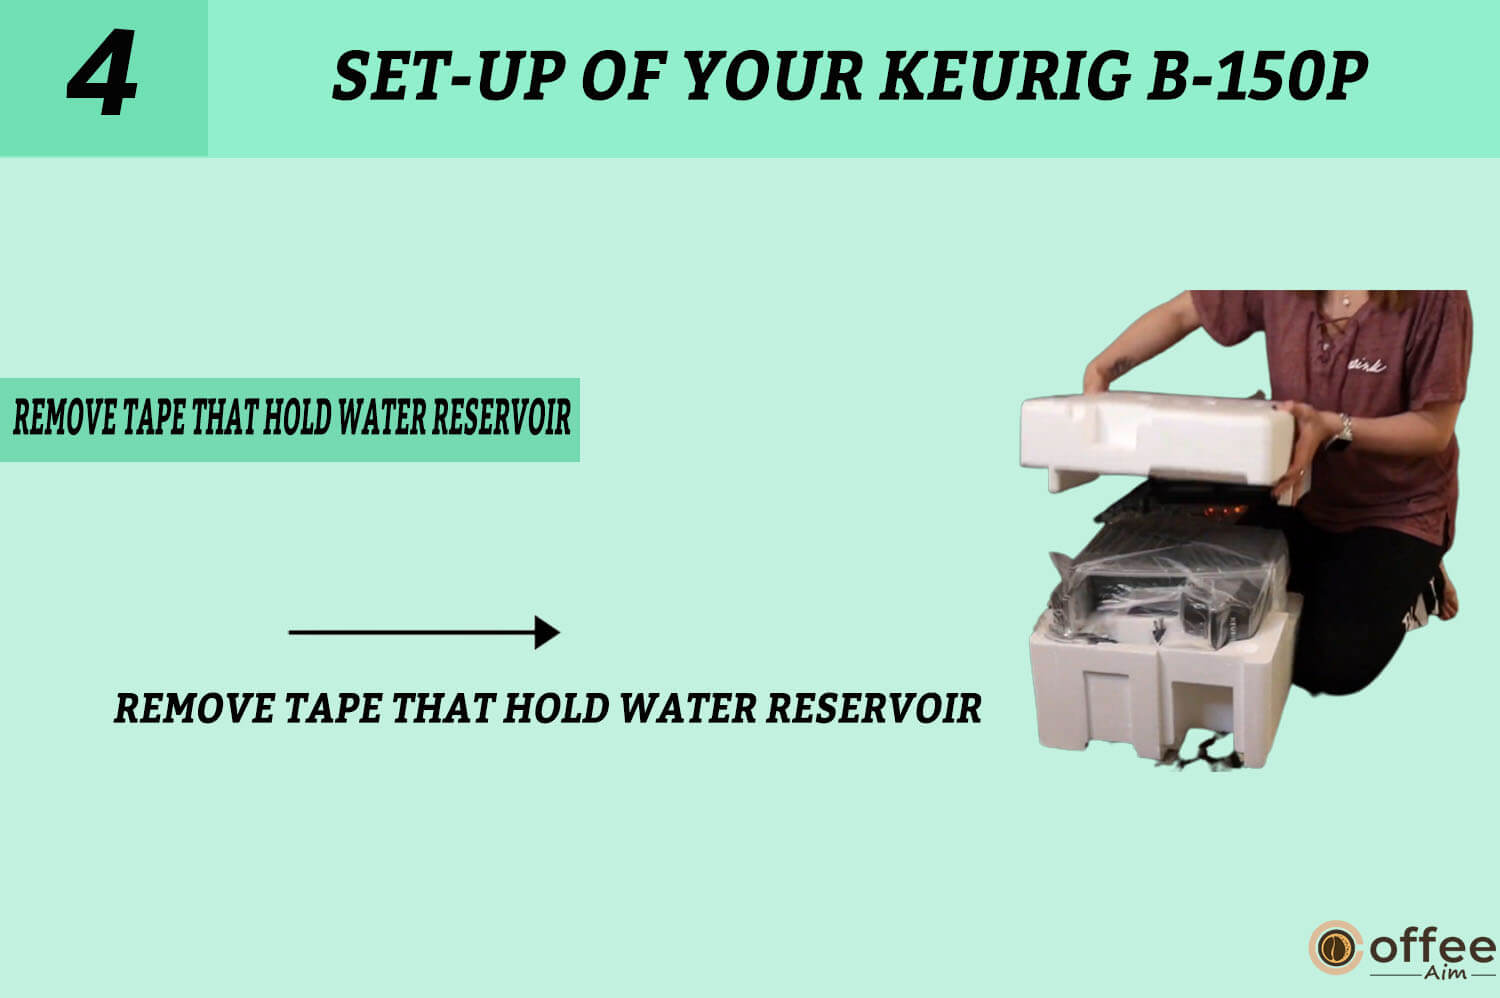
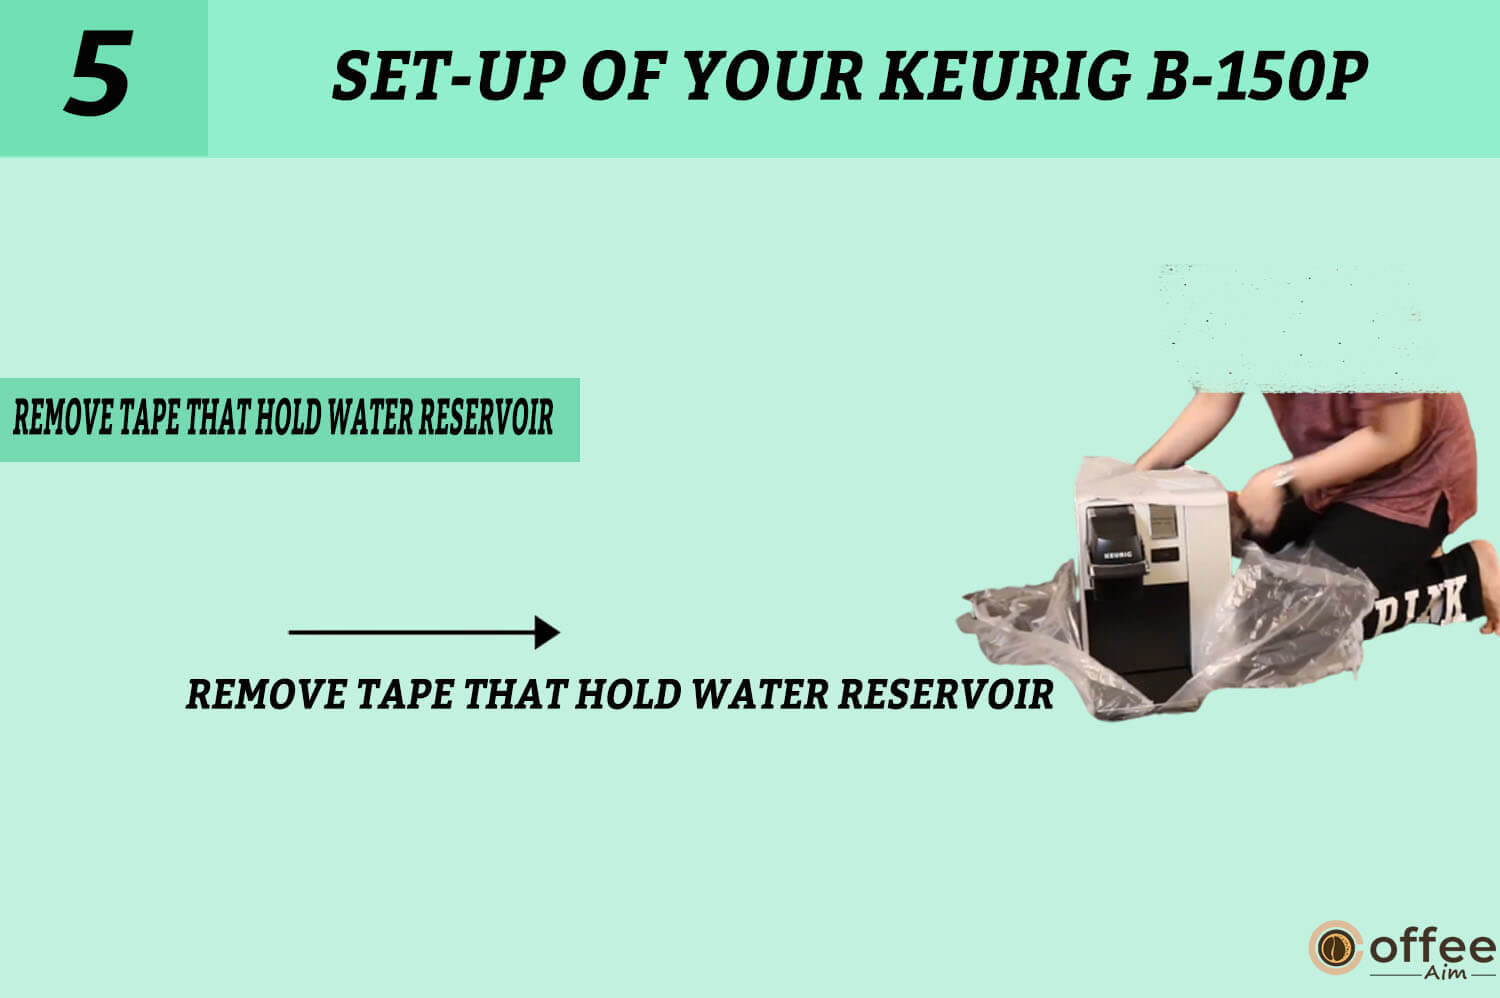
- Remove the tape holding the Water Reservoir in position after recording the serial number on page 3 of the guide, and save all packaging materials in case of future shipping.
These steps will allow you to safely unpack your Keurig B-150p and ensure its parts are in good working condition.
Warning: Always keep all plastic bags away from children
Parts Of Keurig B-150p
To guarantee a smooth and trouble-free brewing experience, familiarise yourself with all of the components of your Keurig B-150p before making your first cup of coffee. To get you started, I’ve collected a list of all the parts and images. Going through this list will help you understand the purpose of each component and how to use it, making your brewing process more straightforward and enjoyable. So, let’s get started and look at the different parts of your Keurig B-150p!
1. Handle
The handle on the Keurig B-150p is crucial for putting in and taking out the K-Cup portion pack from the brewer. It is built to be durable and straightforward to grip, thus making it ideal for those with restricted hand mobility.

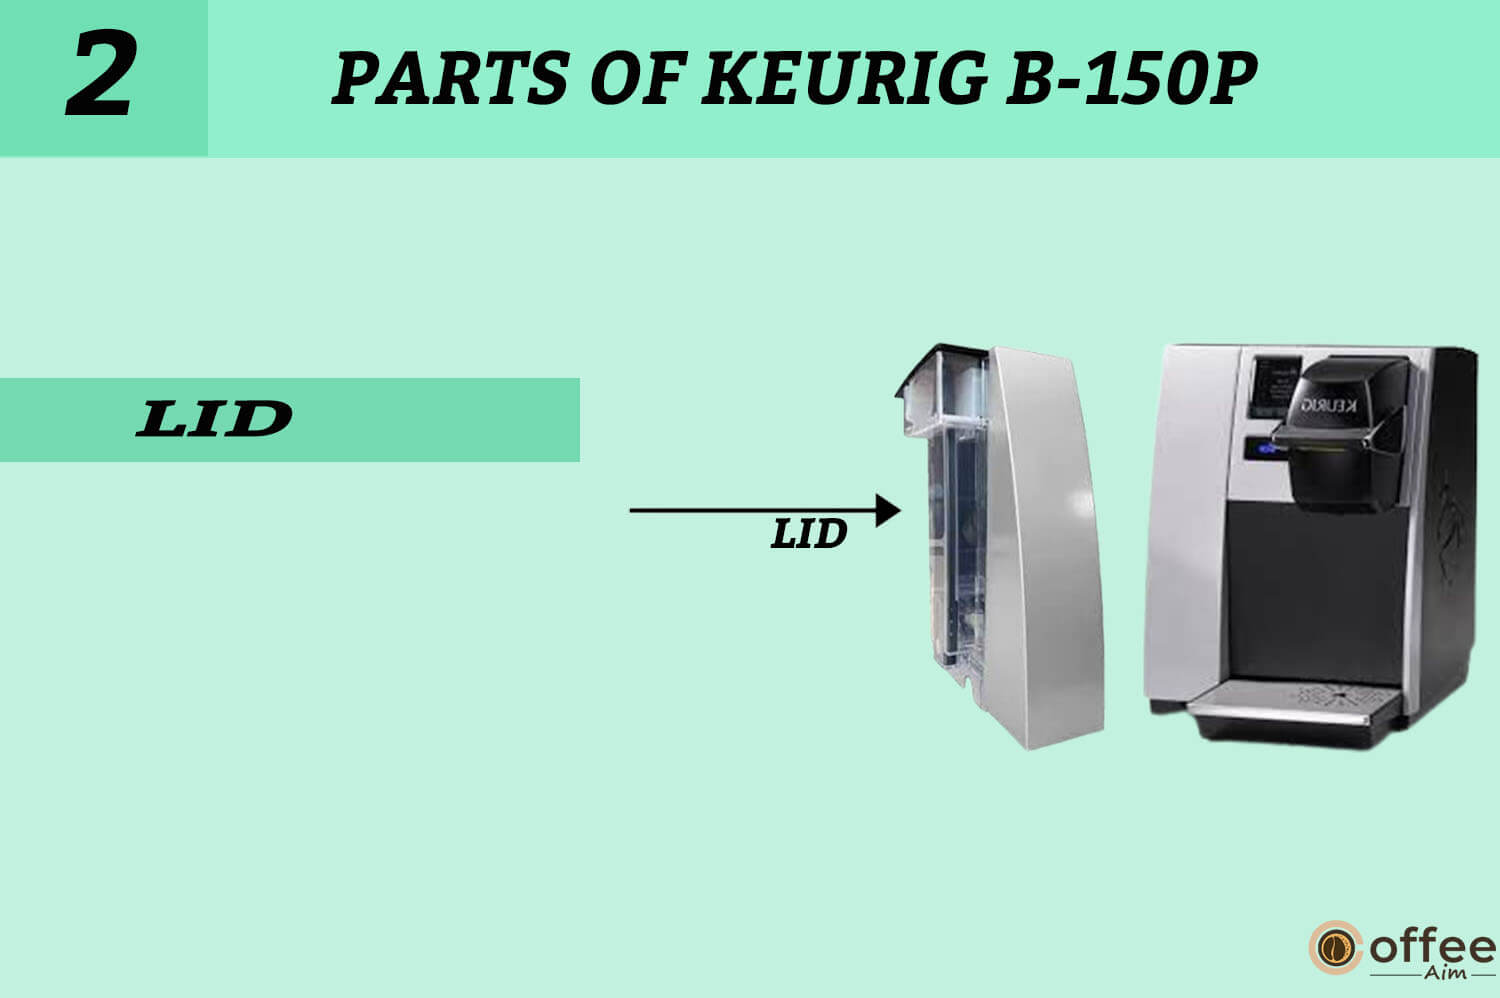
2. Lid
The Keurig B-150p lid, which covers the top opening of the K-Cup portion pack holder, is a vital part of the brewer. It secures the pack during brewing, preventing coffee grounds and other debris from entering your cup. The lid is simple to open and close, making getting in and out of the K-Cup portion packs easy.
3. LCD Screen
This device has a functional LCD screen with an easy-to-use interface for brewing coffee, tea, and other beverages. The Keurig B-150p LCD screen, with its modern and stylish design, provides a simple yet effective means to make coffee or tea for your workplace.

4. K-Cup Assembly Housing
The Keurig B-150P brewing device relies mainly on the K-Cup Assembly Housing. This part holds the K-cup assembly (K-cup pod holder & funnel), providing a consistent and dependable cup of coffee every single time.

5. K-Cup Holder
This component is meant to keep the K-Cup securely in position during brewing, ensuring that hot water enters the pod and extracts the flavours and aromas of the coffee or tea.

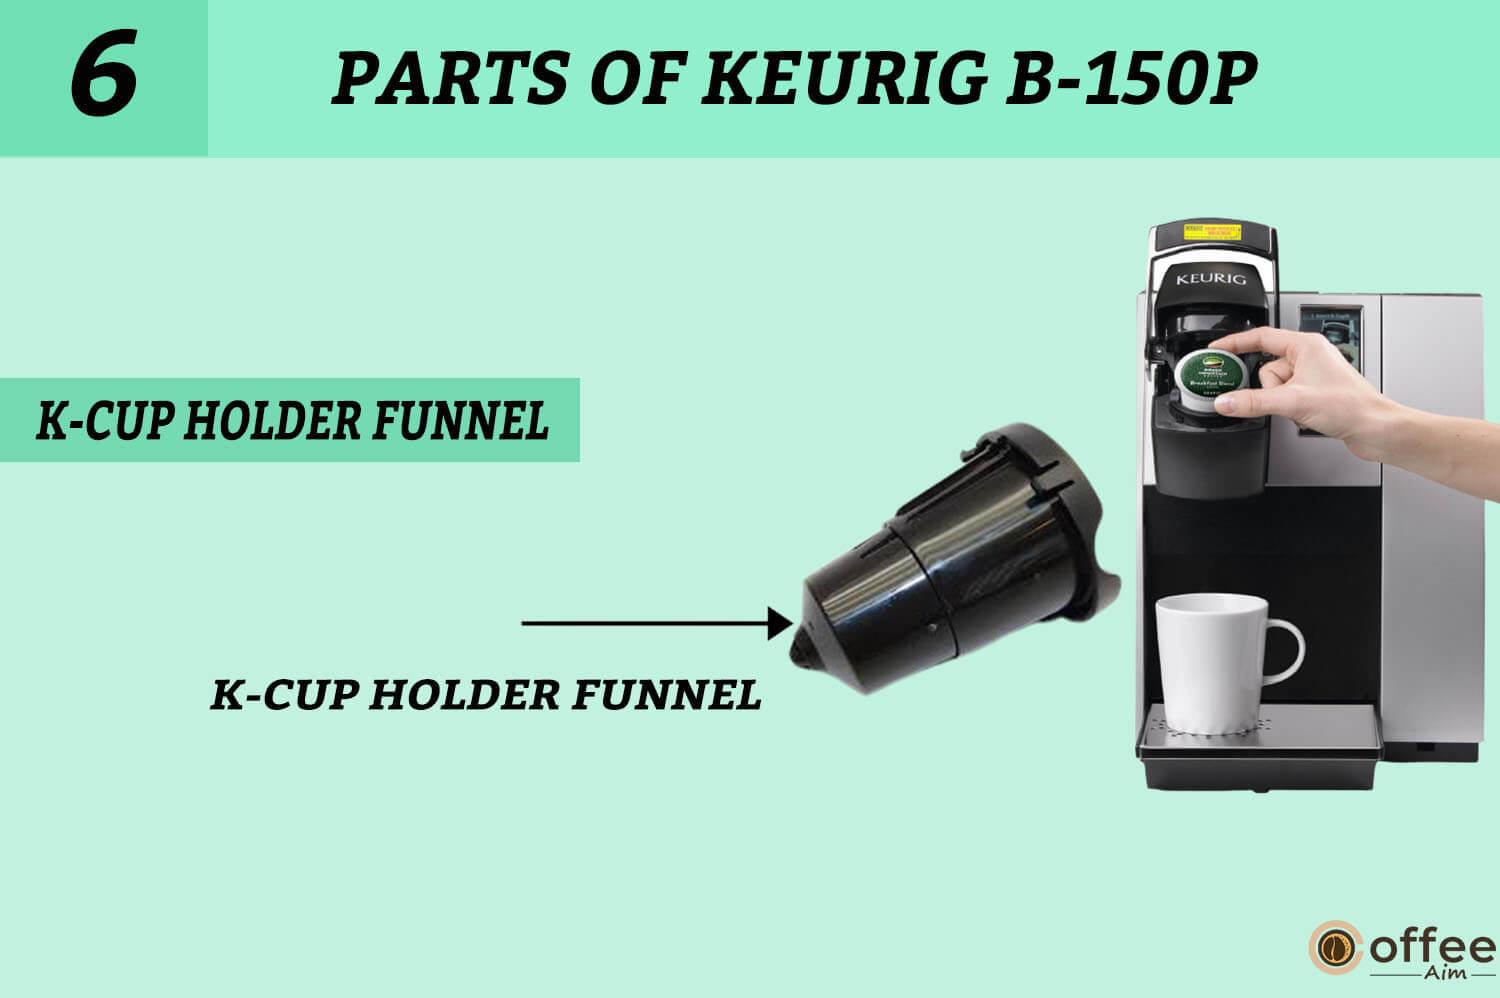
6. K-Cup Holder Funnel
It’s a small piece of plastic that keeps the K-cup in position while the machine brews the coffee. The K-cup holder funnel is designed to fit precisely into the coffee maker and ensure proper brewing. The K-cup may only rest securely with the K-cup holder funnel, resulting in a messy and ineffective brewing process.
7. Drip Tray Plate
The dip tray plate is an essential feature of the Keurig B-150p brewing system that plays a role in the cleanliness of the machine and its surroundings. This component at the machine’s base catches any extra liquid that may drip or spill during the brewing process. Through this plate, these spills enter the drip tray.

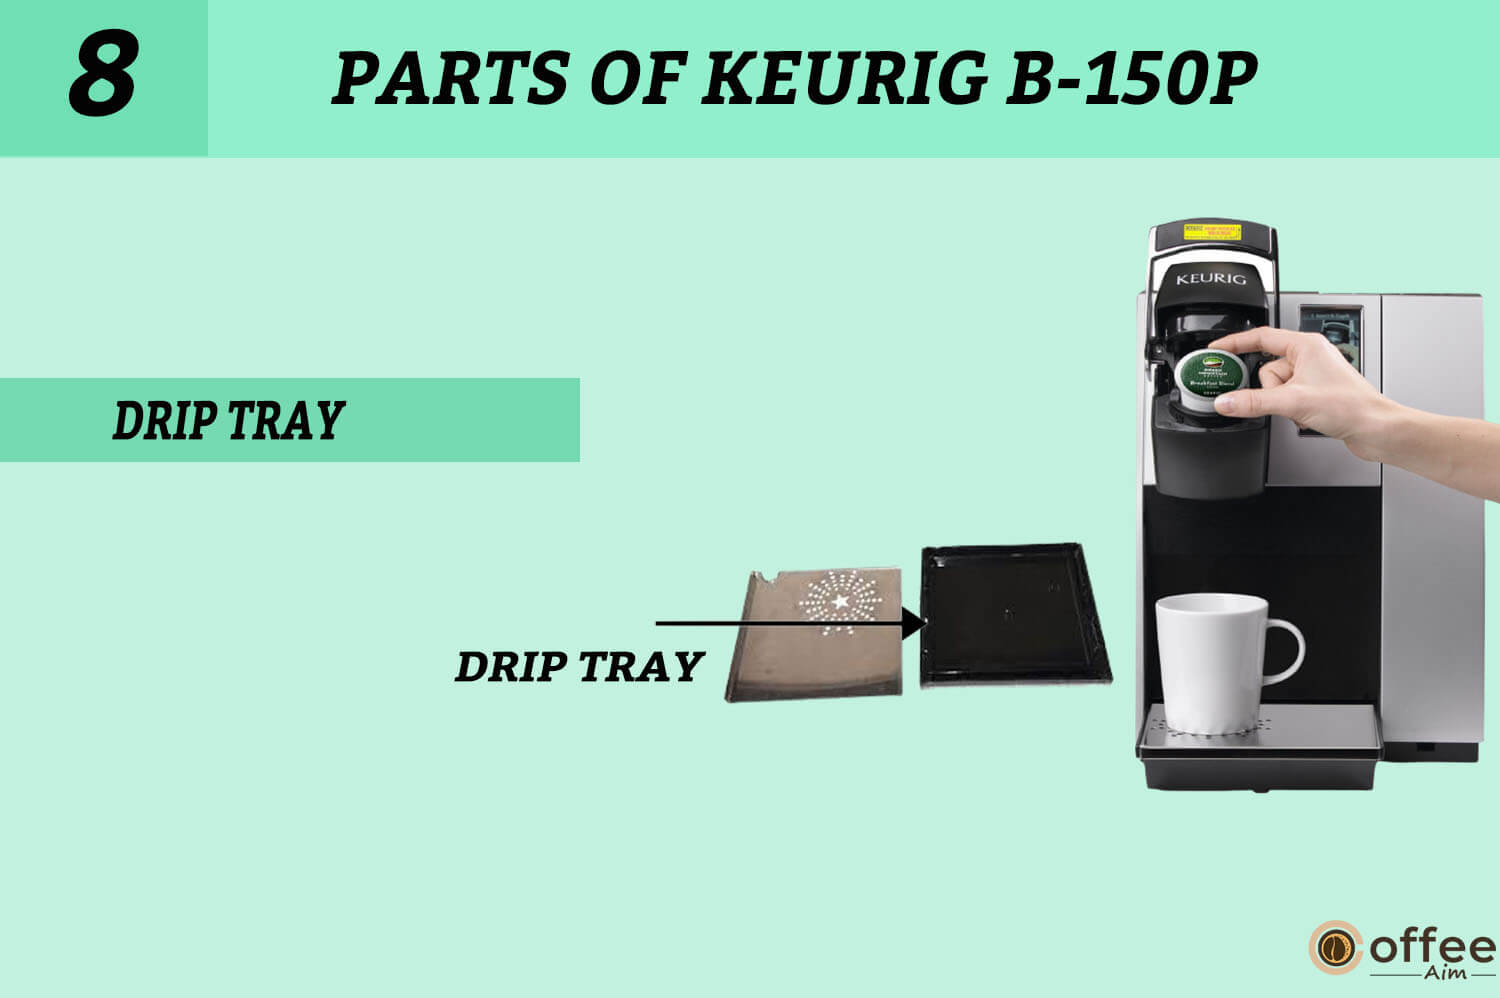
8. Drip Tray
This tray is easy to remove and clean, making it a valuable and accessible option for busy commercial settings. It holds the coffee/water spills. The Keurig B-150p drip tray can generally contain up to 8 ounces of liquid before needing to be emptied. You should check the drip tray regularly and empty it as required to avoid any overflow or mess.
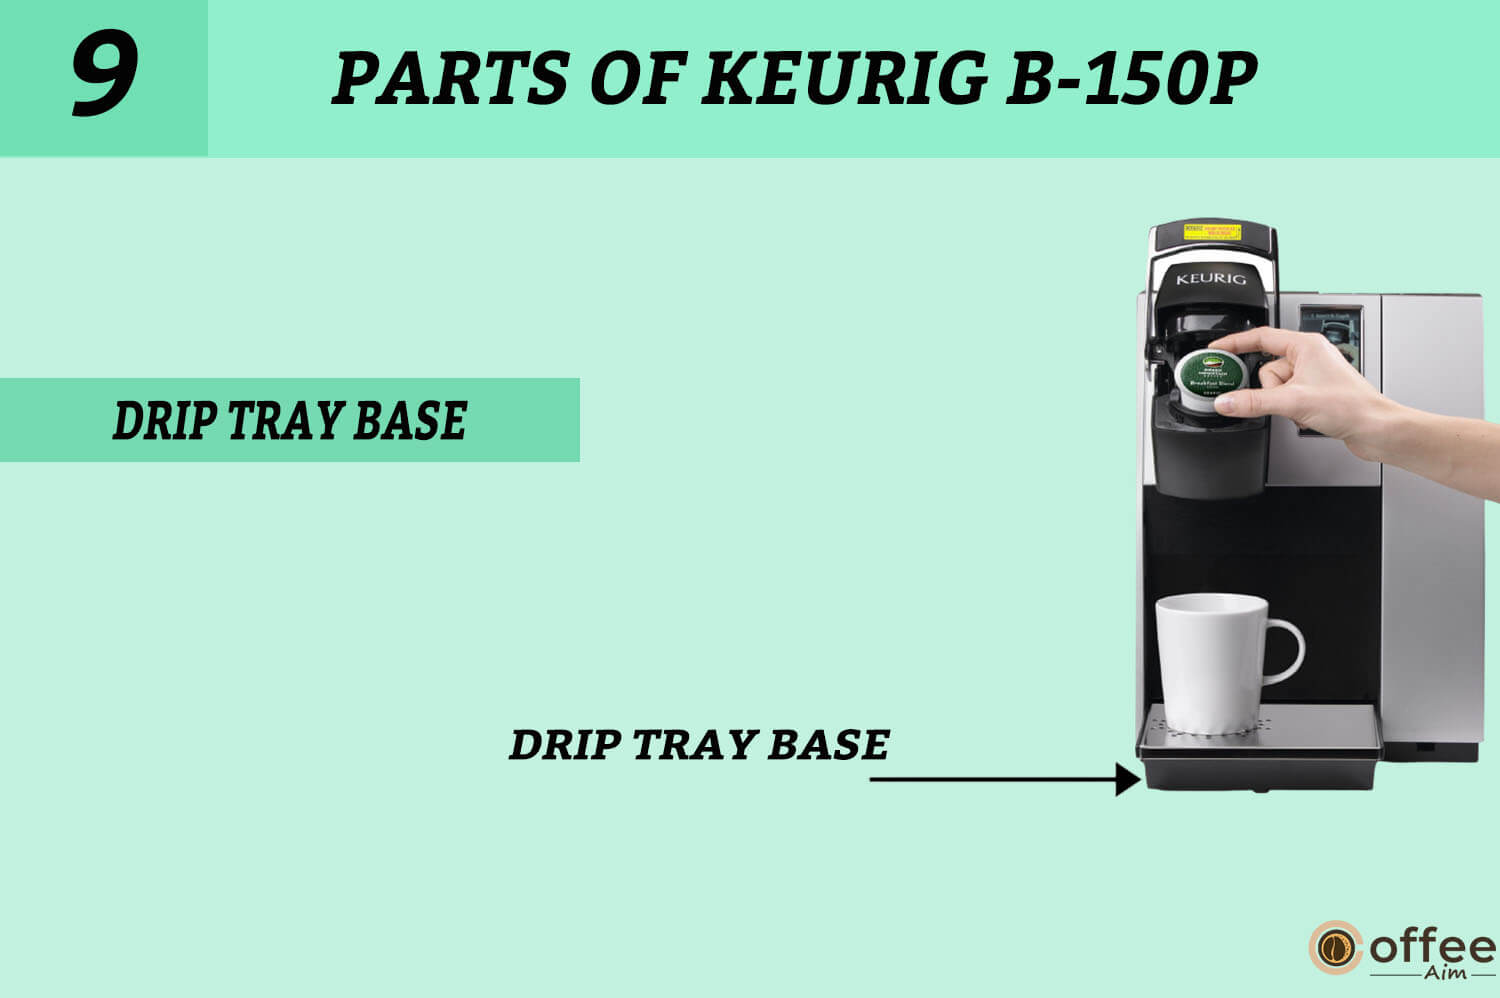
9. Drip Tray Base
The drip tray base was designed to give the cup an additional height, allowing it to fit securely beneath the coffee outlet.
You can use a taller mug by removing the standard drip tray and placing the mug immediately on the drip tray base. This allows you to brew coffee straight into the mug rather than transferring it from a smaller cup.
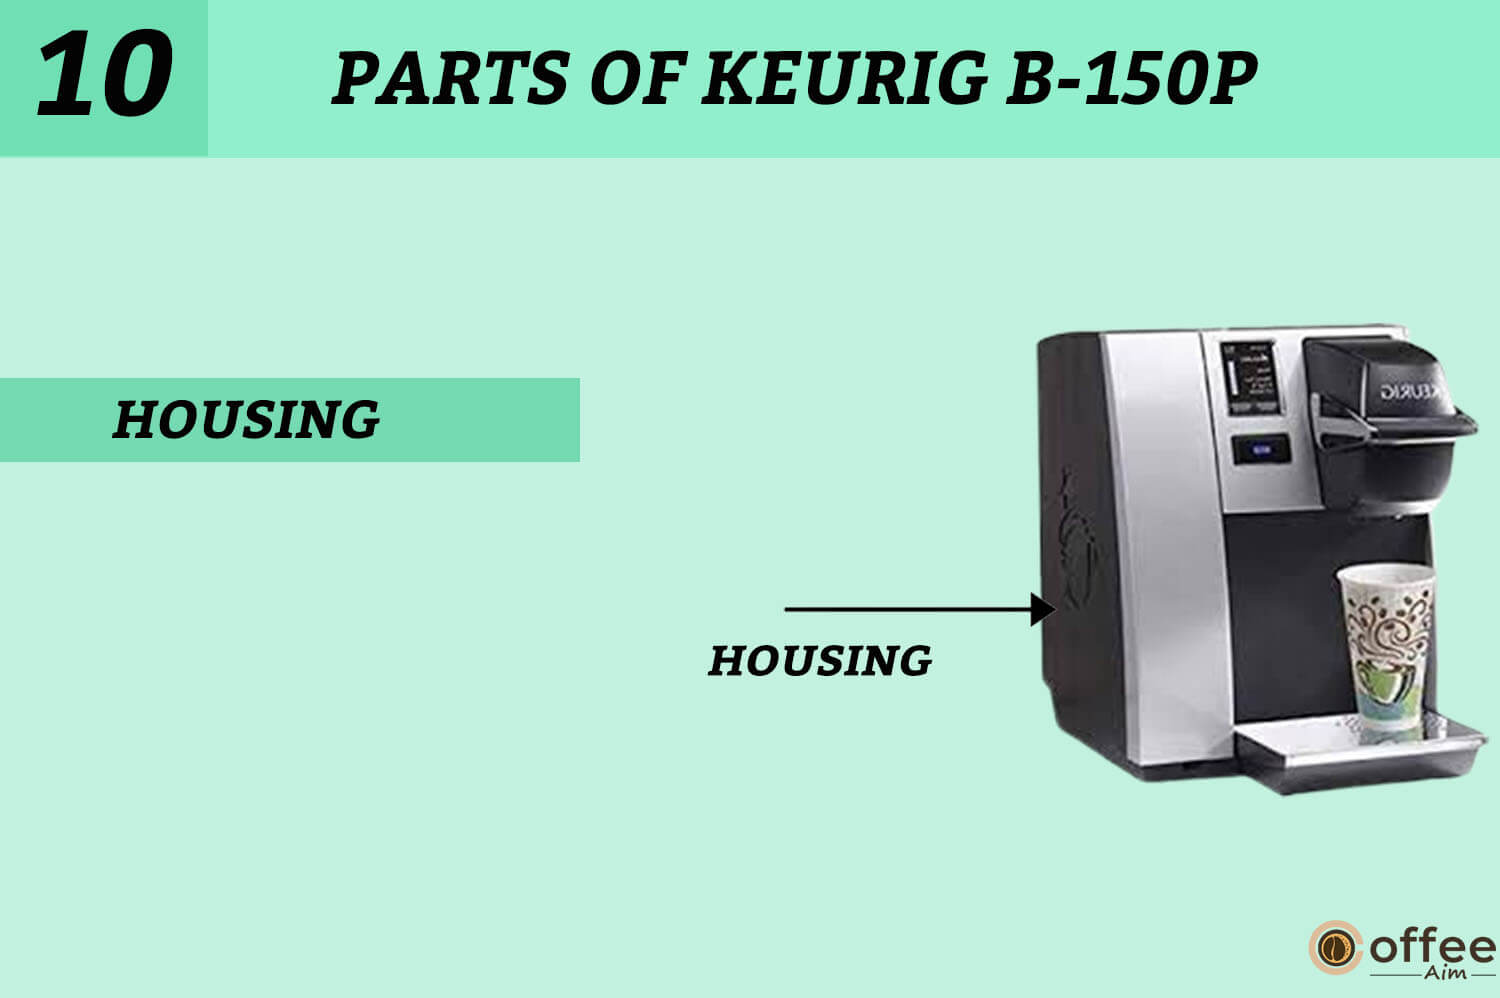
10. Housing
The Keurig B-150P housing is the place that adjusts and protects the coffee maker’s internal component (brewing unit). The Keurig B-150P coffee maker’s housing contains several components: the water reservoir, control panel, coffee spout, and power cable. The housing also houses the various buttons and controls used to run and customise the brewing process, such as the power button, brew size selector, and hot water dispenser button.
11. BREW Button
The brew button is its primary control for starting the brewing procedure. It is easily accessible on the coffee maker’s front panel and has a simple, user-friendly design. The brew button also has indicator lights that suggest the status of the brewing process, enabling you to observe your coffee maker’s activity readily.

12. Power Switch
The Keurig B-150p’s power switch is an essential component that lets you turn the coffee maker on and off. It is typically found on your machine’s front side just beneath the LCD screen and is easily accessible.

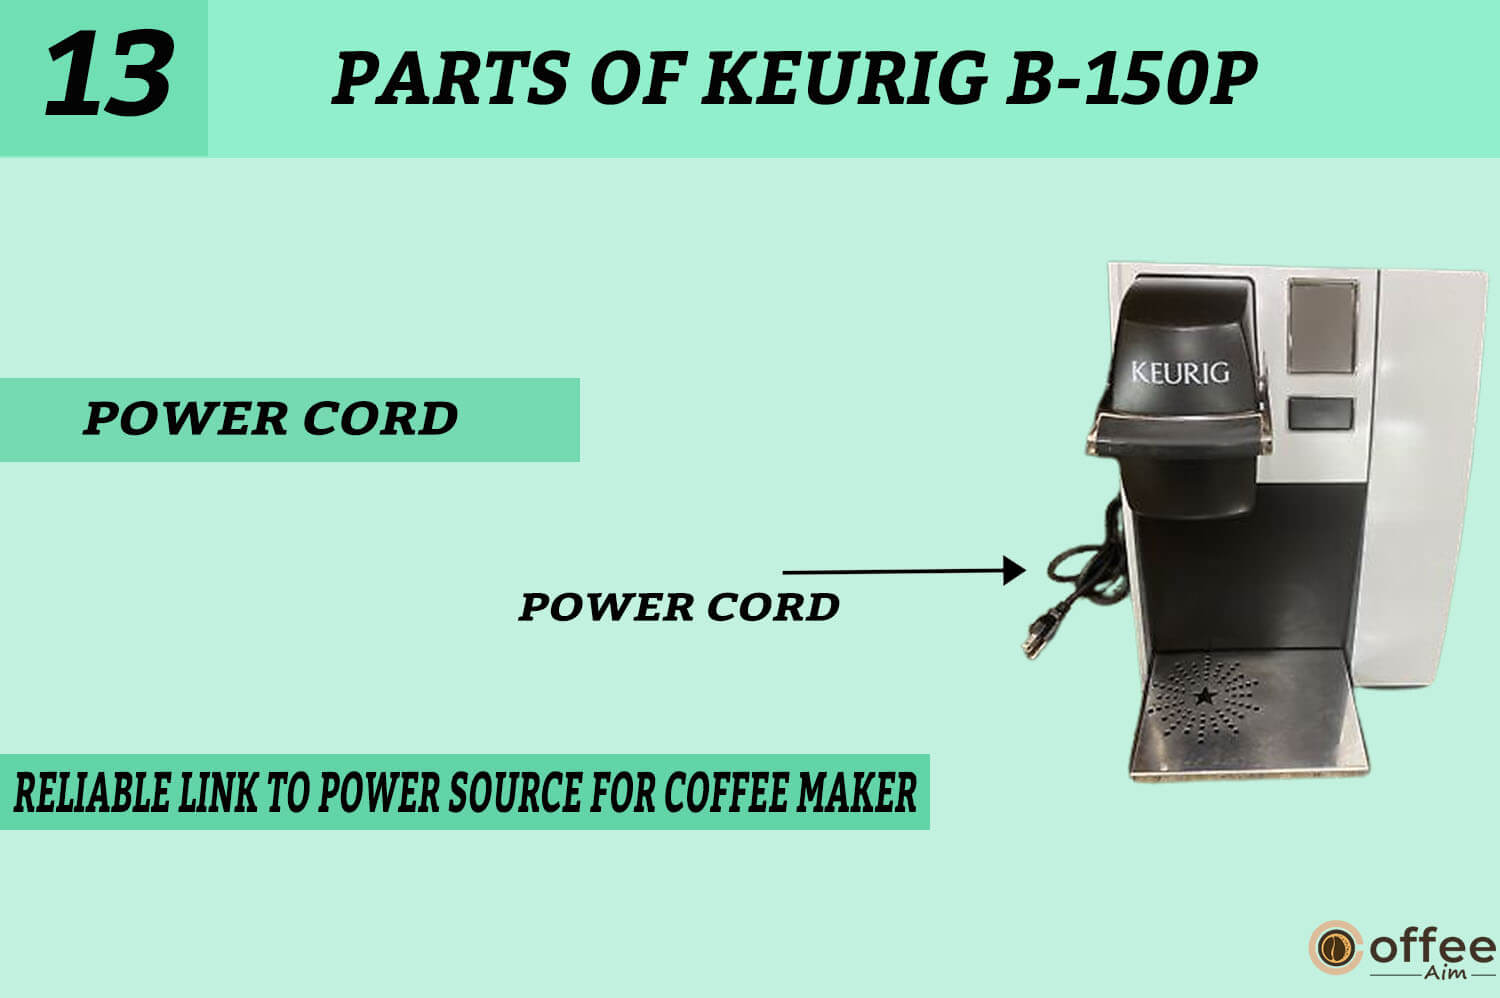
13. Power Cord
The power cord is the electrical cable that links the coffee maker to a power source. The cord is frequently made of durable materials to ensure that it can withstand frequent use and activity.
14. Drain Hatch And Knob
The Drain Hatch and Knob enable you to plug into the drain tube. Furthermore, the hatch and knob are built to be durable and long-lasting, enabling them to cope with frequent use and cleaning.

15. Drain Tubes And Plugs
The Keurig B-150p Drain Tubes and Plugs are essential components that allow for adequate flow and washing of the coffee maker. They are meant to path excess liquid or residue from the machine to the drain, thus keeping the coffee maker clean and functional.

Plumbing Instructions Of Keurig B-150p
Plumbing instructions for the Keurig B-150p coffee maker are required to ensure the machine is installed correctly and operated. These directions walk you through connecting the coffee maker to a water source, including the required plumbing connections and any additional accessories. Let’s do it!
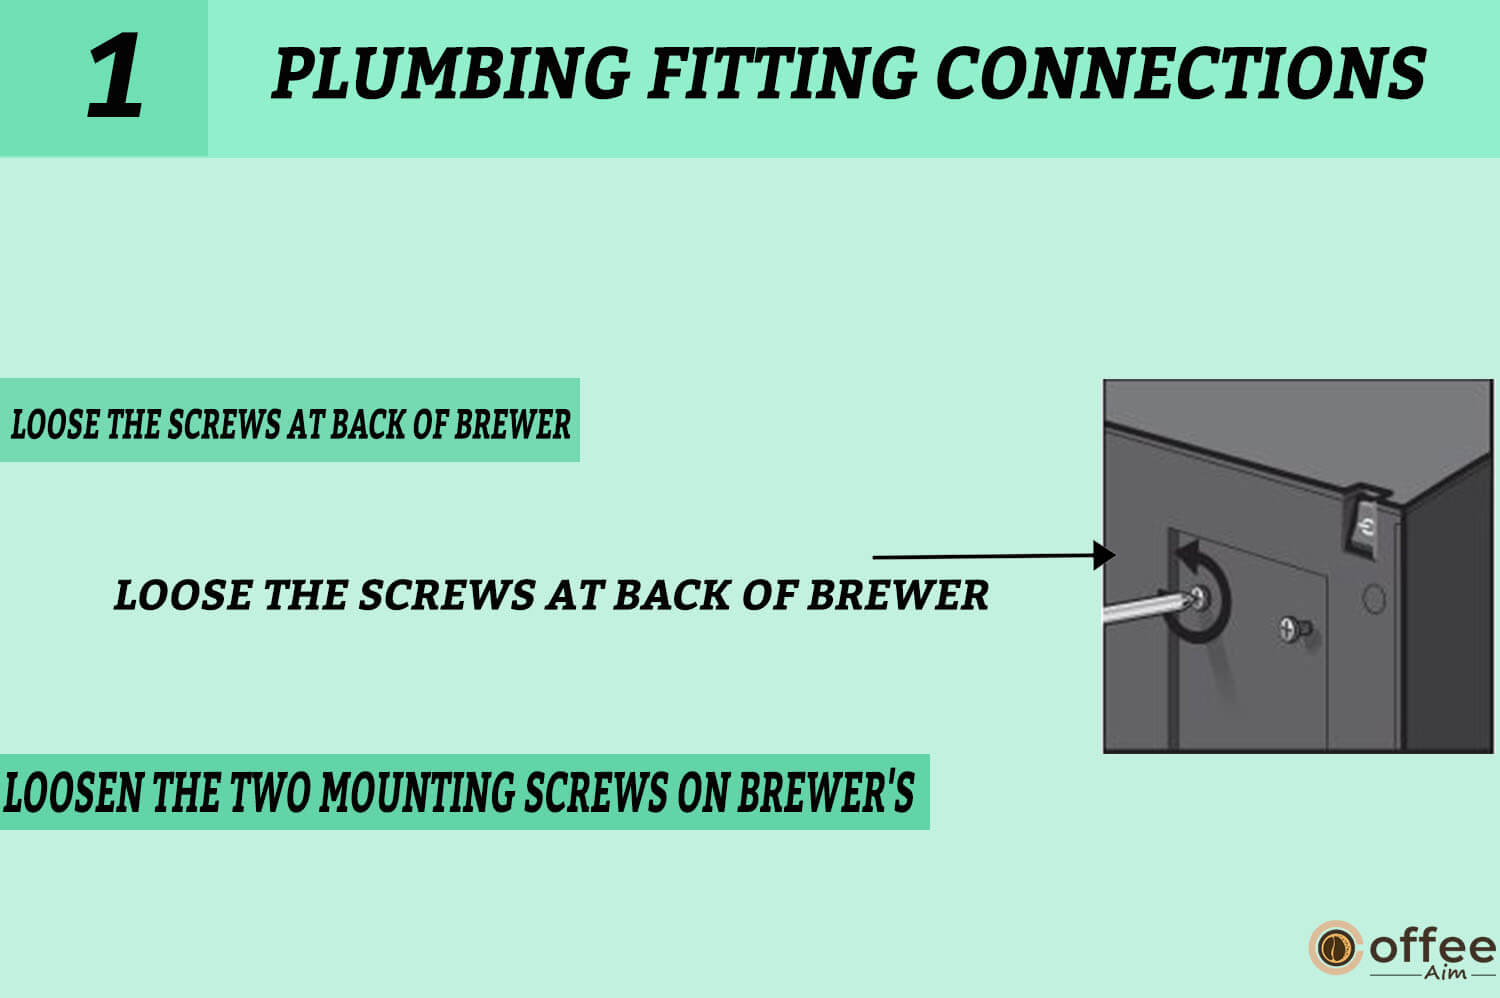
Plumbing Fitting Connections
The plumbing fitting connections on the Keurig B-150p are essential for ensuring correct water flow and reducing leaks. Fittings include connectors, valves, and hoses that link the coffee maker to a water source.
They are typically made of solid components like brass or stainless steel and are intended to endure heavy use and pressure.
The following are essential steps to keep in mind while fitting plumbing connections:
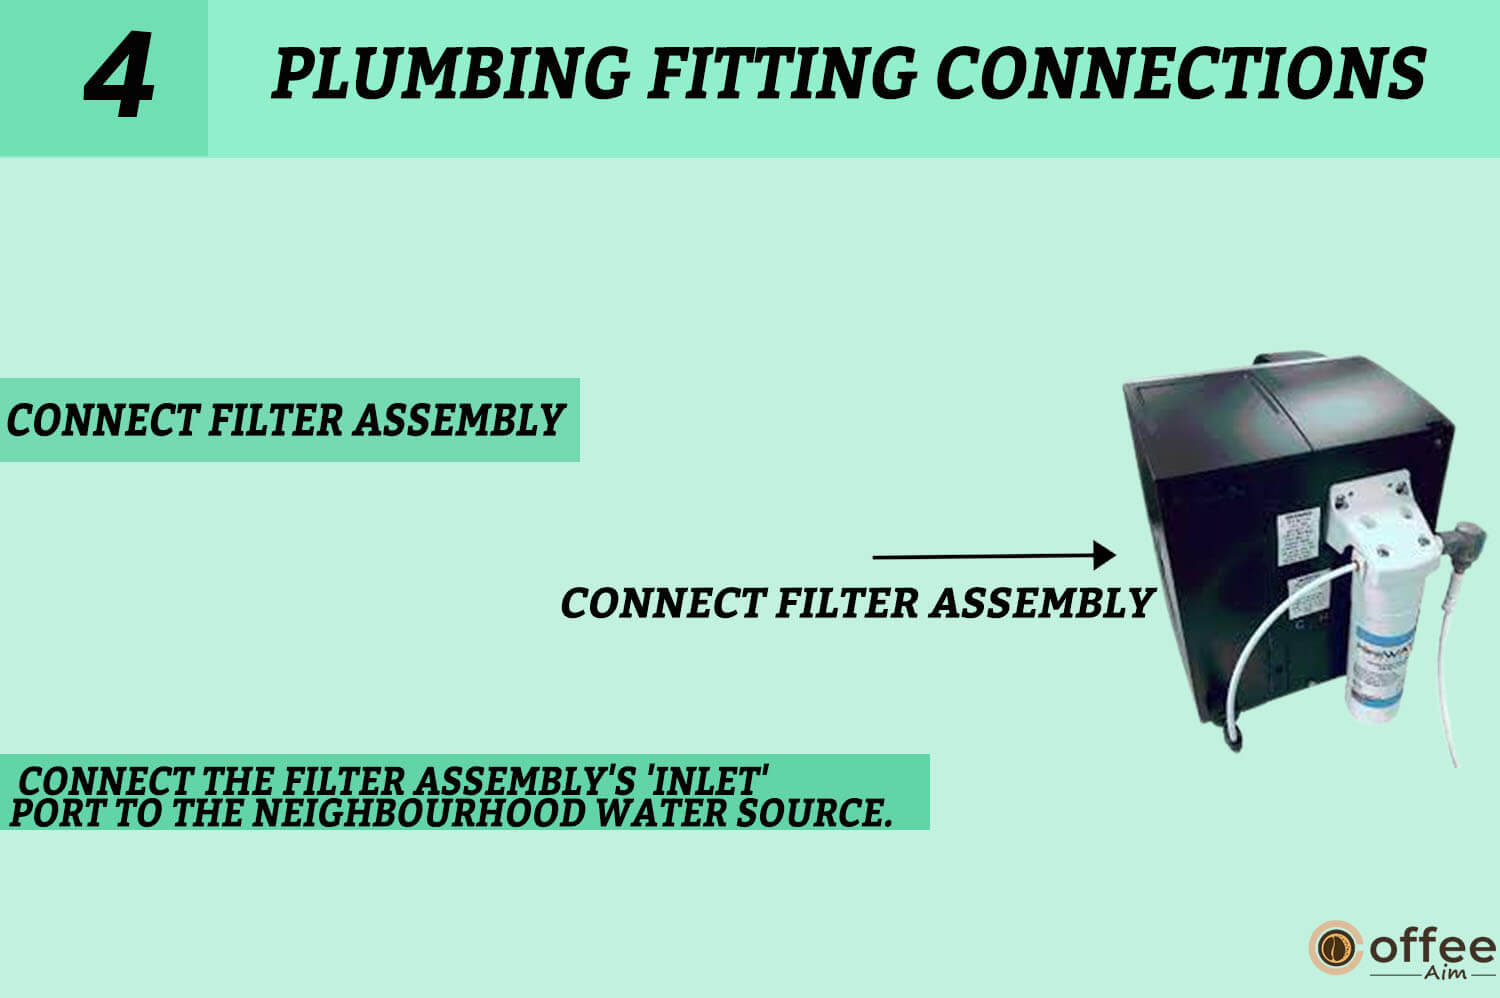
Note: To figure out where to install the filter, locate the back view of the Brewer
- Loosen the two mounting screws on Brewer’s top rear.
- Using the fixing screws, hang the KQ8 filter kit component.

3. Tighten the two fixing screws carefully, being careful not to over-tighten them.

Note: The KQ8A Filter Assembly has 1/4 FPT ports on both the intake and output, and the water inlet to the Brewer is 3/4 Male. Threaded Garden Hose (Invensys solenoid valve).
Between the filter assembly and the Brewer, 1/4 OD LLDPE (Linear Low-Density Polyethylene) tubing is suggested (NSF compliant). NSF-compliant fittings, such as High-Density Polypropylene Type, are suggested.
4. Connect the filter assembly’s ‘INLET’ port to the neighbourhood water source.
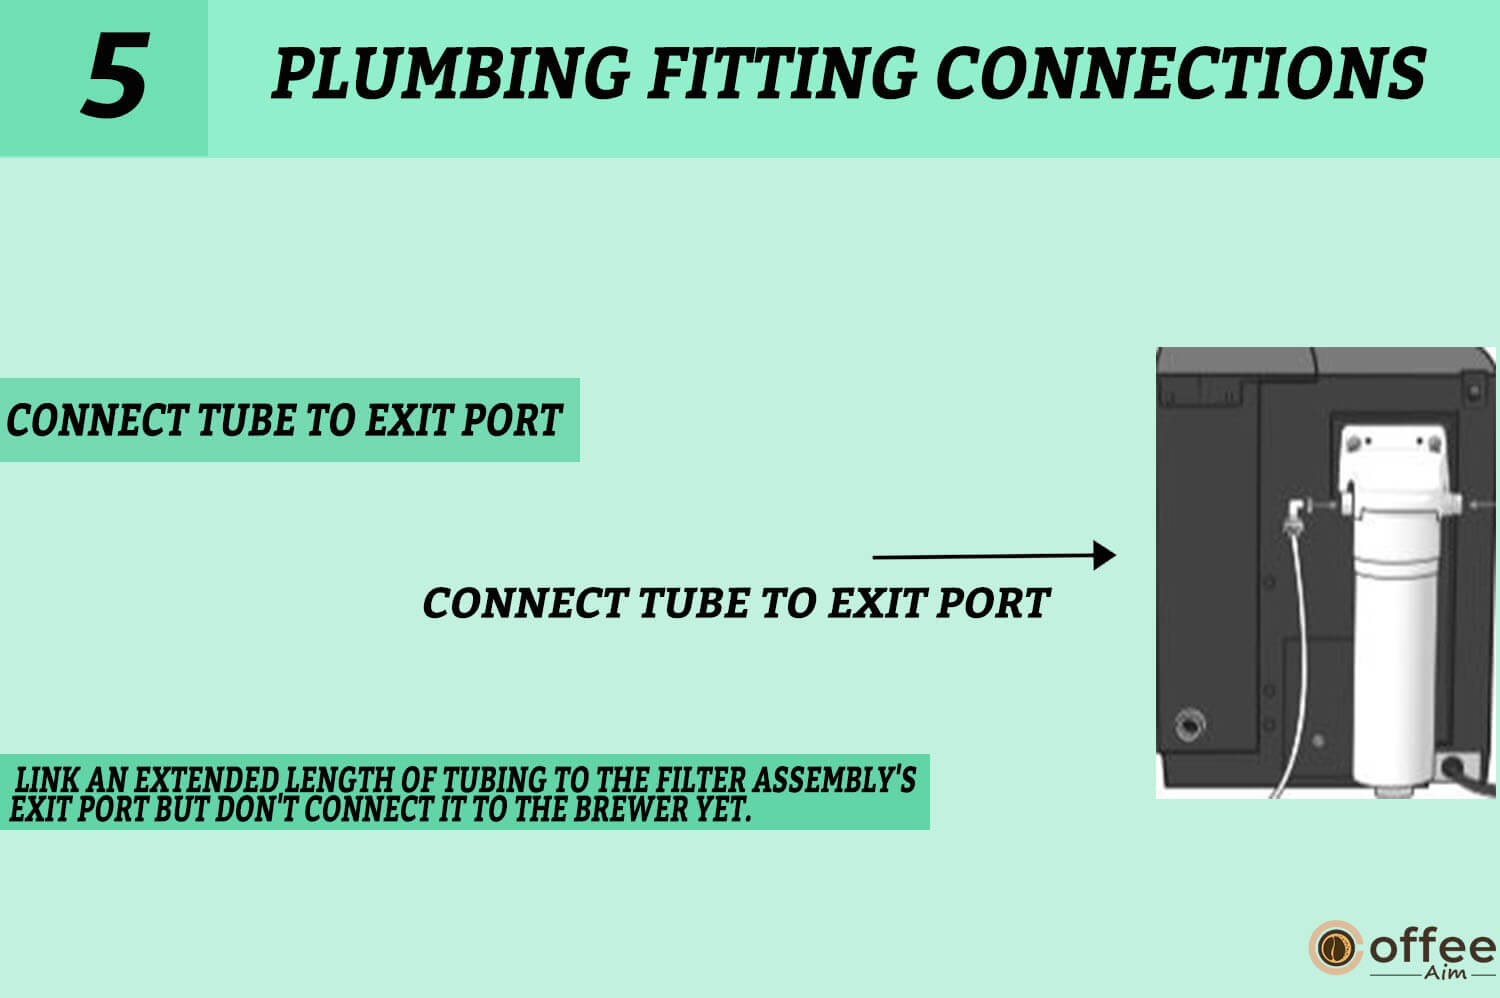
5. Link an extended length of tubing to the filter assembly’s EXIT port but don’t connect it to the Brewer yet.
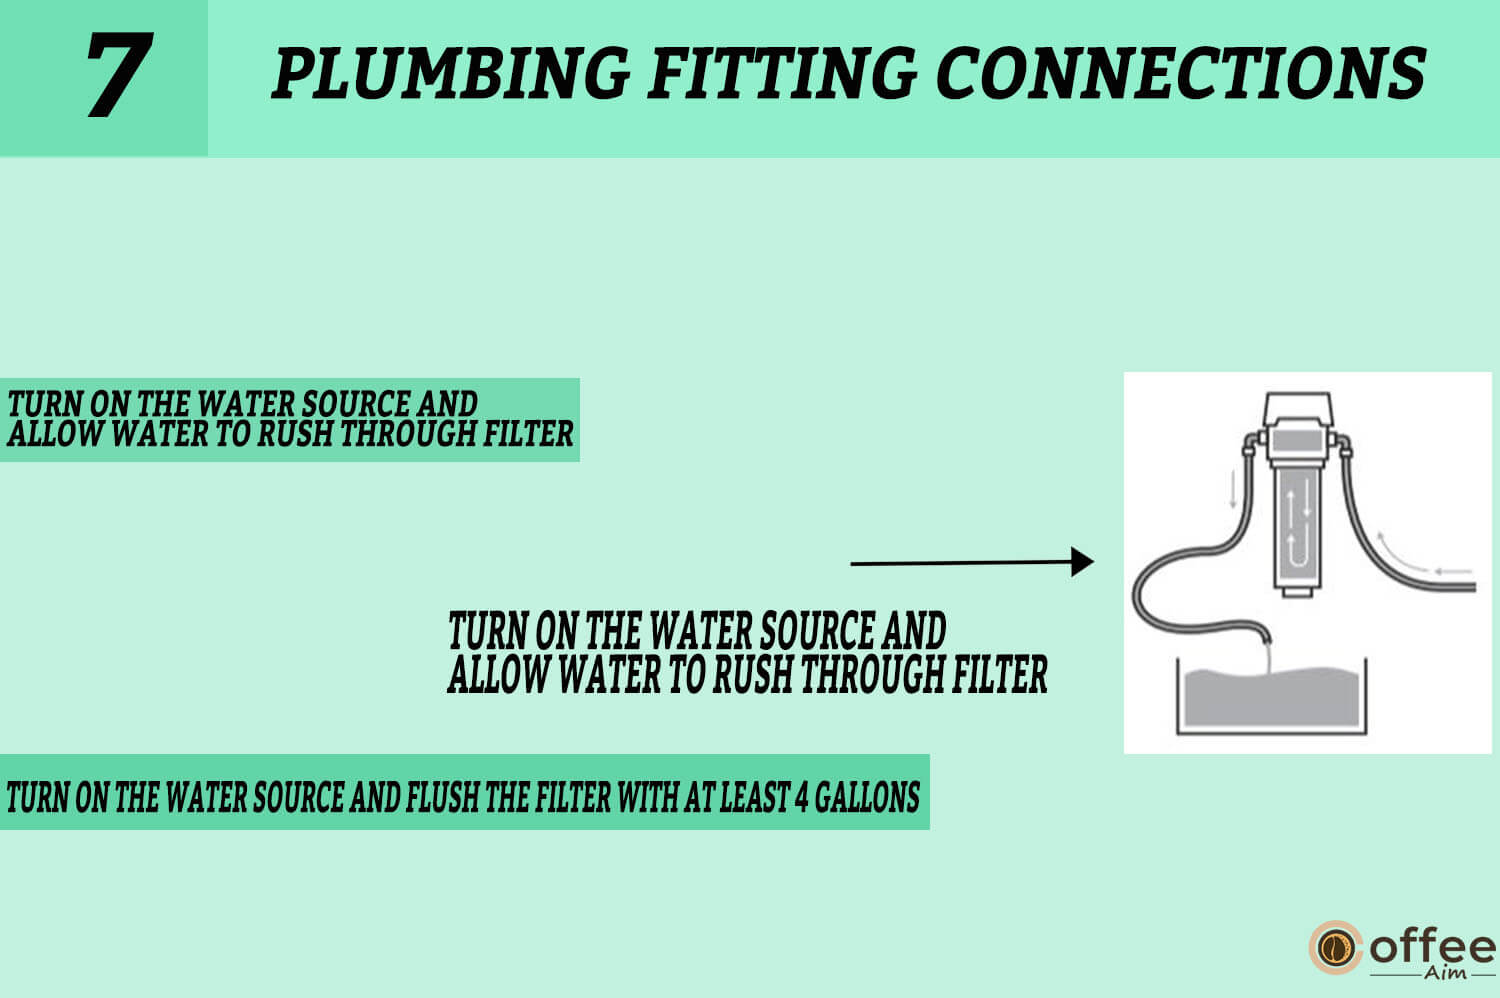
6. An initial flush in the filter is required to remove any carbon buildup. Connect the EXIT port to a container or sink using the lengthy piece of tubing.

7. Turn on the water source and flush the filter with at least 4 gallons.
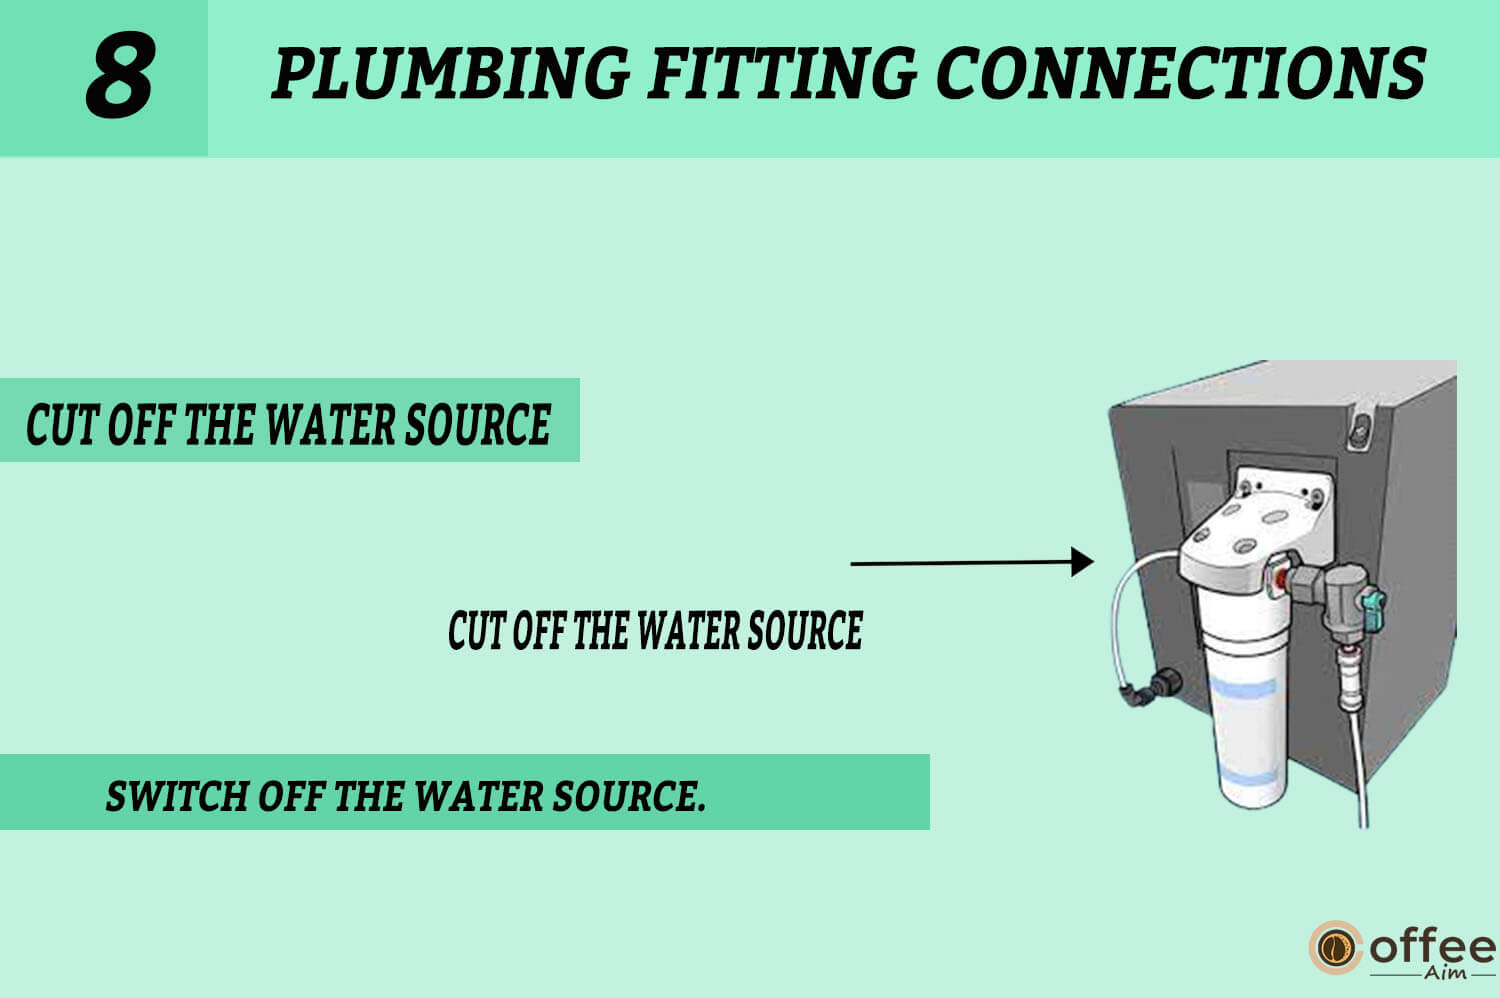
8. Switch off the water source.
9. Cut the tubing to the appropriate length and attach it to Brewer’s inlet plumbing port using the water inlet valve 3/4 hose connector (not included)
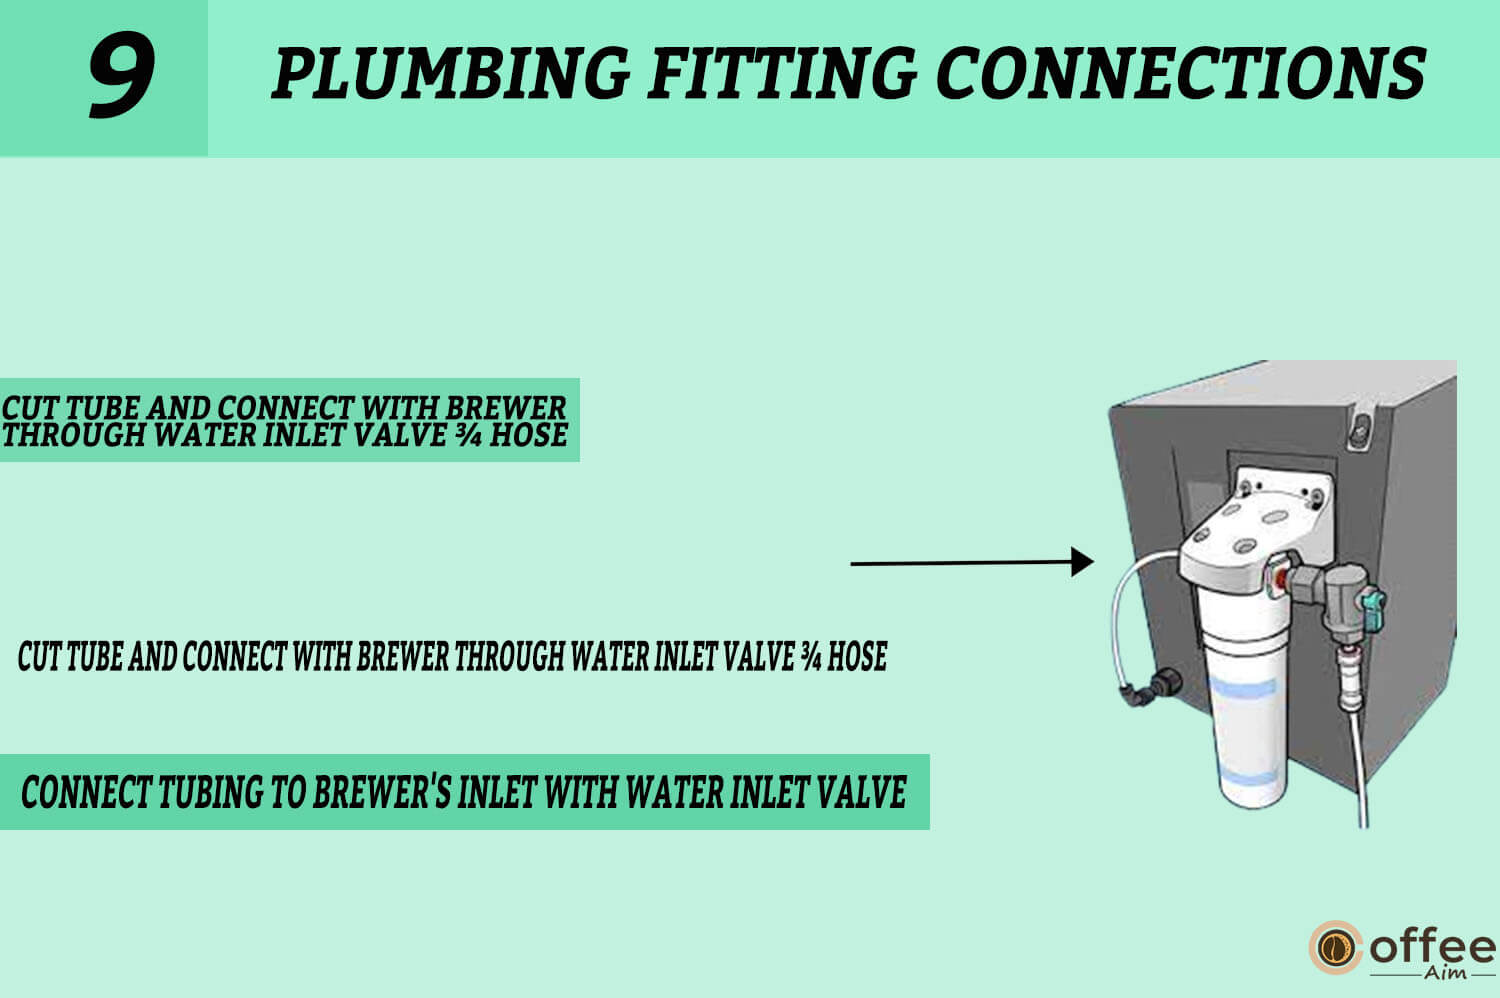
10. To finish the installation, turn on the water source.

Caution: The Keurig B-150p coffee maker needs water pressures ranging from 40 to 125 psig. It is critical to seek the advice of a qualified plumber to ensure that the water pressure is within this range.
It is also critical to use plumbing fittings and tubing that can withstand a maximum pressure of 125 psig to ensure the machine’s safety and efficiency. Following the manufacturer’s instructions and using recommended plumbing materials can help to avoid machine damage and guarantee a dependable and long-lasting brewing experience.
Warning: Keurig suggests using an external water filter with the Keurig B-150p coffee maker, especially the Omnipure KQ8. It is important to remember that failure to use this suggested filter may void Brewer’s warranty. An external water filter can improve the quality and flavour of brewed beverages while protecting the machine from damage caused by minerals or other impurities in the water. For the best performance and longevity of the machine, Keurig strongly suggests following the manufacturer’s recommendations.
Helpful Hints
Using a Keurig B-150p coffee machine can be both efficient and enjoyable but also problematic. With a few helpful tips, you can get the most out of your Keurig B-150p and consistently brew a perfect cup of coffee. We’ll review some helpful hints and tricks for getting the most out of your Keurig B-150p coffee maker.
Always Keep Your Brewer “On.”
It is suggested to keep your Keurig Brewer turned “ON” at all times for easy access to fresh coffee, tea, or hot cocoa anytime. The Brewer can be programmed to turn on and off automatically based on your timetable. You can also program a timer to have the Brewer turn off after a specific time. Follow the simple directions in the section “menu control and indicators” of this user manual to set up your Brewer to your preferences.
Keurig Water Filter Starter Kit
Water quality varies by location, which may affect the flavour of your coffee. If you detect any undesirable tastes, such as chlorine or mineral flavours, it is suggested that you use bottled or filtered water. You may enhance the flavour and taste of your coffee and have a more enjoyable coffee-drinking experience simply by doing so.
Modify The Size
With over 200 K-Cup portion packs and five different brew sizes, the Keurig Brewer provides an extensive range of coffee customization choices. The sizes of the brews vary from 4 oz. for a small cup to 12 oz. for a travel mug. You may select the ideal size, taste, and brew for your needs. If you prefer a more potent, bolder coffee, an Extra Bold portion pack includes up to 30% more ground coffee than standard varieties. Furthermore, the size of your brew impacts the strength of your coffee. A smaller brew produces a more powerful flavour, whereas a larger brew produces a milder flavour.
Plug The Brewer
Using other electrical devices on the same circuit for your Keurig Brewer may overload the circuit and cause the Brewer to break down. Running the Brewer on its specialised circuit, separate from other appliances, is best to avoid this problem. By doing so, you can ensure that the Brewer works correctly and avoid any possible safety hazards.
Brewing Into A Travel Mug
To brew into a travel mug, take out the Drip Tray Assembly and position the travel mug on the Drip Tray Base.
Descale Your Keurig B-150p Regularly
It would be best if you descale your brewer regularly to keep it in good working condition. I have written a separate section for descaling the brewer for your convenience and for the safety of your machine.
How To Use Keurig B-150p For The First Time And After A Period Of Non-Use?
I have divided the procedure into three sections to help you start brewing your first cup of coffee using the Keurig B-150p. The first part will walk you through the steps necessary to make your first cup of coffee.
Setting Up Your Brewer
These steps involve assembling the Brewer, filling the reservoir with water, selecting and inserting a K-Cup, and beginning the brewing process. You can enjoy a delicious cup of coffee in no time if you follow these easy instructions. So, let’s begin by making your first cup of coffee with the Keurig B-150p.
- Remove all packaging materials from the Brewer and Drip Tray and the transparent plastic film from the LCD Display before brewing your first cup of coffee with the Keurig B-150p.
- Connect the Brewer to a grounded outlet and switch it on with the Power Switch on the top left side of the Brewer. The LCD Display will display a welcome image when turned on.

- The Brewer will immediately automatically fill the internal hot water tank and after that, water inside the hot water tank will start heating up, which will take about 3 minutes. The LCD Screen will show “HEATING PLEASE WAIT” during the heating period.Then raise and lower the Brewer Handle.

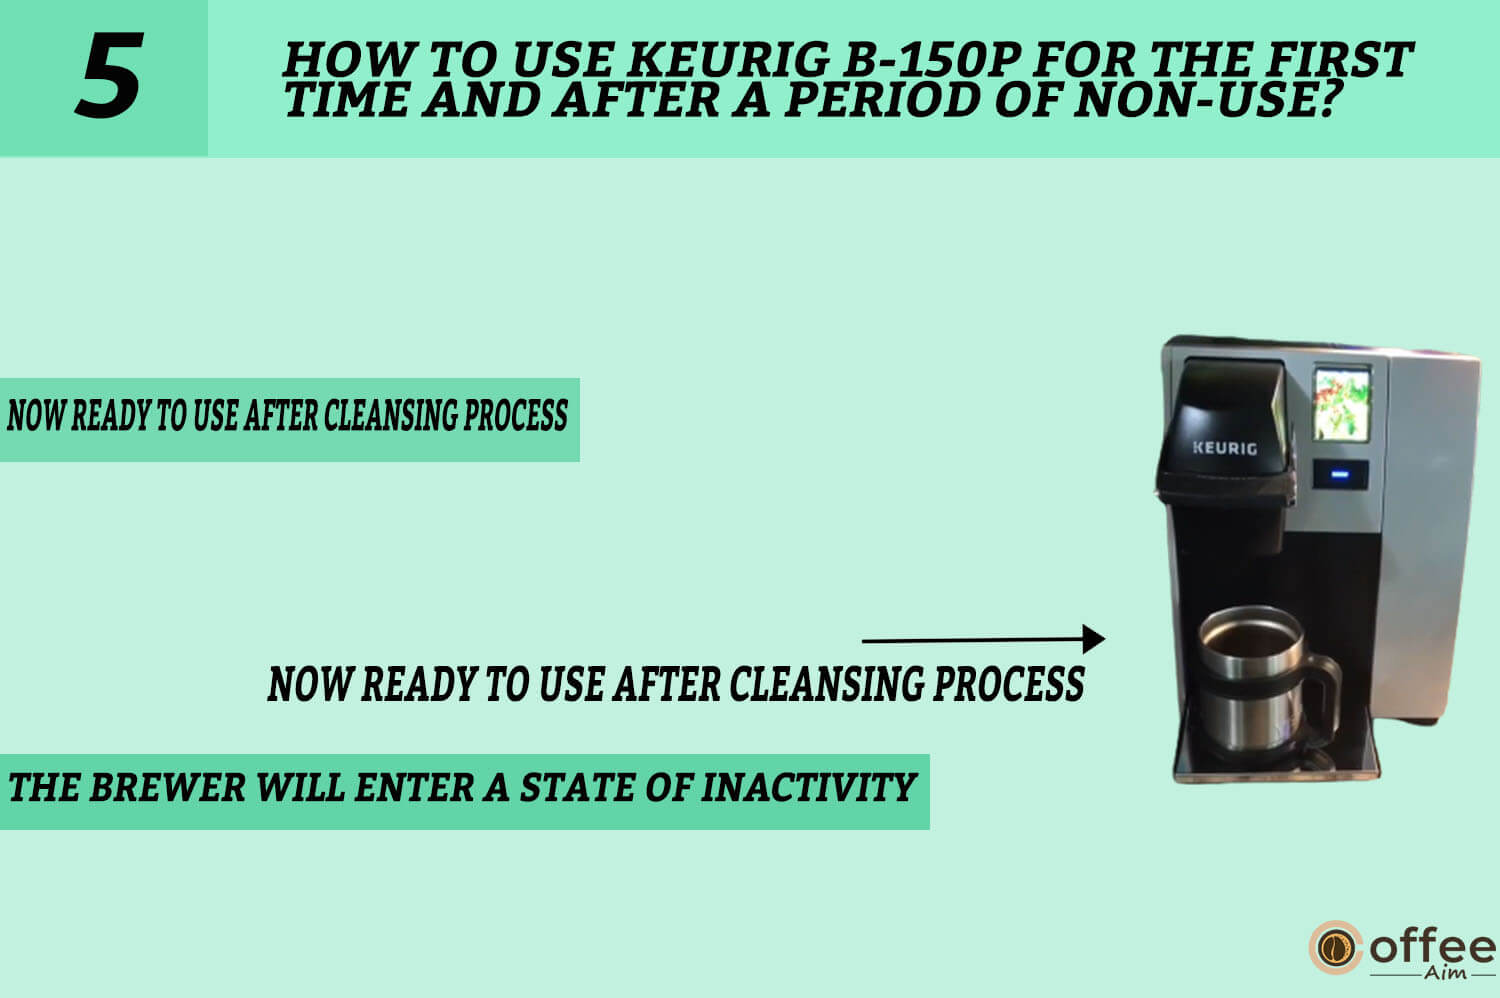
- The Brew Button will now light up. To begin a cleansing brew, press the Brew Button, and do not use a K-Cup portion container.
- When the cleansing brew is finished, the Brewer will enter a state of inactivity and be ready to prepare your first portion pack.
Ready To Brew Your First Cup With Keurig B-150p
Are you ready to relax with a nice mug of coffee at home or work? You can quickly create your first cup with the Keurig B-150P brewing system. I’ll take you through setting up your Keurig B-150p and brewing your first cup of coffee in this guide. Please choose your preferred K-Cup pod now, and let’s start brewing!
Follow mentioned points below for an easy and quick brew:
- The Keurig B-150P LCD will be in its idle state.

- Lift the handle to open the K-Cup holder towards you.

- Choose a K-Cup portion pack and place it in the K-Cup holder.

Note: Do not open the portion pack or remove the foil cap.)K-Cup® Holder and the other in the bottom of the K-Cup® Holder puncture the portion pack. Do not stick your fingers into the K-Cup® Assembly Housing to minimise the potential for damage.
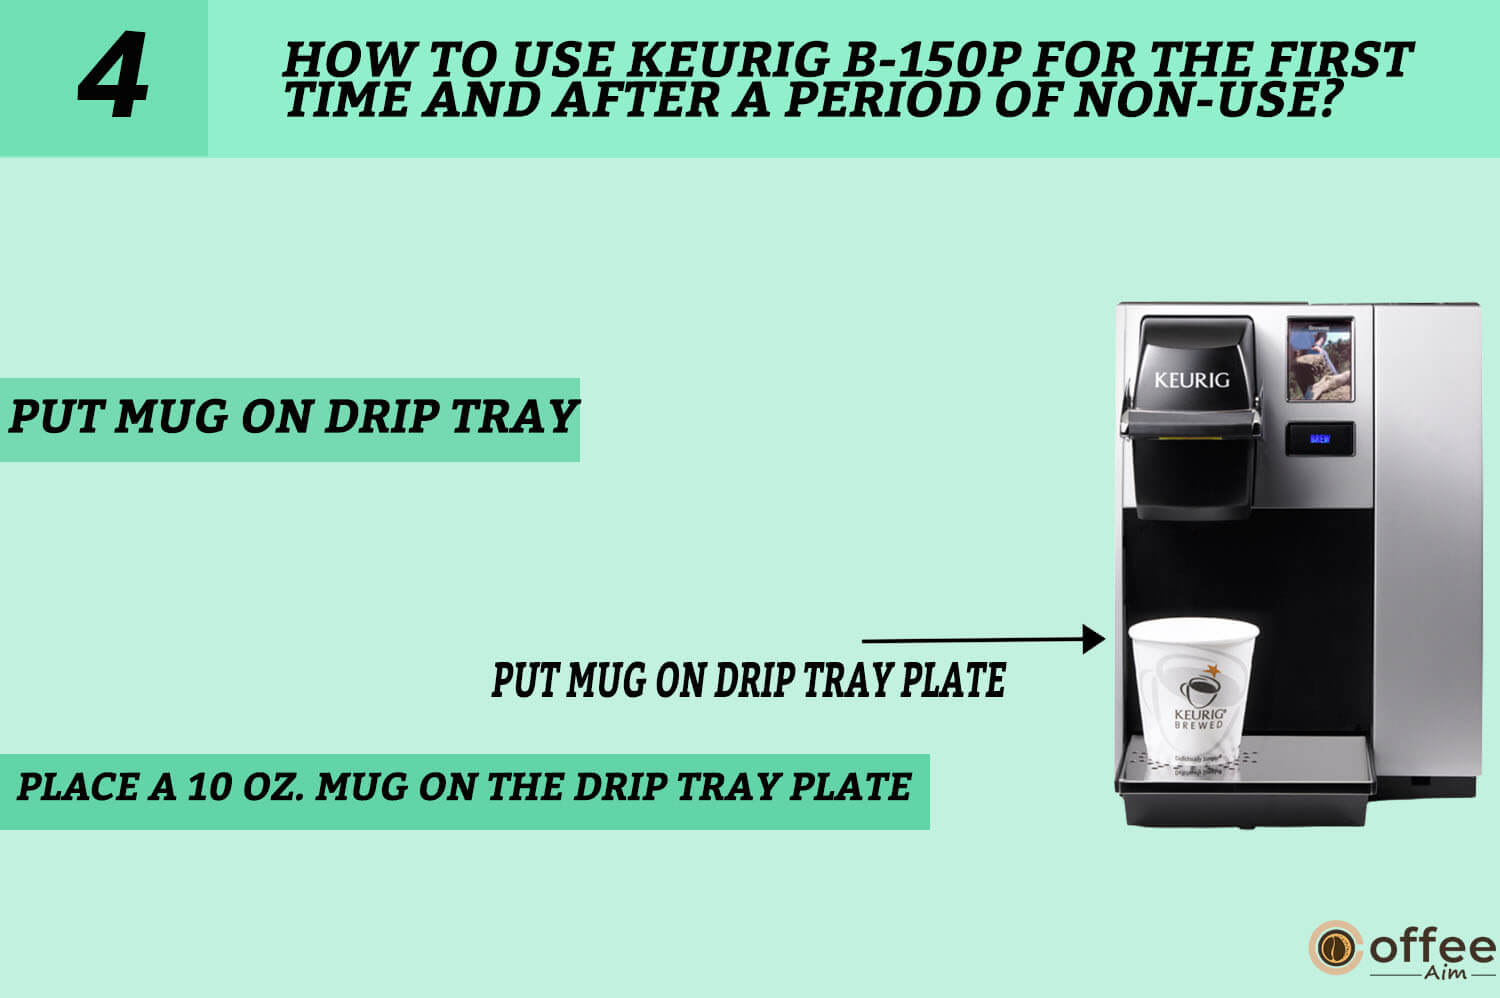
- Lower the handle to close the lid over the K-Cup holder. When fully closed, the BREW button will flash for up to 60 seconds. Put a mug on the drip tray and select your desired brew size.

Note: To prevent accidental activation, the Brewer will return to inactive mode if you do not push the BREW button within 60 seconds. Close the handle after entirely raising it to reactivate.
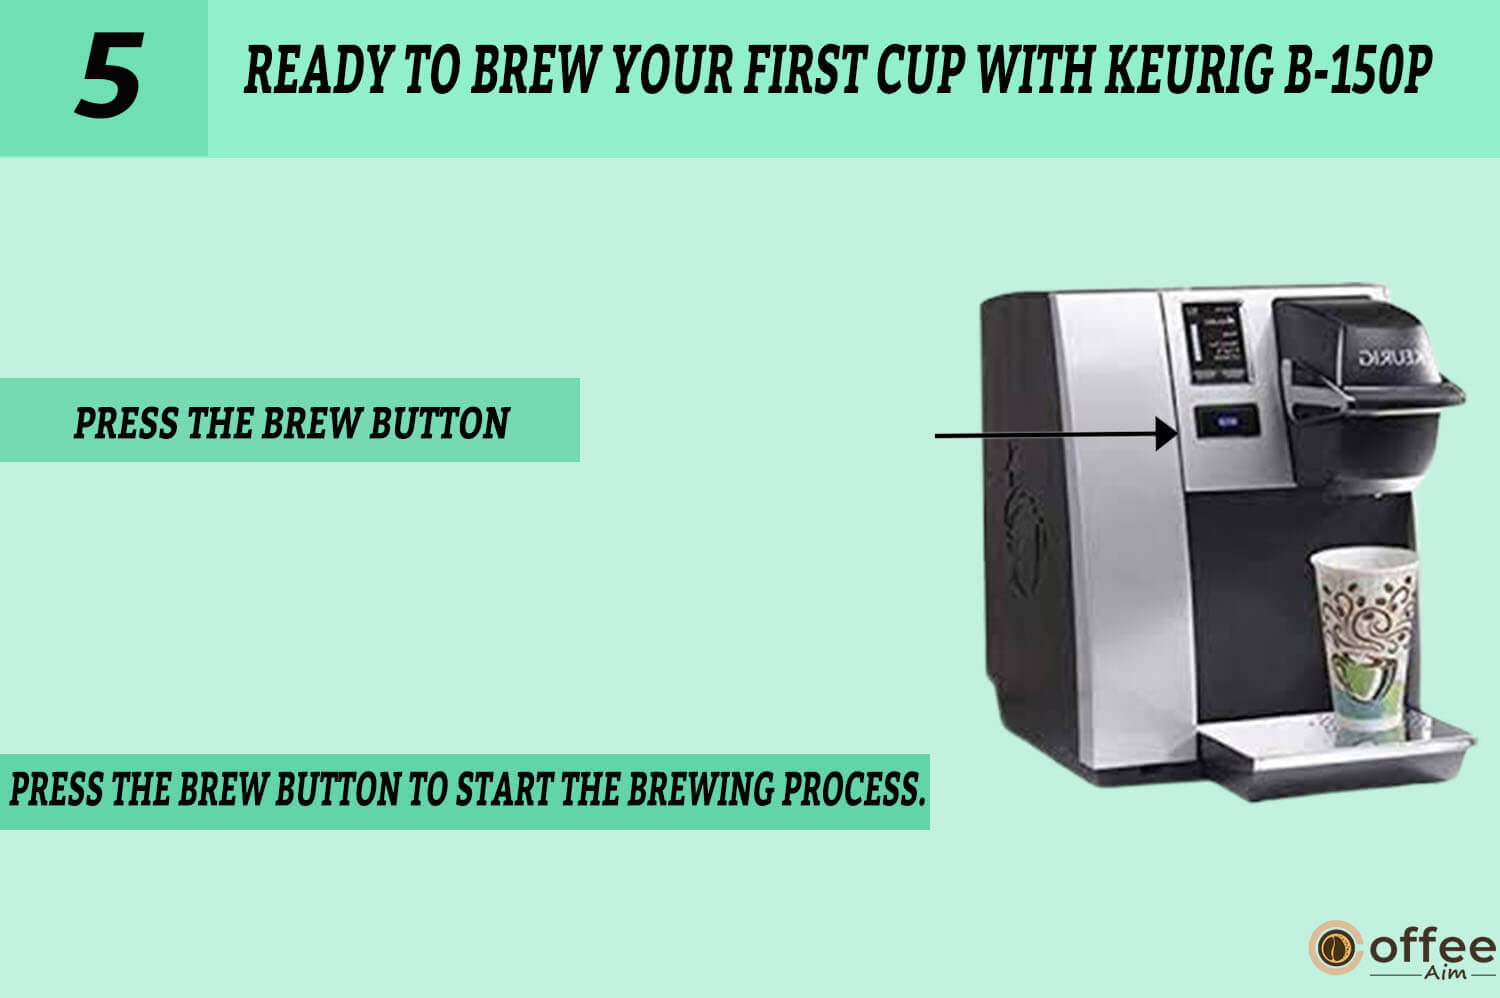
- Press the BREW button to start the brewing process. There may be a brief pause before the coffee is dispensed. The brewing process takes about 1 minute and finishes with a burst of air to remove all liquid from the portion pack. The end of the brew cycle is indicated by “KEURIG BREWED ENJOY.”
Caution: During brewing, the water in the K-Cup® Holder is boiling. Lifting the Handle or opening the K-Cup® Assembly Housing during the brewing process puts you at risk of getting harmed.
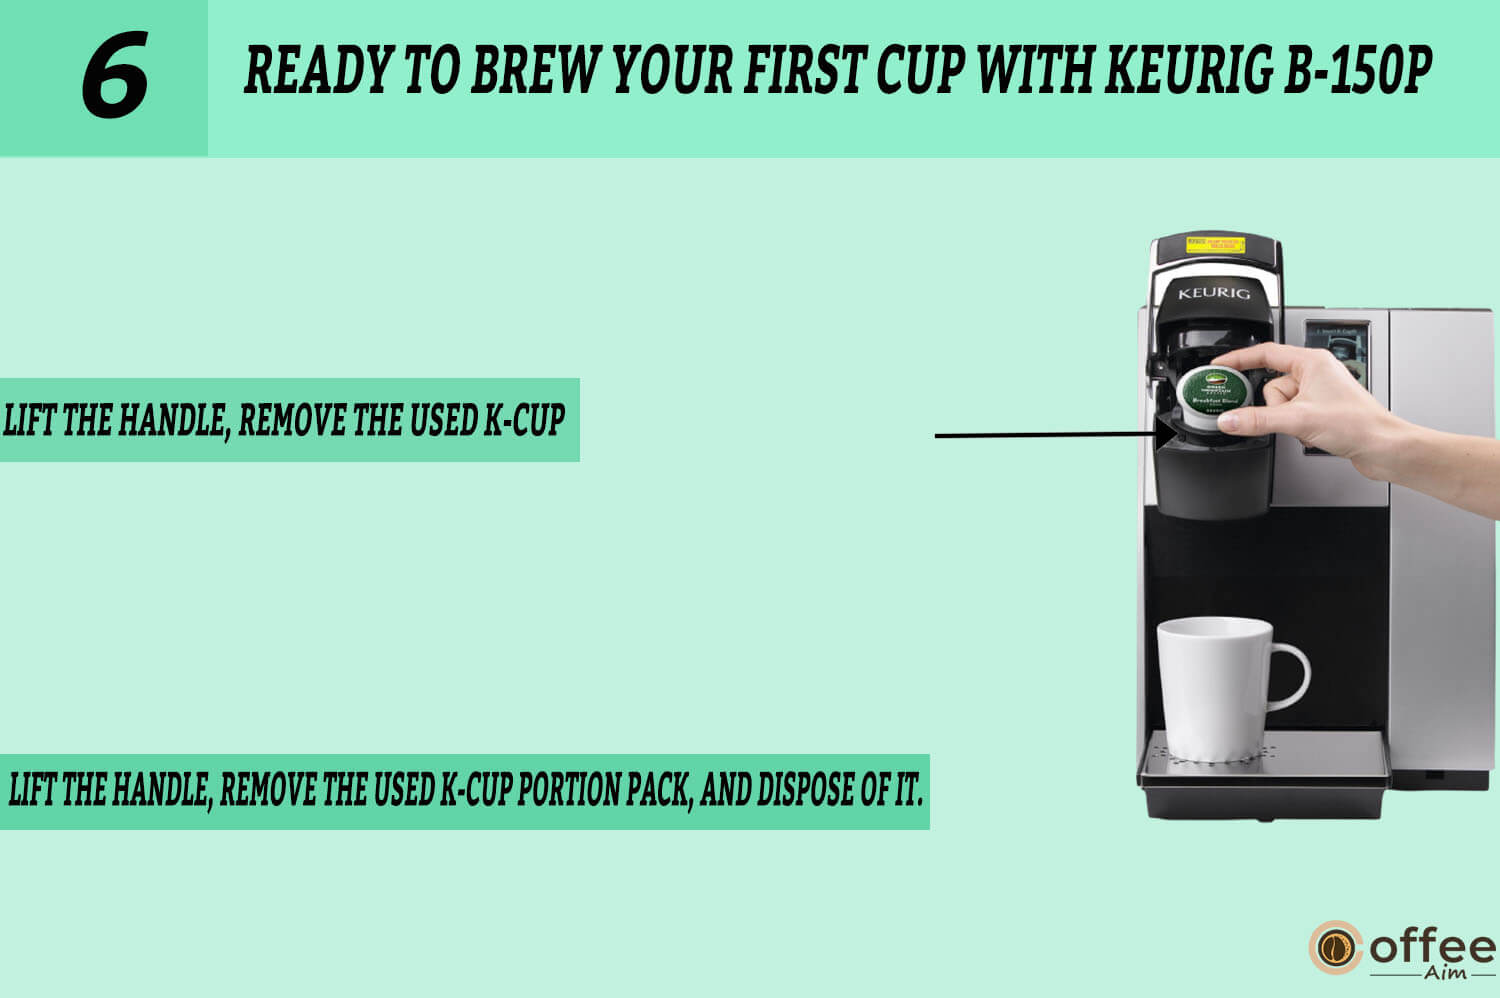
- Lift the Handle, remove the used K-Cup portion pack, and dispose of it.
- Enjoy your freshly brewed coffee, tea, or hot cocoa!

- The Keurig B-150p may display “HEATING PLEASE WAIT” as it heats water for the next brew cycle.

Stopping The Brew Process
If you want to stop the brewing midway, you only need to press and release the power switch to turn your Keurig B-150p off. The coffee, tea, or hot chocolate flow will be promptly stopped, and the heating element and LCD screen will also be turned off. It’s a convenient and straightforward way to manage the brewing procedure and ensure you always get the ideal cup.
Note: You can get more coffee, tea, or hot chocolate in your cup during your next brew if you interrupt a brew cycle or if any water is left in the system. I suggest performing a cleansing brew with water only after a finished brew. This will ensure that your next brew will be the exact volume you have chosen and drain out any leftover liquid in the system.
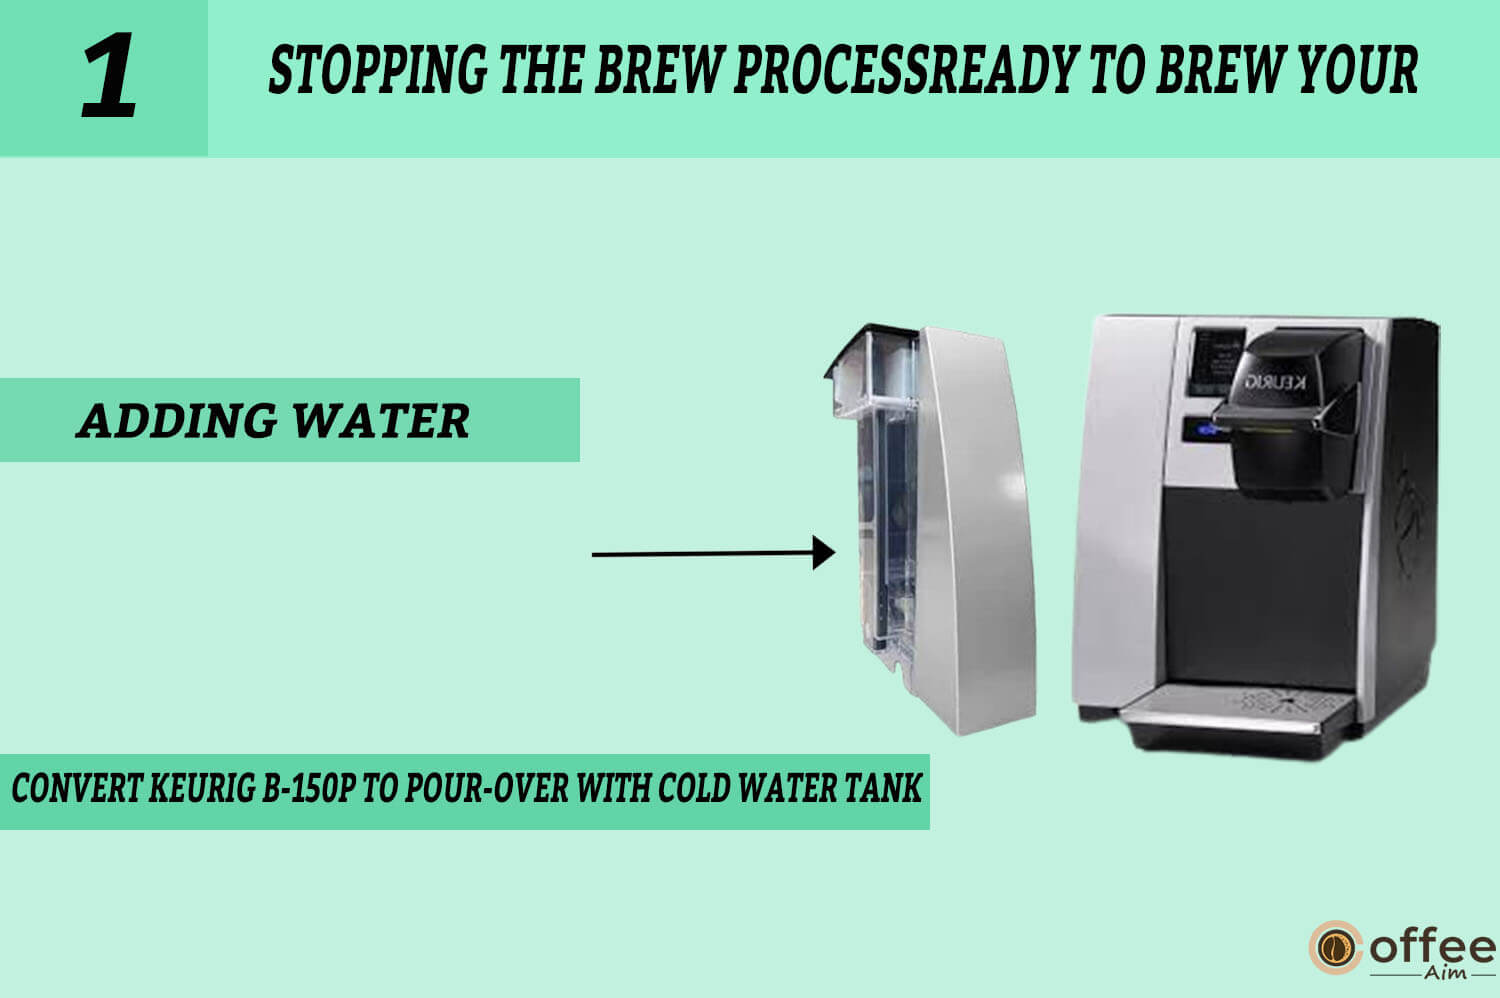
Adding Water
The Keurig B-150p Brewer typically has a default setup to be directly plumbed. But you can buy a Cold Water Tank Spare part Component to convert the Brewer to a pour-over model if you prefer a pour-over style. With this practical choice, you can take advantage of the flexibility and convenience of using your Keurig B-150p Brewer wherever you go.
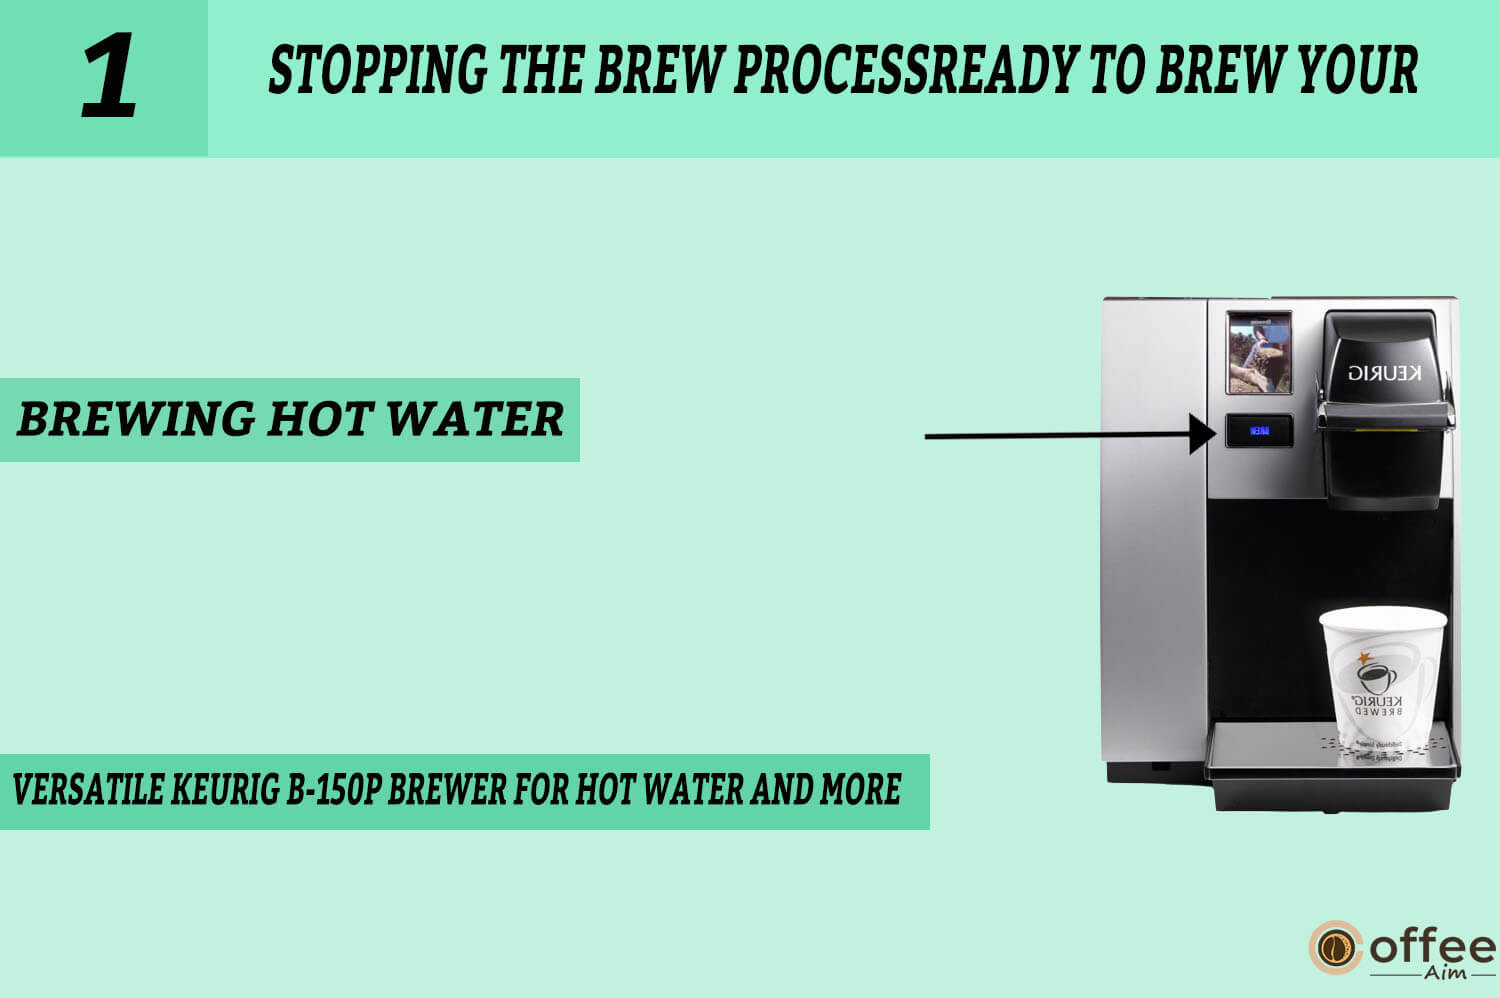
Brewing Hot Water
The Keurig B-150p Brewer can make more than K-Cup portion packs of coffee, tea, or hot cocoa. Also, it can provide hot water for various uses, including cooking and creating hot cocoa from a packet. Follow the directions in “Prepare To Brew Your First Cup” without a K-Cup portion pack to use the Brewer for brewing hot water.
Note: I suggest running a hot water brew cycle without a portion pack after brewing a hot cocoa portion pack.
Purging The Brewer
Purging the Brewer of a Keurig is also suggested before storing the coffee maker for an extended period, in addition to regular maintenance. This is because stagnant water and debris can collect within the internal water lines over time, causing clogs, mould growth, and other issues that can affect the performance and quality of your coffee.
Purging involves clearing out any accumulation and restoring Brewer’s internal system to its initial state by flushing it with water. We’ll review how to properly purge your Keurig B-150p Brewer in the following stages for the best outcomes.
Here are the steps to properly purge your Keurig B-150p Brewer:
- Start by following the directions for draining the Brewer in the section “Draining The Brewer.”
- Reconnect the Brewer to the power supply and switch it on after discharge. Hold off until the Brewer says it is “READY.”

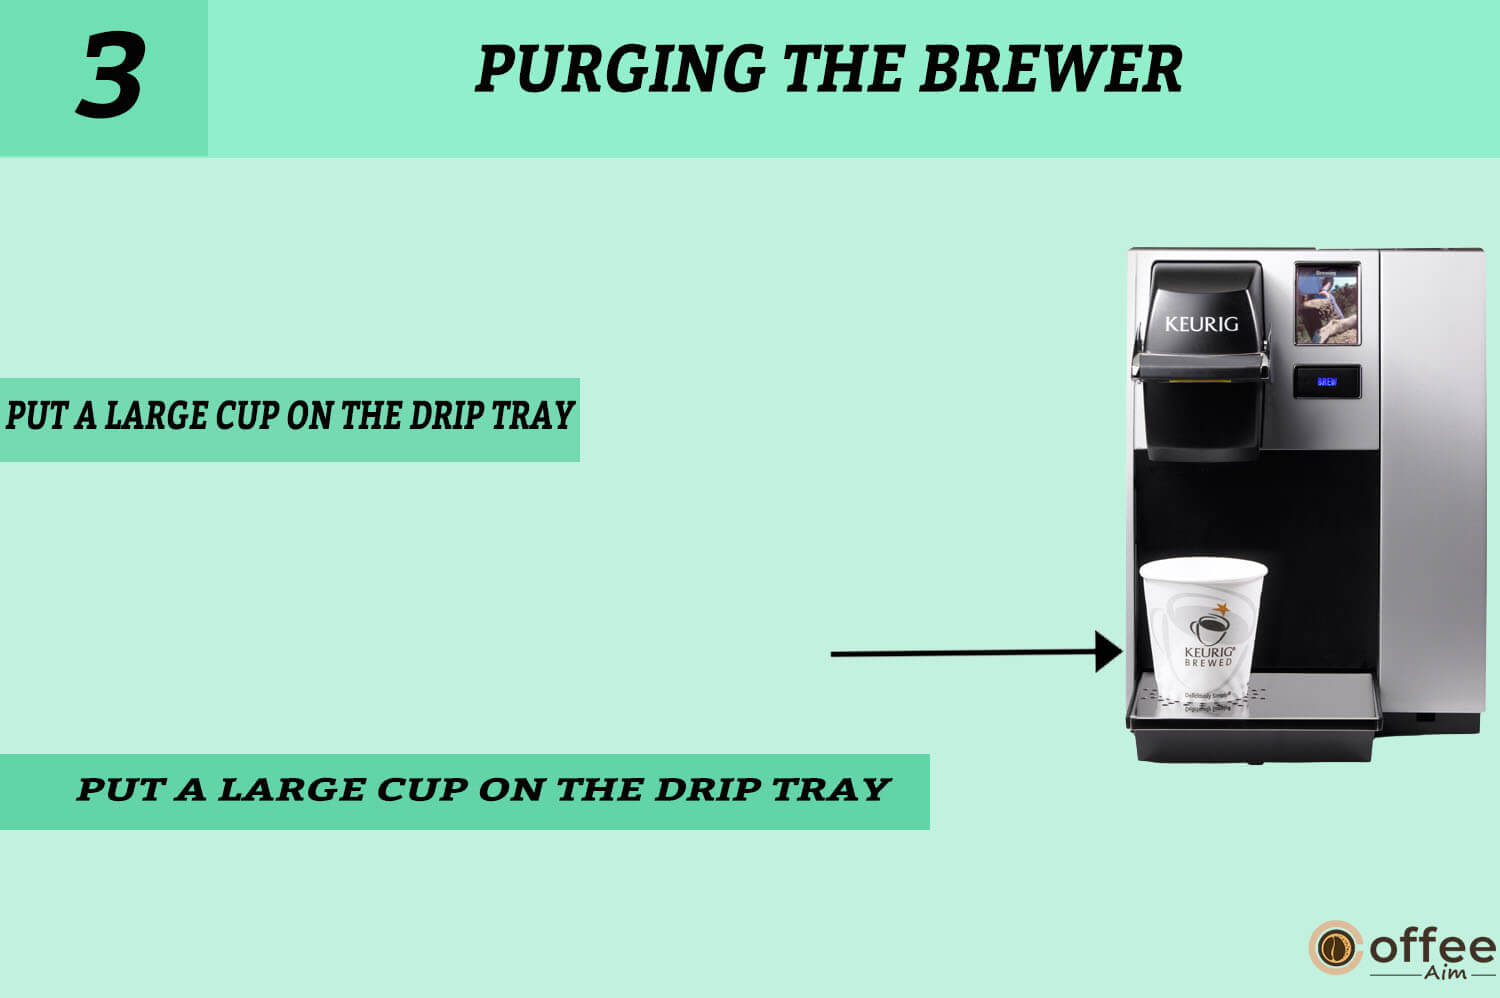
- Put a large cup on the drip tray after that, and then choose the Large Mug (10 oz.) brew size from the Choose Brew Size Menu.
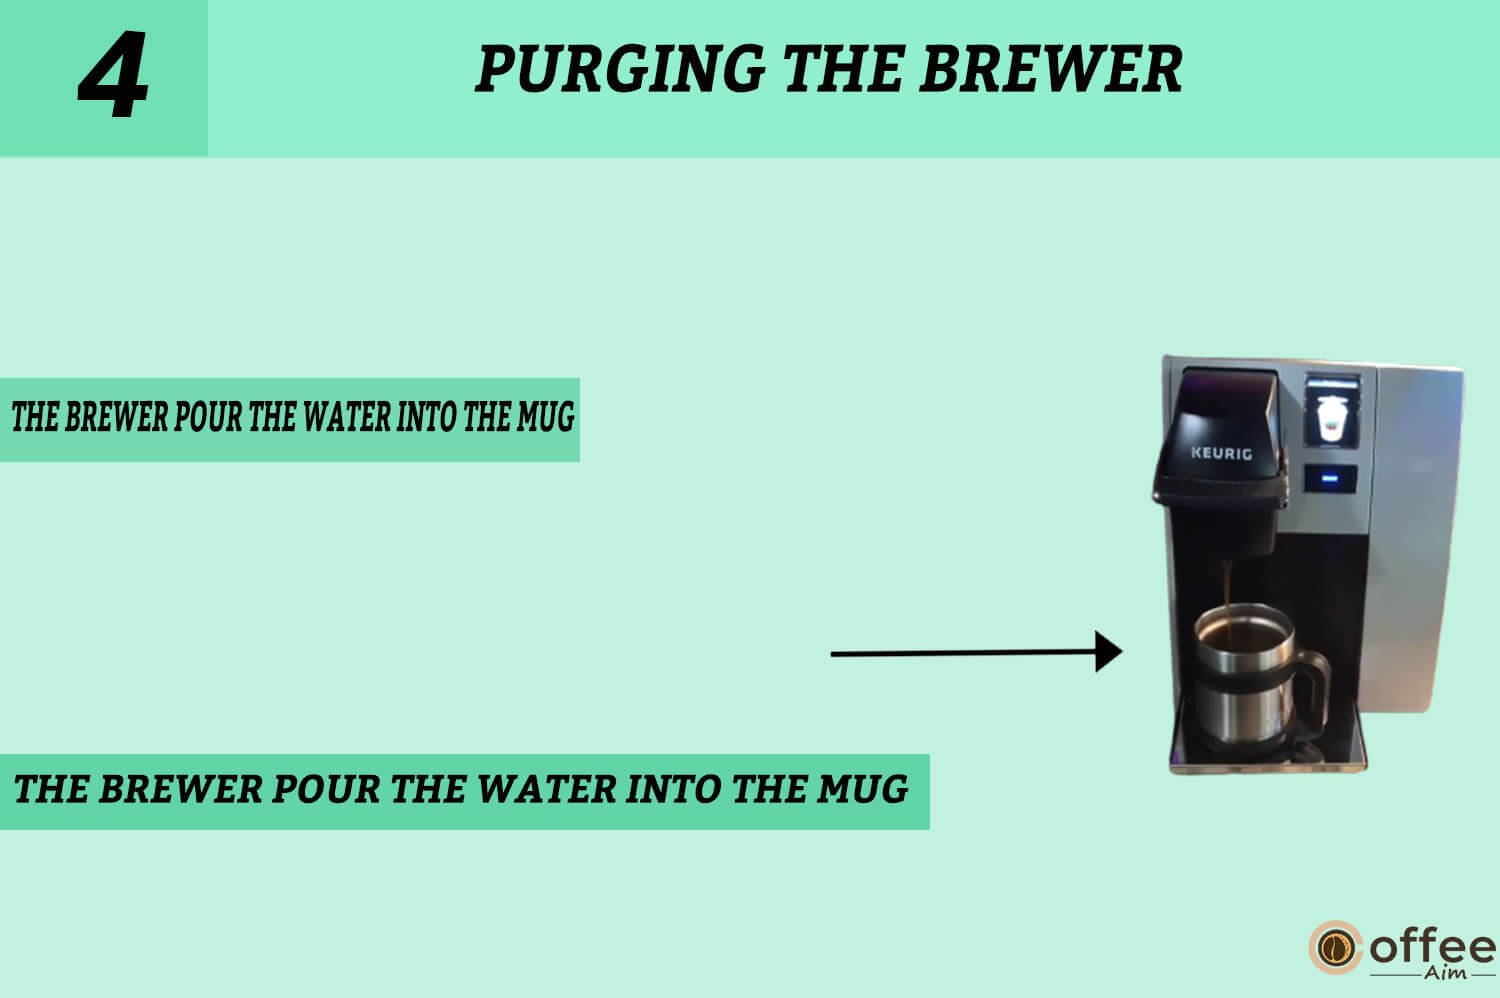
- Let the Brewer pour the water into the Mug, then pour the contents into the sink.
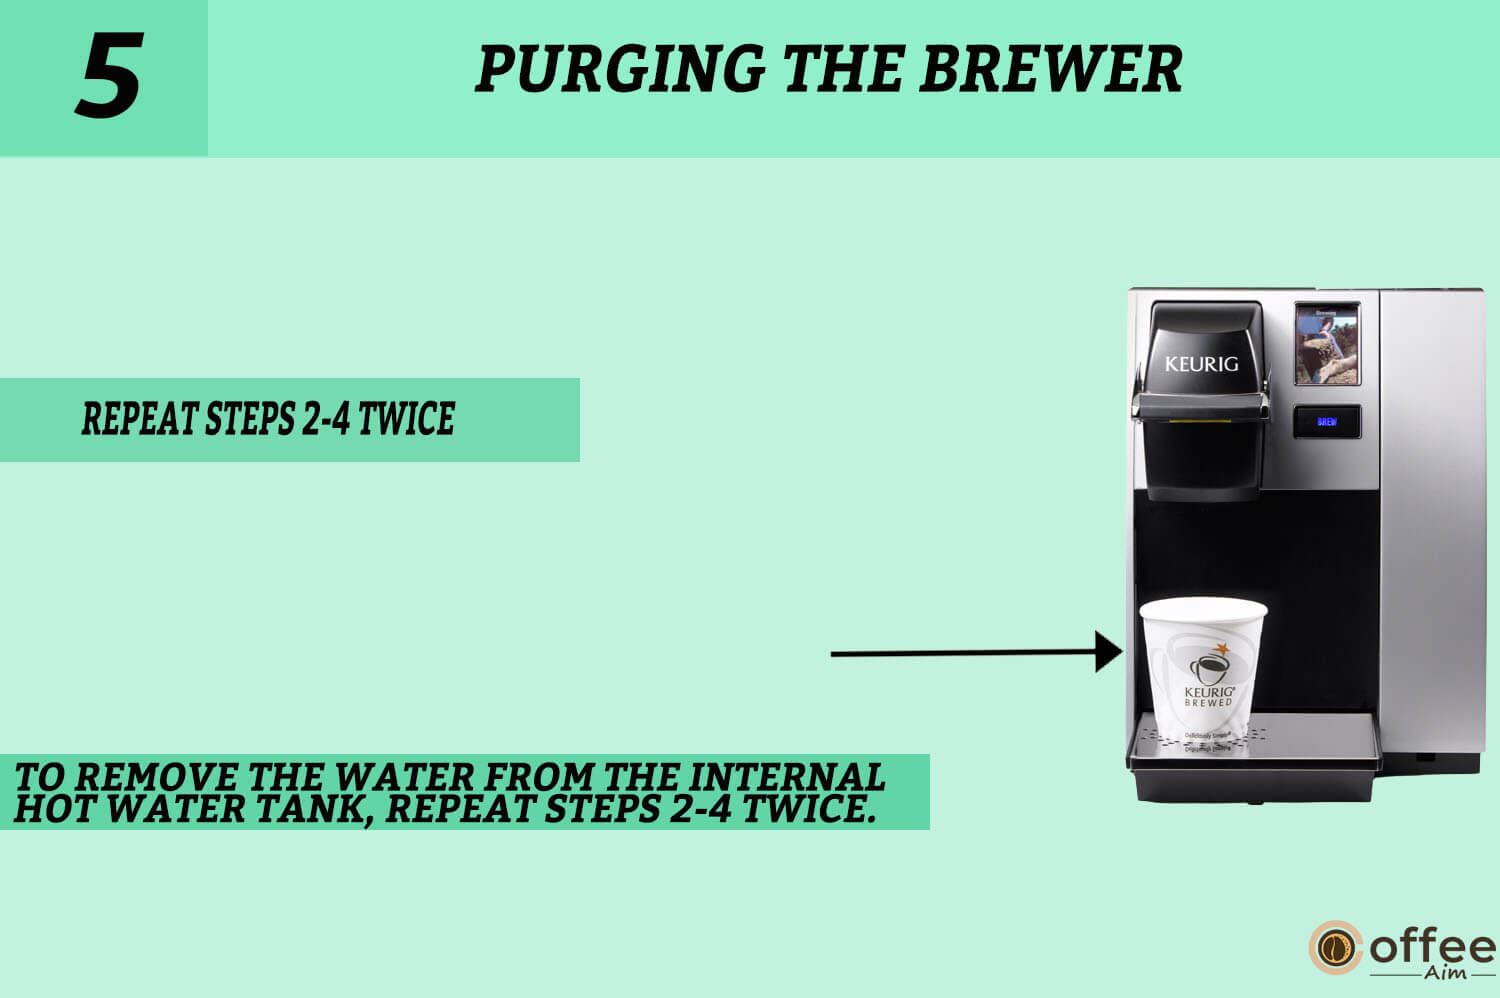
- To remove the water from the Internal Hot Water Tank, repeat steps 2-4 twice.
Menu Controls & Indicators
The Keurig B-150p is a commercial-grade brewing system with several menu controls and indicators to allow users to customise their brewing experience. This machine’s menu controls and indicators are simple and user-friendly, allowing users to change their beverage’s temperature, strength, and size with a few button presses. In this response, I will describe some of the Keurig B-150 p’s main menu controls and indicators to help you comprehend how the machine works.
1. Menu Mode
The Brewer must be connected and turned off to access the MENU MODE. At the same time, holding your finger on the display, press and release the power button. Maintain 5 seconds of pressing on the display. The MENU page will be displayed.

To initiate the setup for a specific feature, select any line item.
Note: If you have any issues with your Brewer, please call Customer Service at 1.888.CUP.BREW. (287.2739).
2. Menu Key Navigation
The Keurig B-150p is a multifunctional brewing instrument with a comprehensive menu key navigation system. Users can change these settings with a button to make the ideal cup of coffee, tea, or other hot beverage. In this response, I will provide an overview of the Keurig B-150 p’s menu key navigation system, highlighting some of its key features and usefulness.
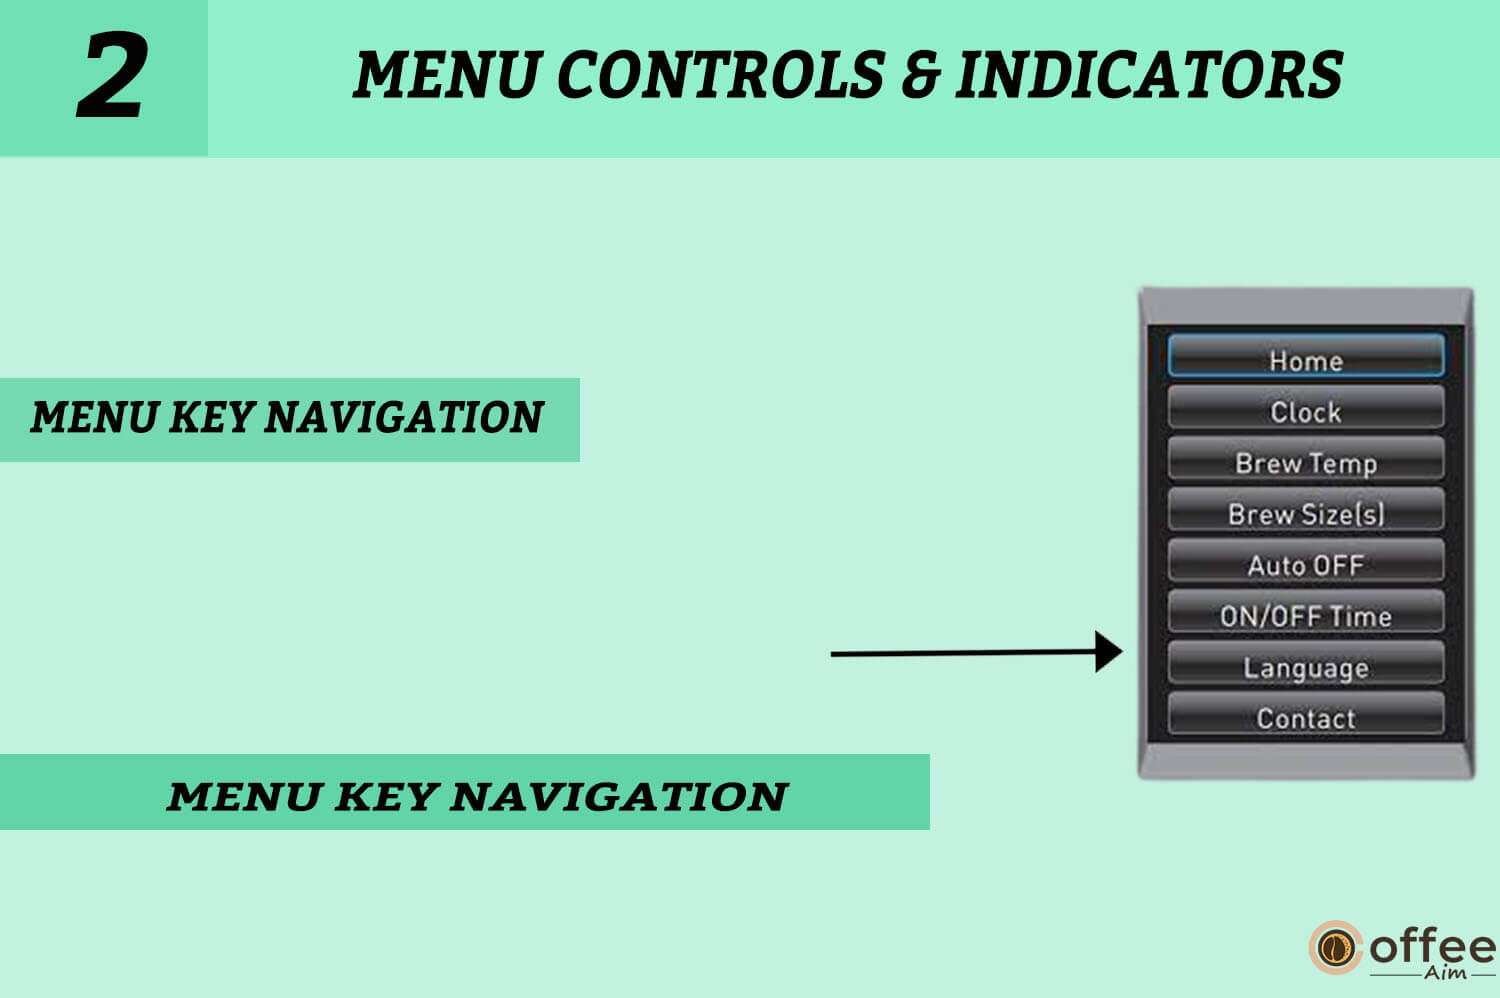
3. Home
To return your Brewer to an idle state, press HOME at any time.

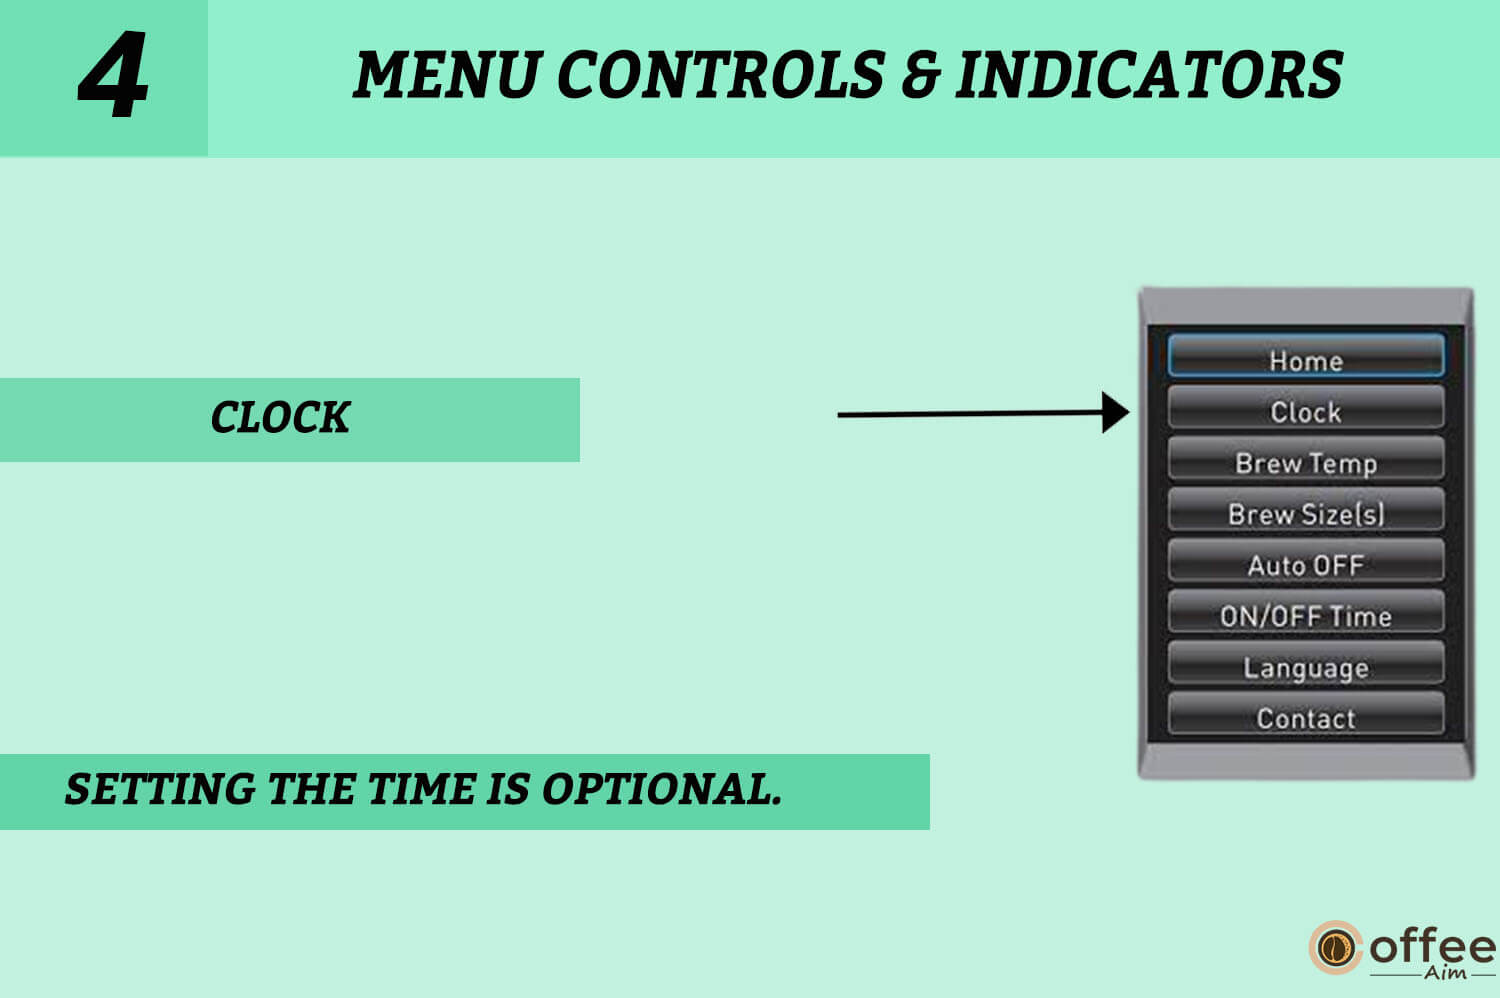
4. Clock
Setting the time is optional. Follow the steps in the “setting the clock” section to program the clock.
5. Brew Temp
The boiling temperature is pre-set at 193 degrees Fahrenheit. You do not have to set the brew temperature, but you can change it by 5 degrees Celsius up or down.

6. Brew Size
Five different brew quantities are available: 4 oz., 6 oz., 8 oz., 10 oz., and 12 oz.

7. Auto OFF
You can set your Brewer to turn off automatically two hours after the last brew.
8. ON/OFF Time
You can always keep your Brewer on and turn it off with the Power button. Alternatively, as mentioned in the section “programming on/off features,” you can program the Brewer to brew at a particular time.

9. Language
This Brewer comes with English set as the primary language.
Follow the instructions in the section of language setting” to change the language.”

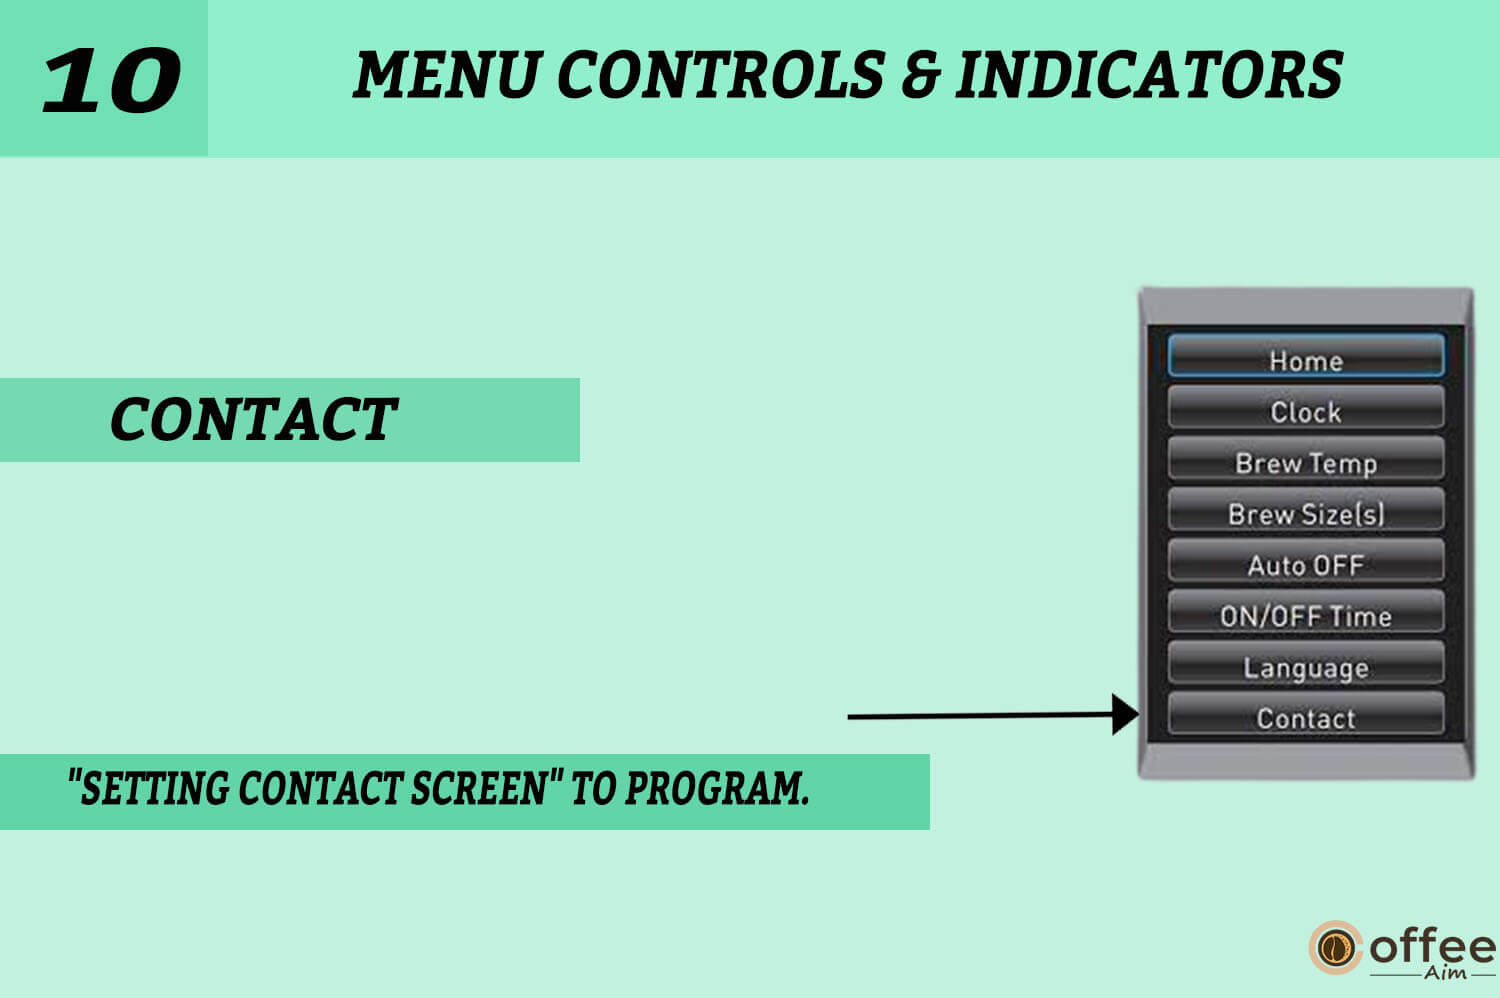
10. Contact
The contact setting features enable you to program the contact information you need for Brewer support and help. Follow the steps in the section “setting contact screen” to program.
Setting The Clock
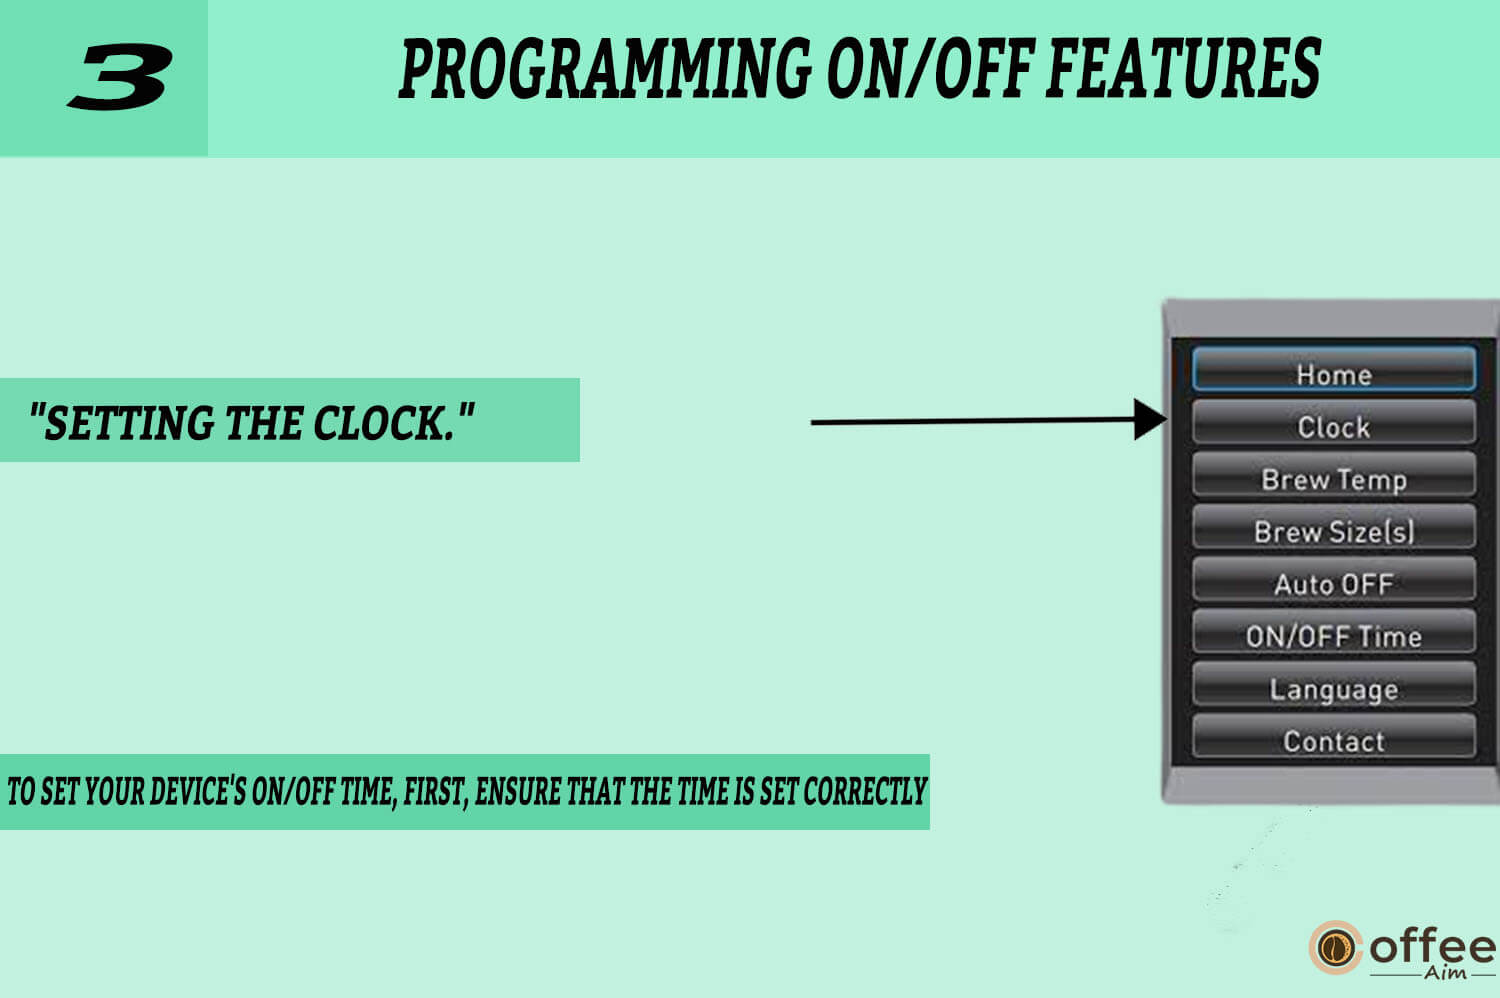
Setting the clock is a straightforward process that involves accessing the Keurig B-150 p’s settings menu and adjusting the time display. You can quickly and easily set the clock on your Keurig B-150p and be ready to start brewing your beloved beverages by following a few simple steps.
Setting the clock is optional, but once the clock is set, the time starts appearing on the screen.
Note: You must first set the clock to use the Auto On/Off Time function.
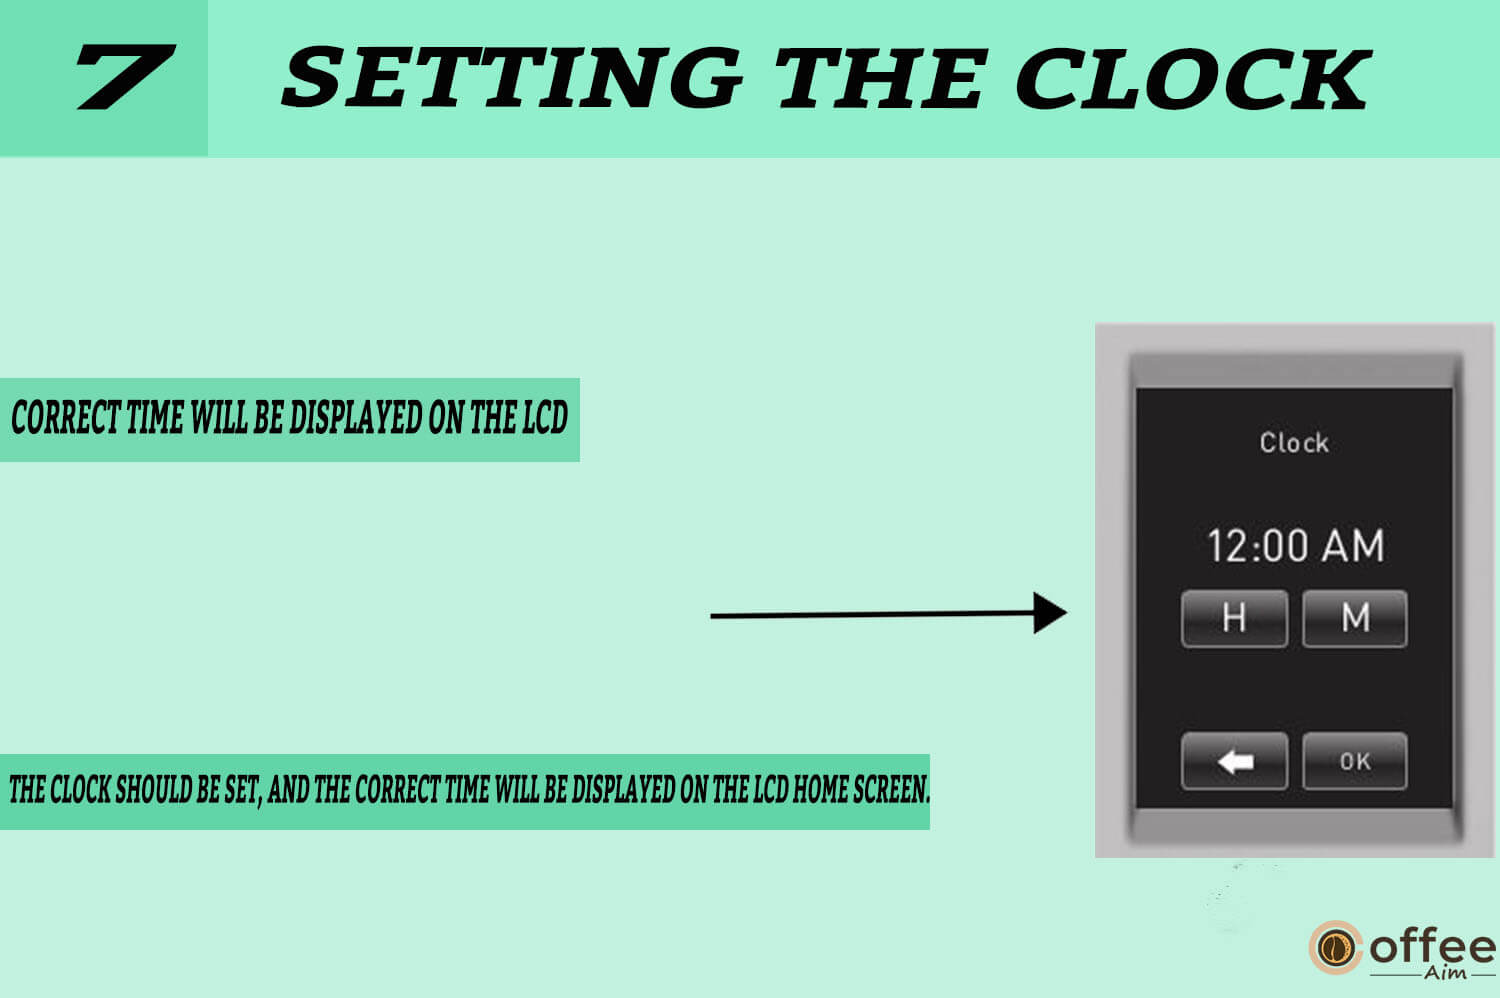
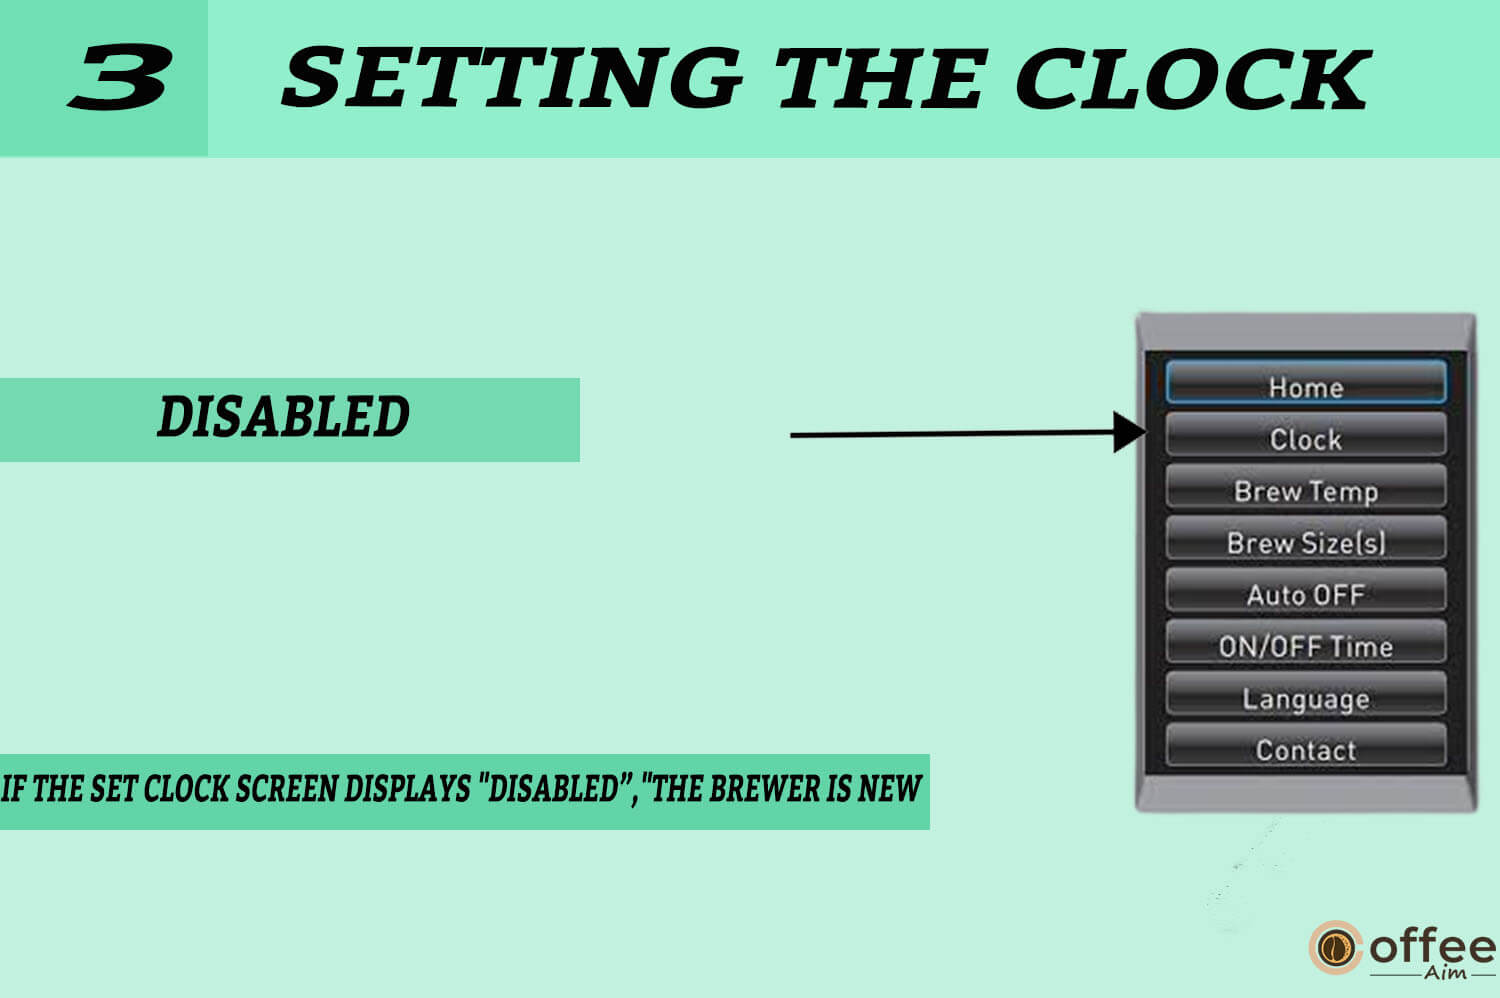
- To set the clock on your Keurig B-150p, start by entering the Menu Mode.
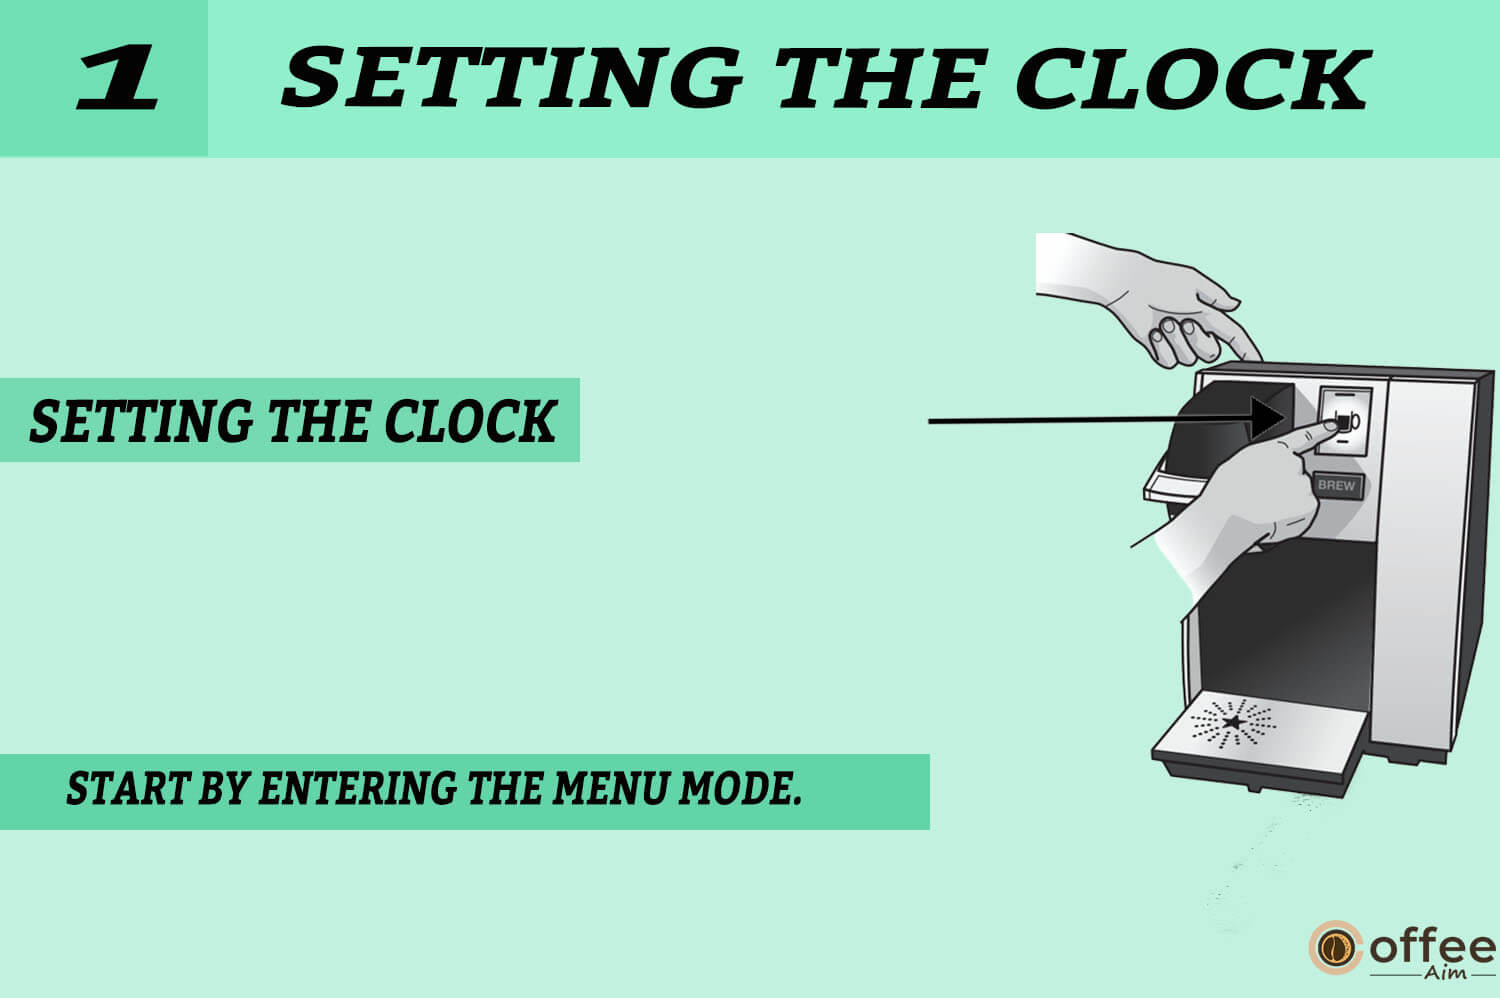
2. Once you’re in the Menu Mode, locate the “CLOCK” option and press it.

3. If the set clock screen displays “DISABLED,” the Brewer is new, or the power has been interrupted—press “DISABLED” to begin setting the time.

4. Use the “H” button to adjust the hour. Press it repeatedly to advance the hour in steps, or hold it down to scroll through the hours quickly.

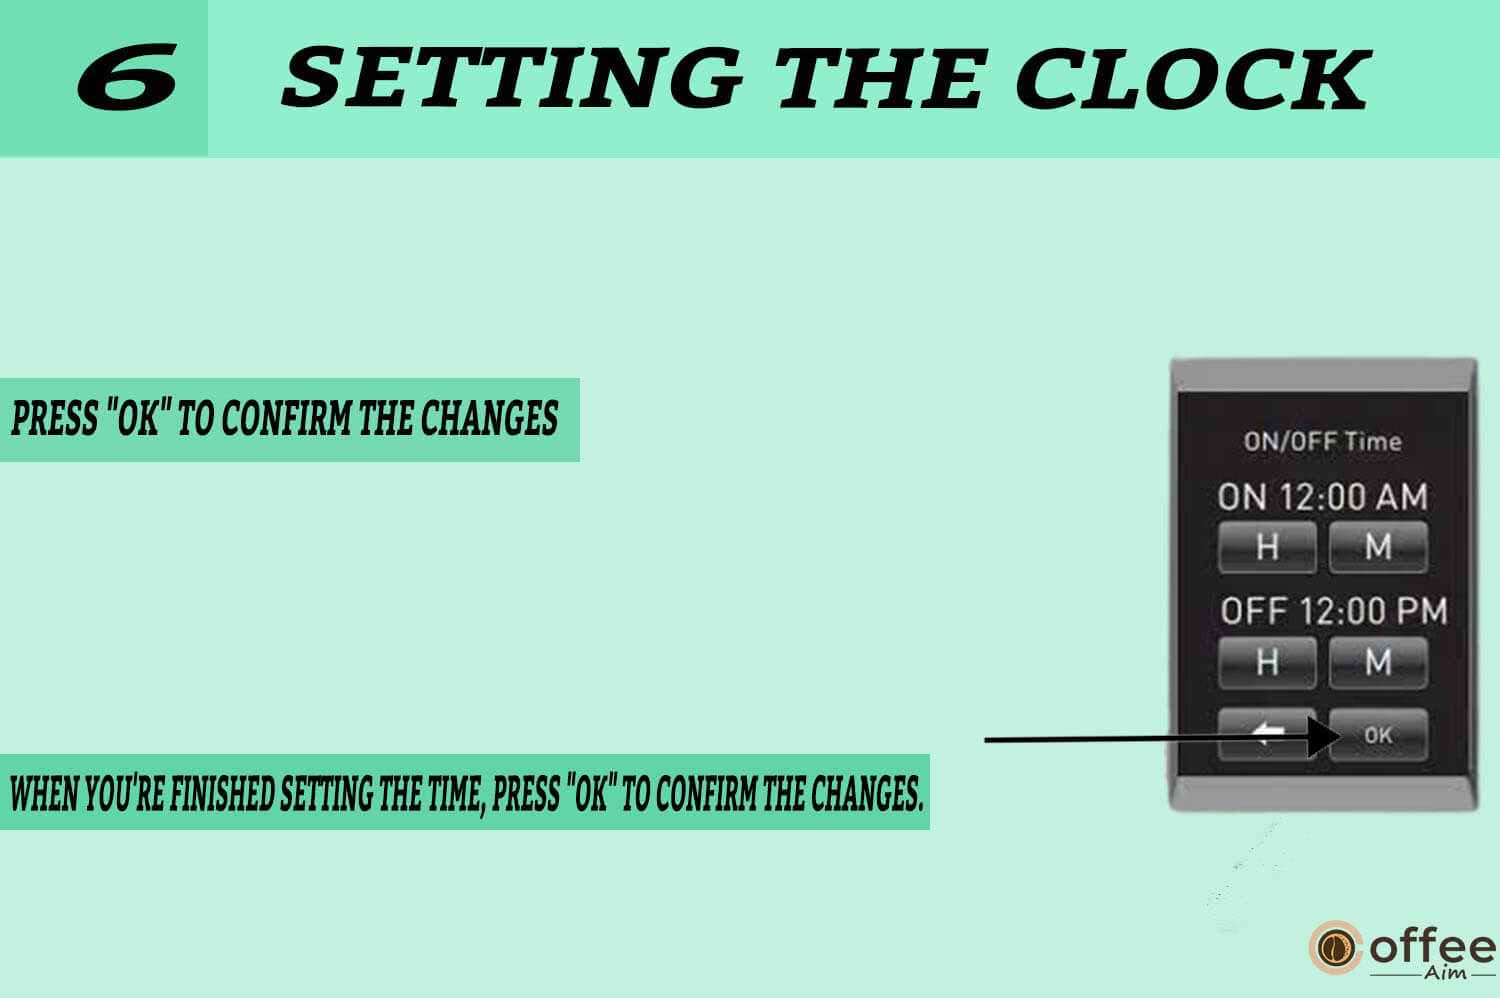
5. Once you’ve set the correct hour, press the “M” button to adjust the minutes. Press it repeatedly to advance by a minute, or hold it down to scroll quickly.

6. When you’re finished setting the time, press “OK” to confirm the changes.
- The clock should be set, and the correct time will be displayed on the LCD Home Screen.
Note:
If the power to the Brewer is interrupted, repeat the above process to reset the time because the clock will no longer be visible. The brew size and brew temperature menu settings will be immediately restored. After the clock is set, all other locations will be immediately corrected.
Note: Press the time to turn off the clock. However, the ‘On/Off’ time option will be disabled as well.
Programming Brew Temperature (188°–198º F)
The Brewer brews at a temperature fixed at 193°F. You can change the weather by 5 degrees. Follow the steps outlined below.
To adjust the brew temperature on your device, follow these steps:
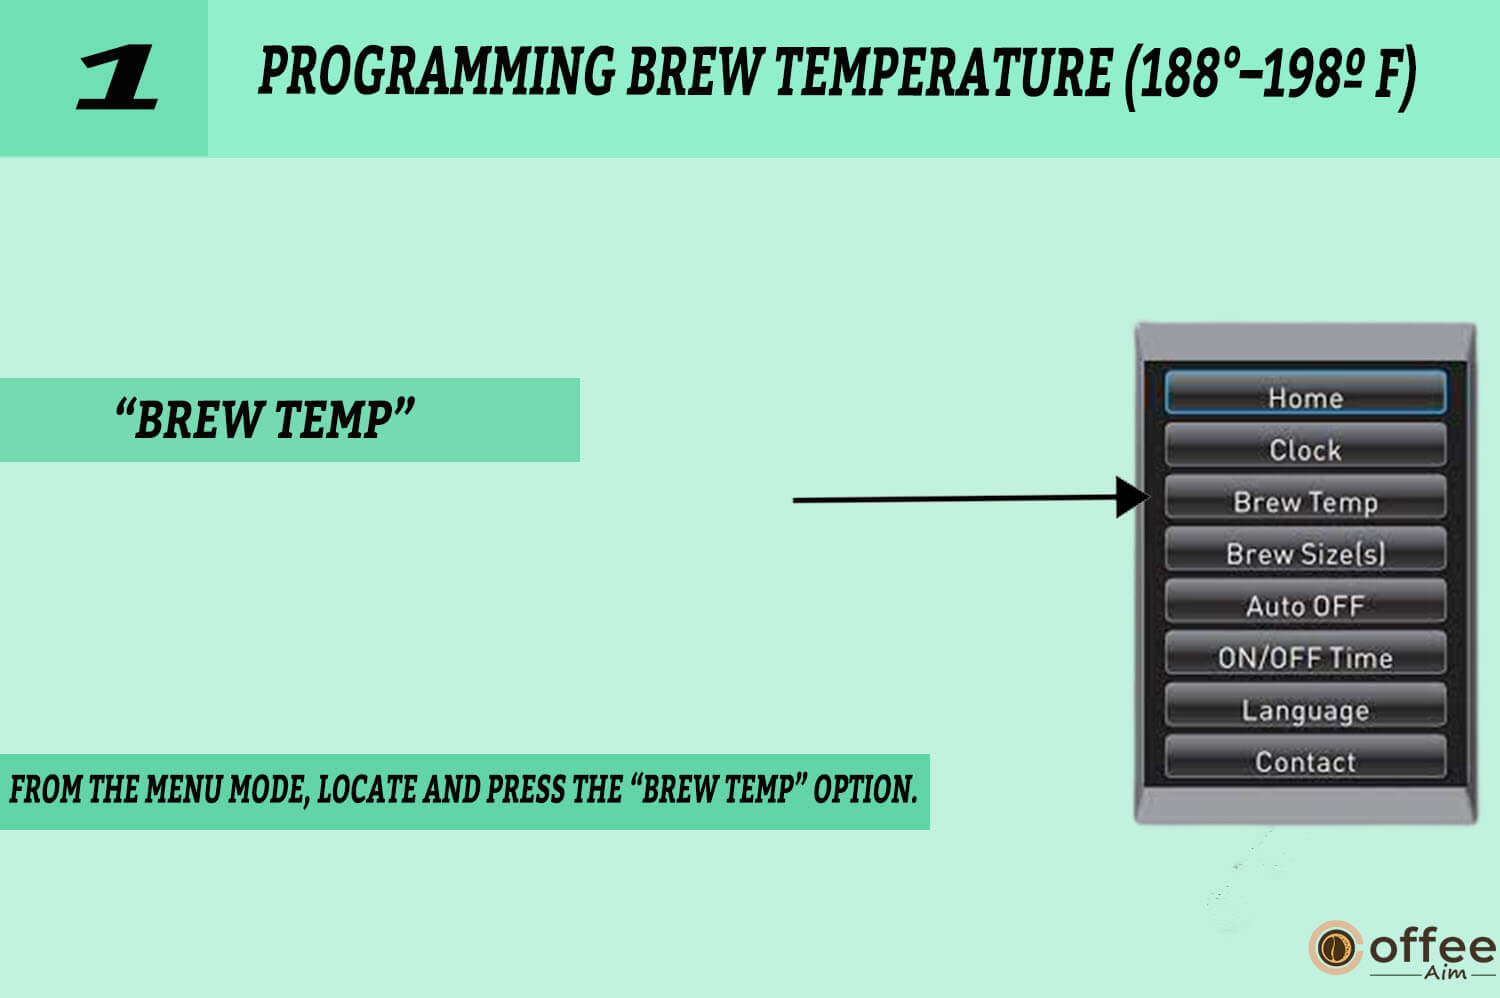
- From the Menu Mode, locate and press the “BREW TEMP” option.
- The LCD Display will then show the programming options for the brew temperature, with the initial setting of 193°F displayed at the top of the screen.

- Use the + symbol to increase the temperature or the – symbol to decrease it, one degree at a time, until you reach your desired temperature.
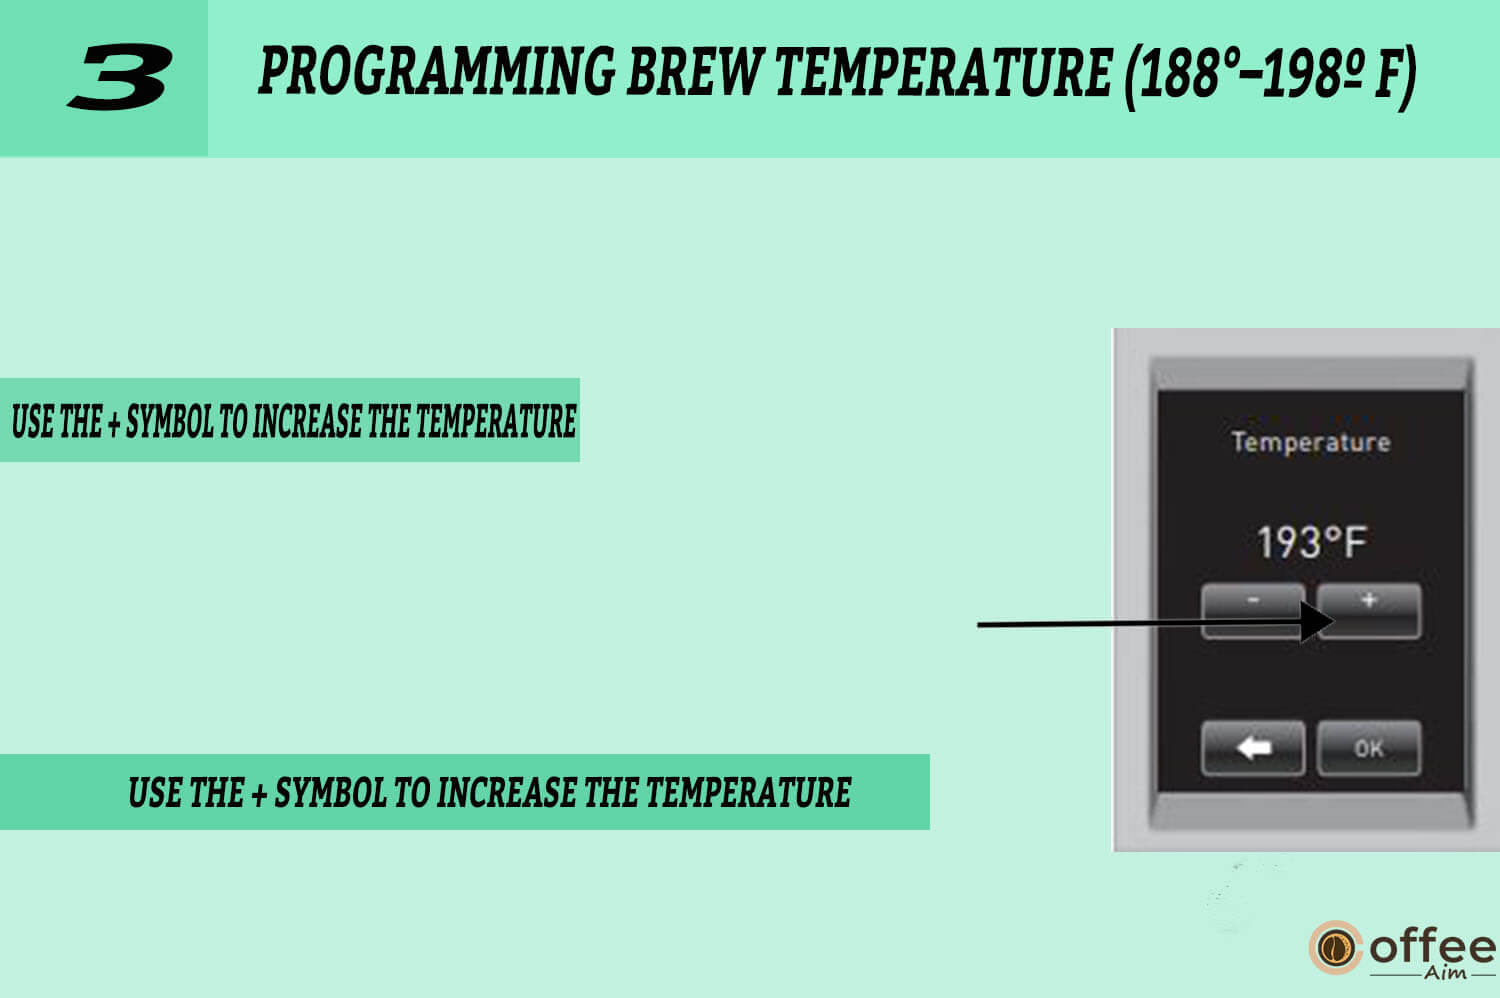
- Once you have reached your preferred temperature, press “OK” to save your settings.

- If you need to change the brew temperature again, repeat steps 1 through 4 to adjust it to your liking.

Note:The Brewer brews at a temperature fixed at 193°F. You can change the weather by 5 degrees.
Note: If boiling happens at high altitudes (above 5,000 feet), use the temperature adjustment (-5°) to lower the temperature.
Programming Your Brew Size
In the default setup, all brew sizes are approved. Click on the correct icon to deactivate any brew size. For this purpose, follow the instructions below:
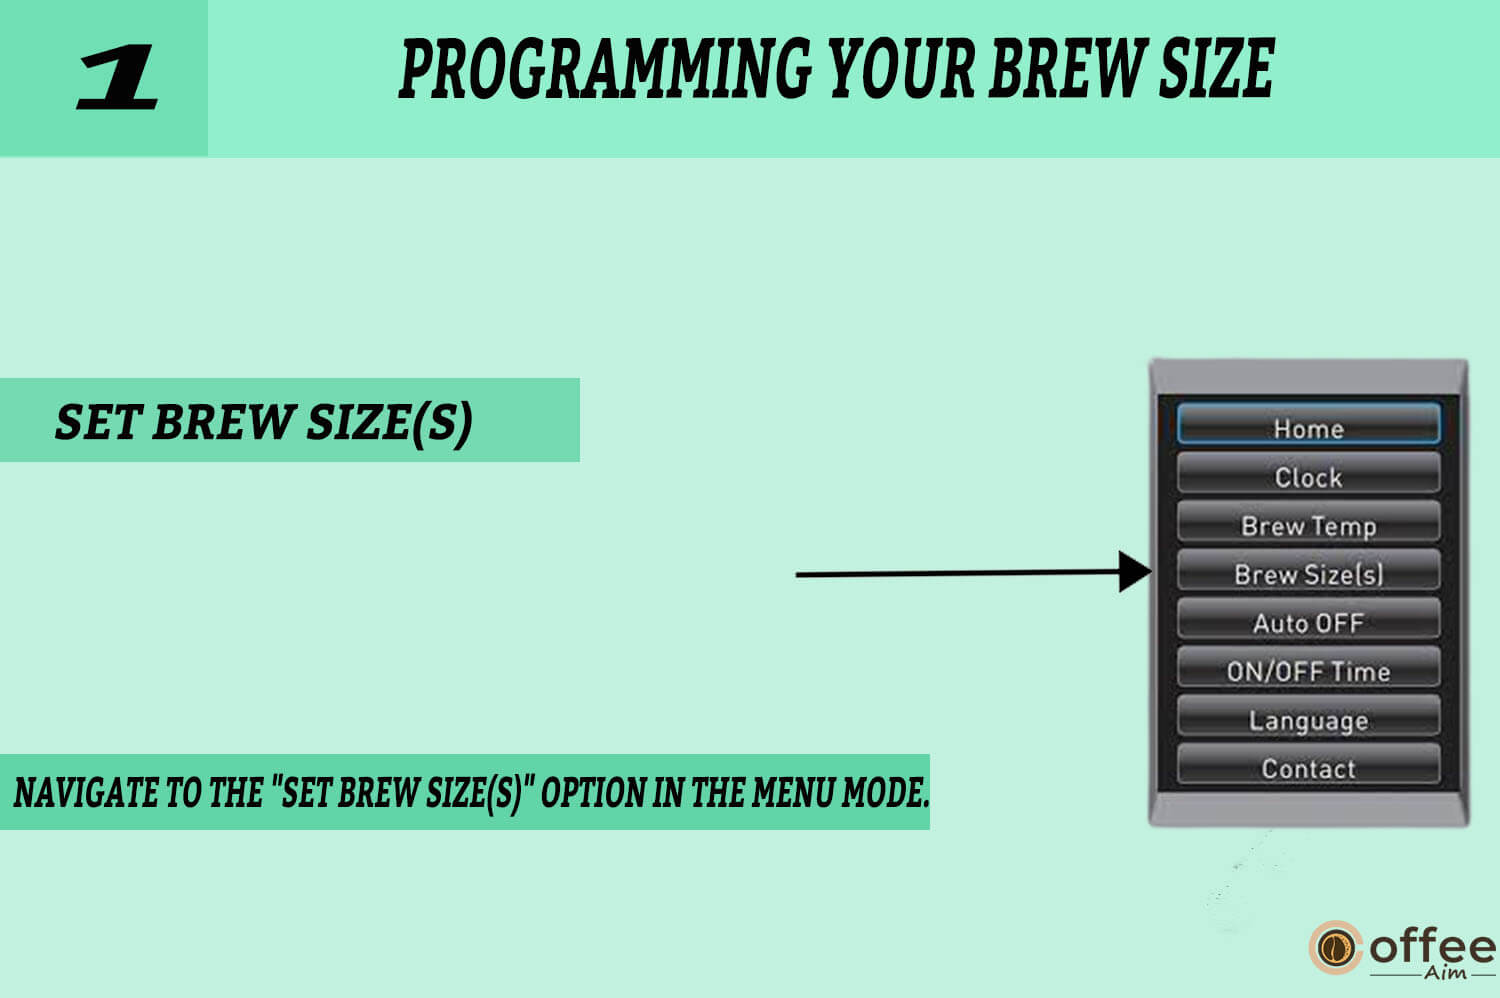
- To view the brew size settings, navigate to the “SET BREW SIZE(S)” option in the Menu Mode.
- The LCD screen will show all of the available brew volumes.

- Select the appropriate icon to deactivate a specific brew size, and the check mark will change to an “X,” indicating that the size is now disabled.
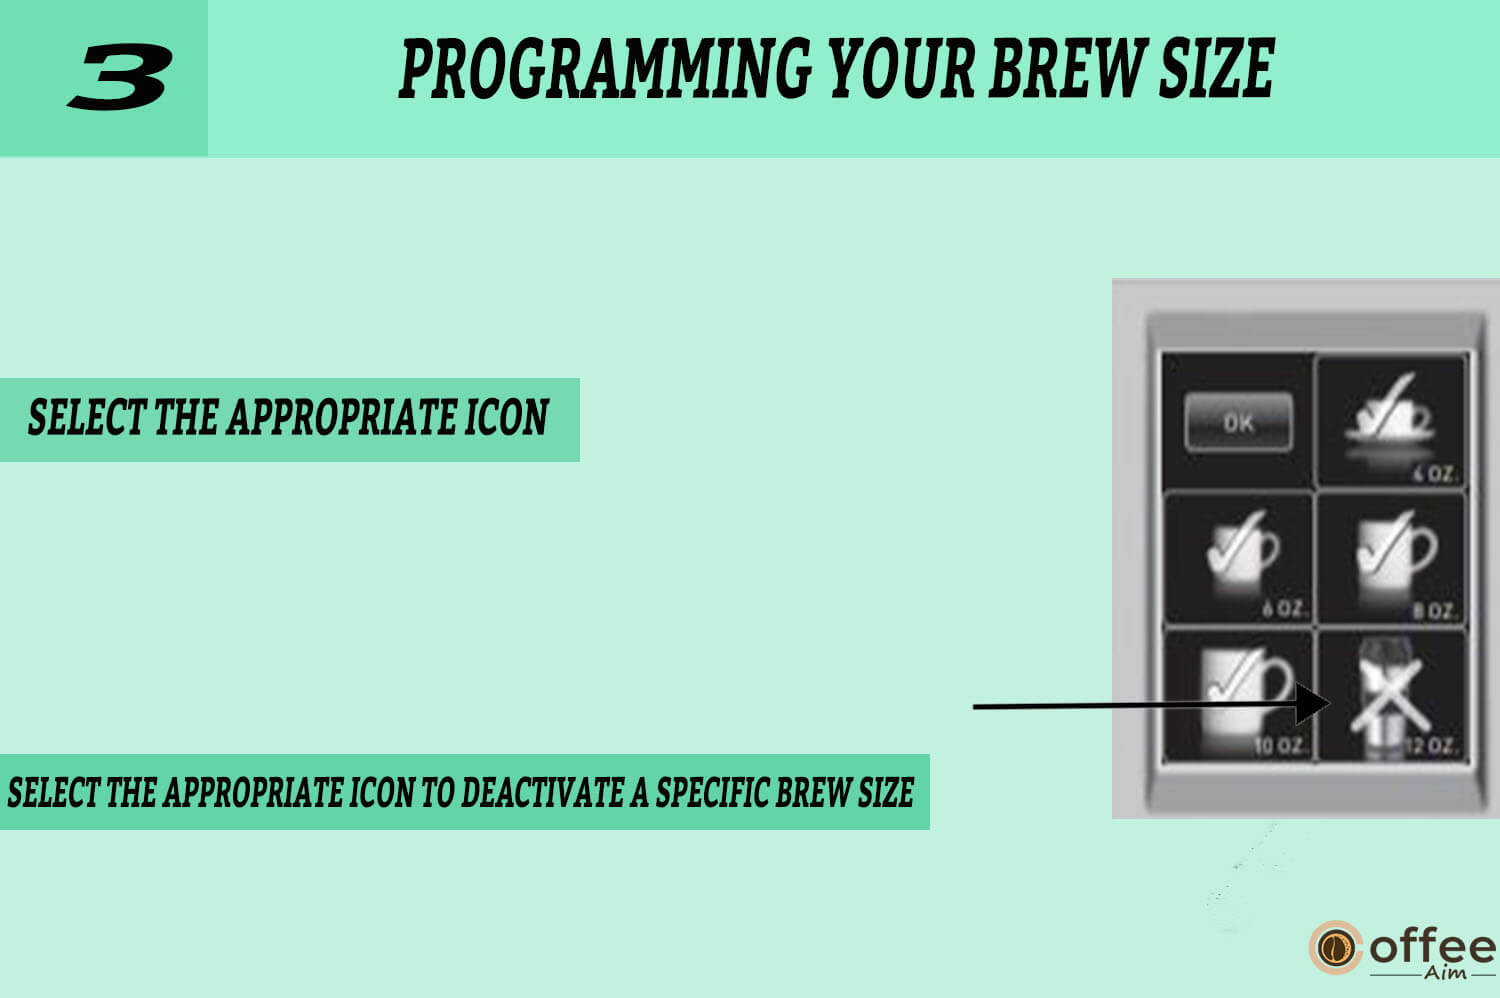
- Once you’ve chosen your preferred brew size(s), click the “OK” button to save your preferences.

- Your chosen brew size(s) are now established and ready to go.
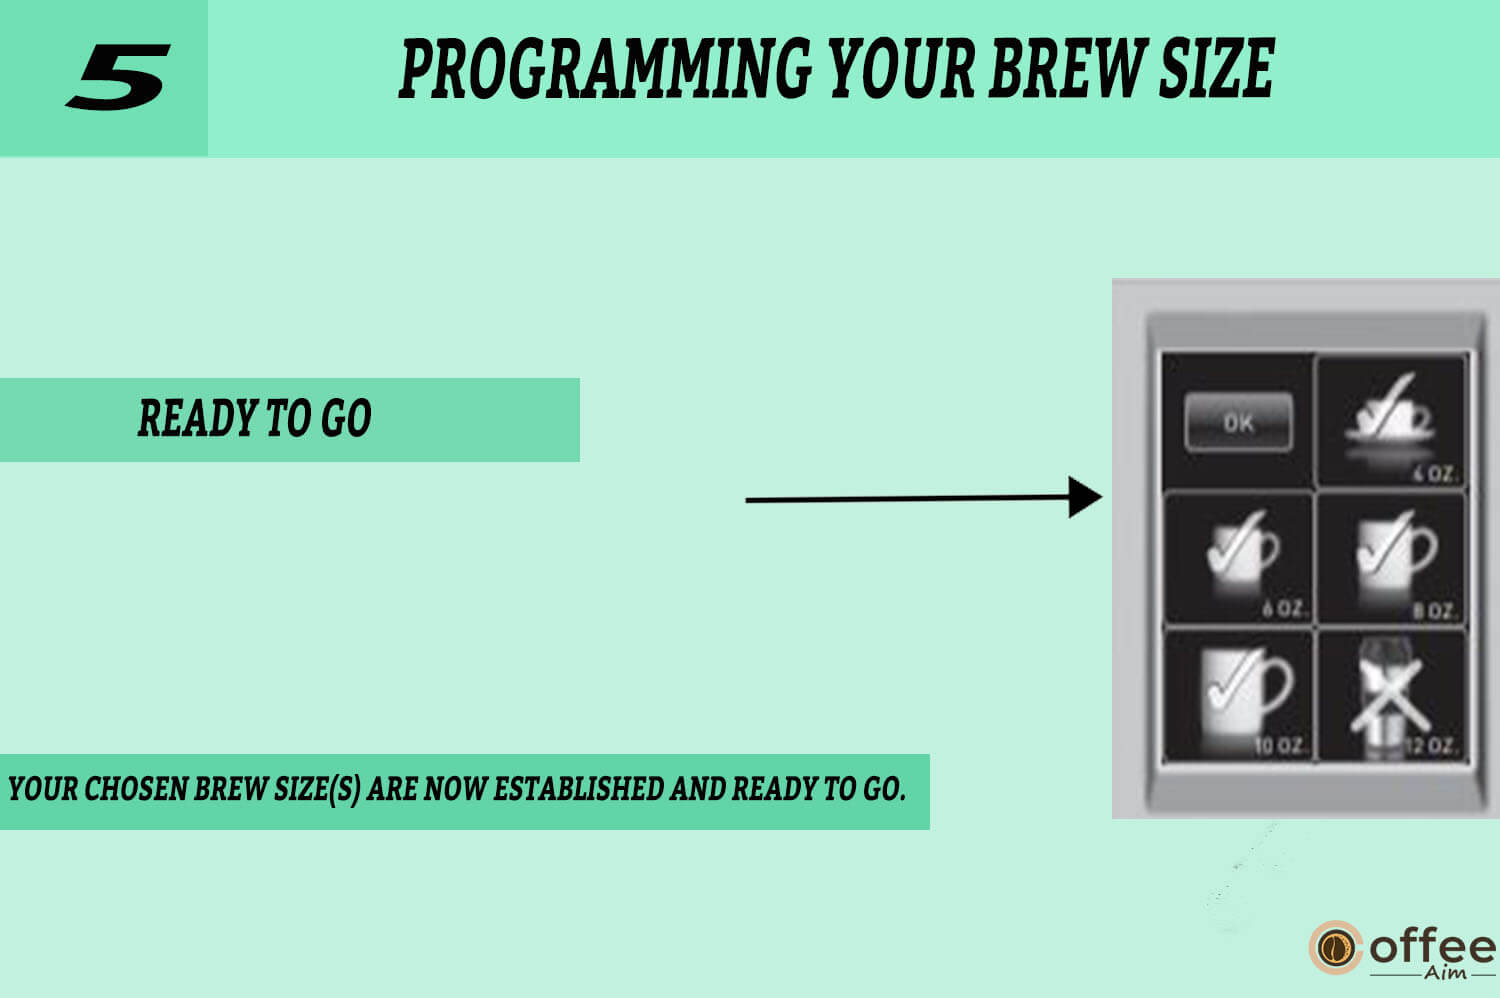
Note: All brew volumes cannot be deleted. To activate a brew size you have already disabled, press its icon and “OK.” The standard brew size is always 8 oz. This brew size cannot be altered or turned off.
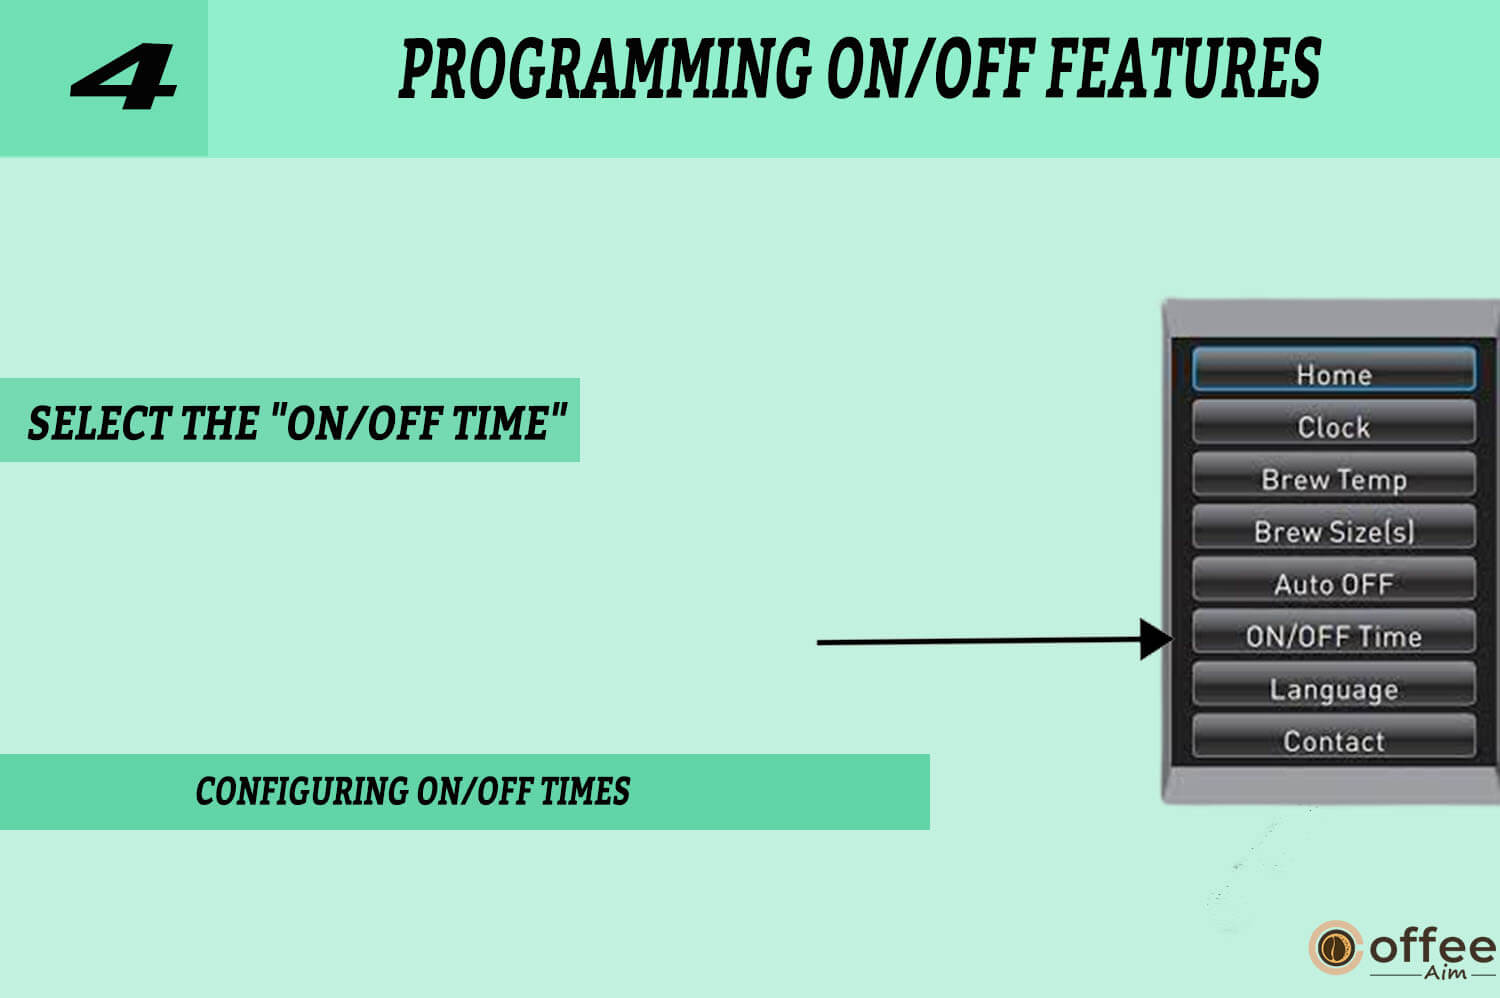
Programming On/Off Features
The Keurig B-150p is a popular commercial coffee machine with various programming features, including the ability to turn on and off specific functions. These programming on/off features enable users to personalise their coffee-making experience and ensure that the machine operates precisely as they require.
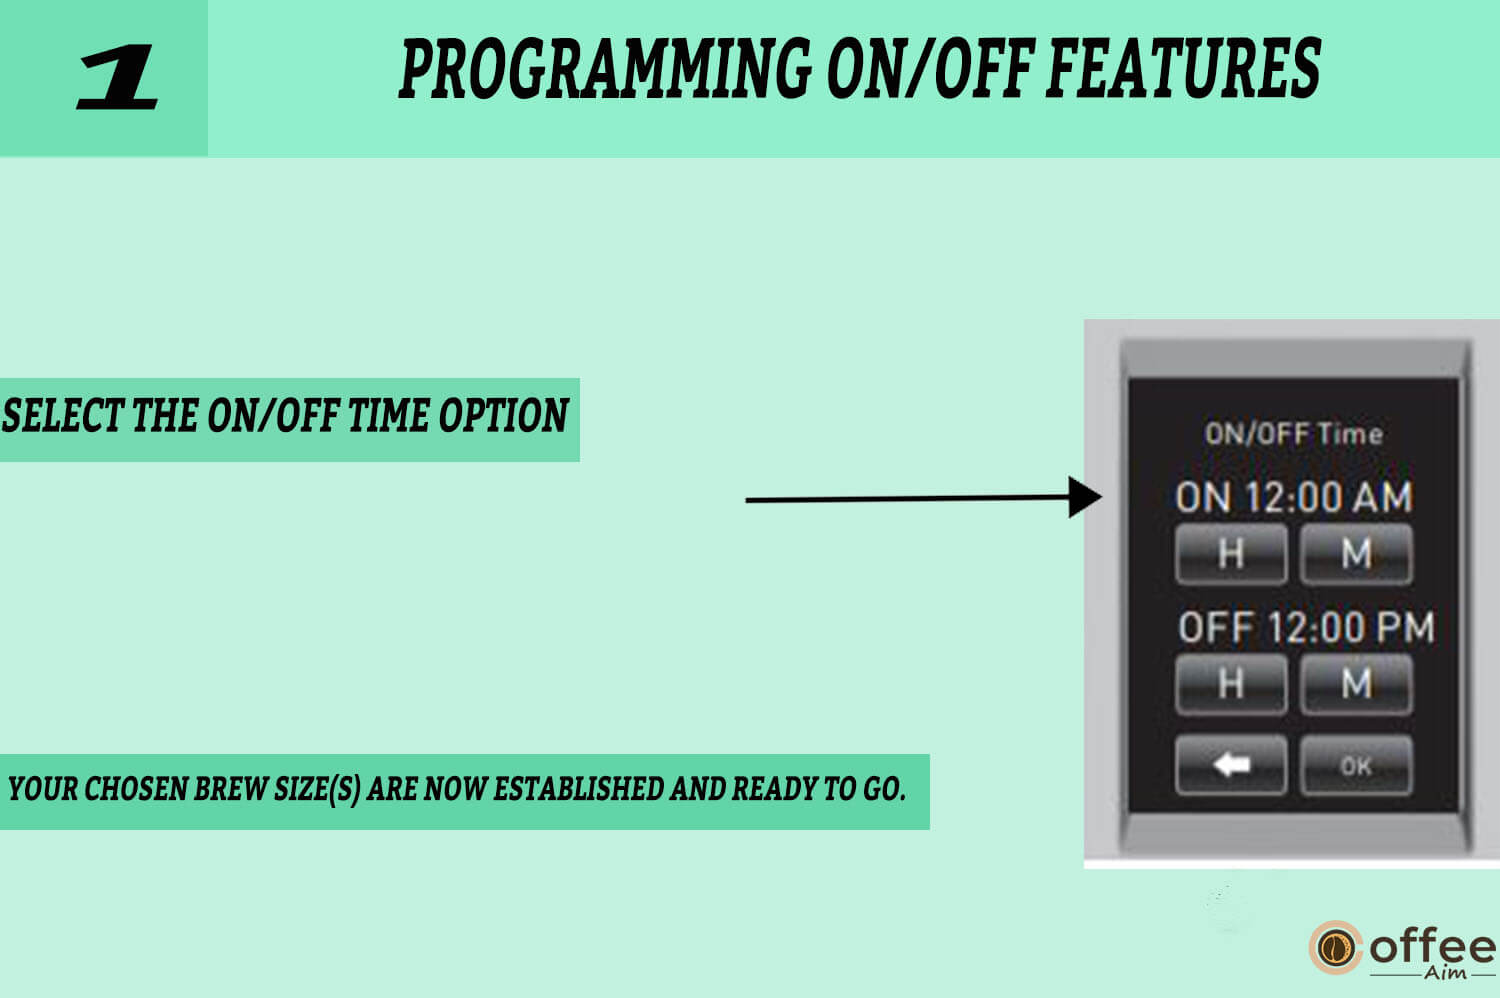
To program the on/off feature, follow the given directions:
- You can access the programming menu and select the On/Off Time option. From there, you can set the time they want the Brewer to turn on and off daily. The Brewer will automatically turn on and heat the water at the designated time, ensuring it is ready to brew when needed.
- When the Off time is reached, the Brewer will automatically shut off, conserving energy until the next On time. This can only be done if the clock is correctly set up.
- To set your device’s ON/OFF time, first, ensure that the time is set correctly by following the directions in the “setting the clock.”
- Return to Menu Mode and select the “ON/OFF TIME” option once the time has been chosen. To begin configuring the ON and OFF times, select this choice.
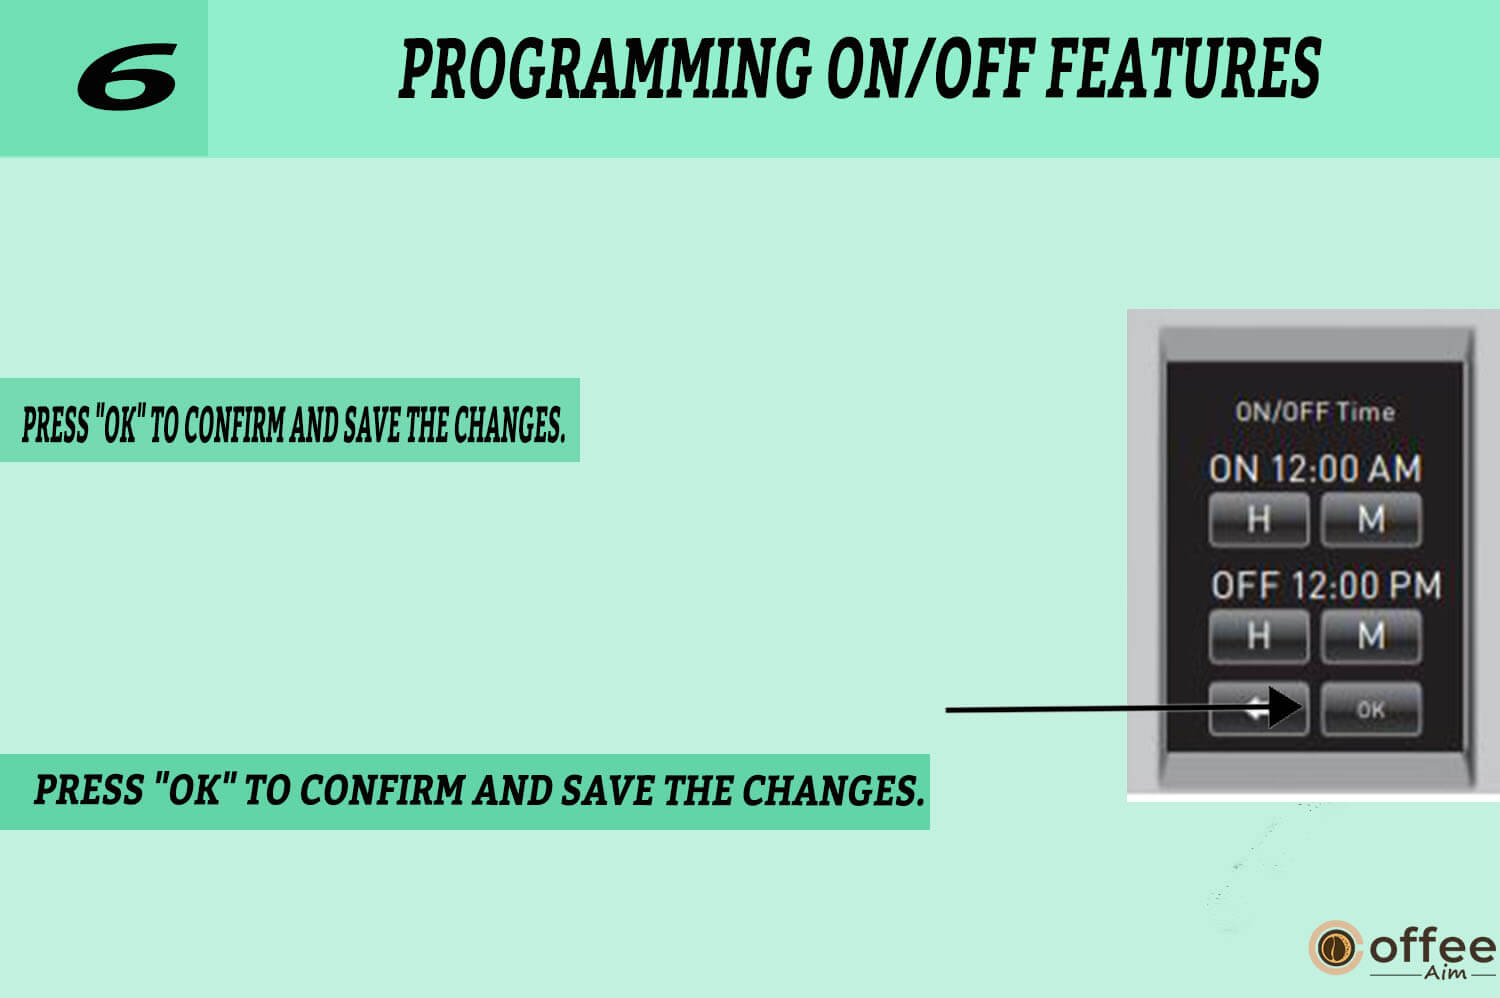
- Press the “DISABLED” button to select the ON time. The display will be updated to reflect the present time of day. Set the appropriate hours and minutes for the ON time using the “H” and “M” buttons. Once the right time has been entered, press “OK” to confirm and save the changes.

- Press the “DISABLED” button again to select the OFF time. The current time will be shown on the monitor once more. Set the appropriate hours and minutes for the OFF time using the “H” and “M” buttons. Once the right time has been entered, press “OK” to confirm and save the changes.
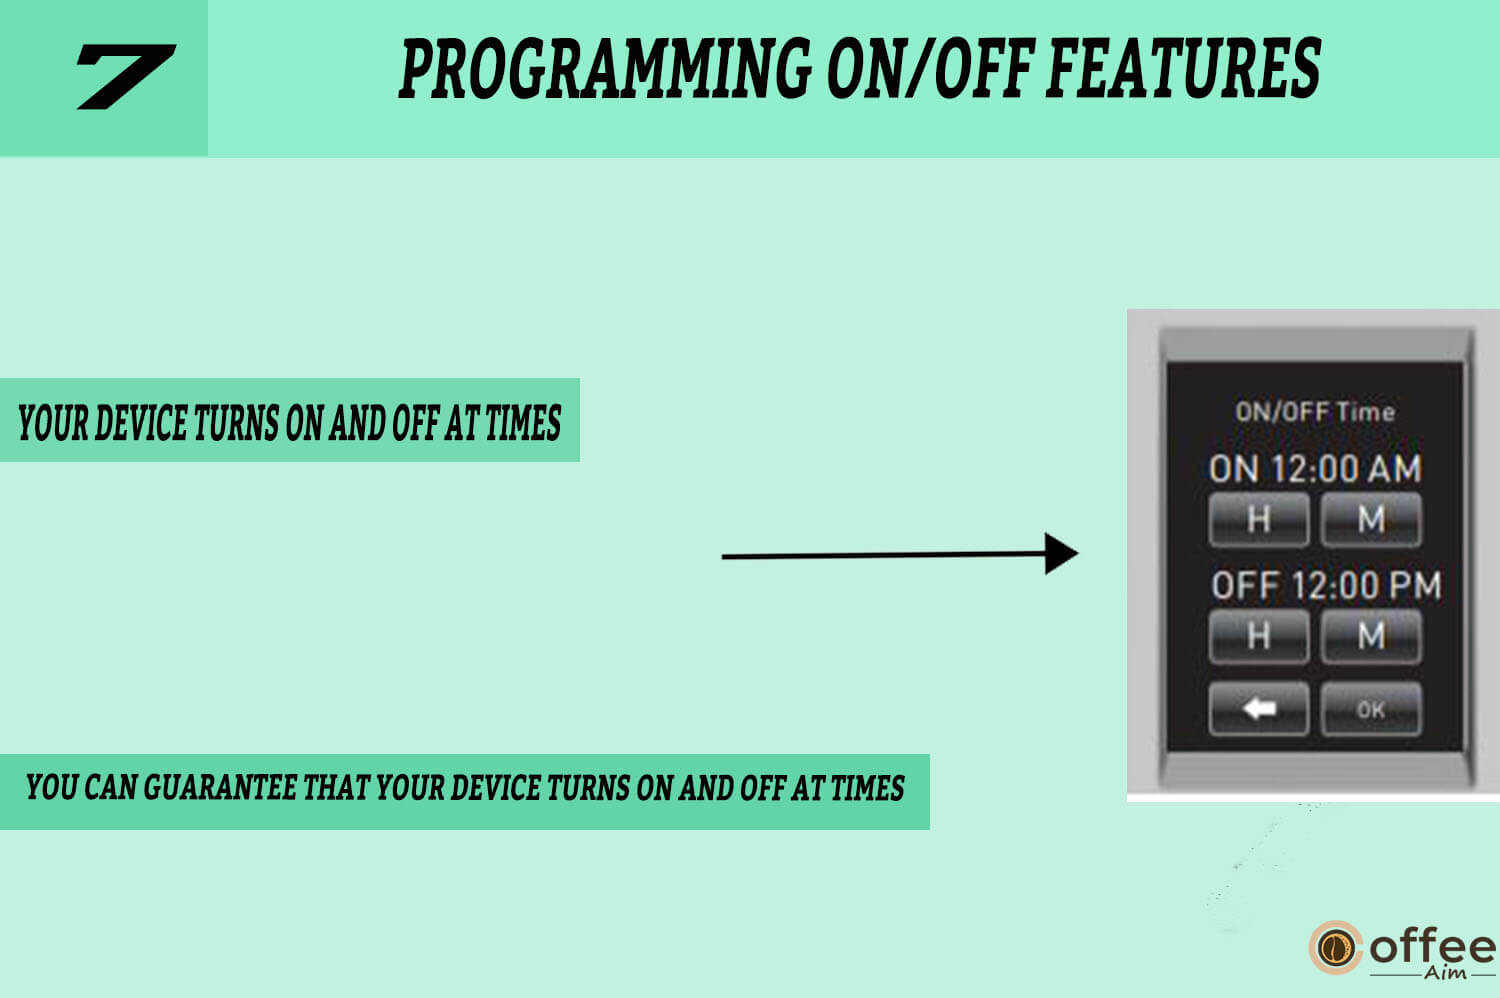
- You can guarantee that your device turns on and off at times you specify by configuring the ON/OFF time. This is particularly useful for conserving energy or scheduling tasks to be finished while you are away.
- Set the Brewer to “AUTO OFF” to switch off 2 hours after the last brew.
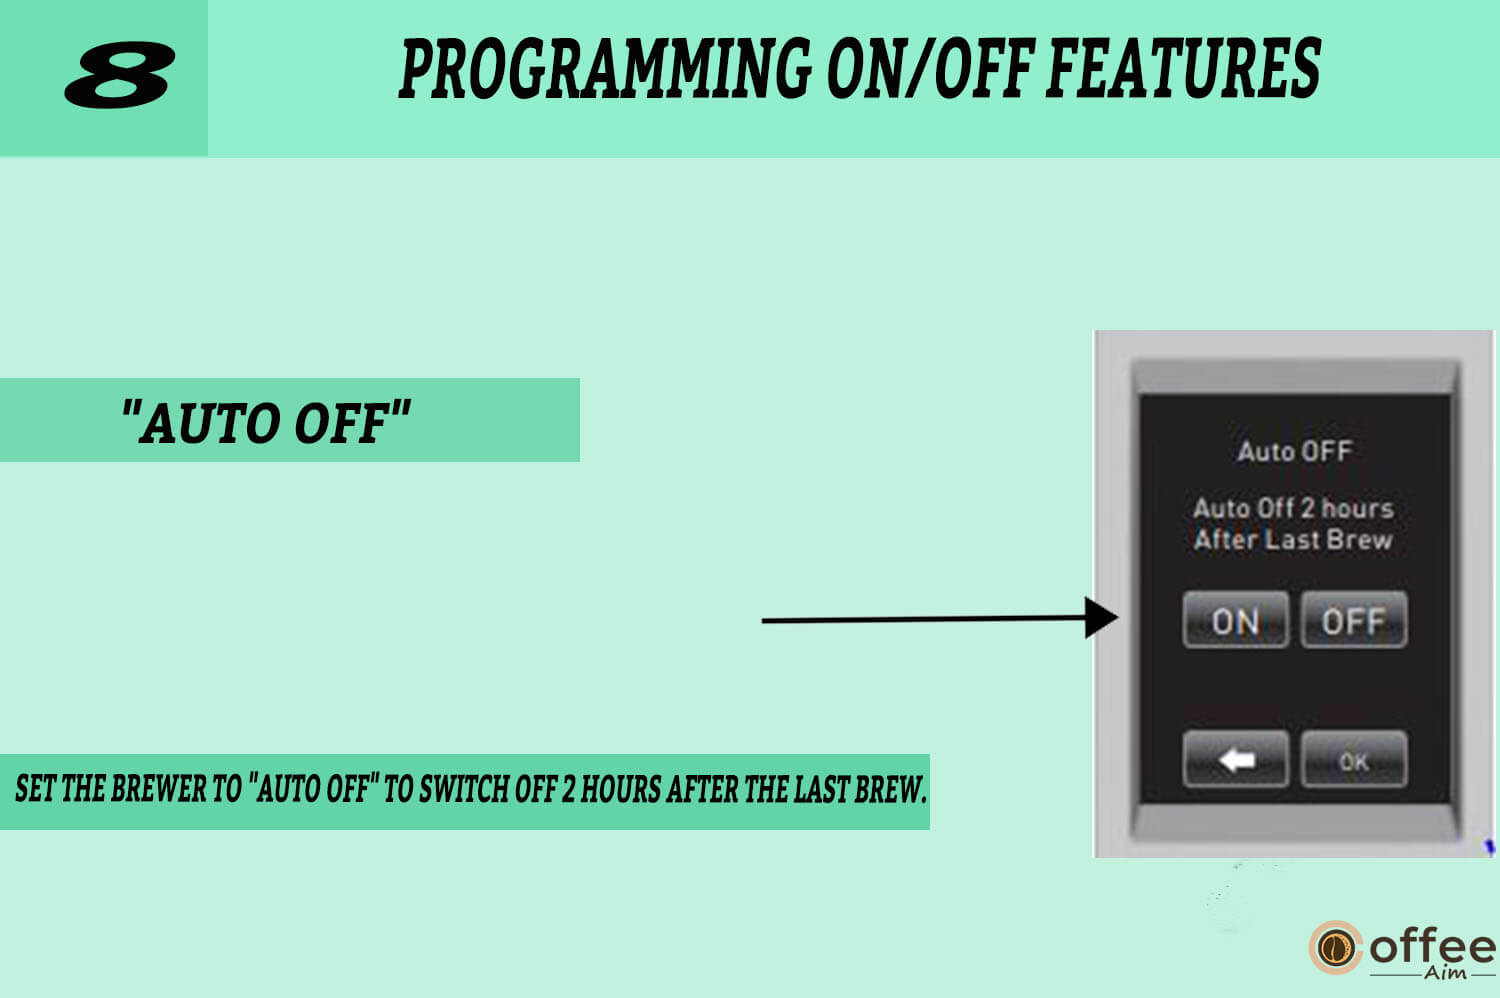
- Select “AUTO OFF” from Menu Mode.
- The “AUTO OFF” programming choice will now be displayed on the LCD Display.
- Press “ON” to activate the “AUTO OFF” feature.
- “ENABLED” will show on the screen; press “OK” to confirm. Press “OFF” to turn off the “AUTO OFF” function. “DISABLED” will show on the screen; click “OK.”
Note: The clock must be set to the proper time to use this programming feature.
Language Settings
The Keurig B-150P’s language setting function is a convenient option that allows users to customise the language displayed on the machine’s screen. This feature benefits people who prefer to use a language other than English or who may struggle to navigate the machine’s settings in English.
Set Language
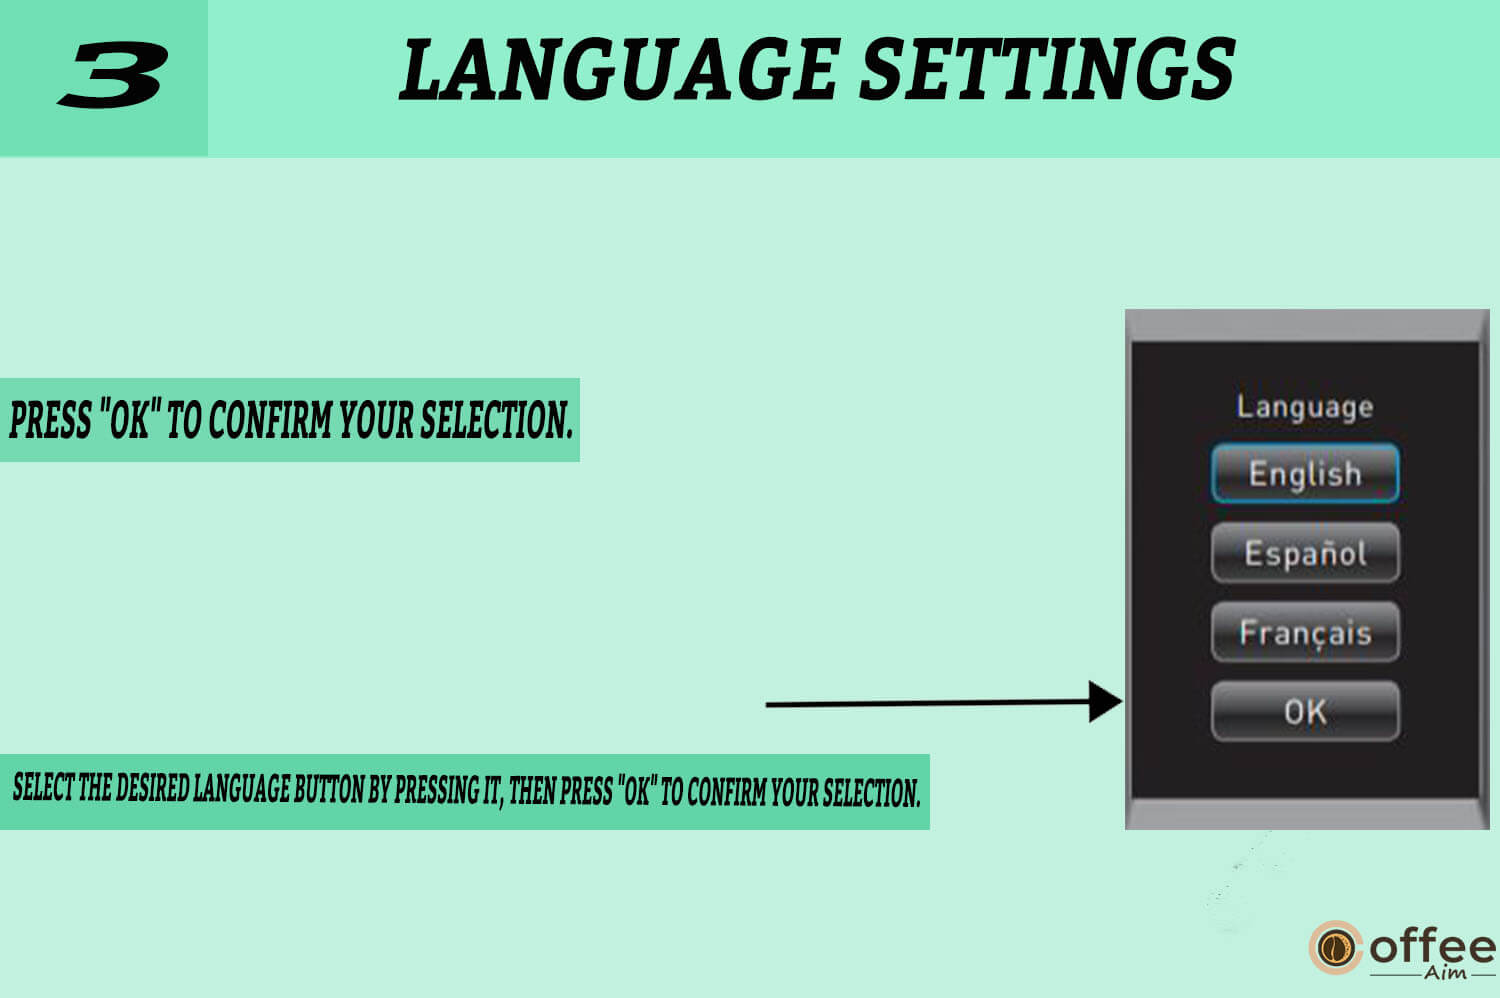
The Brewer comes with English set as the primary language. Follow the steps below to change the default language to Francais or Espanol.
- Navigate to the “LANGUAGE” option in the Menu Mode.

- Once you’ve selected the “LANGUAGE” option, the LCD Display will show the available Language programming options.
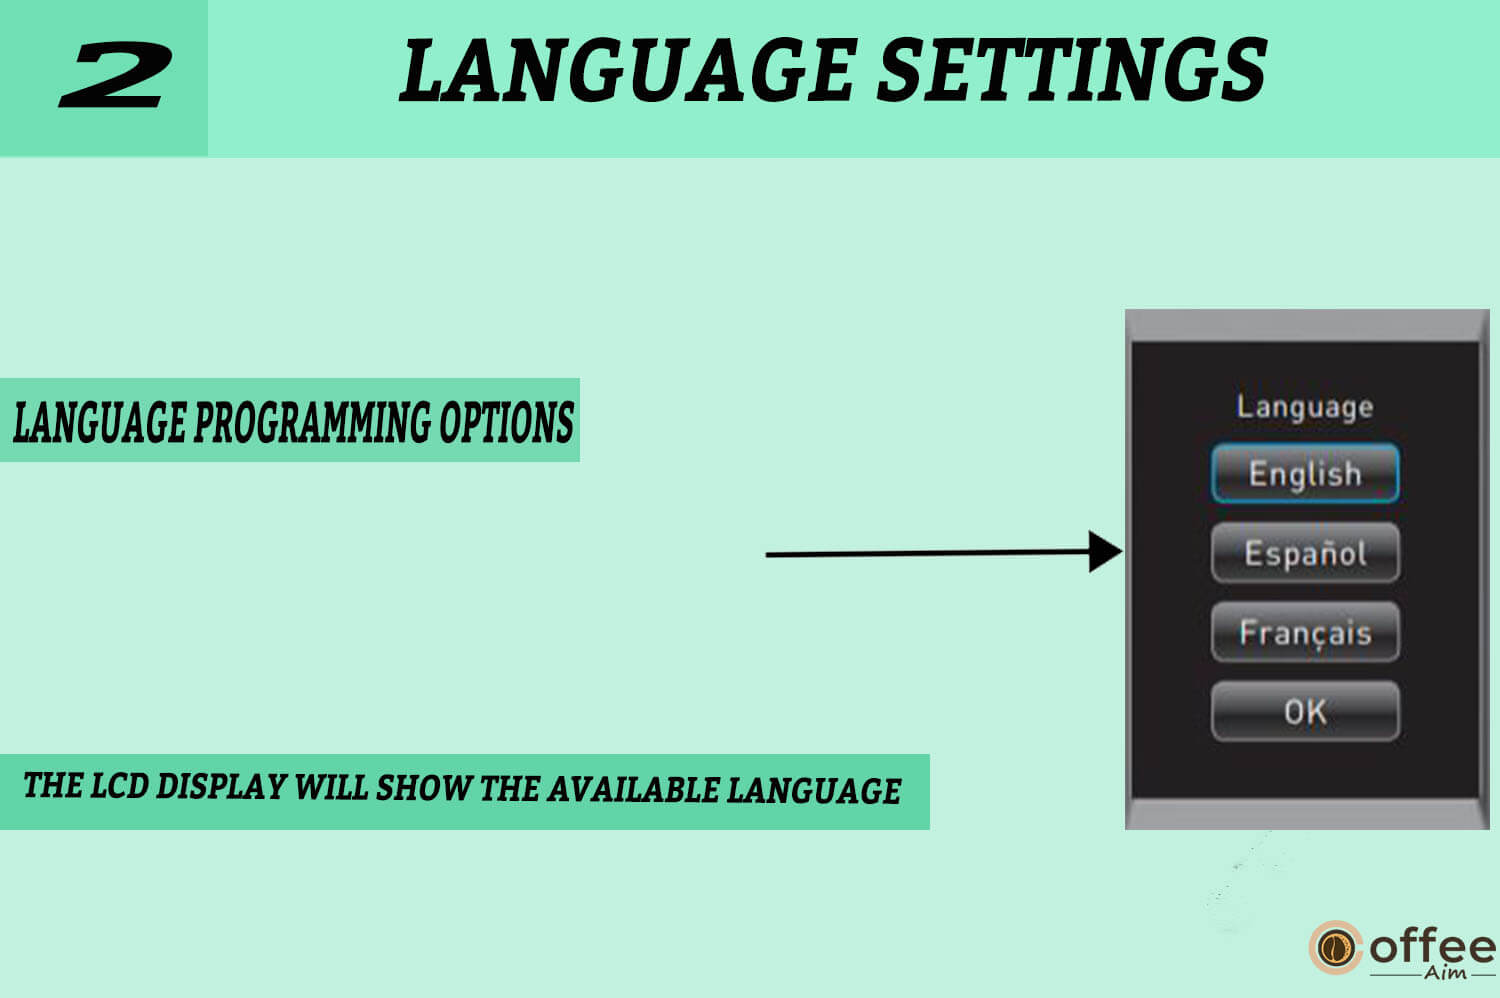
- Select the desired language button by pressing it, then press “OK” to confirm your selection.
Screen
This machine’s customizable settings, including the ability to establish the contact screen, are one of its standout features. The contact screen enables users to program the machine to meet their requirements, such as adjusting the brewing temperature or choosing the cup size. You can program the Brewer to remember your contact details. The contact page will be displayed in the screen saver.
To update the contact information on a Keurig machine:
- From the Menu Mode, select “CONTACT.”

- Press the Upper Box to access the Keypad and delete the current information.
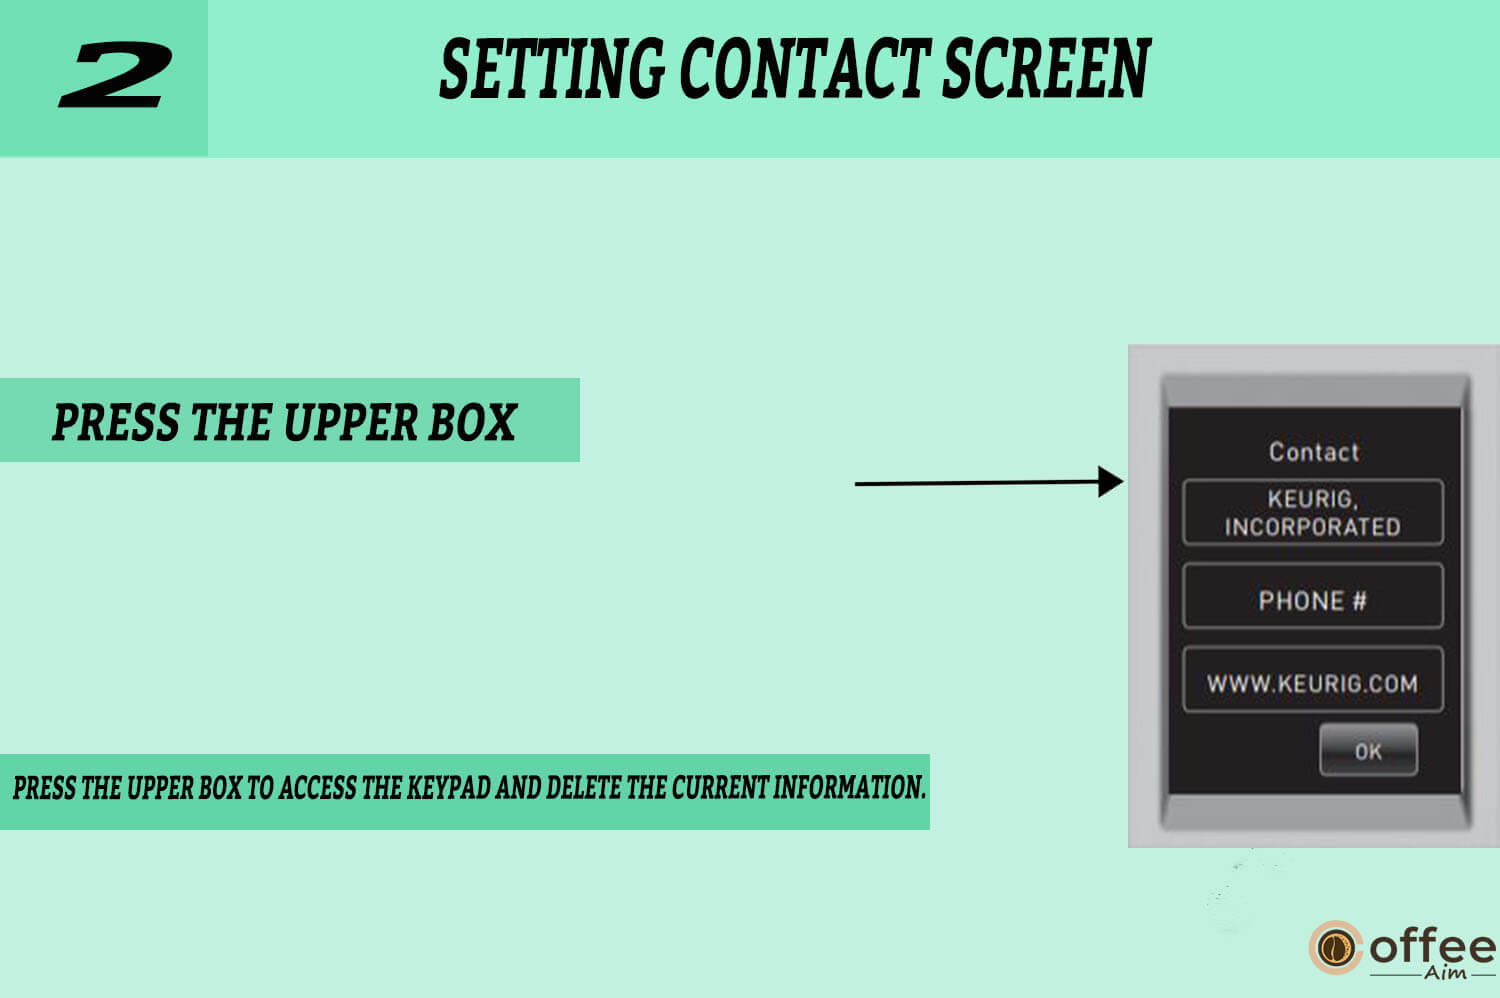
(Note: Keurig contact information will be displayed on the screen unless the user changes it.)
- Enter new information using the Keypad and press “OK” to save changes and return to the Main Contact Screen.
- Press the Middle Box to access the Numeric Keypad Mode, delete the current phone number, and enter new information using the Keypad.
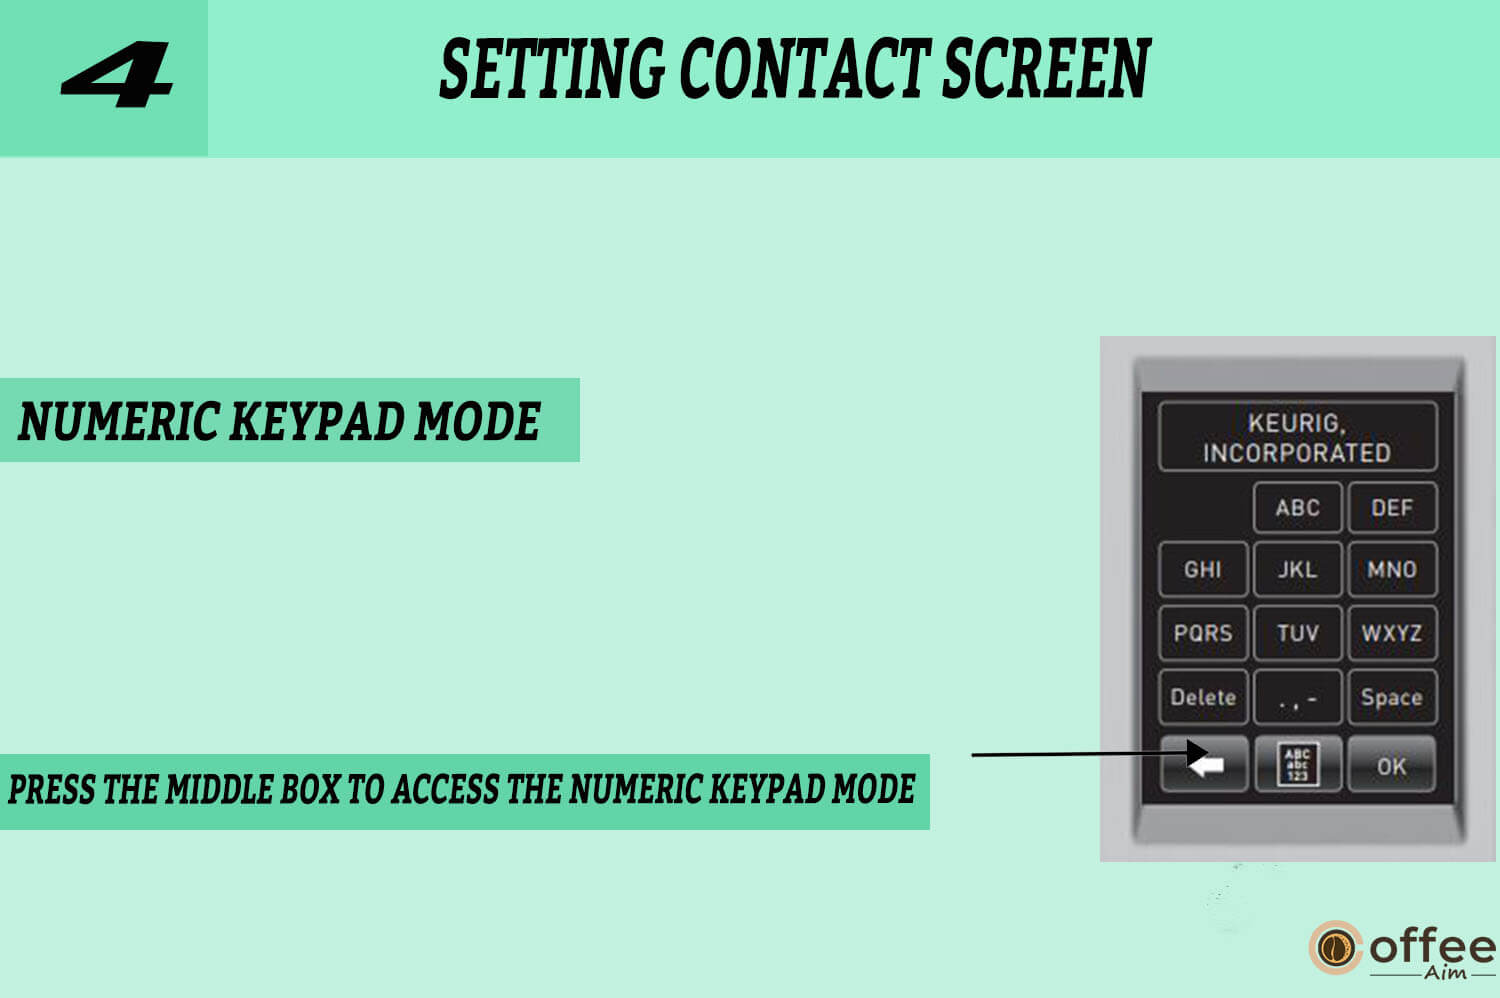
(Note: Press the Keypad Change Key in the bottom centre of the screen to pick Uppercase, Lower Case, Numerals, Upper Case Accents,and Lower Case Accents.)
- Press “OK” to save changes and return to the Main Contact Screen.

- Press the Lower Box to customise with any information, such as web/email address or contact name.
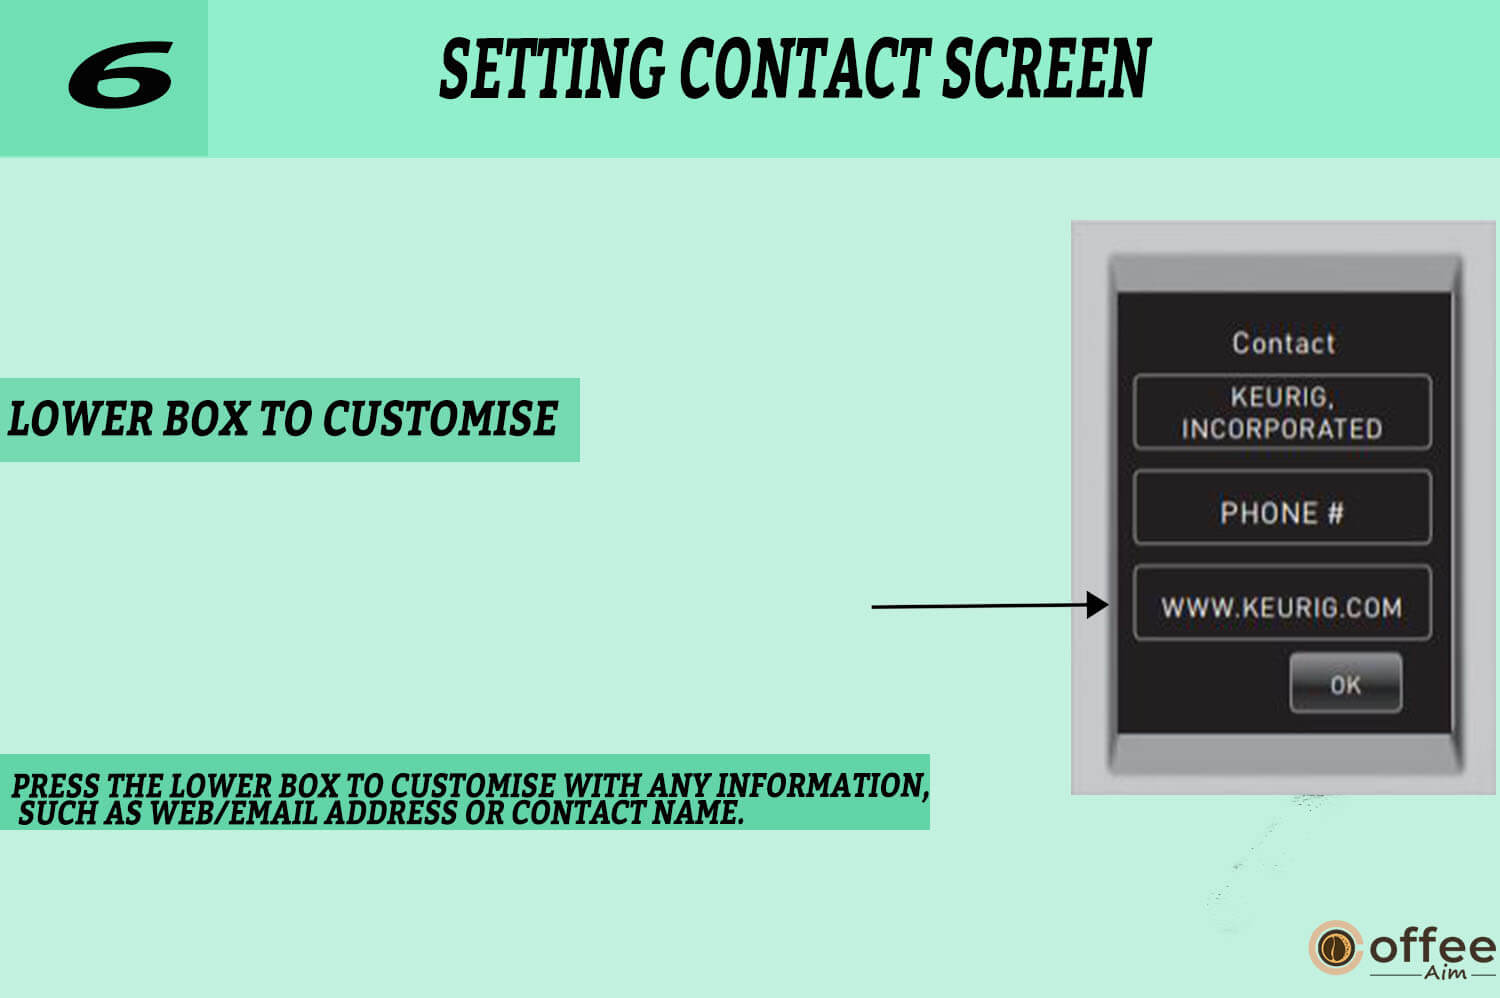
- Enter new information using the Keypad and press “OK” to save changes and return to the Main Contact Screen.

(Note: The Back Arrow Key will restore you to the Main Contact Screen without saving your changes.)
- In the Main Contact Screen, press “OK” to save the updated screen as the default and return to the Menu Screen.
Cleaning & Maintenance Of Your Keurig B-150p
A key component of using this coffee machine is keeping it clean and well-maintained. This keeps the machine running smoothly and ensures that your coffee tastes fresh and delicious every time you brew. In this respect, the Keurig B-150p includes several cleaning and maintenance features that simplify keeping the machine clean and operational.
Cleaning External Parts
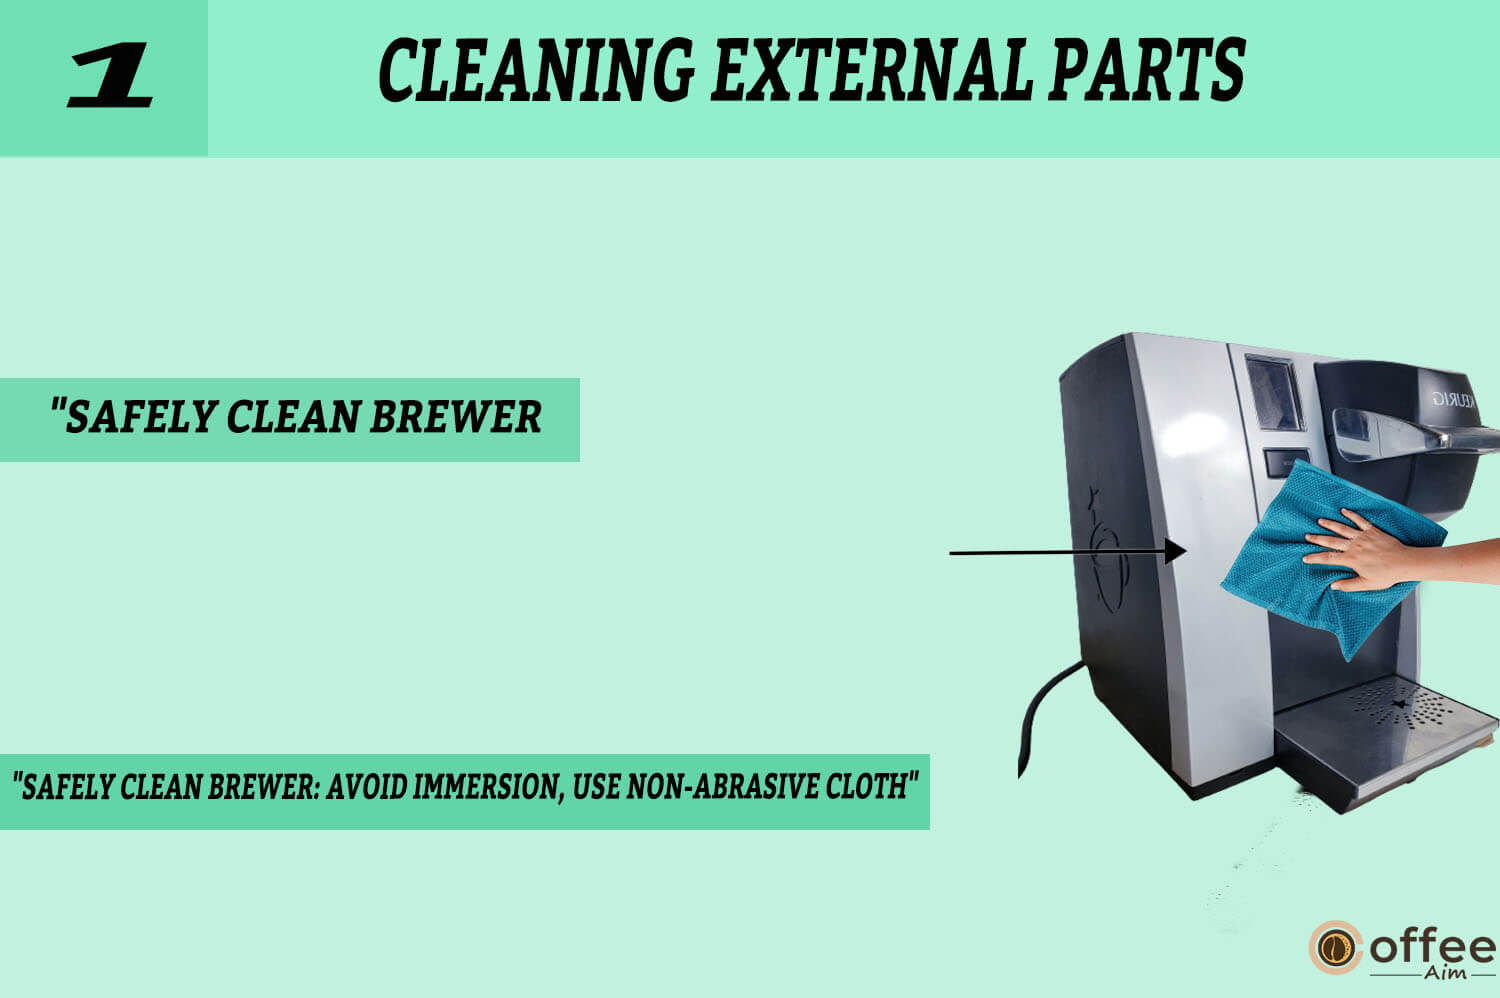
Your Keurig B-150p coffee machine’s external components must be cleaned regularly as part of its maintenance. Dust, dirt, and other debris can collect on the machine over time, reducing its performance and appearance. To keep the machine looking and working at its best, regularly wipe down the exterior with a damp cloth. This should be done at least once a week and more frequently if the machine is dusty or dirty.
To clean external parts, you must keep these points in your mind:
- Avoid immersing the Brewer in water or other liquid substances when cleaning it. Instead, sanitise Brewer’s exterior components, including the Housing, with a non-abrasive, soapy cloth.
- Because the Drip Tray can store up to 12 ounces of overflow, it must be inspected and cleaned regularly. Slide the Drip Tray Assembly towards you, keeping it level to avoid spills. The Drip Tray and Plate should be kept from the machine. Instead, scrub them with a non-abrasive, damp cloth dipped in soap and thoroughly rinsed.

Cleaning The K-Cup Holder Assembly
The K-Cup Holder Assembly holds the K-Cup and punctures it to brew a new cup of coffee or tea.
Mineral deposits and coffee residue can accumulate on the K-Cup Holder Assembly over time, affecting the quality and flavour of your beverage. As a result, cleaning the K-Cup Holder Assembly frequently is critical to maintaining the taste and hygiene of your brewed beverages.
In the following lines, we will go through the step-by-step procedure for cleansing the Keurig B-150p’s K-Cup Holder Assembly.
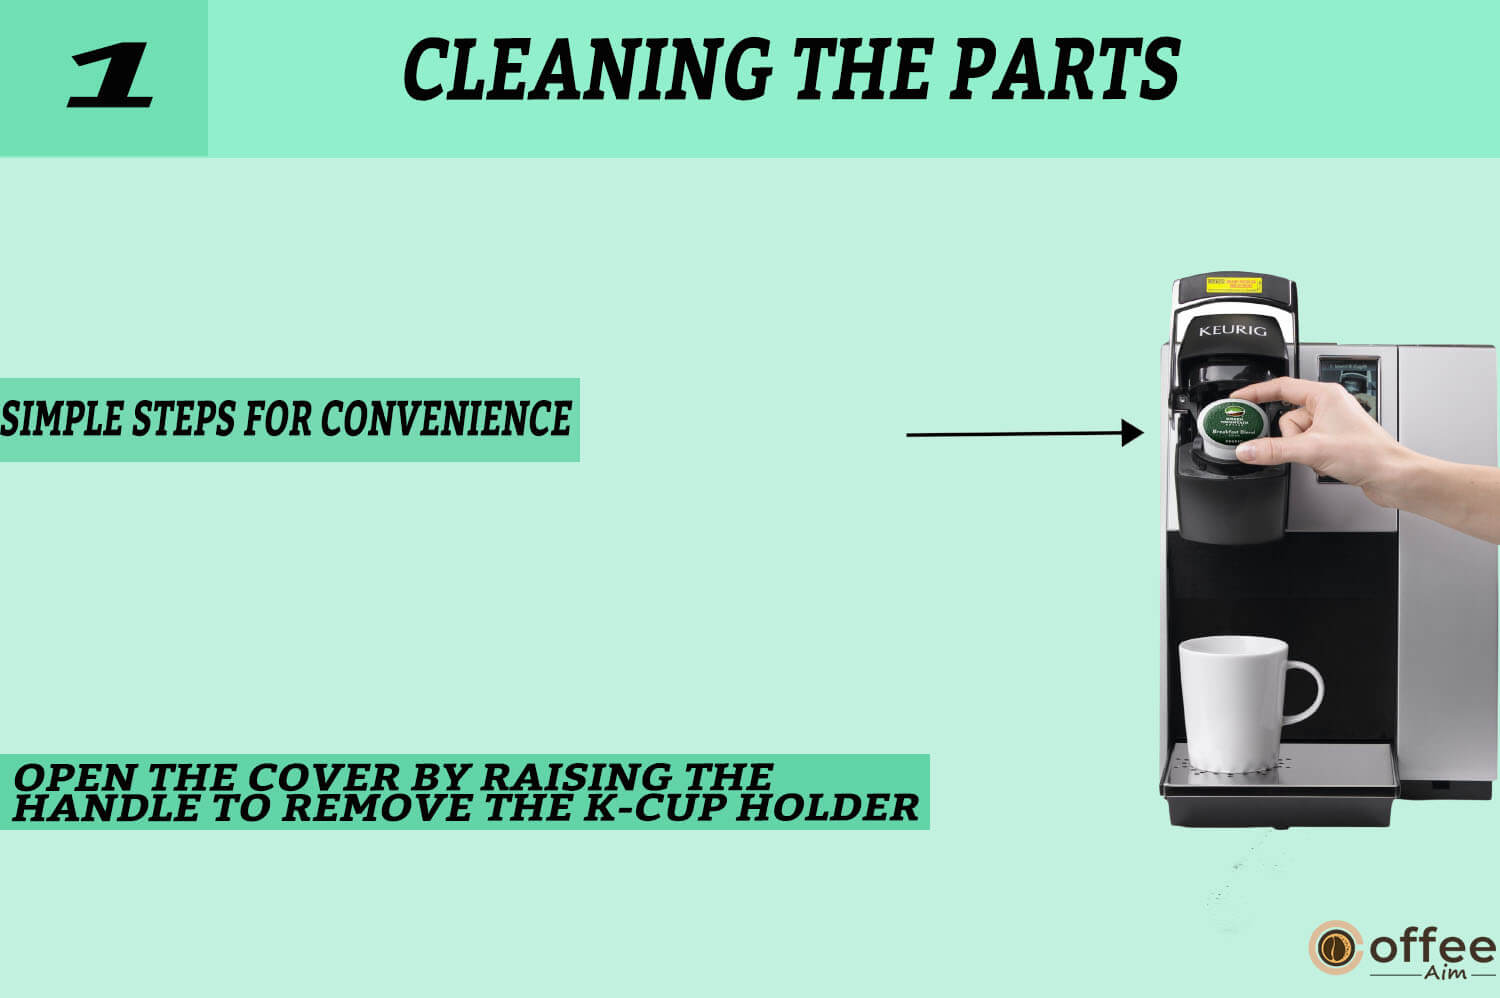
1. Cleaning The Parts
The K-Cup Holder Assembly is dishwasher safe and can be put on the top shelf. To clean the parts:
- Open the cover by raising the Handle to remove the K-Cup Holder Assembly from the Brewer. Grasp the top of the K-Cup Holder with one hand while pulling up from underneath the bottom of the K-Cup Holder with the other until it releases.
- Align the K-Cup Holder with the hole after cleaning.

- Snap them into position from the top, using the two front ribs as a guide.
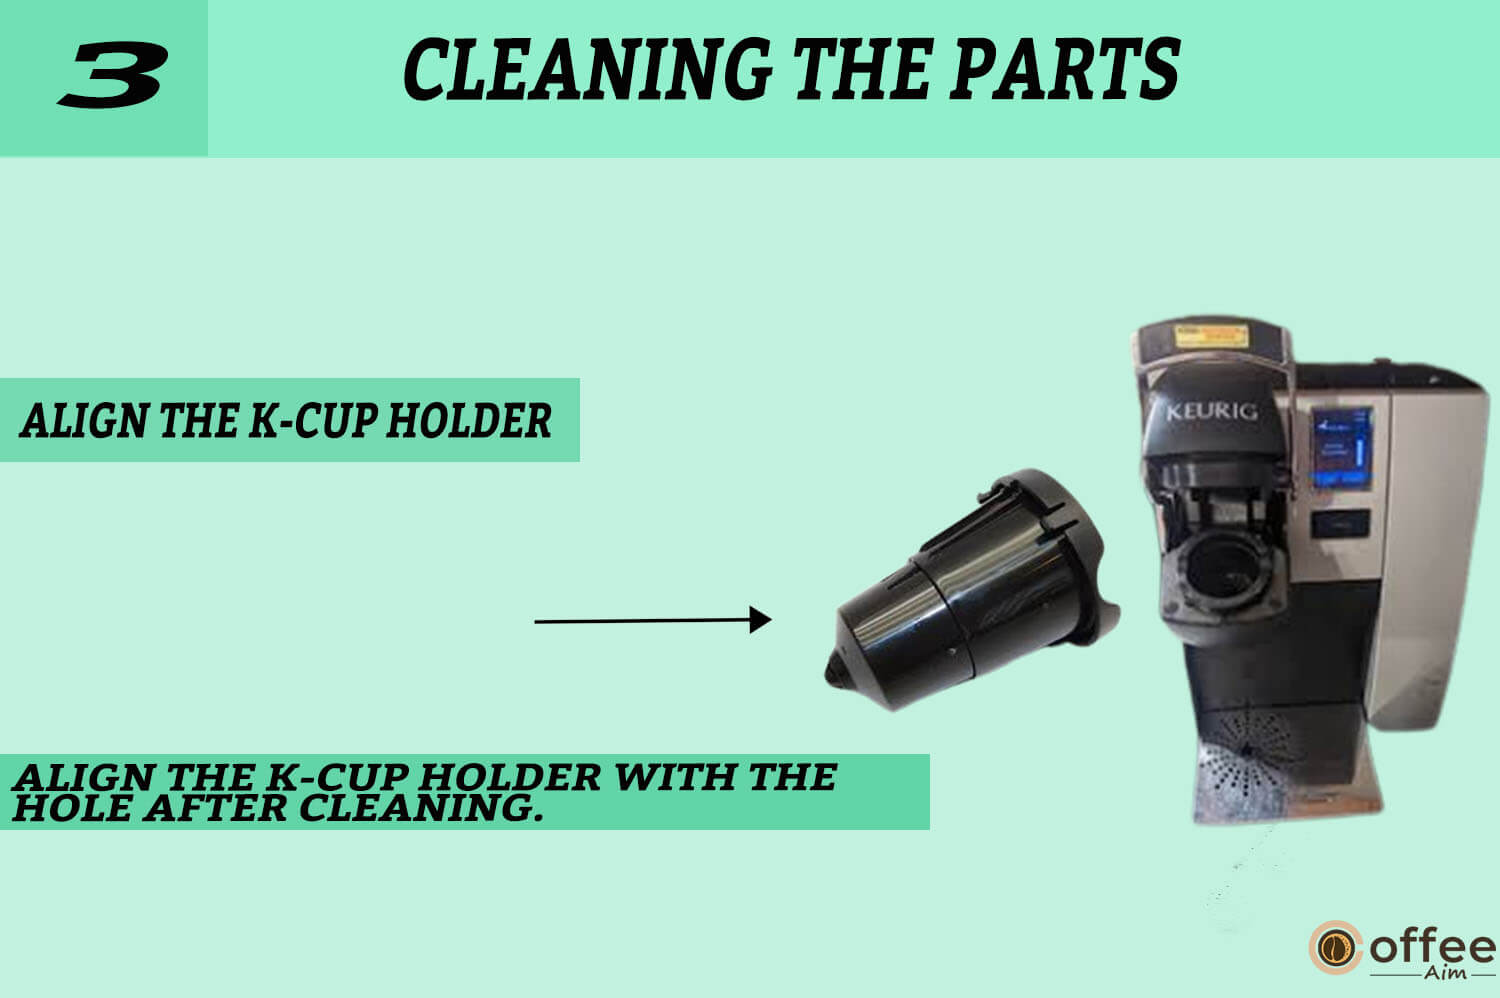
Note: Always remember to use low temperature in the dishwasher.
2. Cleaning The Funnel:
- Pull on the Funnel until it breaks off the K-Cup® Holder, then remove it.
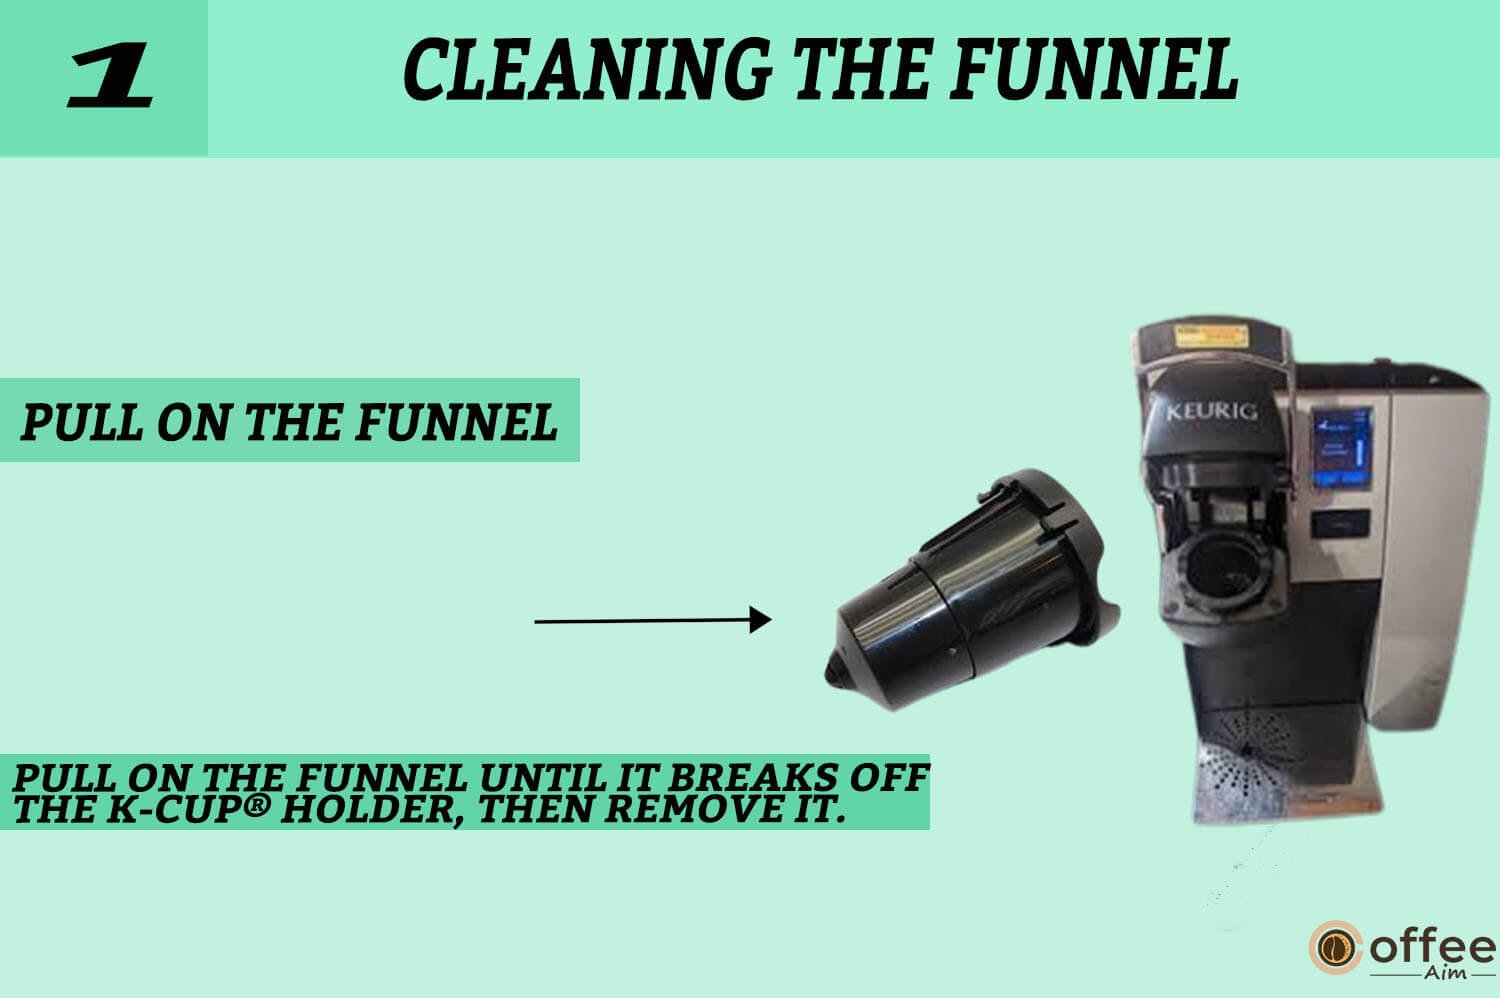
- The Funnel can be washed in the dishwasher.

- Attach it back onto the K-Cup® Holder to replace it.

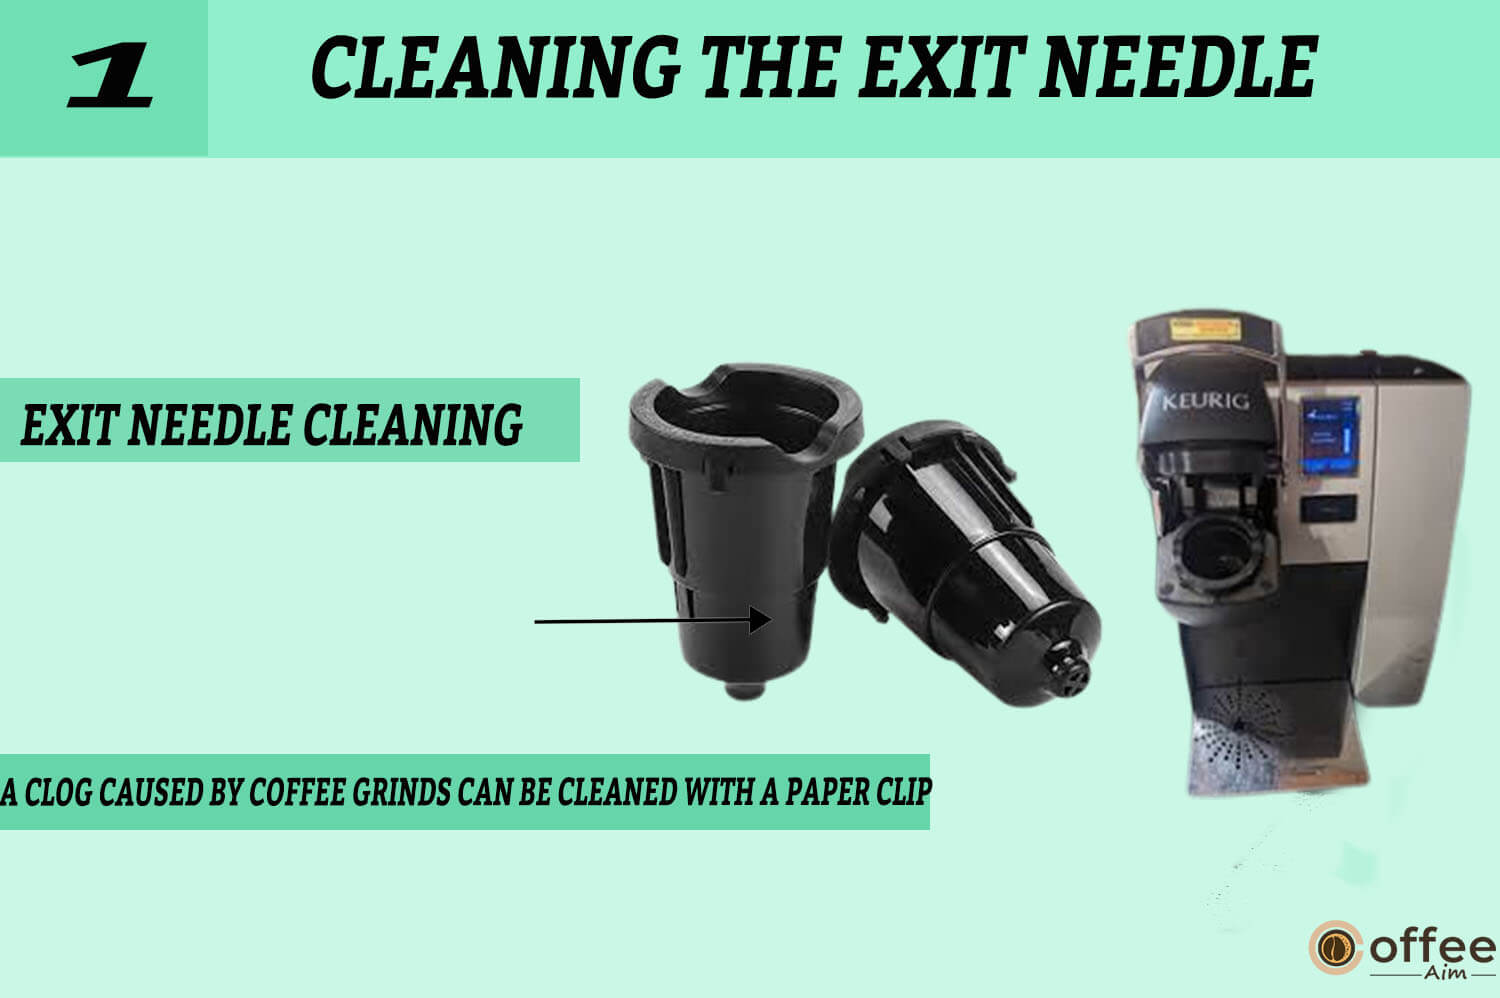
3. Cleaning The Exit Needle
It is situated on the inside of the K-Cup Holder’s bottom. To clean the exit needle, follow the points below:
- A clog caused by coffee grinds can be cleaned with a paper clip or similar tool. First, remove the pod holder assembly, then detach the funnel.
- To loosen the blockage, insert the paper clip into the Needle and then flush with water. The K-Cup Holder Assembly can be placed on the upper shelf of the dishwasher.
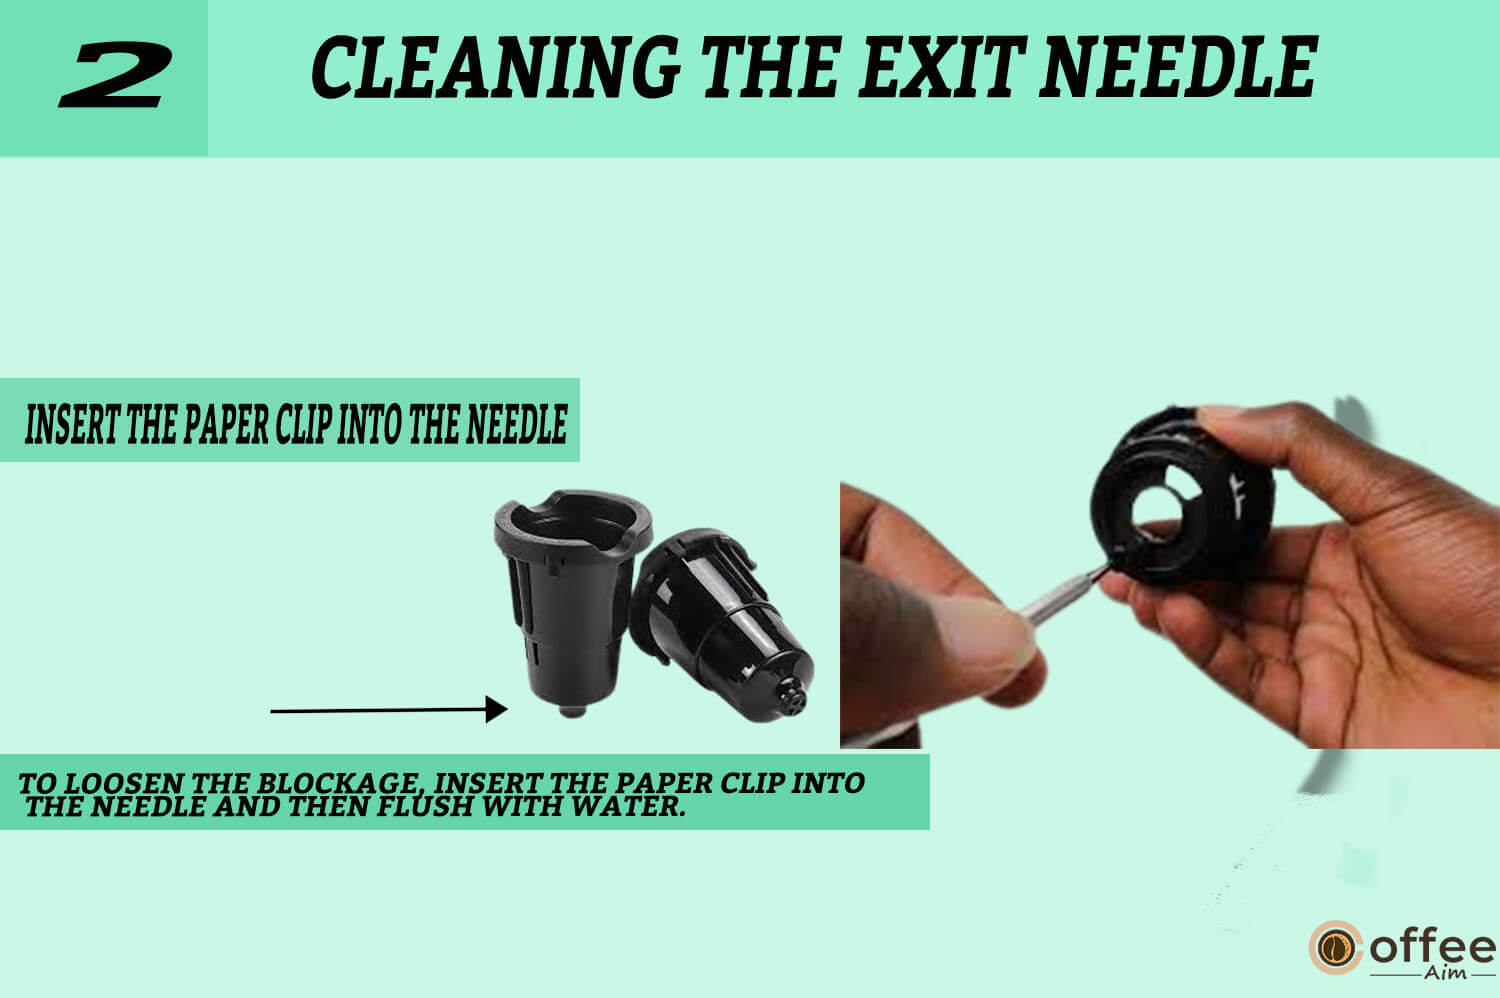
Note: Use low-temperature cycles in the dishwasher.
Caution: Two Sharp needles pierce the portion pack, one above the K-Cup® Holder and one at the bottom of the K-Cup® Holder. Do not put your fingers in the K-Cup® Assembly Housing to prevent injury.
Descaling Your Brewer
The mineral content of water differs by location, which can lead to calcium or magnesium deposits forming in your Brewer. Although non-toxic, these scales can impair Brewer’s performance; thus, descaling is required every 3-6 months, based on your water’s mineral content. Scale accumulation causes slow brewing and short cups.
To descale the Brewer, follow the given instruction:
- First, unplug the Brewer and turn off or disconnect the external water source.

- Drain the Hot and Cold Water Tanks, then remove the Top Cover by unscrewing the two screws on the back, Top, and left side of the Brewer to reveal the Descaling Solution Access Port.

- Then, reconnect the power supply and proceed with the descaling process described in the “descaling instructions” section.

Descaling Instructions
If you own a Keurig B-150p commercial brewing machine, you should clean and descale it regularly to ensure it works properly. Descaling removes mineral buildup from your machine, which can affect the flavour and quality of your coffee and its performance. This guide will walk you through the process of descaling your Keurig B-150p to keep it operating smoothly and brewing delicious coffee. Follow these steps for a proper cleaning up of the machine.
A. PREPARE
It would be best to have a descaling solution, a ceramic mug, and a nearby sink to discard the solution. Let’s dig into the procedure:
Step 1
Are you eager to show your Keurig B-150p some love? You’ll need a specifically formulated solution tough on mineral buildup but gentle on your brewing system to descale your machine. Prepare citric acid to descale solution of at least 40oz; take a large ceramic mug (paper cups will not suffice), and locate a sink to dispose of the hot liquid.
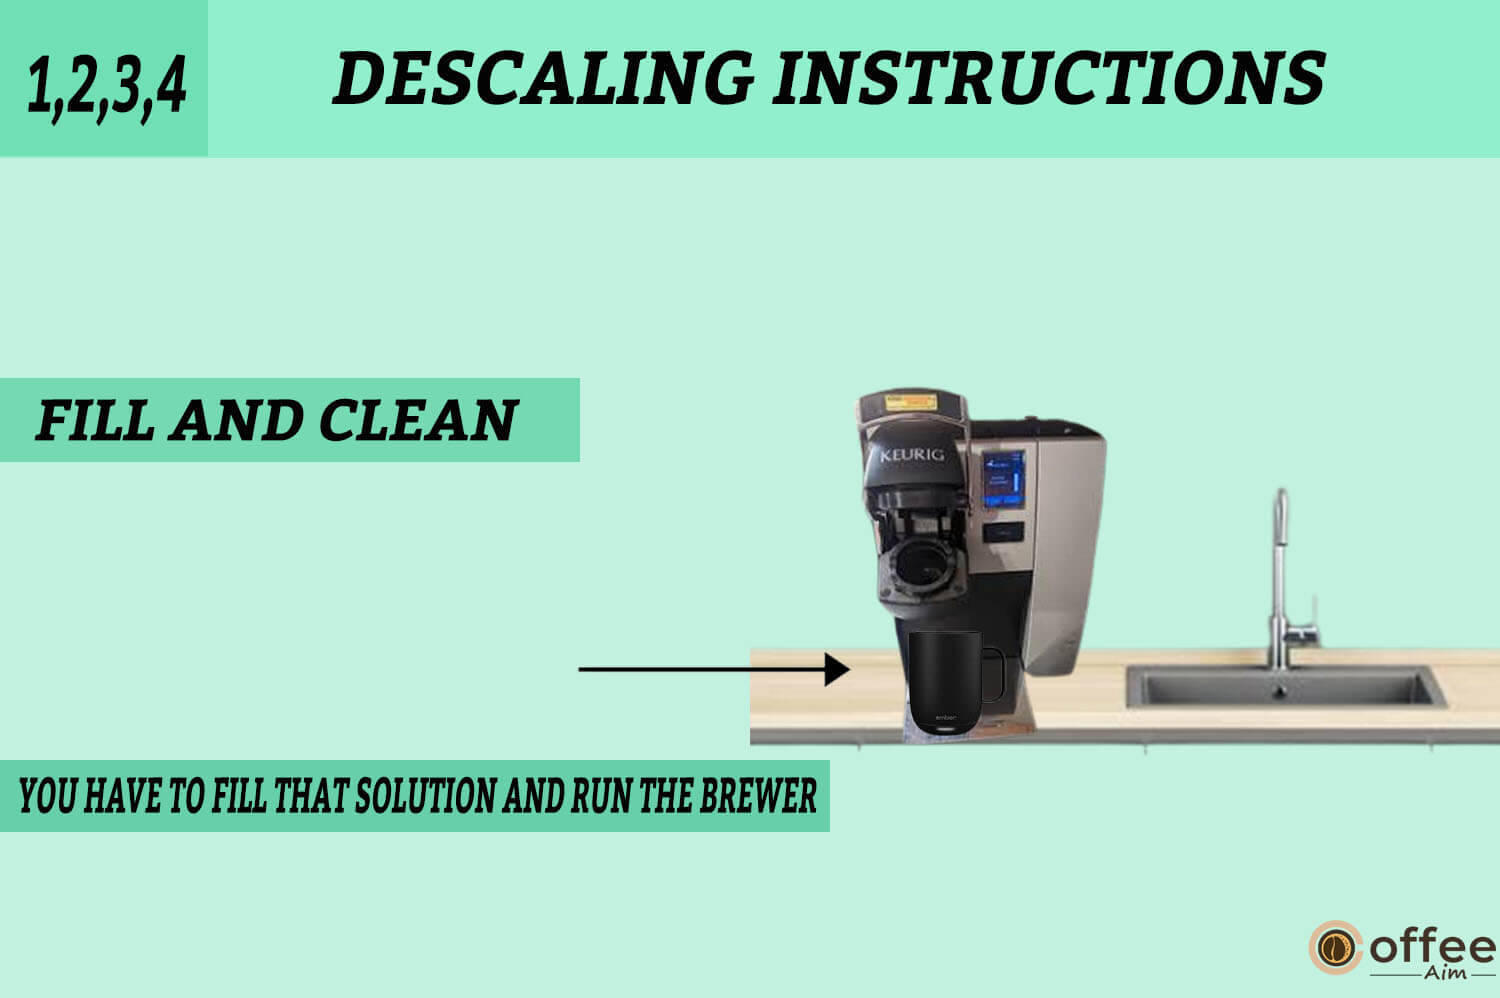
B. FILL AND CLEAN
In the next step you have to fill that solution and run the brewer. Let’s see in detail how it works:
Step 1
Now that you have 40 oz. of the commercial citric acid descaling solution, it’s time to pamper your Keurig B-150p. Pour the solution into the cold water tank through the access port and wait for the magic. Turn on your brewer and let it do its job; the descale solution will automatically fill and begin heating. This is where citric acid comes in, dissolving any mineral buildup that has been slowing down your brewing and affecting the flavour of your coffee. The solution will begin to make its way through your Keurig B-150p, cleaning and descaling as it goes, thanks to the heat from your machine.

Step 2
Once your Keurig B-150p has heated and is ready to use, begin the descaling procedure. Place a large ceramic mug on the drip tray, but don’t use a K-Cup portion pack because this procedure doesn’t involve brewing coffee. Instead, choose the largest brew volume available on your machine and hit the brew button to begin the flow of the descaling solution. Lift the handle just enough to stop the brewing process and leave the device for 40 minutes as the solution exits the brewer. This enables the descale solution to do its job and completely clean out any mineral buildup in the machine’s internal components. Allow the citric acid to work while you sit back and relax.
Step 3
After the 40-minute waiting period, it’s time to complete the descaling process and get your Keurig B-150p back to its optimal performance. Start by turning off the brewer and unplugging it from the power source to ensure your safety.
Step 4
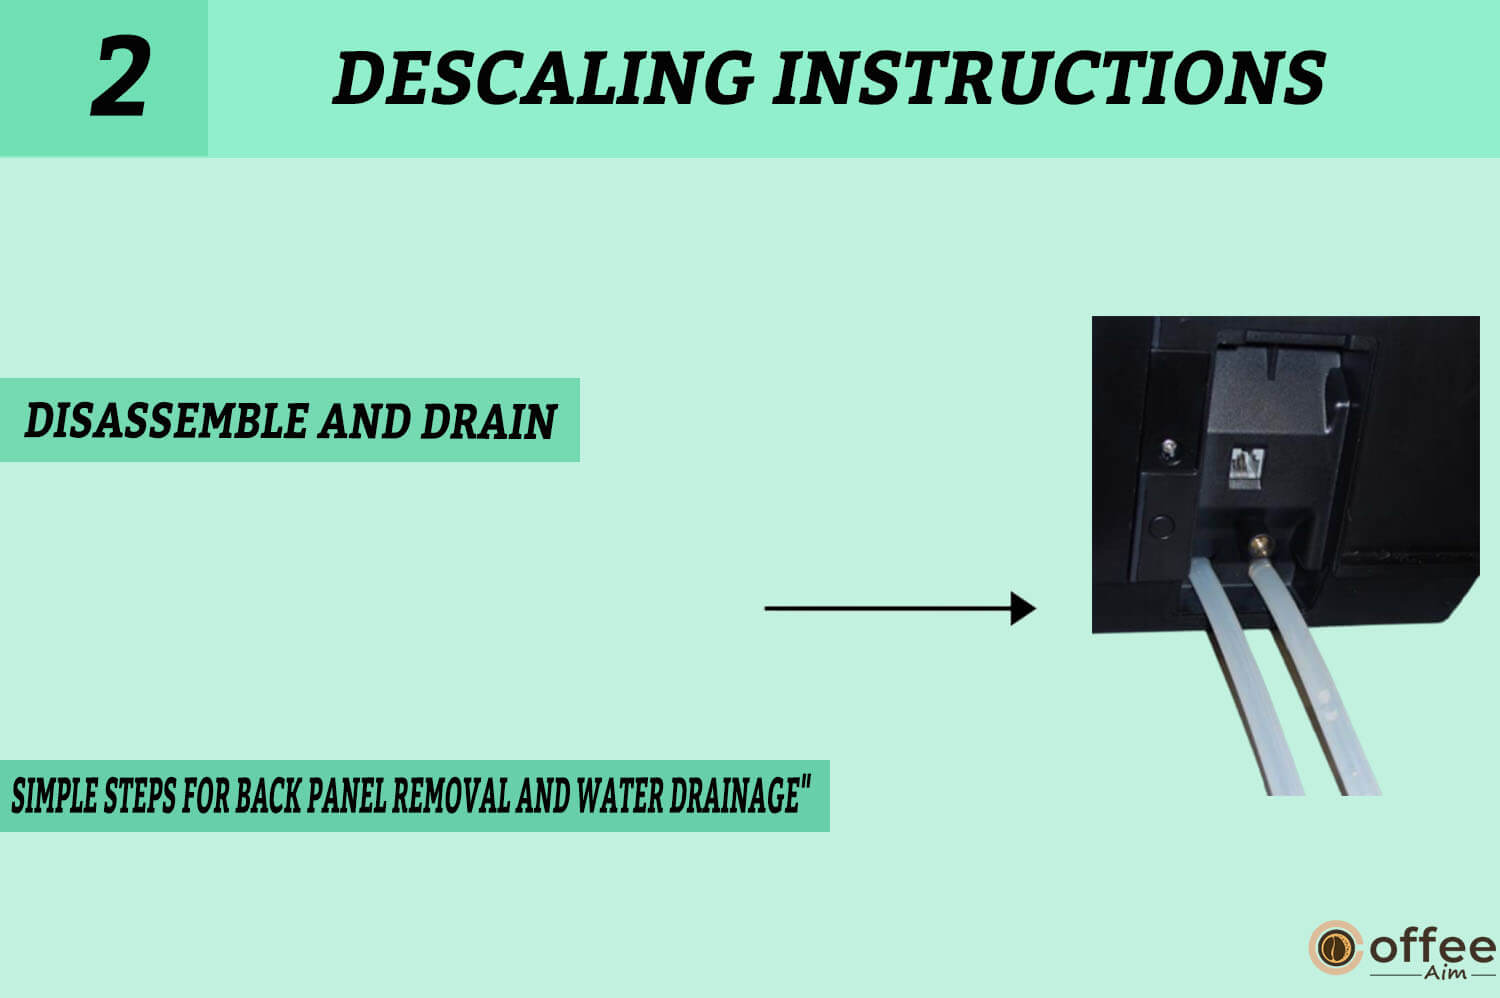
Next, it’s time to drain the hot water and cold water tanks. You can do this using the drain tubes on the back of the brewer. Place a container under the drain tubes to catch the water as it flows out. Allow the tanks to drain fully to ensure that the descaling solution has been removed from the machine. Once the tanks are empty, your Keurig B-150p will be ready for its next brew, free from any mineral buildup that could affect its performance or the quality of your coffee.
C. RINSE
After you’ve finished descaling your Keurig B-150p, thoroughly rinse the machine to remove any leftover descale solution and ensure your next cup of coffee tastes as good as possible.
Step 1
The first step is to physically fill the cold water tank with 40 ounces of fresh water, ensuring it is full. Allow the machine to run through a complete brewing cycle without using a K-Cup portion pack to flush out any remaining solution from the system once the tank is filled. Repeat the process twice when this cycle is finished to ensure your machine is thoroughly rinsed and ready to brew.
Step 2
After draining, reconnect the water and power supply and turn on the brewer.
Step 3
After completing the three rinse cycles, it’s time to conduct a hot water brew cycle to ensure that your Keurig B-150p is entirely free of any remaining descale solution. To do this, run a hot water brew cycle (mentioned in the “brewing hot water ” section) without using a K-Cup portion pack and discard the hot water into the sink. Repeat this process until there is no evidence of any descaling solution in the water. Remember to open and close the brewer handle between each hot water brew cycle to ensure that the hot water flows through all of the machine’s internal components.

Service
While these cleaning and maintenance methods can help keep your Keurig B-150p in good working order, the machine may require expert service at some point. It’s essential to note that the brewer can only be serviced within the recommended cleaning procedures. If you need assistance with your machine, read the warranty section of this guide to find out what steps you need to take to get help from the maker.
Storage
When storing your Keurig B-150p, it’s critical to take the necessary measures to ensure that the machine stays in good working order and is ready to brew your favourite coffee or tea whenever you need it.
Draining The Brewer
Aside from its other benefits, the Keurig k coffee maker is also portable. You can carry it with you wherever you go. The following are some essential things to remember when storing the machine.
- Before going on, please turn off the Brewer, unplug it, and allow it to cool for at least 30 minutes.

2.Turn the Brewer around so that the back panel faces out, and then find the small knob that holds the back panel in place. If required, use a flathead screwdriver to unscrew the knob and remove the back panel from the Brewer. Pull the tube down until the end is free, and position a large pitcher underneath it once the panel has been removed. Remove the plug and let the water drain into the pitcher from the internal hot water reservoir.
3. Finally, re-cap the tube, and your Keurig B-150p is ready to be securely stored until the next time you want to brew a cup of coffee or tea.
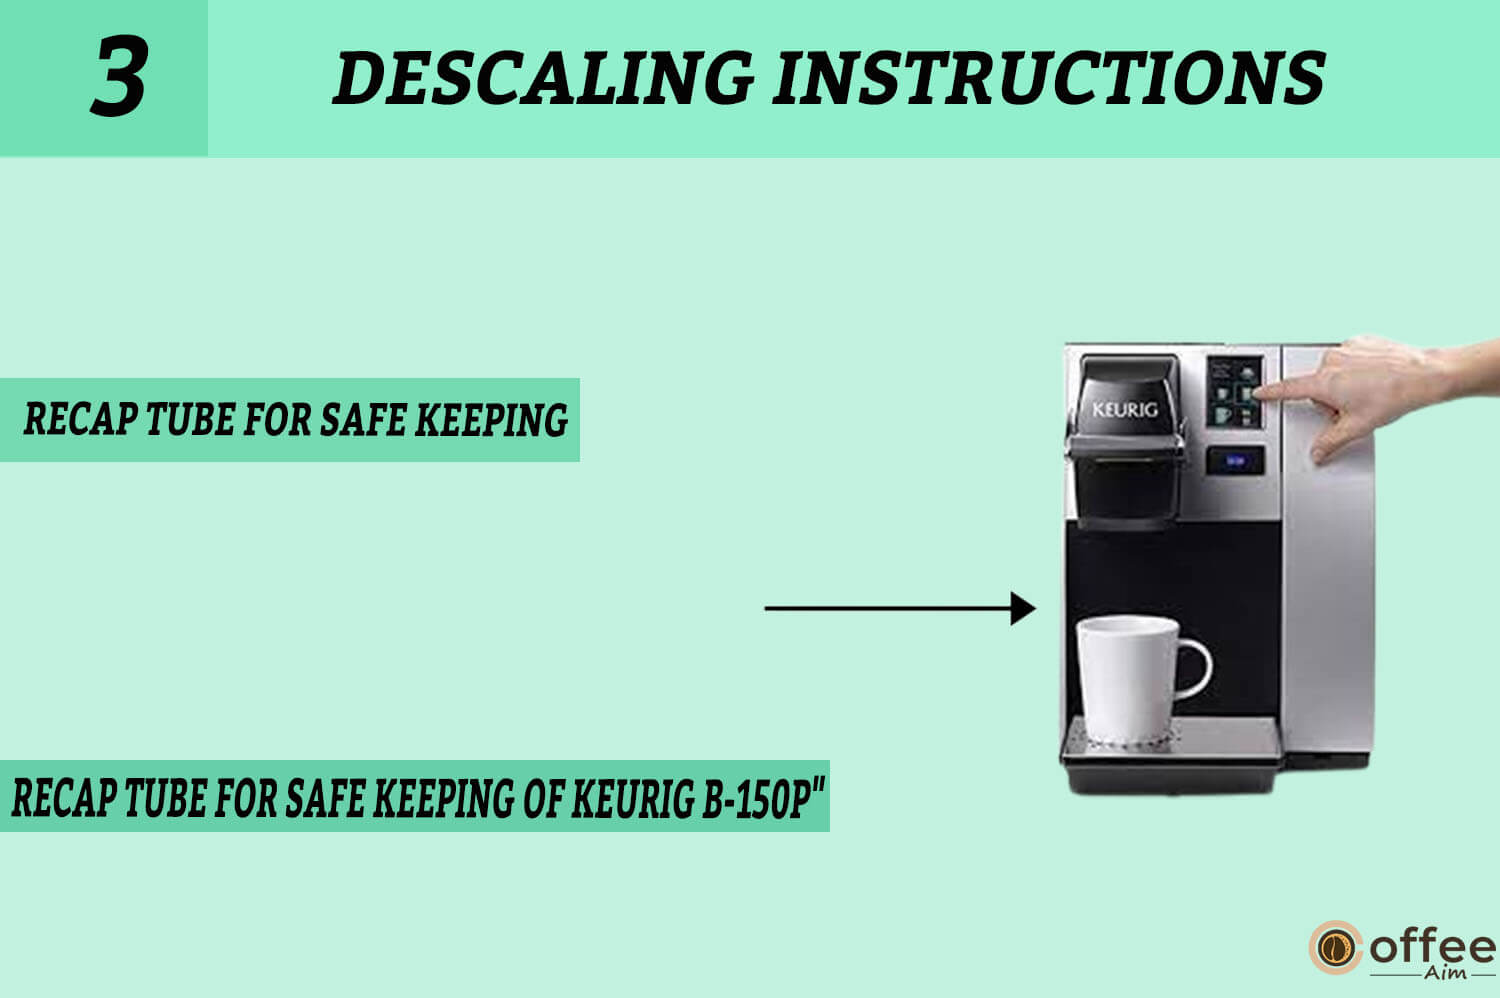
Note: When done, re-insert the tube and screw the panel back onto the Brewer to prevent losing parts.
Caution: The water draining from the tube may be boiling if the Brewer isn’t allowed to cool sufficiently.
SECTION 4: Troubleshooting
Even the most well-maintained devices can have problems now and then, and the Keurig B-150p is no exception. That is why it is critical to becoming familiar with your user manual’s troubleshooting section to quickly recognize and resolve any issues that may occur while using your machine.
Brewer Does Not Have Power
You can take a few troubleshooting measures if you can’t get your Keurig B-150p to turn on.
- First, make sure the Brewer is plugged into a separate outlet and that the plug is firmly inserted. If the machine continues to be powerless, try plugging it into a different outlet or resetting the circuit switch.
- Also, ensure that the Power Switch is switched on and the LCD Display is lit.
- By checking these simple things, you can rapidly spot and resolve power-related issues with your Keurig B-150p.
Brewer Will Not Brew
If you’re having trouble getting your Keurig B-150p to brew, there may be a few different issues.
- First, ensure that you have placed a K-Cup portion pack in the K-Cup Holder and that the Handle is pushed down securely.
- Check that the LCD Control Center reads “READY TO BREW” with the BREW Button flashing, then press the Left, Right, or BREW Button to start the brewing process. If the machine still does not brew, the Exit Needle may be clogged, so refer to the section” cleaning the external parts “of this guide for instructions on how to clear it.
- If you’re using the Keurig B-150p in plumbed mode, water flow may have been interrupted, so the LCD Screen will instruct you to “Please Press Brew Button” and then “Heating, Please Wait.”
- Follow these instructions to restore water flow. If these messages persist even after following these instructions, it may be necessary to contact Customer Service.
Chlorine Or Mineral Taste In Coffee
If your coffee has a chlorine or mineral flavour, it could be due to the quality of your water. Consider using bottled or filtered water to enhance the flavour. This can aid in removing any impurities that may be influencing the taste of your coffee.
Brewing A Partial Cup
If your Keurig B-150p is only brewing a quarter cup, there are a few fixes you can attempt. First, check to see if the Exit Needle is clogged and, if so, clear it. You can also sanitise and rinse the K-Cup Holder Assembly under running water. If you’ve attempted descaling twice and the issue persists, contact Customer Service for further assistance.
The Time Is Not Displayed On The LCD Message Centre
There are two potential explanations for why the time is not displayed on the LCD Message Center of your Keurig B-150p Brewer. To begin, it will not be visible unless you set the clock. Follow the steps described in the user manual’s “Setting the Clock” section to set the clock. Second, if Brewer’s power has been interrupted, you must reset the clock using the same process. These steps ensure the time is displayed correctly on your Keurig B-150p Brewer’s LCD Message Centre.
Brewer Shuts Off Or Turns On Automatically
If you have set the Auto Off timer and On/Off time features, you can disable them by pressing the MENU Button below “MENU” and choosing “OFF” for both the Auto Off timer and On/Off. Contact Customer Service if the Brewer continues to shut down or switch on automatically despite having these settings turned off.
SECTION 5: Warranty
This part informs customers about what is covered by the warranty, how long the warranty lasts, and what steps to take in the event of a warranty claim. Understanding the warranty section is critical for customers who want to safeguard their investment in the Keurig B-150p and receive the best customer service possible in the event of any issues or defects with the product.
Limited One-Year Warranty
For one year from the date of purchase, your Keurig B-150p warranty covers defects in materials or workmanship, and Keurig will fix or replace the Brewer at no cost if evidence of purchase is given. If a new or reconditioned Brewer is required, it will have a new one-year limited warranty. This guarantee is only valid for Brewers used in the United States and Canada. Customers have specific legal rights under this warranty but may also have additional rights that vary by state or province. It is essential to note that filling out and returning the warranty card included with the Brewer is strongly advised to ensure that the purchase information is saved in Keurig’s system.
What Is Not Covered By The Limited Warranty?
The Keurig B-150p warranty does not cover consequential or incidental damages, such as property damage or unexpected expenses, arising from any breach of the warranty. This limitation applies even if the damages were reasonably predictable. Some states or provinces may not allow such exclusions or restrictions, so verify your state or province’s specific laws. Furthermore, this warranty does not cover damages caused by services done by anyone other than Keurig or its approved service providers, using non-genuine Keurig parts, or external causes such as abuse, misuse, insufficient power, or acts of God. These exclusions must be noted to comprehend the scope of the warranty coverage completely.
Other Limitations
The warranty on the Keurig B-150p is exclusive and replaces any other explicit warranty, written or oral. Keurig disclaims any other warranties associated with the B-150p Brewer, including any implicit quality warranty or suitability for a specific purpose. Some states or provinces may not allow such implied warranty disclaimers or limitations on how long an implied warranty lasts, so check the laws in your particular state or province of purchase to understand how this may impact your warranty coverage.
How Do You Obtain Warranty Service?
Keurig Brewers are intended to provide high-quality, dependable performance for many years if properly maintained. Customers should call Keurig Customer Service at 1.888.CUP.BREW (287.2739) to obtain an Authorization to Return (ATR) number if the Brewer requires warranty service. It is critical not to return the Brewer to Keurig Customer Service without obtaining an ATR number. Brewers returned without an ATR number will be returned to the shipper unserviced. This guarantees that the Brewer is appropriately serviced and returned to the customer immediately.
Keurig, Incorporated
55 Walkers Brook Drive
Reading, MA 01867
1.888.CUP.BREW (287.2739) check this number and address for further guidance.
Conclusion
Thank you for reading this guide on making your favourite coffee with Keurig B-150p like a pro. I hope you found the provided helpful information. If you have further questions or concerns, please re-read the article to ensure you completely comprehend the procedure. I appreciate your interest in and support for my informative articles. If you want to learn more about coffee makers and other coffee-related subjects, please visit my website, “Coffee Aim.” In the future, I hope to share more informative writing works with you.
Best wishes for your coffee-making efforts!
Frequently Asked Questions
What Is Not Covered By The Keurig Limited Warranty?
This guarantee does not cover any incidental damages, costs, or expenditures incurred due to any breach of this warranty. ( even if foreseeable). This warranty does not extend, alter, replace, or amend any other securities expressly mentioned on any Keurig-related product, including the Keurig B-150p.
How Do You Obtain Answers For Any Query?
If you have questions or need clarification, you can contact Keurig or any other online shop from where you purchased the machine. The official Keurig website is only liable if you buy the device from them. Otherwise, you must seek assistance from the vendor from whom you purchased the object.
Can I Make A Cappuccino With Keurig?
Prepare a coffee pod in single-serve mode. Mix in the desired amount of sweetener. Pour the desired amount of frothed milk into the coffee, leaving a teaspoon of froth on top.