Quick Navigation
Hello, coffeeholic!
Welcome! Say goodbye to cafe frustrations and kick-start your day quickly using your newly purchased Keurig K-50 coffee maker. In this comprehensive user guide, I will provide you with a complete guide, regardless of whether you’re new to using coffee makers or already have experience, ensuring you can confidently operate your Keurig K-50. Discover unique tactics, tips, and tricks to make your coffee brewing experience a breeze. No need to rely on the user manual anymore! Say farewell to cafe struggles and embrace the convenience of brewing your favorite coffee at home. Let’s begin this journey of coffee enjoyment together!
What are the Safety Precautions for Using Keurig-50?
Do you follow safety precautions? Should you? New to Keurig? The Keurig K-50 is perfect for your coffee needs. Let me provide more information. You certainly have heard prevention is better than cure. Home electrical appliances safety precautions tips are mandatory. Hazards such as arc flash and electric shocks can expose you to death. Therefore, following safety tips when buying any electrical appliance is more important. What would you do if your electrical device ended up in a burn to your children or family member? So, no negligence on basic safety precautions, You must follow the Keurig K-50 safety precautions instructions and then unbox your Keurig K-50 brewer.
What are the Specifications of the Keurig K-50?
What do you feel when you bring a new product to your home? Get excited, right? Similarly, if you just received your brewer or it’s in your hand, you will be keen to unbox it. Isn’t it? But wait, check the key features of your brewer first and keep excitement aside for a while. Why? Ensure first it is the same one you ordered. How? Well, you can match the specifications mentioned below. Such as, Is it in the actual size? Is your home electrical supply suitable for operating it or not? If any problem arises, you can promptly replace it. So, let’s get some popcorn and dive into Keurig K-50 specifications instructions!
| Key Features | Detail |
| Product Line/System | Keurig 1.0 Classic |
| K-Cup Compatibility | Keurig 2.0 licensed K-Cups Ground coffee with the My K-CupUnlicensed K-Cups |
| Brew Sizes | 6 oz (177.4 ml)8 oz (236.6 ml)10 oz (295.7 ml) |
| Water Reservoir Capacity | 48 oz (1.42 L) |
| Water Filter | Compatible (not included in the box) |
| Display | Button controls for;Power Brew SizeLED indicators for;Auto-OffPowerAdd WaterDescaleHeating |
| Temp Control | No |
| Strength Control | No |
| Dimensions | 9.8″ (24.9 cm) W 13.0″ (33.02 cm) D 13.3″ (33.8 cm) H |
| Weight | 12.0 lbs |
| Other Features: | Quiet Brew TechnologyAuto-Off/On Removable drip tray Removable water filter K-Cup variety pack (included in the box). |
What do you get when Unboxing your Keurig K-50?
Congratulations! Your order has been placed timely from the online store. Now it’s in your hands. But before unboxing, it is better to know what items must be inside the box. I have mentioned these items below, so overview carefully when you unbox. If you find any item missing, immediately ask for a new one by contacting the seller.
1. Keurig K-50 Brewer
The Keurig Brewer is renowned for its user-friendly design, making it effortless to brew delicious café-style coffee at home. With its sleek aesthetics, intuitive button controls, and informative indicators, the Keurig Brewer ensures a seamless and enjoyable coffee brewing experience that satisfies even the most discerning coffee enthusiasts.

3. Warranty Card
Do not worry about your brewer’s defects in material. The Keurig K-50 is user-friendly and offers a one-year warranty from the purchase date. Therefore, if you need help with your coffee maker, you can contact the Keurig repair or replacement department, which will listen and not take a penny.

3. User Manual Of Keurig K-50
The Keurig K-50 user manual offers concise guidance on operating, brewing, and maintaining your coffee maker for an enjoyable coffee experience. Keurig K-50 coffee maker’s comprehensive user manual provides step-by-step instructions on managing.
From your first brew to the essential cleaning and descaling processes, this manual covers all aspects of using and maintaining your Keurig K-50, ensuring a seamless and enjoyable coffee experience.

4. K-Cup Portion Pack Box Of Keurig K-50

Experience the thrill of the Keurig K-50 as it expands your beverage options with K-Cup portion packs. Enjoy a variety of flavors and drinks effortlessly brewed with the simplicity of the K-50 system.
Indulge in a vast selection of flavors, from rich coffees to soothing teas and delightful hot chocolates, all conveniently brewed with just a touch of a button.
Elevate your coffee experience with the convenience and versatility of the Keurig K-50 and its K-Cup portion pack compatibility.
Keurig K-50 Coffee Unboxing Instructions
Get ready to unbox your Keurig K-50 and unleash the caffeine-fueled magic! It’s like opening a treasure chest filled with liquid gold and the promise of endless coffee adventures. Just remember, with great coffee comes great responsibility and caffeine-induced excitement!” Let’s start!
1. Find a stable and spacious surface, like a kitchen table, countertop, or even the floor, and position the brewer box on it. Proceed to open the box.
2. Detach the enclosed literature.
3. Turn the box on its side while keeping it face down.
4. Hold the box and grasp the plastic bag with the brewer.
5. Carefully pull the plastic bag out (and packaging materials) toward you or out of the box.
The brewer is still encased in the polyfoam and is on its side.
6. Now remove the top poly foam packaging material.
7. Carefully lift the brewer from the bottom of the polyfoam and place it straight on a flat, smooth,
steady surface.
8. Elevate a plastic bag off of the brewer.
9. Take note of the serial number provided for this brewer, as referenced in this guide. Find the serial number at the bottom of the brewer box or behind the Drip Tray (once removed), ensuring you identify the unique and distinct serial code.
10. Keep the brewer upright on a flat, steady surface. Remove the tape holding the Water Reservoir in place. Save all packaging materials with you in case future product shipping is necessary.
IMPORTANT: Set up your brewer before using it for the first time.
NOTE: Avoid freezing temperatures for the brewer. Allow a two-hour rest period for the brewer to reach room temperature before brewing. Cold or frozen brewers may not function properly.
WARNING: Keep all plastic bags away from your children.
Explore the Parts of Keurig K-50!
When purchasing a new product, what factors do you consider? You check its price, warranty, convenience, and review. Similarly, being enthusiastic about familiarizing yourself with all the labeled components in the figure or guide is essential. Inspecting all the labeled components is crucial upon purchasing and receiving the Keurig K-50 brewer. However, detailed instructions can enhance your brewer’s use or safety. Let’s dive in together!
1. Water Reservoir Lid
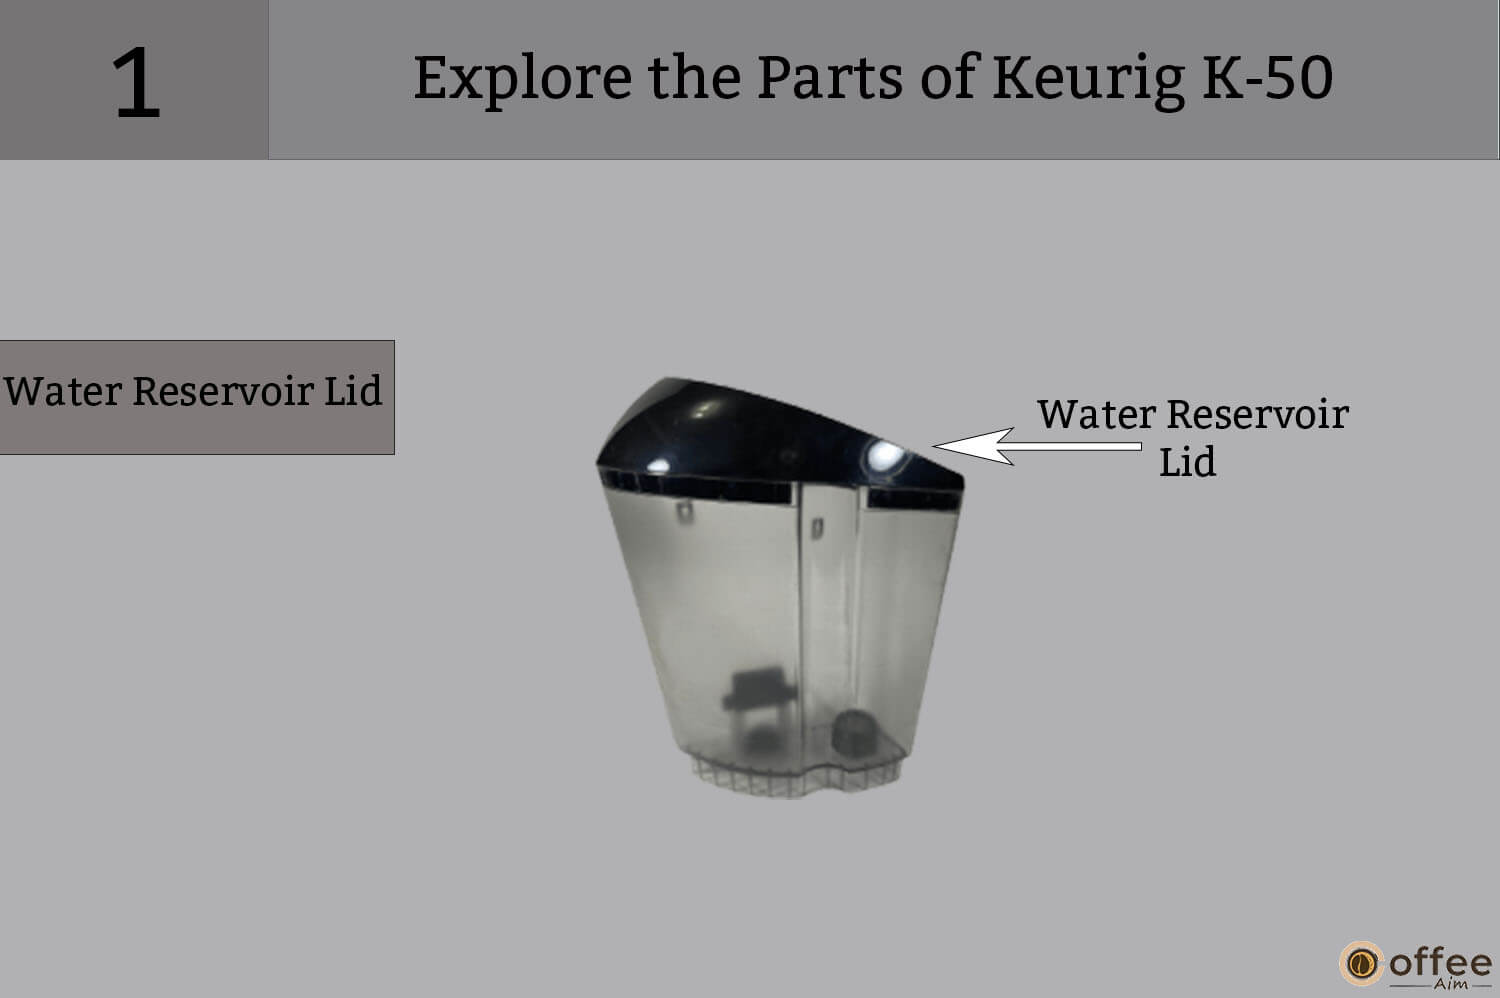
Keurig K-50 has a uniquely designed lid on top of your water reservoir. It covers water in the reservoir, savings from dirt, germs, and splashing out while the machine operates. The Water Reservoir Lid is adjustable and easy to remove. One can detach it whenever refilling is needed.
2. Max Fill Line
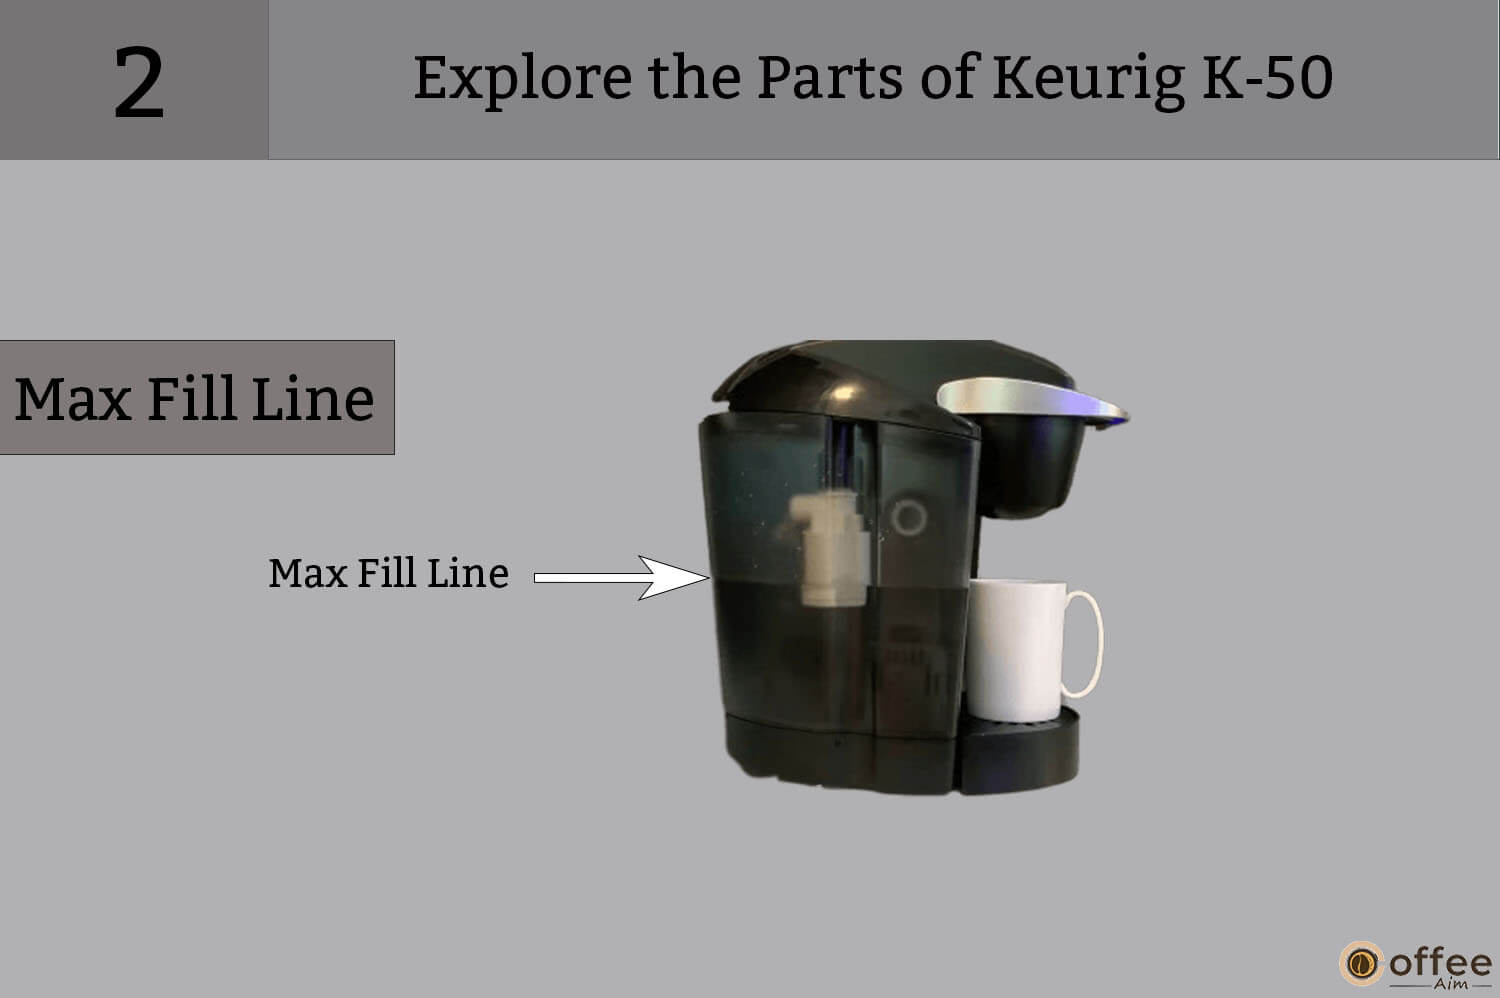
Notable indication for Keurig users. The water reservoir tank has a unique mark highlighted on the water reservoir. You must check out and fill the water to this Max Fill mark. This feature makes the water-adding process super easy.
3. Water Reservoir

Each Keurig model has elegant and modest water reservoirs. K-50 brewer also offers a large capacity-based, longitudinal-shaped water reservoir adjusted at one side. You may brew as many cups of coffee as you want without refilling it.
4. Vent
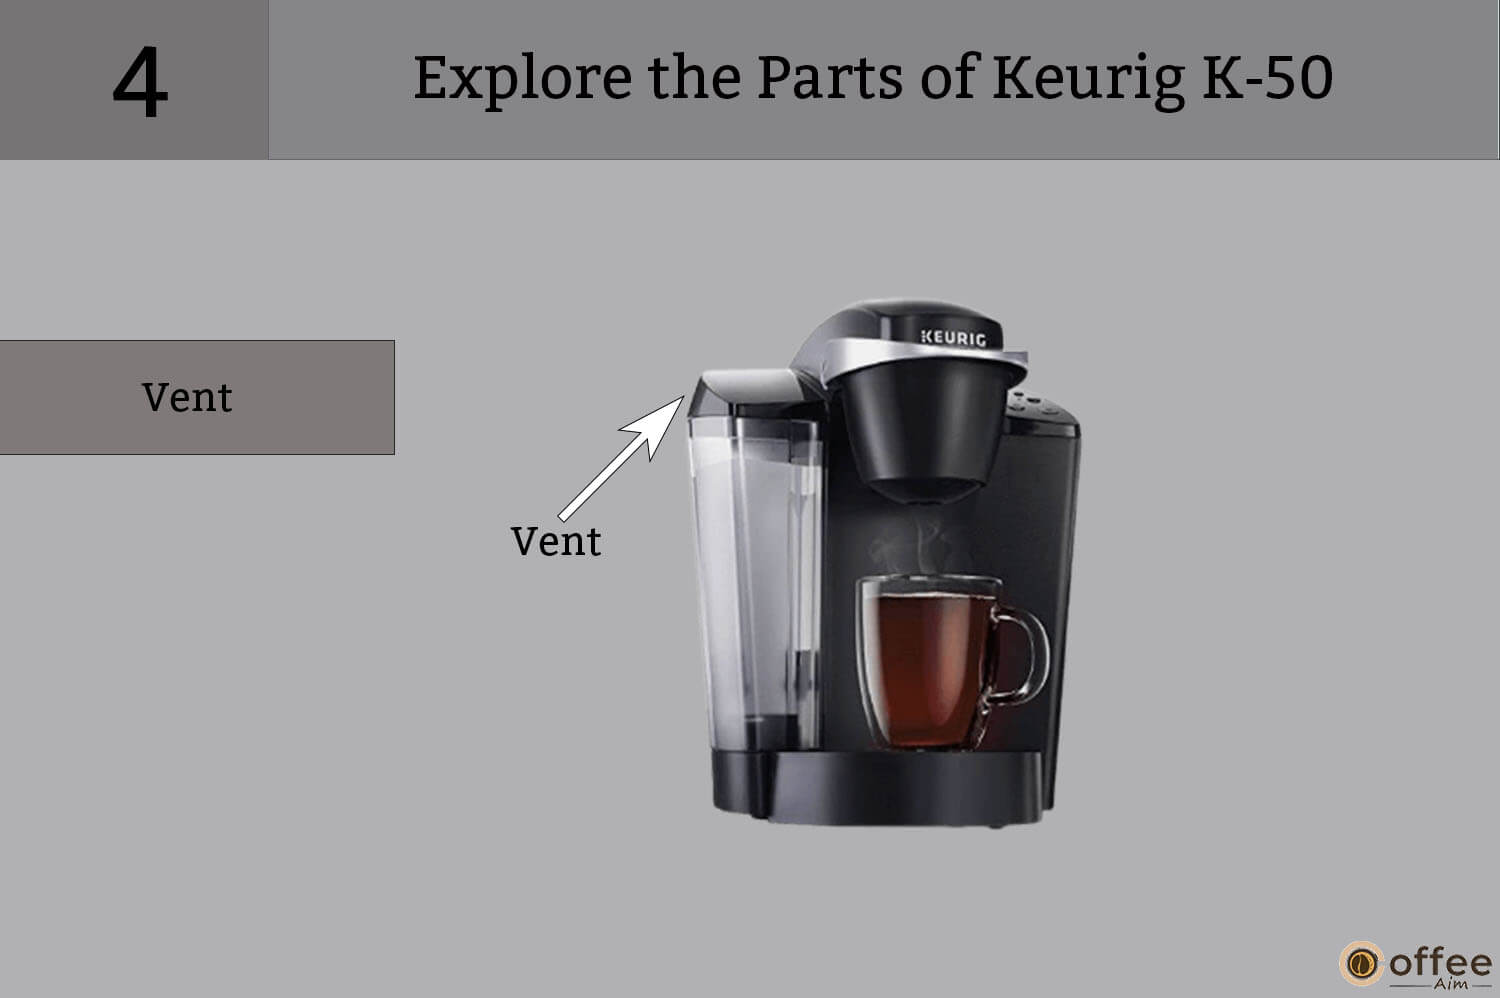
Keurig deliberately designed a vent on the top of your K-50 Brewer. Your brewer cools down immediately by releasing heat and pressure, which prevent overheating and damage to the brewer.
5. Water Reservoir Lock Tab Slots

The Keurig K-50 coffee brewing system contains a convenient water reservoir with lock tab slots, a standout feature. These slots enable effortless removal of the water tank, simplifying transportation and refilling. A secure attachment between the reservoir and the brewer is crucial for safety. Aligning the slots with the brewer’s tabs and firmly pushing the reservoir down until it clicks in place guarantees stability, preventing unintended detachment and ensuring a reliable seal. This feature enhances the overall convenience and dependability of the brewing process.
6. Housing

The housing in the Keurig K-50 surrounds the main body of the brewer, providing protection and containment for its interior components. It has a sleek and compact design, often made of hard-wearing plastic. The housing serves multiple purposes, such as enclosing the internal components and ensuring the safety of the brewer during the brewing process. Additionally, it provides structural support. The housing facilitates user interaction and monitors the brewing operations.
7. Power Cord
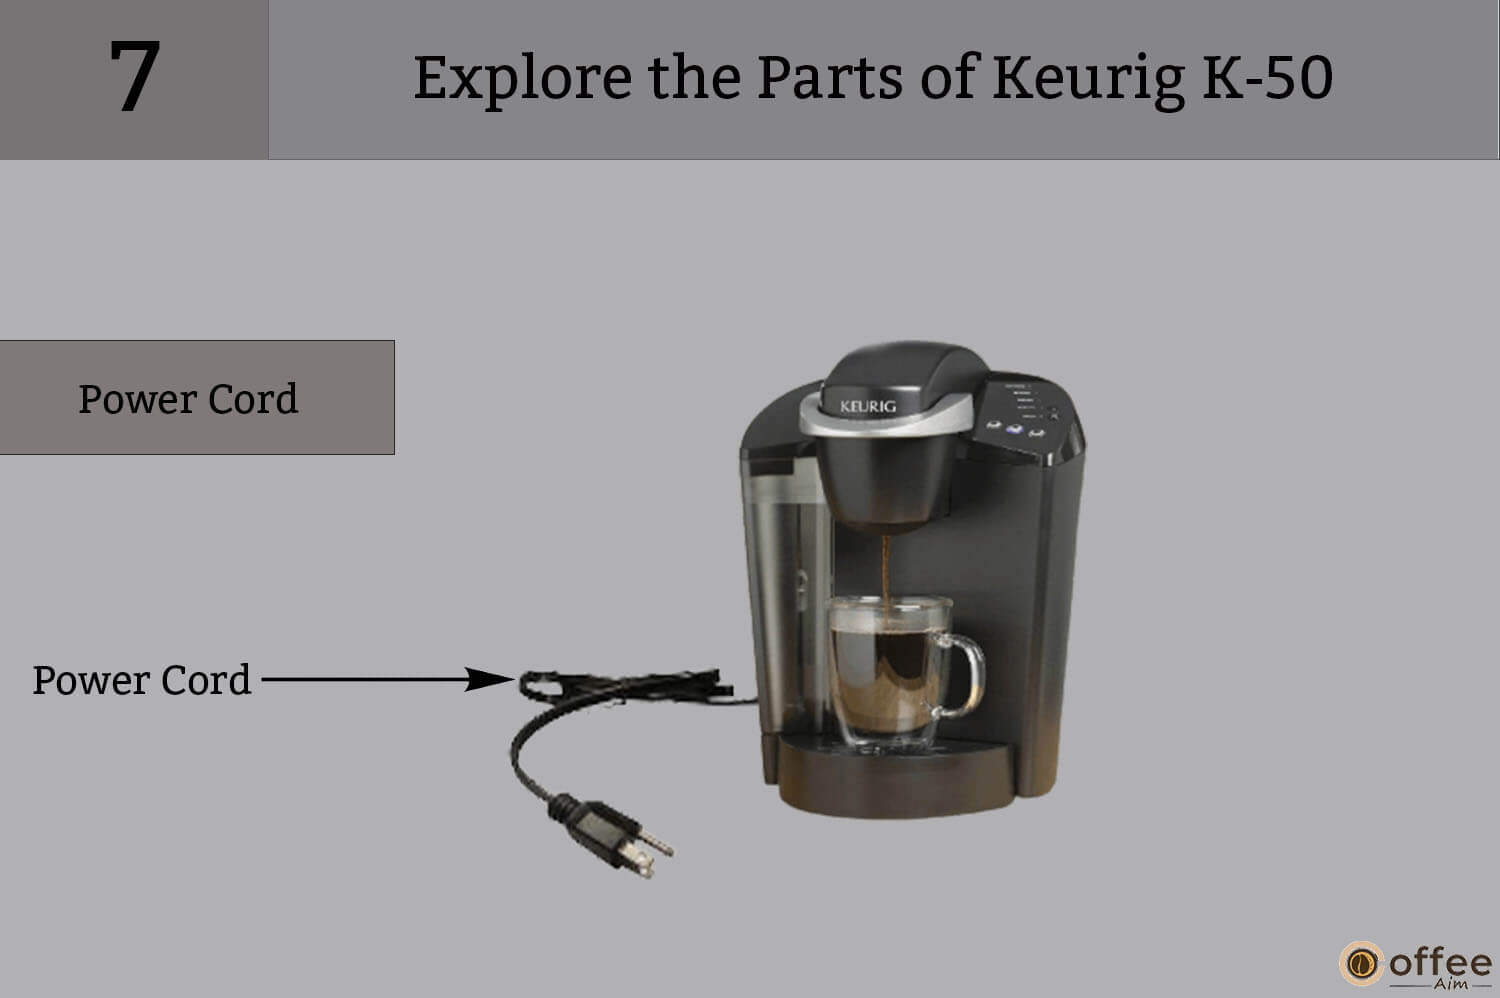
The power cord enfolds at the back side of your brewer. It is the junction between the brewer and the main power. The power cord transports electricity to the appliance. Its durable insulating non-conductive appearance does not pass electricity and protects the user from electric jerks. You may plug in and brew coffee whenever you desire.
8. Handle
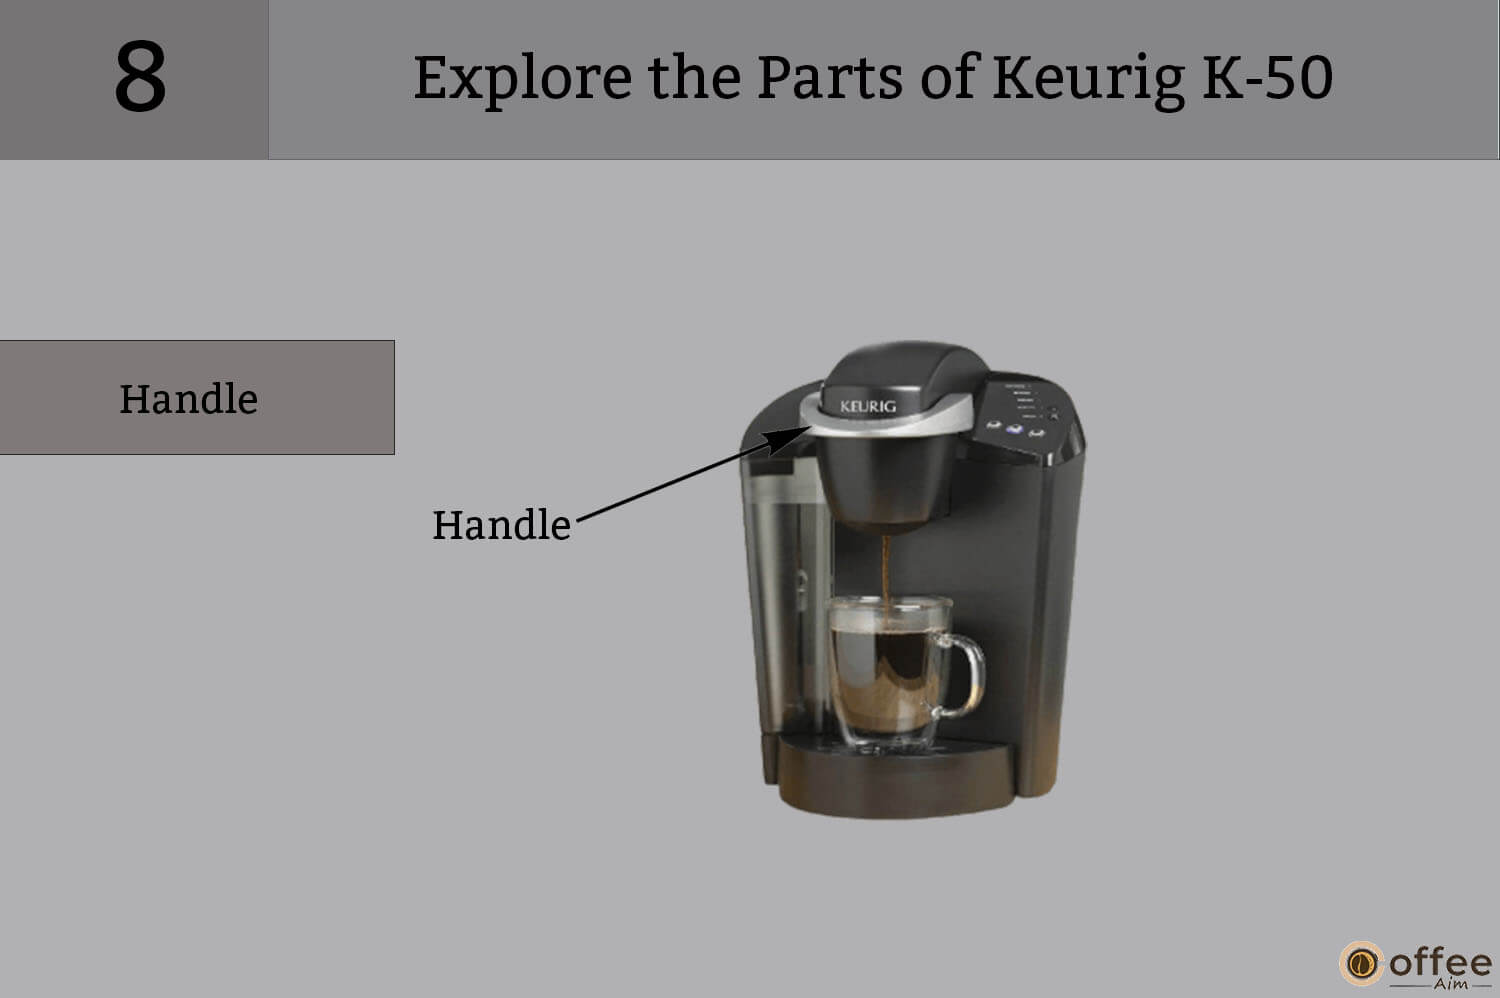
The Keurig K-50 presents an impressive handle. It makes your brewer portable; you can pick and place it anywhere. A flexible and noteworthy body makes the brewer easy to carry. Anytime lift your brewer out or put it back to wash stains conveniently.
9. Lid

The lid sits at the top of your Keurig K-50. It hinges and lets you lift it to access the brewing area.
The design and specific model of your Keurig K-50 determine the exact appearance of the lid.
The essential purpose of the lid is to cover the brewing chamber and ensure a sealed environment during the brewing process. When closed, it helps maintain the optimal temperature for brewing and prevents any debris or contaminants from entering the brewing area. Furthermore, the lid might include features like a handle or a latch mechanism, enhancing the convenience of opening and closing while inserting or removing K-Cup® pods.
10. K-Cup®Pod Holder

The K-Cup® Pod Holder is the place at the top of your brewer where you can insert the K-cup pod for brewing. It offers you a seamless coffee experience.
11. Funnel

The Keurig K-50 has a funnel attached to the bottom of the pod holder. Its guides and channels liquids toward the nozzle. The funnel is designed in a cone shape, tapering to a narrow ending. This specific shape ensures that brewed coffee is directed accurately and prevents any spillage during brewing. The funnel is crucial in facilitating a smooth and mess-free coffee brewing experience.
12. K-Cup®Pod Assembly Housing

The K-Cup® Pod Assembly Housing in your Keurig K-50 coffee brewing system securely holds the K-Cup® pods during brewing. K-Cup®Pod Assembly Housing is one of the main parts of your brewer beneath the handle and lid. It is the space in which the K-Cup® pod holder allows water to pass through the coffee pod and extract the desired flavor. This component provides stability and control for a convenient and enjoyable coffee brewing experience.
13. Drip Tray Plate
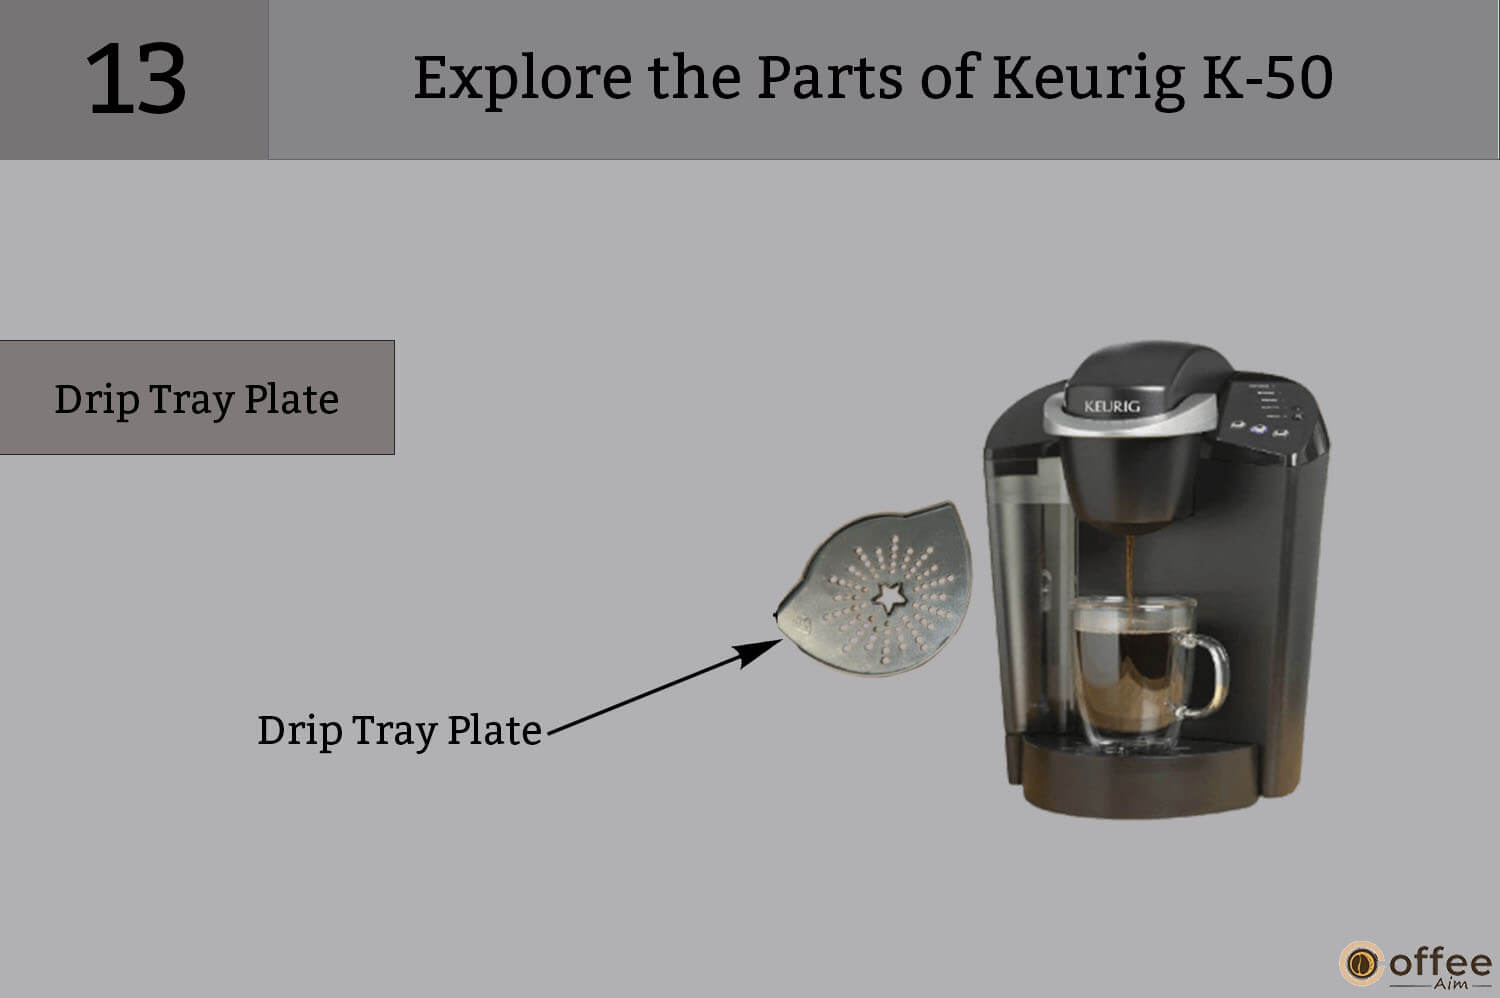
The Keurig K-50 features a removable drip tray plate beneath the dispensing area. Its leading role is collecting any liquid residue, such as brewed coffee or water, that may drip or spill during dispensing. This component helps maintain cleanliness by preventing liquid from reaching the countertop. It also provides a convenient place to rest your coffee cup while brewing. This design feature enhances the overall tidiness and functionality of the brewer.
14. Drip Tray

Drip Tray is a portable and easy-to-install, situated at the base of your K-50, used for storing water spillage. The Keurig K-50’s body parts are innovative and have a classy look. The drip tray also awards your brewer a distinct look. You can remove it for washing and replace it in its position without damaging it.
15. Drip Tray Base

The drip tray base in your Keurig K-50 is the lower part of the drip tray assembly, providing stability and support for the drip tray. It also serves as a platform for accommodating tall mugs during brewing. So, brew your coffee in a tall mug, such as a travel mug, whenever you desire, but before it, detach the drip tray and place the mug on the drip tray base.
Controls and Indicators of Keurig K-50
Get ready to be excited as we delve into the controls and indicators of your Keurig K-50! By becoming familiar with these components, you’ll better understand your brewer’s language and needs.
Uncover a wealth of information about your brewer as we explore all the essential details you need to know.
This comprehensive guide will thoroughly understand your Keurig K-50 coffee brewer, from controls and indicators to various features and functionalities.
1. Add Water Light (Blue)

In your Keurig K-50 brewer, the Water Light (Blue) reminds you to add water to the reservoir. When the blue light blinks behind the “Add water” indicator, you should obey and refill the storage tank. Stay attentive to the blue light’s indication, and keep your brewer well-supplied with water for continuous or uninterrupted brewing.
2. Descale Light (Red)

Periodic descaling is mandatory for every Keurig coffee maker, including the K-50. When the “Descale Light” is On in your K-50 brewer, it indicates it’s time to descale. Promptly respond to the red light by performing the necessary descaling process to maintain the optimal performance of your brewer.
3. Heating Light (Red)
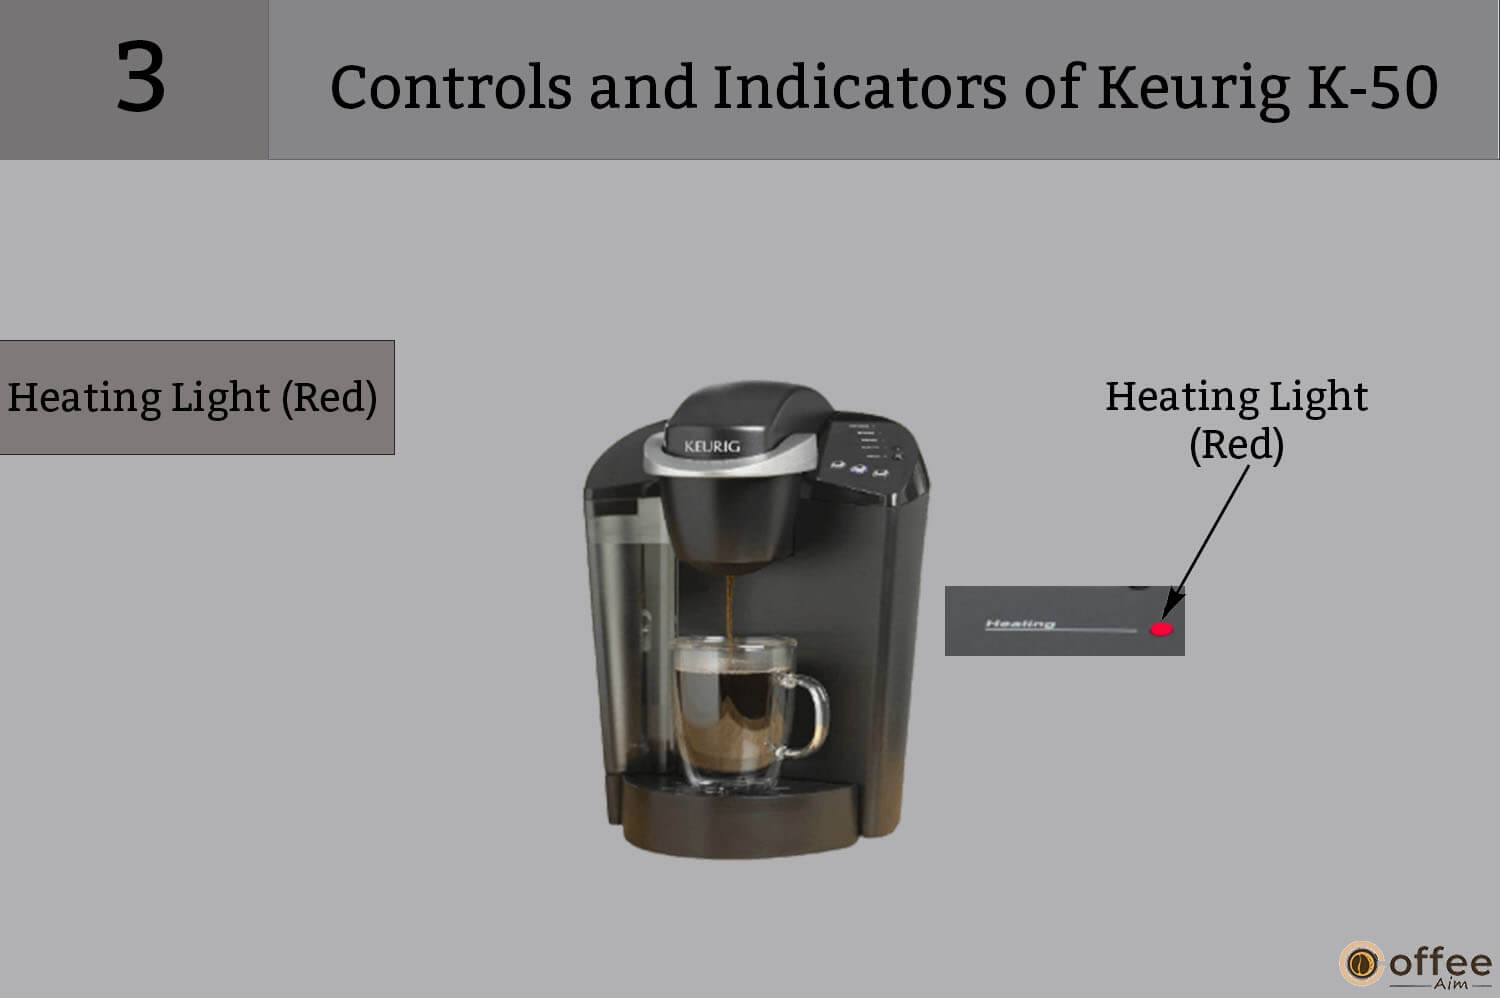
The Heating Light (Red) on your Keurig K-50 lights up when the brewer is heating the water for brewing. The red light serves as an indication that the heating process is underway. Once the water is heated to the ideal temperature, the light will turn off, signifying that your Keurig K-50 is ready to brew a perfect cup of coffee.
4. Auto Off Light (Green)
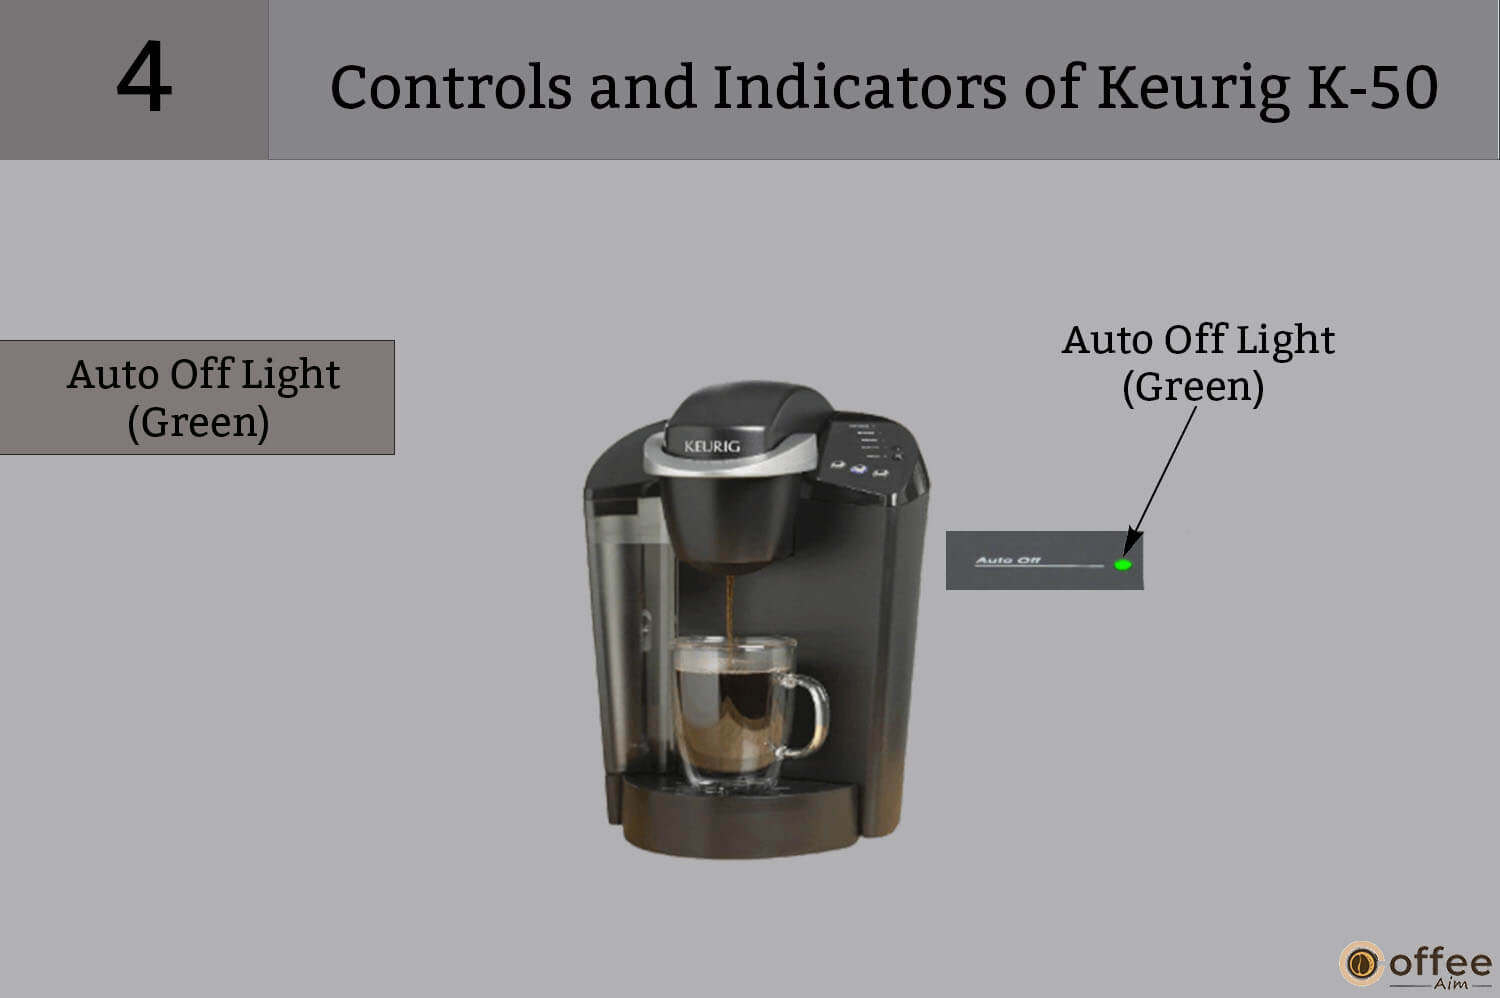
The Auto Off Light (Green) on your Keurig K-50 blinks green when the auto-off feature is activated. This green light serves as a clear visual indicator that the Keurig K-50 brewer is programmed to shut off automatically after a designated period of inactivity. The green light reminds you that the brewer is energy-efficient and will power off to promote energy conservation and safety.
5. Auto Off Button
Press the black Auto-Off button to enable the auto-off timer feature on your Keurig K-50. The green Auto Off light will light up. When the auto-off timer is active, your brewer will automatically turn off two hours after your last brew. Press the black Auto Off button again to turn off the auto-off timer, and the green Auto Off light will turn off.
6. Power Light (Green)
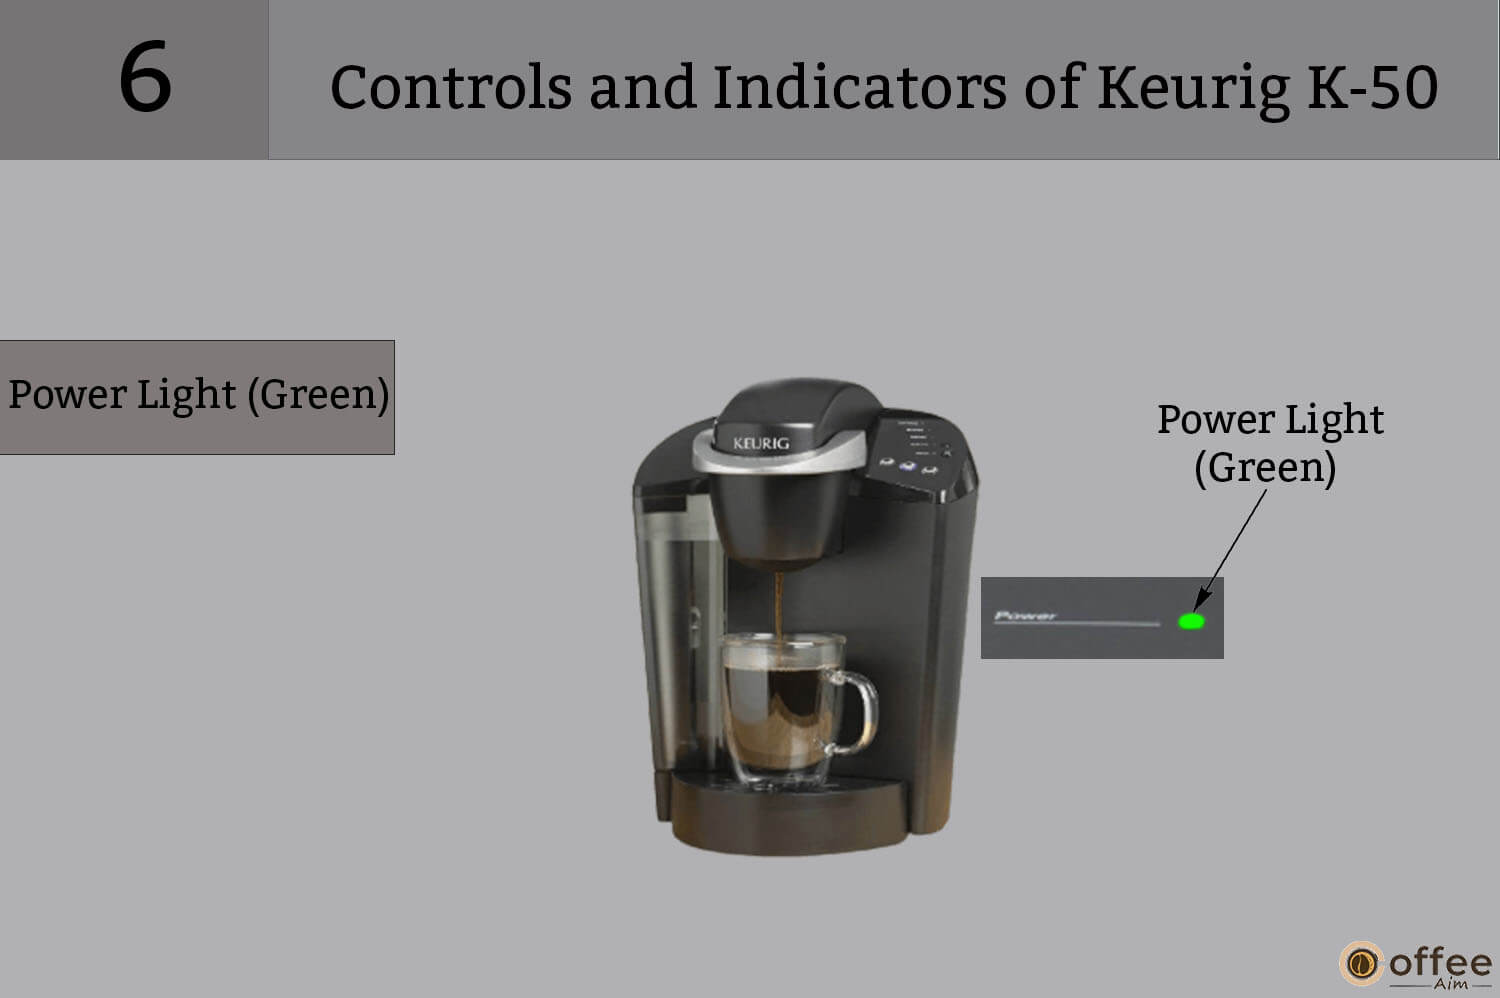
The red Heating Light indicates that the brewer takes around 15 seconds to reheat the water. Once the water reaches the ideal temperature, the light will turn off. Power on the brewer and place a cup over the drip tray. Lift the handle to open the K-Cup pod holder and select a pod to brew.
7. Power Button

Your brewer highlights the power button with a prominent power symbol. The Keurig K-50 features a Power Button which activates or deactivates the power supply to the brewer by pressing it. When the brewer is powered on, the green Power Light will illuminate, indicating that the brewer is ready to be used. Depressing the Power Button again will power off the brewer, and the Power Light will be switched off.
The power button stands out among all the indicators due to its size. You can control your brewer by identifying it and following commands accordingly.
8. Large Mug Button

Press the dedicated “Large Mug” button on the Keurig Brewer for a satisfyingly large cup of coffee. Select your favorite mug or cup for brewing. Use the highlighted indicators and controls to choose your preferred brew size. Press the button to start brewing, and enjoy your coffee in a generously sized mug. The simplicity and convenience make each brewing experience a delight.
9. Small Mug Button

To choose your desired brew size on the Keurig K-50 brewer for smaller cup sizes, press the button corresponding to your preferred serving size, such as the small mug size of 7.25 oz. You can customize your coffee experience and select the amount of coffee that suits your taste and needs. Brewing a smaller volume of coffee is ideal for those times when you desire a smaller serving.
10. Small Cup Button

Experience the pleasure of a precisely portioned cup of coffee using the Small Cup Button on the Keurig K-50. Enjoy the convenience of effortlessly brewing your desired coffee quantity, tailored to your preferences, with a single press of this dedicated button.
What are the Helpful Hints You Need to Remember when using Keurig K-50?
Attention new buyers and existing users of the Keurig K-50! Unlock the full potential of your brewing experience with these essential tips. Dive into the user manual to grasp all the features and functionalities. To ensure the best brewing experience, follow these pro tips. First, plug your brewer into a dedicated grounded outlet and turn it on for instant coffee, tea, or hot cocoa bliss. For gourmet perfection, Keurig recommends using bottled or filtered water.
Customize every cup by choosing your preferred size, flavor, and brew strength. Remember to remove the K-Cup pod after each use. Brew directly into a travel mug for convenience if you’re on the go. And remember, descale your brewer regularly to maintain its peak performance. Elevate your brewing game with these essential guidelines for your Keurig K-50! Remember to register your machine to enjoy exclusive offers. Embark on a journey of ultimate satisfaction with your Keurig K-50!
Plug Brewer Into Its Own Grounded Outlet
Your brewer malfunction if the electric circuit is overloaded with other appliances. Please connect to the brewer on its trajectory, separate from other machines.
Keep Your Brewer Turned “On”
You or your guests can make a fresh mug of coffee, tea, or hot cocoa anytime. Ensure to keep your brewer turned “ON” all the time. However, you can set the brewer to turn off two hours after your last brew automatically. Follow the simple instructions to make using the brewer convenient for you.
Enhancing Your Gourmet Coffee Experience With Quality Water
The quality of water varies across locations. Suppose you notice an undesirable taste in your coffee, tea, or hot cocoa (such as chlorine, sodium, Or other mineral tastes). In that case, consider using bottled water or water from a filtration system.
For best results, carefully follow the manufacturer’s instructions when using any water filtration system.
Customize The Size, Flavor & Brew That’s Perfect For You
With the choice of over 500 varieties of K-Cup® pods and three brew sizes (Small Cup- 5.25 oz., Small Mug-7.25 oz., and Large Mug-9.25 oz.), your Keurig® brewer gives you endless options to customize the size, flavor, and brew that’s perfect for you.
Remove K-Cup® Pod After Use
To prevent clogs and damage, removing the used pods after brewing has finished is necessary. Please follow the instructions from “How To Brew Your First Cup Of Coffee For The First Time Or After A Storage Period.”
Brewing Into A Travel Mug
To brew into a travel mug, remove the Drip Tray Assembly and place the travel mug on the Drip Tray Base.
Descale Brewer Regularly
Keurig advises users to descale their brewer every 3-6 months. Please refer to the instructions in the “Descale Your Keurig K-50″ guide.
How to Set Up Keurig K-50 for the First Time or After a Storage Period?
So, done with unboxing and an introduction session with parts of your Keurig K-50. Now, it’s time to initiate an endless journey of brewing delicious beverages with your Keurig K-50. Let’s start with Keurig K-50 priming instructions!
1. Uncoil the cord and connect the brewer to a grounded outlet. Take off any packing tape that may be attached to the brewer.

2. Put a mug on the Drip Tray Plate with a minimum capacity of 10 oz.

3. Remove the Lid from the reservoir first, then remove the Water Reservoir from the brewer. Then, lift the reservoir straight up and away from the brewer (note that it may require some effort due to a snug fit). Rinse the reservoir thoroughly using fresh water. Next, fill the Water Reservoir with bottled or filtered water, ensuring you stay within the MAX FILL line.

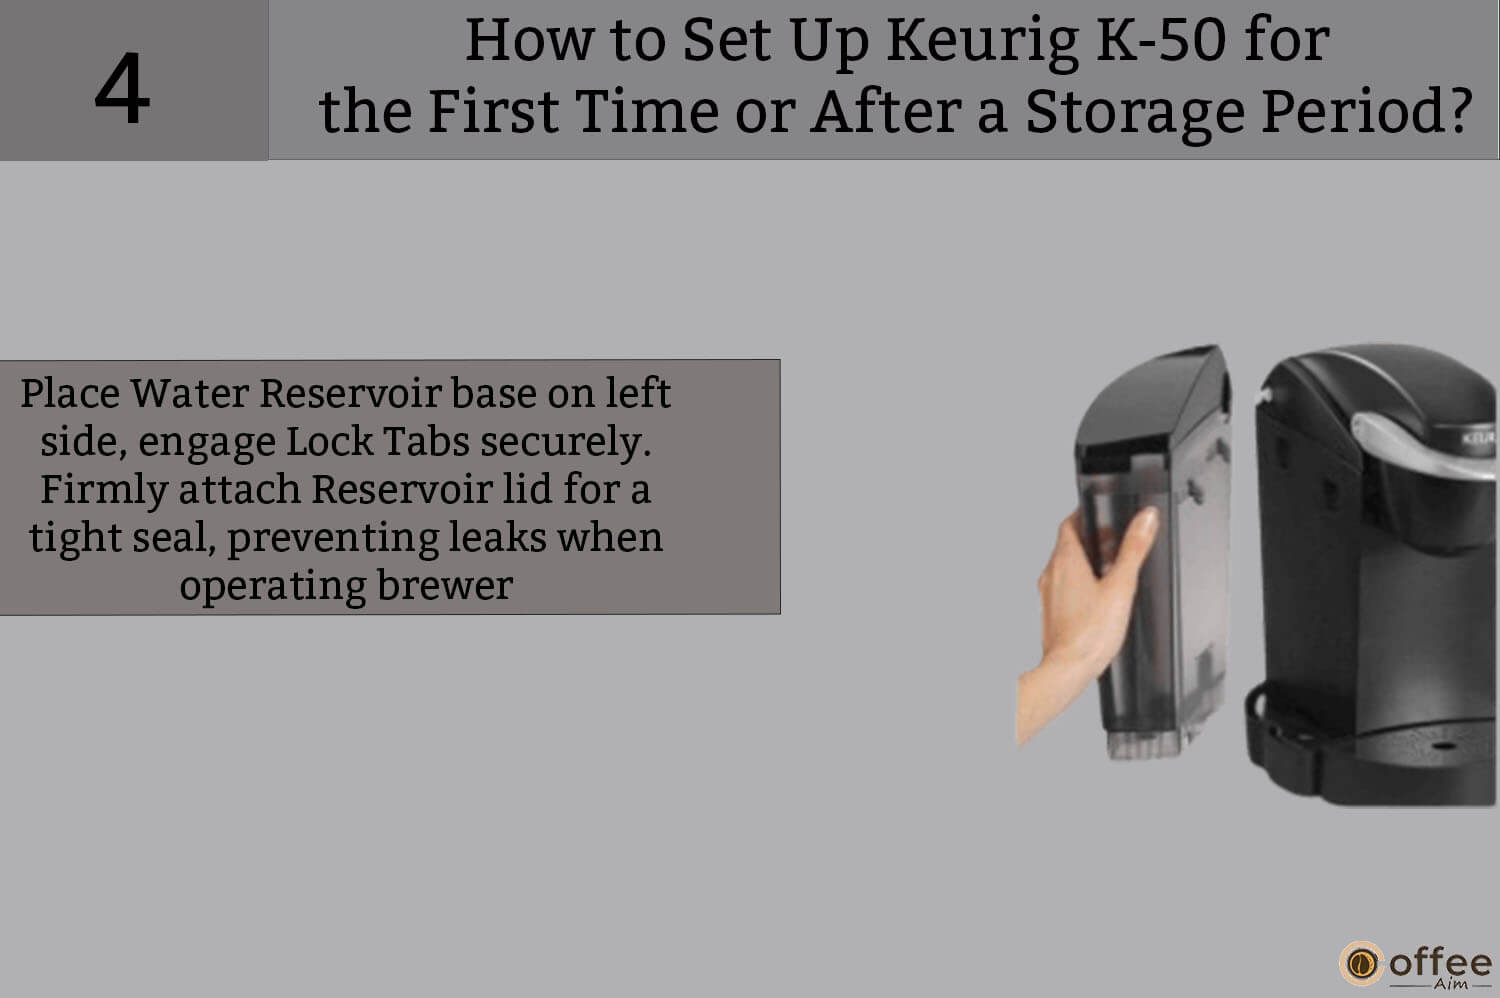
4. Gently place the Water Reservoir base on the left side of the brewer, ensuring the Lock Tabs securely engage. Once correctly positioned, firmly attach the Water Reservoir lid to create a tight seal, preventing possible leaks or issues while operating the brewer.
5. Initiate brewing by pressing the Power Button on the brewer’s upper right panel. This action will activate the green Power Light, indicating that the brewer is operational.

NOTE: Please refrain from using a K-Cup® pod during this particular sequence.
NOTE: The Add Water Light serves as an indicator for an empty or improperly placed Water Reservoir. The Small Mug Button becomes active once water is added to the Reservoir. To power on the brewer, press the Power Button, and observe the green Power Light on the upper right panel.
Important: Please refrain from utilizing a K-Cup® pod during this specific sequence.
Kindly be aware that the blue Add Water Light will be lit if the Water Reservoir is empty or incorrectly positioned. The Small Mug Button will remain inactive until water is added to the Water Reservoir.
6. The brewer will initiate an automatic water-filling process, followed by approximately 4 minutes of water heating. Throughout the heating period, the red Heating Light will be illuminated. Once the water is heated, the red Heating Light will turn off, and the Small Cup, Small Mug, and Large Mug Buttons will become illuminated, indicating that the brewer is ready for brewing.

NOTE: Please refrain from lifting the Handle while the heating process progresses.
NOTE: During the heating and subsequent heat cycles, It’s perfectly normal to observe small quantities of water emerging from the Vent and dripping into the Water Reservoir.
7. Raise and lower the Handle by lifting and releasing it. Next, press the Small Mug Button to initiate a cleansing brew. Please dispose of the hot water by pouring it into the sink.

8. After each brew, the brewer may require approximately 15 seconds to reheat the water. During this time, you may notice the red Heating Light illuminated.
The red Heating Light will switch off as the water meets the ideal temperature, indicating the completion of the one-time setup process. Now, you are all set to begin brewing your favorite beverages quickly!
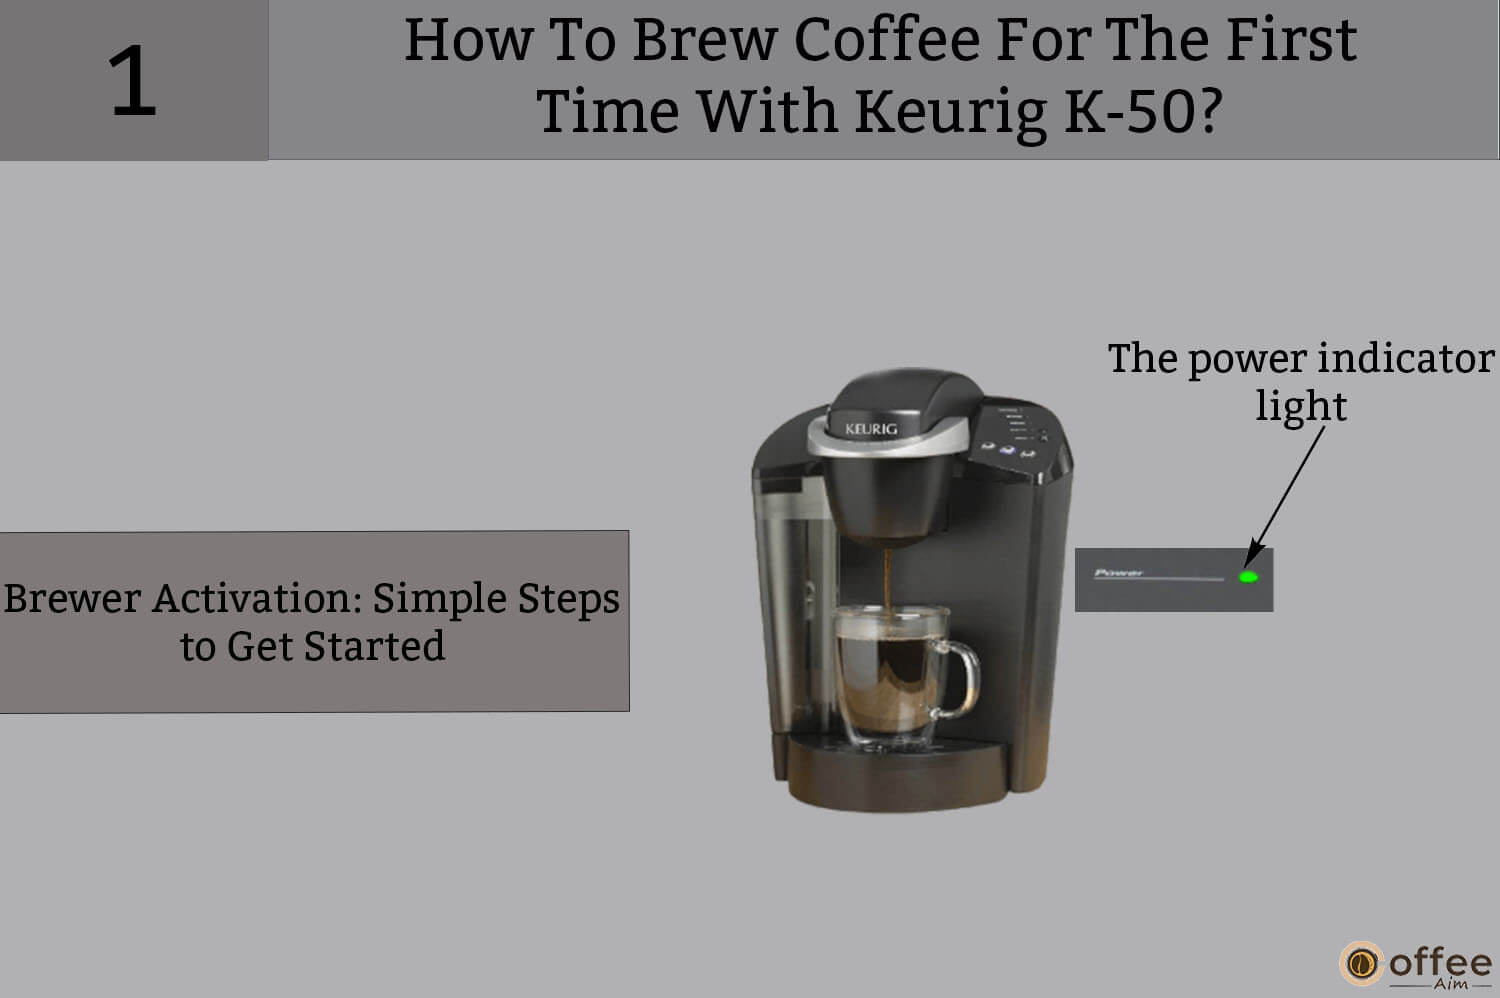
How To Brew Coffee For The First Time With Keurig K-50?
Wait is over! Take out your favorite K-Cup pod and brew a delicious coffee cup for you. Let’s get indulge in Keurig K-50 coffee brewing instructions!
1. Upon turning on the brewer, the power indicator light will illuminate, confirming its activation. Proceed by positioning a cup or mug onto the Drip Tray Plate.
2. Gently lift the handle, and the K-Cup® pod Holder will open in your direction. Now, select a K-Cup® pod.
Note: Please remember not to remove the foil lid or puncture the K-Cup® pod.

3. Insert a K-Cup® pod into the designated K-Cup® Pod Holder. Lower the Handle fully to ensure the secure closure of the Lid.

Warning: The K-Cup® pod is punctured by two sharp needles—one positioned above the K-Cup® Pod Holder and the other at the bottom. Please refrain from inserting your fingers into the K-Cup® Pod Holder to prevent potential injuries.
4. Choose your desired brew size: Opting for the Small Cup will give you a 5.25 oz serving, selecting the Small Mug will provide a 7.25 oz serving, and going for the Large Mug will yield a 9.25 oz serving. The Brew Button you choose will remain lit while the brewing process takes place.

Note: If you don’t press any Brew Button within 60 seconds, it will be deactivated to prevent accidental activation. Reactivate the Brew Buttons by fully lifting and lowering the Handle.
Caution: Boiling water is present in the K-Cup® Pod Holder during brewing. To ensure your safety, refrain from lifting the Handle or opening the K-Cup® Pod Assembly Housing while brewing is in progress.
5. There may be a short pause before the brewing process begins. The brewing takes around 1 minute and concludes with a burst of air to ensure all liquid is extracted from the K-Cup® pod. Raise the handle and discard the used K-Cup® pod.

Warning: The K-Cup® pod will be hot.
6. Savor your initial cup of premium coffee, tea, or hot cocoa brewed with your Keurig® brewer!

7. The red Heating Light may be on while the water is heated for the next brewing cycle. Your brewer will be ready for use in approximately 15 seconds.

Note: Please be aware that your brewer will be in preparation mode during this time. It is usual for the pump to produce a vibrating sound.
Programming the Auto Off Timer Feature of Your Brewer?
Discover the joy of owning a Keurig K-50—your coffee companion simplifies life! Take charge of your brewer with the Auto-off feature, a clever addition. It’s like having a personal assistant who knows when to power down your brewer, giving you control. Follow these easy steps to set a two-hour countdown after your last brew. So, while it rests, you can dive into any task that tickles your fancy!
1. Start the brewing party by pressing the Power Button to bring your brewer to life!

2. Activate the Auto Off Timer by pressing the black button. Once activated, the Green Light confirms your brewer’s readiness, and it will automatically power off after two hours from your last brew.

3. To disable the Auto Off Timer, press the black Auto Off Button again, causing the green Auto Off Light to extinguish.

How to Take Care of Keurig K-50?
Welcome to the world of Keurig K-50! This user manual will guide you on properly caring for and maintaining your beloved brewer. We’ve got you covered, from keeping the exterior shiny and clean to ensuring the drip tray is residue-free. Discover the tips and tricks to enhance your brewing experience and prolong the life of your Keurig K-50. Let’s embark on this journey of coffee perfection together!
1. Cleaning The Brewer Exterior
Keep your Keurig K-50 brewer clean. Clean the exterior from time to time. Use a damp, soapy, lint-free, non-abrasive cloth for cleaning it. Avoid immersing the brewer in water or other liquids.

2. Cleaning The Drip Tray
The Drip Tray can accumulate and hold up to 8 ounces of overflow. Rinse and clean the Drip Tray and the Drip Tray Plate occasionally.
To remove the Drip Tray, carefully slide it towards you while keeping it level to prevent spills. Always use a damp, soapy, lint-free, non-abrasive cloth while cleaning it.

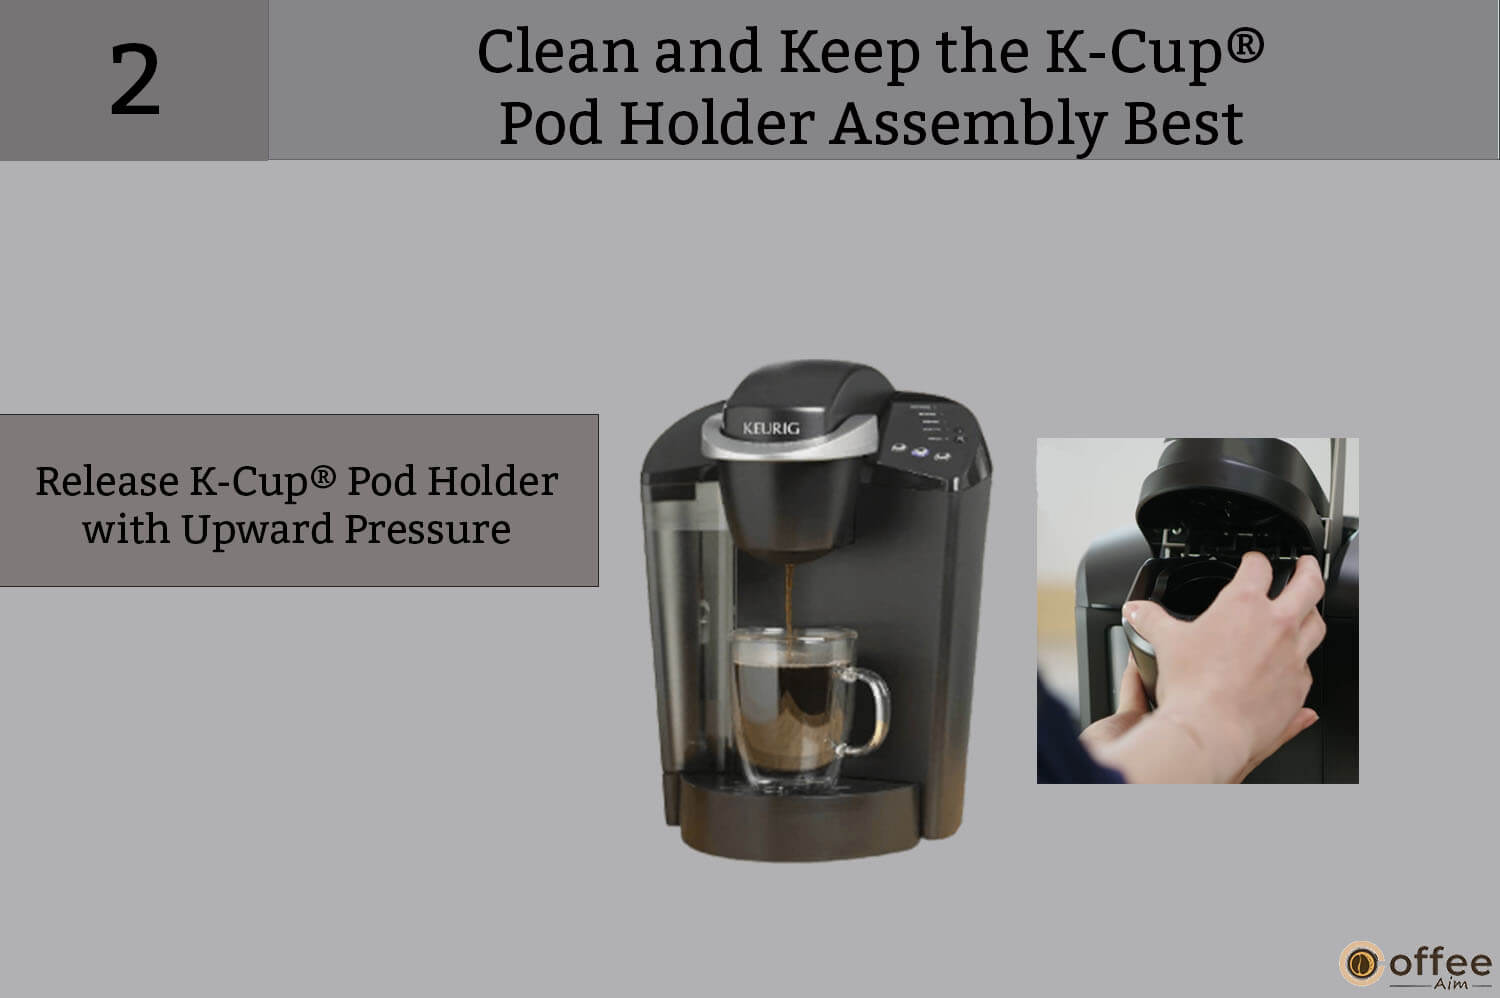
Clean and Keep the K-Cup® Pod Holder Assembly Best
Keeping your K-Cup® Pod Holder Assembly clean is essential for maintaining the best brewing performance of your Keurig K-50. First, remove the pod holder from the brewer to clean the assembly. Then, carefully disassemble and wash the parts in warm, soapy water. Rinse thoroughly and dry completely before reassembling. Regularly cleaning the K-Cup® Pod Holder Assembly will ensure that each cup you brew is fresh, flavorful, and free from residue or buildup.
Cleaning the Parts:
1. To remove the K-Cup® Pod Holder, lift the Handle and securely grip the top of the holder with one hand, then carefully pull it out from the brewer.

2. Using your other hand, apply upward pressure on the bottom of the K-Cup® Pod Holder from underneath until it disengages and releases from its position.
3. Clean the K-Cup® Pod Holder Assembly, then align the K-Cup® Pod Holder with the opening using the two front ribs as a guide. Now snap it into place from the top.

Note: Place The K-Cup® Pod Holder Assembly on the top shelf of the dishwasher.
Note: Be careful and use low-temperature cycles in the dishwasher.
4.Cleaning the Funnel
Remove the Funnel from the K-Cup® Pod Holder. Pull it up until it pops off. The Funnel is dishwasher-safe. To replace it, snap it back onto the K-Cup® Pod Holder Assembly.

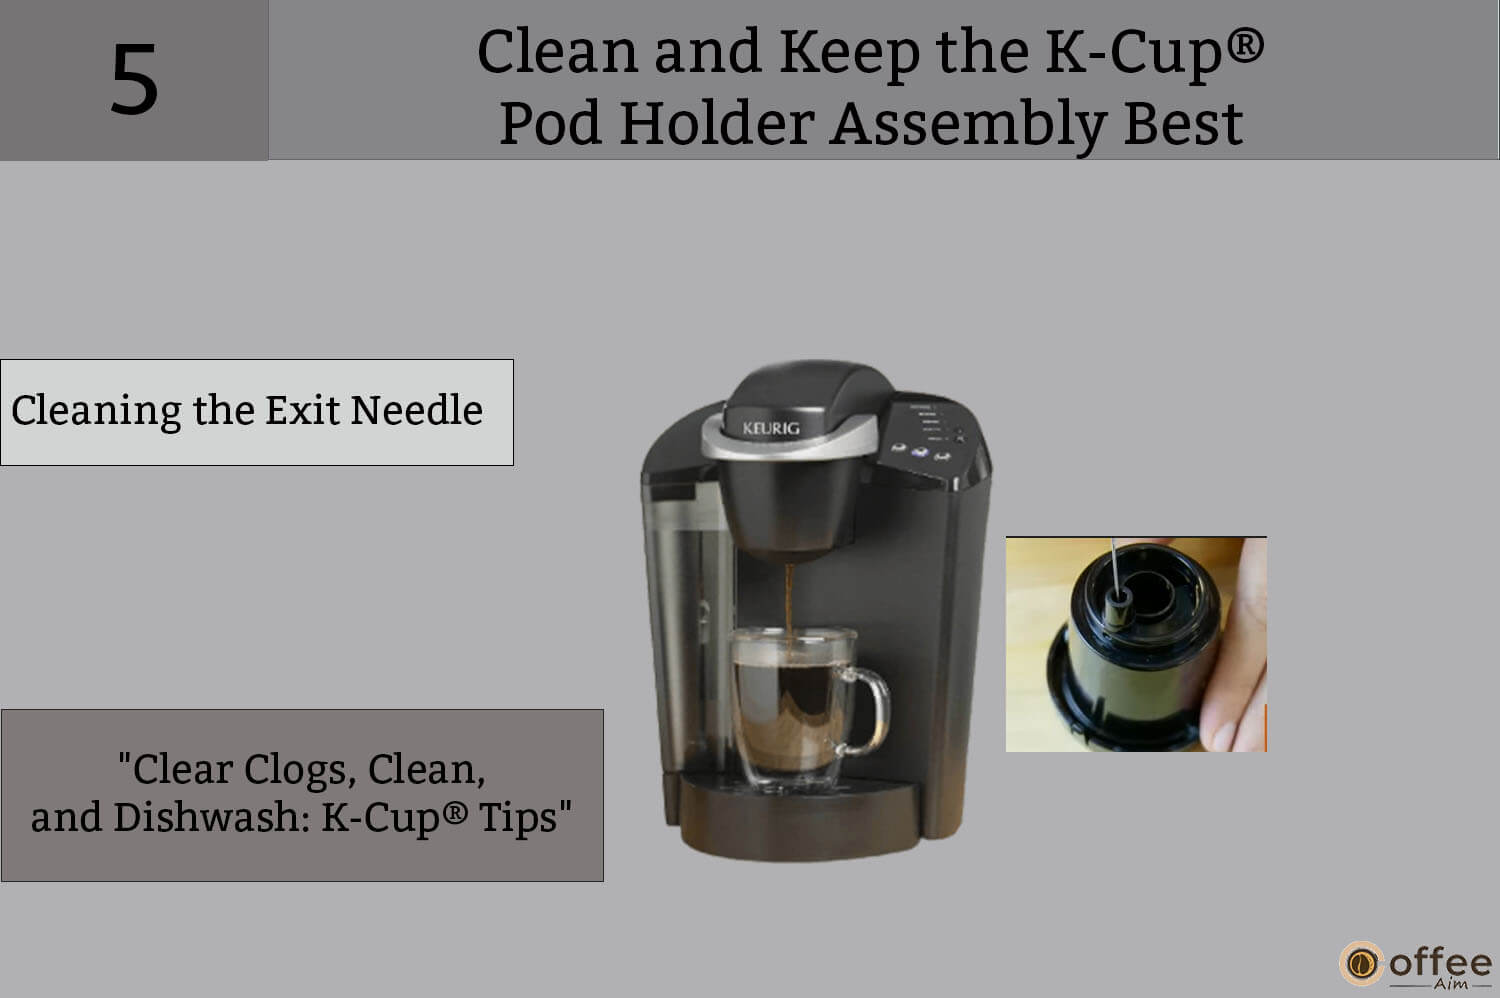
5. Cleaning the Exit Needle
The Exit Needle exists inside the bottom of the K-Cup® Pod Holder Assembly. Clogs arise from coffee grinds; clean them using a paper clip or similar tool. Detach K-Cup® Pod Holder Assembly and Funnel. Insert the paper clip into the Exit Needle to gently dislodge and remove clogs. Additionally, the K-Cup® Pod Holder is also dishwasher safe.
Warning: Please be aware that the K-Cup® brewing system has sharp needles positioned above and at the bottom of the K-Cup® Pod Holder. These needles are designed to puncture the K-Cup® pod during the brewing process. It is crucial to avoid inserting your fingers into the K-Cup® Pod Assembly to prevent any potential injuries.
1. Cleaning the Water Reservoir & Water Reservoir Lid
Inspect and clean the Water Reservoir Lid and Water Reservoir periodically.
Please avoid placing the Water Reservoir Lid or Water Reservoir in the dishwasher. Instead, clean them using a damp cloth with mild, non-abrasive soap, ensuring thorough rinsing. Additionally, dry the inside of the Water Reservoir with a cloth to remove any lint. Before cleaning the filter screen located at the base of the Water Reservoir, make sure to empty the Water Reservoir. Follow one or all of the following procedures:
Note: Remove the water filter inside the Water Reservoir before cleaning.
1. Rinse the filter screen with the vital force of water from the faucet.
2. Aim the water spray at the filter screen if you have a sprayer.
3. Pour approximately two inches of clean water into the Water Reservoir and vigorously agitate it to ensure thorough cleaning.
4. Evacuate the Water Reservoir, fill it with clean water, and return it to the brewer. Repeat the above procedures if needed.
Caution: Please rinse the Water Reservoir thoroughly after cleaning. Ensure that no cleaning solutions remain in this area because they may contaminate the water supply in the brewer.

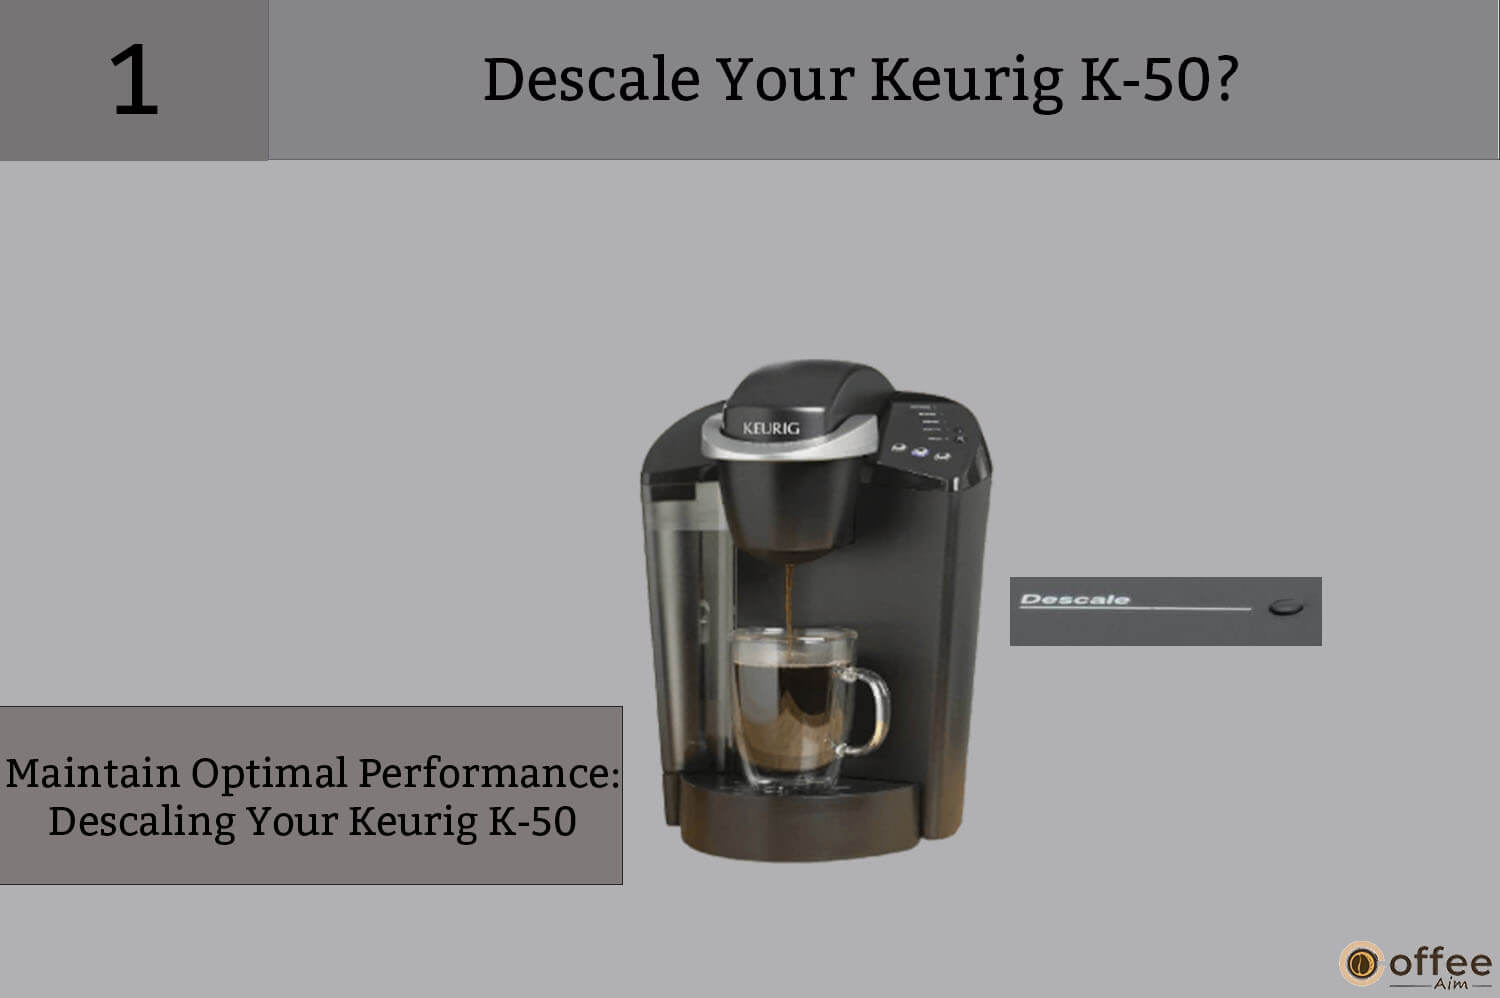
Descale Your Keurig K-50?
Descaling your Keurig K-50 is crucial in maintaining its performance and extending its lifespan. But Descale your brewer from time to time before it shows you problems. With time, mineral deposits can build up inside the brewer, affecting the taste of your beverages and impeding their functionality. By descaling the K-50 regularly, you remove these mineral deposits and ensure optimal water flow through the machine. Descaling improves the quality of your brewed drinks, helps prevent clogs, and keeps the brewer running smoothly. Make descaling a part of your regular maintenance routine to enjoy the best possible brewing experience with your Keurig K-50. Take help from below highlighted pointers:
Be careful: Calcium deposits or scale may build up in your brewer, depending on the mineral content of the water. Never leave your brewer unattended though the scale is non toxic but can hinder your brewer’s performance. Descale your brewer after every 3-6 months. It helps maintain the heating element and other internal parts. Calcium deposits build up faster, making it necessary to descale more often.
The red Descale Light is the indicator to descale, and you should respond promptly. However, even if the red Descale Light does not blink, descale your brewer every 3-6 months. Please follow the descaling procedure properly.
Descaling Procedure
Before beginning the descaling process for your Keurig brewer, gather the necessary supplies: a large ceramic mug, a descaling solution, fresh water, and access to a sink. Ensure you do not use a paper cup. Start by emptying the water from the Water Reservoir. If your brewer has a Keurig® Water Filter, remove it and set it aside. If needed, hamstring any “Auto Off” features. Now, you’re ready to proceed with the descaling procedure.
Step 1: First Descaling Solution Rinse
Switch off your Keurig K-50 by pressing the Power Button. Empty the entire contents of the Keurig® Descaling Solution bottle into the Water Reservoir. Refill the empty bottle with water and add it to the Water Reservoir. Press the Power Button to switch the brewer back on.
Position a large mug on the Drip Tray Plate and initiate a cleansing brew using the largest size. Do not use a K-Cup®pod. Pour the contents of the cup into the sink.
Step 2: Second Descaling Solution Rinse
After preparing the descaling solution and filling the Water Reservoir with it:
1. Put down a large ceramic mug on the Drip Tray.
2. Start the brewing process without inserting a K-Cup pod and wait for the brewer to indicate “ADD WATER.”
3. Leave the brewer on and let it stand for at least 30 minutes; this way, the descaling solution works effectively.
Remove any residual solution and rinse the Water Reservoir thoroughly after 30 minutes.
Step 3: Freshwater Rinse
Please ensure the Water Reservoir is filled with fresh water and does not exceed the MAX FILL line. Position a large mug on the Drip Tray Plate. Run a cleansing brew using the largest brew size. Do not use a K-Cup® pod. Pour the contents of the cup into the sink.
Keep repeating the brewing process until you have completed at least 12 brews using the largest size. You may need to refill the Water Reservoir at least once during this process.
Note: Repeat the descaling process if the red Descale Light blinks.
Keurig’s” Descaling Solution ” cleaning action results in quick foam dispensed from the brewer. The solution reacts with the scale inside naturally. Fill the brewer correctly for a heavy scale, even after adding the descaler. If this situation arises, you may observe a minimal or absence of liquid being dispensed, along with the sound of air being blown out. In such cases:
Throw the contents if there is a Keurig® Descaling Solution in the Water Reservoir. Now rinse the Water Reservoir thoroughly, and refill it with water.
Reconnect the brewer to the power source, turn it on, and repeat Step 3, which involves running a Fresh Water Rinse cycle. The brewer usually functions as you rinse the solution and remove the scale. If the problem persists, allow the brewer to keep unplugged for at least 30 minutes before progressing with the rinse.
Visit us online for more additional information at www.Keurig.com/descaling.
Service
In addition to the suggested cleaning and maintenance steps, this brewer may require professional servicing. For any service needs, please consult the Warranty section of this guide for further assistance.
Keurig K-50 Storage Instructions
Empty the Water Reservoir before storing and ensure you keep your brewer in a safe and frost-free environment. Please reserve your brewer upright to avoid water leakage from the inner tank. When holding the brewer in a cold climate, there is a risk of the water freezing inside, potentially causing damage before using the brewer after storage.
It is recommended to rinse the Water Reservoir with fresh water and run three cleansing brews without a K-Cup® pod for ideal performance.It will help to remove any residual flavors or impurities from the brewing system.
When relocating the brewer, ensure it is turned off, unplugged, and the Water Reservoir is emptied. If the brewer has been exposed to freezing temperatures, let it warm to room temperature for 2 hours before use.
Scan. Click. Call!
Discover more and reach us quickly without leaving home.
Contact Keurig Customer Service at our toll-free phone number, 1.866.901.BREW (2739).
Address:
Keurig Green Mountain, Inc.
33 Coffee Lane.
Waterbury, VT 05676.
1.866.901.BREW (2739)

Scan here for Videos about Caring for Your Brewer!
Scan the QR code from your smartphone’s camera and get access to watch instructional videos on cleaning and descaling. Or, if you prefer, you can watch the videos on your computer at www.Keurig.com/customer-service.

Do you have Questions? We’re Here to Help!
Keurig is committed to your satisfaction. If you have questions, call us to answer them quickly without leaving your home’s comfort zone. 1.866.901.BREW (2739)
How to Troubleshoot and Solve the Problems of Keurig K-50?
Are you fed up with your Keurig? Why? Because every two or three days it starts irritating you with its idle situation! Listen, it’s not always the fault of your coffee maker. Maybe you or your power outlet is guilty. Let’s check it out!
| Situation | Solution |
| The brewer does not have power. | Connect the brewer to a dedicated outlet.Check to be sure that it is plugged in properly.Plug into different outlets. Reset your home’s circuit breaker if necessary.Ensure the Power Button has been turned on and the green Power Light is illuminated. |
| The brewer is not brewing. | After placing the K-Cup® pod in the K-Cup® Pod Holder, ensure the handle is pushed down securely and the blue Brew Buttons are flashing.Add water to the Water Reservoir when the blue Add Water light blinks and gives an indicator.Fill the water till the MAX FILL line. Make sure the Water Reservoir is seated accurately in its base.If the blue Add Water Light keeps illuminating even after refilling, contact Customer Service at 1.866.901.BREW (2739).If the blue Add Water Light, red Heating Light, and Small Mug Button are all flashing simultaneously, see the following situation. |
| Blue Add Water Light, Red Heating Light, and Small Mug Button are all flashing simultaneously. | Remove the Water Reservoir and thoroughly clean it. Ensure the Water Reservoir is filled to and within the MAX FILL line. Please return it to the brewer and ensure it is seated properly, then press the flashing Small Mug Button.If you have completed the procedure mentioned above two times and the situation persists, contact Customer Service at 1.866.901.BREW (2739). |
| Why is the brewer brewing a partial cup only? | The Exit Needle may need to be fixed.Clean K-Cup® Pod Holder and rinse under the faucet.If the Water Reservoir was removed during brewing, place it back in its position and run a cleansing brew without a K-Cup® pod.If the red Descale Light is illuminated, descale the brewer.If you have repeated the descaling procedure on your brewer twice and it is still only brewing a partial cup, contact Customer Service at 1.866.901.BREW (2739). |
| Why does the brewer shut off automatically? | The LCD will only show the time if you do not set the clock. Check to ensure the Auto Off Timer feature has not been enabled. Press the black Auto Off Button to immobilize the Auto Off Timer feature if the green Auto Off Light is illuminated. |
| Water appears in the brewer base with the Water Reservoir removed. | It is usual for a small amount of water (less than 10 ml) to collect when the Water Reservoir is not seated for a while. There will be no effect on the operation of the brewer.To absorb the water, gently wipe the affected part with a cloth or paper towel.Return the Water Reservoir to the brewer base. If any problems persist, contact Customer Service at 1.866.901.BREW (2739) |
What is the Limited Warranty of Keurig K-50?
Keurig Green Mountain, Inc. (Keurig) offers a one-year warranty. It commences from the original date of purchase, ensuring that your brewer is free from any defects in materials or craft for everyday home use. You should fill out and return the warranty card enclosed with your brewer so we can save your purchase information in our system.
Upon providing proof of the purchase date, Keurig will offer the option to repair or replace a defective brewer free of charge. Ensures that you receive proper assistance for any issues with your brewer. If a replacement brewer is necessary to service this warranty, the replacement brewer may be new or reconditioned. If you have already received a replacement brewer, you can not replace your brewer for a further year.
This warranty applies to brewers used in the United States and Canada, granting you specific legal rights. Additionally, you may have other rights varying from state to state within the United States and province to province within Canada.
Using only Keurig® K-Cup® brand pods and accessories ensures and guarantees the proper functioning and longevity of your Keurig® brewer. Never use non-Keurig® pods and accessories; the warranty will not be applicable if any malfunction or damage occurs during usage. Or may result in a service fee if the injury or malfunction is determined to be caused by such use.
What is Excluded from the Limited Warranty?
This warranty expressly excludes any coverage of property damage resulting from the use of the product is not covered under this warranty. This warranty does not extend to cover any unexpected costs and expenses that may arise due to a breach of this warranty, even if such costs and fees were reasonably anticipated.
The exclusion or limitation of incidental harm or consequential damages may not apply to you depending on the state or province of purchase, as some states or provinces do not allow such restrictions or limitations.
This warranty does not extend to harms or injuries resulting from the use of non-Keurig® pods or accessories, services provided by unauthorized individuals or entities other than Keurig or its authorized service providers, the use of non-genuine Keurig® parts, or external factors such as abuse, misuse, improper power supply, or acts of nature.
What are the Other Limitations of the Keurig K-50 Warranty?
This exclusive warranty replaces any other express warranty, whether written or oral. In addition, Keurig disclaims all other warranties concerning your K10 Mini Plus brewer. This warranty expressly excludes any implied warranty of merchantability or fitness for a real purpose.
Please note that certain states or provinces may have laws that do not allow the exclusion of interpreted warranties or limitations on the duration of such securities. Therefore, the above rule may not apply to you if you are in a state or province with different legal requirements regarding the length of warranties.
How do You Obtain the Warranty Service?
While Keurig® brewers are designed to offer exceptional performance with proper care, there may be instances where warranty servicing is required. To initiate warranty service, please get in touch with Keurig Customer Service at our toll-free phone number, 1.866.901.BREW (2739). Before sending your brewer for servicing, it is important to first speak with Keurig Customer Service and obtain an Authorization to Return number (ATR). Ensure a transparent and efficient process for resolving issues with your brewer. If you send Keurig® brewers without an ATR number, we will not serve them.
Keurig Green Mountain, Inc.
33 Coffee Lane.
Waterbury, VT 05676.
1.866.901.BREW (2739)
Conclusion
It is time to sip mugs of coffee and thank your brewer for this sacred moment. We have discussed the entire procedure of your favorite coffee brewer’s operating mechanism. Go through the article, and you will find the most accessible explanation.
However, if you still need clarification about your brewer, take another ride and re-read this article. I have high hopes you will not have any issues. If you need further clarification on any topic related to your coffee maker, coffee beans, and maker queries, visit CoffeeAim.com. This place will satisfy your dreamy coffee and intense feeling related to its making.
Come on, our dearest customers; treat yourself or your friends by brewing super foamy coffee, and enjoy its yummy flavors.
Commemorate your every day with your favorite Keurig K-50 coffee maker. You would love to make coffee.
FAQs
What is the Capacity of Water in Keurig K-50 to Hold?
The Keurig K-50 Water Reservoir allows you to brew more than six (6) cups before refilling. It saves your time and simplifies your morning routine.
Is it OK to Leave Keurig On all the Time? Or Should I Leave My Keurig® Coffee Machine On All the Time?
I advise you to set the brewer to turn off two hours after your last brew automatically. Keeping your coffee maker on all the time will lead to increased consumption of energy. Furthermore, it may lead to any mishap, such as electric shock or fire eruption. Therefore, it is better to enable the “Auto off” feature in your brewer and enjoy hassle-free brewing!
How does Keurig K-50 Know That the Water Level is Low?
The Keurig uses a floater (magnet) to detect low water levels in the reservoir. Therefore, the Keurig K-50 model uses a float system to detect low water levels in its reservoir. It includes a floating component that moves with the water level. When the water level drops below a certain threshold, the float lowers and triggers a switch or sensor, indicating that the water level is low and prompting the user to refill the reservoir.
Does the Keurig K-50 Occupy a Water Filter?
No, the Keurig K-50 does not come with a built-in water filter. Please note that the K-55 model includes a water filter starter kit. If you wish to have the water filter starter kit with the K-50 model, it must be purchased separately.