Quick Navigation
Coffee lovers, It can be difficult for new buyers to understand how to use a new technological device, especially if they are unfamiliar with coffee makers. Old buyers, on the other hand, may have misplaced their manual or become stuck at some point, making it difficult for them to use their devices. But don’t be concerned! Whether you’re a new or experienced buyer, you’ll have a better understanding of how to use an Instant Pod 2-in-1-Multi-Function coffee maker by the end of this guide.
Don’t be concerned if you find the guide difficult to understand. I will make it friendly and simple to understand. You’ll be able to use your Instant Pod coffee maker with confidence and skill by the end of this guide.
So, take a seat, relax, and prepare to enter the world of instant coffee making!
Stay Safe: Precautions To Follow While Using Instant Pod Coffee Maker
Are you ready to brew the perfect cup of coffee with your Instant Pod coffee maker? But before you hit that button, let’s talk about safety! The Instant Pod coffee maker, like any other electrical device, requires caution and care to ensure your safety and the longevity of your device.
Making coffee may appear to be a simple task, but it is an art that requires precision and attention. As a result, we must take basic safety precautions to avoid mishaps. Nobody wants to get an electric shock or catch fire while brewing their favorite cup of coffee, do they?
So, let’s go over some important safety precautions you should take when using your Instant Pod coffee maker. After all, looking after yourself and your device should always come first.
Specifications
I am excited for you to start using your new device. While you’re eager to try out your new appliance, make sure it’s a good fit for your kitchen. Here’s a specification detail to help you decide if the Instant Pod coffee maker is right for you:
| Specification | Detail |
| Model | DPCM-1100 |
| Water Tank Capacity | 68 oz /2011 mL water tank |
| Wattage | 1500 watts |
| Power | 120V/60Hz |
| Weight | 12.0 lb /5.4 kg |
| Dimension(Width x Depth x Height) | 13.0 in H X 7.0 in W X 15.4 in D 33.0 cm H X 17.8 cm W X 39.1 cm D |
| Pressure | 19 bars |
| Energy saving mode | (Yes) Auto shut off after 30 minutes |
| Brew Sizes | 6 |
| Compatible Pods | K-Cup podsNespresso OriginalLine pods |
Overall, the Instant Pod coffee maker is an excellent choice for those looking for a quick and easy way to make coffee with minimal effort. However, before committing to using it on a regular basis, make sure it fits your lifestyle and preferences. We hope this guide has helped you decide if the Instant Pod coffee maker is right for you.
So, if you haven’t started using your Instant Pod coffee maker yet and aren’t sure if it’s a good fit for you or discovered that this is not for you, then don’t feel obligated to continue using it. It’s perfectly fine not to use the device if it doesn’t meet your needs. It’s not a bad idea to experiment with different coffee makers until you find one that works best for you. There are numerous types of coffee makers in the market, so you’re sure to find one that suits your needs. Remember that the most important thing is to enjoy your coffee, regardless of the method you use to make it.
What’s In The Box
Are you prepared to take your coffee-making skills to the next level? Well, the Instant Pod coffee maker is here to help! When you buy an Instant Pod coffee maker, you can expect to receive a number of items in the box. When you open the box on your Instant Pod coffee maker, you should find the following items.
1. Instant Pod Coffee Machine
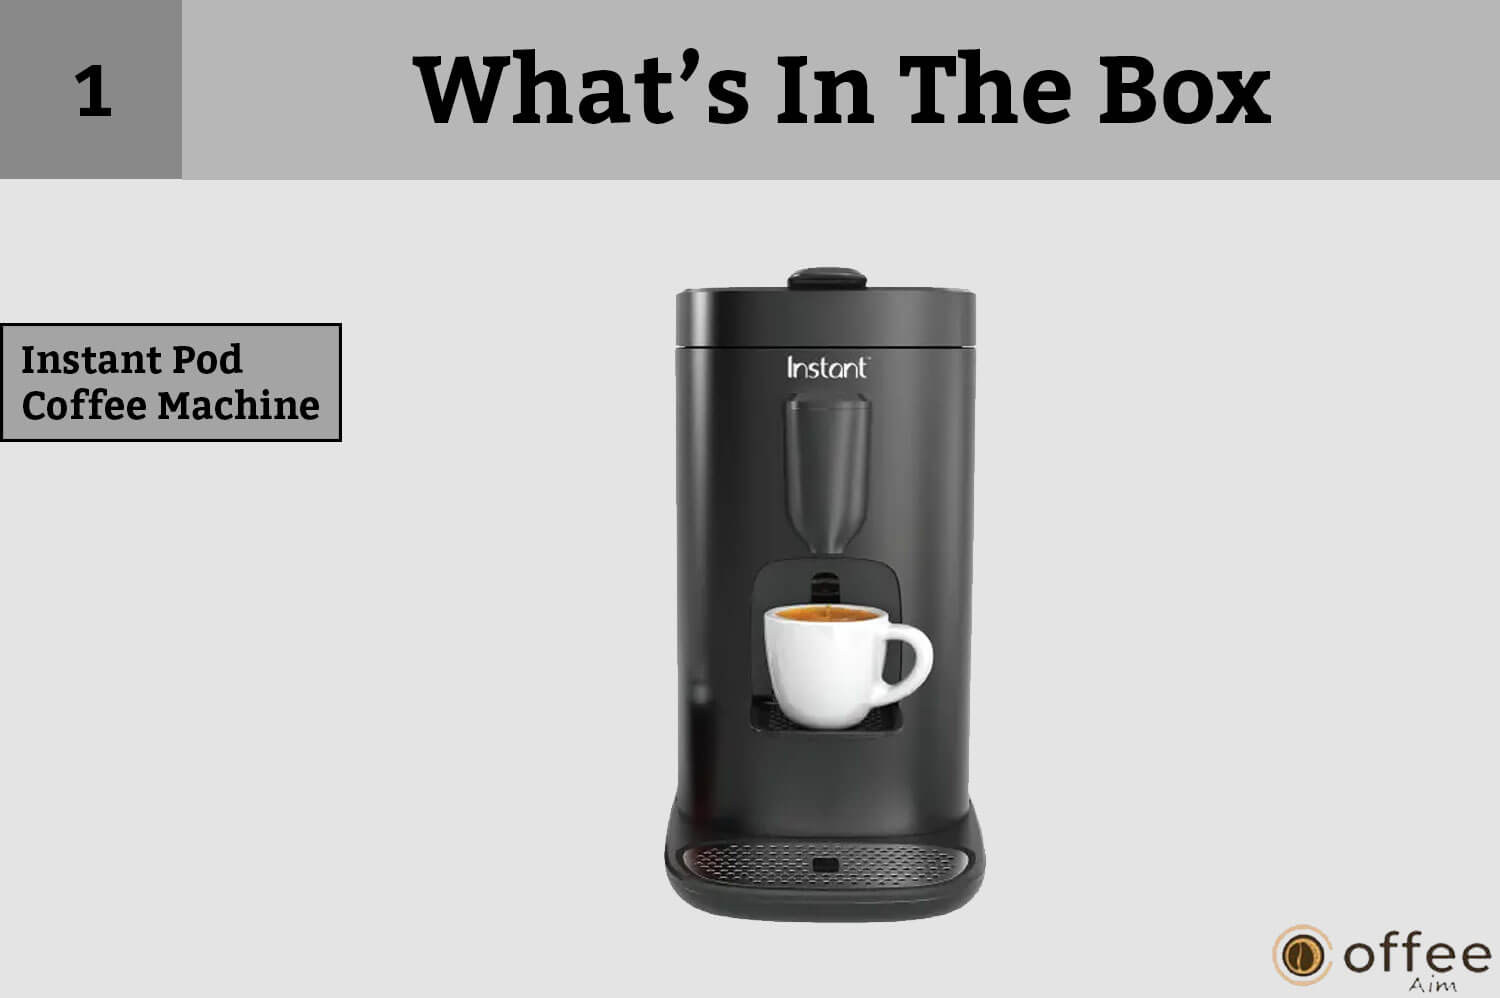
The Instant Pod coffee maker is a sleek and modern coffee machine designed to make brewing coffee at home quick, easy, and convenient. It is a single-serve coffee maker that makes delicious cups of coffee in just a few minutes by using coffee pods.
This coffee maker accepts both K-Cup and Nespresso pods, making it a versatile machine that can accommodate a variety of coffee preferences. It has several settings for customizing your brew, such as cup size, brew strength, and temperature control.
2. A User Manual

In the box, you will find a user guide manual. The manual includes detailed instructions on how to use the machine, including how to set it up, choose your preferred cup size and brew strength, and clean and maintain it. The manual is an essential tool for getting the most out of your coffee maker. It includes diagrams and illustrations to help you understand the machine’s various parts and how they interact with one another.
3. A Water Reservoir That Can Be Removed
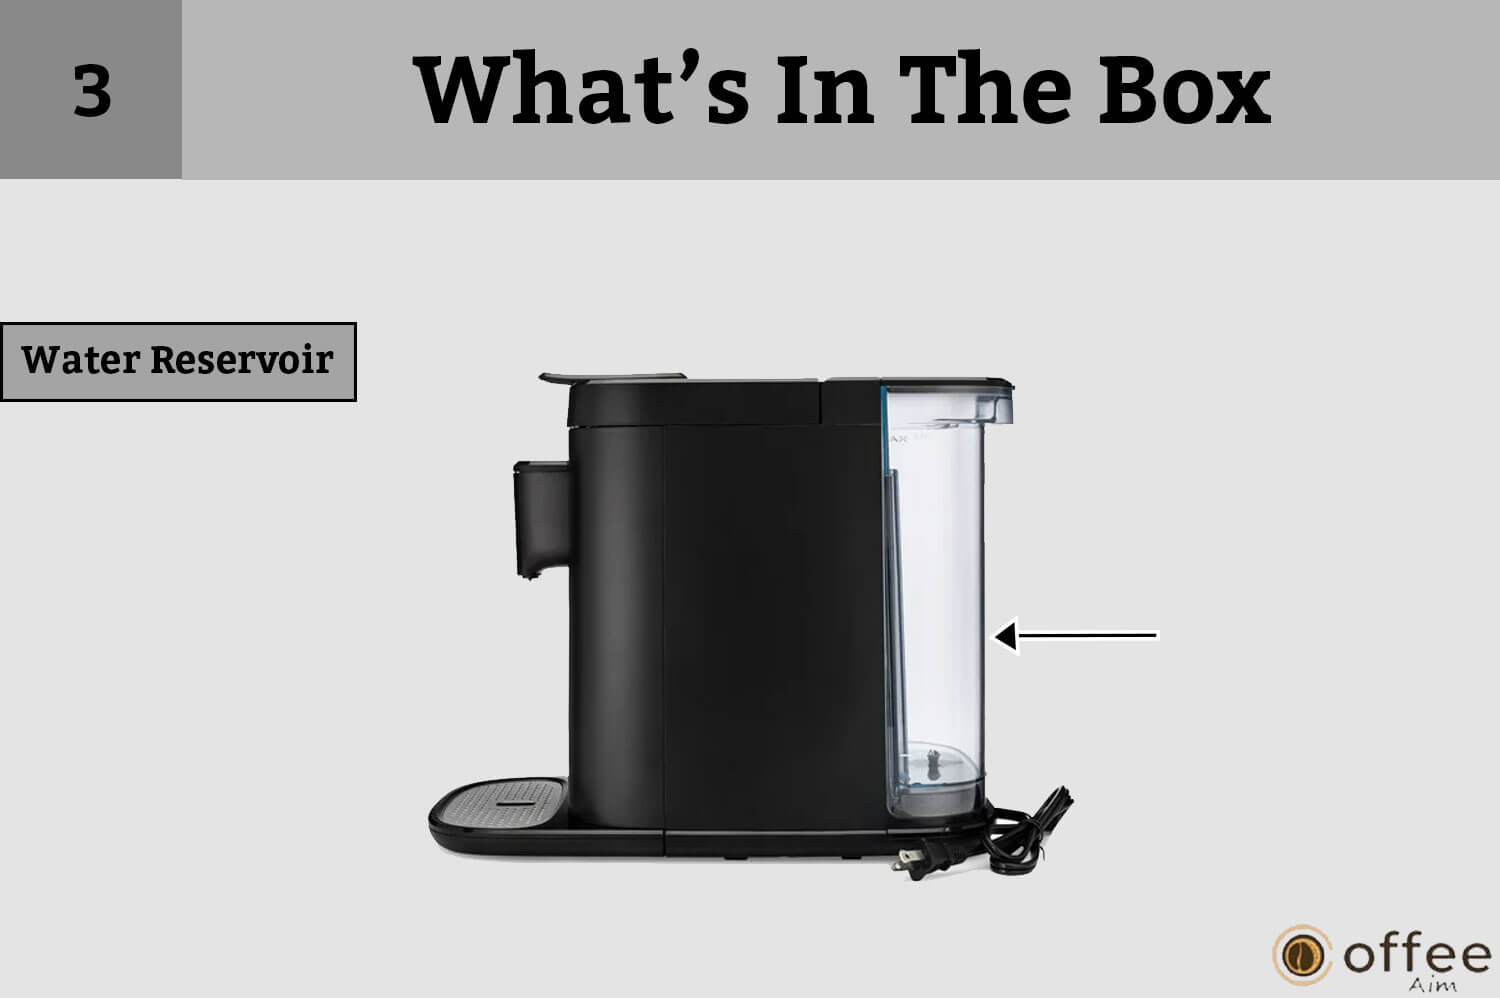
A sleek and innovative water reservoir that can be easily removed from your water pitcher or dispenser can be found. This ingenious invention is intended to make your life easier in a variety of ways.
To begin with, it makes it simple to refill your water container. No more lugging a heavy pitcher around or attempting to pour water without spilling it. With a removable water reservoir, you can easily lift it out of your dispenser and take it straight to the sink to refill.
But hold on; there’s more! Because the water reservoir is easily removable, you can clean it thoroughly without difficulty. No more scrubbing those hard-to-reach corners or dealing with gunk buildup. You can easily clean every inch of a removable reservoir, ensuring that your water stays fresh and clean.
4. A Pod Holder Or Reusable Pod Adapter That Can Be Used With Your Own Coffee Grounds
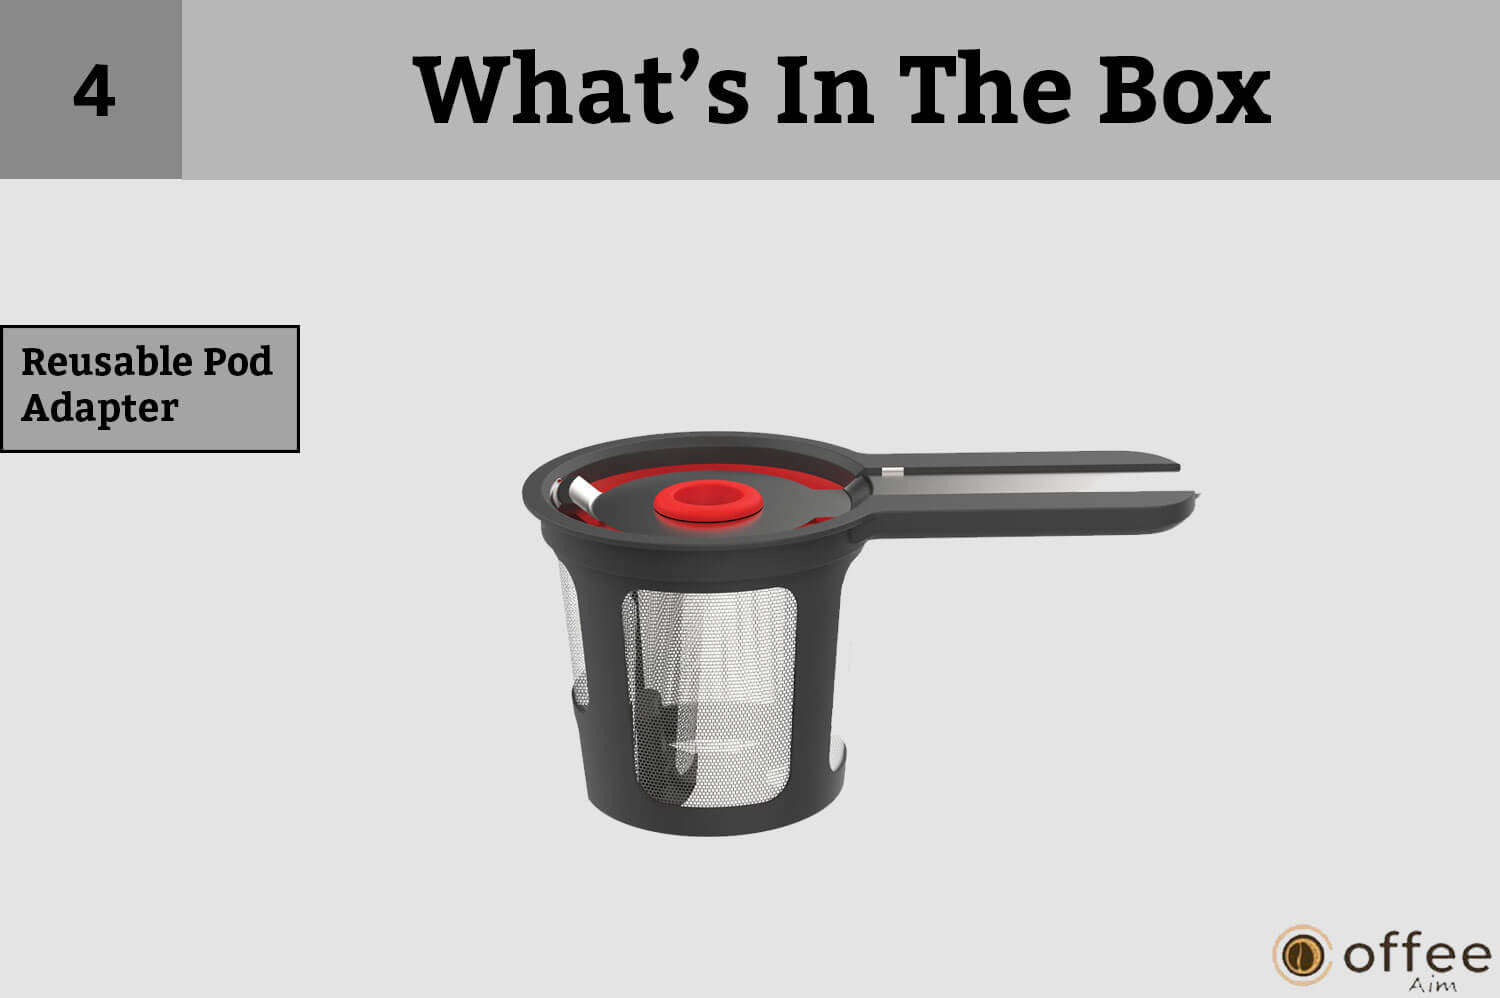
You’ll discover a clever little gadget that allows you to use your own coffee grounds with your pod-based coffee maker. Depending on the model, you may find a pod holder that allows you to fill a reusable pod with your own coffee or a reusable pod adapter that allows you to use your own coffee instead of pre-packaged pods.
In any case, this handy little invention is intended to make your morning coffee routine a little more personalized and eco-friendly. You can now make the perfect cup of coffee every time by using your favorite coffee blend, whether it’s a specialty roast or a beloved local blend.
5. A Power Cord For Connecting To An Electrical Outlet
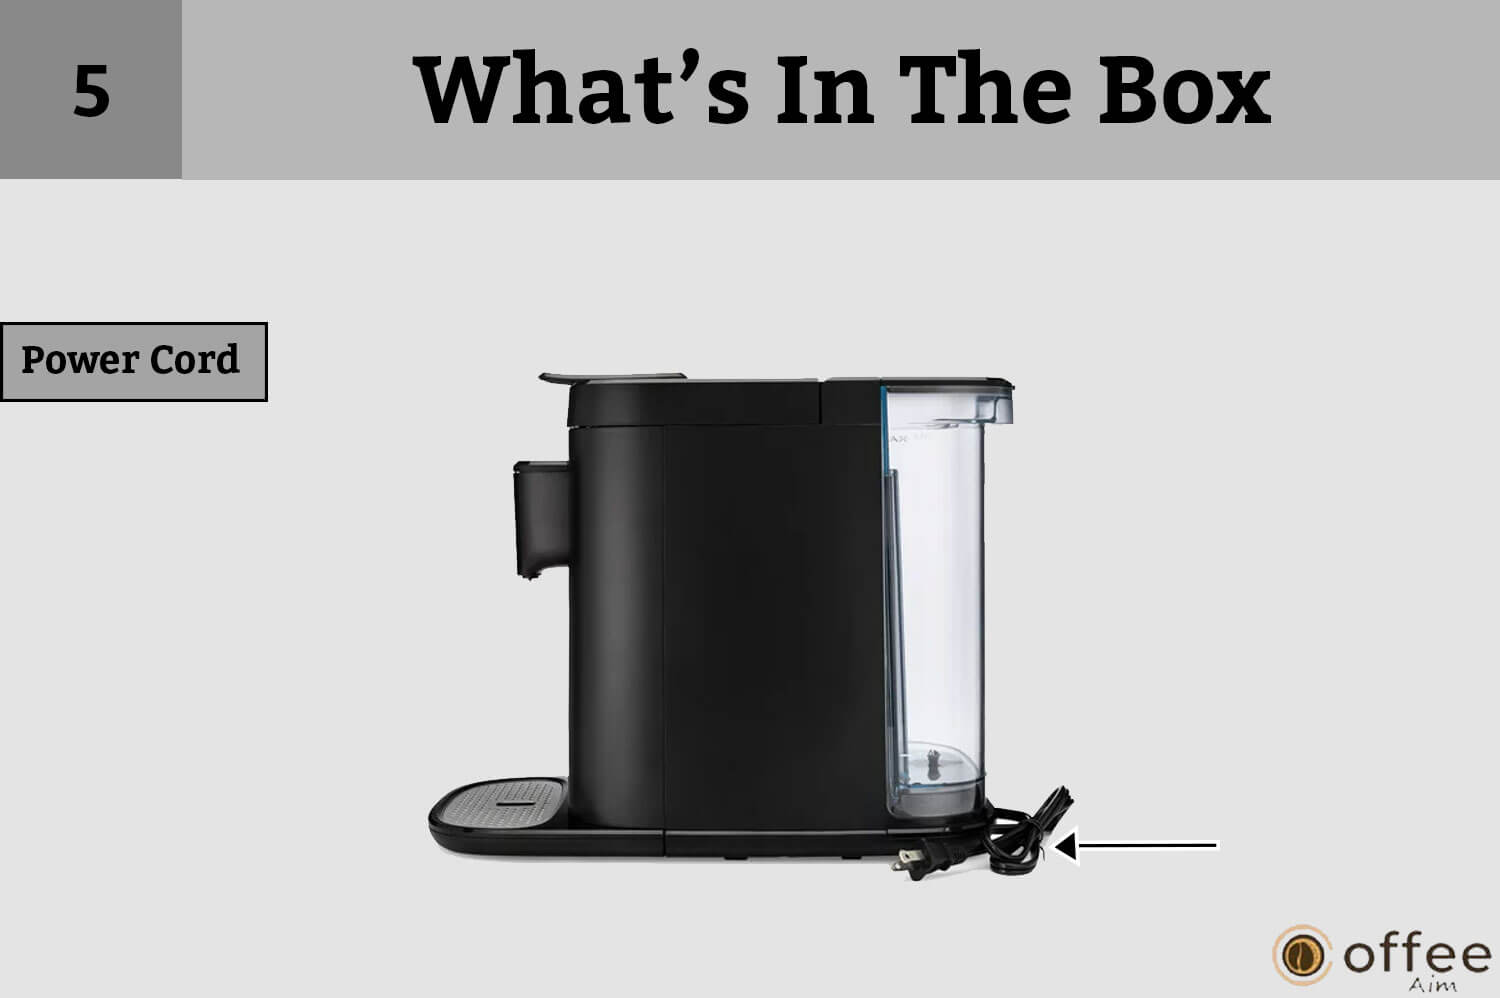
You’ll find a dependable power cord that’s ready to go. This cord is intended to connect your electrical device to an outlet, providing it with the power it requires to power up and begin working.
The power cord may have a variety of features to make your life easier, depending on the device you’re using. It could have a flat or braided design to prevent tangling, or it could have a built-in surge protector to protect your electronics from power surges. Furthermore, some power cords may be available in fun colors or with cool designs to add a little personality to your setup.
It’s important to note that the exact contents of the box will vary depending on the model or package you choose. Check the product description or user manual for a complete list of what your Instant Pod coffee maker comes with.
Certainly! It is important to remember that if anything is missing from the box, you must contact the seller immediately. You should check the contents of the box as soon as you receive it, and if anything is missing or damaged, don’t hesitate to reach out to the seller. Most sellers have a return or replacement policy in place and will gladly assist you in resolving the issue. However, you must act quickly because some sellers may have a time limit for returns or replacements.
Parts Of Your Instant Coffee Pod
If you’re new to using the Instant Pod coffee maker, it’s important to understand the various parts of the machine and how they all work together to make the perfect cup of coffee. I will walk you through the various parts of the Instant Pod coffee maker and explain how to use each one effectively in this guide.
To summarise, the Instant Pod coffee maker is made up of several components that work together to make the perfect cup of coffee. You’ll be able to enjoy delicious coffee in no time if you understand how each part works and how to use it effectively. In the sections that follow, I’ll go over each step of the brewing process in detail to help you get the most out of your Instant Pod coffee maker.
1. Water Tank Lid
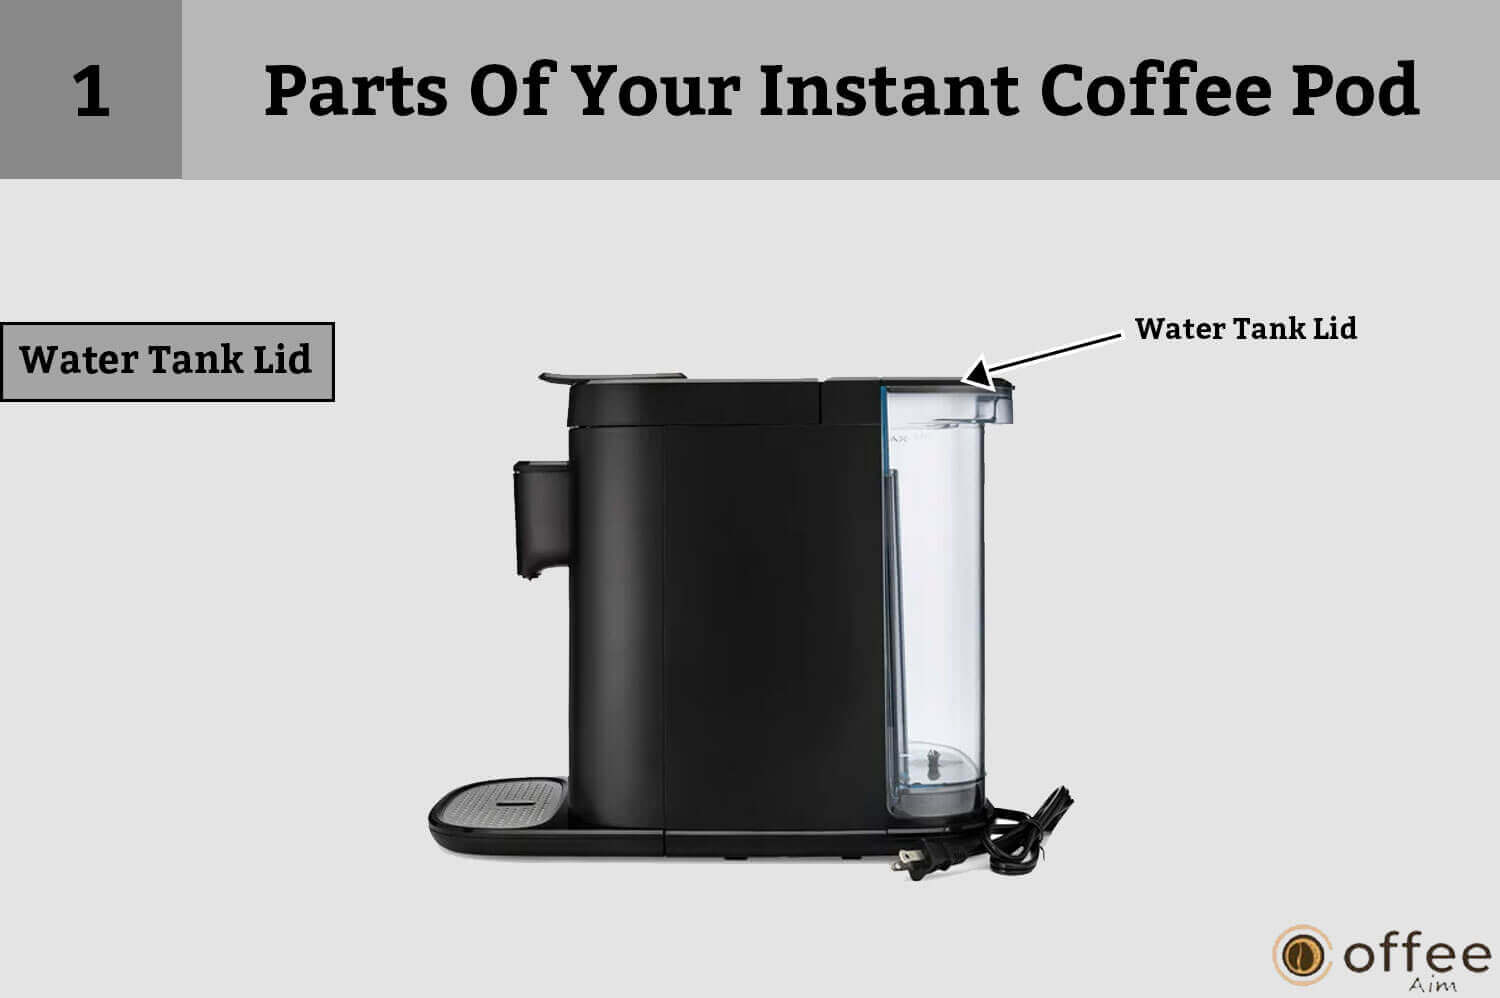
The lid is used to cover the water tank opening and is easily removable for filling and cleaning. Simply lift the lid up from the back, and it will come free of the water tank. After you’ve filled the water tank to your desired level, replace the lid, making sure it snaps securely into place. The water tank lid is an important component of the coffee maker because it allows easy access to the water tank, which is required for the brewing process. To ensure that your coffee maker continues to function properly, keep the water tank clean and well-maintained.
2. Water Tank Handle
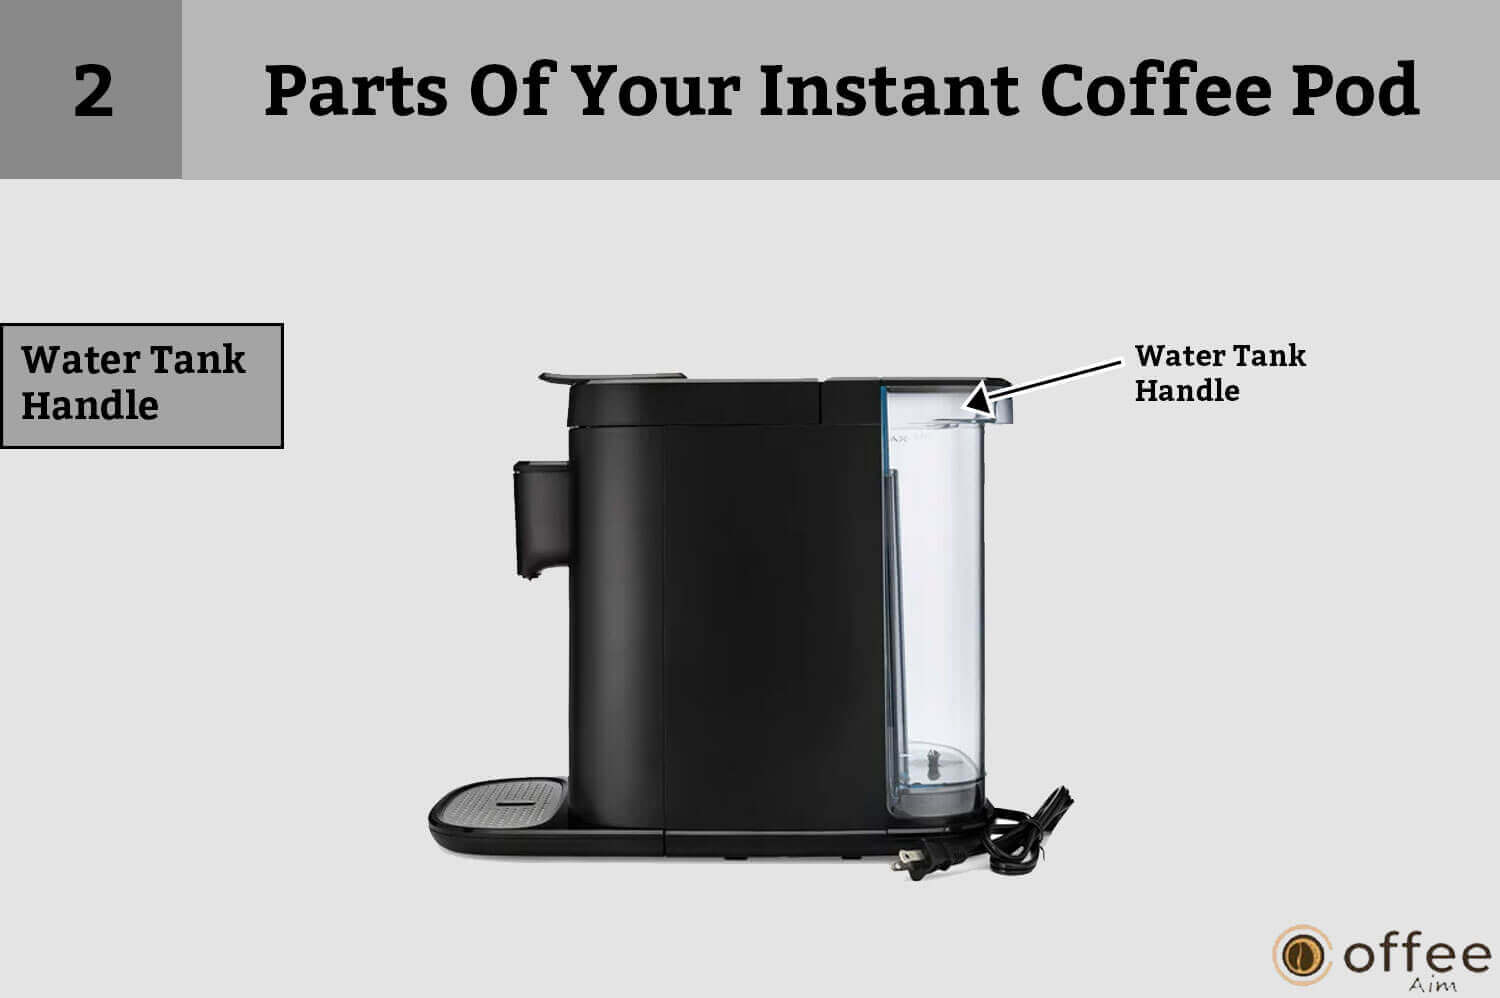
The water tank handle on the Instant Pod coffee maker is located at the top of the water tank. It is a strong and well-designed handle with a comfortable and secure grip. Because the handle is located in the center of the water tank, it is simple to lift and pour water into the tank. This feature allows the water tank to be easily refilled without spilling or making a mess. The handle is an important part of the Instant Pod coffee maker because it allows you to transport and refill the water tank in a safe and convenient manner. You can ensure a smooth, stress-free, and mess-free coffee-making experience by using the handle.
3. Handle

The Instant coffee maker’s handle is an important part, providing a comfortable and secure grip for easy movement of the coffee maker. Whether you’re filling the water tank or transporting the coffee maker, the handle makes it simple and easy. The ergonomic design of the handle was created with the user in mind, ensuring a comfortable grip and reducing strain on your hand.
4. Top Cover
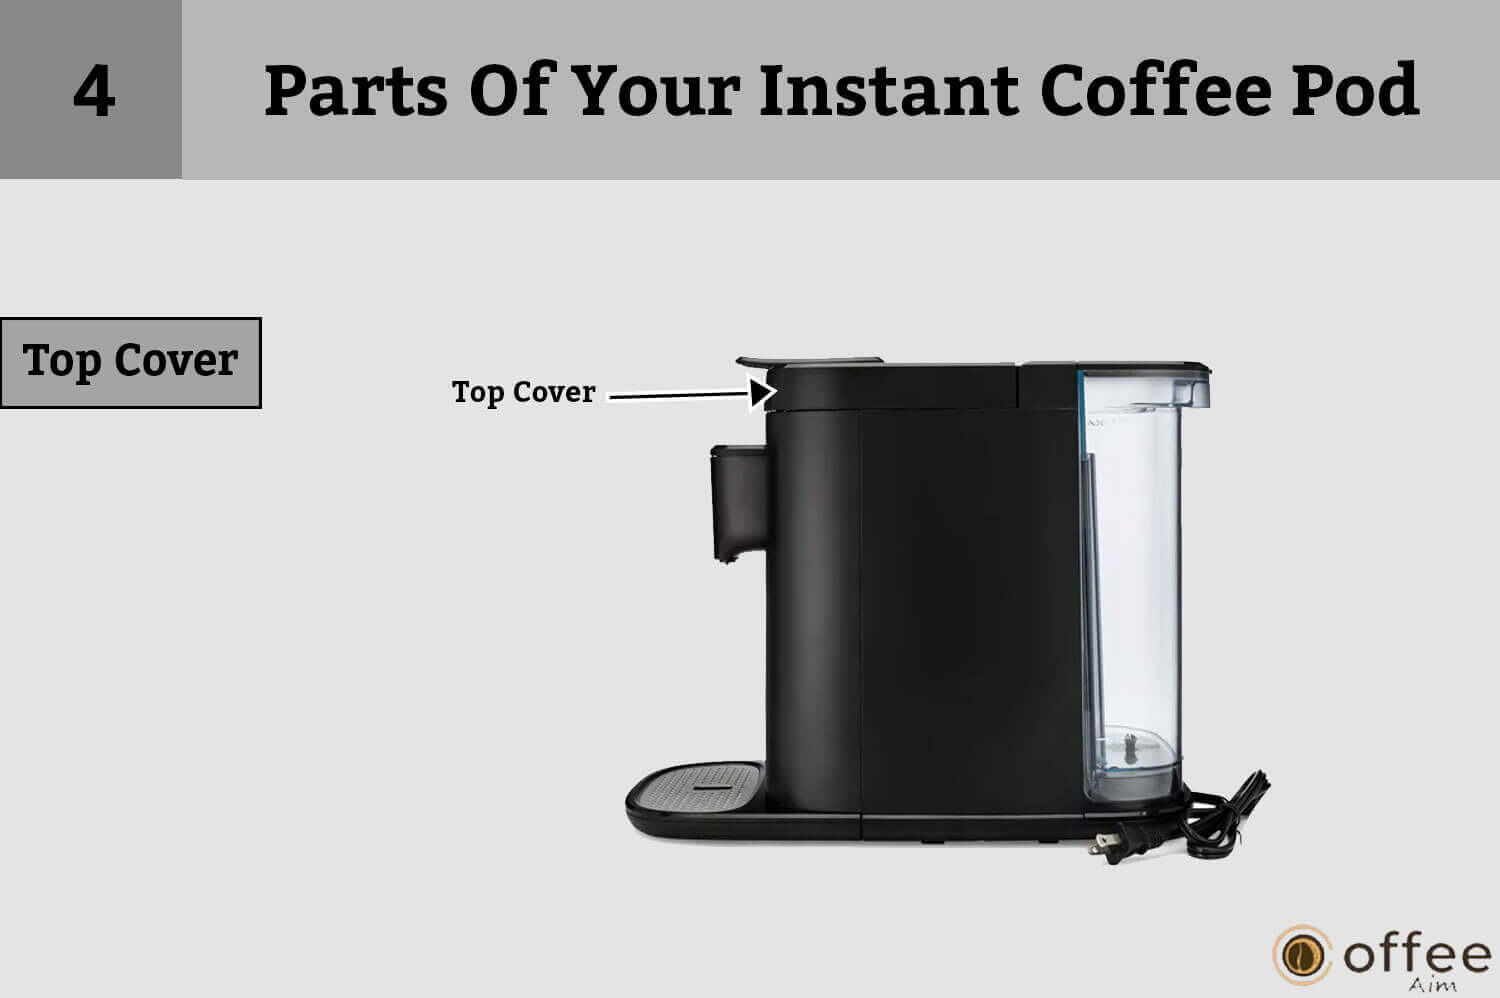
The top cover serves as the lid on the whole coffee maker.
5. Removable Water Tank

The Instant coffee maker’s removable water tank is a game changer, providing a convenient and hassle-free way to refill the water supply. The water tank is easily removable and refillable, allowing you to quickly resume brewing your favorite coffee.
6. Power Cable
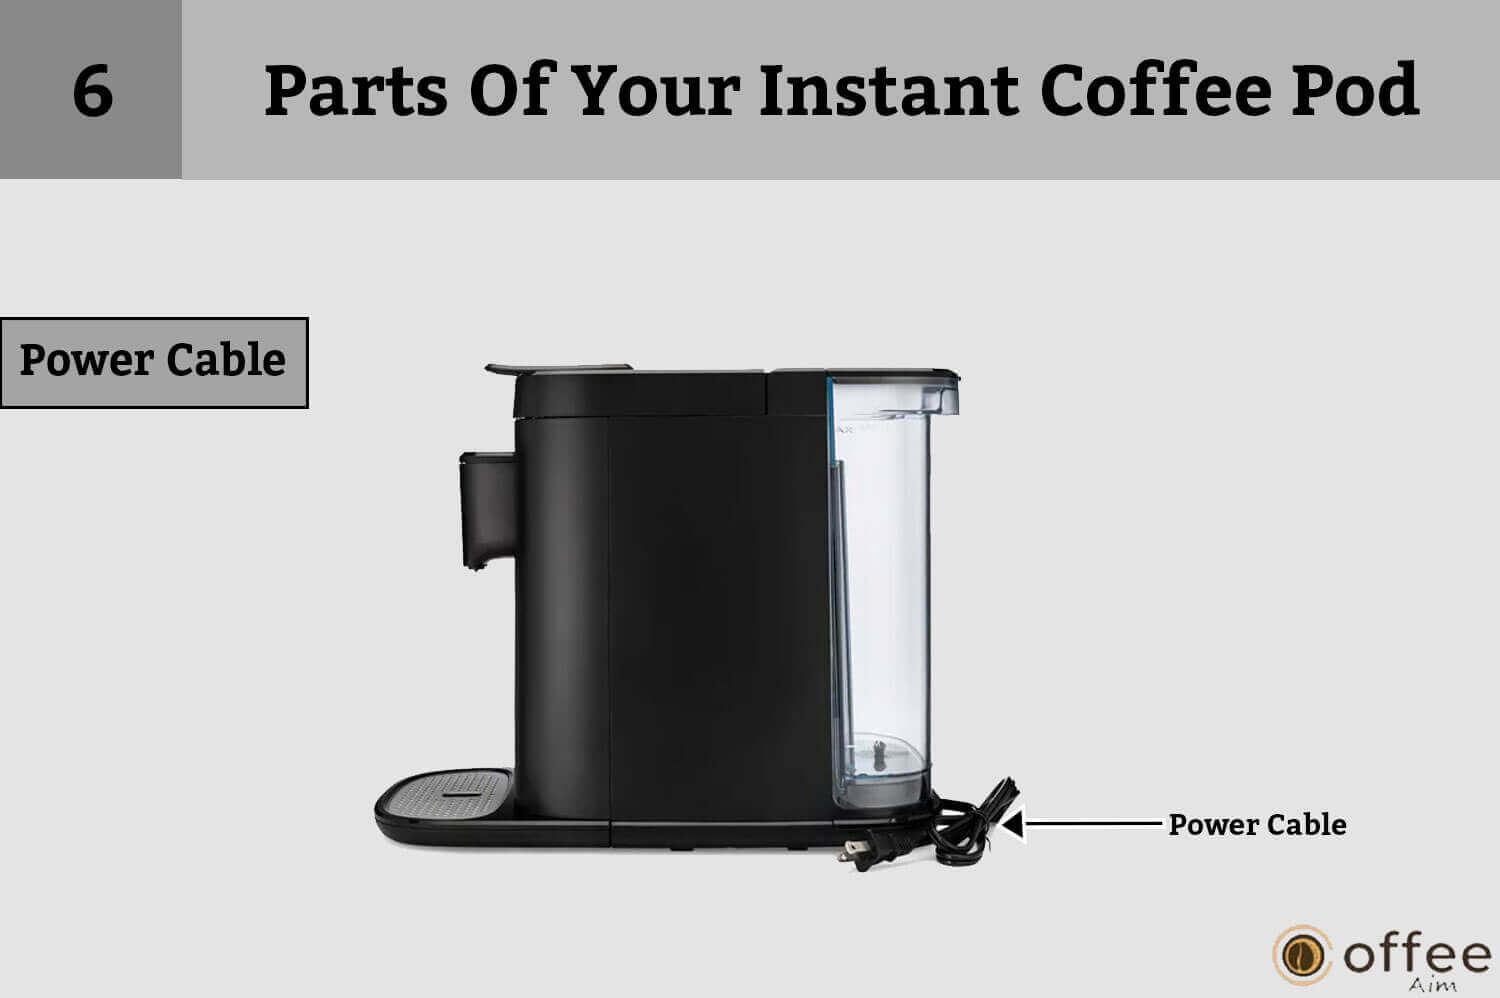
The power cable is an important component that helps to transfer the power required from the power outlet to brew your coffee. The cable is long enough to reach an outlet from anywhere in your kitchen, allowing you to place the coffee maker wherever it is most convenient for you. The cable is also made of high-quality materials, ensuring its durability and safety.
7. LED Control Panel
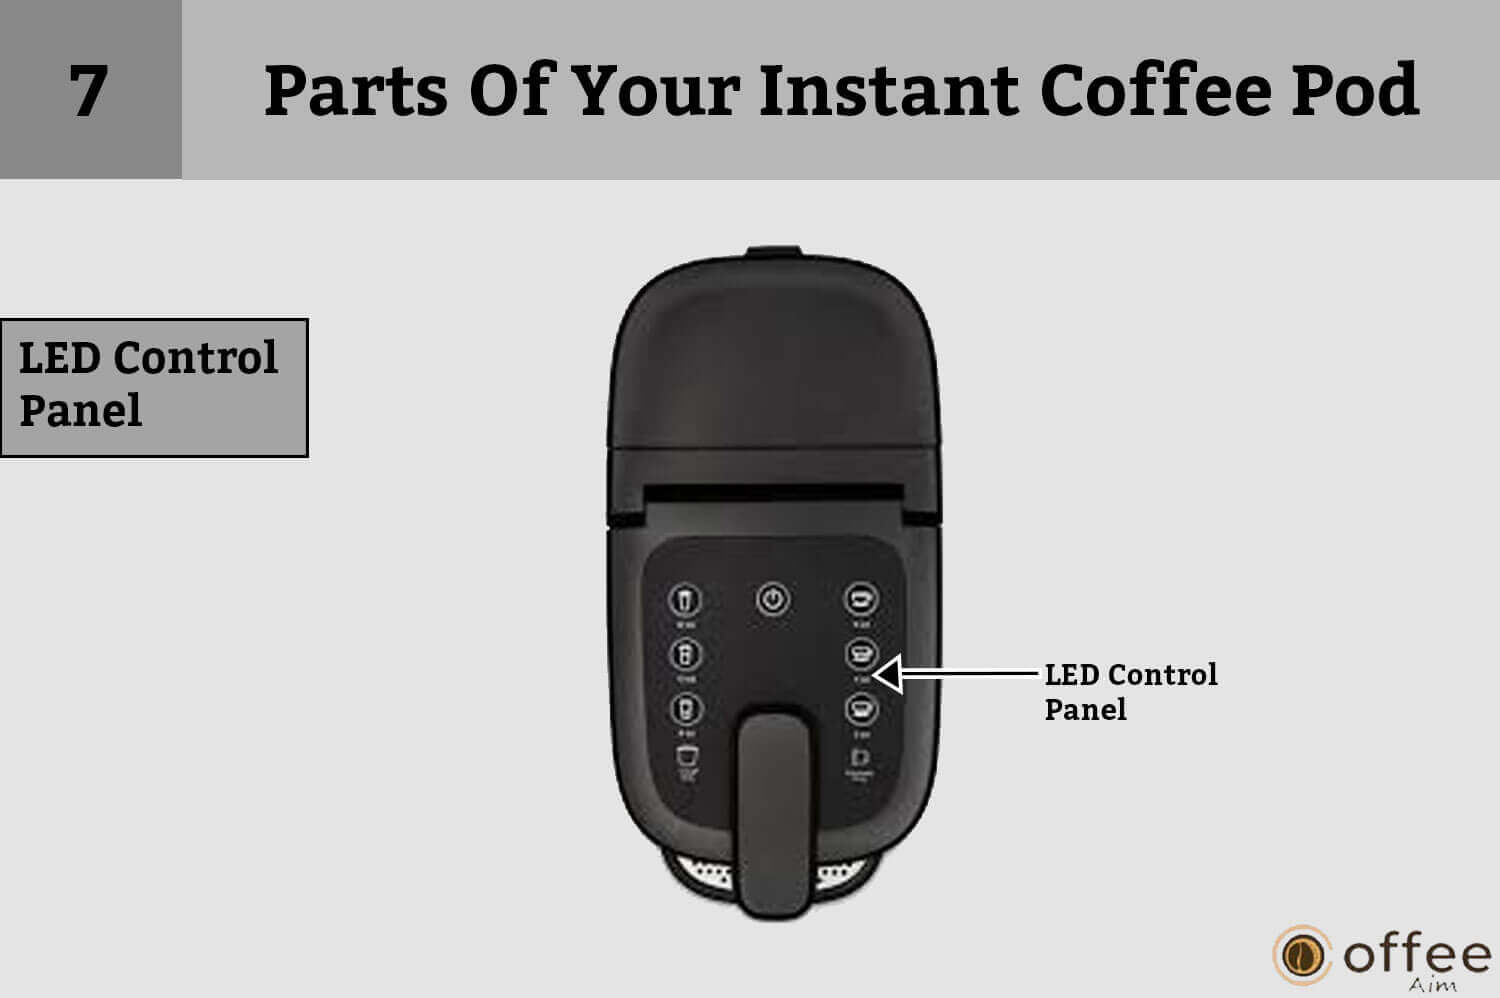
On the top of the Instant multi-function coffee maker there are different buttons such as brew size buttons (2oz, 4oz, 6oz, 8oz, 10oz, and 12oz), power button, coffee pod only, espresso-only, and Bold button. The control panel’s buttons allow users to change settings such as brew strength and cup size.
Overall, the LED control panel offers a modern and user-friendly interface for controlling the various functions and features of a multi-function Instant coffee maker.
8. Removable Drip Tray
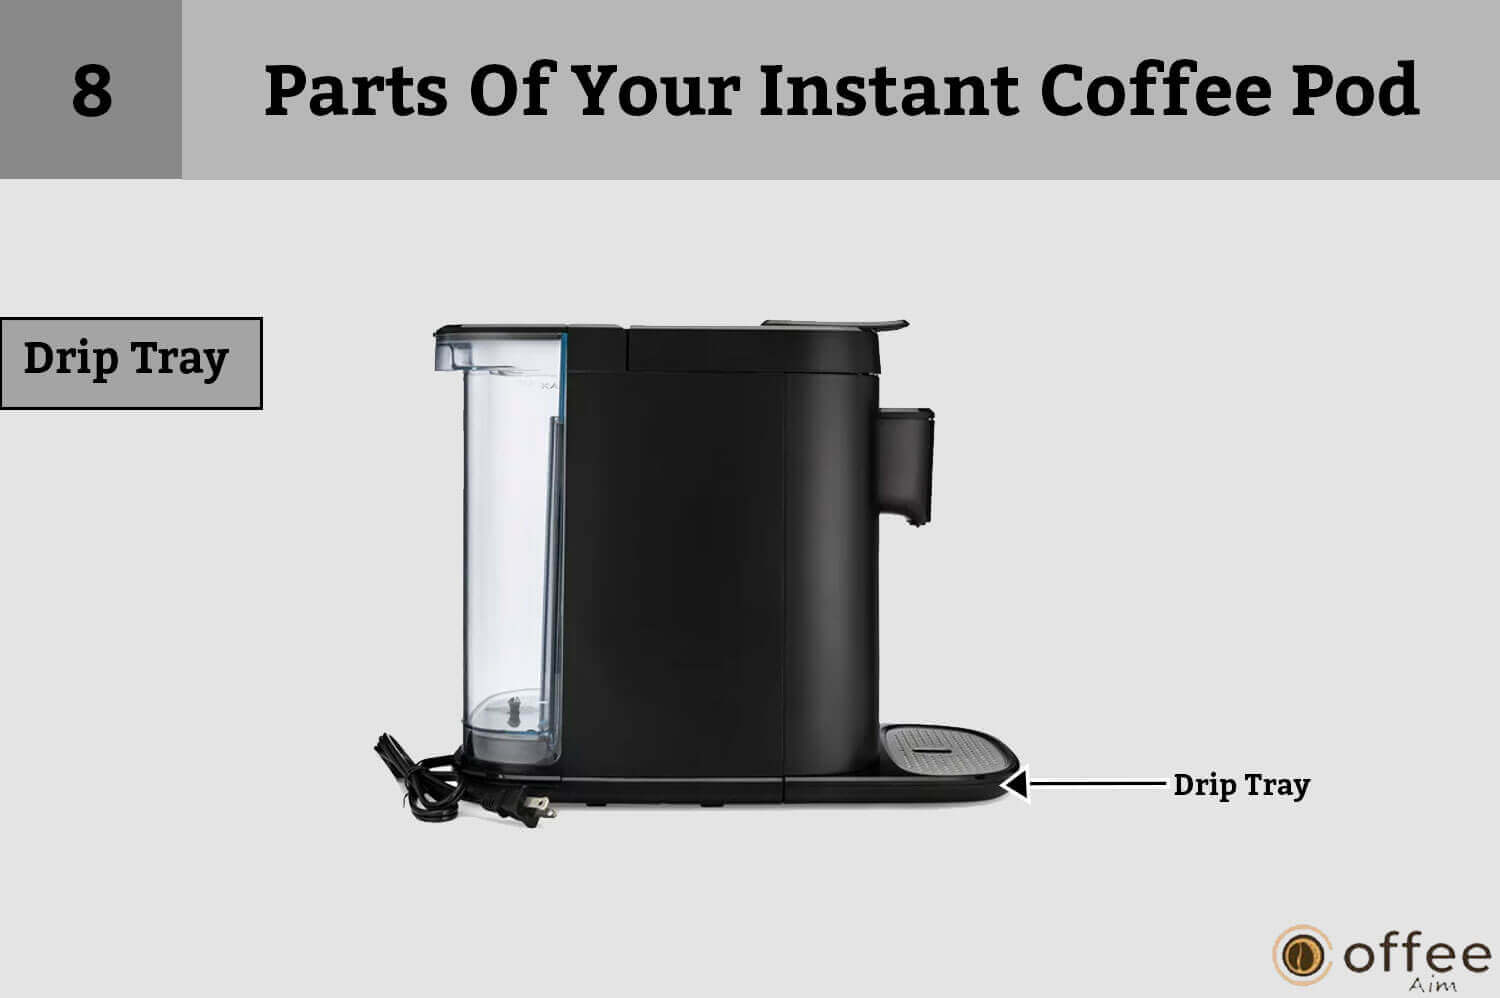
The removable drip tray is a smart and practical feature that makes cleanup a breeze. The tray collects any drips or spills from the brew spout, keeping your countertop clean and tidy. The tray is easily removable and cleanable, ensuring that the coffee maker is always in good working order. The removable drip tray is a thoughtful design element that makes your coffee maker an easy-to-use.
9. Drip Tray Plate

A drip tray plate is an important component that keeps your countertop clean and free of coffee spills. The tray is placed beneath the brew spout to catch any drips or spills, making it simple to keep the workspace clean and tidy. The drip tray plate is also removable, making cleaning and maintenance a breeze. The drip tray plate, which has a nonstick surface, is easy to clean and keeps the coffee maker looking brand new.
10. Reusable Coffee Pod
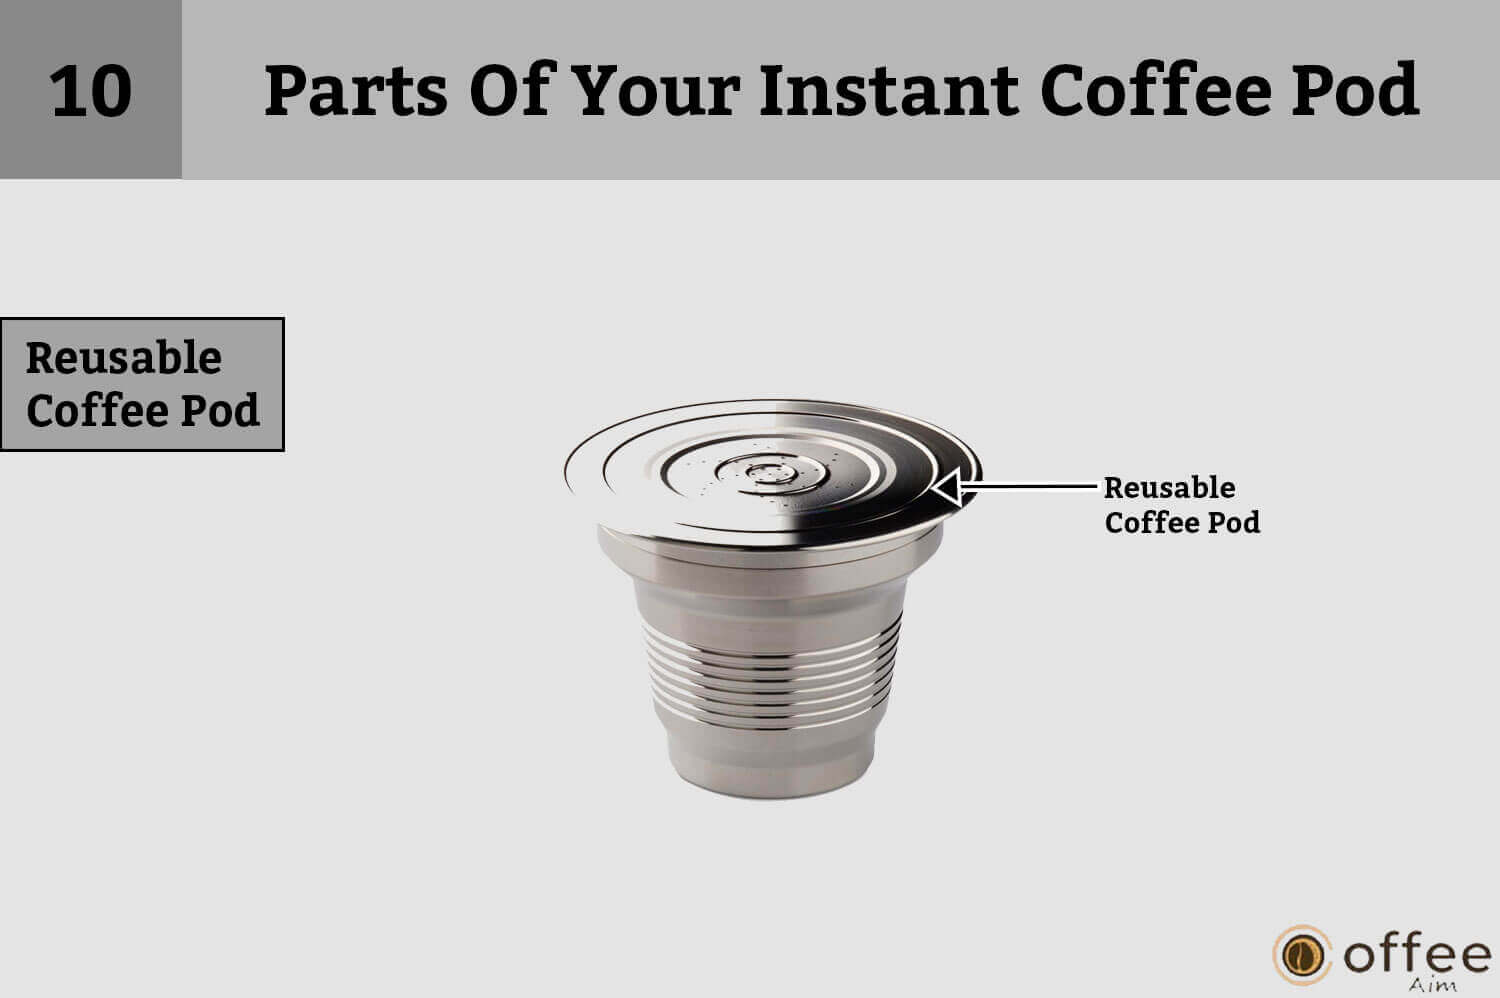
The Instant Pod coffee maker’s reusable coffee pod is a unique and eco-friendly feature that distinguishes it from other coffee makers. When compared to single-use pods, the pod allows you to use your own coffee grounds, saving money and reducing waste. The reusable coffee pod is also simple to use; simply fill it with your preferred coffee grounds and place it in the coffee maker. The coffee pod is made to be long-lasting and durable, so you can enjoy your favorite coffee for many cups to come. Its sustainable feature makes it an excellent choice for coffee lovers who care about the environment.
11. Top Cover

The Instant coffee maker’s top cover is a sleek and stylish component that complements the coffee maker’s overall design. The cover is made of high-quality materials, ensuring its durability and longevity. The top cover protects the coffee maker’s internal components while also allowing easy access to the water tank and coffee Pod holder. The cover is also easily cleanable.
12. Brewing House
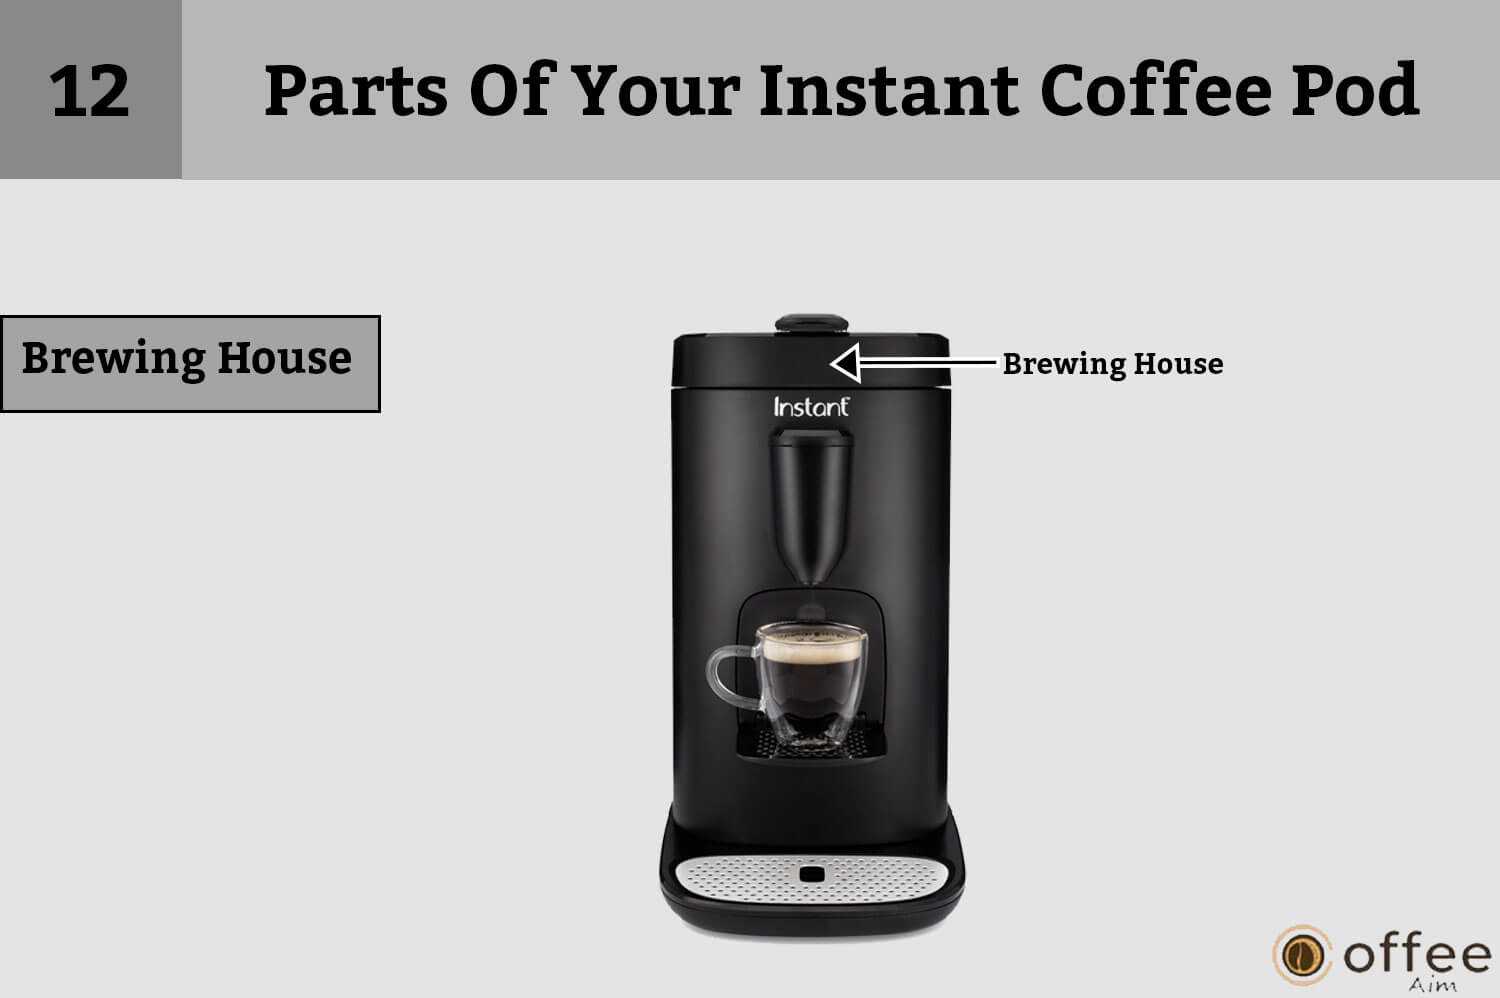
The instant pod coffee maker’s Brewing House is where the magic happens, and your coffee is brewed to perfection. It contains the following parts;
Coffee Pod Needle
The needle in the coffee pod punctures the coffee pod, allowing hot water to flow through and extract the delicious flavor.
Coffee Pod Holder
The coffee Pod holder keeps the coffee pod securely in place, ensuring a consistent and efficient brewing process every time.
Coffee Pod Inlet
The coffee pod inlet is the place where you insert a reusable coffee pod to begin the brewing process quickly and easily.
Espresso Inlet
It is the place where you insert the espresso pod to brew delicious espresso for you.
The combination of the coffee pod and espresso inlets makes the DPCM-1100 a versatile and efficient coffee maker ideal for any coffee enthusiast.
Brew Spout
The brew spout is the dispensing outlet for freshly brewed coffee, allowing you to enjoy your coffee quickly and without a mess. The brew spout’s height and design are optimized for easy pouring into a cup, ensuring a smooth and effortless coffee-making experience.
13. Used Capsule Container
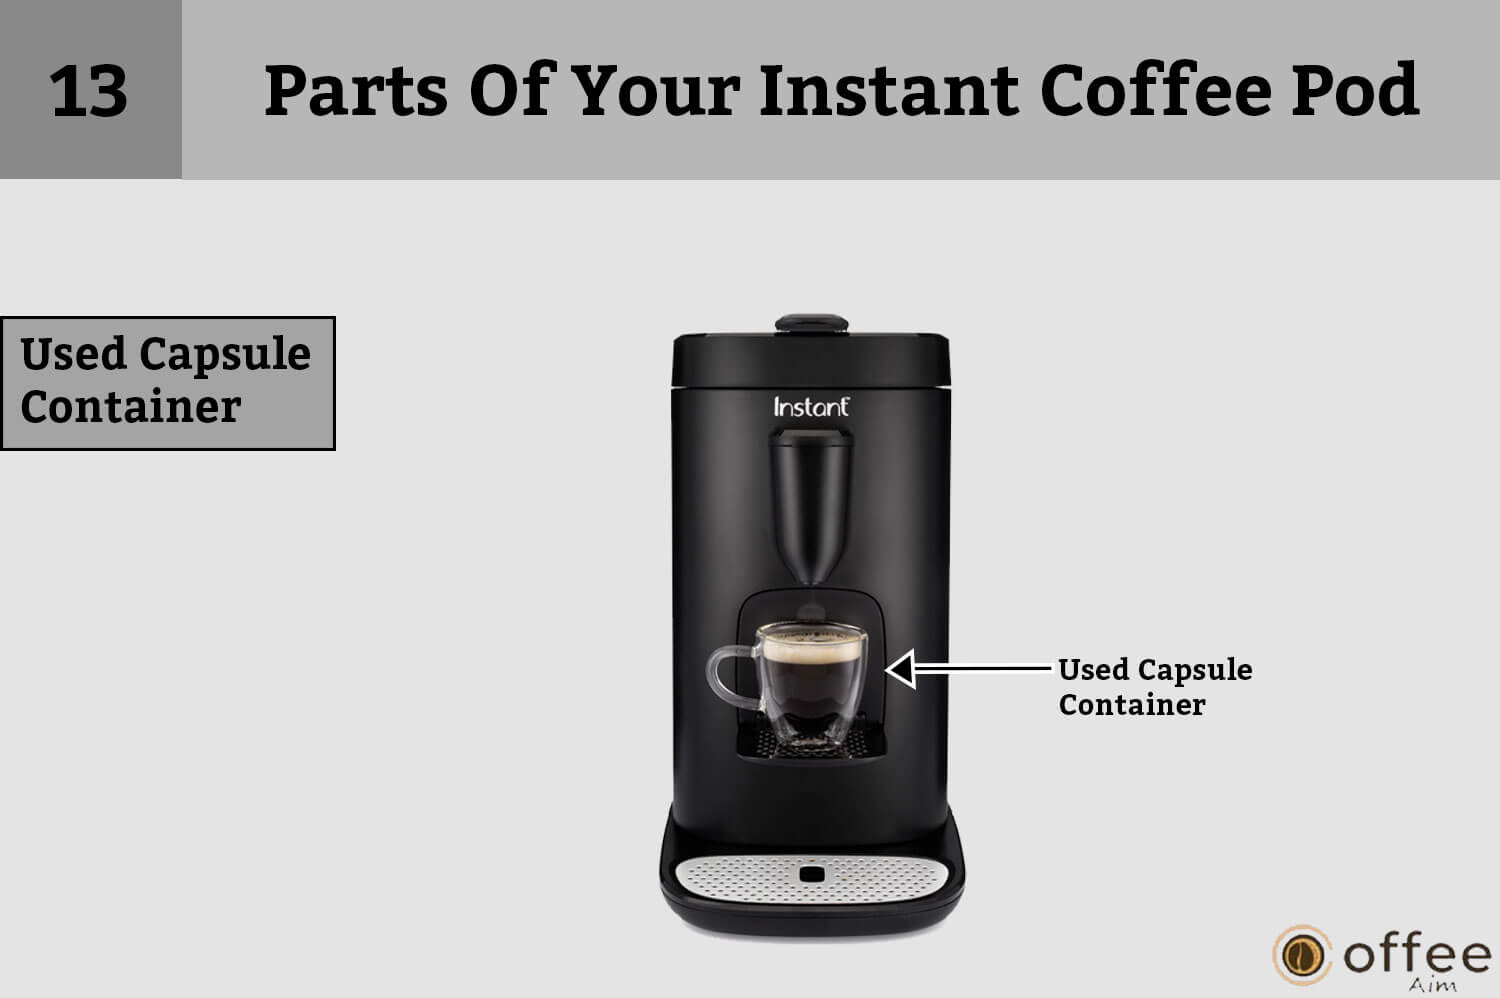
It is the container where the used capsule gets dumped. It has a certain capacity to store used capsules. Therefore, you have to empty it periodically.
Unleash Your Inner Barista: The Easy-To-Use Control Panel
The sleek and user-friendly control panel of the Instant coffee maker is sure to impress. You’ll be able to easily navigate through the various brewing options and customize your perfect cup of coffee thanks to its clear and intuitive display. The control panel allows you to modify the strength, temperature, and even the cup size to your liking, ensuring that every cup is exactly how you want it.
1. Power Button

Nothing beats the satisfaction of starting your day with a perfectly brewed cup of coffee, and the Instant Multi-function coffee maker makes it simple with its large power button. With a single press, you’ll be on your way to a delicious, piping-hot cup of coffee. Whether you keep it on your kitchen counter or in your office, the LED light on the power button will keep you informed, letting you know when your machine is heating up and ready to start brewing.
- The power button on the Instant Multi-function coffee maker is a prominent button that turns the machine on and off.
- This button is usually found near the top of the machine or on the front panel.
- The power button includes an LED light that indicates the machine’s status, such as when it is heating up or ready to brew.
2. Bold Button

If you enjoy a robust and full-bodied flavor in your coffee, bold coffee is the perfect choice for you. Bold coffee has a rich and intense flavor profile that is sure to wake up your taste buds and kickstart your day. It’s no surprise that many coffee connoisseurs prefer this roast due to its more pronounced bitterness and acidity, which adds a welcome depth to each sip. So, go ahead and indulge in a cup of bold coffee – it’s the ideal choice for anyone looking to elevate their coffee experience. So, press the Bold button when you want a robust cup of coffee.
Low Water Indicator
The last thing you want is to be caught off guard by low water in the water tank when you rely on your coffee maker to make that all-important morning brew. That’s where the low water indicator comes in, alerting you when the water in your coffee maker is running low. This feature ensures that your machine is always ready to brew your favorite cup of coffee without fail. When the indicator light illuminates, you know it’s time to refill the water tank.
4. Coffee Pod Serving
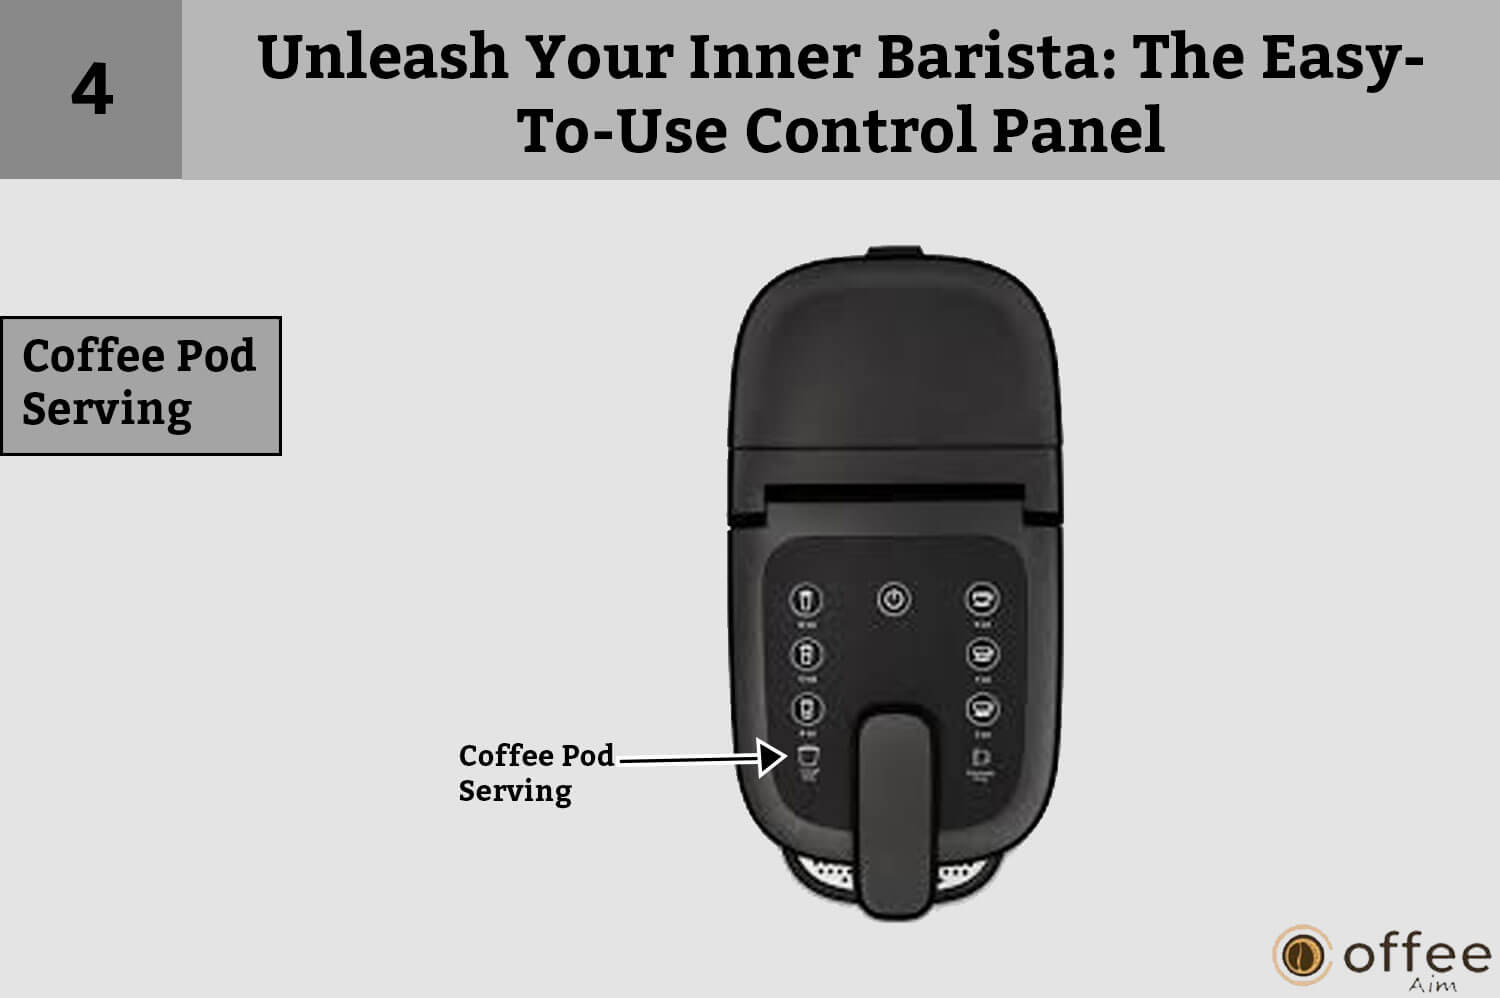
Consider making a tasty cup of coffee without worrying about measuring and grinding coffee beans. That is exactly what the coffee pod serving feature provides. Simply fill the reusable coffee pod with your ground coffee, press your desired coffee size and you’re ready to go! There are three different coffee pod servings that are 8oz, 10oz, and 12oz.
Cleaning Indicator
I all know how important it is to keep our coffee makers in good working order, but it can be difficult to remember when it’s time to clean them. That’s where the cleaning indicator feature comes in, notifying you when it’s time to run a cleaning cycle to ensure peak performance. Mineral buildup in the machine’s internal components can occur over time, affecting the quality of your brewed coffee. However, with the cleaning indicator light, you’ll never forget to clean your coffee maker again.
6. Espresso Serving

For many coffee enthusiasts, espresso is the ultimate coffee experience. This intense and confined coffee shot is made by forcing hot water under high pressure through finely-ground coffee beans, resulting in a thick layer of crema on top. In the Instant Pod coffee maker, there are three different coffee serving sizes; 2oz, 4oz, and 6oz.
Instant Pod 2-in-1: Multifunction Coffee Maker
Make your coffee-making experience fun and love with the Instant Pod coffee maker! So, what are you holding out for? Begin exploring your Instant Pod Multi-Function Coffee Maker’s delicious brewing options!
Coffee Maker’s Simple Plug-In Process
Get Your Caffeine Fix in an Instant: With your Coffee Maker, you can enjoy the convenience of a barista-quality brew – simply plug it in and enjoy! The coffee Maker is designed for ease of use, beginning with the simple plug-in process.
- Make sure your Coffee Maker is securely placed on a dry, stable, and level surface before you begin brewing. This will ensure that your coffee maker produces the best results possible.
- Once plugged in, the power button, located above the Bold button, is the key to unlocking the full potential of your coffee maker. Simply press it to enter the Function Selection mode, where you can tailor your cup of coffee to your exact preferences.
How To Turn Off Instant Pod Coffee Maker?
You’ll be able to effortlessly navigate through the brewing process and enjoy a perfectly brewed cup of coffee in no time with the LED control panel guiding the way. If you need to take a break, simply press the power button to turn the coffee maker off.
Instant Pod Energy Saving Mode
To save energy, your Instant Pod Coffee Maker has an energy-saving standby mode that activates after 30 minutes of inactivity. The LED control panel will turn off completely after 2 hours of inactivity, so you don’t have to worry about wasting energy.
Customizable Sound Settings Will Transform Your Coffee-Making Experience
Do you prefer the calm ambiance of a café or the bustle of a busy coffee shop? You can have the best of both worlds with the Coffee Maker. You can turn on or off button-pressing sounds and reminder beeps using its customizable sound settings, creating the ideal environment for your coffee-making experience.
The sound settings are simple to configure. Simply follow the steps below. Here’s how it’s done:
1. Turn on your coffee maker

2. Now, keep on pressing the 4 oz and 6 oz (espresso buttons) for 3 seconds at the same time.

3. Both the buttons will blink twice which indicates that you’ve arrived.

To enable the button-pressing sounds, repeat the preceding steps, and the 4 oz and 6 oz buttons will blink three times to confirm that the sound settings have been activated.
You have complete control over your coffee-making experience with your Coffee Maker. So, whether you prefer the peace and quiet of a tranquil café or the bustle of a bustling coffee shop, you can create the ideal environment for your perfect cup of coffee.
With Altitude Mode, You Can Enjoy The Full Flavor Of Your Coffee Regardless Of Altitude
If you live or travel at higher altitudes, brewing the perfect cup of coffee can be difficult. However, the Coffee Maker allows you to say goodbye to flat, tasteless coffee and hello to a perfectly brewed cup every time. All because of its Altitude Mode!
It is simple and straightforward to enable Altitude Mode. Simply follow these easy steps:
1. Start your coffee maker

2. Keep on pressing the 8 oz and 10 oz buttons for three seconds at the same time.

3. These two buttons will blink three times indicating that Altitude Mode is active.

Your coffee maker’s brewing parameters are adjusted by Altitude Mode to ensure that your coffee is always full of flavor, no matter where you are. So, if you live at a high altitude, don’t be afraid to use this feature to take your coffee-making experience to new heights.
With The Coffee Maker, Turn Off Altitude Mode And Enjoy A Perfect Cup Of Coffee Anywhere
Do you prefer brewing coffee at lower elevations? The Coffee Maker is here to help! You can disable Altitude Mode and brew your coffee to perfection regardless of your location by following a few simple steps.
Here’s how to go about it:
1. Start your coffee maker.
2. Hold the 8 oz and 10 oz buttons together for 3 seconds.
3. Wait for the 8 oz and 10 oz buttons to blink twice to indicate that Altitude Mode has been deactivated.
When you turn off Altitude Mode, your coffee maker returns to its standard brewing parameters, resulting in a perfectly brewed cup every time. So, whether you like your coffee brewed at sea level or high in the mountains, the Coffee Maker has you covered!
Low Water Level
Don’t let a low water tank ruin your coffee break! To keep you on track, your trusted coffee maker has a low water alert system. If the water tank runs low while brewing, the Water LED on the control panel will flash brightly, indicating that it is time to refill. Don’t worry! Your brewing cycle will continue uninterrupted.
If the water tank runs completely dry, the Water LED and Power button will flash like a beacon, reminding you to refill before brewing another delicious cup. Stay ahead of the game by refilling before you run out, ensuring a consistent and uninterrupted coffee experience!
Adding Water
Prepare for a sip of pure coffee bliss in just a few simple steps! It’s never been easier to refill your coffee maker’s water tank:
Here are the five steps to filling a coffee maker with water:
- Choose whether to remove the water tank from the coffee maker.
- Fill the water tank with clean, cold water, but don’t overfill it.
- Replace the water tank if it was removed from the coffee maker. Close the lid securely if it has one.
- Check that the water tank is properly filled and in place before brewing your next cup of coffee.
- Do not use the coffee maker if the water tank is empty, as this can cause damage to the machine.
Remember that a full tank is essential for successful brewing. Don’t even consider using your coffee maker without water in the tank. Follow these simple steps for a consistent coffee experience.
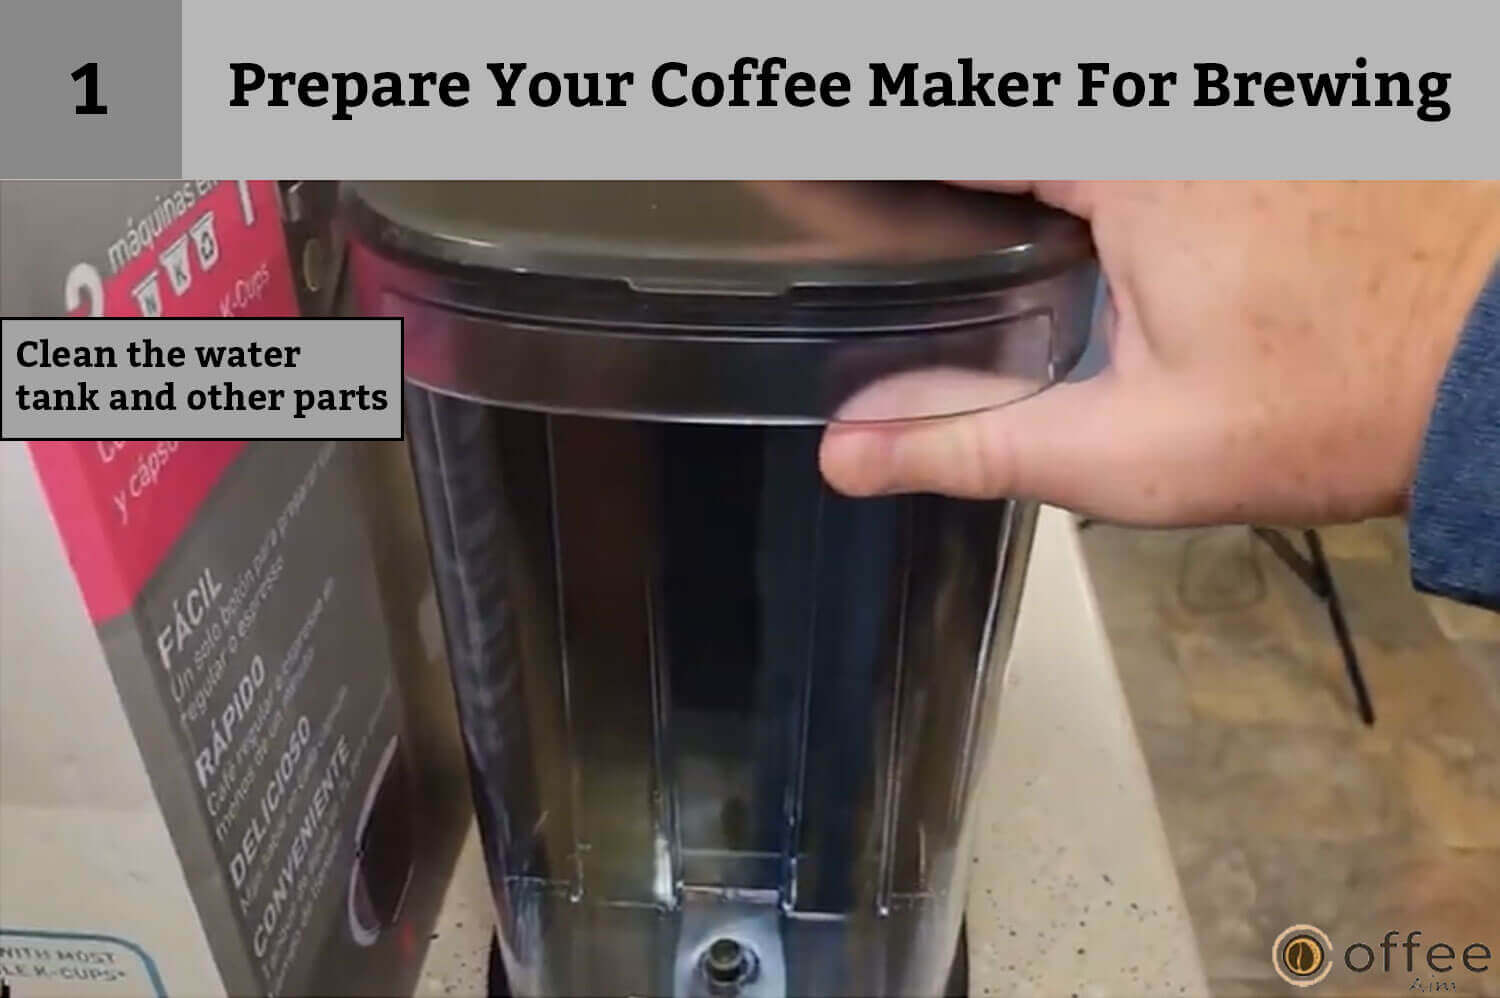
Prepare Your Coffee Maker For Brewing
Prepare to enjoy a tasty cup of coffee with your Instant Multi-function coffee maker! Follow these simple steps before you begin brewing to ensure a smooth and effortless experience.
Preparations:
Step 1: Clean it up! – Use warm water and dish soap to clean the water tank and reusable coffee pod, then rinse with clear water. Remove the foam cushion from beneath the water tank and use a clean, dry cloth to wipe down the water tank, accessories, coffee maker base, and control panel.
Step 2: Fill it with stuff! – Fill the water tank to the MAX fill line with cold water. Replace the lid and the water tank on the coffee maker.

Before You Brew
With the Instant Multi-function coffee maker, you can enjoy a hassle-free coffee experience: Excitedly unbox your coffee maker and all of its accessories!
Initial Set Up
Here are the five steps to assembling an Instant Multi-function Coffee Maker:
- Remove the Instant Multi-function Coffee Maker and all accessories from the box with care.
- Remove all packaging materials from the Instant Multi-function coffee maker and its surroundings.
- Put the Multi-function coffee maker on a dry, stable, and level surface.
- Check that the water tank is securely attached to the coffee maker base.
- Connect the Instant Multi-function Coffee Maker to an electrical outlet.
You’ll be well on your way to coffee heaven in no time if you follow these simple steps! So, what are you holding out for? Begin your coffee journey right now.
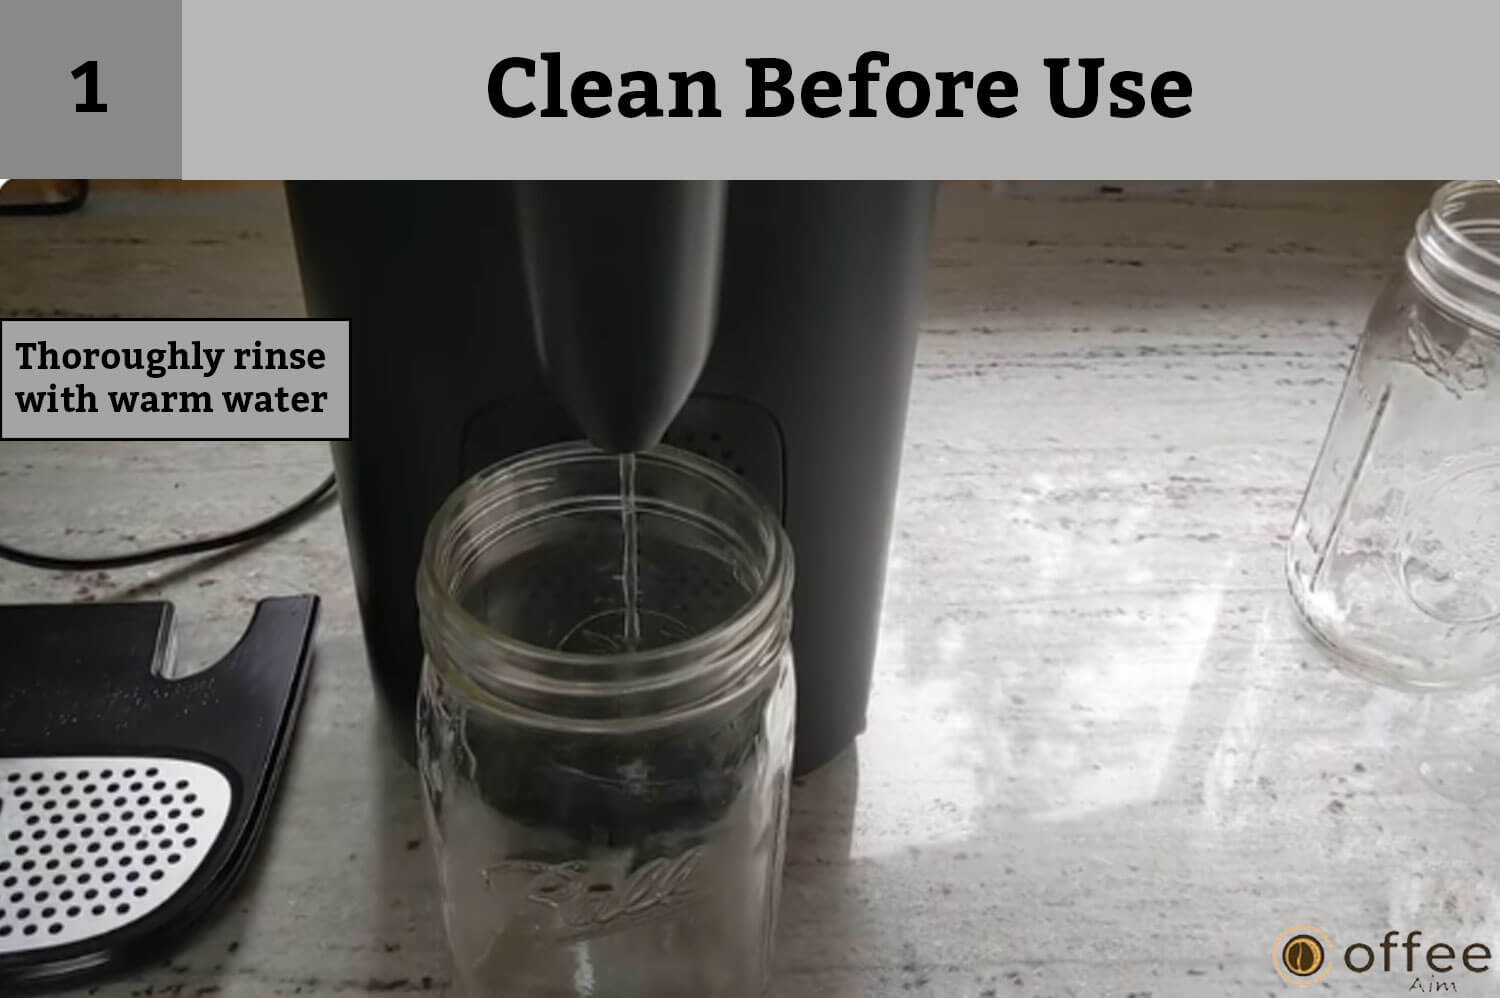
Clean Before Use
A fresh cup of coffee in the morning is a great way to start the day productively and energetically. However, before brewing your first cup, ensure that your coffee maker is clean and ready to use. Following these six easy steps will keep your coffee maker clean and operational.
1. Warm water and dish soap are used to clean the water tank and reusable coffee pod. Thoroughly rinse with warm water.
2. Remove any foam cushions or stickers from underneath the water tank.

3. Replace the water tank on the base, ensuring that it is securely pressed down.

- To remove any excess water or residue, wipe the water tank and other accessories with a clean, dry cloth.
- Wipe down the coffee maker base and control panel with a damp cloth to remove any dust or debris.
- Allow the coffee maker and its accessories to completely dry before using.
With these simple steps, you’ll have your coffee maker ready to brew like a pro. So, get ready for a consistent coffee experience!
Beginning Your Coffee Adventure: The Importance of Initial Cleaning Before Enjoying Your First Cup!
To ensure that your first cup of coffee tastes as good as possible, thoroughly clean your coffee maker before using it. A well-maintained coffee maker not only ensures the best possible taste but also contributes to the machine’s longevity. Cleaning and maintaining your coffee maker properly will keep it running smoothly and producing high-quality coffee. So, to ensure that you always get the best cup of coffee, take the time to clean and maintain your coffee maker on a regular basis.
Here’s how to do it in a few simple steps:
1. Fill the water tank with cold water all the way to the MAX fill line.

2. Replace the water tank in the coffee maker and replace the lid.

3. Close the brewing lid and place a large mug on the drip tray beneath the brew spout.

4. Press the 8oz button, and the key will start flashing as the water is heating up.

5. The coffee maker will start brewing once the 8oz button is illuminated

6. The hot water will start dispensing

- When the brewing cycle is finished, remove the water from the mug.
- You can stop the process anytime by pressing the 8oz button.
- Repeat the process with the 10 oz button.
- After each brewing cycle, remember to discard the water in the mug.
- Your Instant Multi-function coffee maker is now clean and ready to make your favorite cup of coffee.
- To avoid personal injury or property damage, avoid touching the brewing housing unit and spout during the brewing process.
NOTE: The brewing housing unit and spout can reach high temperatures during the brewing process. Avoid touching these areas during the brewing process for your own safety, as it may result in personal injury and/or property damage.
Welcome To The Art Of Brewing
Coffee brewing is more than just a morning ritual; it’s an art form. Every cup is a blank canvas waiting to be filled with a variety of flavors, aromas, and textures. The brewing process is a journey of experimentation, discovery, and refinement from the moment you select the beans to the final pour. Each step, from grinding the beans to selecting the best brewing method, influences the final flavor of your coffee. Brewing is more than just making a great cup of coffee; it’s about the experience of creating something special and unique each time. So come along on this adventure and discover the limitless possibilities of brewing art.
Here are the 7 steps to making coffee with a coffee maker:
- Fill the water tank up to the MAX FILL line.
Note: Don’t brew when the water in the water tank is below Min Fill level or empty.
- Now, fill the reusable pod with 2 spoons of medium or medium-fine ground coffee.
- It’s time to lift the latch towards the brewing unit.
- Now, insert your desired coffee pod into its appropriate inlet.
- Place a large mug (10 oz or larger) beneath the brew spout and onto the drip tray.
- To make a stronger cup of coffee, press the Bold button before selecting the desired serving size.
- Now, press the appropriate button you want to brew for either coffee pods (8oz, 10oz, 12oz) or espresso capsules (2oz, 4oz, 6oz). While the water heats up and the brewing process begins, the selected button will flash. By pressing the selected cup size button again, you can pause the brewing cycle at any time.
- The selected button will flash and remain illuminated once the brewing process begins. The brew spout will begin to pour hot coffee.
- Remove your cup of coffee once the brewing cycle is complete and the coffee no longer drips from the spout.
- You can start brewing your favorite coffee blends now that your coffee maker is clean and ready to use! Enjoy!
Note: Don’t touch the brewing unit and coffee spout while brewing as the temperature reaches too high during the process.
Brew To Perfection
To ensure a fresh and flavorful cup every time, begin by cleaning the machine and accessories. With the reusable pod, you can use K-Cups, espresso capsules, or even your own favorite coffee grounds with this coffee maker.
But wait, if you live at a higher elevation, don’t forget to follow the Altitude Mode. This allows the water to extract more flavor from your chosen coffee pod or espresso capsule, ensuring that your coffee maker works at its best and brews a more flavorful cup of coffee.
Keep Your Coffee Maker In Good Condition
To ensure a delicious cup of coffee every time and to extend the life of your Instant coffee maker, clean it and its accessories on a regular basis. Before cleaning, unplug the coffee maker and allow it to cool to room temperature. Avoid using abrasive cleaning products such as metal scouring pads or abrasive powders. After cleaning and drying all parts, store the coffee maker and accessories in a secure location. This guide will assist you in keeping your coffee maker in good working order for many years to come!
Here’s how to clean each component:
1. Water Tank
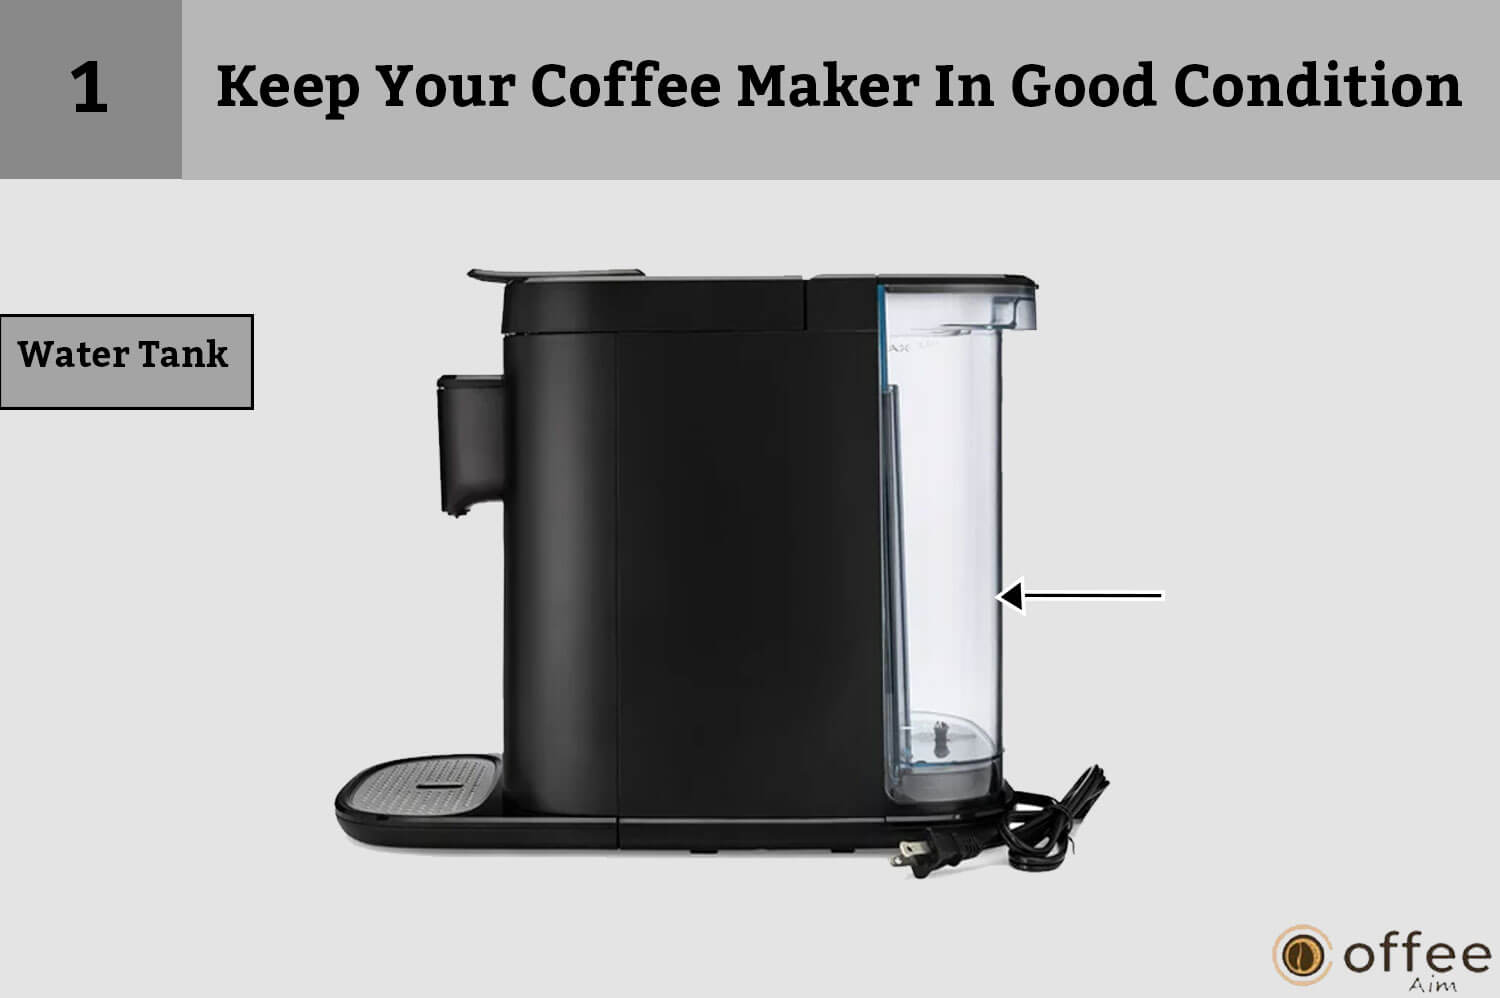
Remove the tank and hand-wash it in warm water with dish soap.
2. Coffee Pod Holder
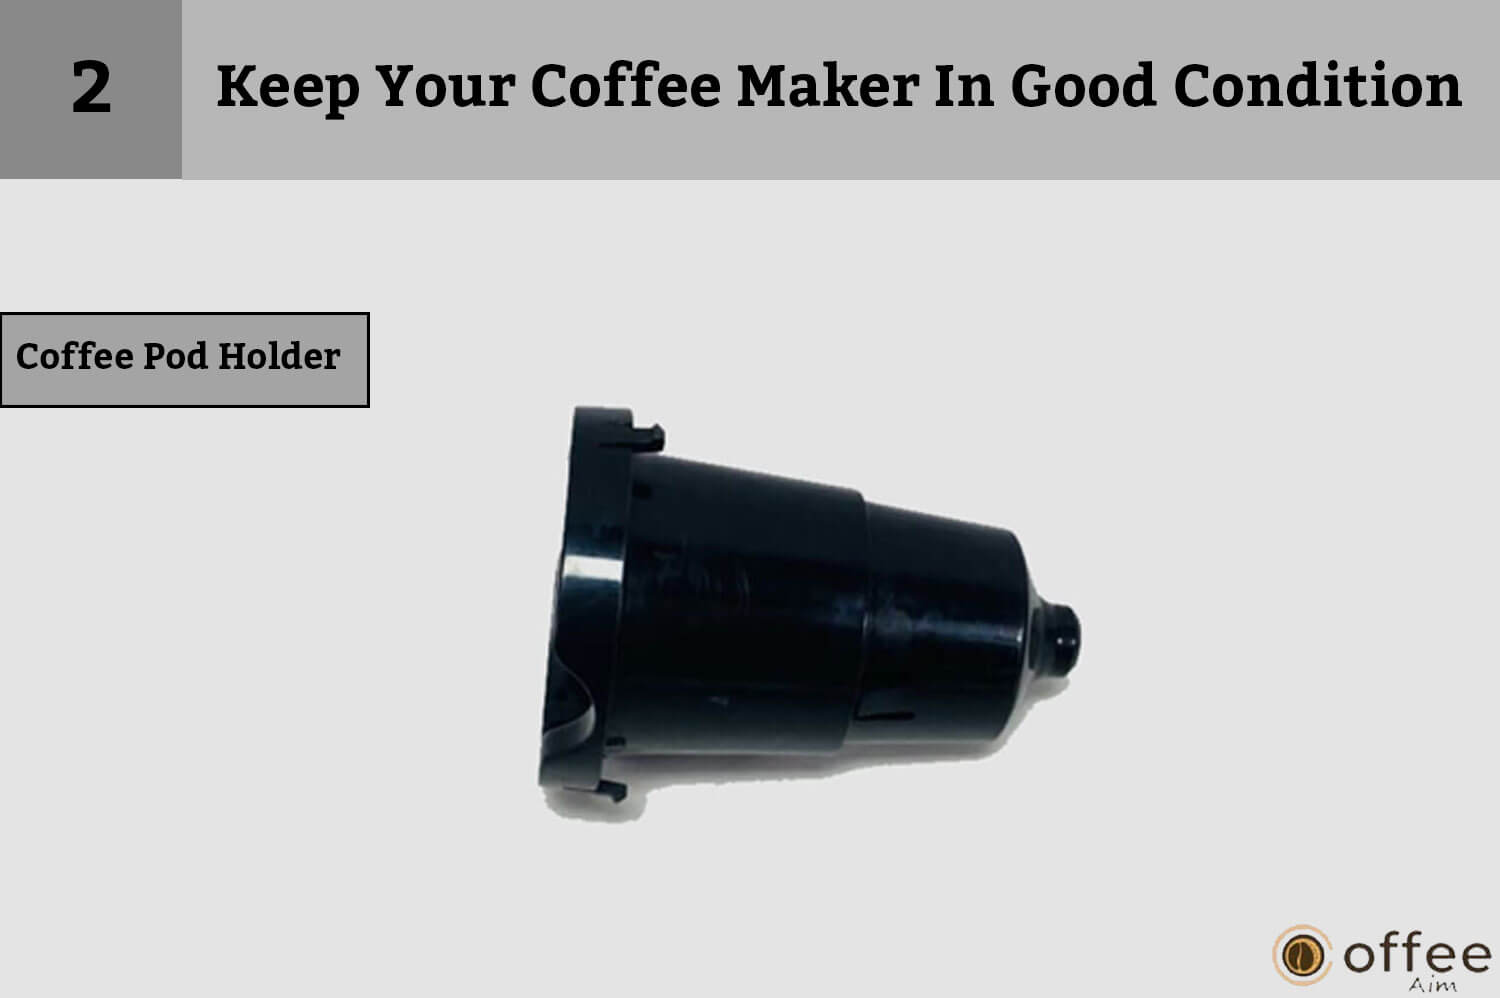
Remove it and hand-wash it in warm water with dish soap, or place it in the top rack of a dishwasher.
3. Drip Tray Made Of Stainless Steel
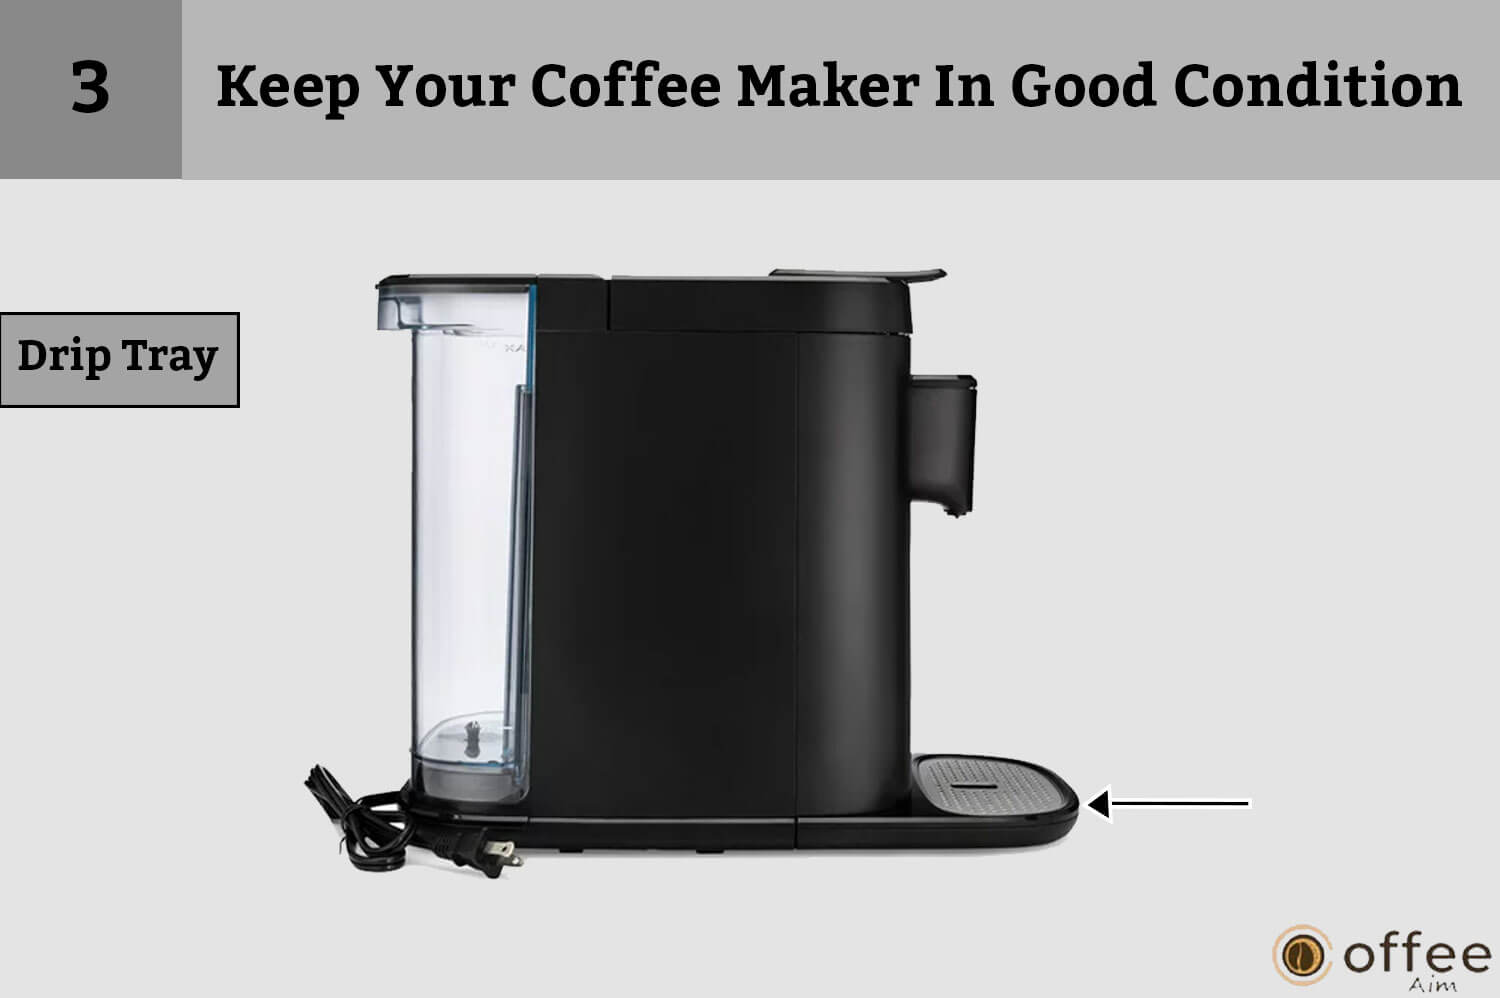
This can also be removed and washed by hand with dish soap and warm water or placed in the dishwasher’s top rack.
4. Coffee Maker And LED Display

Using a damp dishcloth, clean the outside of the coffee maker and the LED panel.
5. Power Supply
When storing, do not fold the power cord.
6. Container For Used Pods
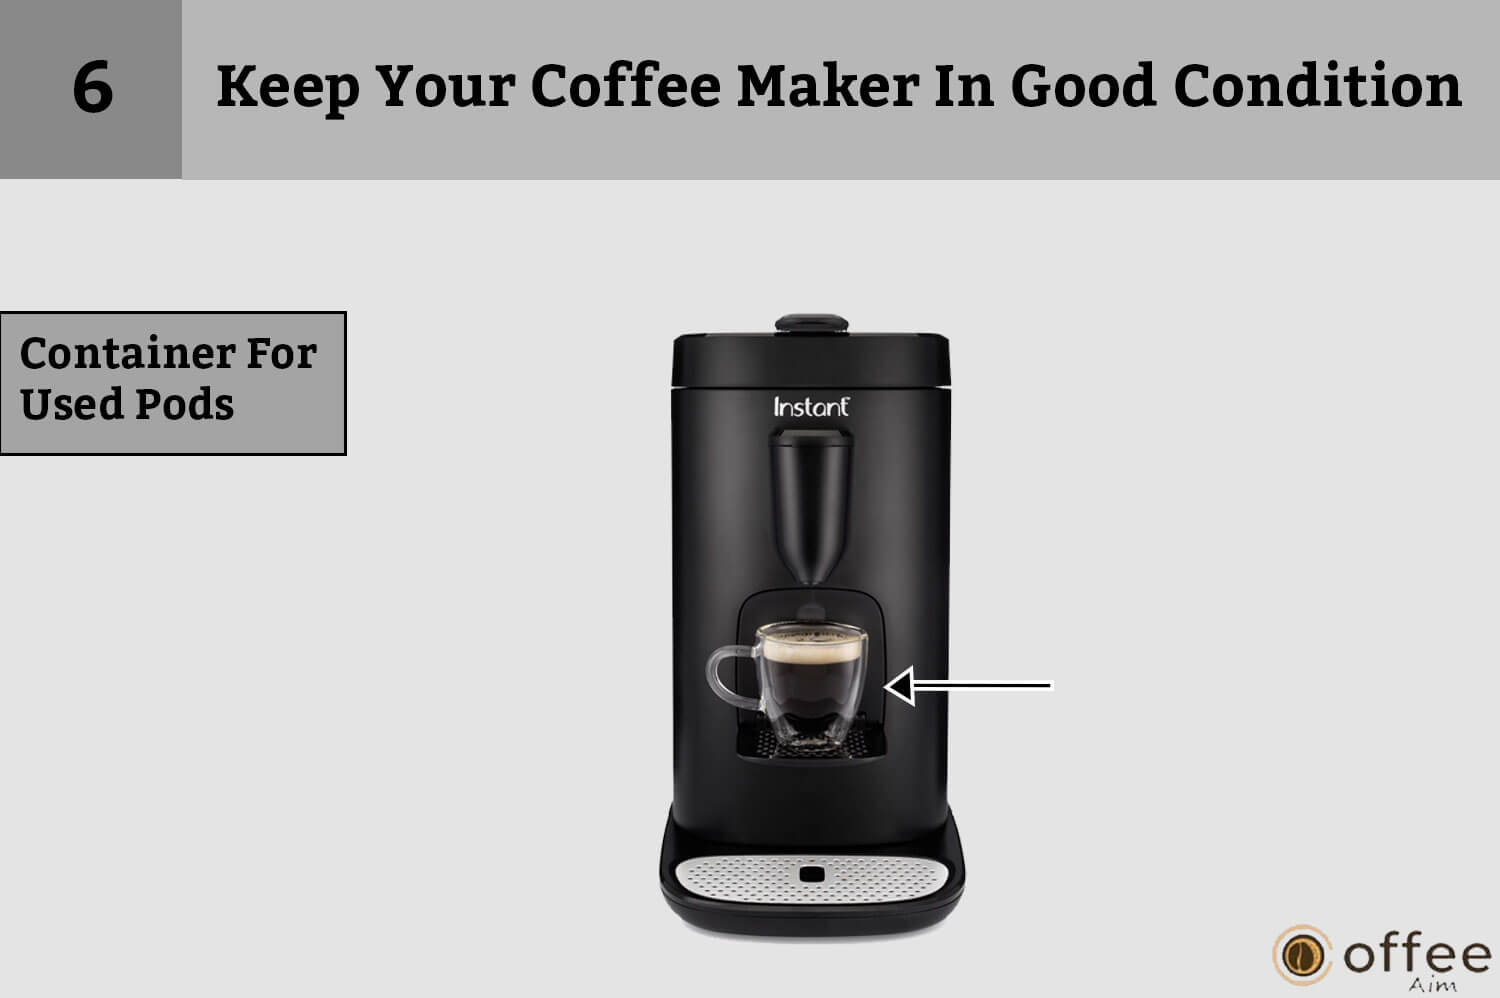
Fold down the cup support and pull back on it to open the container. Recycle the used pods and empty the container on a weekly or as-needed basis. Pods should not be left for more than 7 days. Hand-wash the container in warm soapy water and allow it to air dry before reusing it in the coffee maker.
Handle your Instant coffee maker with caution for your own safety. Please follow the following guidelines to avoid potential accidents:
- Hand washing is the only way to clean the coffee maker.
- Never submerge a coffee maker or power cord, or plug in water or other liquids.
- Do not submerge these parts in water.
You can ensure a safe and enjoyable experience with your coffee maker by following these instructions.
1. Descale Your Instant Pod 2-in-1-Multi-Function

To keep your coffee maker in good working order and brew the perfect cup every time, descale it and remove any mineral build-up on a regular basis. Mineral deposits can affect the temperature and strength of your coffee over time, so it’s critical to keep your coffee maker in good working order. The 10 oz and 12 oz keys will begin flashing after 300 cycles to remind you that it is time to clean and descale your coffee maker. This easy step will keep your coffee maker running smoothly for years to come!
Descaling Solution Ratio
| Cleaner | Cleaner-to-water ratio |
| Household descaler | 1:4 |
| Citric acid | 3:100 |
Instructions:
- Combine the cleaning solution and water in the proportions shown in the table.
- Ascertain that the reusable pod is securely attached to the brewing housing unit.
- Fill the water tank to the brim with the cleaning solution mixture.
- Place a large container beneath the drip nozzle to catch the liquid flow.
- For 3 seconds, press and hold the 10 oz and 12 oz keys. The cleaning solution will circulate through the coffee maker until the water tank is empty.
- Replace the used cleaning solution beneath the drip nozzle after discarding it from the container.
- Rinse the water tank and fill it to the top with fresh, cool, and clean water.
- Repeat the previous process by pressing and holding the 10 oz and 12 oz keys for 3 seconds, allowing fresh water to flow through the coffee maker until the tank is empty.
- Discard the coffee maker’s water, which has been thoroughly purged of any cleaning solution residue, resulting in pure and revitalizing hydration.
Note: To avoid any risk of injury or damage, make sure the container is large enough to hold the entire contents of the water tank (68oz / 2000 mL) during the descaling process. It is best to consult an authorized service representative for any other service needs. Have fun brewing!
Peace Of Mind With Warranty Services
To give you extra peace of mind, your Instant coffee maker comes with a limited warranty. For one year from the date of purchase, this warranty covers any defects in materials and workmanship under normal use.
1-Year Limited Warranty
The original appliance owner is the only party covered by this one (1) year limited warranty, which only applies to purchases made through Instant Brands Inc. (“Instant Brands”) authorized merchants. To be eligible for service under this Limited Warranty, you must present proof of the original purchase date and, if Instant Brands so, request the return of your appliance.
In the event that the appliance was utilized in accordance with the use and care guidelines, Instant Brands will, in its sole discretion, either:
(i) rectify manufacturing flaws
or (ii) replace the appliance.
If your appliance has to be replaced, the new appliance’s limited warranty will end twelve (12) months after it is delivered. Your warranty rights are not affected if you don’t register your product.
Any liability of Instant Brands for any purportedly defective appliance or component will not, in any case, be greater than the cost of an equivalent new appliance.
Things Not Covered By Warranty
1. Items bought, utilized, or operated outside of the US and Canada.
2. Products that have undergone modification or attempted modification.
3. Damage brought on by an incident, an alteration, a misuse, an abuse, neglect, an unreasonable use, a use against the guidelines, a commercial use, an improper assembly, a disassembly, a failure to perform reasonable and necessary maintenance, a fire, a flood, an act of God, or a repair made by anyone other than those authorized by an Instant Brands representative.
4. Making use of unapproved components and accessories.
5. Incidental and indirect losses.
6. The price of maintenance or replacement in the aforementioned excluding situations.
Except as expressly provided herein and to the extent permitted by applicable law, instant brands makes no warranties, conditions, or representations, express or implied, by statute, usage, custom of trade, or otherwise with respect to the appliances or parts covered by this warranty, including but not limited to, warranties, conditions, or representations of workmanship, merchantability, merchantable quality, fitness for a particular purpose or durability.
Other Restrictions
These restrictions might not apply to you because certain states or provinces do not permit the following: (1) the exclusion of implied warranties of merchantability or fitness; (2) limitations on the duration of an implied warranty; or (3) the exclusion or limitation of incidental or consequential damages. You only have the implicit guarantees that are expressly required to be granted by relevant law in these states and provinces. To the fullest extent permissible by law, the limits on warranties, liabilities, and remedies are applicable. You may also be entitled to other legal rights that differ from state to state or province to province, in addition to those that are provided for under this limited warranty.
How To Register Your Coffee Maker
To register your new Instant BrandsTM appliance, go to www.instanthome.com/register.
Your right to a warranty will not be affected if you don’t register your product. Along with your name and email address, you will be required to supply the name of the retailer, the date of purchase, the model number (located on the back of your appliance), and the serial number (located on the bottom of your appliance).
We can contact you in the unusual case of a product safety notification and keep you informed about new product developments and recipes thanks to the registration. By registering, you confirm that you have read, understood, and agree to the warnings and usage guidelines in the following instructions.
How You Can Obtain Warranty Service
Please call our Customer Care Department at 1-800-828-7280 or send an email to support@instanthome.com to get warranty service. On www.instanthome.com, a support ticket may also be created. You could be required to send your appliance to the service department for quality inspection if we are unable to fix the issue. The cost of shipping in connection with warranty servicing is not covered by Instant Brands. In addition to a description of the issue you are having with the appliance, please include your name, postal address, email address, phone number, and confirmation of the original purchase date when returning your equipment.
Conclusion
Thank you for taking the time to read this guide to using your Instant Pod coffee maker. I hope you found it useful and informative in learning how to use your coffee maker to its full potential. Whether you are a seasoned coffee connoisseur or a casual coffee drinker, you can now enjoy the perfect cup of coffee with ease. Cheers to delectable coffee! If you have any questions or concerns about using an instant coffee maker, please scroll down the Coffee Aim pages for solutions. Hope you found the guide useful, and we wish you the best of luck in your coffee-making adventures!
FAQs
How Do You Use An Instant Pod Coffee Maker?
To use an Instant Pod coffee maker, go through the following steps:
- Fill the water reservoir to the desired level with cold water.
- Insert your preferred coffee pod into the pod holder or reusable coffee pod adapter.
- On the drip tray, place a mug or cup.
- To begin the brewing process, press any brew size button.
- After brewing, remove the cup from the drip tray and either discard the used pod or clean the reusable pod.
How Do You Use a Reusable K-Cup In Instant Pods?
Fill a reusable K-Cup with the desired amount of coffee grounds and place it in the pod holder or reusable coffee pod adapter to use it in your Instant Pod coffee maker. Fill the reservoir with water, set a cup on the drip tray, and press the brew button. Remove the cup and empty the used coffee grounds from the K-Cup once the brewing is finished. By using a reusable K-Cup, you can control the amount and type of coffee you drink while reducing waste. For optimal use, remember to clean and maintain the reusable K-Cup.
How Do You Use A Keurig Pod Without A Keurig?
To use a Keurig pod without a Keurig machine, open the pod and use the coffee grounds to make a cup of coffee using a drip coffee maker or a French press. Another option is to use a compatible reusable coffee pod in your coffee maker and fill it with Keurig pod coffee grounds. This gives you the convenience of a single-serve coffee pod without the need for a Keurig machine. Click here to find more.