
Quick Navigation
Dive into the world of premium coffee experiences with the Delonghi Eletta Explore Espresso Machine. Whether you’re a coffee connoisseur or a beginner eager to perfect your brew, this guide promises a transformative journey. From understanding the nuances of water hardness to maximizing energy efficiency, every detail matters. As you embark on this aromatic adventure, you’ll discover how tailored settings, meticulous maintenance, and a deeper understanding of your machine can elevate every cup. Read on to unveil the art and science of creating the most divine espresso experience right in your kitchen.
Initial Setup and Usage Guide for Your Eletta Explore Espresso Machine
Expertly Set Up and Use Your Delonghi Eletta Explore Espresso Machine. Having used the Delonghi Eletta Explore Espresso Machine for over six months, I’m excited to walk you through setting up and using this incredible appliance.
Keep in mind the following tips to ensure a smooth experience:
- The grinder may show slight traces of coffee due to settings tests conducted before sale, demonstrating Delonghi’s meticulous care for their products.
- Before your initial use, it’s essential to rinse all removable accessories that come into contact with water or milk, such as the milk carafe, travel mug, coffee pot, water tank. For convenience, you can wash the milk carafes in a dishwasher.
- To optimize your coffee experience, customize the water hardness as soon as possible, following the instructions in the “Setting Water Hardness” section.
Now, let’s proceed with the setup:
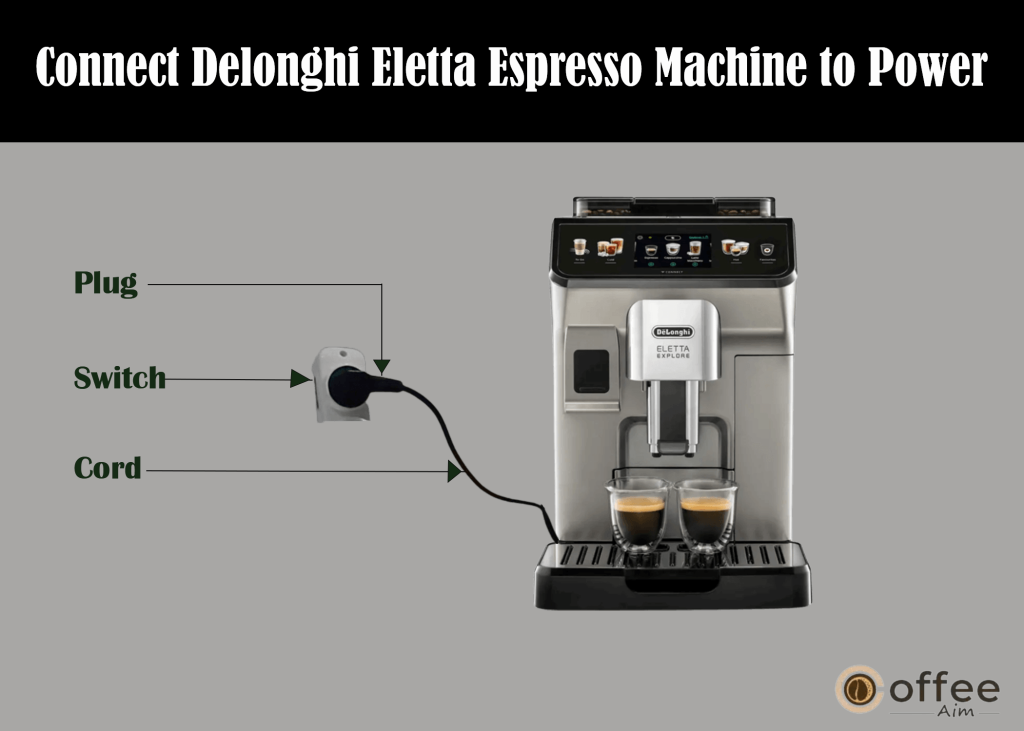
- Connect your Delonghi Eletta Explore Espresso Machine to the mains supply, as shown in the below figur.
- Select your preferred language by pressing the corresponding flag and confirming your choice with “Done.”
Follow the on-screen instructions:
- Remove the water tank and fill it up to the MAX line with fresh water.
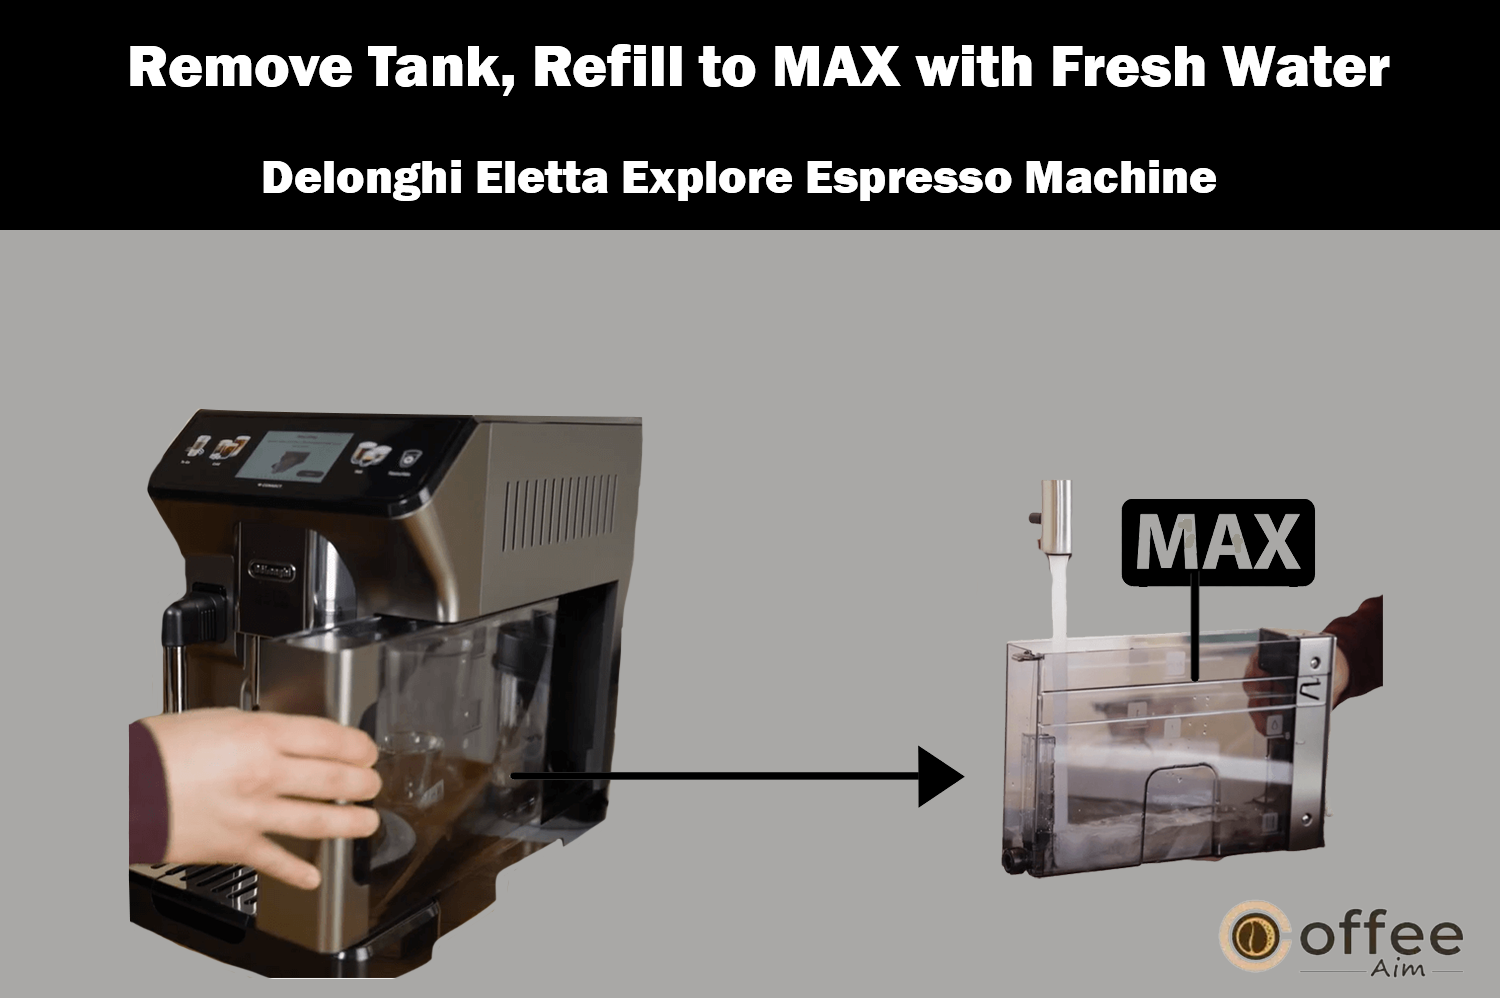
- Place the water tank back in its position and press “Next.”
- Fill The Beans Container, as shown in the below figure with your favorite coffee beans and confirm with “Next.”

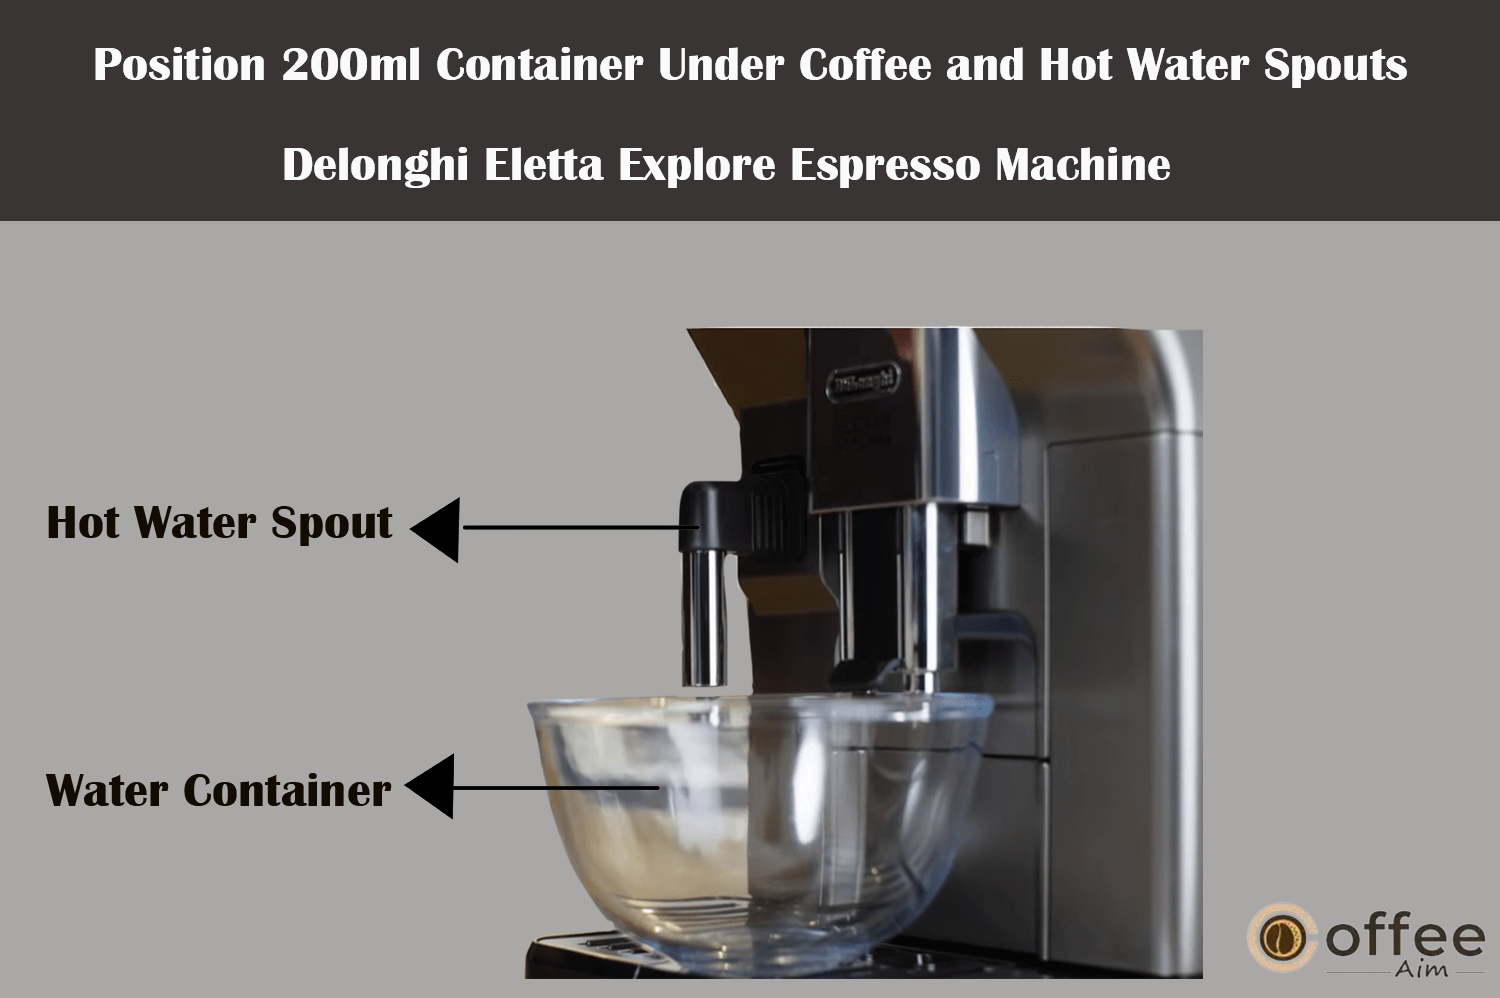
- Insert the hot water spout into the accessories connector, as shown in the below figure.

And place a container with a minimum capacity of 200 ml under the coffee spouts and hot water spout, as shown in the below figure.
- Press “OK” to start filling the water circuit. Your Delonghi Eletta Explore Espresso Machine will deliver water from the hot water spout, as shown in the below figure.

Once the delivery is complete, the machine will perform a rinse cycle, delivering hot water from the coffee spouts, as shown in the below figure.

Upon reaching the desired temperature, your Delonghi Eletta Explore Espresso Machine will offer a tutorial to walk you through its usage.
From my experience, here are a few additional tips:
- The first 4-5 cappuccinos might not be perfect, but don’t worry; the results will improve as you become familiar with the machine.
- During the initial use, you may notice some noise as the water circuit fills up, but rest assured, the noise will gradually decrease.
Now, you’re all set to enjoy the exceptional coffee-making capabilities of your Delonghi Eletta Explore Espresso Machine. Let’s learn “How to Safely Turn Off the Coffee Machine”.
How To Power On The Coffee Machine?
After learning the initial setup, let me walk you through the process of powering on your machine. Please keep in mind the following essential details:
- Every time you turn on the coffee machine, it automatically goes through a preheat and rinse cycle. You must not interrupt this cycle. Once it completes, your machine will be ready to use.
Now, let’s get your coffee machine up and running:
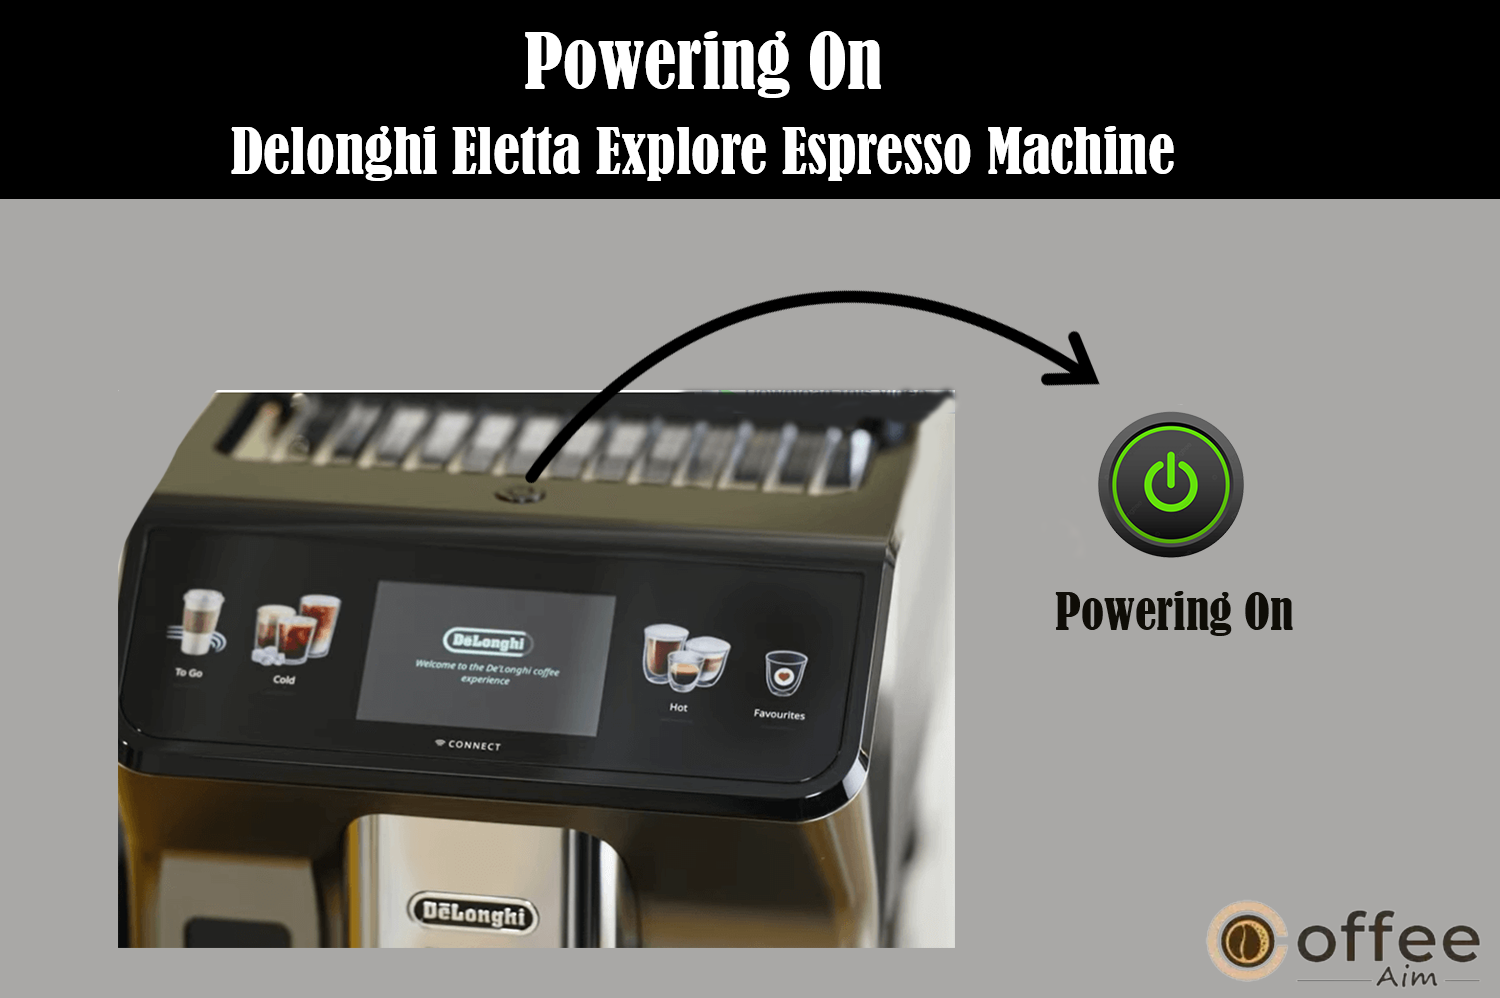
- To power on the appliance, simply press the button
, as shown in the below figure. You’ll notice the machine comes to life, starting its preheat and rinse process.
- Once the machine reaches the desired temperature, it performs a rinse cycle, delivering hot water from the coffee spouts. This cycle not only heats the boiler but also warms the internal circuits by circulating hot water.
By following these steps, you’ll have your Delonghi coffee machine ready to brew your favorite coffee in no time. Let’s learn “How to safely turn off the coffee machine?”.
How to Safely Turn Off the Coffee Machine?
Having grasped the process of activating the appliance, let me guide you on how to safely turn off your machine after enjoying a delicious cup of coffee.
After you’ve finished making your coffee, the machine automatically performs a rinse cycle to ensure proper maintenance. To turn off the coffee machine, follow these steps:
- Locate the button, as shown in the below figure. On the machine, and simply press it to turn off the appliance.
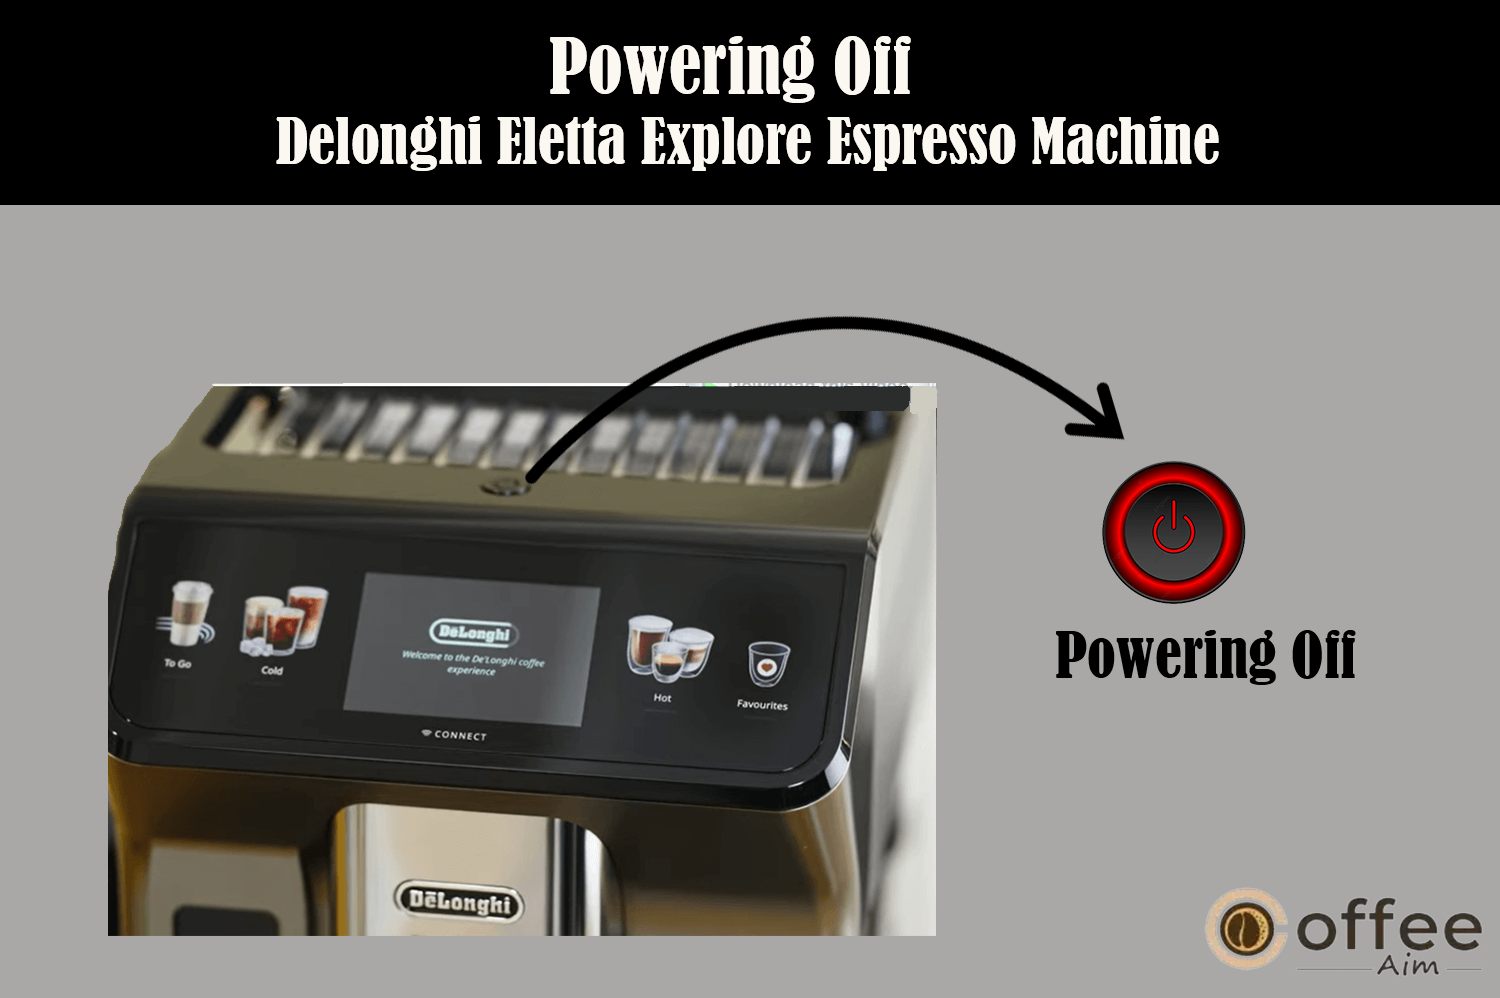
- If your machine has this design feature, it will quickly rinse the coffee spouts with hot water before entering standby mode.
Here are some important tips to keep in mind for safe usage:
- If you’re not planning to use the coffee machine for an extended period, it’s best to turn it off and unplug it from the mains socket. This helps conserve energy and ensures safety when the machine is not in use.
- Never attempt to unplug the coffee machine while it is still on and operating. Always make sure to turn it off first before disconnecting it from the power source.
By following these steps, you can safely turn off your Delonghi coffee machine and keep it in optimal condition for your next coffee brewing session. “Let’s dive into the subject of ‘Exploring menu settings.’
Exploring Menu Settings
Once you’ve understood how to switch the machine on/off, I’ll now guide you in exploring menu settings.
Uncover the secrets to the perfect cup of coffee with our intuitive coffee machine. From fine-tuning grinding settings to customizing your beverage, embark on a delightful journey of coffee exploration. Elevate your coffee game and savor every sip like a true connoisseur.
How to Clean and Heating Your Appliance Circuitce’s Intern?
Expert Tip: Keep your coffee machine in top-notch condition with this simple cleaning and heating method. Deliver hot water from the coffee spouts to clean and heat the appliance’s internal circuit. Just press the settings menu, select “Rinsing,” and press “OK” to start the process.
Remember, we recommend performing 2-3 rinses if you haven’t used the machine for a few days.Enjoy your perfectly brewed coffee every time!
Descaling Instructions
To find guidance on descaling, as outlined under heading ” How to Descale Delonghi Eletta Explore Espresso Machine” in the manual.
Enabling and Configuring Remote Control (Certain Models Only)
With your understanding of the Descaling Instructions, let’s now explore how to Enable and Configure Remote Control (Available for Specific Models).
To enable or disable connectivity, follow these steps:
- Open the settings menu by pressing.
- Navigate through the menu pages until you find “Connectivity.”
- Proceed by selecting “Next.”
- Activate both the Wi-Fi connection and remote control feature using the De’Longhi Coffee Link App.
- The appliance will display the PIN you need for App connection on the screen.
- Return to the settings menu by pressing “<.”
- To save your updated settings and return to the homepage, press “X.”
On the homepage, you’ll see different symbols, including one representing the connection status. If the connection isn’t active, go into the settings menu and turn it on.
| Symbol on homepage | Meaning |
| Connectivity enabled: the machine is waiting for the first connection | |
| The appliance is connected | |
| The appliance is connected to the home Wi-Fi, but there is no network, or the cloud cannot be reached | |
| Connection disabled. To enable, enter the settings menu |
Take note: certain App functions won’t be accessible when the remote connection is off, and if you change your Wi-Fi network name or password, you’ll need to perform a reset to update the credentials.
Let’s explore the concept of “Achieving Ideal Coffee Grinding.”
Optimizing Grinding for Perfect Coffee
With a solid understanding of Activate and Customize Remote Control (Exclusive to Certain Models), let’s explore the techniques of Elevating Grinding for the Perfect Coffee Brew.
To achieve the perfect coffee grind, follow these steps:
- Access the settings menu;
- Find and select “Adjust grinder”;
- Consult the tutorial on adjusting grinding coarseness by pressing “Read more”.
Keep in mind: After completing this process, we recommend brewing at least 3 coffees before you make any more adjustments. If you don’t achieve the desired results, redo the procedure. Please remember to only turn the grinding coarseness regulator while the coffee grinder is in operation during the initial coffee preparation phase. For models with Bean Adapt Technology, you can fine-tune this parameter in the Coffee Link App to match your coffee beans.Let’s take a closer look at the specifics of “Personalizing Coffee Temperature.”
How to Customizing Coffee Temperature
With a good understanding of how to Enhance Grinding for the Ideal Coffee Brew, let’s now explore the steps for Personalizing Coffee Temperature.
To personalize the coffee temperature, follow these steps:
- Access the settings menu;
- Find and select “Coffee temperature”;
- Choose your desired temperature from the options available;
- Press “<” to save your selection.
Kindly be aware that: adjusting the temperature is more noticeable for long beverages. For models with Bean Adapt Technology, you can fine-tune this parameter in the Coffee Link App to match your coffee beans.Now, we’ll explore the idea of “Choosing Your Desired Language.”
Selecting Your Preferred Language
Now that you’ve comprehended how to Adjust Coffee Temperature according to your preference, let’s transition to the subject of Selecting Your Preferred Language.
To set your preferred language on the homepage, follow these steps:
1. Access the settings menu;
2. Find and select “Languages”;
3. Choose the desired language by pressing the corresponding flag (use “Next” or “Back” to see all options). The display will update immediately with the selected language;
4. Press “<” to save your choice and return to the settings menu;
5. Press “X” to go back to the homepage.
Next, we will delve into the concept of “Personalizing Icons and Colors for Every User.”
Customizing Icons and Colors for Each User
With the knowledge you’ve acquired about Choosing Your Desired Language, let’s now explore the realm of Personalizing Icons and Colors for Individual Users.
Personalize the profile icons and colors with this feature. Follow these steps:
1. Access the settings menu;
2. Find and select “Create and edit profiles”;
3. Press “Next”;
4. To create a new profile, choose “Add new”; To modify an existing one, select the profile and press “Edit”;
5. Customize as desired and press “Save” to confirm.
6. Press “<” to save your changes and return to the homepage.
Now start the exploration of “Enabling Energy-Efficient Auto-Off.”
How to Energy-Saving Auto-Off
Now that you’ve understood how to customize icons and colors for individual users, let’s delve into the approach of activating the Energy-Saving Auto-Off feature.
Important Considerations:To save energy, you can customize the auto-off feature, which turns off the appliance after a period of inactivity (15 or 30 minutes, or 1 or 3 hours).
Follow these steps:
1. Access the settings menu;
2. Find and select “Set auto-off”;
3. Choose your preferred time interval;
4. Press “X” to save your selection and return to the homepage.
Let’s discover “Managing Beep Sound and Enhancing Energy Efficiency”.
Controlling Beep Sound and Energy Saving
With a clear understanding of how to activate the Energy-Saving Auto-Off feature?, let’s now delve into the technique for managing Beep Sound and Energy Conservation.
To control the beep sound and energy-saving settings, follow these steps:
- Access the settings menu;
- Look for “General” and customize the functions:
– “Beep sound”: enable for operation beeps.
– “Energy saving”: enable to reduce energy consumption as per regulations. An icon on the homepage indicates the status.
- Press “X” to save your changes and return to the homepage.
Embark on the journey of understanding “Guidelines for Water Filtration”.
Water Filter Instructions
To learn about the water softener filter, as outlined under the heading ” Effective Use of the Water Softener Filter: Proper Instructions” for detailed instructions.
How to Adjusting Water Hardness
To get guidance on adjusting water hardness, as outlined under the heading “Customized for Water Hardness” for detailed instructions.
How to Restoring Default Settings
After comprehending the steps for Adjusting Water Hardness, let’s delve into the procedure for Restoring Default Settings.
To restore all menu settings and user customizations to their default values (excluding language and statistics), follow these steps:
- Access the settings menu;
- Navigate to “Default values”;
- Choose whether to reset the entire appliance or a single profile;
- Follow the instructions and confirm the reset. The machine will display the homepage again. Note that the introductory tutorial will be presented if the appliance is reset to default settings.
Embark on the exploration of comprehending “Ensuring Secure Storage and Maintenance”.
Ensuring Safe Storage and Maintenance
Now that you’ve understood how to reset the default settings, let’s delve into the approach of ensuring secure storage and proper maintenance.
To prevent the water in the system from freezing when the machine is left idle for an extended period or when you’re preparing it for service, it’s recommended to drain the water circuit. Here’s how you can do it:
- Access the settings menu by pressing the designated button.
- Navigate through the menu until you see the option “Drain water.”
- Initiate the guided procedure by pressing “OK.”
- Begin by removing, emptying, and then reinserting the grounds containe and drip tray, as shown in the below figure, then press “Next”;

- Attach the spout to the connector.
- Place a 100 ml container underneath the spouts.
- The machine will go through a rinse cycle using hot water from the spouts.
- After rinsing, remove and empty the water tank, as shown in the below figure.

- If applicable, take out the water softener filter from the water tank.
- Reinsert the empty water tank into the machine.
- Allow the machine to thoroughly drain the circuit (Note: Expect some noise as this happens).
- When the circuit is completely empty, take out and empty the drip tray, then put it back in place.
- Press “OK” to power off the machine (standby mode).
The next time you switch on the appliance, refer to the instructions in the section titled “Setting up the Appliance” to ensure proper operation.
By following these steps, you can maintain your machine’s performance and extend its lifespan.
Potential Drawback if Instructions Aren’t Followed:
Failure to carry out these steps may lead to complications in maintaining the appliance. Neglecting to prevent water freezing within the system during extended periods of inactivity or maintenance may result in damage and reduced performance.
Let’s embark on the exploration of comprehending “Exploring Machine Statistics”.
Viewing Machine Statistics
With a good understanding of how to guarantee secure storage and perform maintenance, let’s now delve into the procedure for viewing machine statistics.
To access machine statistics and view related information, follow these steps:
- Access the settings menu;
- Navigate to “Statistics” to view principal statistics. For more details, press “Read more”;
- Press “Back” to return to the settings menu.
Let’s delve into discovering the “Assortment of Hot and Cold Beverages You Can Indulge in with Your Delonghi Eletta Explore Espresso Machine.”
Variety of Hot and Cold Drinks That You Can Enjoy with Your Delonghi Eletta Explore Espresso Machine
Now that you have comprehended the process of examining machine statistics, let’s proceed to discover the range of hot and cold beverages that you can savor using your Delonghi Eletta Explore Espresso Machine.
You have the capability to create a wide range of drinks using your machine. The drinks represented by this symbol can also be found in the “To Go” menu.
| Hot | Cold | |
| Espresso | ✓ | ✕ |
| 2X Espresso | ✓ | ✕ |
| Coffee | ✓ | ✕ |
| Doppio+ | ✓ | ✕ |
| Long | ✓ | ✕ |
| Americano | ✓ | ✓ |
| Coffee pot | ✓ | ✕ |
| Over ice | ✕ | ✓ |
| Cappuccino | ✓ | ✓ |
| Latte Macchiato | ✓ | ✓ |
| Caffelatte | ✓ | ✓ |
| Cappuccino Mix | ✓ | ✓ |
| Espresso Macchiato | ✓ | ✓ |
| Flat White | ✓ | ✓ |
| Cappuccino + | ✓ | ✕ |
| Cortado | ✓ | ✕ |
| Milk | ✓ | ✓ |
| Tea function | ✓ | ✕ |
| Hot water | ✓ | ✕ |
Let’s delve into the subject of “Crafting Your Preferred Coffee with Delonghi Eletta Explore – Comprehensive Step-by-Step Instructions.”
How to Make Your Favorite Coffee with Your Delonghi Eletta Explore – A Step by Step Guide
Mastering Menu Settings opens the door to creating your cherished coffee delights. Let me now walk you through crafting your preferred coffee, step by step.
Unleash the full potential of your coffee brewing skills with our step-by-step guide. From
personalized options to smart technology, we’ve got you covered for the perfect cup every time! Elevate your coffee experience now!
Setting Up Your Machine for Crafting Coffee Beverages?
When it comes to making coffee with your delonghi machine, the first step you need to know is Setting Up Your Machine for Crafting Coffee Beverages. Follow the below steps:
Important Note: Avoid using green, caramelized, or candied coffee beans as they may adhere to the coffee grinder, rendering it ineffective.
- Position 1 or 2 cups beneath the coffee spouts.
- Adjust the spouts to be as close to the cup as possible (see the pic below). This enhances the creaminess of your coffee.

.Let’s explore the concept of “Effortless and Rapid Coffee Preparations.”
Quick and Easy Coffee Preparations
After setting up your machine, now it is time to Quick and Easy Coffee Preparations.
Follow these steps:
- Select the coffee type you desire from the homepage by pressing the corresponding image, such as espresso (see in the below figure).

- For a hot coffee beverage, the machine begins the preparation process. If you prefer a cold coffee beverage:
- Choose “Iced” or “Extra Iced” option by pressing “Next.”
- Depending on your previous choice, the appliance suggests the appropriate amount of ice cubes. Add the indicated ice cubes to your glass (as shown in the below figure), then press “Brew.
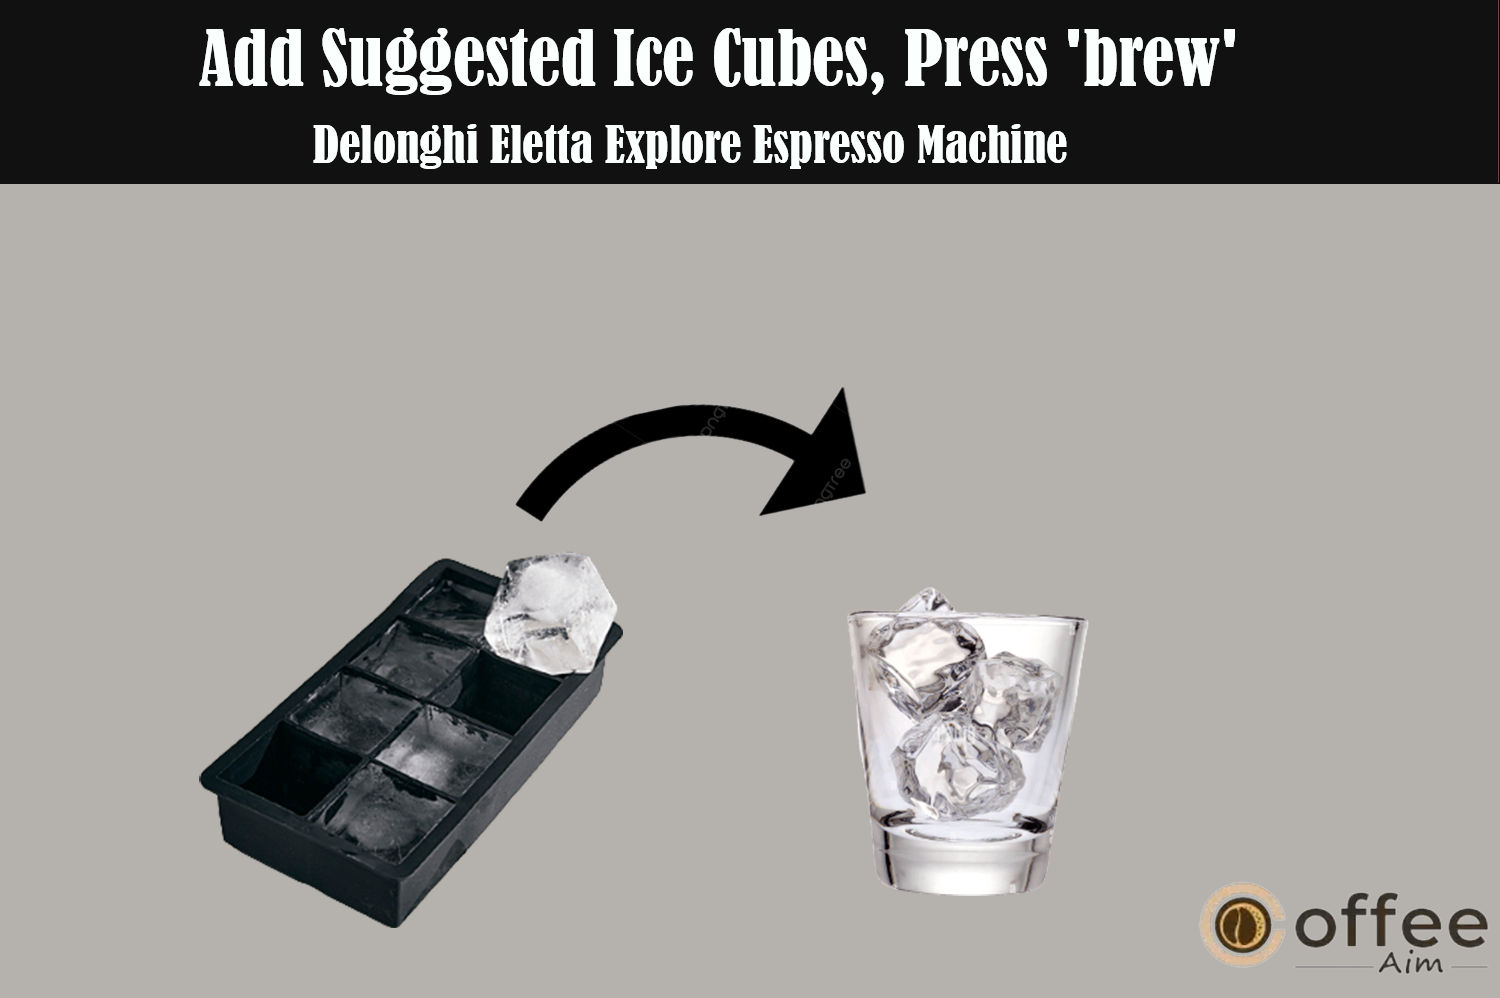
- The machine initiates the preparation process. Throughout each stage (grinding, brewing), the display provides descriptions. Upon completion, your appliance is set for your next flavorful beverage.
Allow us to delve into the exploration of customizing parameters for your personalized beverages.
Customizing Parameters for Custom Beverages
After getting the hang of Quick and Effortless Coffee Preparations, I’ll now walk you through the steps of Personalizing Settings for Your Own Special Brews.
For a unique coffee experience that suits your preferences, follow these steps to customize your beverages:
- Navigate to the desired coffee image on the homepage and press located at the bottom of the image (e.g. espresso, as shown in the below figure). This action reveals customizable parameters on the display.

- For a hot coffee beverage, adjust the parameters to your liking and press “Brew” to initiate the brewing process. The appliance commences brewing, and each step (grinding, brewing) is detailed on the display. For a cold coffee beverage, modify the parameters and follow these steps:
- Select “Iced” or “Extra Iced” option and press “Next.”
- The appliance suggests the amount of ice cubes based on your previous choice. Add the specified ice cubes to your glass (see in the below figure), then press “Brew.”

- Similar to hot beverages, the machine begins brewing, and each phase is described on the display.
- After delivery, you can choose to “Save” the new settings or “Cancel” to keep the previous parameters.
Keep in mind: That when you save the updated preferences, they are stored exclusively within the chosen profile for future use.
- Press “X” to return to the homepage, and your appliance is ready for its next use.
Let’s embark on the journey of exploring the utilization of pre-ground coffee: crafting individual cups with personalized options.
Using Pre-Ground Coffee: Brewing Single Cups with Custom Options
Exploring Customizing Parameters for Custom Beverages opens the door to enhancing your coffee routine. Discover our concise guide for brewing single cups using pre-ground coffee, offering ultimate flavor customization.Follow these steps:
Note:
- Avoid adding pre-ground coffee when the machine is turned off, as it might scatter within and soil the interior, potentially damaging the appliance.
- Refrain from exceeding 1 level measure of pre-ground coffee to prevent internal staining or clogging the funnel . Pre-ground coffee is suitable for brewing one cup at a time.
- For crafting Long coffee, midway through the process, the appliance will prompt you to add one level measure of pre-ground coffee. Press “OK” to proceed.
- Keep in mind that pre-ground coffee cannot be used for Doppio, 2x Espresso, Coffee Pot, or Cappuccino & beverages.
Follow these steps for a customized pre-ground coffee experience:
- Locate and press
positioned at the image’s base that corresponds to your coffee preference (e.g., espresso). This action brings up adjustable parameters on the display.
- Choose your desired quantity and adjust the pre-ground coffee setting.
- Initiate the brewing process by pressing “Brew.”
- Raise the lid of the pre-ground coffee funnel, ensuring that the funnel isn’t obstructed. Add one level measure of pre-ground coffee (as shown in the below figure), then press “OK” to begin brewing.

- The appliance commences brewing your coffee, providing an overview of each phase (grinding, brewing) on the display.
Upon completion, the appliance is ready for your next brewing adventure.Join us as we venture into the exploration of elevating your coffee experience through intelligent technology.
Perfecting Your Coffee with Smart Technology
Now that you’re familiar with Brewing Single Cups using Pre-Ground Coffee and Custom Options, I’m here to help you optimize your coffee experience with Smart Technology.
Enhancing your coffee experience through Smart Technology: Unlock the expertise of a virtual barista that empowers you to fine-tune your coffee brewing process. This intelligent system provides step-by-step guidance, helping you customize everything from grind coarseness to brewing techniques based on your coffee beans. Simply download the Coffee Link App and access the “Bean Adapt Technology” section to save your settings.
Kindly be aware:Once configured, enjoy the precision of “Espresso SOUL” on the homepage for espresso coffee that matches your preferences.
Follow the instructions in section “Quick and Easy Coffee Preparations” for making the perfect cup.
Come along with us as we dive into the world of improving your basic instructions for making coffee.
General Guidelines for Coffee Preparation
Once you’ve gained mastery over Enhancing Your Coffee with Smart Innovation, allow me to lead you through Essential Tips for Crafting the Perfect Coffee.
- Filling water beyond level 1 is suitable for most beverages. This aids the appliance in estimating water availability for brewing.
- You can halt coffee preparation anytime by pressing “Stop” or “Cancel.”
- Adjust coffee quantity post-delivery by pressing “Extra” until desired quantity is reached, then pressed “Stop” or “Cancel.”
- Various alerts may appear (“Please fill the tank to MAX level”). Their meanings are in section “DISPLAYED MESSAGES”.
- Address issues like weak, cold coffee or slow delivery by consulting grinding adjustments in “Optimizing Grinding for Perfect Coffee” and “TROUBLESHOOTING.”
- If “Energy Saving” mode is on, a brief delay before the first coffee is delivered is possible.
Let’s begin our exploration of discovering easy tricks to elevate the temperature of your coffee.
Simple Tips to Enhance Coffee Temperatur
With a good understanding of the General Coffee Preparation Guidelines, let’s delve into some easy yet effective ways to enhance the temperature of your coffee and enjoy a more satisfying cup.
Simple Techniques for Elevating Coffee Temperature:
To achieve a hotter brew, follow these steps:
- Initiate a rinse cycle before brewing (refer to “How to Clean and Heating Your Appliance Circuitce’s Intern?”);
- Preheat cups using the hot water function (check “Preparing Hot Water and Tea”);
- Adjust coffee temperature settings (explore “How to Customize Coffee Temperature”).
Join me in discovering the art of creating a delightful coffee pot drink.
Delightful Coffee Pot Beverage
Once you’ve gained insights into improving coffee temperature, I’ll now lead you towards creating delightful and flavorful coffee pot beverages. Let’s explore this process together,
For a delightful coffee pot beverage, which boasts a balanced and light espresso base with a delicate frothy layer, perfect for sharing.
Follow these steps:
- On the homepage , select the “Coffee Pot” beverage;
- Choose cup quantity and aroma strength;
| Number of cups | Number of grindings | Total quantity (ml)* |
| 2 | 2 | 250 |
| 3 | 3 | 375 |
| 4 | 4 | 500 |
| 5 | 5 | 625 |
| 6 | 6 | 750 |
- Press “Start” to proceed;
- Add water and coffee beans as directed on the display (see in the below figure);

- Position the coffee pot beneath the coffee spouts and press “Brew”;
- The appliance commences beverage creation, displaying each phase description.
Please keep in mind: Press “Cancel” or “Stop” to halt the preparation and return to the homepage.
- After the delivery concludes, press “Save” to store new settings or “Cancel” to keep the previous parameters.
- Press “X” to navigate back to the homepage. The appliance is now ready for use.
Please be aware: If you save the new settings, they are stored exclusively in the chosen profile.
Safety Alert: Following the preparation of a coffee pot, allow the appliance to cool for 5 minutes prior to crafting another beverage.
Caution: Risk of excessive heat!
Let’s uncover the methods for ensuring the cleanliness of your coffee pot.
How to Maintaining Coffee Pot Hygiene
Having explored the pleasures of the Delightful Coffee Pot Beverage, now let’s delve into the essential steps for maintaining the cleanliness and hygiene of your coffee pot.
- To keep your coffee pot in its best state, establish a routine for cleaning after each use.
- Use mild dish soap and hot water to gently clean the pot, ensuring all coffee residues are eliminated.
- Rinse the pot thoroughly with hot water to ensure no traces of detergent are left behind.
- This simple practice maintains your coffee pot’s hygiene and safeguards the quality of your brewed drinks.
Let’s delve into the detailed instructions for savoring creamy milk-based delights with our step-by-step guide.
Step-by-Step Guide to Enjoying Frothy Delights (Milk)
Having honed your skills in Utilizing Pre-Ground Coffee for Custom Single Cups, let’s now dive into the Step-by-Step Guide to Enjoying Frothy Milk Delights. Welcome to a world where velvety milk meets coffee perfection, ensuring an optimal frothing experience for your palate’s delight.
Ensuring Optimal Frothing and Maintenance
Remember: For consistently velvety milk froth and to prevent undesired large bubbles, ensure you maintain the milk carafes diligently by following the instructions outlined in sections ” Efficient Cleaning of the Milk Carafe” and “Proper Cleaning of Milk Carafes (E) and (F).” Your dedication to upkeep guarantees delightful frothy indulgence.
Choosing the Right Milk
The quality of froth is influenced by:
- Milk or plant-based beverage temperature (optimal at refrigerator temperature, around -5°C).
- Type of milk or plant-based beverage.
- Brand used.
- Ingredients and nutritional content.
Different types of cow’s milk yield varying results:
| Lattecrema system | Lattecrema cool system | |
| Cow’s Milk | ||
| Whole (fat content >3.5%) | ✓ | ✕ |
| Partially skimmed (fat content between 1.5 and 1.8%) | ✕ | |
| Skimmed (fat content < 0.5%) | ✓ | |
Plant-based options also result in distinct froth outcomes
| Lattecrema system | Lattecrema cool system | |
| Beverages derived from plants | ||
| Soy | ✓ | ✓ |
| Almond | ✓ | ✓ |
| Oat | ✓ | ✓ |
Join me in understanding the “Process of Filling and Attaching Milk Carafes.”
Steps for Filling and Attaching Milk Carafes
Having become familiar with Choosing the Right Milk, let’s proceed to the Steps for Filling and Attaching Milk Carafes.
Here are the steps for filling and attaching milk carafes:
- Lift the lid (as shown in the below figure).

- Fill the milk carafe with milk, ensuring it doesn’t exceed the MAX level (see in the below figure).

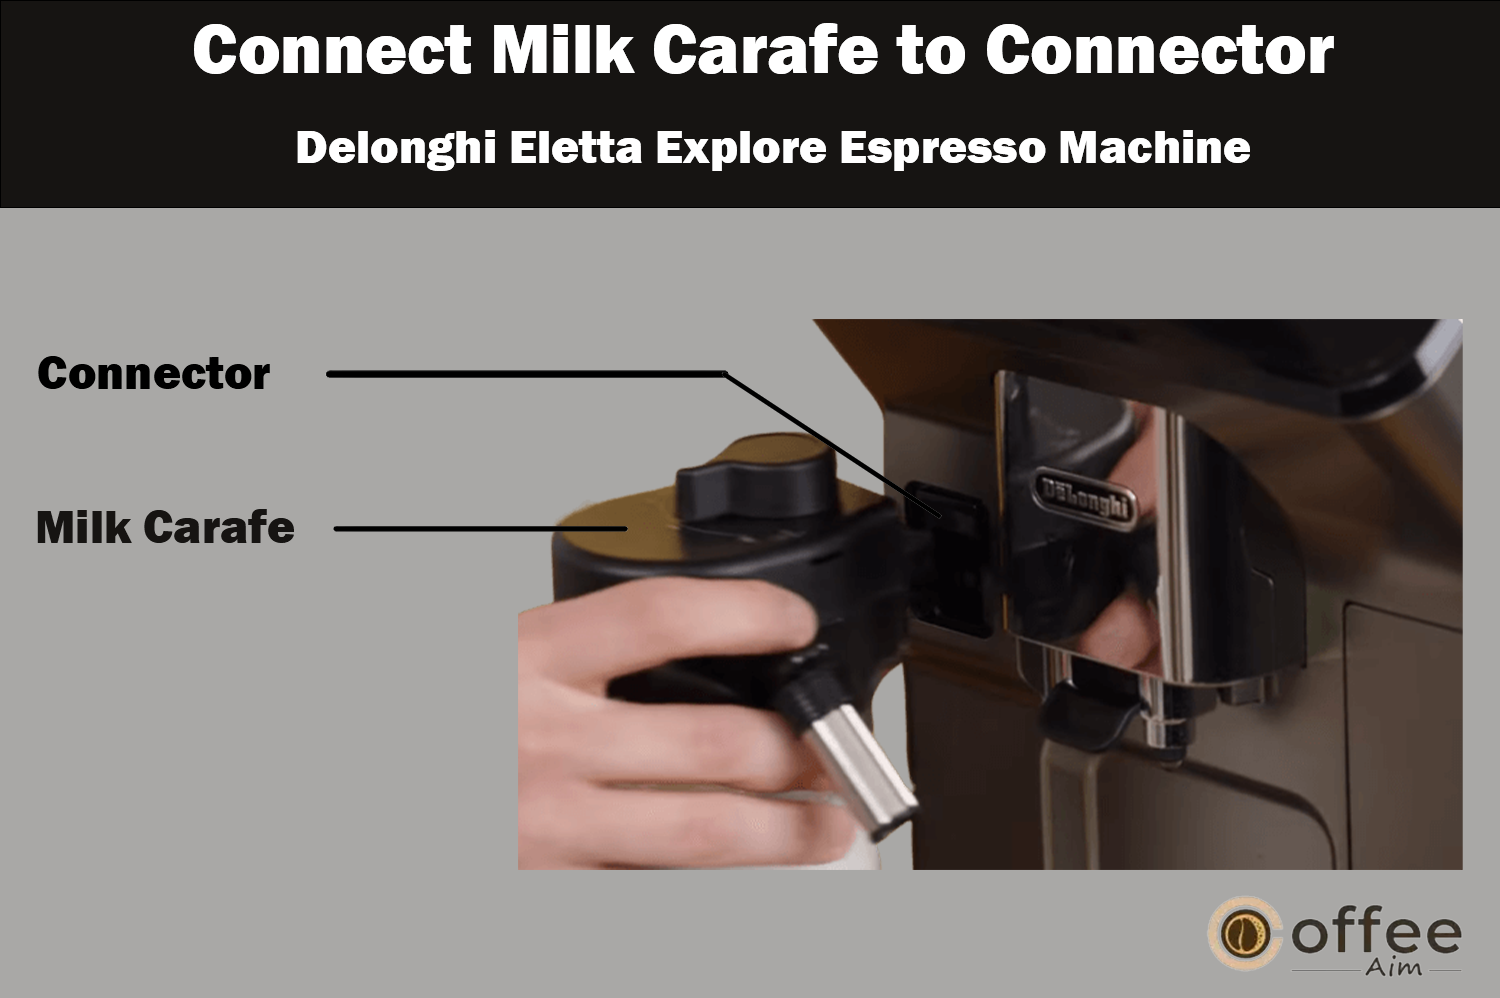
- Make sure the milk intake tube is properly inserted into the bottom of the milk carafe lid (see in the below figure.)

- Place the lid back on the milk carafe
- Attach the carafe to the connector and push it in until it clicks (as shown in the below figure), emitting a beep if enabled.
- Position an adequately sized cup under the coffee spouts and milk spout, adjusting the milk spout if needed
- Select your desired beverage using the following instructions.
Keep in mind: that if “Energy Saving” mode is active (refer to section “Controlling Beep Sound and Energy Saving”), there might be a brief pause before the machine prepares the beverage.
Let’s learn “Settings for Warm and Chilled Milk Drinks on the Dial’’
Dial Positions for Hot and Cold Milk Beverages
With a good grasp of the Step-by-Step Guide to Savoring Frothy Milk Delights, let’s now move on to understanding the Dial Positions for Hot and Cold Milk Beverages.
Adjust the froth control dial to modify the froth level of milk in your milk beverages. Here are the recommended dial positions for different drinks:
| Dial position | Recommended for… | |
| Hot | Cold | |
| MIN froth | • Caffelatte • Hot milk (not frothed) | • Caffelatte |
| MED froth | •Latte Macchiato • Flat White • Cortado | •Latte Macchiato • Flat White |
| MAX froth | • Cappuccino •Cappuccino Mix •Espresso Macchiato • Cappuccino + • Hot milk (frothed) | • Cappuccino • Cappuccino Mix • Cold milk (frothed) |
Let’s explore the detailed instructions for creating delightful milk-based beverages that you can enjoy to the fullest with our step-by-step guide.
Crafting Delicious Milk Beverages to Savor
Having familiarize yourself with Dial Positions for Hot and Cold Milk Beverages, let’s now explore the art of Crafting Delicious Milk Beverages to Savor.
- Explore the world of delectable milk-based beverages that promise to delight your palate.
- Head to the homepage and locate the image corresponding to your desired milk beverage .
- Similar to customizing coffee drinks, you can personalize your milk-based creation by tapping the symbol situated at the base of the image on the homepage.
Let’s now explore the comprehensive steps for effectively cleaning the milk carafe through our detailed and easy-to-follow guide.
Efficient Cleaning of the Milk Carafe: Step-by-Step Guide
Having mastered the art of Crafting Delicious Milk Beverages to Savor, I will now walk you through the Efficient Cleaning of the Milk Carafe using a detailed Step-by-Step Guide.Maintaining the pristine hygiene of your milk carafe is pivotal for exceptional milk-based beverages. After each milk drink, the appliance prompts you to initiate the CLEAN function to ensure the cleanliness of the milk carafe lid . To undertake this cleaning process, follow these steps:
- Keep the milk carafe in the machine (no need to empty);
- Position a cup under the milk spout (as shown in the below figure);

- Adjust the froth setting/clean dial to “Clean” (see in the below figure), releasing hot water and steam from the milk spout, with automatic halting of the cleaning;

- Return the dial to your desired froth level.
Efficiently managing consecutive beverage preparations:
- To continue making subsequent beverages, when the “Clean” message appears, press “Cancel.” Clean the milk carafe once the final beverage is created. Upon completion of the process, the milk carafe might be empty or insufficient for other recipes.
- After utilizing the “Clean” function, remove the milk carafe and sanitize all elements following the instructions in the “Proper Cleaning of Milk Carafes (E) and (F)” section. When there’s enough milk remaining in the carafe post-preparation:
- After employing the “Clean” function, extract the milk carafe and promptly store it in the refrigerator. The carafe can be refrigerated for up to 2 days, after which all components should be cleaned as outlined in the “Proper Cleaning of Milk Carafes (E) and (F)” section.
Maintaining optimal hygiene post milk beverage preparation:
- Neglecting milk carafe cleaning prompts the appearance of a symbol
on the homepage, reminding you to clean it.
- In specific instances, the machine may require warming up before the carafe cleaning process can commence.
- To guarantee proper cleaning, wait until the CLEAN function concludes. This automatic process should not be disrupted while in progress.
Important note: If the milk carafe remains unrefrigerated for over 30 minutes, disassemble and sanitize all components following the instructions in the “Proper Cleaning of Milk Carafes (E) and (F)” section.
Let’s now dive into the comprehensive guidelines for creating hot water and tea, following simple steps to enjoy a rejuvenating drink.
Preparing Hot Water and Tea: Easy Steps for a Refreshing Beverage
Discover the joy of crafting your favorite hot tea and beverages effortlessly. From soothing herbal blends to quick hot water, your appliance enhances your beverage experience. Let’s explore simple steps for a refreshing, personalized drink.
Preparing Hot Water and Tea with Convenient Glass Options
Here’s how you can prepare hot water and tea with the convenience of various glass options:
- Insert the hot water spout into the machine .
- Position a cup under the spout.
For taller glasses:
- Raise the flap (as shown in the below figure) and position the glass in the compartment ;

- Adjust the water spout accordingly (as shown in the below figure).

Let’s explore the detailed instructions for brewing hot tea using your appliance, following a step-by-step guide.
Step-by-Step Guide to Making Hot Tea with Your Appliance
Now that you’ve become acquainted with Preparing Hot Water and Tea using Convenient Glass Options, let me lead you through the detailed Step-by-Step Guide to Making Hot Tea with Your Appliance.
Here’s your step-by-step guide to making hot tea using your appliance:
- Navigate to the homepage and select the tea image .
- Customize the quantity and temperature settings to your preference.
- Press “Brew” to start the tea-making process, which will automatically begin and complete.
Kindly take note: To halt the brewing process, simply press the “Stop” or “Cancel” button.
Embark on a journey to comprehend the process of quick and hassle-free hot water preparation.
Quick and Convenient Hot Water Preparation
Having understood the Step-by-Step Guide to Making Hot Tea with Your Appliance, let’s now explore the convenient method of Quick and Convenient Hot Water Preparation.
Straightforward choice:
- Simply tap the hot water image on the homepage. The preparation initiates and halts automatically.
Adjusting the amount:
- Tap beneath the hot water image to reveal quantity options on the display.
- Press “Brew.” The process starts and stops automatically.
Keep in mind:
To halt the brewing process, simply press the “Stop” or “Cancel” button.
Embark on a voyage to grasp the concept of crafting and tailoring preferred drinks for individual profiles.
Creating and Customizing Favorite Beverages for Each Profile
Having grasped the concept of Quick and Convenient Hot Water Preparation, I’ll now assist you in Crafting and Personalizing Favorite Drinks for Every Profile.
You can craft a selection of beloved beverages for each profile. Here’s how to do it:
- Tap at the base of the image representing the drink you wish to add to the collection. For example, Espresso Size M Aroma 4 (as shown in the below figure).

- Opt for the heart icon.
- Return to the homepage by pressing “X”. The drink is now part of the collection and accessible by pressing Favourites on the control panel .
Keep in mind: You can rearrange the drink order within the collection:
- Press ;
- Choose the drink you want to reposition;
- Use the arrows to adjust the beverage sequence;
- Press “X” to return to the homepage.
Uncover the steps to create personalized “On-the-Go” drinks: Customized for your travel mug.
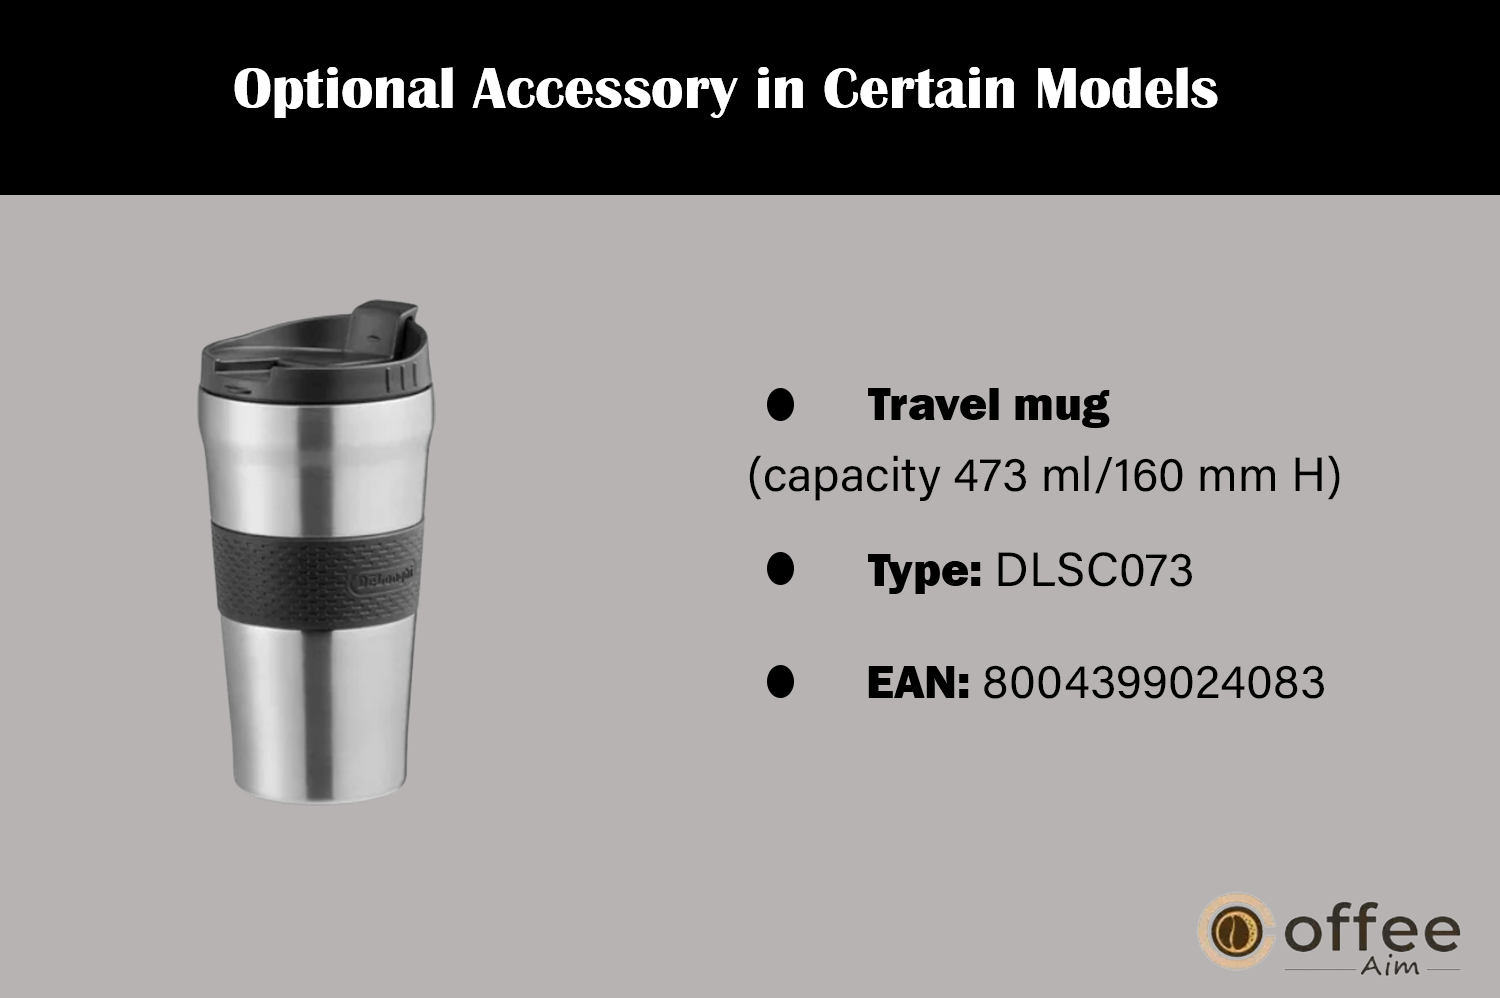
Customized “To Go” Beverages: Tailored for Your Travel Mug
The “To Go” feature is ideal for creating a personalized beverage to take with you.
Follow these steps for a tailored experience:
- Set up the machine with the required accessories for your chosen beverage .
- Lift the flap and place the travel mug into the compartment (see in the below figure).

- Press “To Go” ;
First-time use:
- Press “Start.”
- Information about quantities for your travel mug size will be displayed.
- Choose your travel mug size (Piccolo, Medio, Grande) and press “Next.”
- The appliance will allow you to adjust the quantity after preparation to match your mug’s capacity. Press “Next.”
- Select the beverage type (Hot or Cold ).
- Navigate the homepage to find your desired beverage. Select it and customize the suggested parameters. Proceed with preparation.
- After preparation, you can fine-tune the delivered quantity for accurate brewing in the future.
Note:
- When using a different mug, it’s advisable to monitor the beverage quantity closely.
- New settings are saved only within the chosen profile.
- For maintaining hot beverage temperature, preheat the travel mug with hot water.
- The travel mug is suitable for beverages listed on the homepage.
- Ensure any alternative travel mug’s height doesn’t exceed 16 cm.
Important:
- Before sealing the lid, open the closing cap to release pressure.
- Milk-based recipes: After preparation, clean the milk carafe (see section” Efficient Cleaning of the Milk Carafe”).
- Consume the contents within 2 hours. After this, follow cleaning instructions in the subsequent section.
- Refer to the attached leaflet for more details.
Reveal the instructions for individualized “Maintaining Cleanliness of the Travel Mug: Crucial Steps for Upkeep.”
Hygienic Cleaning of the Travel Mug: Essential Steps for Maintenance
Now that you’ve become familiar with Personalized “To Go” Drinks: Customized for Your Travel Mug, let me provide you with guidance on Maintaining Cleanliness of the Travel Mug. To ensure hygiene, it’s essential to clean the travel mug after each use. Avoid abrasive materials that could harm the mug’s surface. Follow these steps:
- Unscrew the lid and rinse both the container and lid with hot drinking water (40°C).
- Immerse the components in hot water (40°C) mixed with washing up liquid for at least 30 minutes. Avoid scented detergents.
- Use a clean sponge with washing up liquid to clean the interior of the container and lid, eliminating visible dirt.
- Thoroughly rinse all parts with hot drinking water (40°C).
- Dry everything using a clean, dry cloth or paper towels. Reassemble the components.
- Clean the lid in the dishwasher weekly. Note: that the metal container is not dishwasher safe.
Let’s delve into the comprehensive guidelines for Customizing Your Drinks using the ‘My Function’: Step-by-Step Instructions.
Personalize Your Beverages with ‘My Function’: A Step-by-Step Guide
Having familiarized yourself with Ensuring Cleanliness for Your Travel Mug: Vital Maintenance Steps, let me now provide you with comprehensive guidance on Customizing Your Beverages through the ‘My Function’ Feature.
To customize your beverage using the “My Function,” follow these simple steps:
- Ensure the desired profile is active for the beverage customization.
- Tap
below the image of the beverage you want to create.
- Tap the quantity you prefer.
- Press “Start” to initiate the guided procedure.
- If applicable for the beverage, select your desired aroma and press “Next.”
- Press “Brew” to begin the preparation process.
- When the desired amount is dispensed into your cup, press “Stop.”
- If you are satisfied with the result, press “Save” to store the settings, or “Cancel” to retain the previous ones.
- Tap “X” to return to the homepage .
Please Note:
- Customized settings are saved only in the selected profile.
- Customizing a single beverage also applies to its double version, and the message “Settings saved on both double and single recipe” will be displayed.
- You can exit programming anytime by pressing “X,” and the changes will not be saved.
- A customized beverage will show “Reset” under the image and “my” among the quantity selections. Press “Reset” to revert to the default values for the beverage.
| Beverage quantity table | ||
| Beverage | Standard quantity | Programmable quantity |
| ESPRESSO | 40 ml | 20-180 ml |
| 2X ESPRESSO | 40 ml + 40 ml | 20-180 ml + 20-180 ml |
| COFFEE | 180 m | 100-240 m |
| LONG | 160 ml | 115-250 ml |
| DOPPIO+ | 120 ml | 80-180 ml |
| AMERICANO | 150 ml | 70-480 ml |
| TEA | 150 ml | 20-420 ml |
| HOT WATER | 250 ml | 20-420 m |
Discover the procedures to establish customized “Management of Multiple Profiles”.
Managing Multiple Profiles
Once you’ve grasped the concept of Tailoring Your Drinks with the ‘My Function’ Feature: An In-Depth Tutorial, I’ll lead you through the process of Handling Multiple Profiles.You have the option to save various personalized profiles, each represented by a unique icon. Each profile stores your customized beverage settings. The beverage display order is based on your selection frequency. To choose a profile, follow these steps:
- From the homepage, tap on the current profile . A list of available profiles will be displayed.
- Select the desired profile from the list.
Remember:
- After selecting a profile, all beverage settings bars will adopt the profile’s color.
- You can rename your profiles for easy identification.
- For customizing the profile icon, refer to section “Customizing Icons and Colors for Each User.”
Explore the steps for creating personalized “Ensuring Cleanliness and Hygiene”.
Maintaining Hygiene and Cleanliness
Master the art of Using Pre-Ground Coffee and Managing Multiple Profiles with our step-by-step guide. Now, let’s dive into Ensuring Hygiene and Cleanliness, ensuring your machine stays in top shape for a consistently delightful coffee experience.
Discover the process of customizing “Caring for the Coffee Machine Components”.
How to Maintain the Coffee Machine’s Parts?
Below are essential actions to guarantee the durability and peak functionality of your machine:
- Regularly clean the appliance’s internal circuit.
- Keep the coffee grounds container tidy.
- Maintain the cleanliness of the drip tray and drip tray grille.
- Clean and care for the water tank .
- Pay attention to the cleanliness of coffee spouts .
- Maintain the pre-ground coffee funnel .
- Regularly clean the brewing unit by extracting it after opening the brewing unit flap.
- Keep milk carafes clean.
- Pay special attention to the coffee pot refer to section “How to Maintaining Coffee Pot Hygiene”.
- For the travel mug, refer to section “Hygienic Cleaning of the Travel Mug.
Vital Reminders!
- When it comes to maintaining your coffee machine, avoid the use of solvents, abrasive cleaners, or alcohol. De’Longhi superautomatic coffee machines don’t necessitate chemical products for cleaning.
- Refrain from employing metal objects to remove coffee deposits, as they may scratch both metal and plastic surfaces.
Dishwasher safe  | Hand wash only |
| Coffee grounds container | Coffee grounds container support |
| Drip tray | Cup tray |
| Flap grille support | Flap grille |
| Drip tray grille | Water tank |
| “Hot” milk carafe | Removable brewing unit |
| Cold” milk carafe |
Uncover the process of customizing “Maintaining the Inner Circuits of the Appliance”.
Cleaning the Appliance’s Internal Circuit
With a solid grasp of How to Maintain the Coffee Machine’s Parts?, let’s delve into Cleaning the Appliance’s Internal Circuit to ensure peak performance and a pristine machine.
To ensure your coffee machine stays in top-notch condition, especially after not using it for a few days, it’s essential to perform a few rinse cycles using the “Rinse” function (see section ” How to Clean and Heating Your Appliance Circuitce’s Intern?”) before brewing.
Kindly be aware: Don’t worry if you find some water in the ground container after the cleaning process.
Let’s learn “How to Properly Clean the Coffee Grounds Container and Drip Tray?”.
How to Clean the Coffee Grounds Container and Drip Tray?
Now that you’ve gained insights into Maintaining the Coffee Machine’s Parts, let me walk you through the process of Cleaning the Appliance’s Internal Circuit.
Understand the importance of maintaining cleanliness in your coffee grounds container and drip tray. When the message “Please empty the grounds container” is displayed, it’s time to take action.
Keep in mind: that even if the container isn’t completely full, you should clean it within 72 hours of making your first coffee. This keeps your appliance running smoothly and ensures a quality coffee experience. Remember, keeping your machine connected to the mains power supply is crucial for accurate tracking.
Attention: Risk of burns. If you prepare consecutive milk-based beverages, the metal cup tray may become hot. Wait for it to cool before touching, and handle it from the front only. To clean (while the machine is on):
- Take out the drip tray and coffee grounds container (as shown in the below figure);

- Empty and thoroughly clean the drip tray and ground container to remove any residue at the bottom. Utilize the brush’s spatula for this purpose.
- Reinsert the drip tray with grille and coffee grounds container into the machine.
Vital Notice: Always remember to empty the coffee grounds container when removing the drip tray, even if there are only a few grounds left. Neglecting this step can result in unexpected overflow and blockage of the machine when brewing subsequent coffees.
Allow me to inform you about the “Crucial Cleaning Manual: Maintaining the Drip Tray and Drip Tray Grille.”
Essential Cleaning Guide: Drip Tray and Drip Tray Grille Maintenance
Now that you’ve gained insights into Cleaning the Coffee Grounds Container and Drip Tray, let’s delve into the Essential Cleaning Guide for Drip Tray and Drip Tray Grille Maintenance.
Be mindful: The drip tray’s water level indicator, indicated by the protruding red marker (as shown in the below figure).

Prevent overflowing and potential damage by regularly emptying and cleaning the drip tray. To remove the drip tray, follow these steps:
- Take out the drip tray and coffee grounds container.
- Verify the red condensate tray and empty if full;
- Extract the cup tray and drip tray grille , then clean and wash all parts;
- Reassemble the drip tray with the grille and ground container back into the machine.
Crucial Note: Ensure to empty the grounds container when taking out the drip tray, even if it holds only a small amount of grounds. Neglecting this step could lead to an excessive buildup of grounds, causing potential clogs in the machine when brewing subsequent coffees.
Let me provide you with information regarding “Thoughtful Cleaning of the Interior of Appliances.”
Cleaning the Appliances Interior with Care
Following your completion of the Essential Cleaning Guide for Drip Tray and Drip Tray Grille Maintenance, let’s move forward to Cleaning the Interior of the Appliance with Care.
Before proceeding with the maintenance of the appliance’s interior components, ensure the machine is powered off (refer to section “How to Safely Turn Off the Coffee Machine?”) and disconnected from the power source. Avoid immersing the machine in water.
Follow these steps to maintain the cleanliness of the interior:
- Regularly inspect (approximately once a month) the inner parts of the appliance, accessible by removing the drip tray, for any accumulated dirt. Employ the provided brush and a sponge to eliminate coffee residues if necessary.
- Employ a vacuum cleaner (as shown in the below figure) to remove all remaining debris.

Allow me to furnish you with details concerning “Cleansing and Replenishing the Water Reservoir.”
Cleaning and Refilling the Water Tank
Now that you’re acquainted with the careful cleaning of the appliance’s interior, allow me to assist you in the process of Cleaning and Refilling the Water Tank.
Regularly maintain the water tank , roughly once a month, and whenever you replace the water softener filter .
- Extract the water tank, remove the water softener filter if it’s there, and rinse under running water.
- Empty the water tank, then clean it using a damp cloth and a small amount of dish soap. Rinse thoroughly with water.
- Reinsert the filter into the machine (as shown in below figure), refill the tank with freshwater up to the MAX level and place the tank back.
- (For models with water softener filters) Run 100ml of hot water through the filter to reactivate it.
Please take note: If the machine remains unused for over 3-4 days, remember to clean the tank as outlined above.
Enable me to equip you with information pertaining to the “Regular Maintenance of the Pre-Ground Coffee Funnel.”
Routine Cleaning of the Pre-Ground Coffee Funnel
Having gained expertise in Cleaning and Refilling the Water Tank, let me now direct you in the proper maintenance of the Pre-Ground Coffee Funnel through routine cleaning.
To keep the pre-ground coffee funnel clean, you should perform regular maintenance every month.
Follow these simple steps:
Here are the steps to follow for routine cleaning of the Pre-Ground Coffee Funnel:
- Turn off the machine.
- Open the funnel flap.
- Use the included brush to clean the funnel.
- Ensure there are no accessories remaining in the funnel.
- Close the flap to prevent any potential appliance damage during operation.
Crucial Note: After cleaning, ensure no accessories remain within the funnel. Having foreign objects in the funnel while the machine is operational may lead to potential damage to the appliance.
Allow me to share valuable insights on the process of “Monthly Cleaning for the Brewing Unit: A Step-by-Step Guide.”
Monthly Cleaning of the Brewing Unit: Step-by-Step Guide
Following your mastery of routine cleaning for the pre-ground coffee funnel, allow me to lead you through a step-by-step guide for Monthly Cleaning of the Brewing Unit.
Follow these simple steps:
Vital Note: You cannot remove the brewing unit while the machine is operational.
- Ensure the machine is turned off properly (see section “How to Safely Turn Off the Coffee Machine?”).
- Take out the water tank .
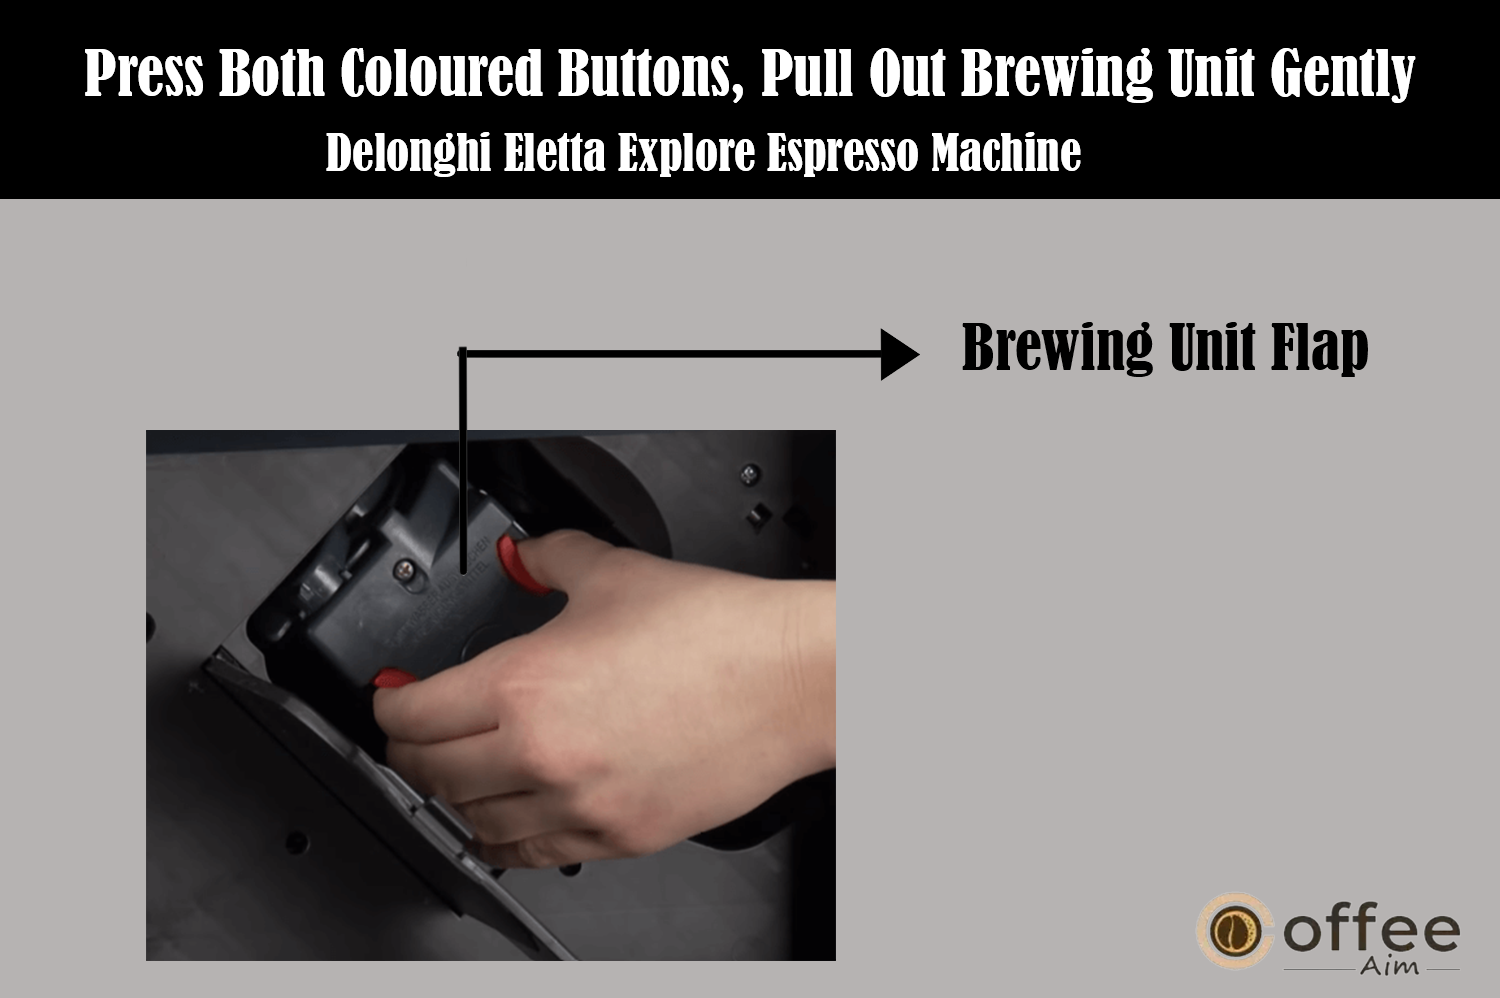
- Open the brewing unit flap (see in the below figure) located on the right side of the machine.

- Simultaneously press the two colored release buttons inward and gently pull the brewing unit outwards (see in the below figure).
- Allow the brewing unit to soak in water for about 5 minutes, then rinse it under running water.
Crucial Note:Only use water for rinsing; avoid using detergents for dishwashers, as they can cause damage.
- Employ the brush to remove any lingering coffee residues from the brewing unit housing, visible through the brewing unit flap.
- After cleaning, insert the brewing unit by sliding it onto the internal support, then press the PUSH symbol fully until it clicks into place.
Please note:If you face difficulty in inserting the brewing unit, adapt its size by pressing the two levers (see in the below figure) before insertion.

- Ensure the two colored buttons on the brewing unit have securely snapped out once it’s in place.
- Close the brewing unit flap.
- Replace the water tank and you’re good to go!
Let me provide you with knowledge about “Maintaining Milk Carafes through Correct Cleaning: Maintenance Guidelines.”
Proper Cleaning of Milk Carafes (E) and (F): Maintenance Instructions
With a firm grasp of the Monthly Cleaning of the Brewing Unit from our comprehensive guide, let me now guide you in effectively maintaining the Milk Carafes:
Maintaining Your Milk Carafes (E) and (F):
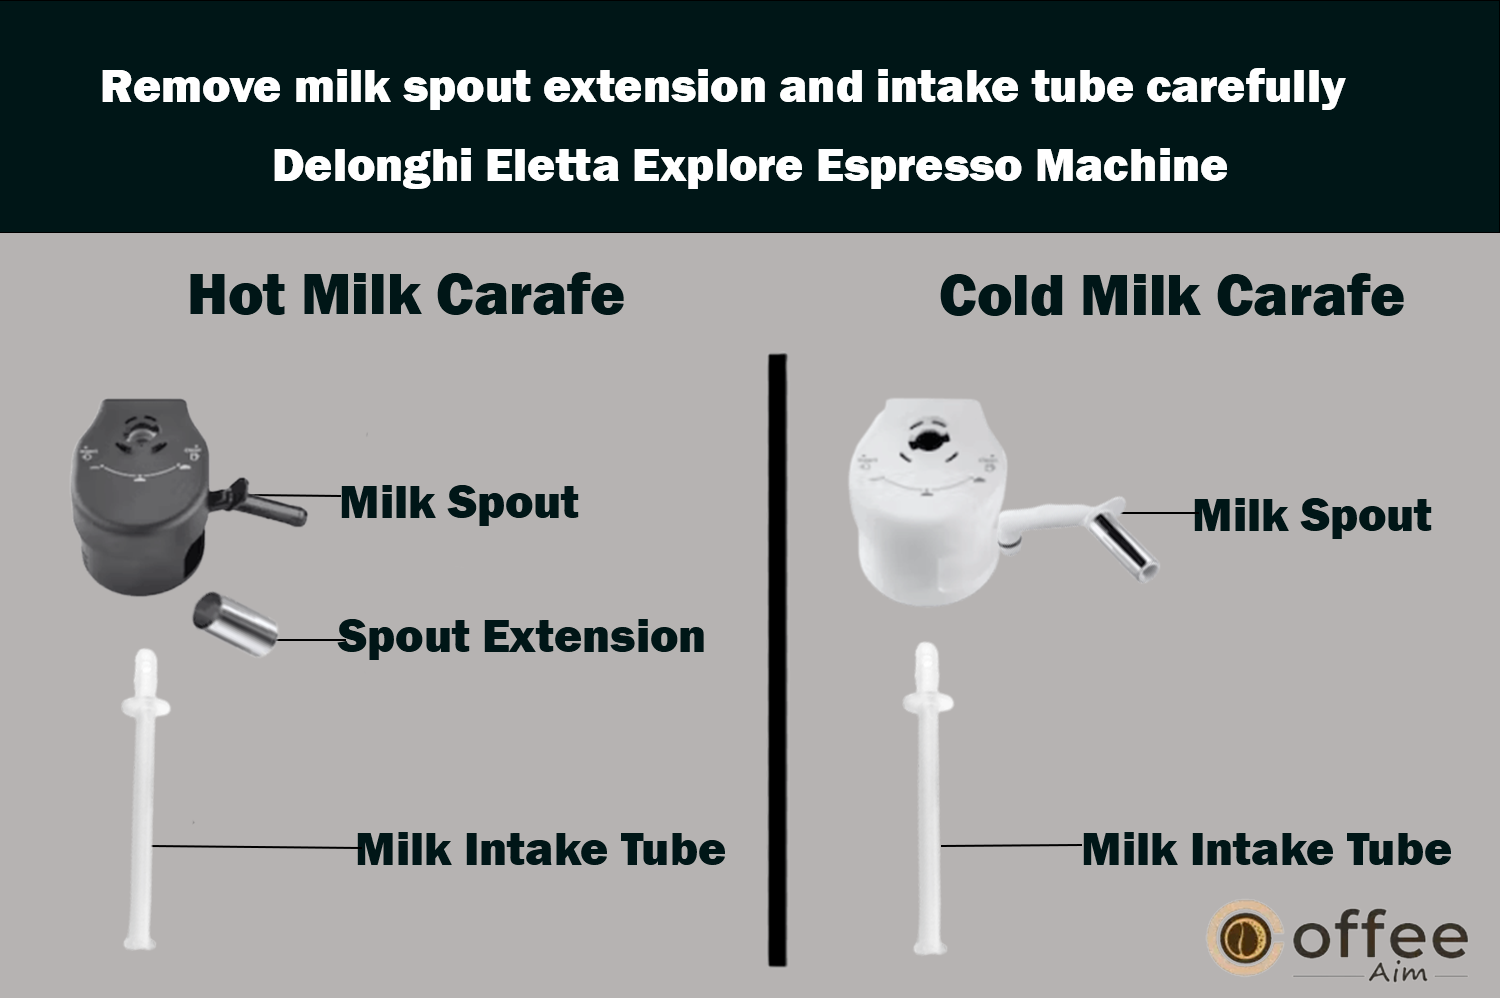
- Gently detach the lid of the milk carafe (E1) or (F1) .
- Carefully remove the milk spout (E5) or (F5), milk spout extension (E7) for the ‘Hot’ carafe only, and the milk intake tube (E6) or (F6) (as shown in the below figure).
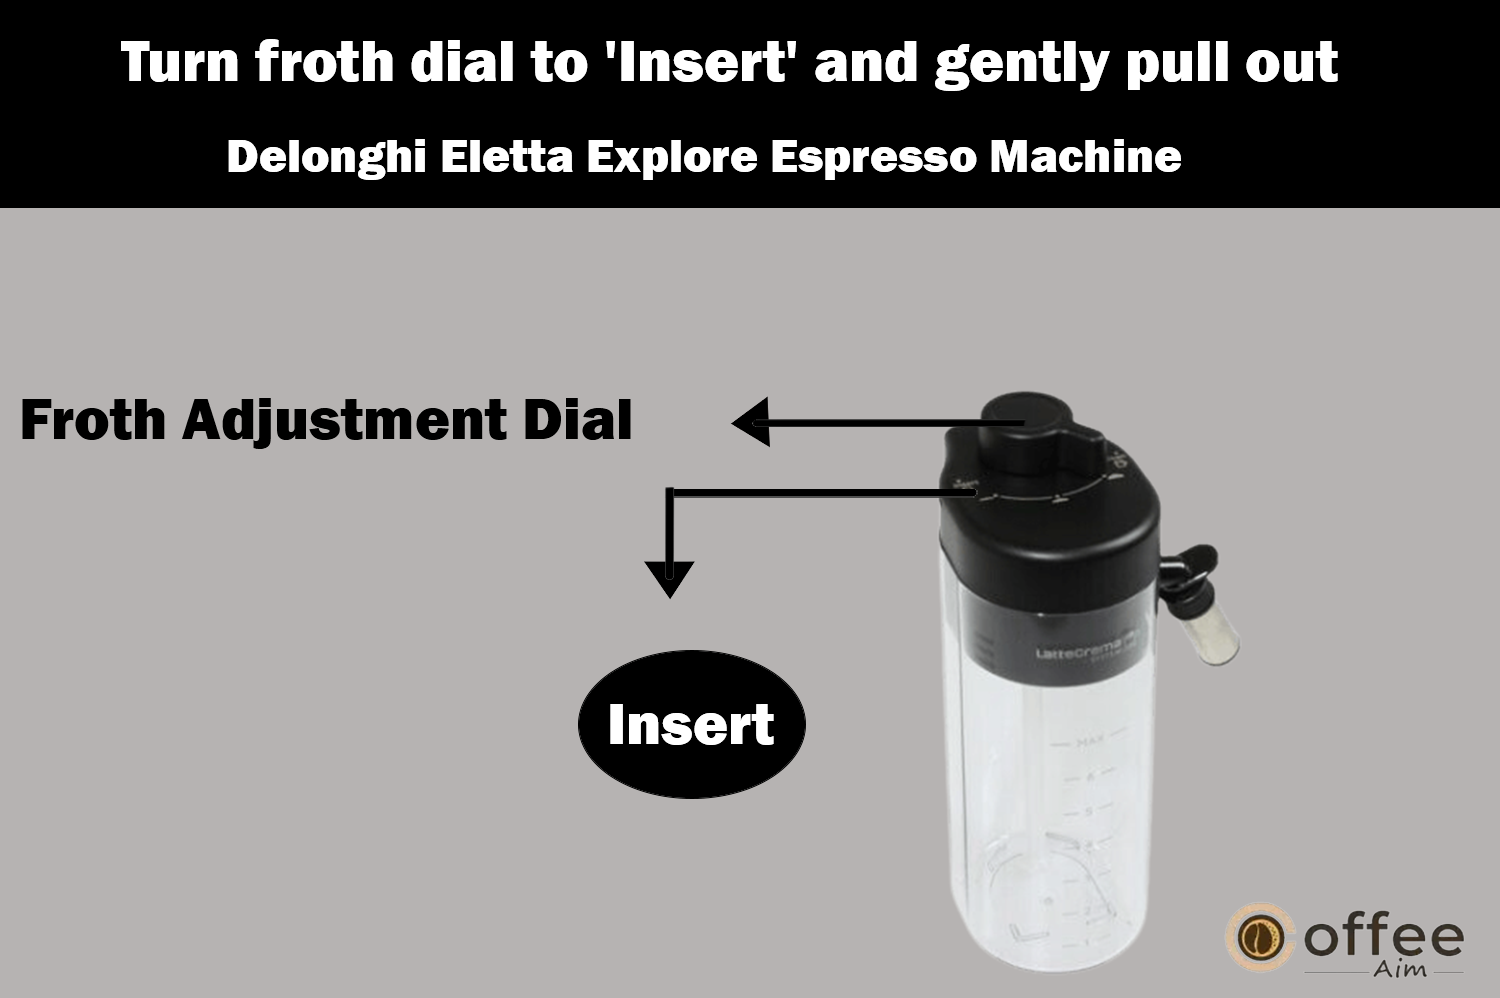
- Rotate the froth adjustment dial (E3) or (F3) clockwise to the ‘Insert’ position (as shown in the below figure), and gently pull it out.
- Counter-clockwise, turn and remove the milk carafe connector (E4) or (F4) (see in the below figure).

- Cleaning options:
- Dishwasher: Rinse all components and the milk carafe with hot drinking water (minimum 40°C), then place them in the top dishwasher basket. Run a 50°C program, like standard ECO.
- Manual cleaning: Thoroughly rinse all components, especially the visible milk residues, under hot drinking water (at least 40°C). Soak all components in hot drinking water (minimum 40°C) with dishwashing liquid for 30 minutes. Carefully rub each component under running water.

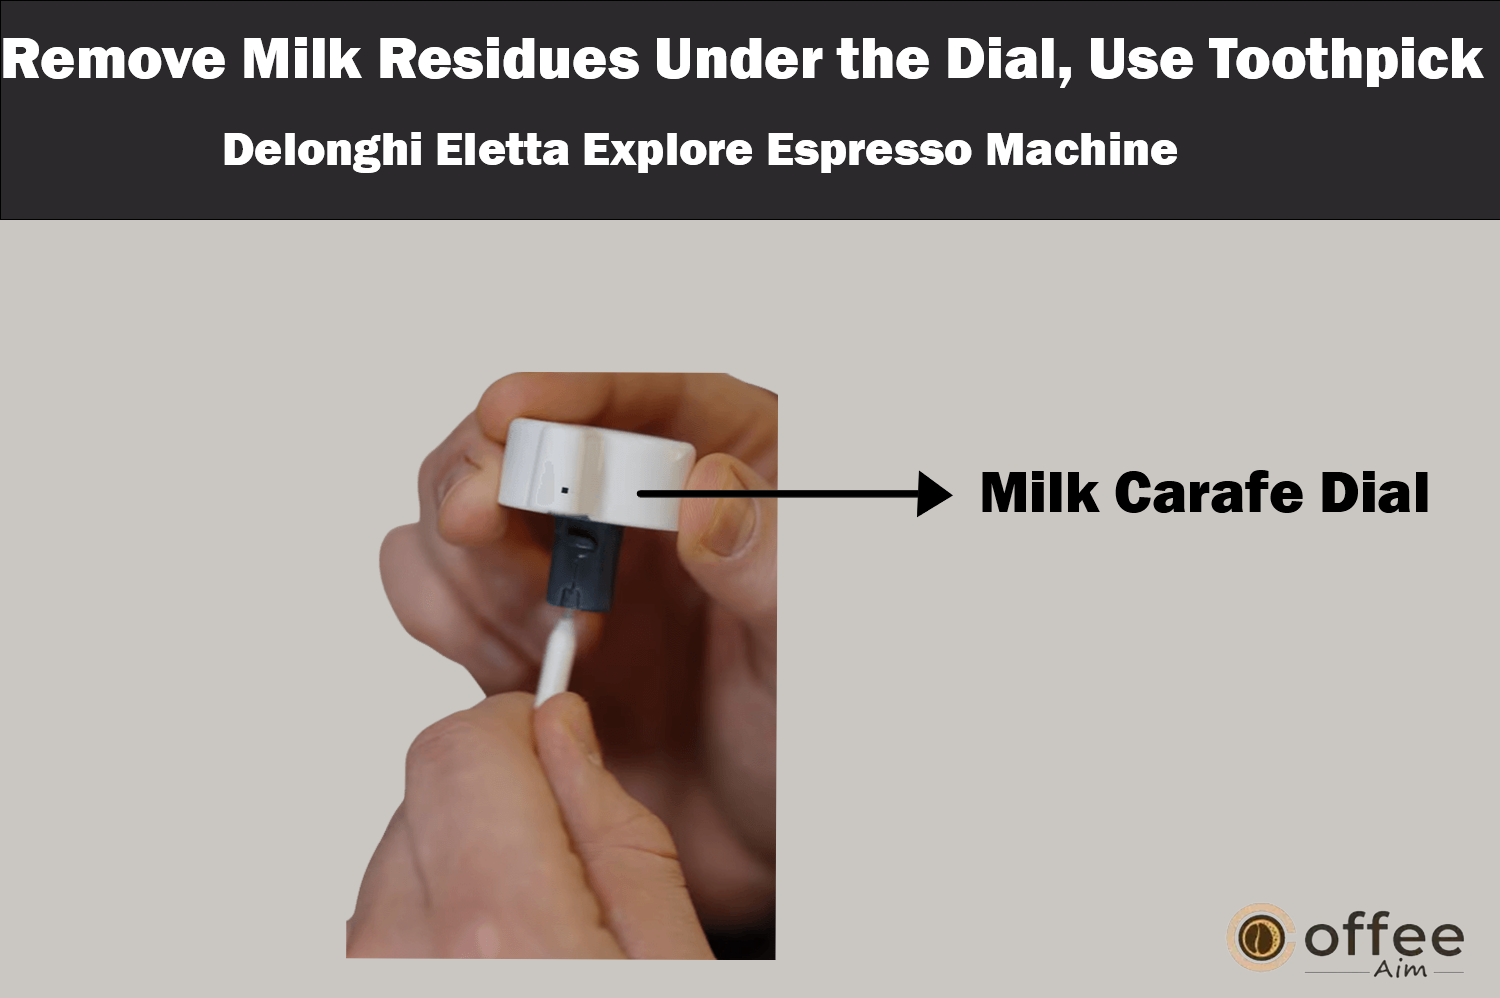
- Ensure no milk residues are left in the hollow and groove beneath the dial (see in the below figure). Gently use a toothpick if needed.
- Check the intake tube and spout for potential clogs from milk residues.
- Dry all components with a clean, dry cloth.
- Reassemble all lid components.
- Reattach the lid onto the milk carafe.
Please remember: Your appliance will prompt you to thoroughly clean the milk carafe each week, offering the proper cleaning sequence.”
Let me provide you with details about effectively descaling the Delonghi Eletta Explore Espresso Machine to remove the buildup of limescale.
How to Descale Delonghi Eletta Explore Espresso Machine (Removing limescale buildup)?
Having acquired knowledge about the correct maintenance of Milk Carafes (E) and (F), I’m here to provide you with guidance on Descaling the Delonghi Eletta Explore Espresso Machine to effectively eliminate limescale buildup.
Follow these expert guidelines for effective descaling:
Vital Notes:
- Before commencing, carefully read the directions and information provided on the descaler packaging.
- Utilize only Delonghi’s recommended descaler. Failure to do so or incorrect descaling procedures might lead to issues not covered by the manufacturer’s warranty.
- Be cautious as the descaler could potentially harm sensitive surfaces. In case of any accidental spillage, promptly dry it.
| To descale | |
| Descaler | De’Longhi descaler |
| Container | Recommended capacity: 2 l |
| Time | ~50min |
Descaling is essential when prompted by the respective message on the homepage. You have the option to descale immediately by selecting “OK” and following the steps outlined from point (5). Alternatively, you can postpone descaling by pressing “Cancel”. The symbol serves as a reminder on the homepage, indicating the need for descaling. This message is displayed each time you power on the appliance.
Unlocking the Descaling Menu:
- Tap the settings menu icon located on the homepage;
- Navigate through the menu options until you spot “Descaling” being displayed;
- Initiate the guided descaling procedure by pressing “Start”;
- Begin the descaling process by selecting “Start”;
- Gently insert the water spout ;
- Take out and empty the drip tray and the coffee grounds container, then reposition both within the appliance and press “Next”;
- Extract the water tank, lift the lid, and if applicable, take out the filter . Empty the tank entirely.
- Pour the descaler into the tank until it reaches the level A marked within the tank (equivalent to one 100ml pack), then add water (one litre) up to level B (as shown in the below figure). Put the water tank (with its lid) back into the appliance and press “Next”;

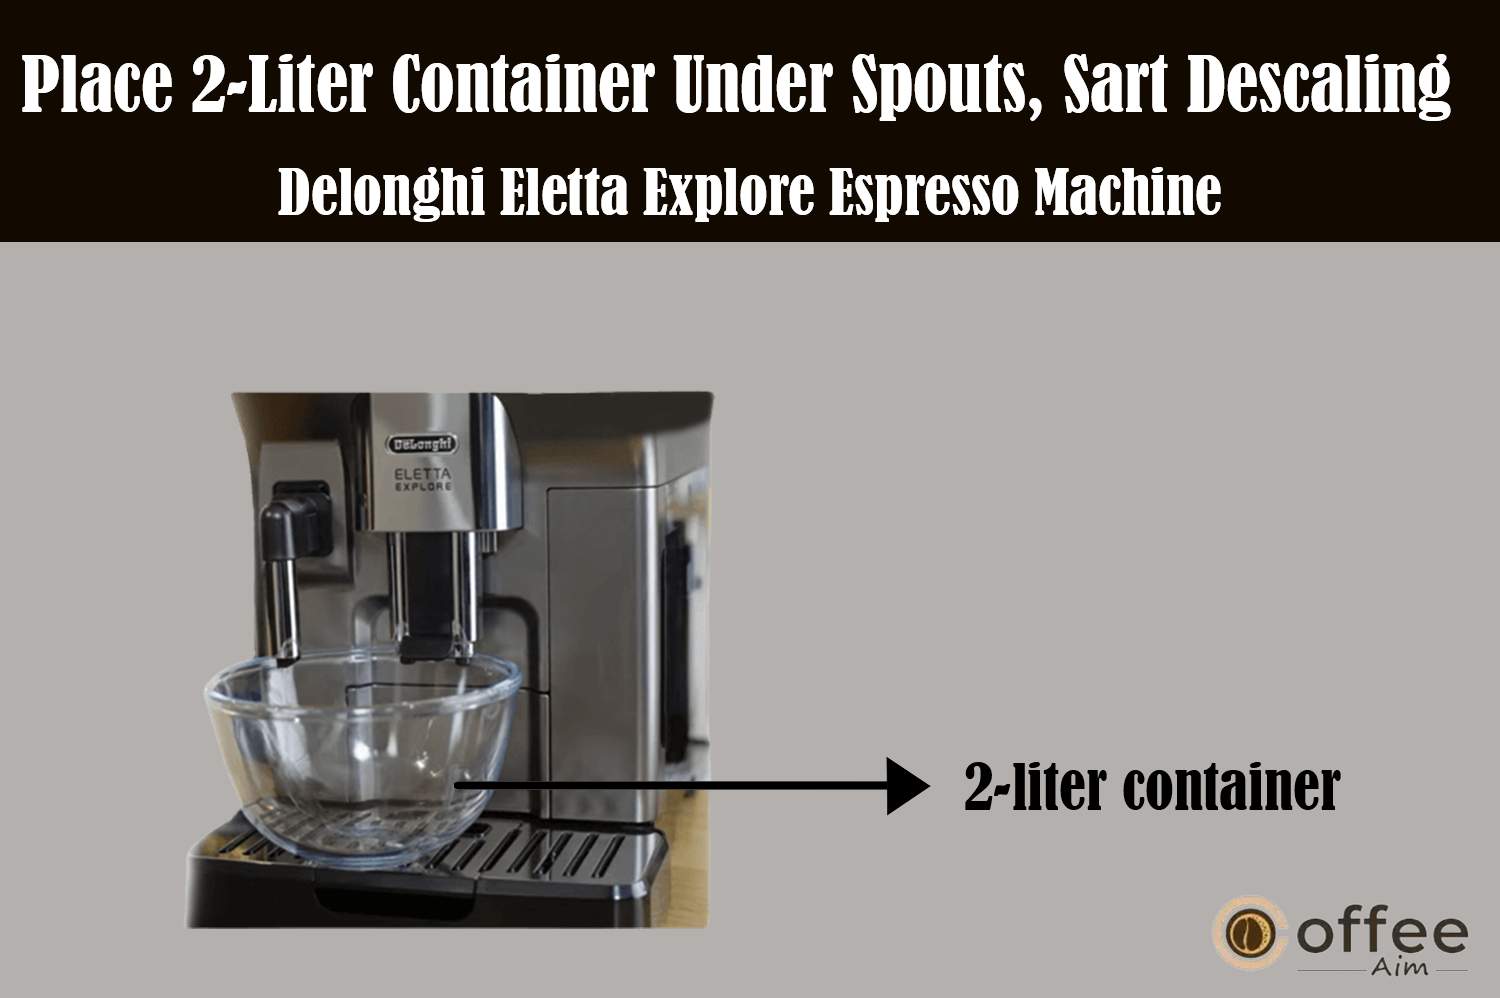
- Position an empty 2-liter container beneath the spouts (as shown in the below pic). Press “Next” to commence the descaling process (“Back” to revert to the previous screen or “X” to exit the procedure, ensuring to eliminate the descaling solution from the tank);
Note: Caution for Scalding Beware of acid-infused hot water that comes out of the spouts. Take care to prevent contact with splashes of this solution.
- The descale program begins, and the descaler liquid emerges from both the hot water and coffee spouts. An automated sequence of rinses occurs to expel scale residues from within the coffee machine; Once around 40 minutes have passed, the descaling operation concludes;
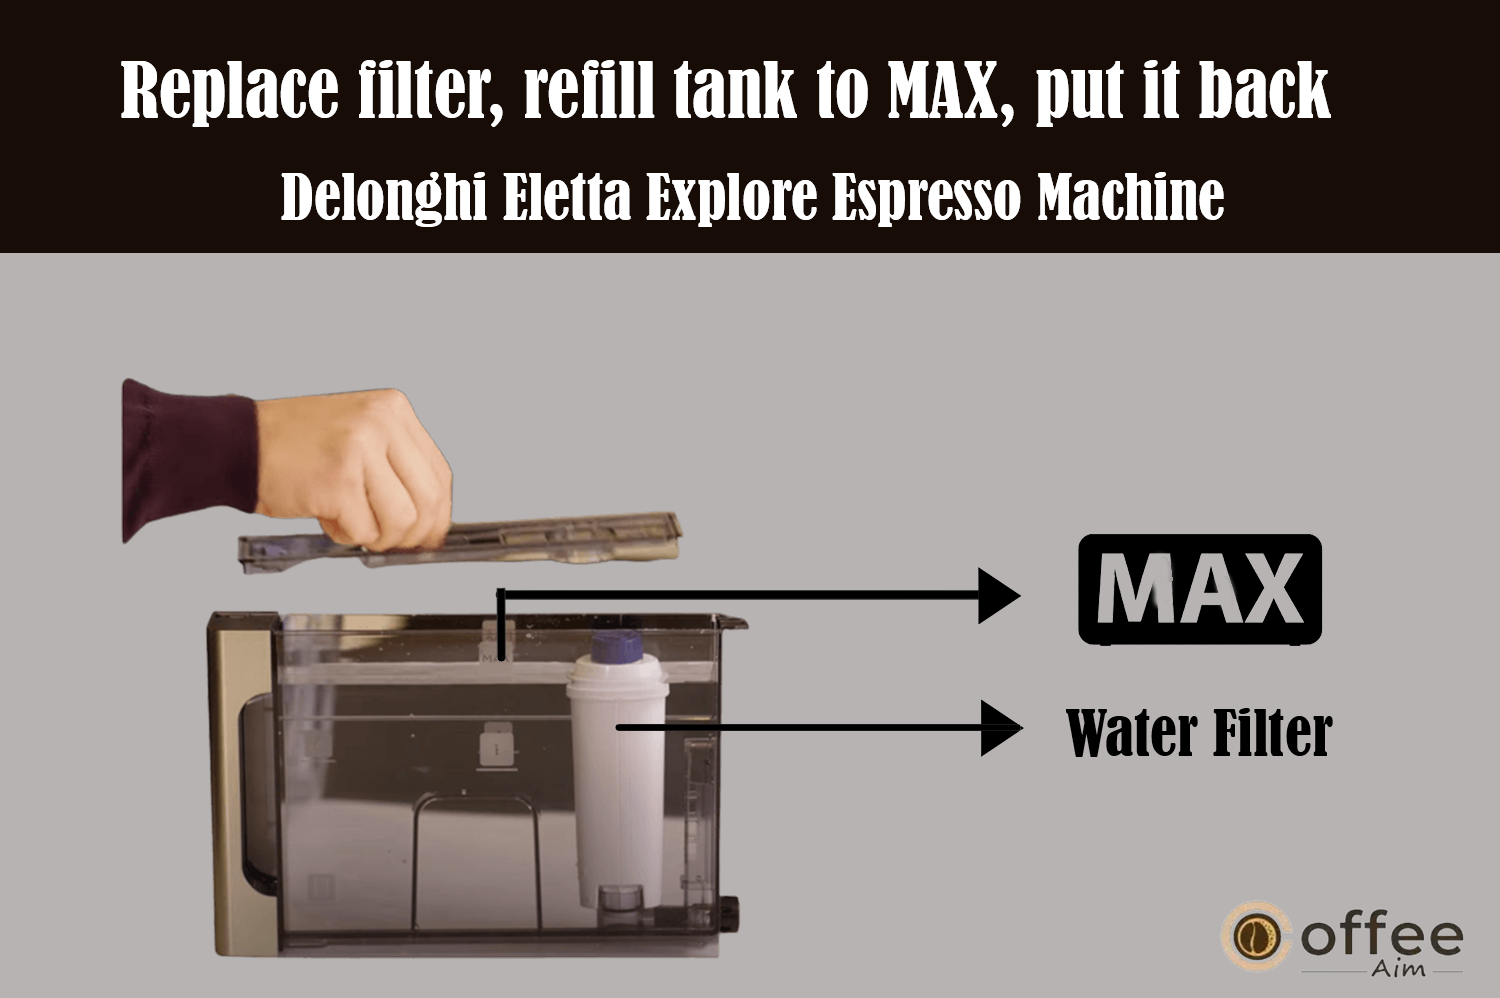
- The appliance is now prepared for a thorough rinsing with clean water. Empty the container used for collecting the descaler solution. Remove the water tank, empty it, rinse it under running water, fill it with fresh water up to the MAX level, and place it back into the appliance (see in the below figure). Press “Next”;

- Set the empty container designated for the descaler solution underneath the spouts and press “Next” to initiate rinsing;
- Hot water streams from both the hot water spout and coffee spouts;
- Empty the container used for collecting the rinsing water once the tank runs dry;
- Extract the water tank and reinsert the water softener filter if previously removed. Press “Next” to continue;
- Refill the tank with freshwater up to the MAX level, reposition it in the appliance, and press “Next” to proceed;
- Place the empty container intended for the descaler solution under the spouts and press “Next” to initiate another round of rinsing;
- Once the tank’s water supply is exhausted, empty the container used to collect the rinsing water, and reinsert the drip tray and grounds container after emptying, then reposition them in the appliance;
- Extract the water tank, top it up to the maximum level, return it to the appliance, and press “Next”;
- The descaling procedure is now complete. Press “OK”. The appliance undertakes a quick preheat cycle before returning to the homepage.
Please note:
- If the descaling cycle isn’t correctly finished (e.g. power interruption), it is recommended to repeat the process;
- Following descaling, it’s normal for the grounds container to hold water;
- If the water tank isn’t filled to the MAX level after descaling, the appliance prompts a third rinse to guarantee complete removal of the descaler solution from the machine’s internal circuits. Before starting the rinsing, don’t forget to empty the drip tray.
Allow me to provide you with insights regarding the “Intelligent Descale Alert: Tailored to Your Water Hardness Level.”
Smart Descaling Alarm: Customized for Water Hardness
Now that you’ve become acquainted with how to descale the Delonghi Eletta Explore Espresso Machine to remove limescale buildup, let’s explore the Smart Descaling Alarm, which is designed to accommodate the water hardness in your area.
The intelligent descaling alarm is personalized according to the hardness of your water. It will remind you to perform descaling at intervals that are adjusted to the mineral content of your water. Moreover, you have the option to set the machine to align with the hardness of your local water, which helps in reducing the need for frequent descaling.
.Let me provide you with valuable information about the procedure of “Evaluating Water Hardness: A Fast and Simple Measurement.”
Assessing Water Hardness: Quick and Easy Measurement
Now that you’ve become acquainted with the Smart Descaling Alarm tailored to water hardness, let’s explore the Quick and Simple Method for Evaluating Water Hardness.
- Use the “Total hardness test” indicator paper to assess water hardness conveniently.
- Dip the indicator paper in a glass of water for one second, and then shake it gently.
- After a minute, check the paper for the appearance of 1 to 4 red squares, which indicate the level of water hardness.
Let me provide you with details about the “Step-by-Step Instructions for Modifying Water Hardness.”
Adjusting Water Hardness: A Step-by-Step Guide
After getting to know how to Assess Water Hardness: A Quick and Easy Method, let’s now dive into Adjusting Water Hardness: A Step-by-Step Tutorial.
Here’s a step-by-step guide to adjusting water hardness:
- Access the settings menu icon found on the homepage .
- Navigate through the pages and pick “Water hardness.”
- Tap on “Set.”
- Follow the steps outlined in the preceding section to measure water hardness.
- Select the dot corresponding to the previously measured water hardness, following the provided table.
| Total Hardness Test (D1) | Water hardness |
 | Level 1 |
 | Level 2 |
 | Level 3 |
 | Level 4 |
- The machine will now be updated with the newly set water hardness.
- Press the “<” button to return to the settings menu.
Let me offer you information regarding the “Proper Guidelines for Efficiently Utilizing the Water Softener Filter.”
Effective Use of the Water Softener Filter: Proper Instructions
Now that you understand how the Smart Descaling Alarm adjusts to your water hardness, let’s explore the effective use of the Water Softener Filter. Properly utilizing the water softener filter is crucial for specific models. If your model doesn’t include one, you can obtain it from De’Longhi Customer Services. Here’s how to efficiently employ the filter to ensure optimal performance.
Allow me to give you information concerning the “Step-by-Step Guide to Installing and Activating the Filter.”
Filter Installation and Activation: Step-by-Step Guide
Now that you’re familiarized with the Step-by-Step Guide for Installing and Activating the Filter, let’s now explore the Step-by-Step Guide for Installing and Activating the Filter.
Follow these steps to install and activate the water filter for optimal performance:
- Access the settings menu;
- Browse the available options and choose “Water filter”;
- Press “OK” to initiate the guided procedure;
- Remove the water filter from its packaging and adjust the date indicator to indicate the next two months (as shown in the below figure);

It’s important to note that under normal usage, the filter lasts around two months. If the machine remains idle with the filter, its lifespan is about three weeks at most;
- Press “Next” to proceed (Press “Back” to return to the previous screen; Press “X” to cancel the operation);
- To activate the filter, run tap water through the central hole of the filter until water streams out from the side openings for over a minute (see in the below figure). Press “Next”;

- Remove the water tank and fill it with water. Submerge the filter in the water tank, ensuring complete immersion for about ten seconds. Tilt and gently press the filter to allow air bubbles to escape (as shown in the below figure). Press “Next”;

- Place the filter into the filter housing (as shown in the below figure) and push it in as far as it will go. Press “Next”;

- Securely close the tank with its lid , then reinsert the tank into the coffee machine;
- Insert the hot water spout . Press “Next”;
- Position an empty container with a capacity of at least 0.5 liters beneath the hot water spout and press “Next” to activate the filter;
- The machine dispenses hot water and stops automatically. Press “OK” to return to the homepage;
- The filter is now operational, and you can proceed to use your coffee machine.
Now, explore the efficient process of filter replacement with our step-by-step guide.
Step-by-Step Guide for an Effective Filter Replacement
Having gained familiarity with the Step-by-Step Guide for Efficient Filter Replacement,let’s delve into the Skillful Replacement of the Filter: Step-by-Step Instructions.
When it’s time to change the filter, take action upon seeing the message to replace it on the homepage. If you opt for an immediate replacement, press “OK” and follow the directions from point 3 in the preceding section. If you decide to postpone it, press “Cancel”. The filter symbol will appear on the display, serving as a reminder for you to replace it. To proceed with the replacement process, adhere to the following steps:
- Access the settings menu.
- Scroll through the pages until you see “Water filter,” then press “OK”.
- Press “OK” to start the guided procedure.
- Remove the water tank and the exhausted filter.
- To detach the filter, press “OK” (“Back” to return to the previous screen; “Cancel” to cancel the operation).
- To put in the new filter, press “Next” and follow the steps described in the previous section starting from point (4).
Remember: After two months (check the date indicator) or if the machine hasn’t been used for three weeks, consider replacing the filter even if the message hasn’t appeared yet.
Let’s uncover the “Technical Specifications: Appliance Particulars and Dimensions.”
Technical Specifications: Details and Dimensions of the Appliance
Once you’ve acquired an understanding of the Proper Instructions for Effectively Using the Water Softener Filter, let me guide you through the Technical Specifications: Appliance Details and Dimensions.
Delve into the realm of precision as we dissect every aspect that defines its functionality, size, and capabilities. From its inner workings to its outer form, this section provides a comprehensive overview, ensuring you have all the information you need to understand and appreciate the appliance’s design and performance.
| Voltage: | 220-240 V~ 50-60 Hz max. 10 A |
| Power: | 1450 W |
| Pressure: | 1.9 MPa (19 bars) |
| Water tank capacity: | 1.8 l |
| Size LxDxH: | 260x450x385 mm |
| Cord length: | 1200 mm |
| Weight (varies according to model): | 11.2 kg |
| Beans container capacity: | 300 g |
| Frequency: | 2400/2500 MHz |
| Maximum transmission power: | 20 mW |
Please note: that Delonghi may make technical specification and design changes without compromising functionality and quality.
Energy Saving Tips: Efficient Usage for Reduced Consumption
Now that you’re well-versed in the process of Technical Specifications: In-depth Appliance Details and Dimensions, let’s delve into Energy Saving Tips: Smart Practices for Minimizing Consumption.
As an expert user of this machine, I’ve learned some valuable strategies to minimize energy usage. Here are some guidelines that can truly make a difference:
- After you’ve enjoyed your beverages, remember to take a moment and remove the milk carafes or any accessories.
- Take advantage of the auto-off feature by setting it to 15 minutes (refer to section ” How to Energy-Saving Auto-Off”). This way, the machine won’t stay powered on when not in use for extended periods.
- Activate the Energy Saving mode (found in the “Controlling Beep Sound and Energy Saving” section) to ensure your machine optimizes its energy consumption when not actively in operation.
- It’s a good practice to consistently perform the descaling cycle whenever your machine prompts you to do so. This helps maintain its efficiency and ensures it runs smoothly.
By following these user-tested tips, you can significantly lower your energy consumption while enjoying the full benefits of your machine.
DISPLAYED MESSAGES
| DISPLAYED MESSAGE | MEANING | SOLUTION |
| Make sure you put clean water in the tank until it reaches the highest level marked as MAX. Remember to pour the water above Level 1. | Not enough water in the tank | Remove the tank, fill it with fresh water until it reaches above Level 1, and then return it to the appliance. |
| I don’t have sufficient water for your drink. Kindly pour fresh water into the tank until it reaches the MAX level. Make sure to fill it above Level 1. | ||
| Kindly place the water tank inside | The tank is not properly positioned | Place the tank in the correct position and press it in as far as it can go. |
| Add fresh water to the tank, and don’t forget to empty the drip tray and ground container, please. | There’s not sufficient water in the tank to prepare the drink, and you’ll soon see a message telling you to empty the grounds container. | The machine requests both tasks to be completed to ensure uninterrupted beverage production, allowing you to make multiple drinks consecutively without needing to do anything else. |
| Kindly put in the brewing unit. | After cleaning, the brewing unit hasn’t been put back in place. | Place the brewing unit following the instructions in section ”Monthly Cleaning of the Brewing Unit”. |
| Kindly remove the contents from the ground container. | The container for used coffee grounds is completely filled. | Clean it as it’s explained in section ‘How to Clean the Coffee Grounds Container and Drip Tray?. |
| Please, put back the ground container and drip tray. | The container for used coffee grounds and/or the drip tray is not properly positioned or is not there. | Place the drip tray with the ground container into position and push it in as far as it can go. |
| Please put in your favorite pre-ground coffee, but only use one serving at most! | You’ve chosen to use pre-ground coffee for the preparation. | Ensure that the funnel is clear, then add a single level scoop of pre-ground coffee. Afterward, press ‘Next’ on the screen and follow the guidance in section ‘Using Pre-Ground Coffee. |
| Fill up the coffee bean container and press ‘OK’ to continue making your coffee. | There are no more coffee beans left. | Put coffee beans into the container and press “OK” to start brewing again. |
| Kindly put in the water spout. | The spout is either not properly placed or is not there. | Put the spout in and push it as much as you can. The machine will make a beep sound (if the beep function is turned on). |
| Kindly put in the cold/hot milk carafe. | The milk carafe (E) or (F) isn’t placed properly or is not there. | Put in the milk carafe and push it all the way in. The machine makes a beep sound (if the beep function is on). |
| Just tidying up a bit. I’ll be back in a few moments. | The machine has found contaminants within its internal circuits. | Wait until the machine is ready again and then choose your desired drink once more. If the issue continues, get in touch with customer support. |
| The changes you made haven’t been stored. | When personalizing the drinks (refer to section ” Personalize Your Beverages with ‘My Function’ (“Hot” beverages only)”), the process was intentionally stopped by pressing “X” or an alarm was activated. | To return to the homepage, press “X” and check the alarm that caused the interruption. Follow the instructions related to the displayed alarm (refer to section “Displayed messages“). |
| I can’t finish making your drink. Decrease the aroma level and give it another try. | The coffee grounds are too fine, causing the coffee to be dispensed too slowly or not at all. | Choose a gentler “Aroma” setting (refer to section “Customizing Parameters for Custom Beverages”). |
| If you have the water softener filter, there might be an air bubble inside the system causing a blockage in the flow. | Press the “OK” button and release a small amount of water (refer to ” Preparing Hot Water and Tea”) until the water flow becomes steady. If the issue persists, take out the filter (see “Step-by-Step Guide for an Effective Filter Replacement”). | |
| I can’t make your drink. Please turn the coffee grinder dial up one step at a time. | The coffee grind is too small, so the coffee comes out very slow or not at all. | Press “OK” and change the coffee grinder settings (look at “Optimizing Grinding for Perfect Coffee”). |
| Please choose a milder taste or use less ground coffee. | You’ve used too much coffee. | Choose a lighter taste (look at “Customizing Parameters for Custom Beverages”) or use less ground coffee (up to 1 scoop). Press “OK” to return to the main screen or wait for the message to go away. |
| Please keep the milk container in the refrigerator. | A milk drink was made and the milk container is still in the machine. | Take out the container and put it in the fridge. |
| The machine needs cleaning. Press OK to begin (it takes about 50 minutes). | The machine needs cleaning. | To clean the machine, press “OK” and follow the steps. If you don’t want to, press “Cancel”. But, a reminder will show on the main screen (C) to tell you it needs cleaning (look at “How to Descale Delonghi Eletta Explore Espresso Machine”). |
| Please change the water filter. Press OK to begin. | The water softening filter is used up. | Press “OK” if you want to change or take out the filter now, or “Cancel” if you want to do it later. Look at “Effective Use of the Water Softener Filter” for steps. |
| There’s a main alert. Please check the instruction book or the Coffee Link App. | The inside of the machine is really dirty. | Clean the inside of the machine well, like it says in “Maintaining Hygiene and Cleanliness”. If the message shows up even after cleaning, reach out to De’Longhi help or a certified repair place. |
| There’s no water in the machine. Press OK to start adding water. | There’s no water in the system. | Press “OK” to add water. It will stop on its own. It’s normal to see water in the drip tray after adding. If it keeps happening, check if the water container is put in correctly. |
| A new water cleaning filter has been put in. | Be sure you’ve followed the steps for putting in the new filter (look at “Filter Installation and Activation” and “Step-by-Step Guide for an Effective Filter Replacement”). If there’s still an issue, take out the filter (see “Step-by-Step Guide for an Effective Filter Replacement”). | |
 | Power-saving mode is on. | To turn off power-saving, follow the steps in “Controlling Beep Sound and Energy Saving”. |
 | The machine needs to be cleaned. | You need to clean the machine as explained in “How to Descale Delonghi Eletta Explore Espresso Machine”. |
 | The filter needs to be changed. | Change or take out the filter like it says in “Effective Use of the Water Softener Filter”. |
 | Don’t forget to clean the milk container (E) or (F). | Set the foam control knob to CLEAN. |
| *For models that can connect to Wi-Fi: | ||
 | You set up the connection in the machine’s settings . | Link to the Coffee Link App. |
 | It shows the machine is linked up. | To turn off the connection, follow the steps in “Enabling and Configuring Remote Control”. |
 | It’s connected, but can’t reach the cloud. | If you just switched it on, wait for the machine to finish starting up. |
| If the issue keeps happening, turn off the connection and then turn it back on, like explained in “Enabling and Configuring Remote Control)”. | ||
| If the issue persists, restart both the device and your home router. | ||
| *Only for models with Bean Adapt: | ||
| The profile of the coffee beans has been altered! Make sure to make at least 3 coffees before switching the bean profile again. | The device must make a minimum of 3 coffees before you can modify the Bean Adapt settings. | Make a minimum of 3 coffees using the new beans before adjusting the Bean Adapt. |
TROUBLESHOOTING
Here’s a list of potential issues. If you can’t fix the problem following the given instructions, please reach out to customer support.
| PROBLEM | POTENTIAL REASON | RESOLUTION |
| The device fails to power up. | It’s not connected to the electrical outlet. | Connect to the electrical outlet. |
| The temperature of the coffee is not sufficiently high. | The internal circuits of the device have cooled down as it has been 2-3 minutes since the last coffee was brewed. | Prior to brewing coffee, warm up the internal circuits by using the rinse function as described in section “How to Clean and Heating Your Appliance Circuitce’s Intern?.” |
| The coffee temperature setting is set too cool. | Adjust a higher coffee temperature within the settings menu as outlined in section “How to Customize Coffee Temperature.” | |
| The cups were not heated in advance. | Heat the cups by flushing them with hot water (Note: you can utilize the hot water feature). | |
| Descaling of the machine is necessary. | Follow the instructions provided in section “How to Descale Delonghi Eletta Explore Espresso Machine.” Afterward, assess the water hardness as detailed in “Assessing Water Hardness” and ensure that the machine’s settings correspond to the local water supply hardness, as explained in “Adjusting Water Hardness.” | |
| The coffee lacks strength or doesn’t have enough creaminess. | The coffee beans are ground with a coarse texture. | Navigate to the settings menu and adhere to the provided directions to modify the grind. Note that the changes will only become apparent after brewing 3 coffees, as detailed in section “Optimizing Grinding for Perfect Coffee” |
| The coffee is not appropriate. | Utilize coffee intended for espresso machines. | |
| The coffee is not freshly roasted. | The coffee package has been unsealed for an extended period, causing it to lose its flavor. | |
| The coffee is dispensed at a sluggish pace or in a single droplet at a time. | The coffee beans are finely ground. | Access the settings menu and adhere to the provided instructions for grinding adjustment. You will notice the results after making 3 coffee deliveries, as explained in section “Optimizing Grinding for Perfect Coffee.” |
| No coffee is dispensed from either one or both of the spouts. | Obstructions are present in the coffee spouts . | Use a sponge or toothpick to clear any blockages in the coffee spouts. |
| The coffee being dispensed is diluted or lacks concentration. | The funnel is obstructed. | Use the brush to cleanse the funnel according to the instructions outlined in section “Routine Cleaning of the Pre-Ground Coffee Funnel.” |
| A small amount of the beverage is dispensed. | The water level in the tank is not adequate. | Ensure the tank is consistently filled beyond Level 1.Regenerate |
| The device doesn’t brew coffee. | The appliance has identified contaminants within its internal components, and it displays the message “Just performing some cleaning…” | Wait until the appliance is operational again, then choose your desired beverage once more. If the issue persists, please get in touch with customer support. |
| It’s not possible to remove the brewing unit. | The appliance was not powered down properly. | Power down the appliance by pressing the button as explained in section “How to Safely Turn Off the Coffee Machine?.” |
| Upon completing the descaling process, the appliance prompts for a third rinse. | Throughout the two rinsing cycles, the water reservoir has not been filled up to the maximum level. | Adhere to the guidance provided by the appliance’s display, but make sure to empty the drip tray beforehand to prevent water overflow. |
| Milk doesn’t come out from either the milk spout. | The milk carafe lid is soiled. | Perform the cleaning procedure for the milk carafe lid as outlined in section “Proper Cleaning of Milk Carafes (E) and (F).” |
| The lid is not properly assembled. | Properly arrange all the parts following the instructions provided in sections “Ensuring Optimal Frothing and Maintenance” and “Dial Positions for Hot and Cold Milk Beverages.” | |
| The milk has big bubbles and spurts from the milk spout , resulting in minimal froth. | The milk is either not sufficiently chilled or not appropriate for the selected beverage. | To achieve optimal outcomes, ensure you use the appropriate milk for preparing both hot and cold beverages (refer to section “Choosing the Right Milk“). Additionally, use beverages that are chilled to refrigerator temperature (around 5°C). |
| The lid of the milk carafe is contaminated. | Perform the milk carafe cleaning procedure as outlined in section ” Efficient Cleaning of the Milk Carafe.” | |
| Water has accumulated in the groove beneath the froth adjustment dial . | Remove the dial and ensure it is completely dried. | |
| Non-dairy, plant-based drinks have been employed. | For optimal outcomes, utilize beverages cooled to refrigerator temperature (around 5°C). Modify the froth level according to the instructions detailed in section “Dial Positions for Hot and Cold Milk Beverages.” | |
| The cup shelf is warm. | Several drinks have been prepared in quick succession. | |
| Following the cleaning process, you’re unable to reinsert the drip tray into the machine. | The condensate tray is not correctly situated. | Ensure that the condensate tray is properly placed or inserted. |
| The appliance produces sounds or releases minor bursts of steam when it’s idle. | The machine is either prepared for operation or has been powered down recently, and there is condensation dripping into the hot vaporizer. | This is a regular aspect of its functioning. To minimize this occurrence, empty the drip tray. |
| The appliance releases bursts of steam from the drip tray , and/or there is moisture on the surface where the appliance is situated. | The drip tray grille hasn’t been reinstalled following the cleaning process. | Return the drip tray grille to its place within the drip tray. |
| The Takeaway drink either exceeds the capacity of the travel mug or has leaked from it. | An inappropriate amount has been chosen. | Opt for a reduced amount (either Medio or Piccolo). |
| Modify the amount inside the mug to ensure the next drink is prepared accurately. | ||
| An insufficient amount of the Takeaway beverage has been prepared. | An inappropriate amount has been chosen. | Select a greater quantity (either Medio or Grande). |
| Modify the volume within the mug to ensure the next drink is prepared accurately. | ||
| Alter the liquid level inside the mug to guarantee the next beverage is made correctly. | The cover of the travel mug compartment is shut, and/or the coffee dispensers are in the lowered position. | Lift the flap and/or elevate the coffee dispensers. |
| *Variants equipped with Wi-Fi connectivity: | ||
| The application is malfunctioning. | The app is experiencing operational issues. | Shut down the application and then restart it. |
| The application signals an issue, but the appliance is functioning correctly. | The information between the appliance and the app is not in sync. | Turn off and then turn on the connectivity (as described in section Enabling and Configuring Remote Control (Certain Models Only). |
Conclusion
As we conclude our exploration of the Delonghi Eletta Explore Espresso Machine, you’ve ventured into the heart of coffee craftsmanship. From disassembling and maintaining intricate components to adjusting water hardness for a personalized brew, you now wield the knowledge to create the perfect cup of coffee. With every sip, you’ll taste the fruits of your efforts and feel the satisfaction of mastering this sophisticated appliance.
Remember, every detail matters in the pursuit of a sublime coffee experience. As you follow the smart descaling alarm, optimize energy efficiency, and engage with the water softener filter, your journey continues long after your first brew. This appliance isn’t just a coffee maker; it’s your gateway to a world of flavors and aromas, ready to be explored and tailored to your preferences.
So, embark on your journey armed with these insights, and let your mornings be greeted by the tantalizing scent of freshly brewed coffee. May every cup be a testament to your dedication, passion, and newfound mastery. Here’s to elevating your coffee ritual and savoring every moment – one aromatic sip at a time.
Cheers to your coffee odyssey with the Delonghi Eletta Explore Espresso Machine