Quick Navigation
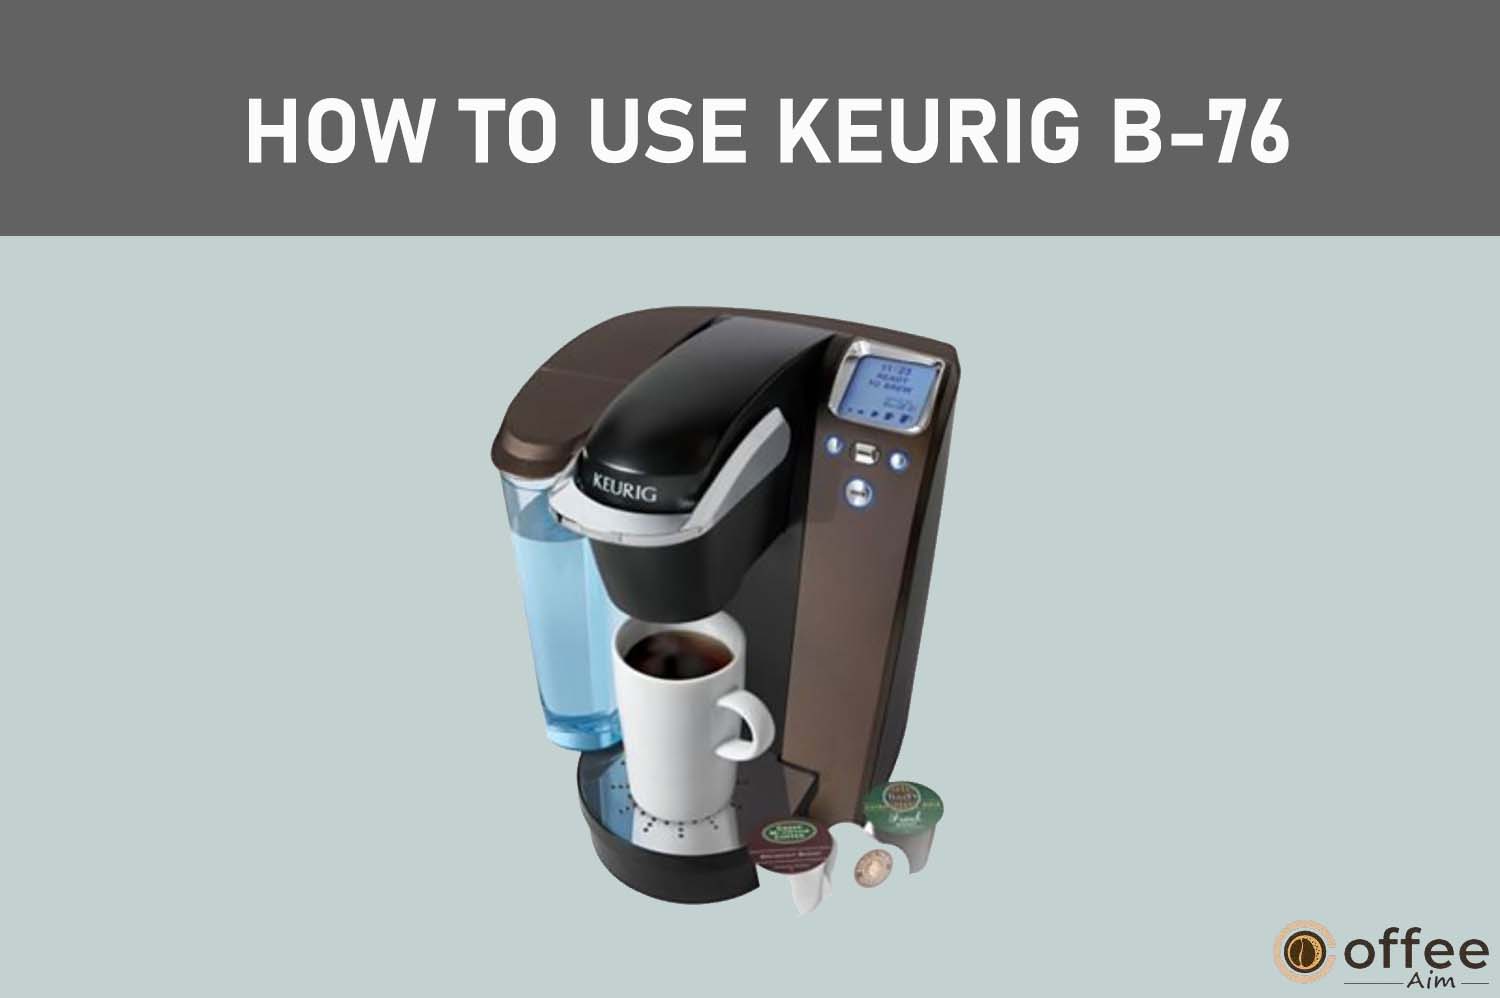
Welcome! If you recently purchased a Keurig B-76 and are seeking its instruction manual, you’ve come to the correct spot. After reading my “How to Use Keurig B-76” guide, you can operate your appliance more quickly and conveniently. Also, if you have accidentally misplaced the user manual that came with your device, you may refer to this article for any appliance-related queries. Let’s go and have a look at these instructions.
Safety Precautions
Before using any electrical appliance, it’s critical to read the safety precautions to protect yourself and those around you and ensure the appliance’s longevity. That is why I strongly advise you to read the safety instructions for your Keurig B-76 before using it. Trust me when I say it’s better to avoid accidents and injuries first than to try to fix the consequences later. Click the link below to read them.
Related: Keurig B-76 Safety Precautions
Specifications
It is critical to read the specifications of your appliance before using it. These are the standards on which your Keurig B-76 operates. Check them against your house power supply and voltage to avoid damaging your Keurig B-76. You should also consider your personal preferences, such as machine weight and water tank capacity. You may return the machine if these specifications do not match your preferences.
| Specifications | Details |
| Product Line/System | Keurig 1.0 Platinum |
| K-Cup compatibility | Unlicensed K-Cups, Keurig 2.0 licensed K-Cups,Ground coffee with the My K-Cup |
| Brew sizes | 4 oz/ 118.29 mL,6 oz/ 177.44 mL,8 oz/ 236.58 mL,10 oz/ 295.73 mL |
| Water reservoir capacity | 72 oz/ 2129.29 mL |
| Water filter | Included |
| Display | Blue backlit LCD with Brew button |
| Temperature control | Yes |
| Strength control | No |
| Dimensions in inches | W= 10.3″D= 13.8″H= 13.0″ |
| Dimensions in cm | W= 26.16 cmD= 35.05 cmH= 33.02 cm |
| Weight | 12 lbs/ 5.4 kg |
| Other features | Quiet Brew Technology, Auto-On/Off, 24-hour digital clock, Programmable favorites, Removable drip tray |
Packaging Content
When you order the Keurig B70 from Amazon, Walmart, or any other online retailer, the package should include all of the items listed below. If any contents are missing, contact the store and place another order.
1. Keurig Coffee Machine
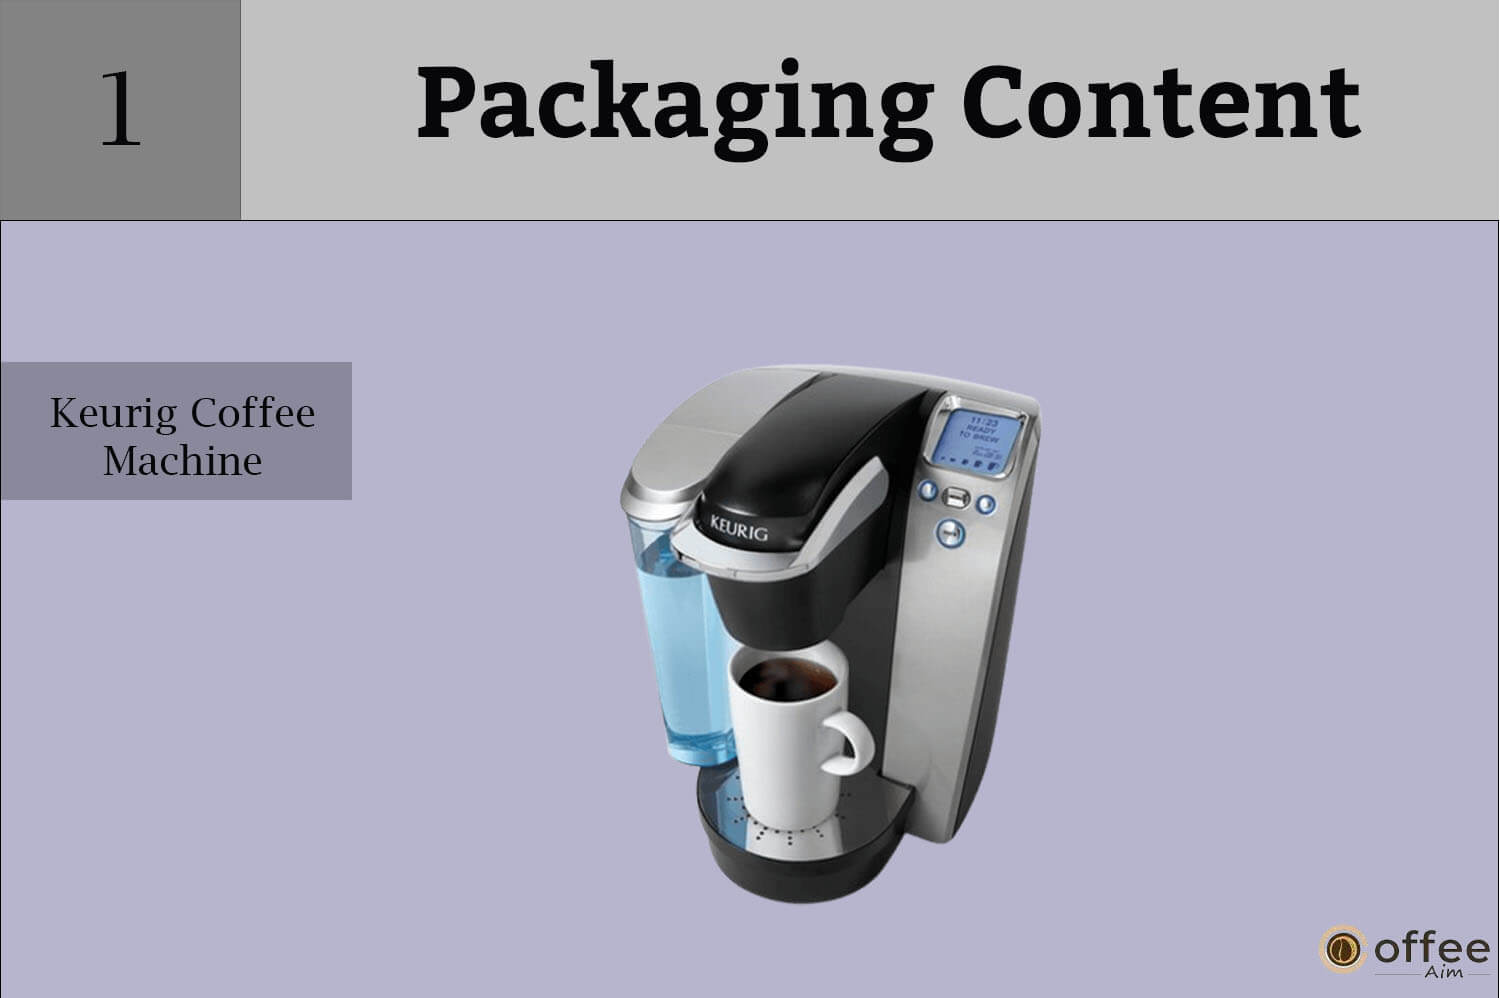
The Keurig Coffee Machine is the main item in the package. You can use this machine to make coffee, tea, or hot chocolate whenever you wish.
2. Keurig Welcome Brochure
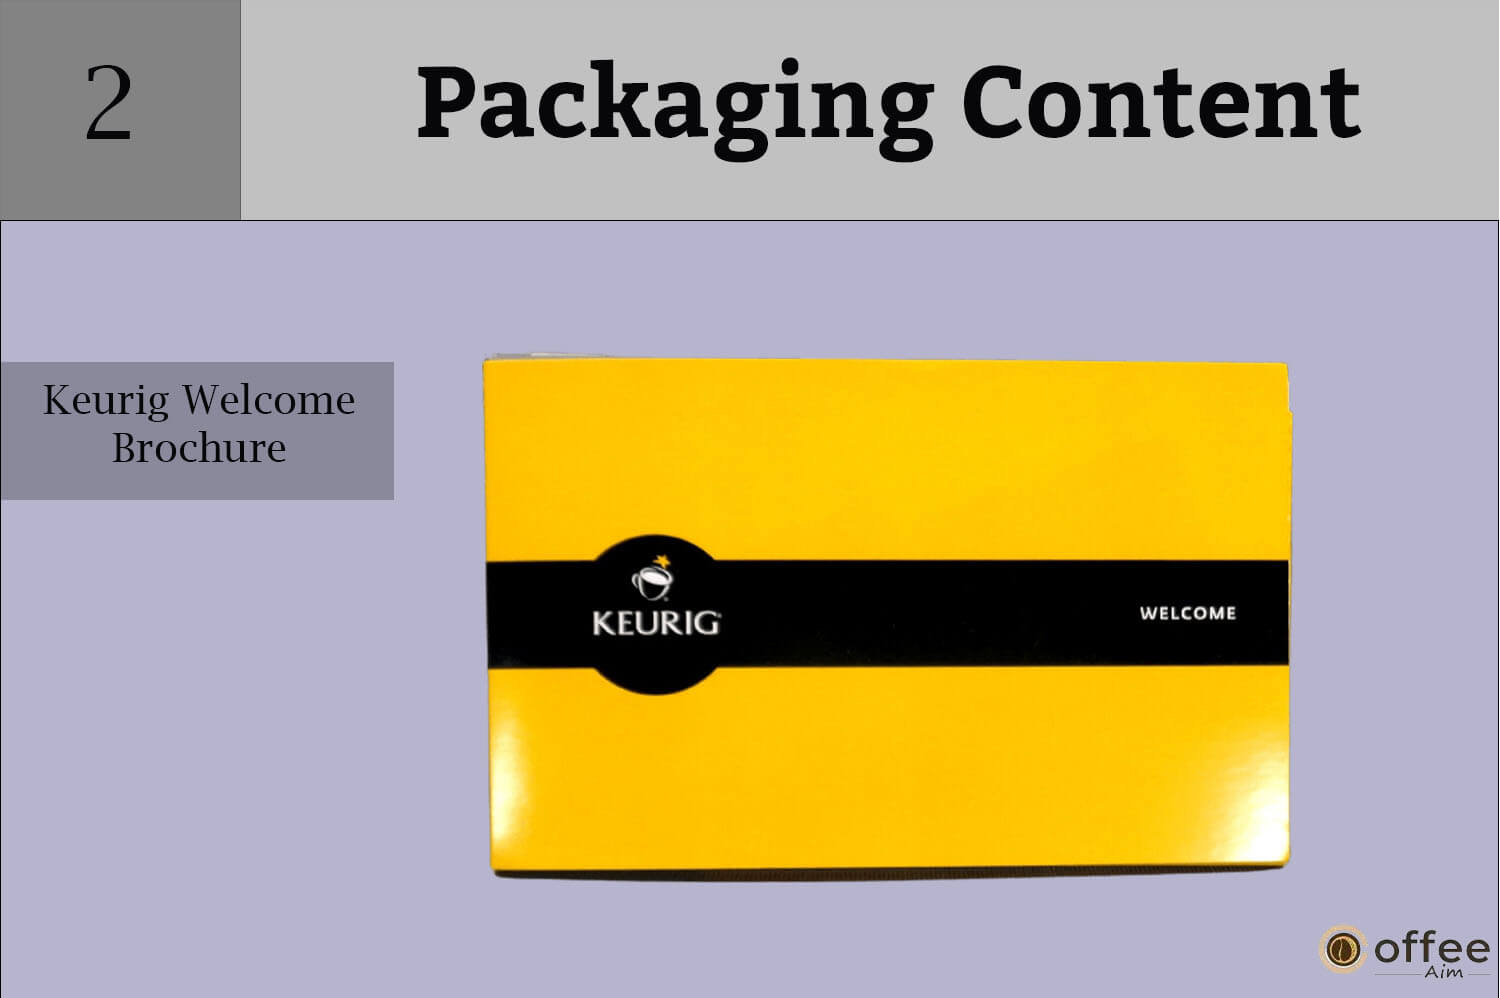
The package also includes a welcome brochure. It includes basic instructions for using your Keurig as well as safety precautions. You can use it whenever you need assistance with your appliance.
3. How To Unpack And Set-up Manual

“How To Unpack And Set-up” manual is also included in the package. This manual includes instructions for unpacking your machine and setting it up for the first time.
4. User Manual

This manual covers the operation, standards, and guidelines for your Keurig B-76. You can keep it in a cabinet for future reference.
5. “Finding Your Taste” Manual

This manual contains information on all available K-Cups, whether coffee, tea, or hot chocolate. You can use this to find the flavor you want.
- Warranty Card
Keurig gives a one-year warranty from the date of purchase. So, if your brewer ever faces any problem within the warranty period, contact Keurig and get your brewer repaired without spending any money.
Unpacking Instructions
Your appliance is fragile and sensitive. You must take care to avoid damage to your machine when unboxing it. The machine is encased carefully in plastic bags and polyfoam. After unpackaging, you should keep these packaging materials out of reach of children. Also, I advise you to save all packaging if the machine has to be shipped again. Follow the below-mentioned guidelines when unpacking your machine.
- Set your machine on a flat surface before you unpack it. The likelihood of mishaps while unpacking is reduced by doing this.
- Open the box and remove any contained material.
- Now flip the box on its side so that its front faces down.
- Remove the plastic bag containing your machine with caution. Pull it towards yourself and out of the box. In addition to being enclosed in a plastic bag, the device has polyfoam on its sides.
- First, remove the top polyfoam packaging material and the bottom. Keep your machine upright.
- Now remove the plastic bag from the machine.
- You must note down the serial number of your appliance in the user guide (page no. 3). The serial number is significant. It lets the manufacturer pinpoint precisely when and where your machine was made in the factory and choose the appropriate component if a replacement part is required. You can find the serial number on the brewer. The number is written under its drip tray or on the bottom of the box.
- When you have unboxed your machine, keep it on a flat surface. The water reservoir is attached to the brewer with the help of tape. Remove it with care.
Parts Of The Keurig B-76
The shipment should include all the items listed below when you order the Keurig B-76 from Amazon, Walmart, or any other online retailer. If any parts are missing, contact the store and make another purchase. Before utilizing your machine, you should become acquainted with its components. Becoming familiar with your machine allows you to use your equipment better. Let’s look at the various parts of the Keurig B-76.
1. Water Reservoir Lid
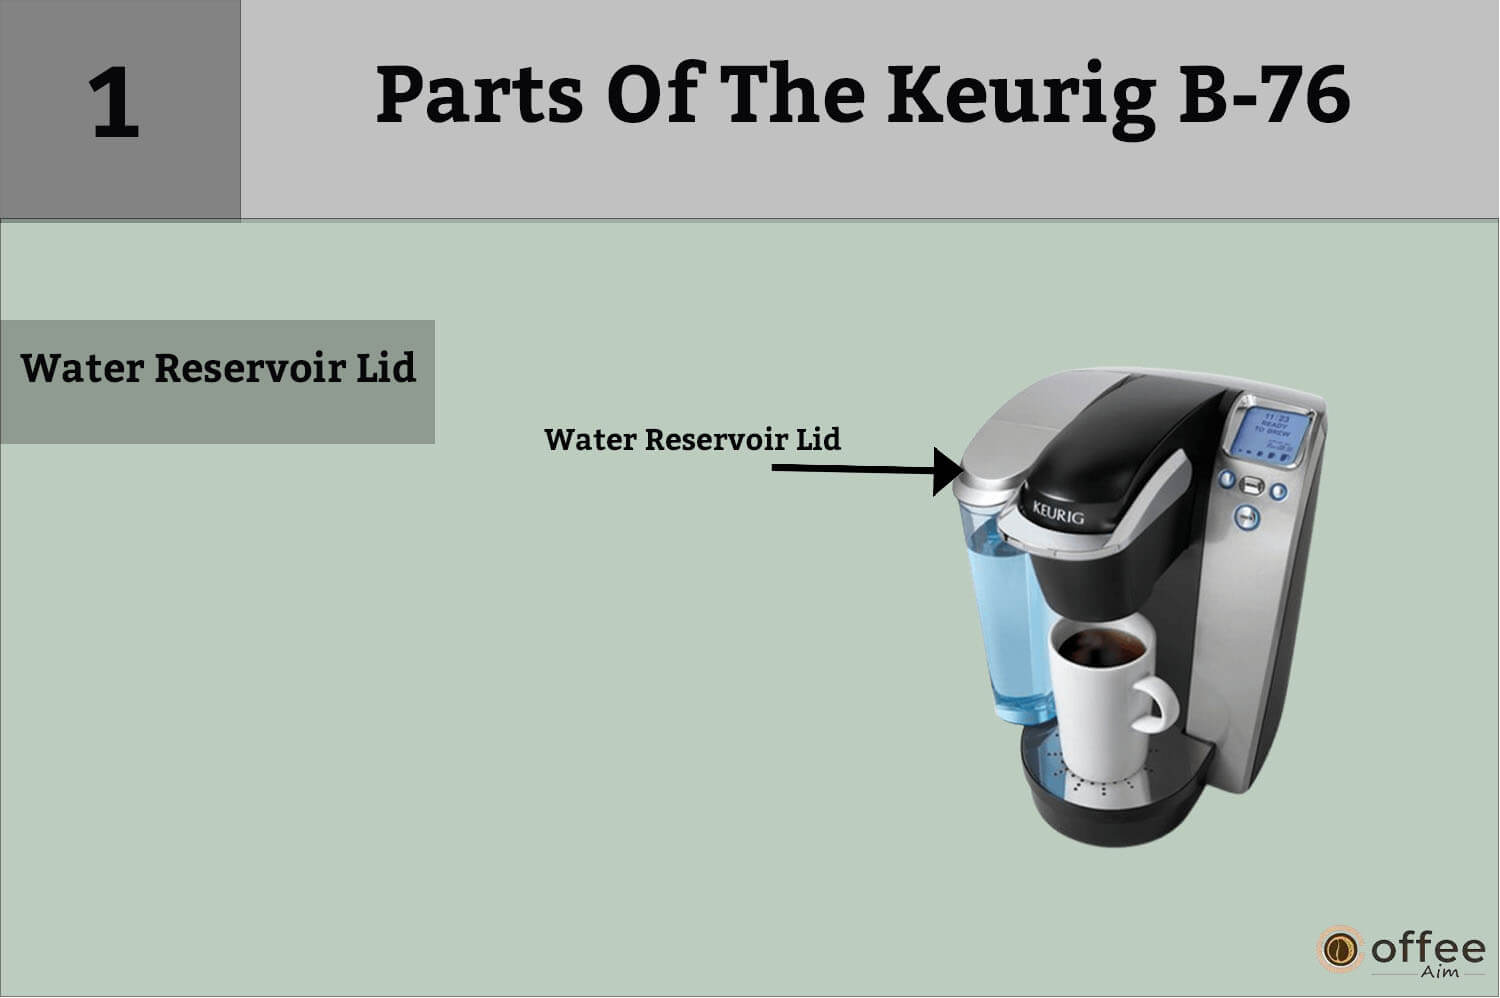
The water reservoir lid covers the tank, keeping the water clean and dust-free.
2. Easy-Fill Lid

The water reservoir lid has an easy-fill cover. It allows you to open the water tank lid partially, making filling the water reservoir tank easier.
3. Water Reservoir
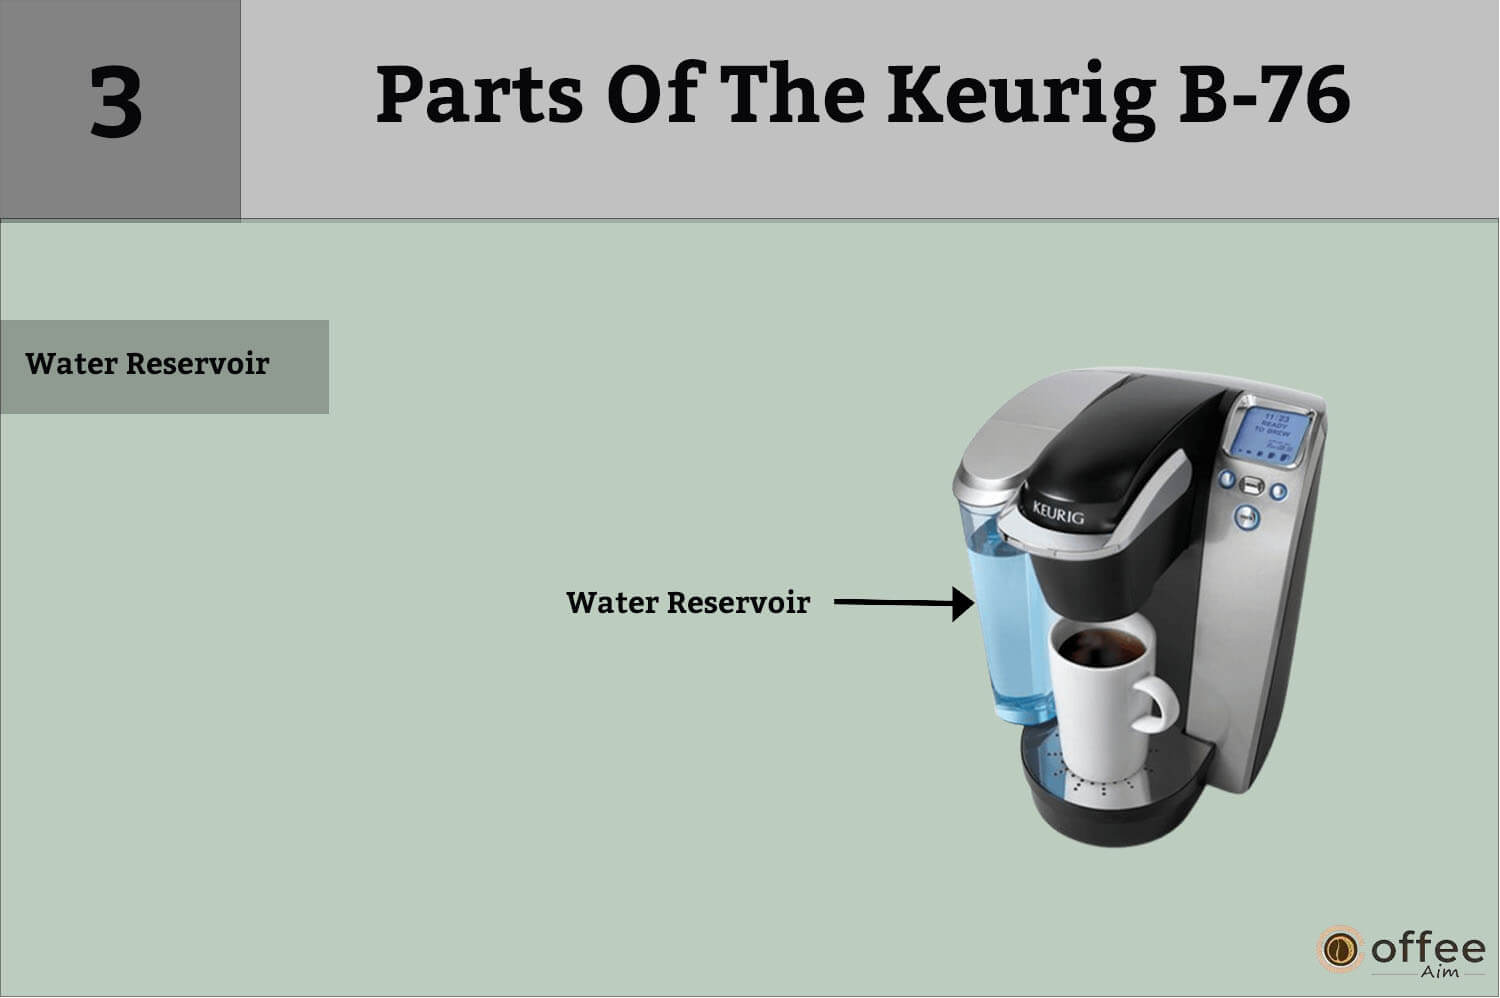
The water reservoir tank is attached to the side of your machine. Your machine stores water in this tank to make your coffee.
4. Water Reservoir Lock Tab Slot

This lock tab slot engages with the lock tab on the Water reservoir. It ensures that the water reservoir is seated correctly on the brewer, so the back of the Water Reservoir is flush with the Brewer.
5. Handle
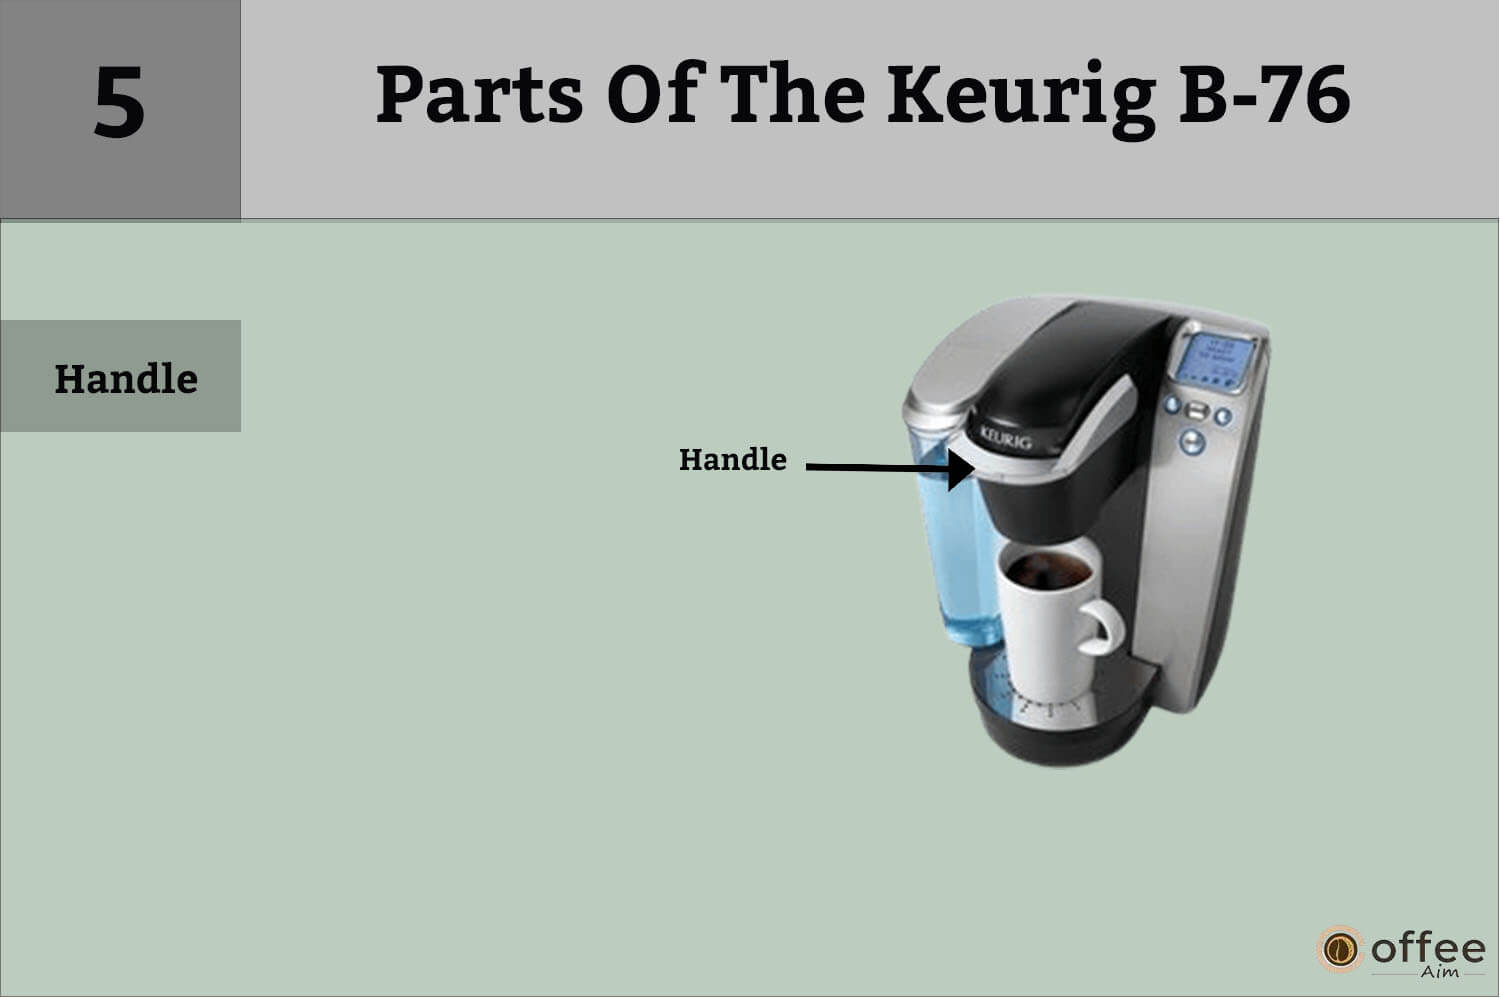
The handle is in union with your brewer’s lid. By lifting the handle, you can easily open and close the lid.
6. Funnel

The funnel on Keurig B-76 is located at the top of the machine and attaches to the K-cup pod holder. It allows the extracted coffee to enter the coffee outlet and finally into your coffeecup.
7. K-Cup Portion Pack Holder (Funnel And K-Cup Portion Pack Holder Are The K-Cup Holder Assembly)
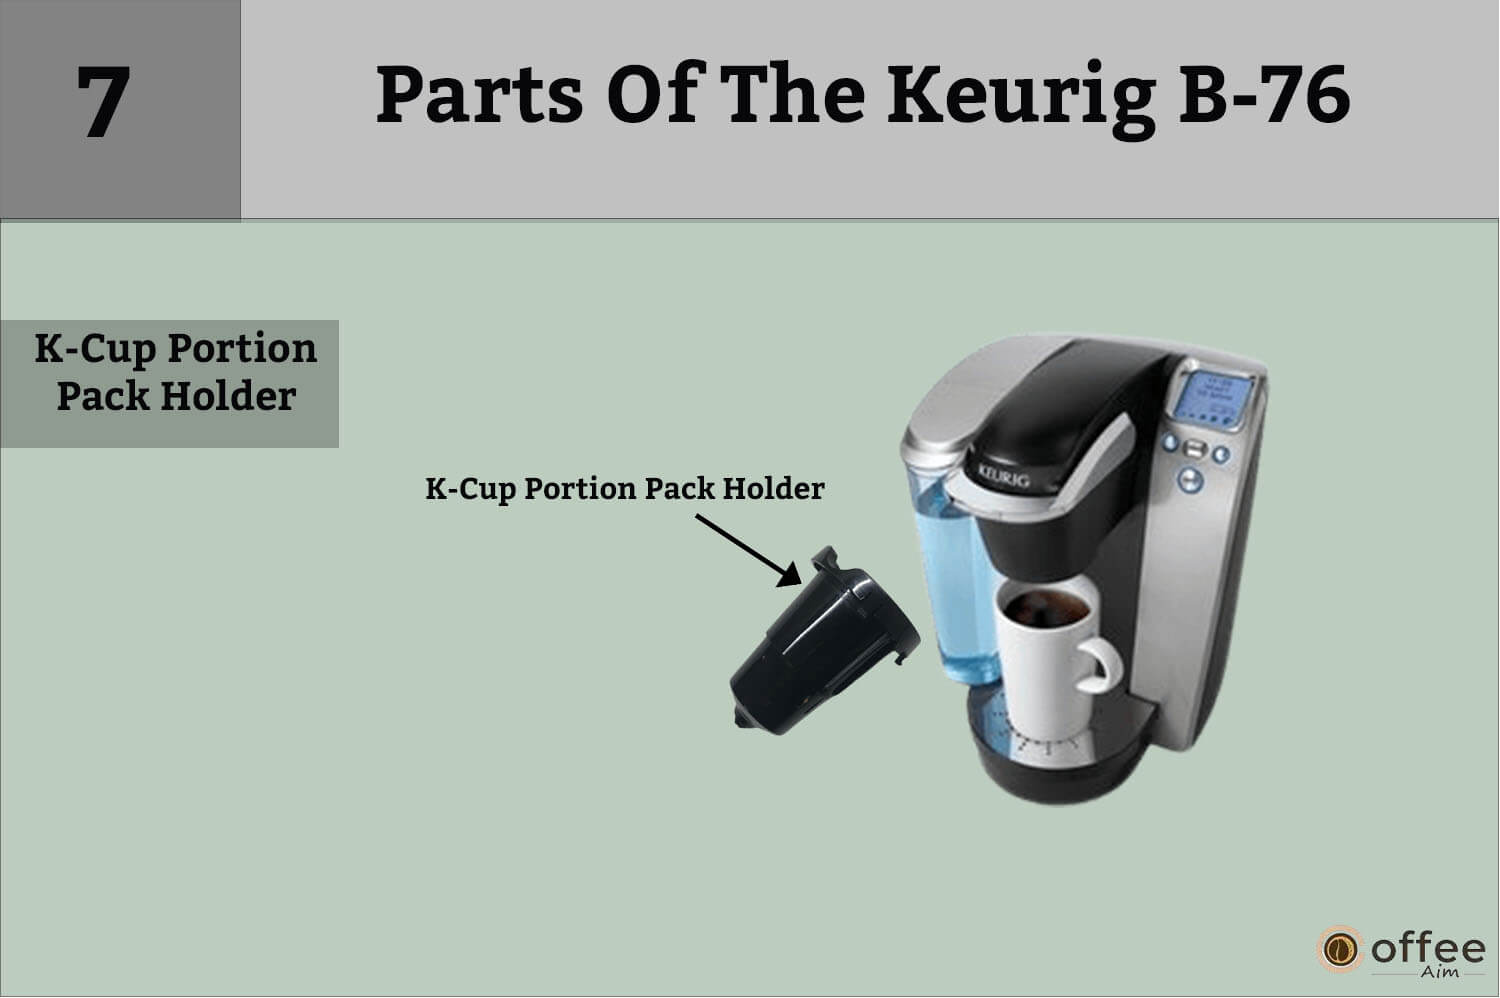
It is located directly underneath the funnel on the front of the machine. The K-Cup Portion Pack Holder serves as a receptacle for the K-Cup portion pack. When the K-Cup is placed into the holder, it is punctured by a needle in the brew basket. The hot water is pumped through the needle and into the K-Cup, brewing the beverage. It ensures that the K-Cup stays in place during the brewing process.
8. Lid
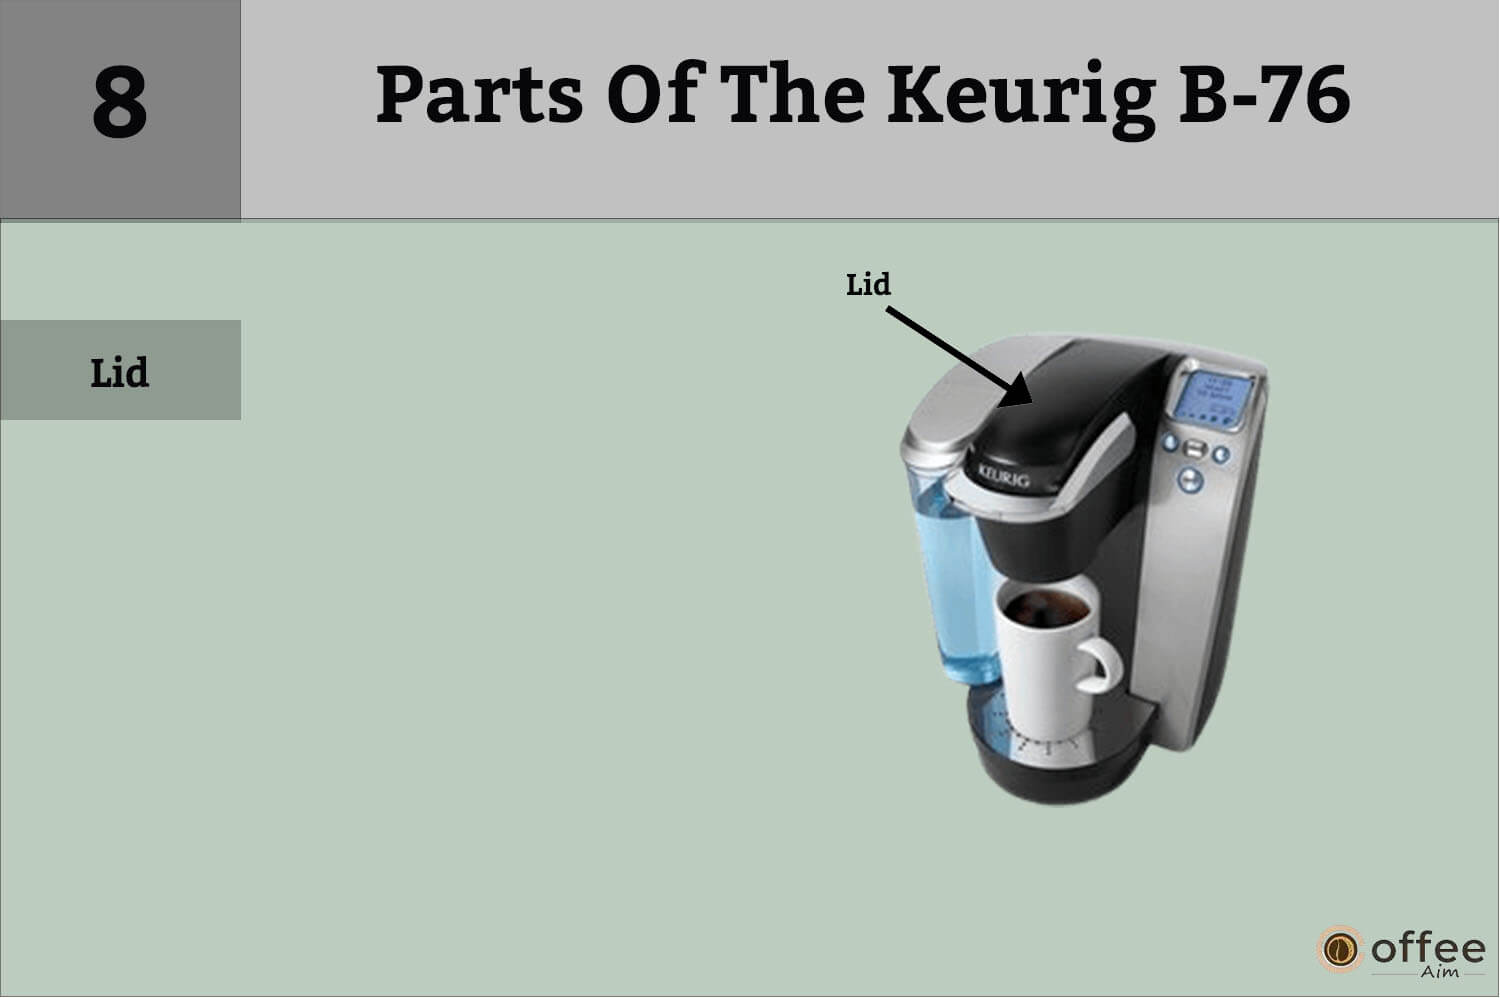
The lid is in the upper right corner of the Keurig B-76, directly above the funnel and K-Cup portion pack holder. The cap is a protective cover. It helps prevent dust, debris, or other contaminants from entering the coffee maker. It also helps prevent any splashing or spilling of hot water during brewing.
9. K-Cup Portion Pack Assembly Housing
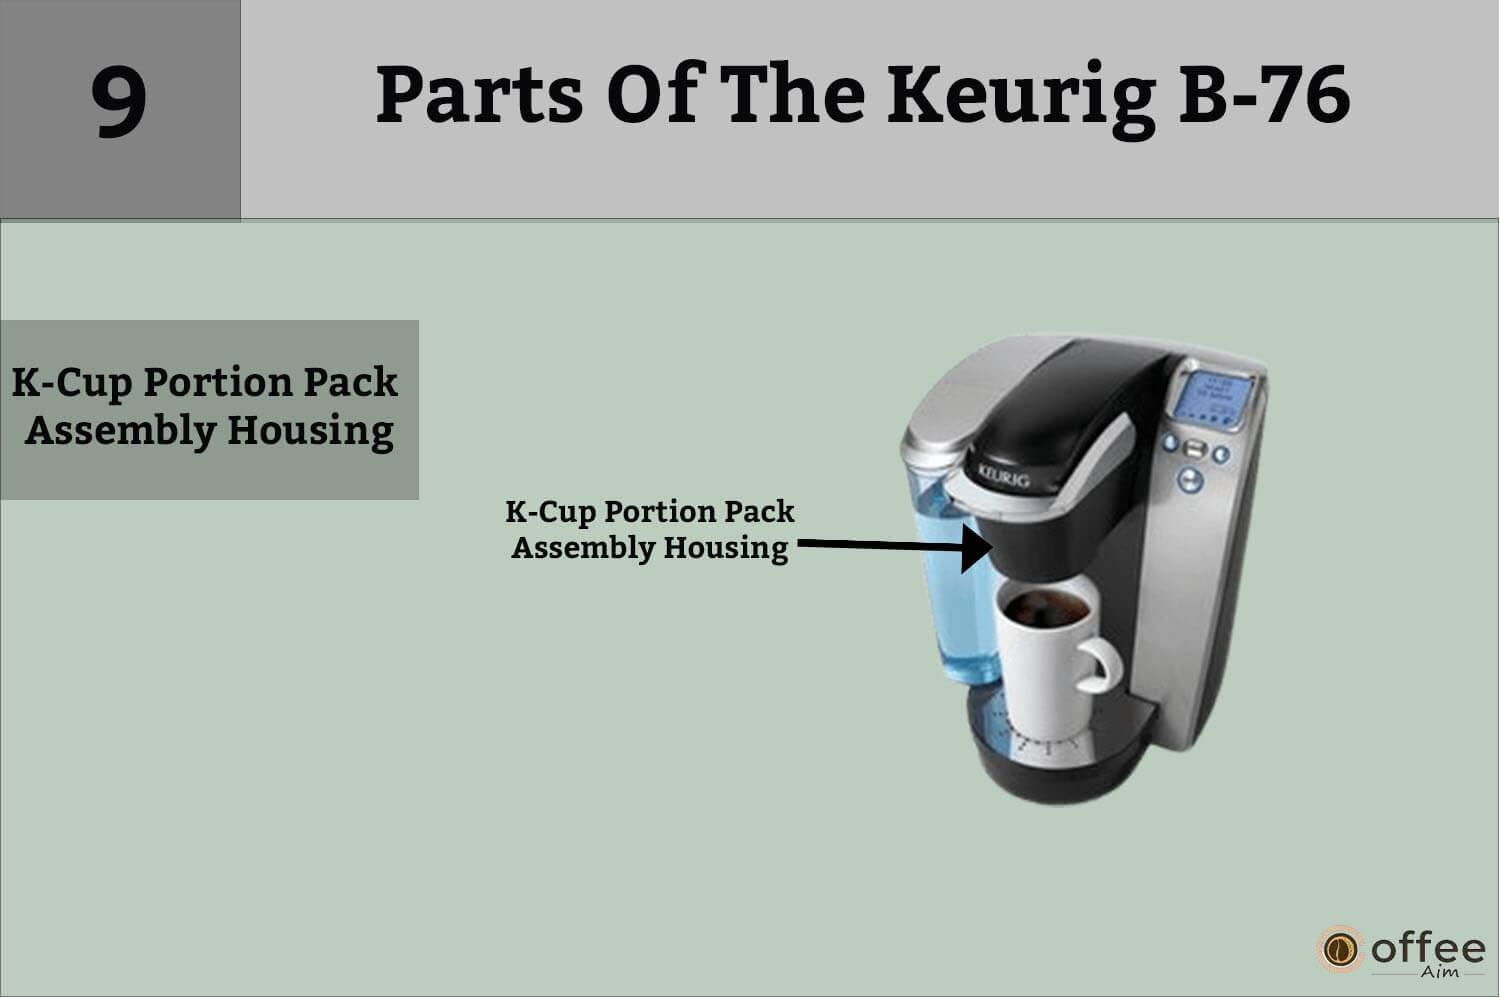
The assembly housing is located on the Keurig B-76, directly above the drip tray. The K-Cup Portion Pack Assembly Housing in the Keurig B-76 serves as a holding place for the K-Cup portion pack. The assembly housing is responsible for piercing the top of the K-Cup portion pack and injecting hot water into it, which brews the beverage and dispenses it through the spout.
10. Housing
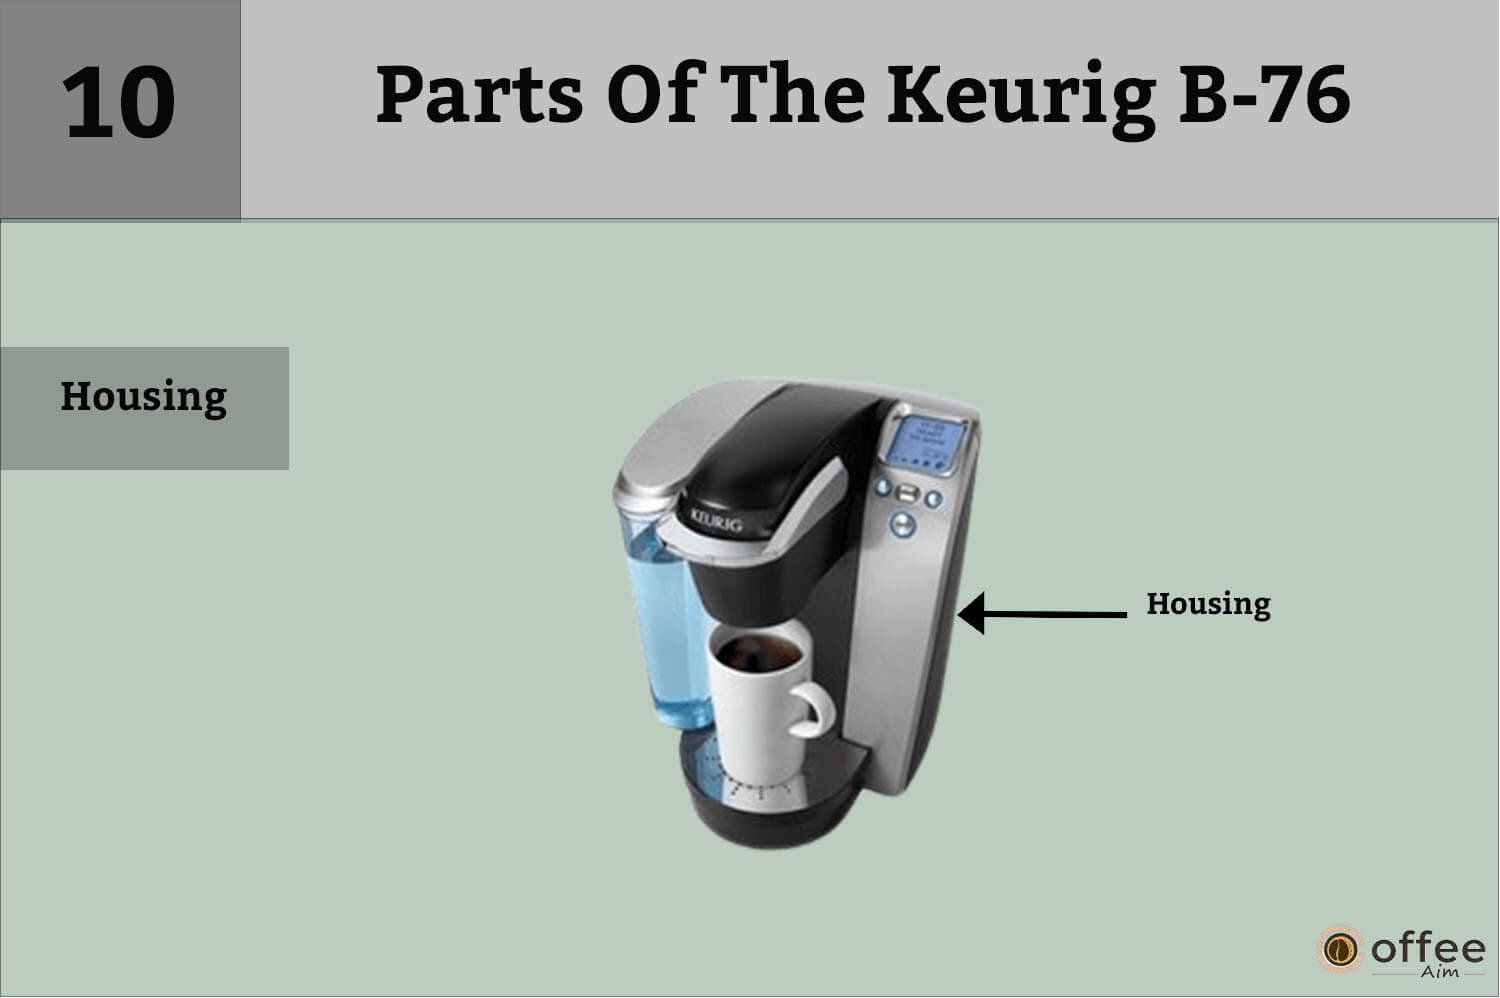
The housing on the Keurig B-76 refers to the outer shell or casing that encloses the internal components of the coffee maker. Its primary function is to protect delicate and complex parts while providing an aesthetically pleasing appearance to the machine. It is made of durable plastic materials designed to withstand the heat and pressure generated during the brewing process and the wear and tear that comes from regular use.
11. Drip Tray Plate
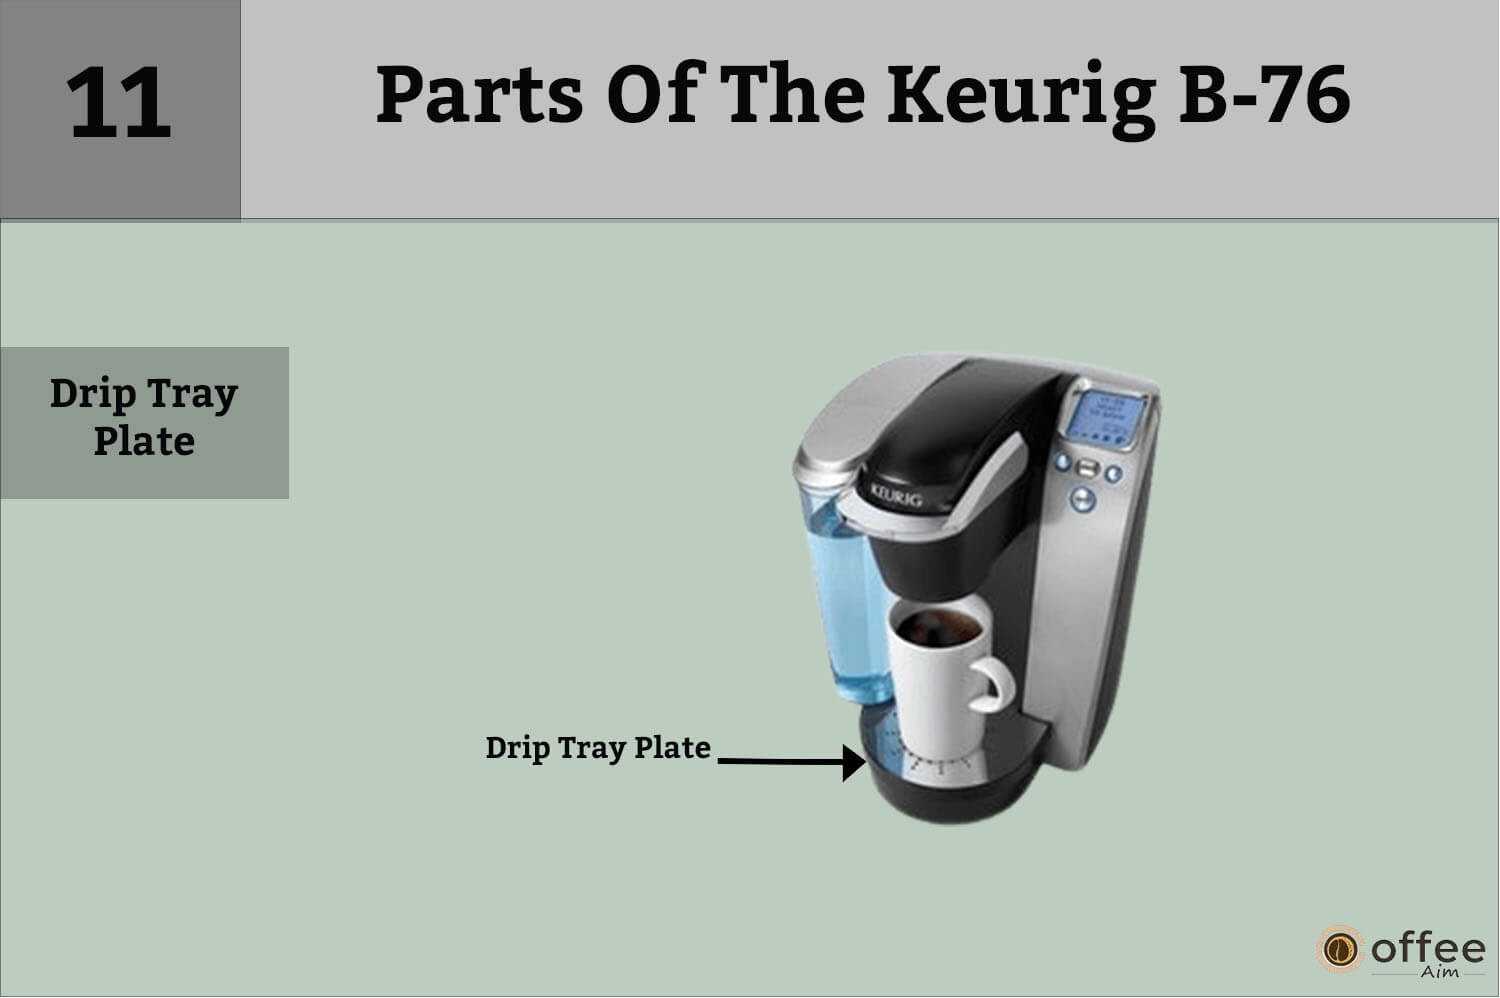
The drip tray plate is at the bottom of your Keurig B-76, directly beneath the drip tray. The drip tray plate on the Keurig B-76 serves as a surface for collecting any excess water or liquid that may drip from the brewing process. Its primary function is to hold your coffee cup and help keep the area around the coffee maker clean and free from spills and drips. The drip tray plate is removable and can be quickly cleaned, which helps maintain the coffee maker’s hygiene and cleanliness.
12. Drip Tray

The drip tray is situated at the bottom front of your Keurig B-76, directly above the drip tray plate. The drip tray on the Keurig B-76 serves as a surface for holding the cup or mug during the brewing process and collecting any excess liquid that may drip from the K-Cup portion pack or the spout. Its primary function is to prevent spills and messes from occurring.
13. Drip Tray Base

The drip tray base is situated at the bottom of the front face of your Keurig B-76, directly below the drip tray. It is usually made of durable plastic materials. Its primary use is to accommodate large/tall cups. If you wish to brew into a travel mug, remove the drip tray and set it straight on the drip tray base.
14. Vent

The vent is situated on the top of the Keurig B-76, near the back of the machine. It is usually a small, circular opening that allows hot air and steam to escape from the coffee maker during brewing. The vent may be positioned in a way that helps direct the flow of hot air and steam away from the user towards a safe and open area. The vent on your Keurig B-76 serves an essential function in regulating the pressure and temperature within the coffee maker.
15. Power Cord
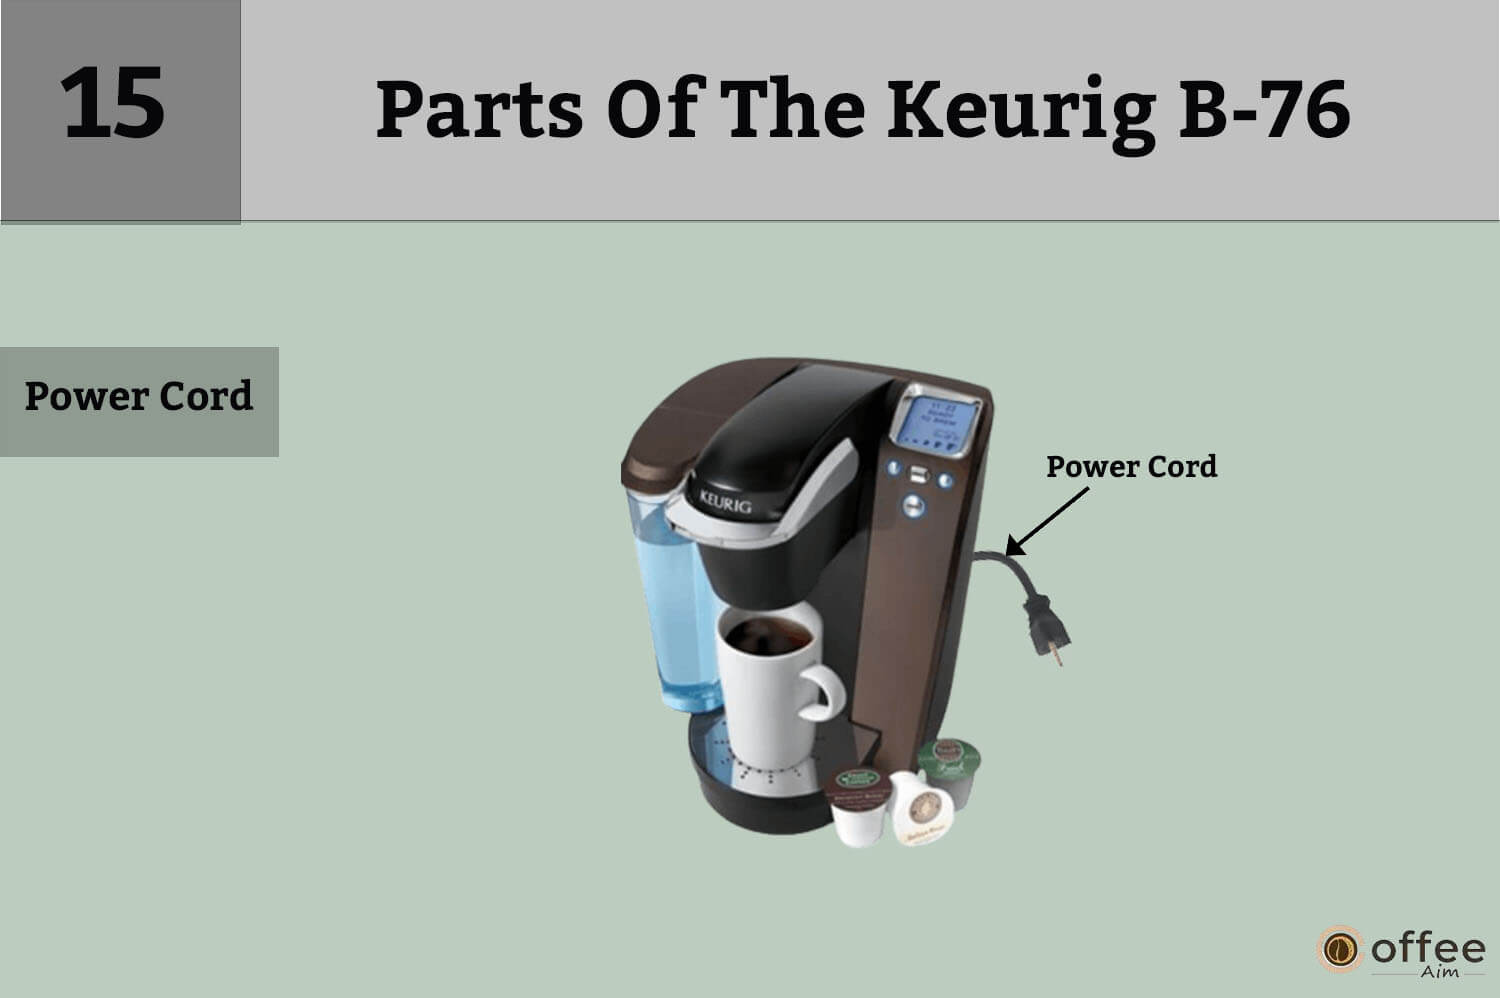
The power cord is at the back of your machine. It delivers electric power from the outlet to your appliance.
16. Power Switch (Not Shown) Located Rear Right Side Of Brewer

The power switch is on the rear right side of the Brewer. The coffee maker’s switch controls the power to the heating element and turns it on or off.
Controls And Indicators
There is a display panel and various control buttons on your Keurig B-76. The display panel shows the status of your appliance’s operation. The various control buttons serve different purposes and allow you to program your Keurig B-76 exactly how you want it.
17. LCD Control Center

The LCD control center is a flat panel display on your brewer. It shows the operational status of your appliance. It also displays the various programming options of your brewer.
18. Left Button
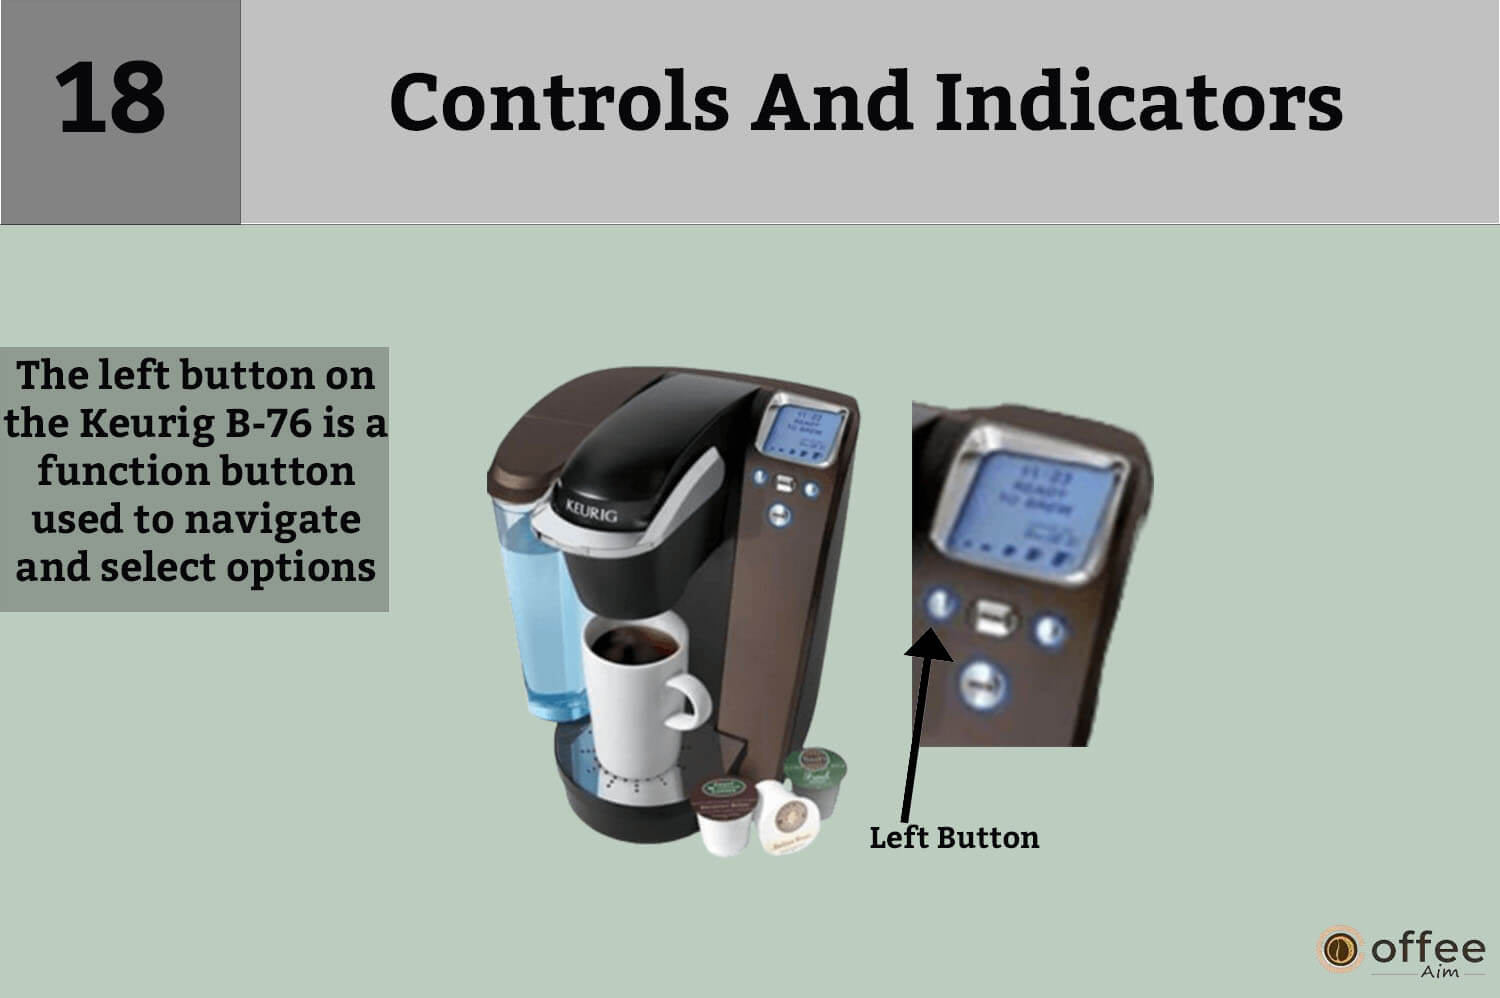
The left button is on the left side of your Keurig B-76, next to the menu button. It is usually a small, circular button with various icons or symbols on the screen to indicate its function. The left button on the Keurig B-76 serves as a function button that is used to navigate and select multiple options and settings on the coffee maker. Its primary function is to provide a convenient way for users to customize their brewing experience and adjust the grounds of the machine to their preferences.
19. Right Button
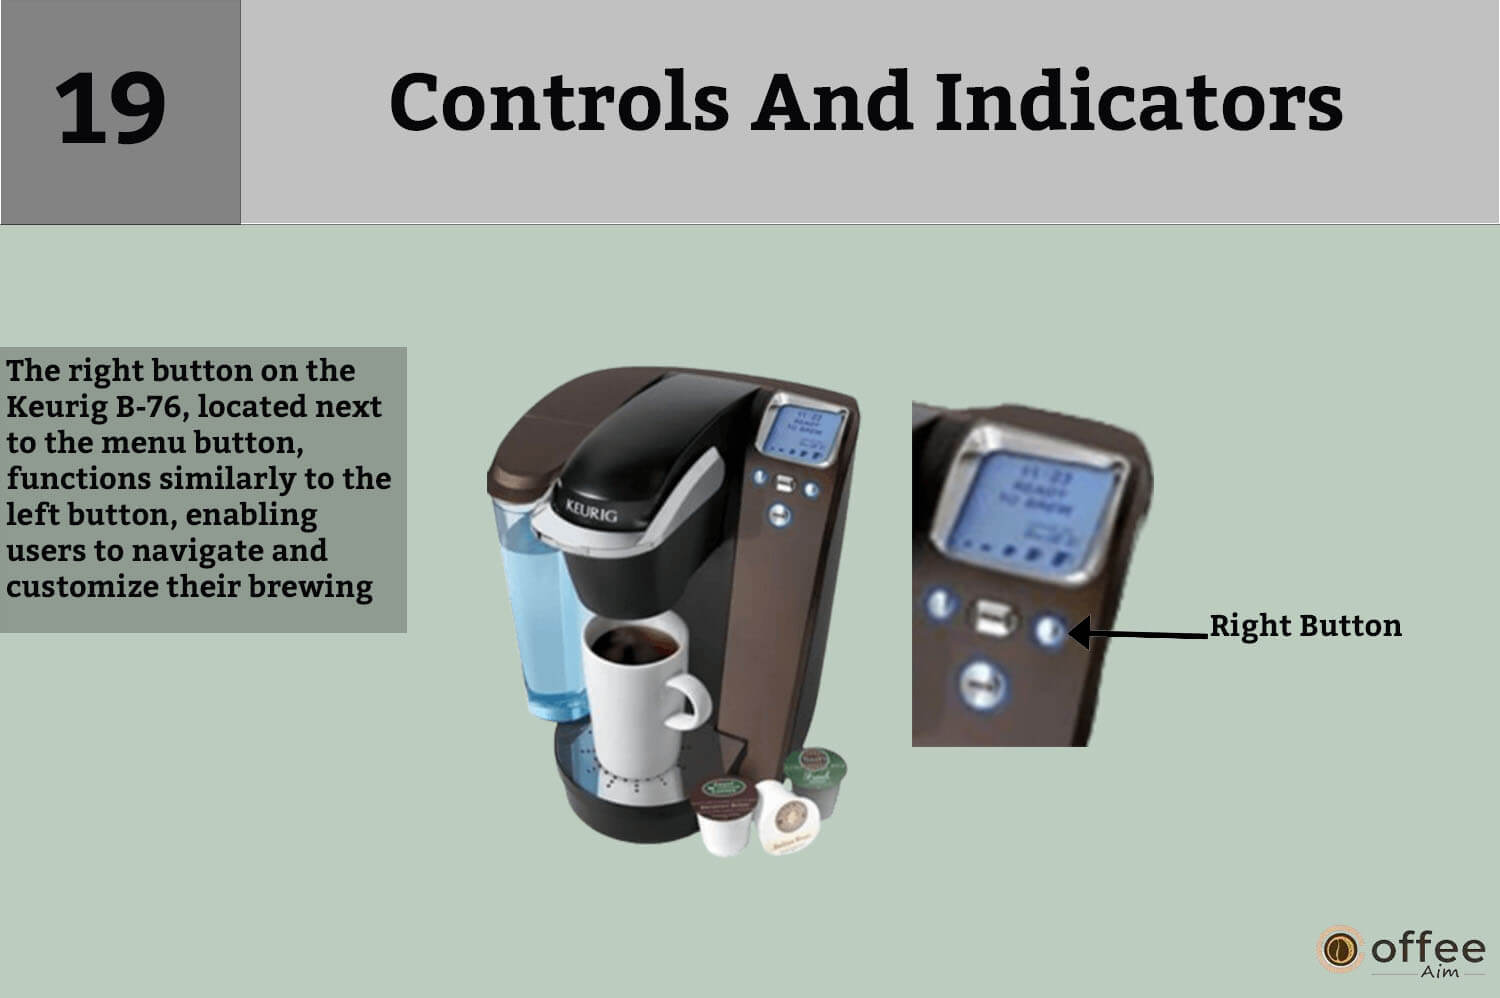
The right button is on the right side of your Keurig B-76, next to the menu button. It is usually a small, circular button with various icons or symbols on the screen to indicate its function. The right button on the Keurig B-76 serves a similar position to the left button, providing users with a convenient way to navigate and select various options and settings on the coffee maker. Its primary function is to allow users to customize their brewing experience and adjust the grounds of the machine to their preferences.
20. Menu Button

When you click the Menu button of your brewer, the LCD control center will display the various programming options of your brewer. The programming options include setting the clock, AUTO OFF, ON and OFF time, brew temperature, and brew size. You can also press the Menu button to scroll through the programming steps.
21. Brew Button
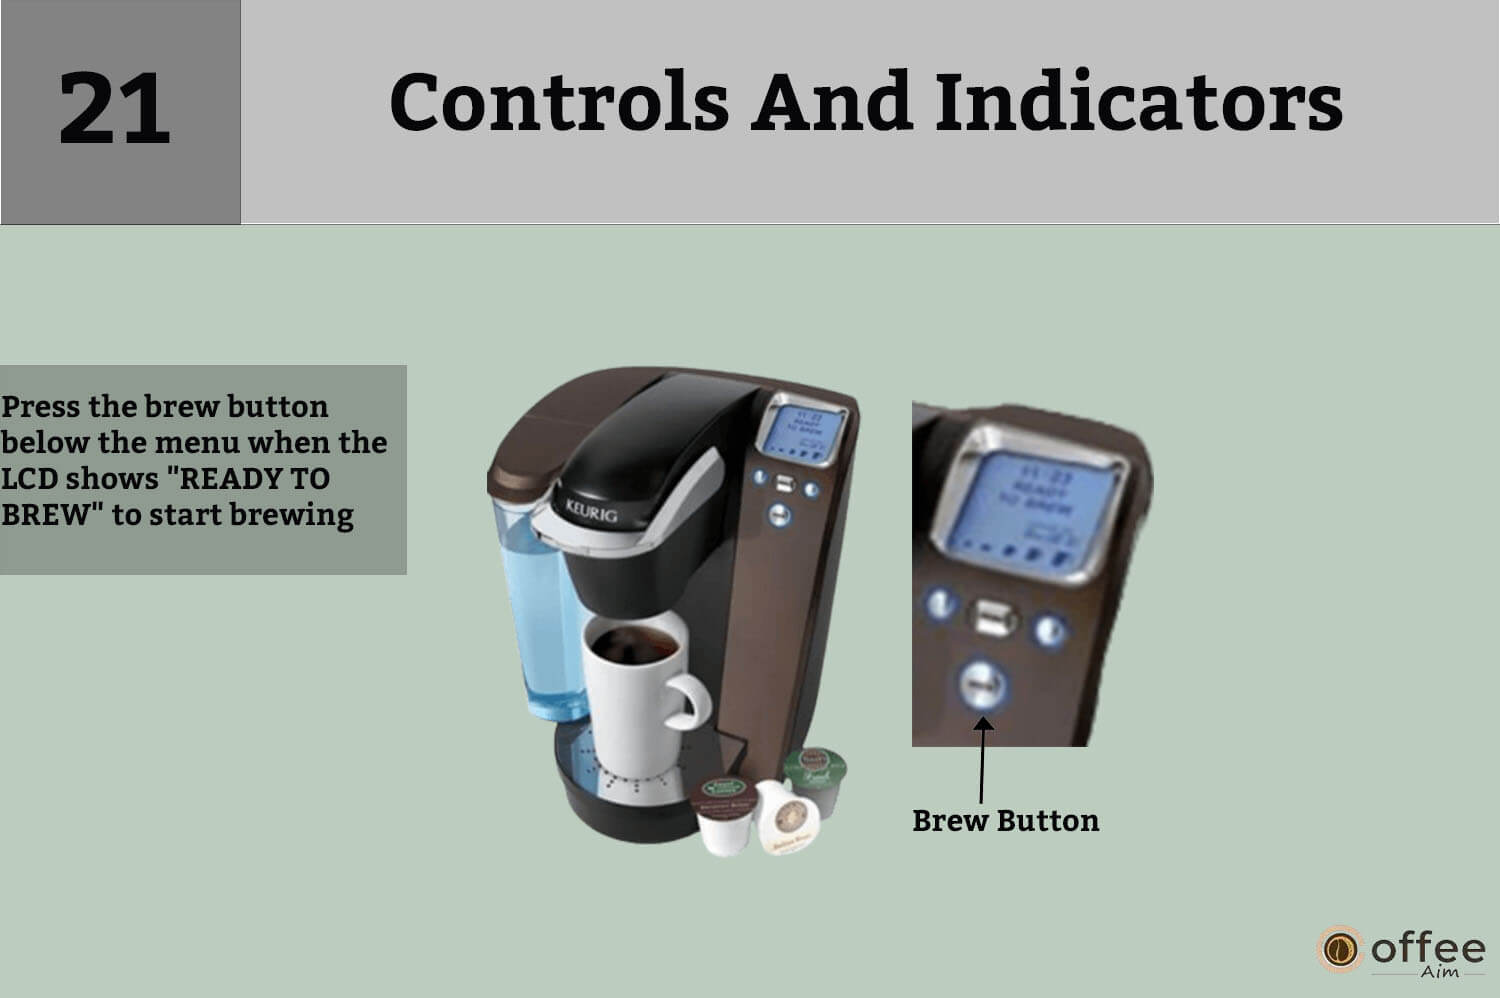
The brew button is located below the menu button. When the LCD control center displays “READY TO BREW,” press the brew button to start brewing.
Helpful Hints
Your machine allows you to brew coffee conveniently time after time because of its unique design. You can use your appliance more efficiently by referring to the below-mentioned points. These suggestions will allow you to operate your machine more smartly.
- Connect Brewer to its own grounded outlet.
Always plug your brewer into a separate power outlet, not where all your other machines are connected. Doing this assures the proper operation of your appliance since it avoids an overload of its electrical circuit. Doing so also contributes to the longevity of your machine.
- Keep Your Brewer Switched “On”
Because of Brewer’s full programmability, you may automatically arrange it to switch on and off per your schedule. Alternatively, you can program your machine to turn off automatically when not used for some time, whatever suits best for you.
- Keurig Suggests Using Bottled Or Filtered Water To Make The Best Gourmet Coffee, Tea, Or Hot Chocolate.
To experience the best coffee taste, try using filtered or bottled water. Filtered water tastes differently and will affect your coffee’s taste and quality. Tap water has more contaminants and might impart a metallic or acidic flavor to your coffee.
- Choose The Size, Taste, And Brew Right For You.
You can alter the coffee’s brew size and flavor that suit your preferences. With your Keurig Brewer, you have countless alternatives. Over 200 varieties of K-Cup portion packs and five brew sizes are available. Keep the brew size of your coffee smaller if you like a more robust flavor, and vice versa for a milder flavor.
- After Usage, Discard The K-Cup Portion Pack.
Once your machine has prepared your coffee, remove the used K-cup portion from your brewer. It may cause jamming if it remains in your machine after being used.
- Brewing Into A Travel Mug.
Place a cup or mug of the proper size whenever you adjust the brew size of your machine to prevent coffee spills. If you want to brew into a travel mug, just remove the Drip Tray Assembly and set the travel cup on the Drip Tray Base to brew into it.
- Brewer Should Be Descaled Regularly.
Descaling is the fundamental process of deep cleaning your coffee maker to remove calcium and mineral deposits, or scale, that can build up over time. Mineral scale build-up negatively affects the working of your machine and the taste of your coffee. So, you should descale your brewer regularly to prevent these effects.
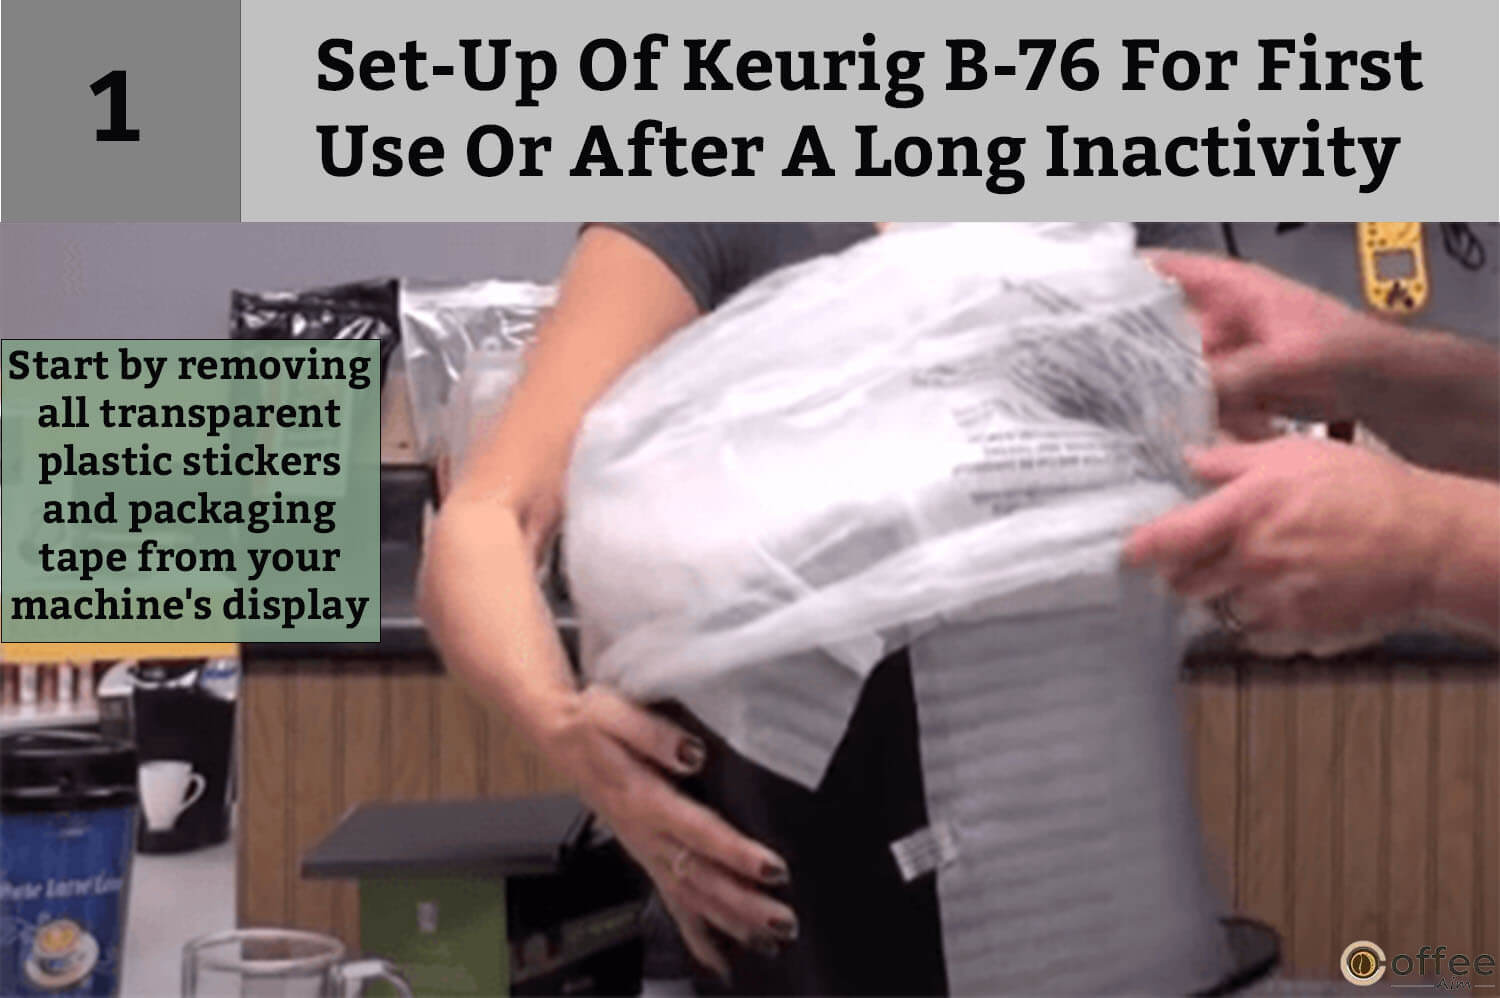
Set-Up Of Keurig B-76 For First Use Or After A Long Inactivity
You must properly set up your machine before using it for the first time. Implementing a standardized machine set-up is essential for the proper functioning of your Keurig Brewer. If you have exposed your device to a lower temperature, allow it to reach room temperature before using it. Follow the below-mentioned steps to set up your Keurig Brewer.
1. Start by removing all transparent plastic stickers and packaging tape from your machine’s display.
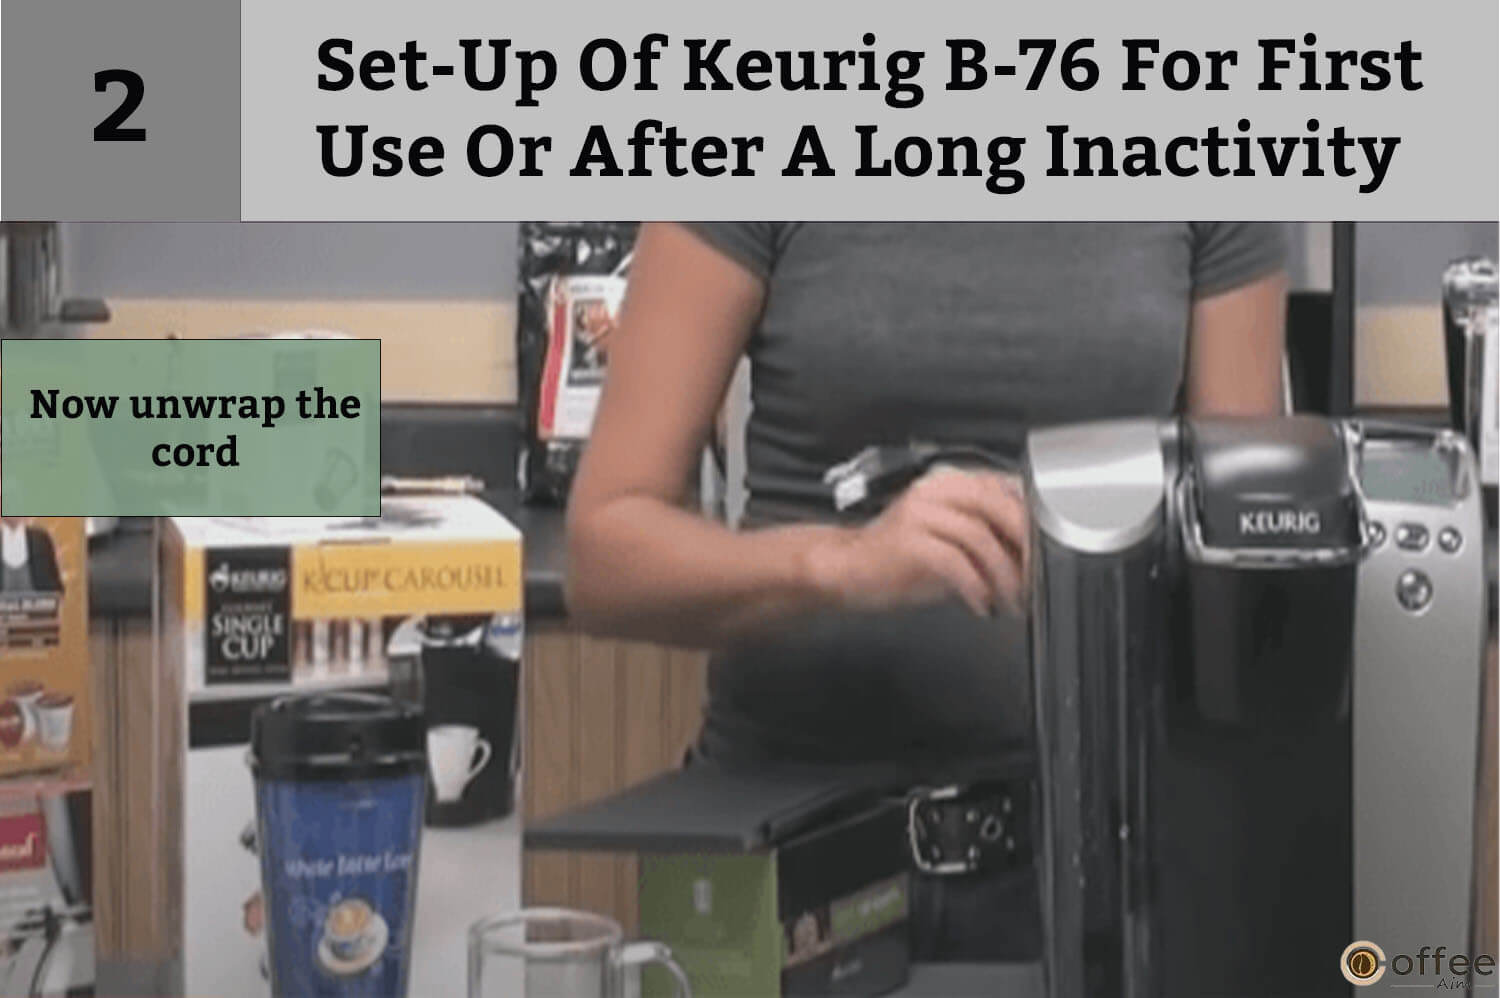
2. Now unwrap the cord.
3. Connect your brewer to a power outlet.

4. On the drip tray plate, set a large cup. The cup should have a minimum volume of 10 oz.

5. After removing the lid from the water reservoir, lift it straight up and towards the front of the brewer to remove it. You need to remove it with some force as the water reservoir fits tightly in its place.

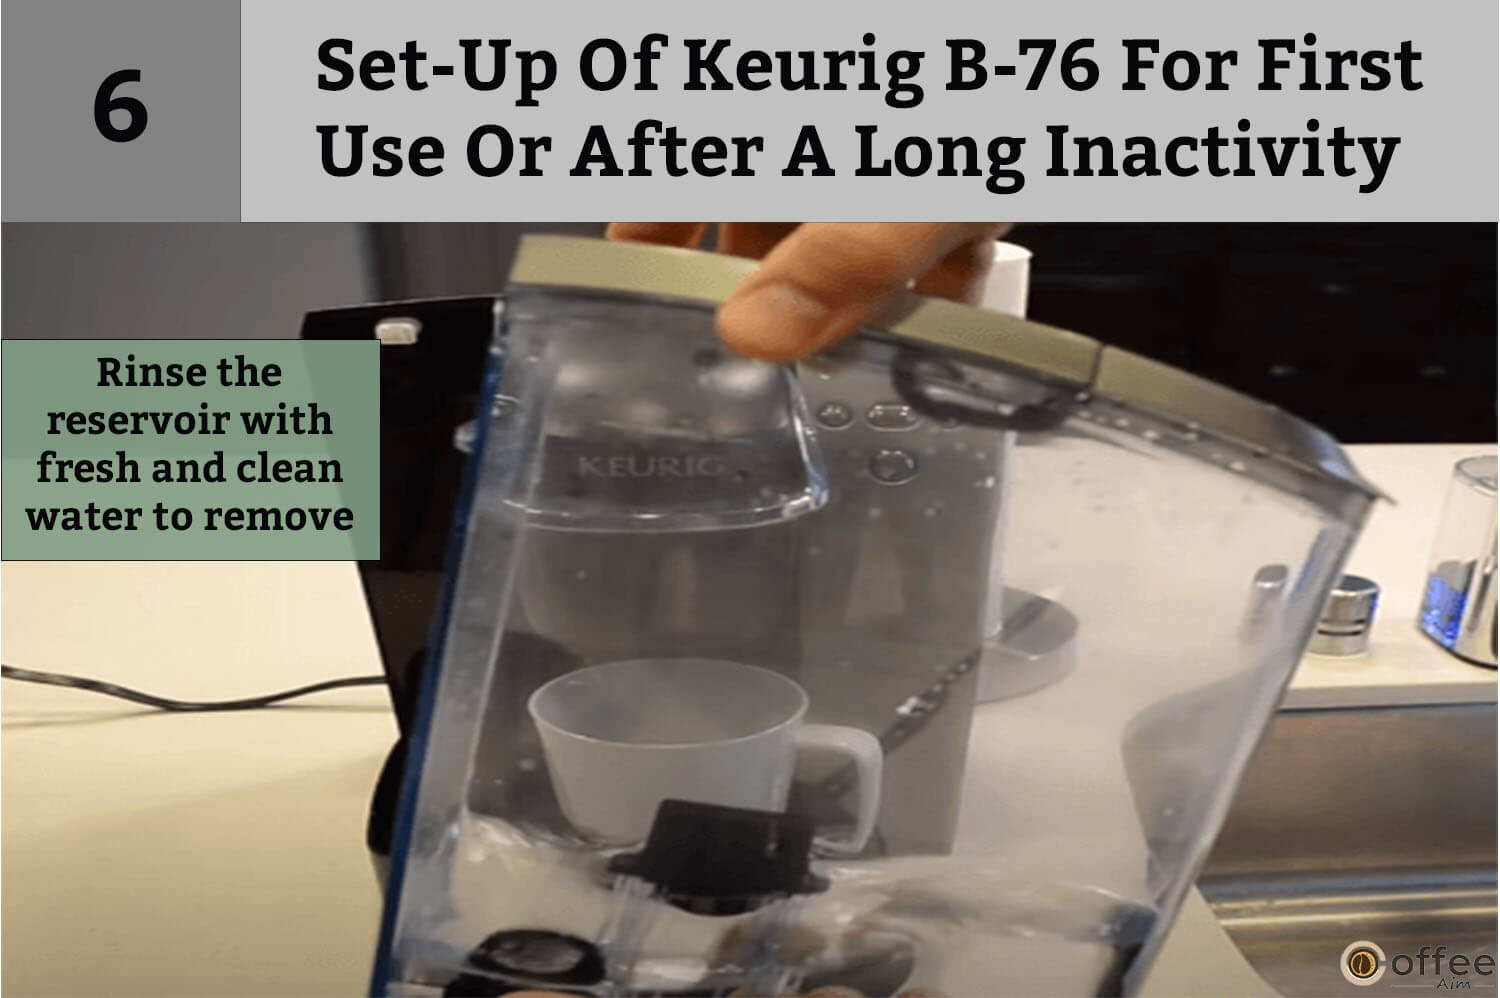
6. Rinse the reservoir with fresh and clean water to remove dust particles.
7. Now, fill the water reservoir with potable water. Fill it up to the brim.

- After filling, place the water reservoir back on the left side of the brewer. Cover it with its lid. Ensure it fits correctly and its lock tab fits the brewer.
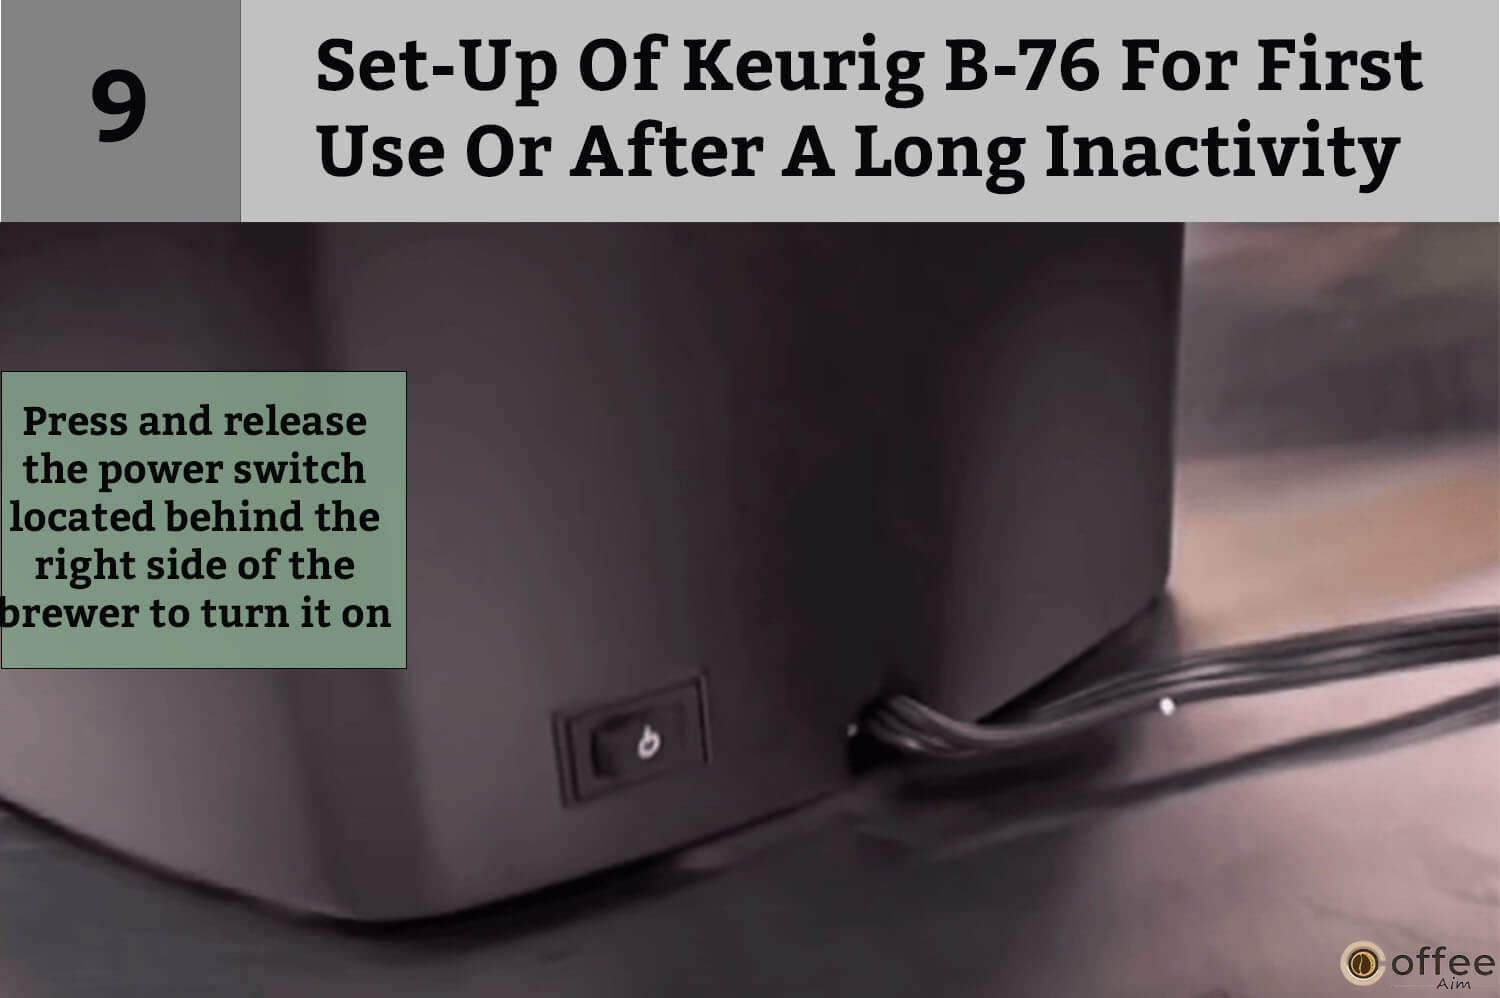
9. The machine’s power switch is present behind the right side of the brewer. Press and release it to turn the device on. The button is spring-loaded and returns to its initial position.
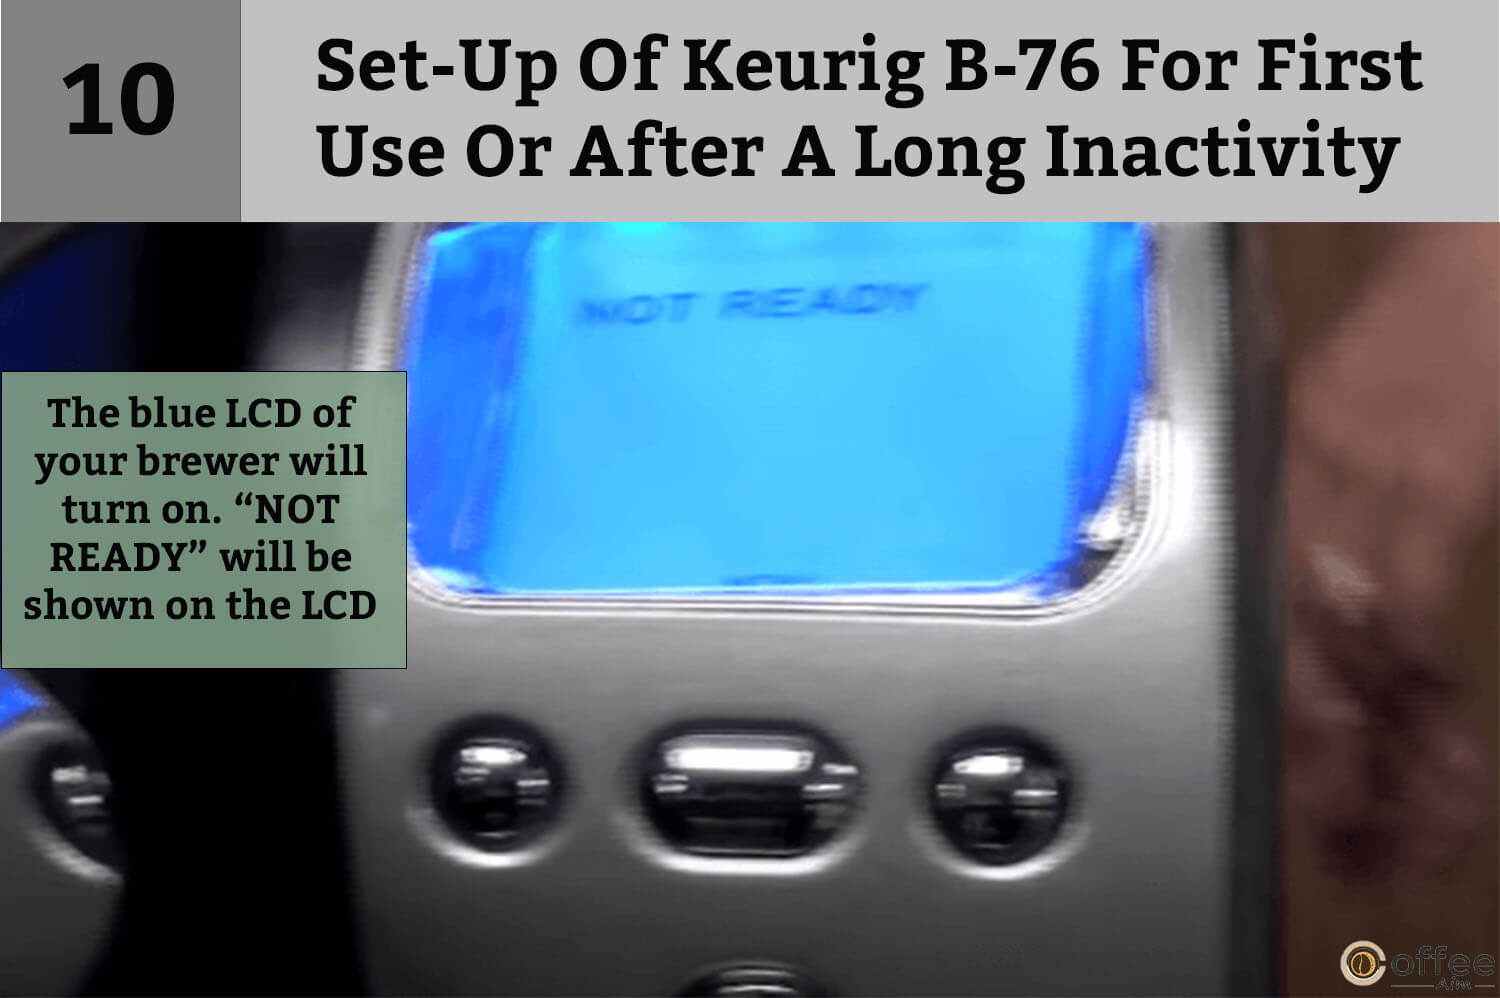
10. The blue LCD of your brewer will turn on. “NOT READY” will be shown on the LCD.
11. Your brewer will automatically fill its internal tank with water from the external reservoir. The water will start to heat up.

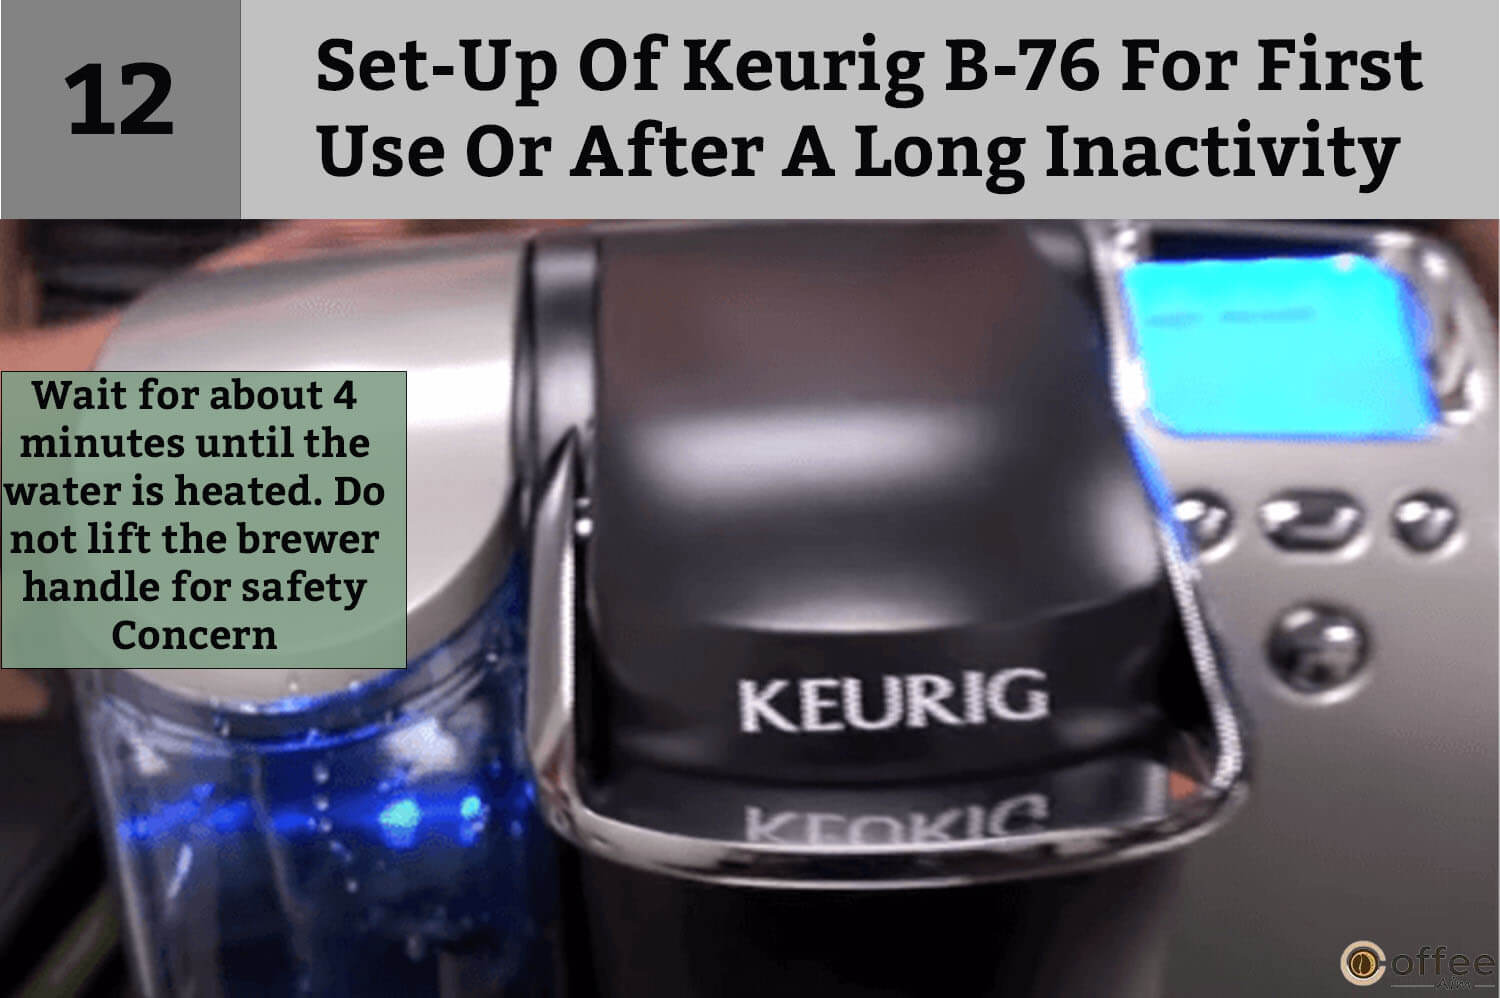
12. Wait for about 4 minutes till the water is thoroughly heated. The LCD will still display “NOT READY” during this heating period. It is advised never to lift the brewer handle during the heating period due to your safety concern.
13. After heating, “READY TO BREW” will be displayed on the brewer’s LCD. Also, the brew button will light up. Throughout this process and any future heating, you could notice minimal water dropping into the Water Reservoir from the Vent. This dripping of water is regular.

14. Now lift and lower the handle. To start the cleaning process, press the flashing brew button. The hot water will pass through your machine and remove dust particles. Throw away the hot water collected in the cup.

NOTE: You should not use a K-Cup for this entire sequence.
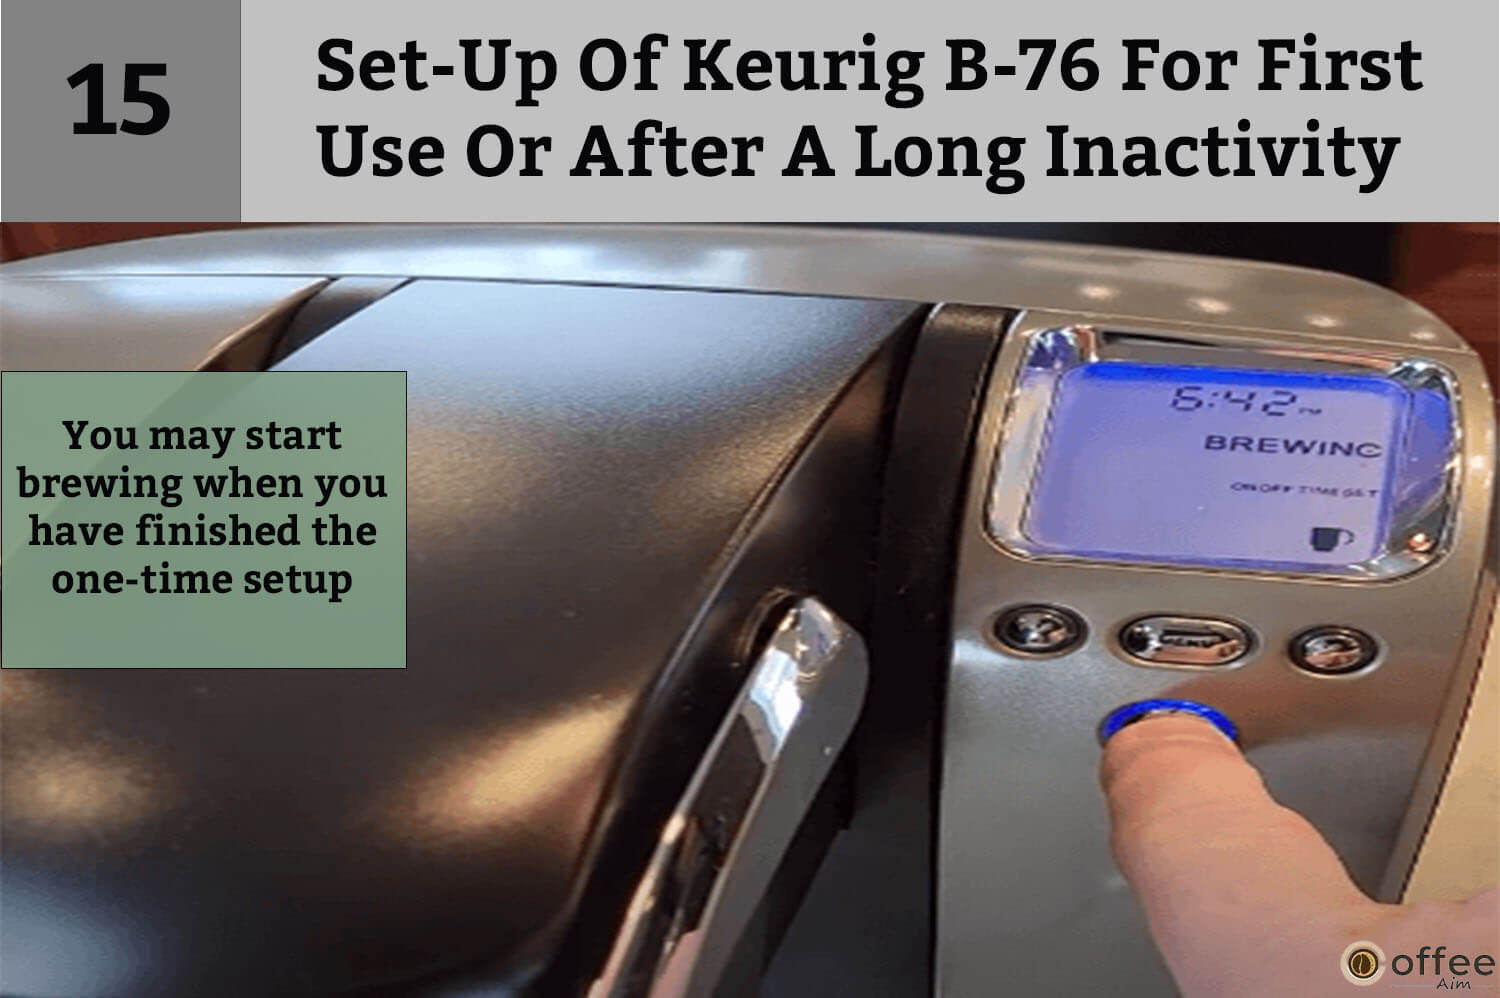
15. You may start brewing when you have finished the one-time setup.
Ready To Brew Your First Cup With Keurig B-76
You now have a thorough understanding of every feature of your Keurig B-76. Your machine is now ready to brew your first cup of coffee after being correctly installed. Remember that your appliance runs on electricity, so use caution when operating it. Brew your first cup of coffee with the Keurig B-76 by carefully following the procedures listed below.
1. Turn your machine on by pressing and releasing its power switch behind your brewer’s right side.

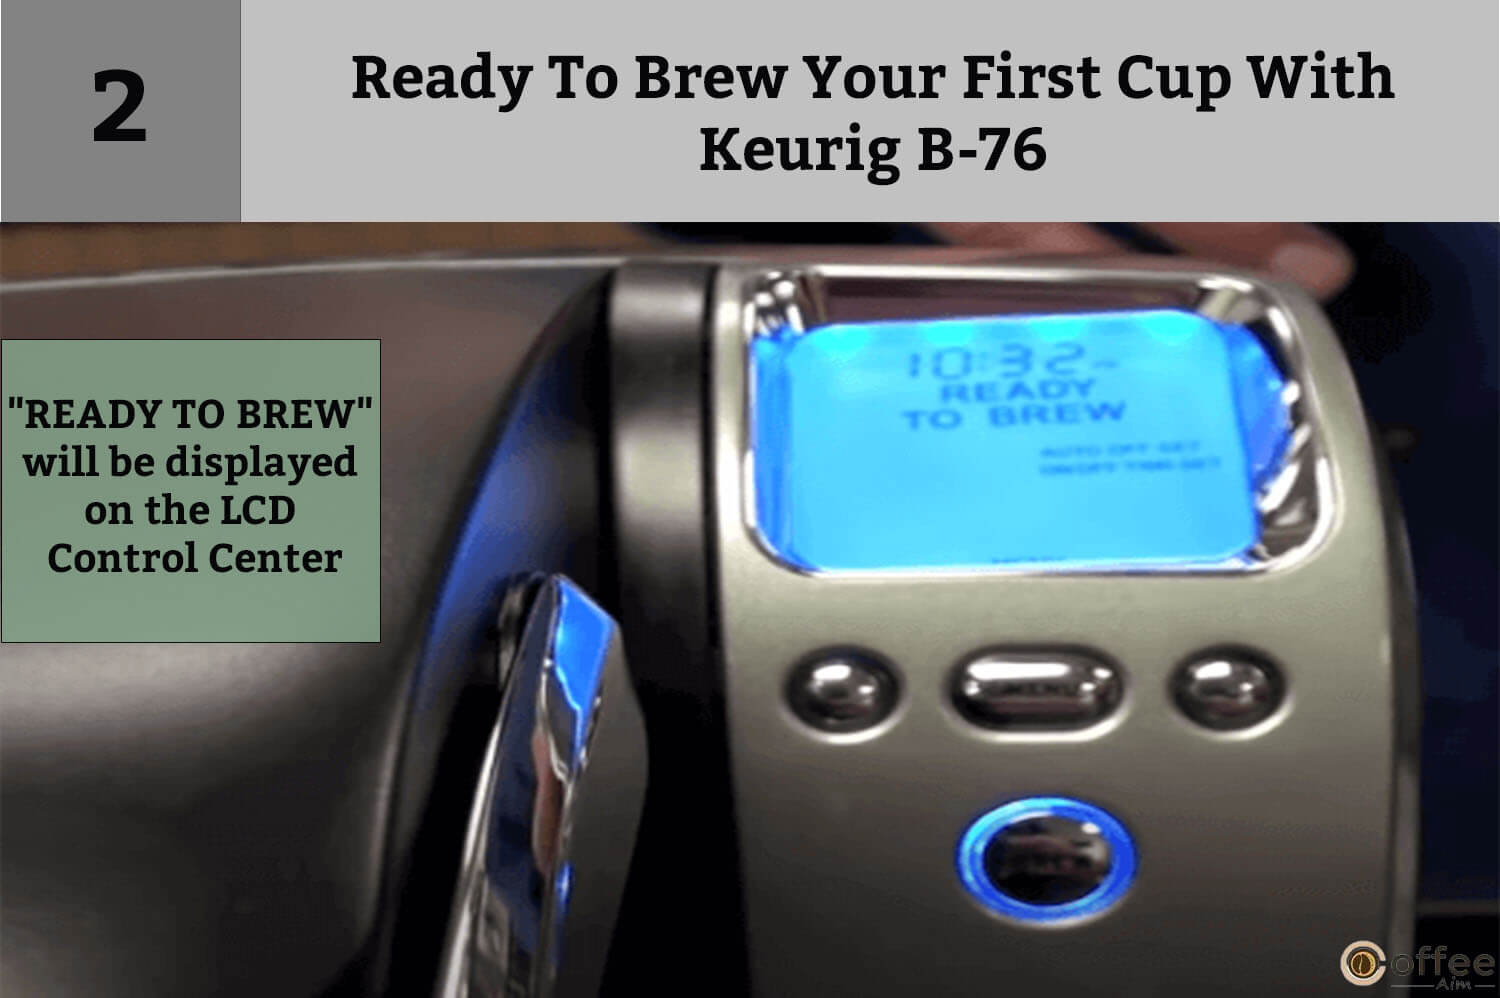
2. “READY TO BREW” will be displayed on the LCD Control Center.
3. Place a cup or mug on the Drip tray.

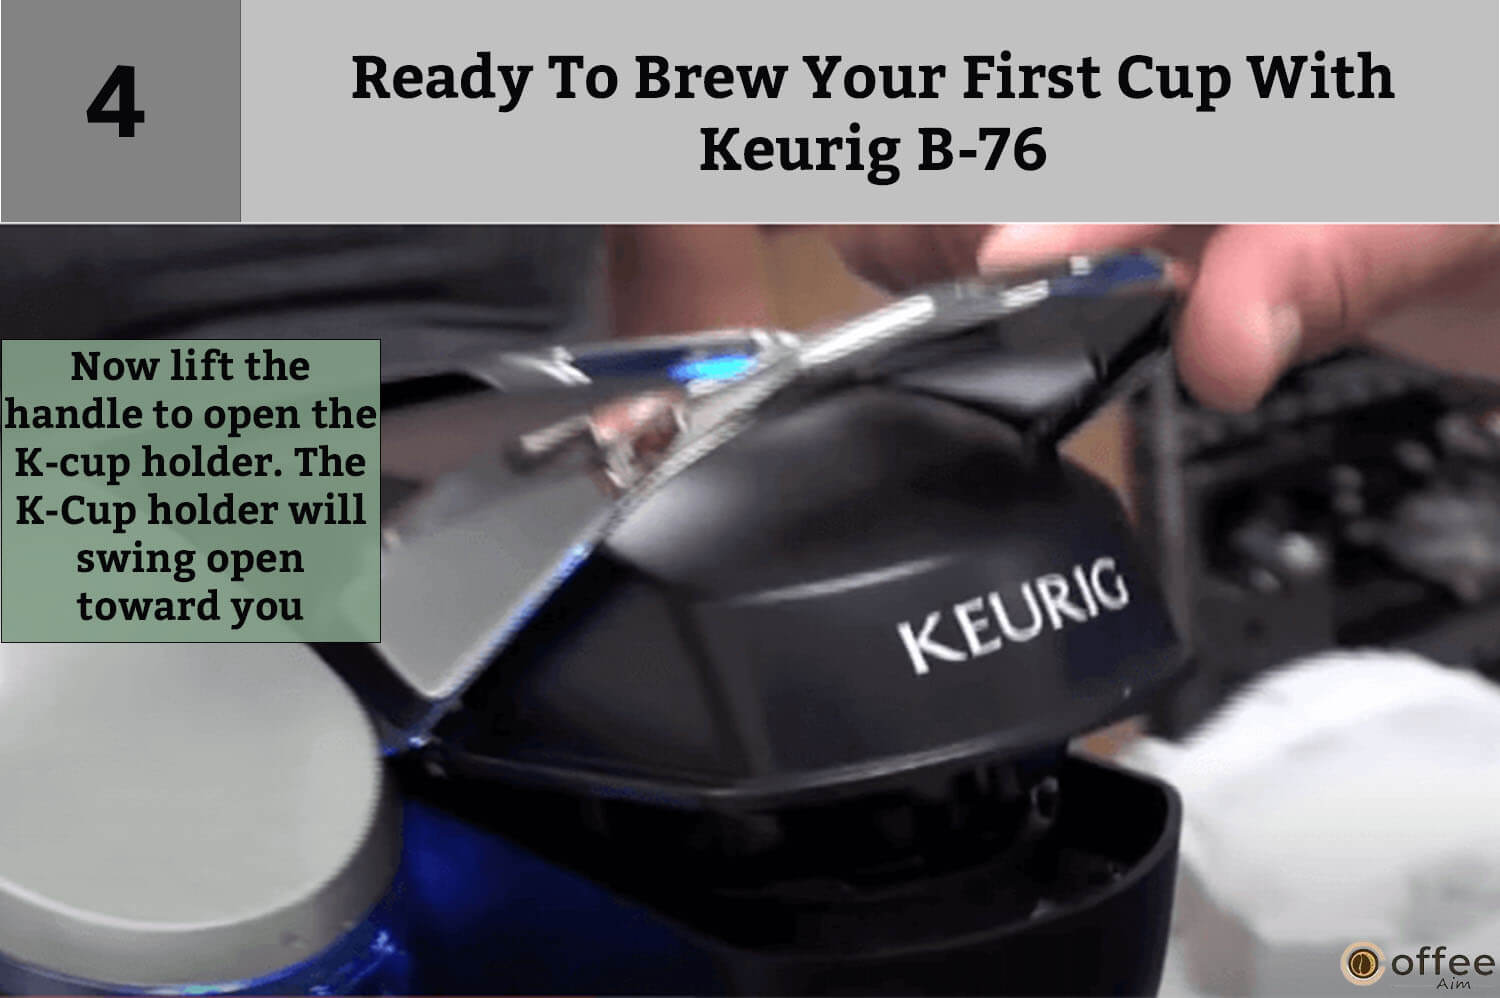
4. Now lift the handle to open the K-cup holder. The K-Cup holder will swing open toward you.
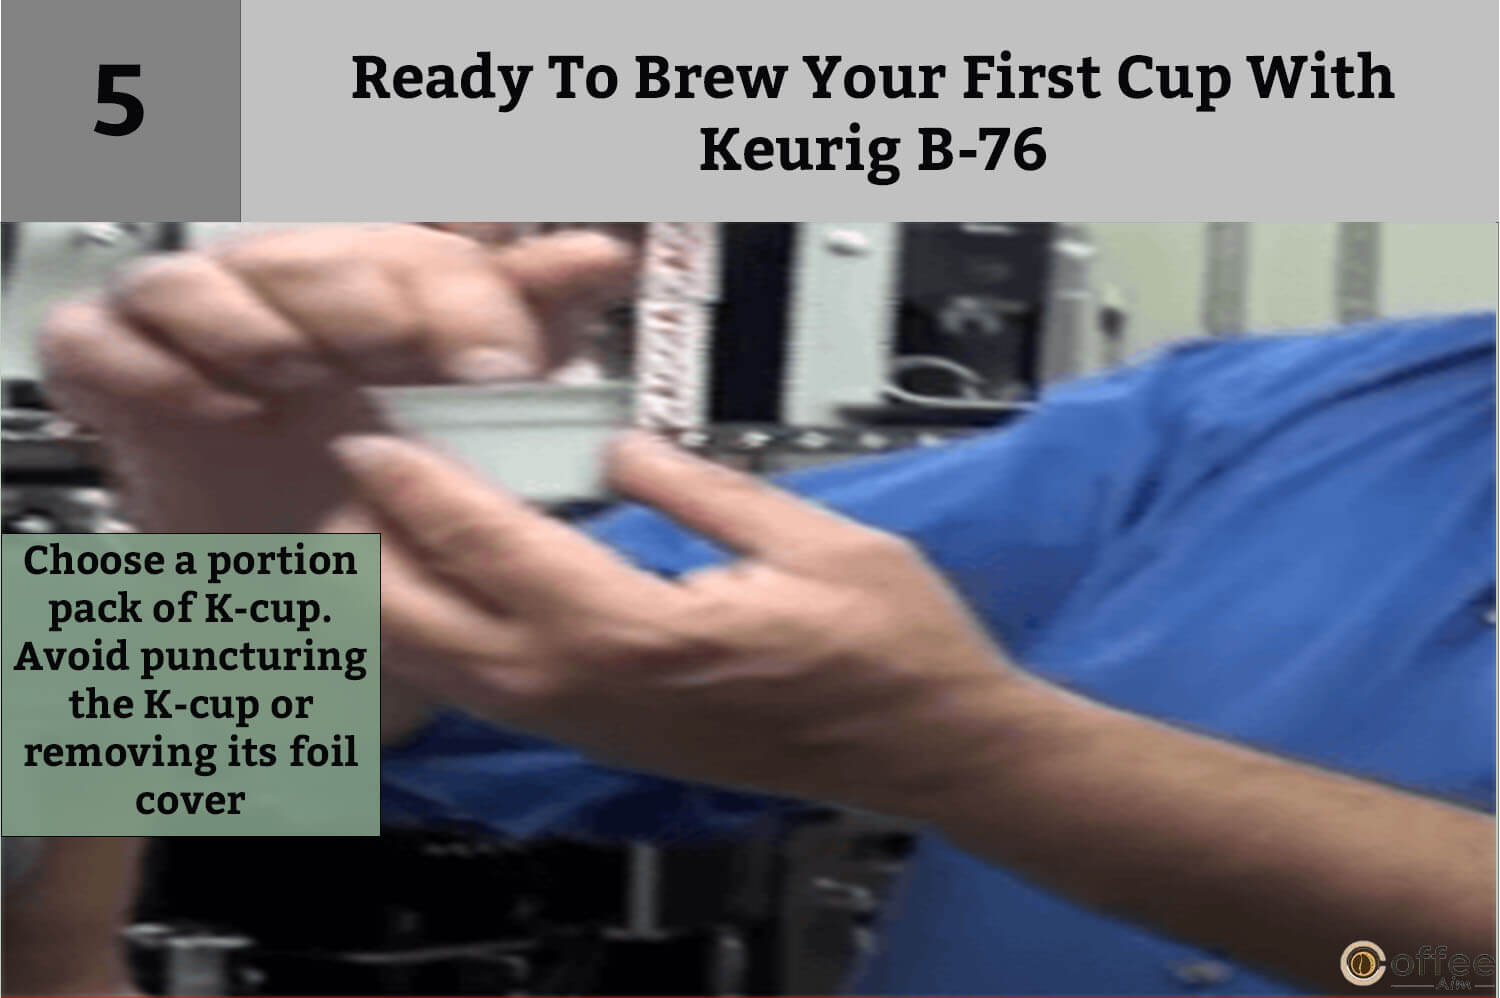
5. Choose a portion pack of K-cup. Avoid puncturing the K-cup or removing its foil cover.
6. In the K-Cup Holder, place a K-Cup portion pack. The portion pack is in the machine punctured by two sharp needles, one above the K-Cup Holder and the other at the bottom. Therefore, do not put your fingers in the K-Cup Assembly Housing to avoid harm from these needles.

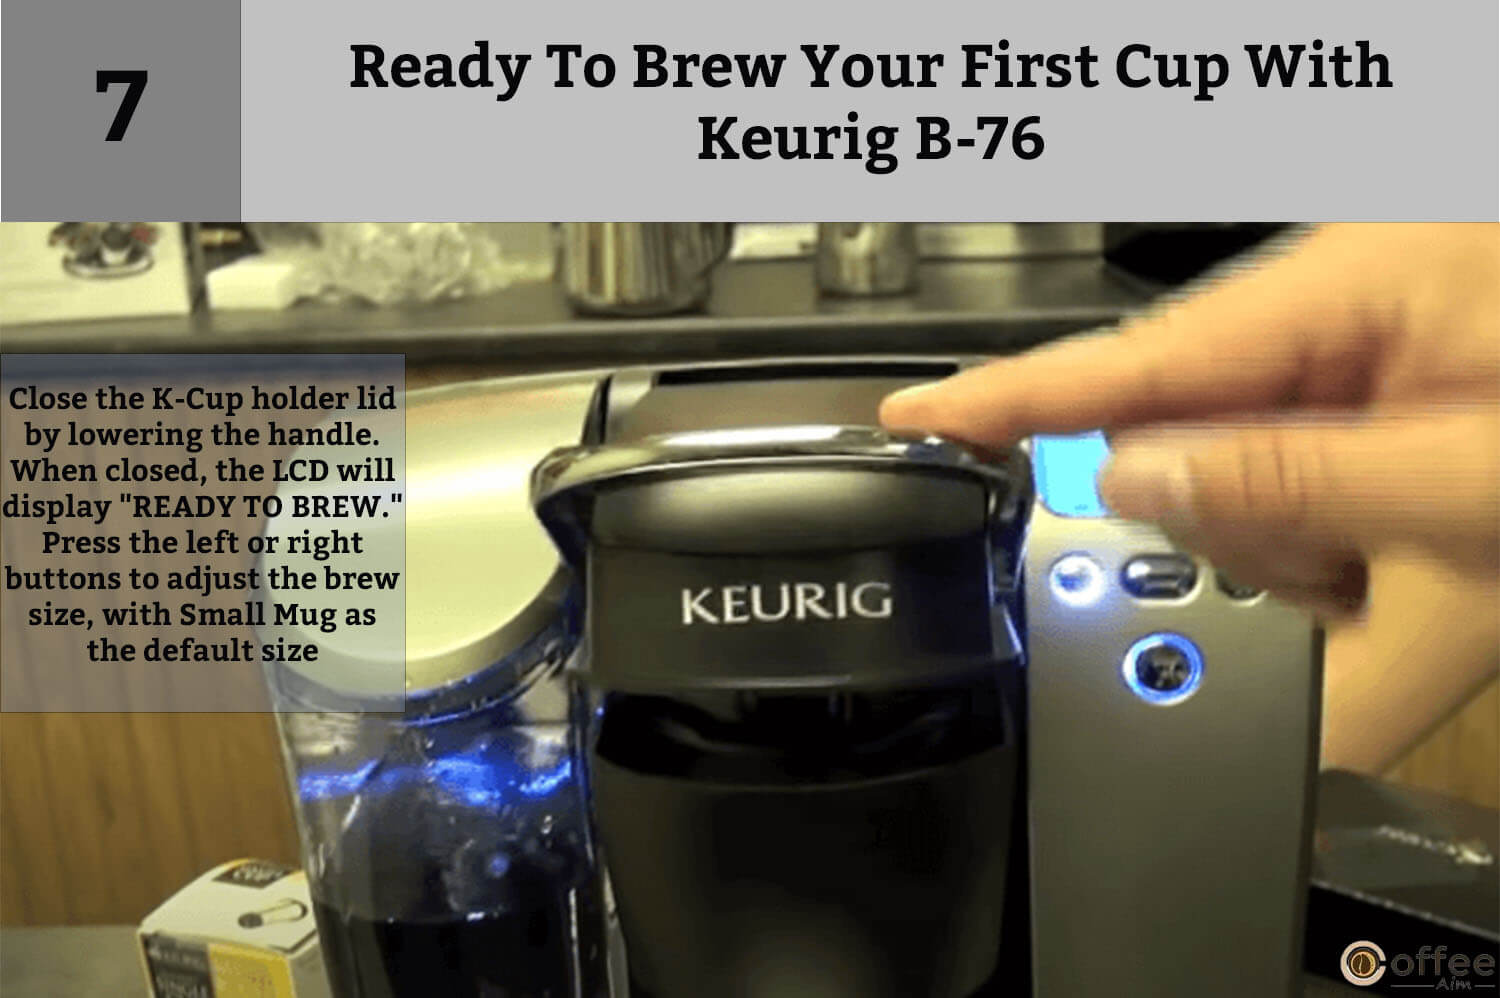
7. Now close the lid of the K-cup holder by lowering the handle. When the lid is closed correctly, the LCD will display “READY TO BREW.” The left and right buttons will light up, and the BREW button will flash for 60 seconds.
All brew size icons will illuminate with the default size flashing on the LCD screen. The Small Mug is the factory-set default brew size. You can change the size by pressing the left or right buttons. To decrease the size, use the left button; to raise the size, press the right button.
Size choices are as follows:
- Extra-Small Cup (3.25 oz/ 96.11 mL serving)
- Small Cup (5.25 oz/ 155.26 mL serving)
- Small Mug (7.25 oz/ 214.40 mL serving)
- Large Mug (9.25 oz/ 273.55 mL serving)
- Travel Mug (11.25 oz/ 322.70 mL serving)
8.Once you have selected your desired brew size, press the BREW button. After pressing, the BREW button will stop flashing. The left and right buttons will no longer be lit; only the brew size icon will be lit.

9. The word ‘BREWING’ will now appear on the LCD Control Center, which will light your selected serving size.

NOTE: During brewing, boiling water is present in the K-Cup Holder. Therefore, never lift the handle or open the K-cup assembly housing during brewing since the hot water might injure you.
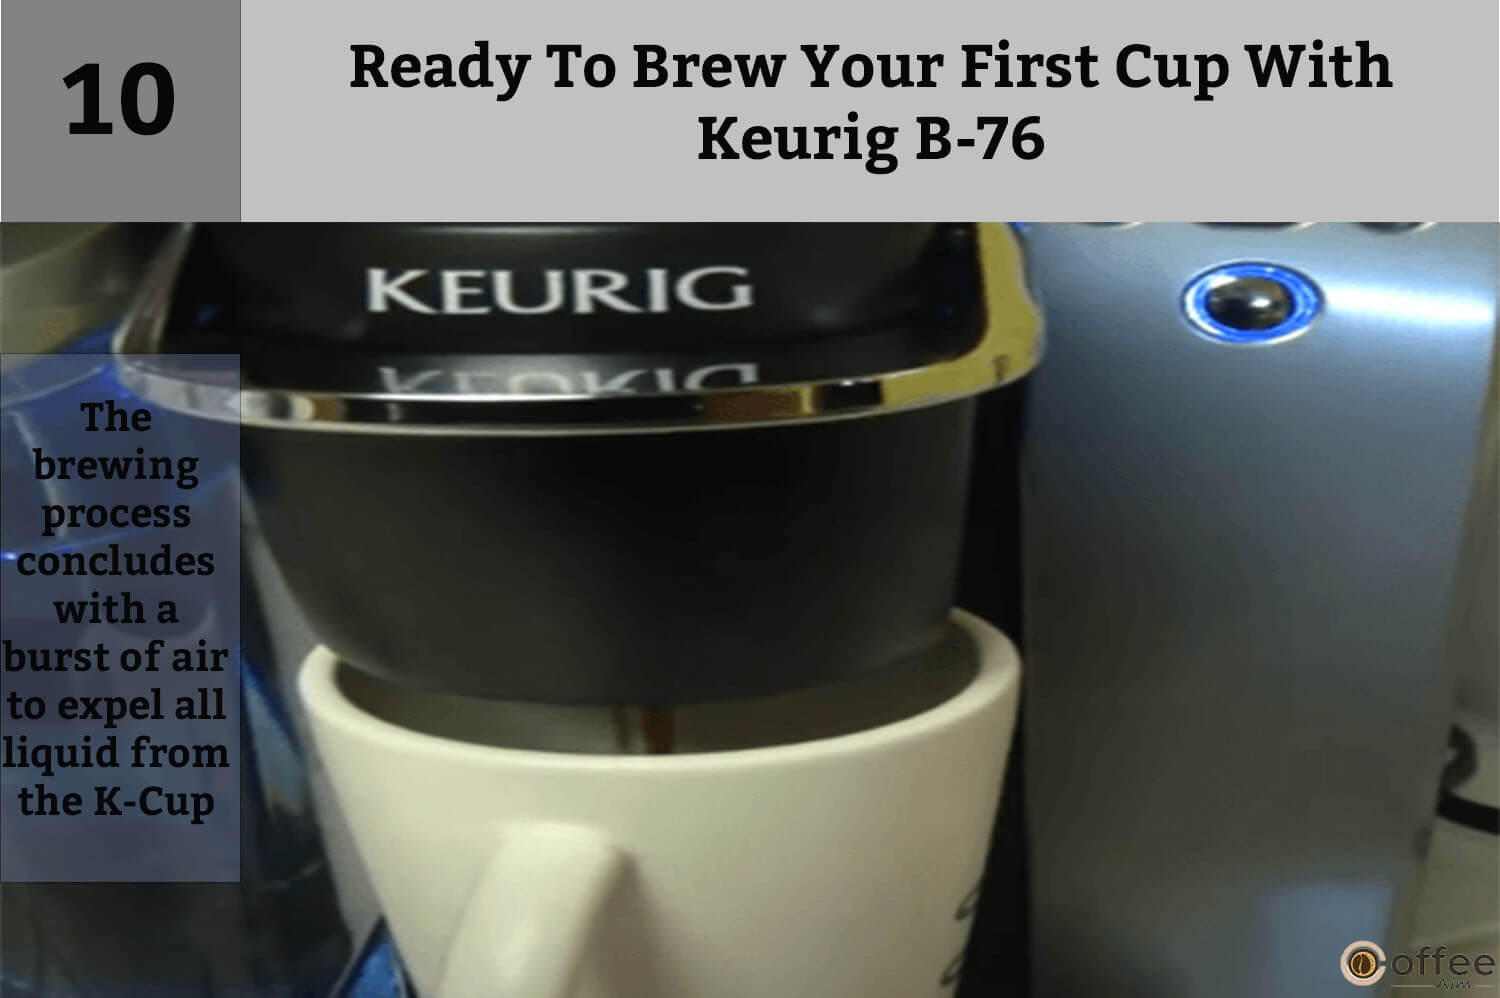
10. A brief gap might exist before the machine serves the coffee. The brewing process takes about a minute and concludes with a burst of air to expel all liquid from the K-Cup.
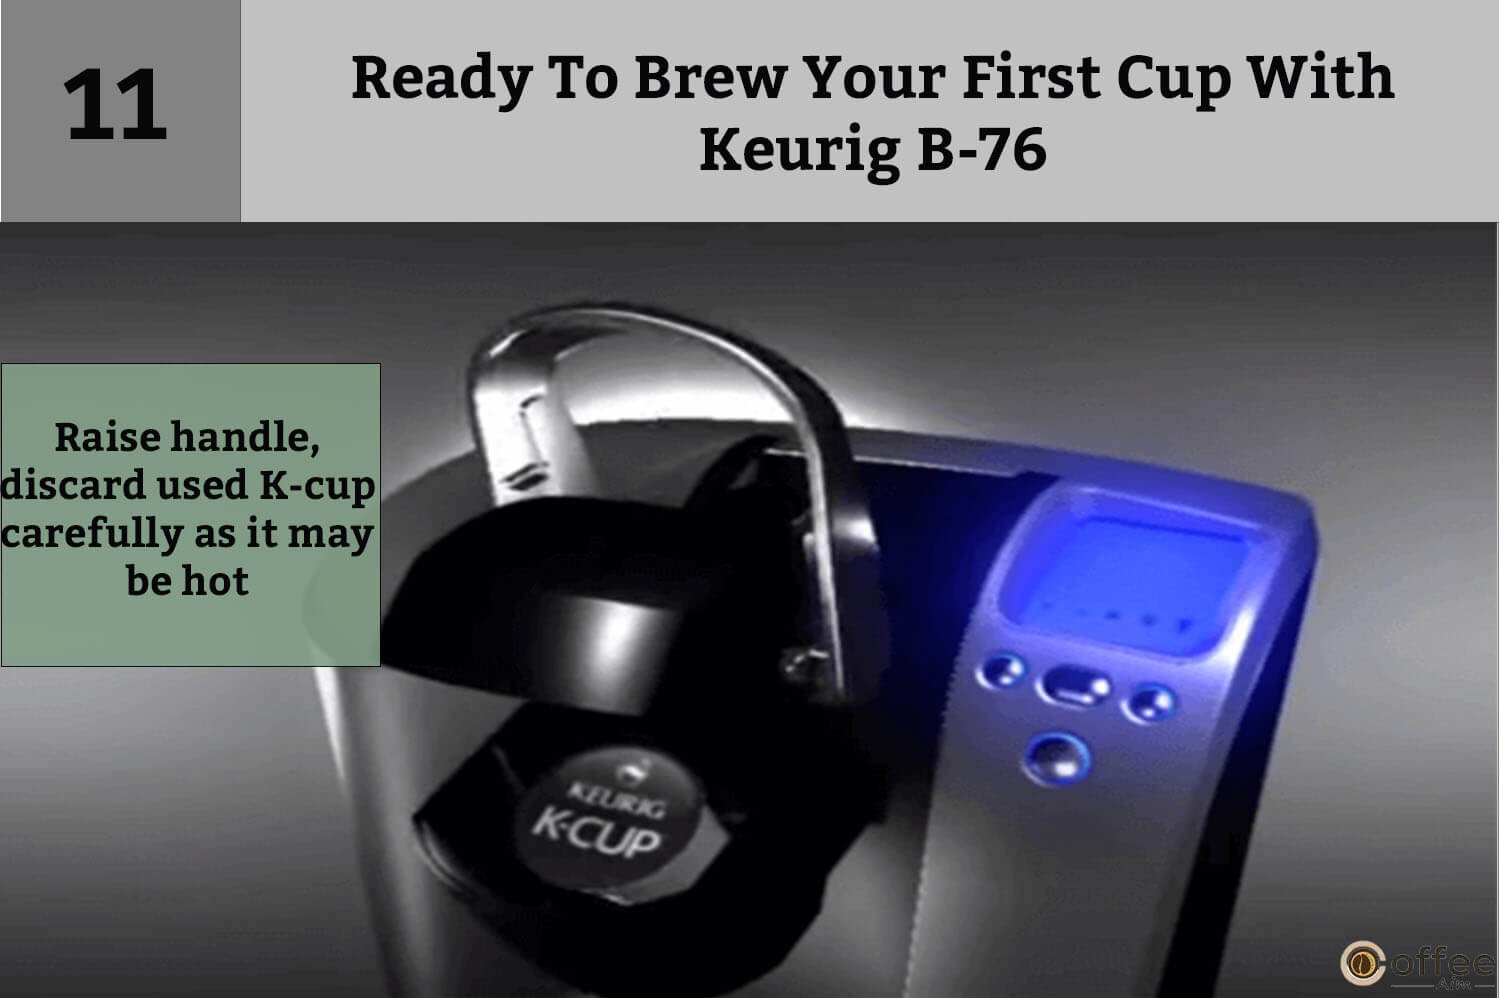
11. Raise the handle to open the K-cup holder. Take the used K-cup and discard it. The K-cup will be hot, so remove it with caution.
12. Enjoy your first cup of exquisite Keurig Brewed coffee, tea, or hot chocolate!

13. Your Brewer will show “NOT READY” while heating water for the next brew cycle. In about 15 seconds, the “READY TO BREW” indication will return to the LCD Control Center.

Stopping The Brew Process Midway
Keurig B-76 is a user-friendly appliance. Your machine operates efficiently to accomplish any desired process. Even once the brewing process has begun, you can stop it. To do so, press and release the power switch, and the brewer will turn off. Turning the brewer off will also stop the coffee, tea, or hot cocoa flow. Doing this will also turn off the heating element and the blue lights illuminating the LCD Control Center and Water Reservoir. But doing so will increase the volume of coffee, tea, or hot chocolate in the next cycle. As a result, I advise you to run a brew cycle and clean your brewer with just water after a terminated brew. As a result, the volume of brewed coffee, tea, or hot chocolate will stay the same as you specified.
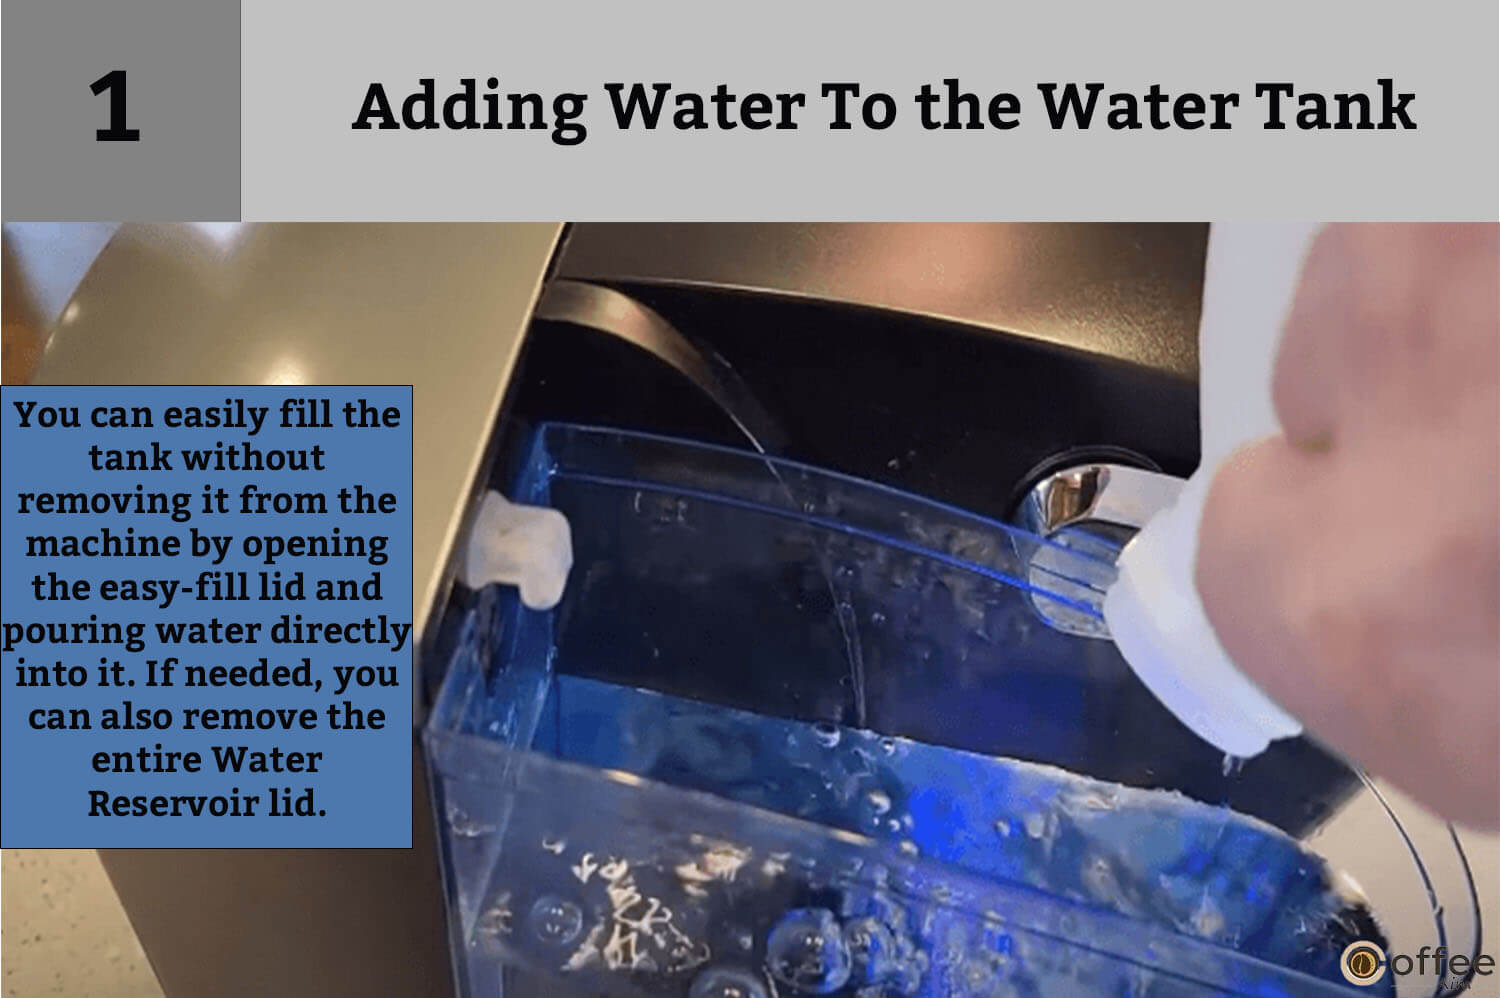
Adding Water To the Water Tank
Always use fresh and potable water for brewing coffee with your machine. Doing this will eliminate mineral buildup, allowing your coffee to taste better and your device to operate effectively in the long run. When the water level in the water reservoir tank is low, your machine will display “ADD WATER” on its LCD Control Display. The blue light in the Water Reservoir will likewise blink when the water level is low. “ADD WATER” will also be displayed on the LCD when you have removed the water tank. Your machine will not allow you to brew coffee when “ADD WATER” is shown.
There are two methods for filling the Water Reservoir Tank.
1. You can fill the tank without removing it from your machine. Just open the easy-fill lid and pour water directly into the tank. Close the cover when you have filled the tank. If desired, you can remove the entire Water Reservoir lid.
2. The second method is to remove the Water Reservoir from the Brewer by removing the Lid and then pulling the Water Reservoir straight up and towards the front of the Brewer. Fill it with potable water. After filling, put it back on the brewer and cover it with its lid. But the water tank should always be kept on when brewing coffee. Only remove it when the brew cycle has stopped.

Brewing Iced Beverages With Keurig B-76,
You can prepare iced beverages from your machine. When you pour freshly brewed hot coffee over ice, iced tea, and coffee taste the finest. Doing so locks in the flavor for rich, smooth iced coffee or tea. The end product will be a strong flavor rather than a watered-down flavor of the coffee. Place a tall cup full of ice on the Drip Tray Plate. You can remove the Drip Tray Assembly to accommodate taller cups. Choose your favorite K-Cup portion pack and brew size, and push the BREW Button. Some K-cups are specially designed to be brewed over ice. These K-cup portions will have a Brew Over Ice icon on them. You should never prepare iced coffee in cups made of glass, as the hot coffee from the brewer can cause the glass to crack or break.
Brewing Hot Water
You may also use your machine to produce hot water, which you can use in cooking, making soups, or preparing hot chocolate from a packet. If you want water for these purposes, simply operate your machine without adding a K-cup portion in the holder. In this way, only hot water will flow out from your brewer. When making hot chocolate from a K-cup, it is best to rinse your brewer by running a hot water brew cycle, without a K-cup, just afterward so that the residue does not interfere with the flavor of your coffee in the next brew cycle.
Purging Your Keurig B-76
If you last used your Brewer a week ago, you should cleanse the water from the inner tank. You are purging guarantees that only water with the desired temperature makes your coffee. Simply follow the below-mentioned steps to clean your brewer deep.
1. Remove the Lid, then pull the Water Reservoir straight up and away from Brewer if there is water. Remove the water, rinse, and refill. Replace the Lid and the Water Reservoir on the Brewer. If the Water Reservoir is empty, simply refill it.

2. Make sure that the Brewer is on. Lift and lower the Brewer’s Handle without inserting a K-Cup.

3. When “READY TO BREW” appears on the LCD, brew a travel mug (11.25 oz. serving) of water from your machine.
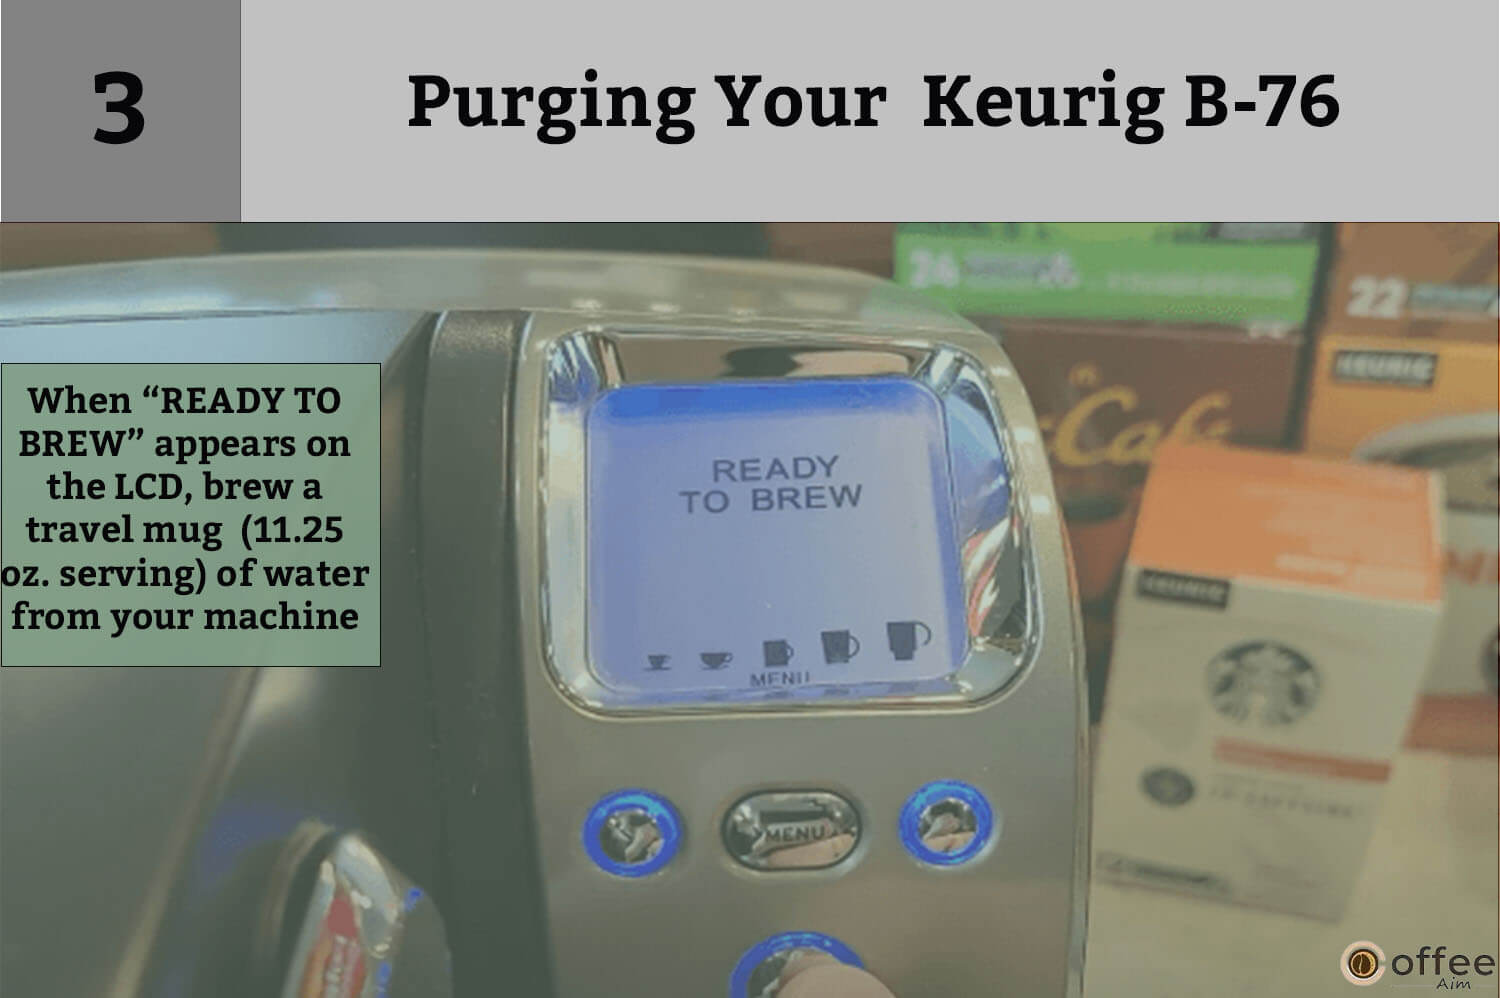
4. You should repeat steps 2 and 3 twice to remove the water from the inner tank.

NOTE: If you have issues with your brewer, please contact Customer Support at 1.866.901.BREW (2739).
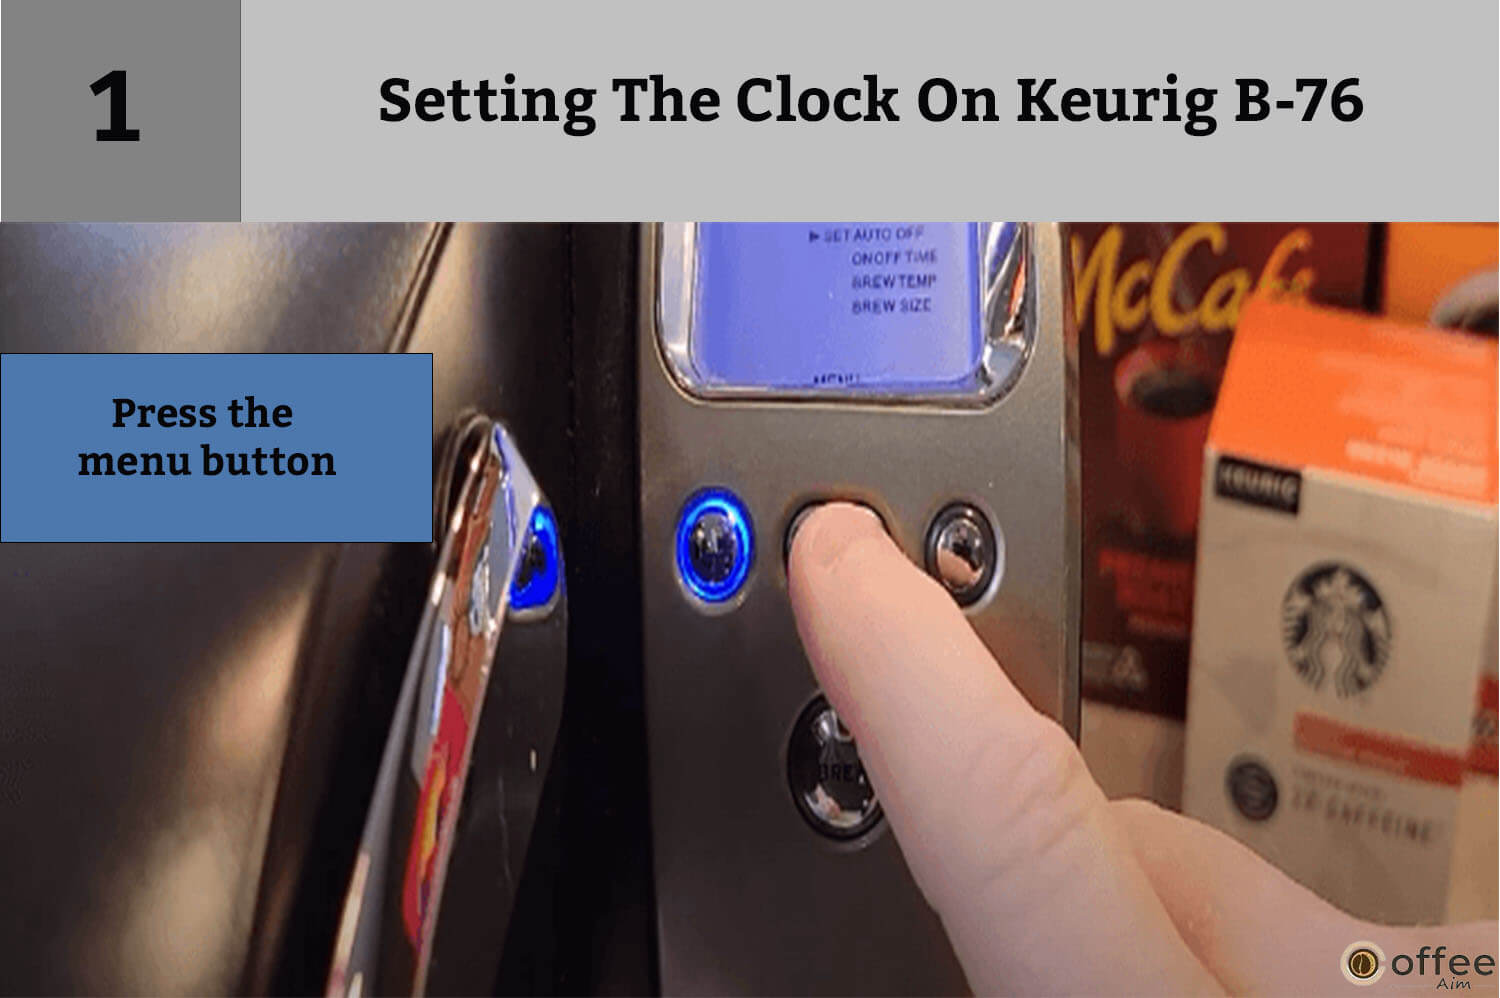
Setting The Clock On Keurig B-76
Setting the clock is optional. The LCD Control Center of your brewer will display the time after you set the clock. If you plan to use the Auto On/Off Time programming option, you must first set the clock. Then you can program your machine to brew coffee on your schedule. Follow the below-mentioned steps to set the clock on your machine.
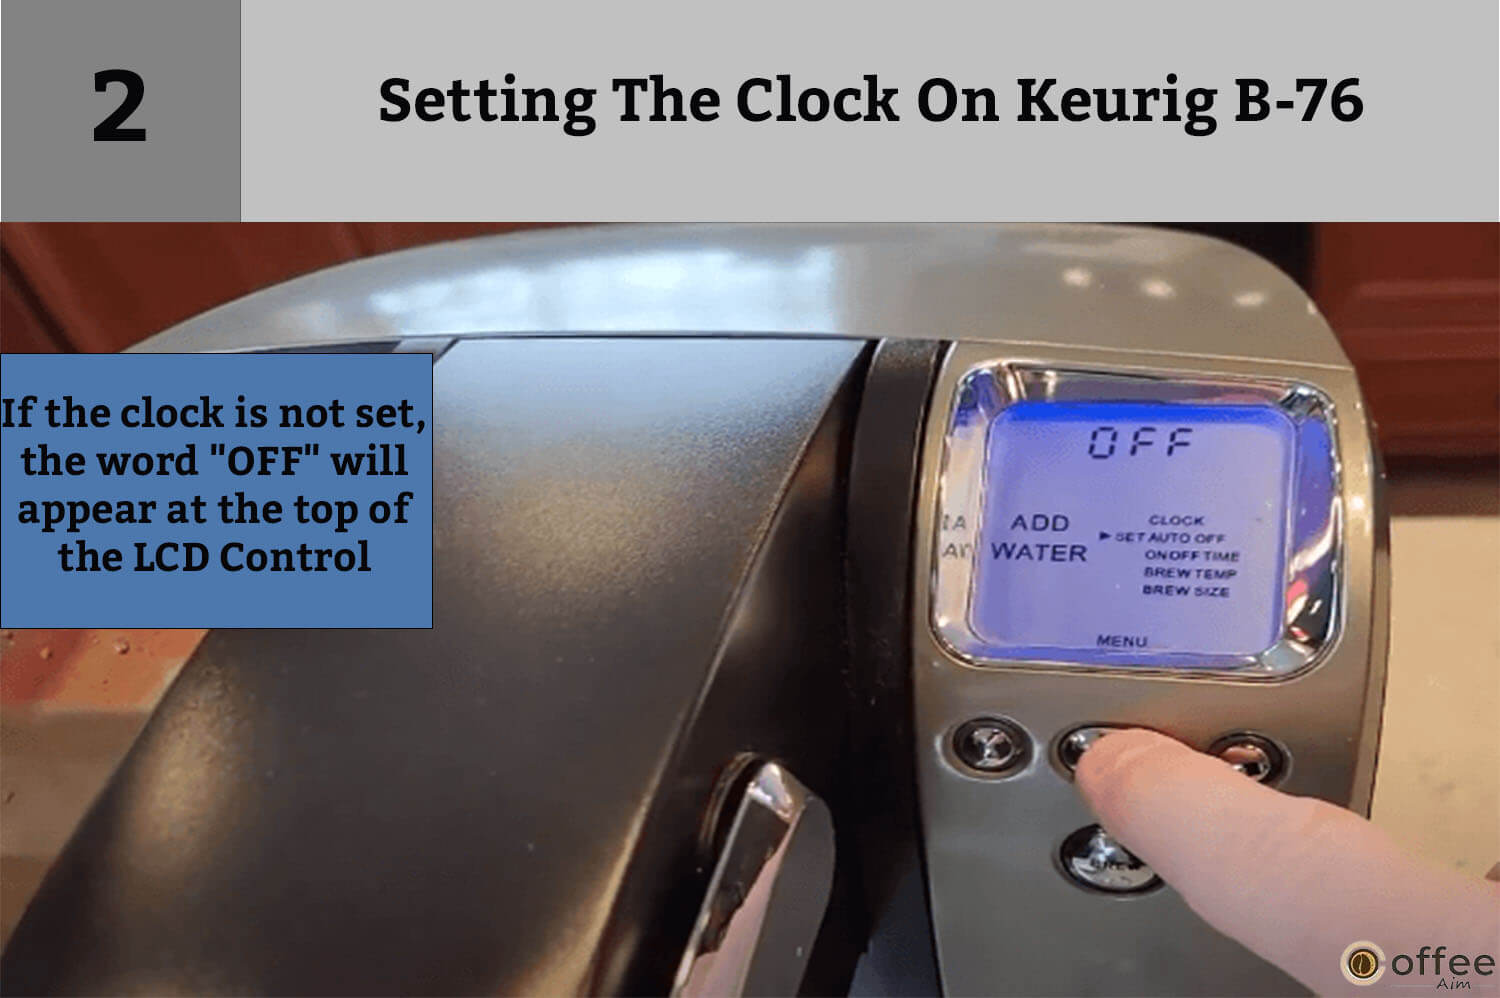
1. Press the menu button.
2. If you have not set the clock, the word ‘OFF’ will show at the top of the LCD Control Center. The programming options will display on the LCD Control Center, with a little arrow pointing to ‘SET CLOCK.’ The letters “H” (Hour) will appear above the Left Button, and the letters “M” (Minute) will show above the Right Button. Left and right buttons and the “H” and “M” icons will flash.
3. Push the Left Button under the flashing “H” until you reach the correct hour. If the hour has passed 12 o’clock, “PM” will be shown.

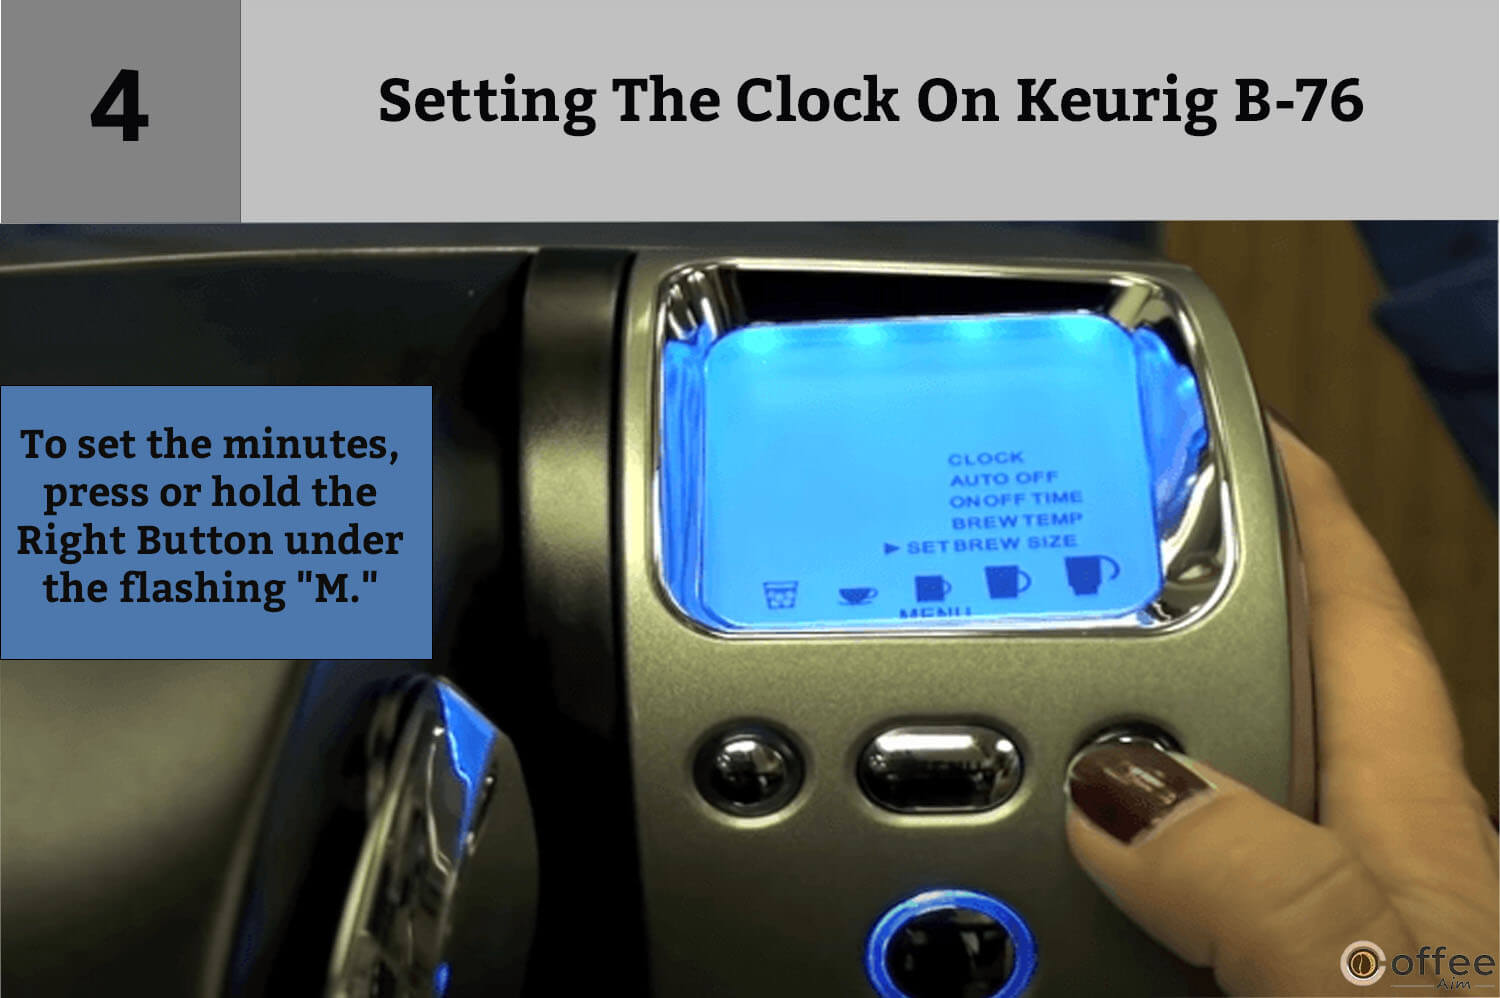
4. To set the minutes, press or hold the Right Button under the flashing “M.”
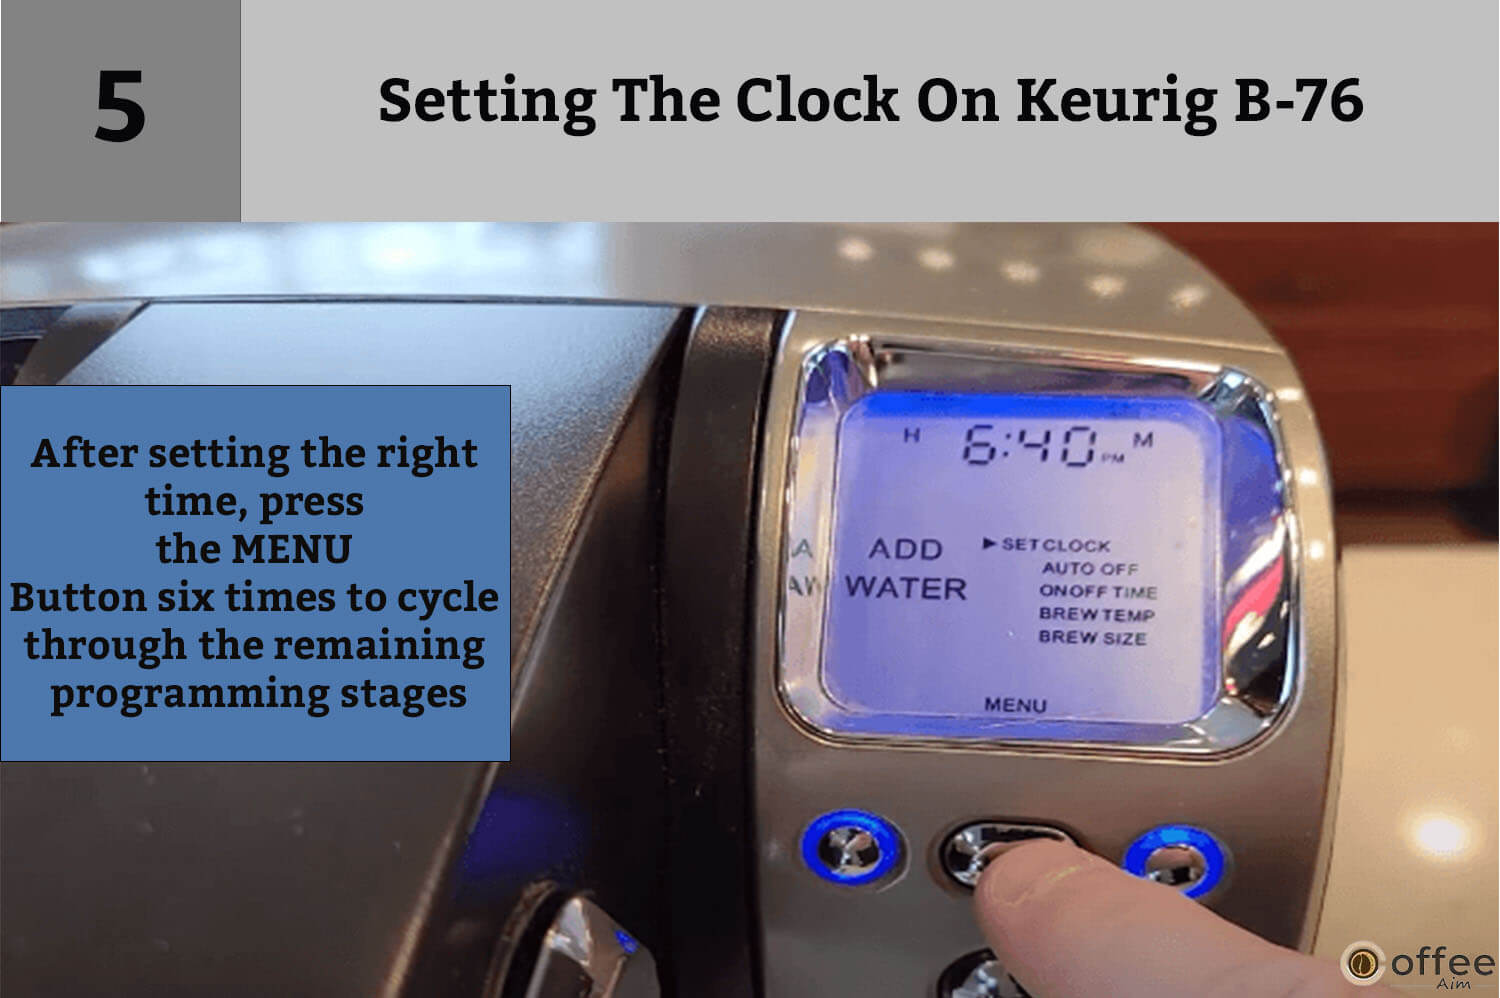
5. When you’ve set the right time, press the MENU Button six times to cycle through the remaining programming stages.
6. The LCD control panel will now show the proper time.
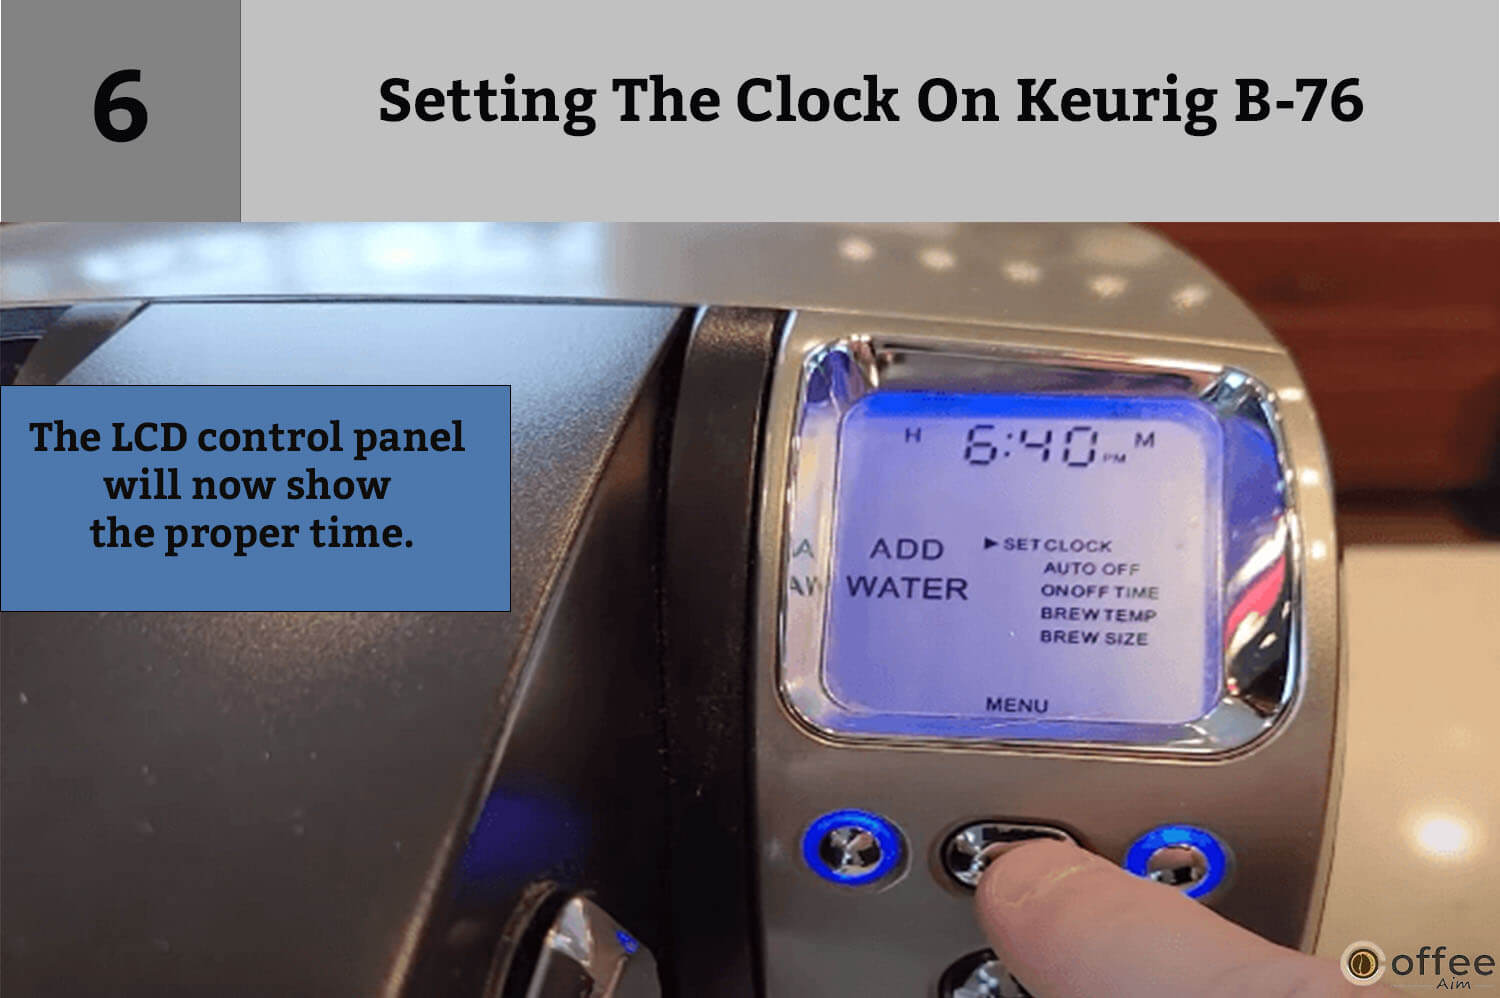
NOTE: If the power to the Brewer is interrupted by disconnecting it or if power is lost, repeat the step above to reset the time since the brewer will not display the clock until you set it. Menu settings for brew size and temperature are kept and restored automatically. When you set the clock, all other settings will be restored automatically.
Programming On/Off Features
You can program your Keurig B-76 to function as you choose. You can configure your machine to make coffee on your schedule. By programming your Keurig B-76 to turn on every morning, you will never have to wait for it to warm up before brewing a delicious cup of coffee. The Brewer requires around 4 minutes to warm up from room temperature. You may program your machine using one of three settings on the brewer.
- You can leave your machine ON all the time. This way, your brewer will always be ready to brew an exquisite cup of coffee, tea, or hot chocolate. To turn your machine OFF, simply press and release the power switch. But, even if you have set the clock for a specific time, your machine will not brew coffee after switching it off. To brew coffee, you must turn it on again by pressing and releasing its power button. Your machine will also take some time to heat the water before it is ready to brew coffee, tea, or hot cocoa.
- You can set your machine to “AUTO OFF” mode. This way, your device will switch off when a certain amount of time has passed since the last brew. Follow the below-mentioned steps to program your machine to “AUTO OFF” mode.
- Press the MENU Button twice to program the Auto Off function. The programming choices will now be visible on the LCD Control Center, with an arrow next to “SET AUTO OFF.”
2. Press or hold the Left Button under the flashing “H” to advance 1 hour at a time, up to 9 hours.

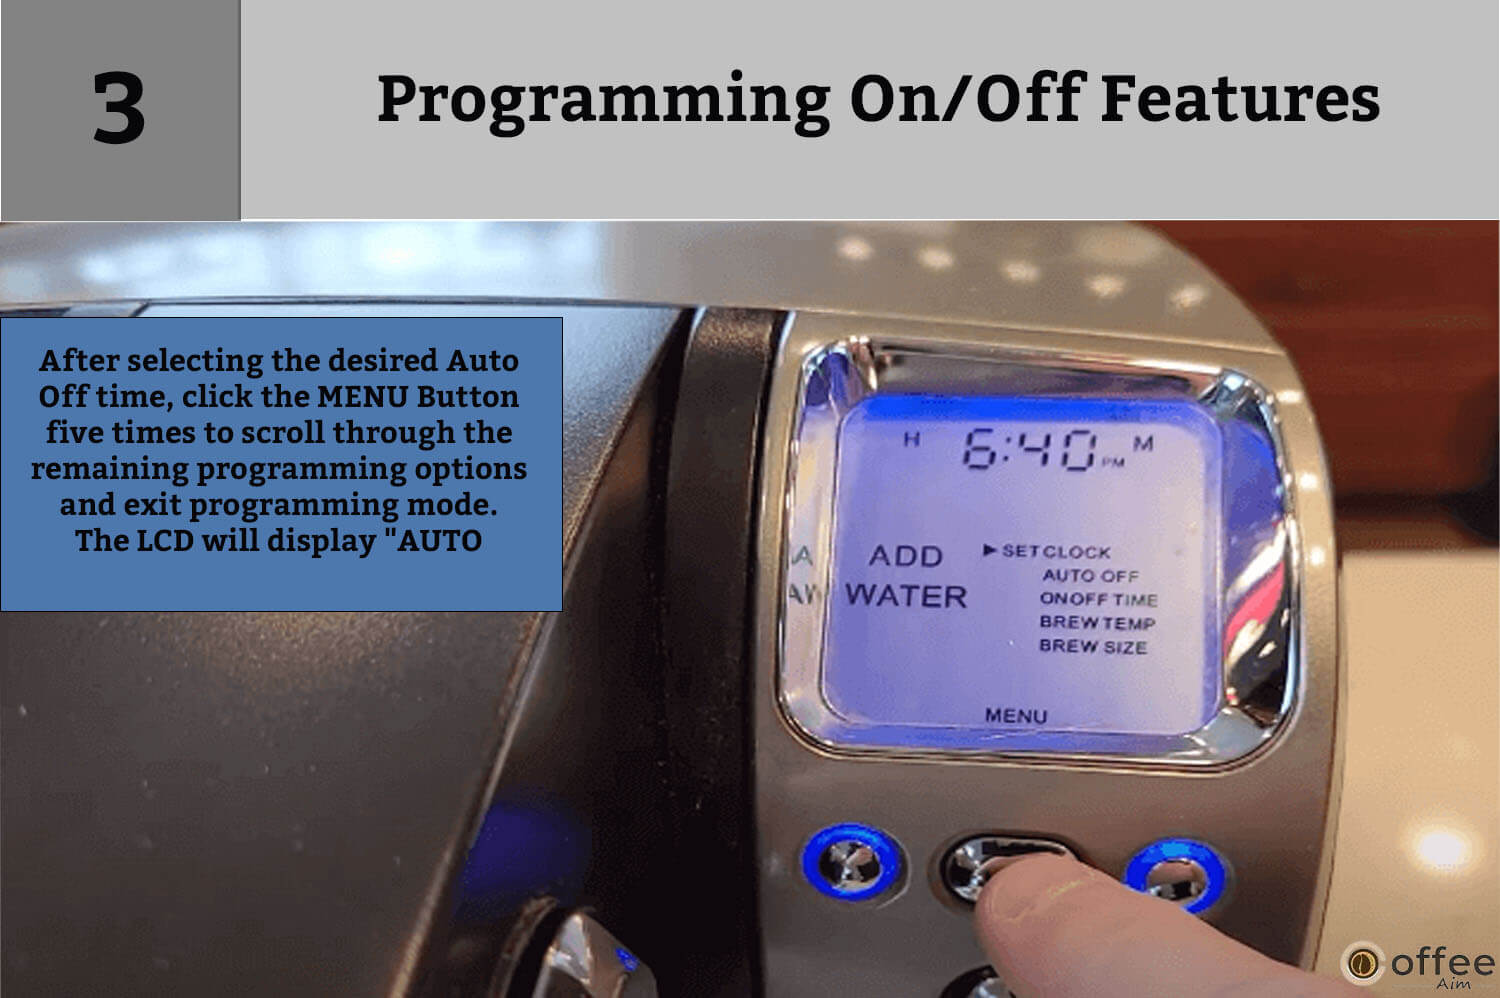
3. When you’ve selected the desired Auto Off time, click the MENU Button five times to scroll through the remaining programming options and leave programming mode. The LCD will now display “AUTO OFFSET.”
4. To disable the Auto Off function, press the MENU Button twice to enter the “AUTO OFF” programming mode. To advance one hour at a time, press and release the blue Left Button under the flashing “H” until “OFF” is shown.

- You can also set your Brewer to turn on and off at a particular time. You must set the clock to the correct time before you use this programming feature. The brewer will display the clock on the LCD. To program specifically on and off time, follow the steps mentioned below.
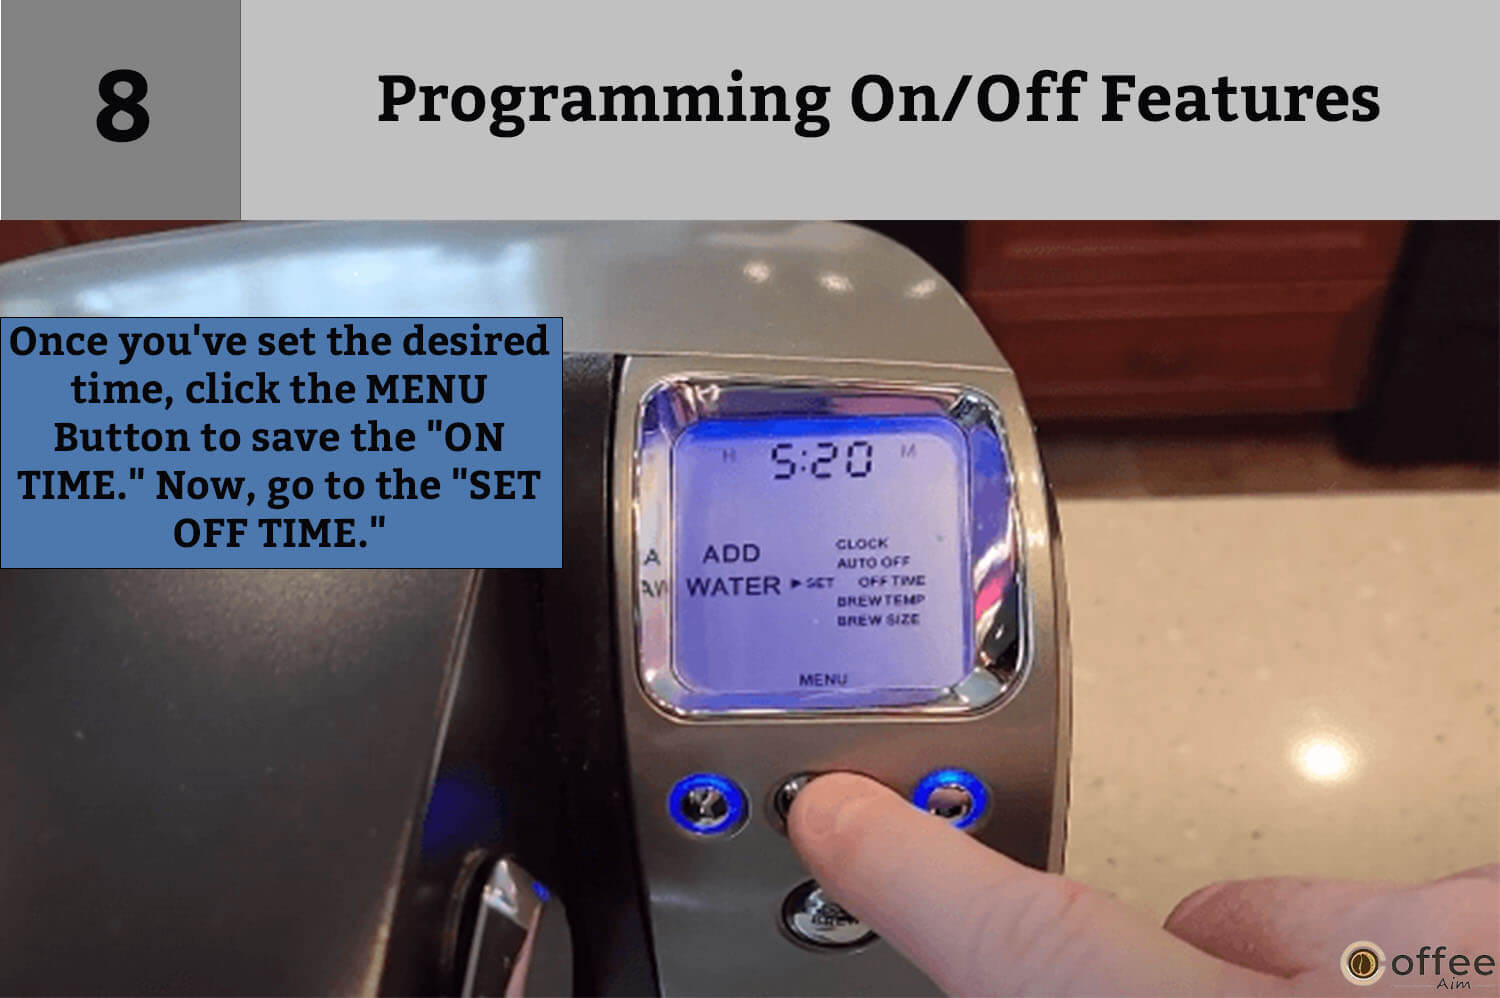
5. When you have set the right time, click the MENU Button three times to configure the On Time function. The programming options will be shown on the LCD Control Center by a little arrow next to “SET ON TIME.”

6. To reach your desired “ON TIME” hour, press the Left Button under the “H” for a few seconds.

7. To reach your desired “ON TIME” minutes, press the Right Button under the “M” for a few seconds.

4. Once you’ve set the desired time, click the MENU Button to save the “ON TIME.” Now, go to the “SET OFF TIME.”
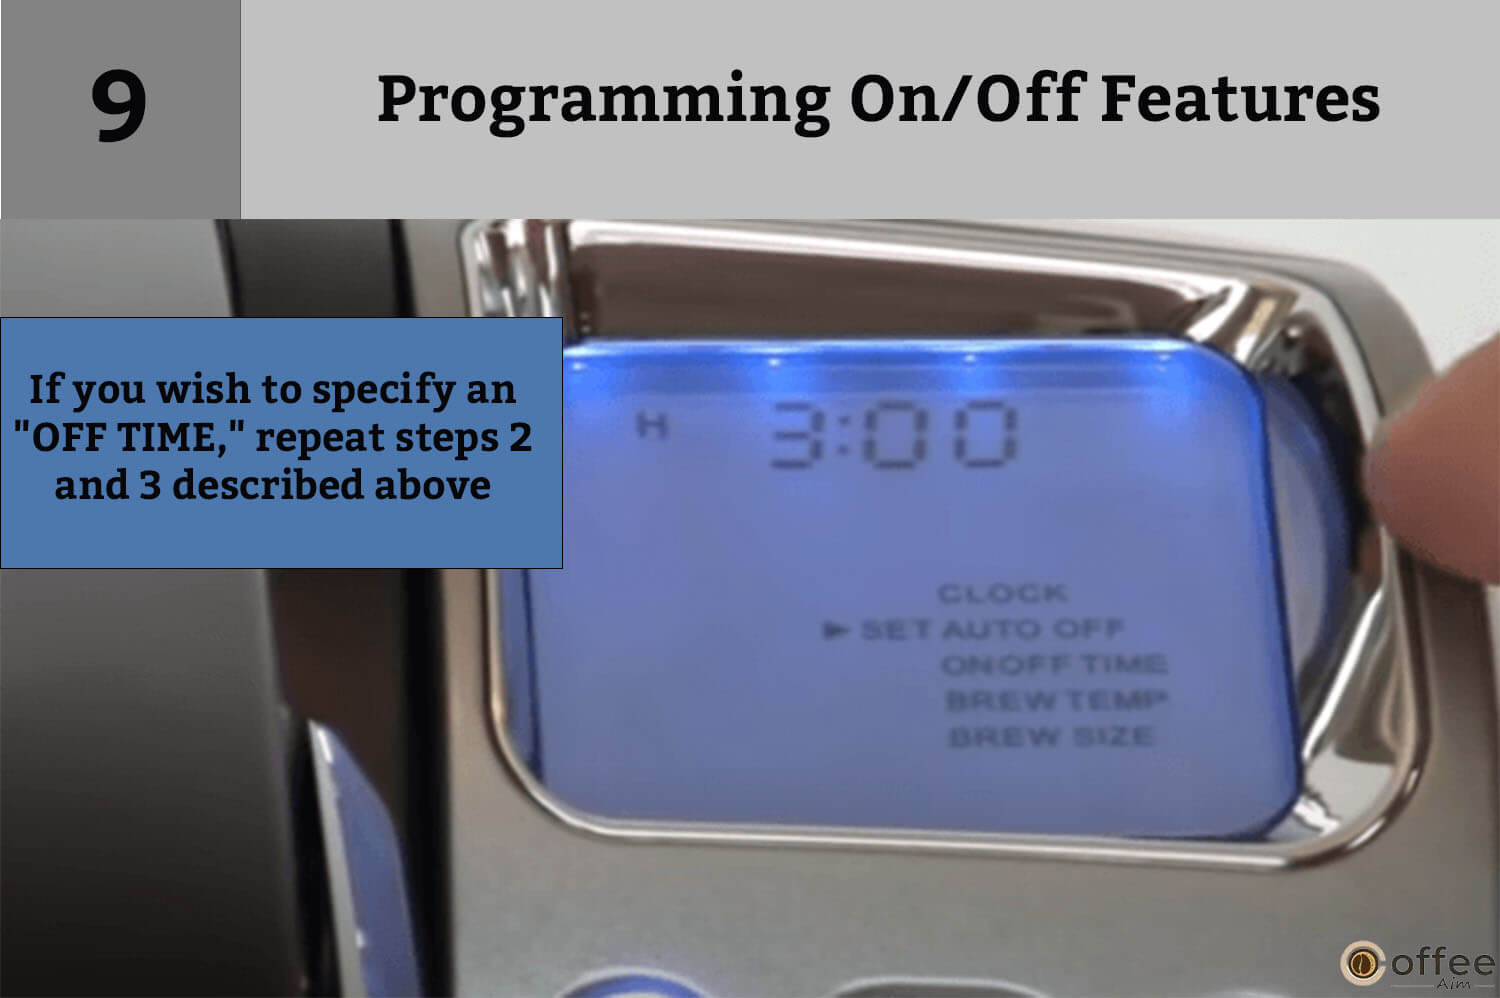
9. If you wish to specify an “OFF TIME,” repeat steps 2 and 3 described above.
10. To finish, hit the MENU Button three times more to leave programming mode. The Control Center will now display the options you’ve selected.

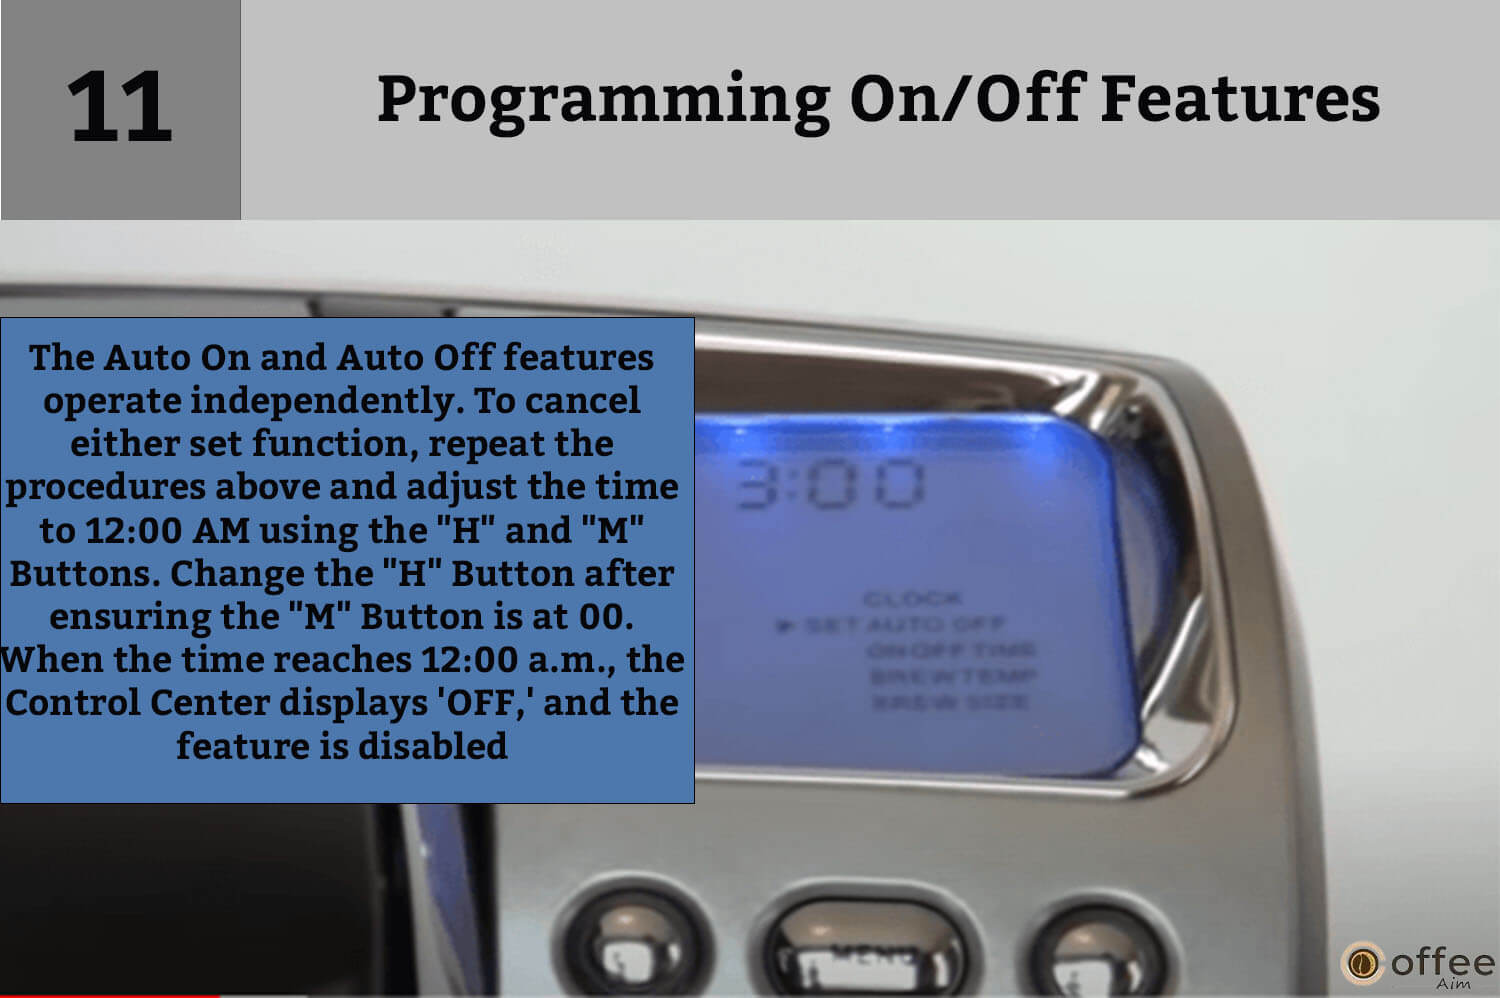
11. The Auto On and Auto Off features work independently. To cancel either set function, repeat the procedures above and advance to 12:00 AM using the “H” and “M” Buttons. Change the “H” Button after ensuring that the “M” Button is at 00. When you reach 12:00 a.m., the Control Center displays ‘OFF,’ and the feature is disabled.
Example
Here is an example of how your machine operates when you program it for a specific on-and-off time. If you set the On Time to 6:55 AM and the Off Time to 10:00 PM, the Brewer will be “READY TO BREW” and keep hot water in the tank throughout that period to be always ready for you to brew. Also, if you want to brew apart from this specified time, simply push the Power Button to begin brewing as soon as the water heats up and the “READY TO BREW” signal appears on the LCD Control Center.
NOTE: The Auto Off timer and On/Off Time programming options function individually but may also be set to work together. For example, you can configure the On Time function to switch on at 7:00 AM and the Auto Off timer feature to turn off the Brewer two hours after the previous brew.
Programming Brew Temperature (187° – 192º F)
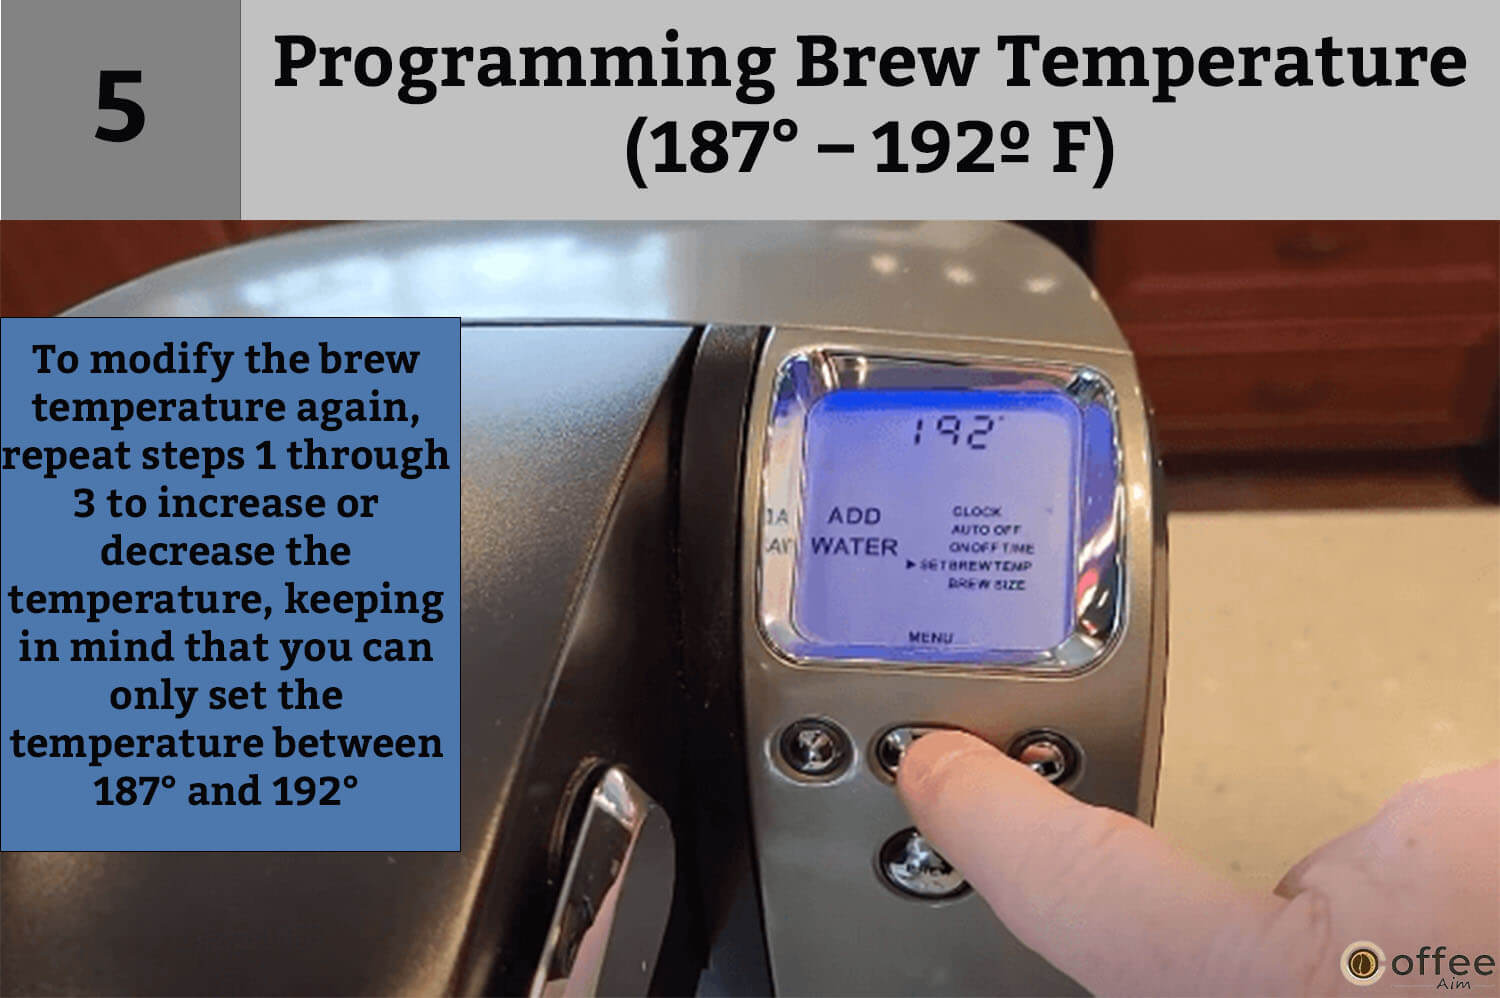
The brew temperature significantly impacts the ultimate quality of coffee because it affects the extraction rate. Your brewer’s default settings are that it brews the coffee at 192°, the ideal water temperature for extraction. If you prefer a colder cup of coffee, tea, or hot chocolate, you can reduce the temperature by 5 degrees by simply following the instructions below.
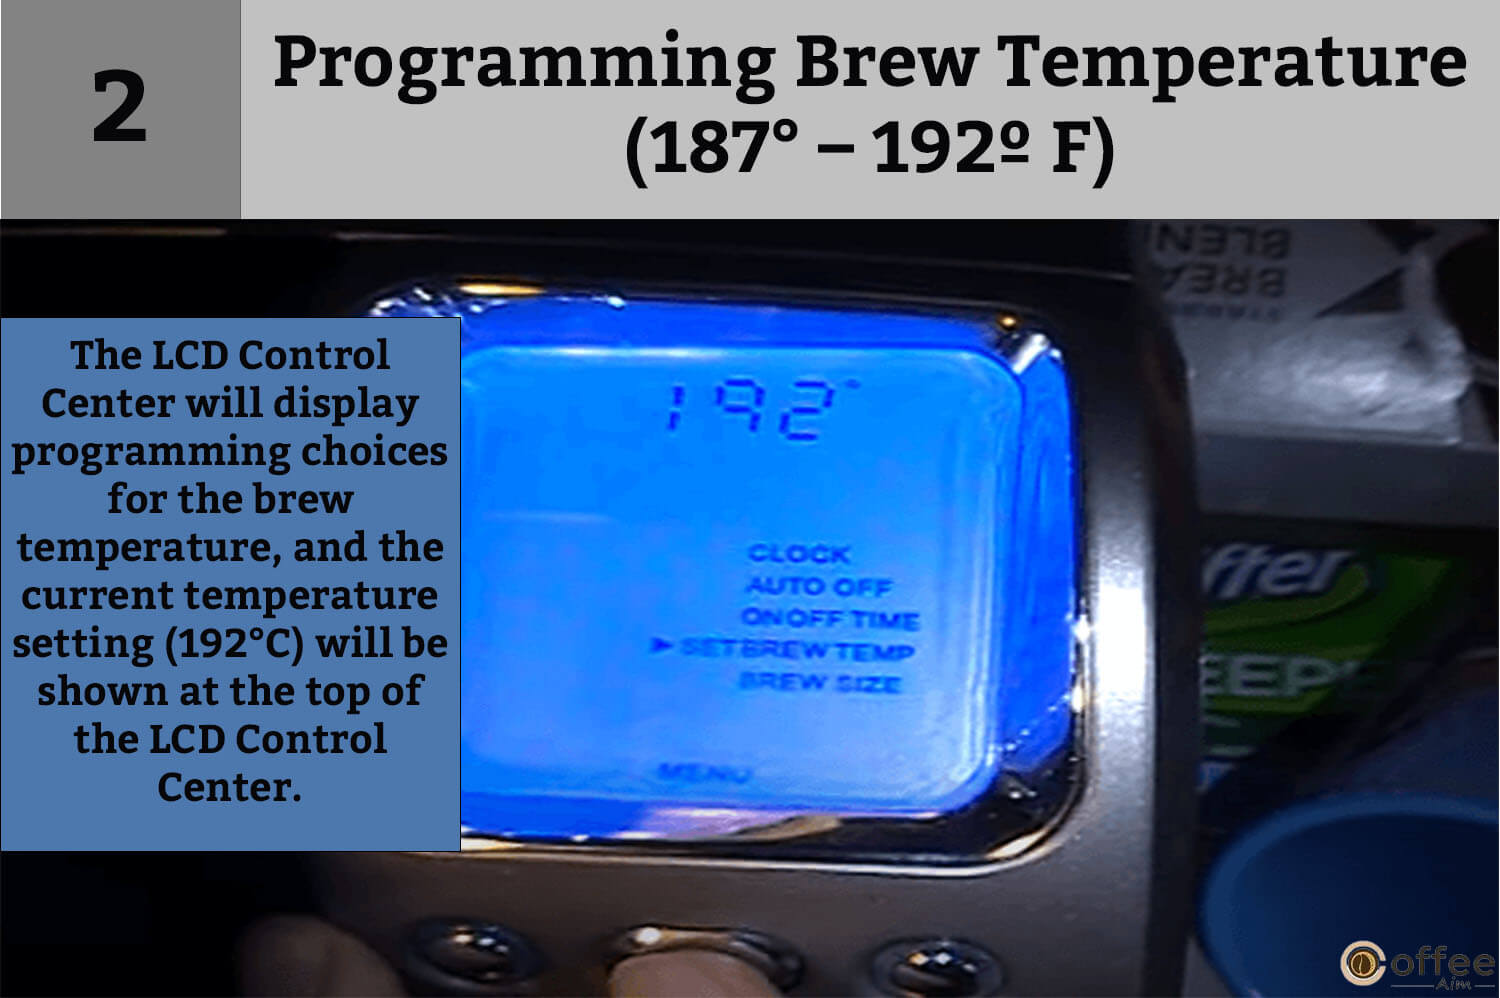
1. Press the MENU Button on the LCD Control Center five times to preset the Brew Temperature function.
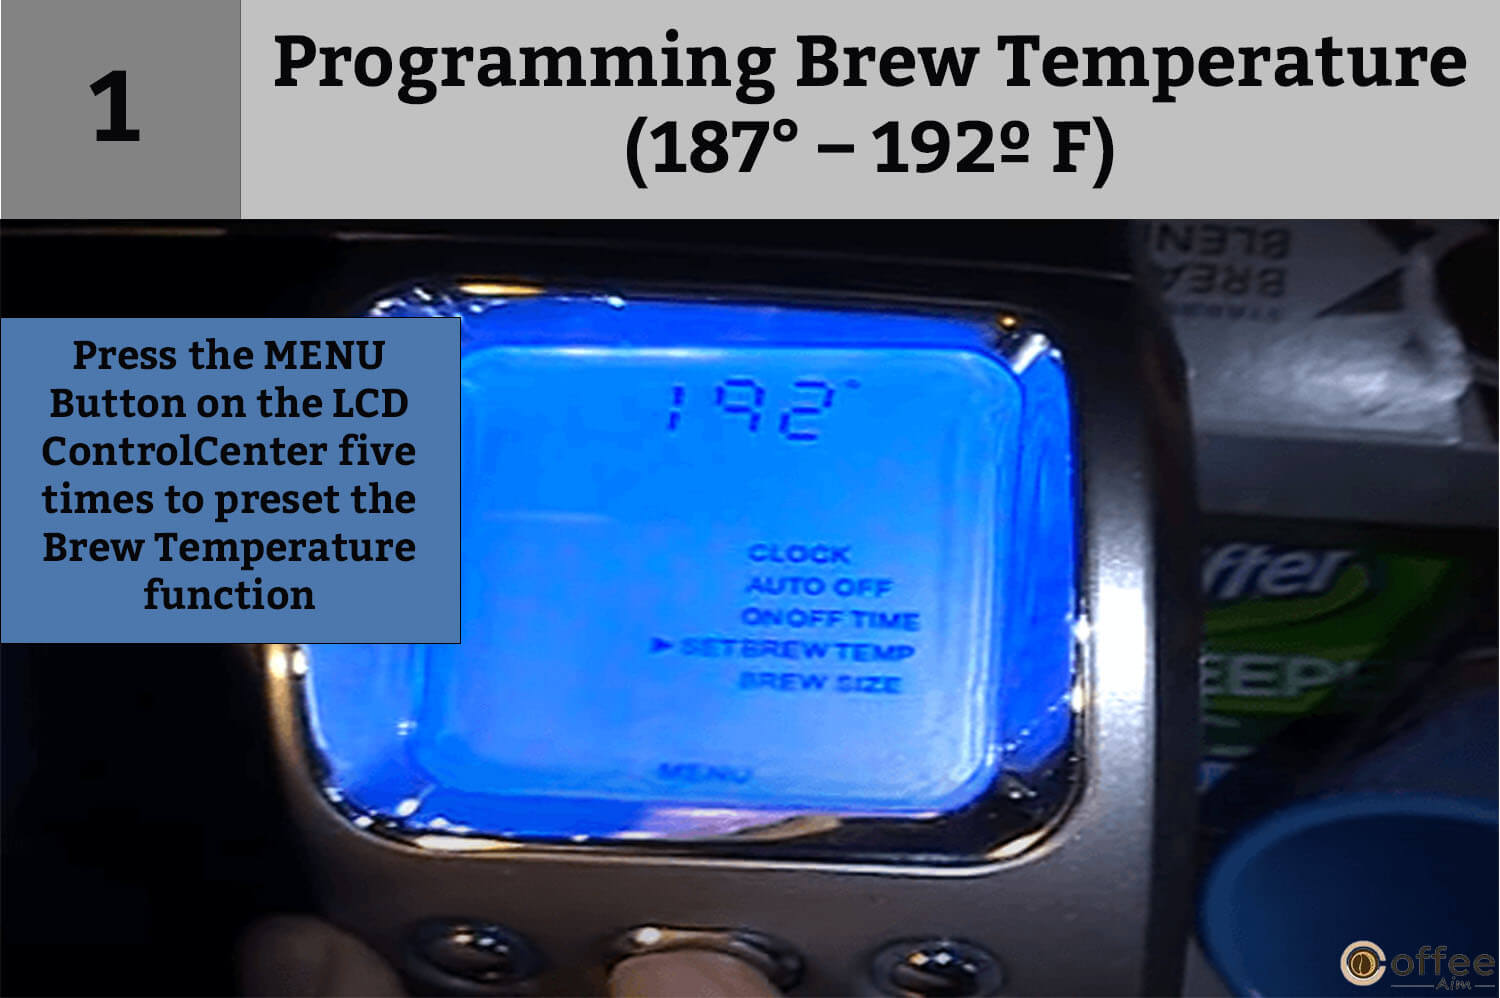
2. With a little arrow next to “SET BREW TEMP,” the LCD Control Center will now provide the programming choices. In addition, the temperature 192°C (starting setting) will be shown at the top of the LCD Control Center to indicate the current temperature setting.
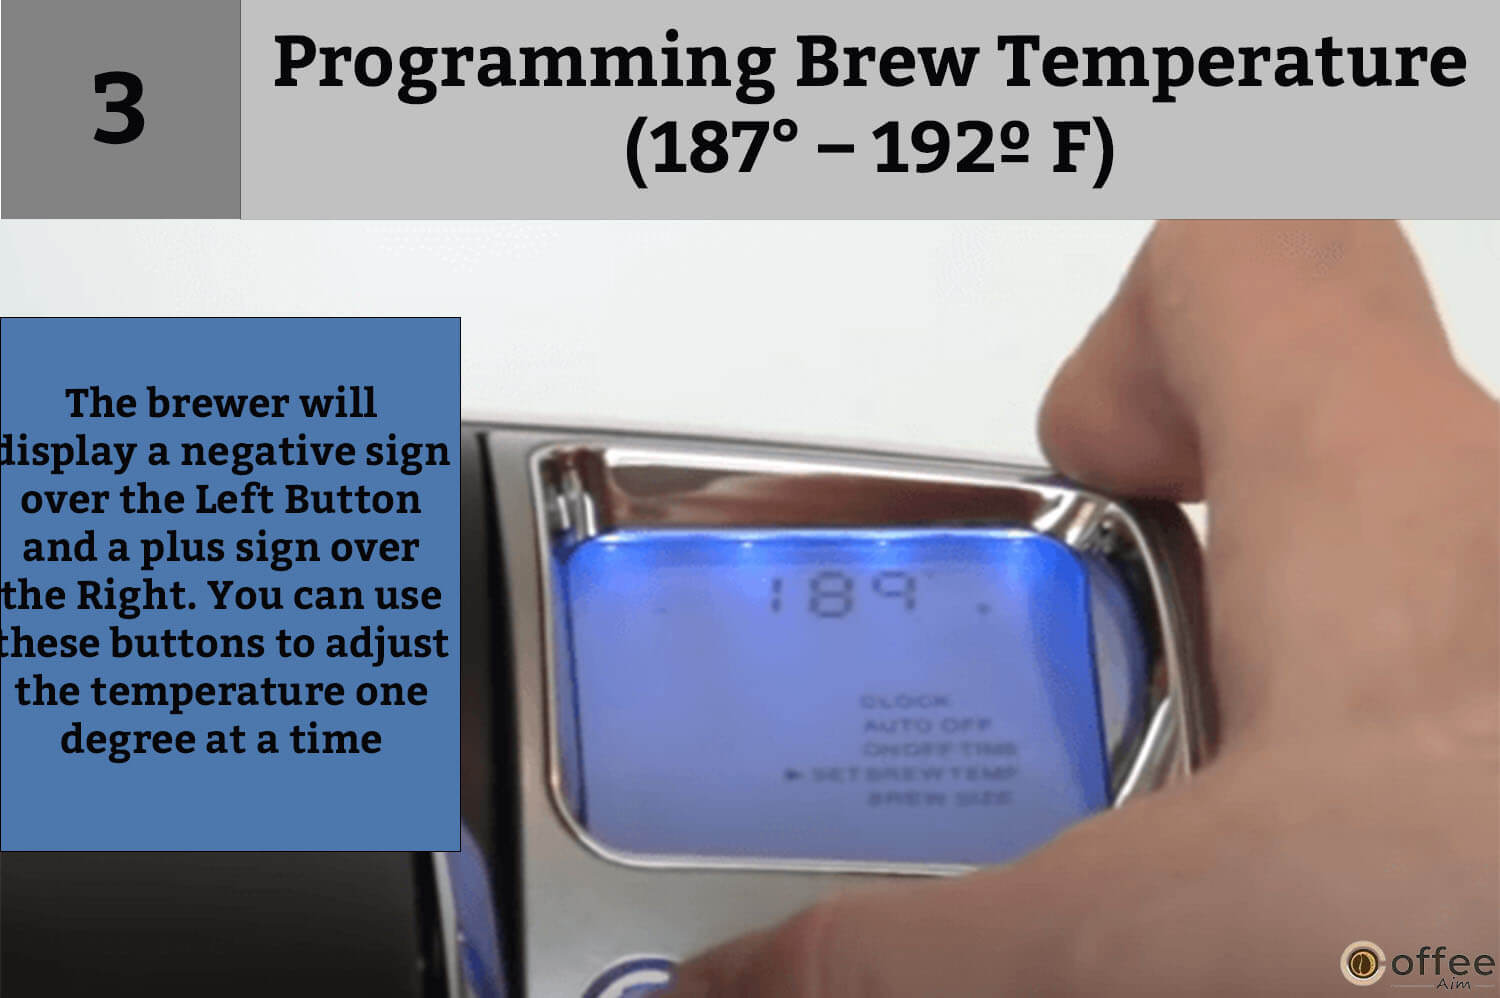
3. The brewer will display a negative sign over the Left Button and a plus sign over the Right. You can use these buttons to adjust the temperature one degree at a time.
4. Once you’ve reached your preferred brew temperature, click the MENU Button twice to leave programming mode. If you modify it from 192°, “BREW TEMP SET” will be shown on the LCD Control Center.

5.
NOTE: If boiling happens at high altitudes (above 5,000 feet), apply the temperature adjustment (+0 and -5 degrees) to reduce the temperature.
Programming Brew Size
Your Keurig B-76 has many brew size choices from which you can select your desired size. The Small Mug (7.25 oz.) is the default brew size on the Brewer. The default brew size helps the user to skip scrolling through brew sizes if a specific size is frequently selected.
Size choices are as follows:
- Extra-Small Cup (3.25 oz/ 96.11 mL serving)
- Small Cup (5.25 oz/ 155.26 mL serving)
- Small Mug (7.25 oz/ 214.40 mL serving)
- Large Mug (9.25 oz/ 273.55 mL serving)
- Travel Mug (11.25 oz/ 322.70 mL serving)
To modify the default brew size to your preferred brew size, follow these steps:
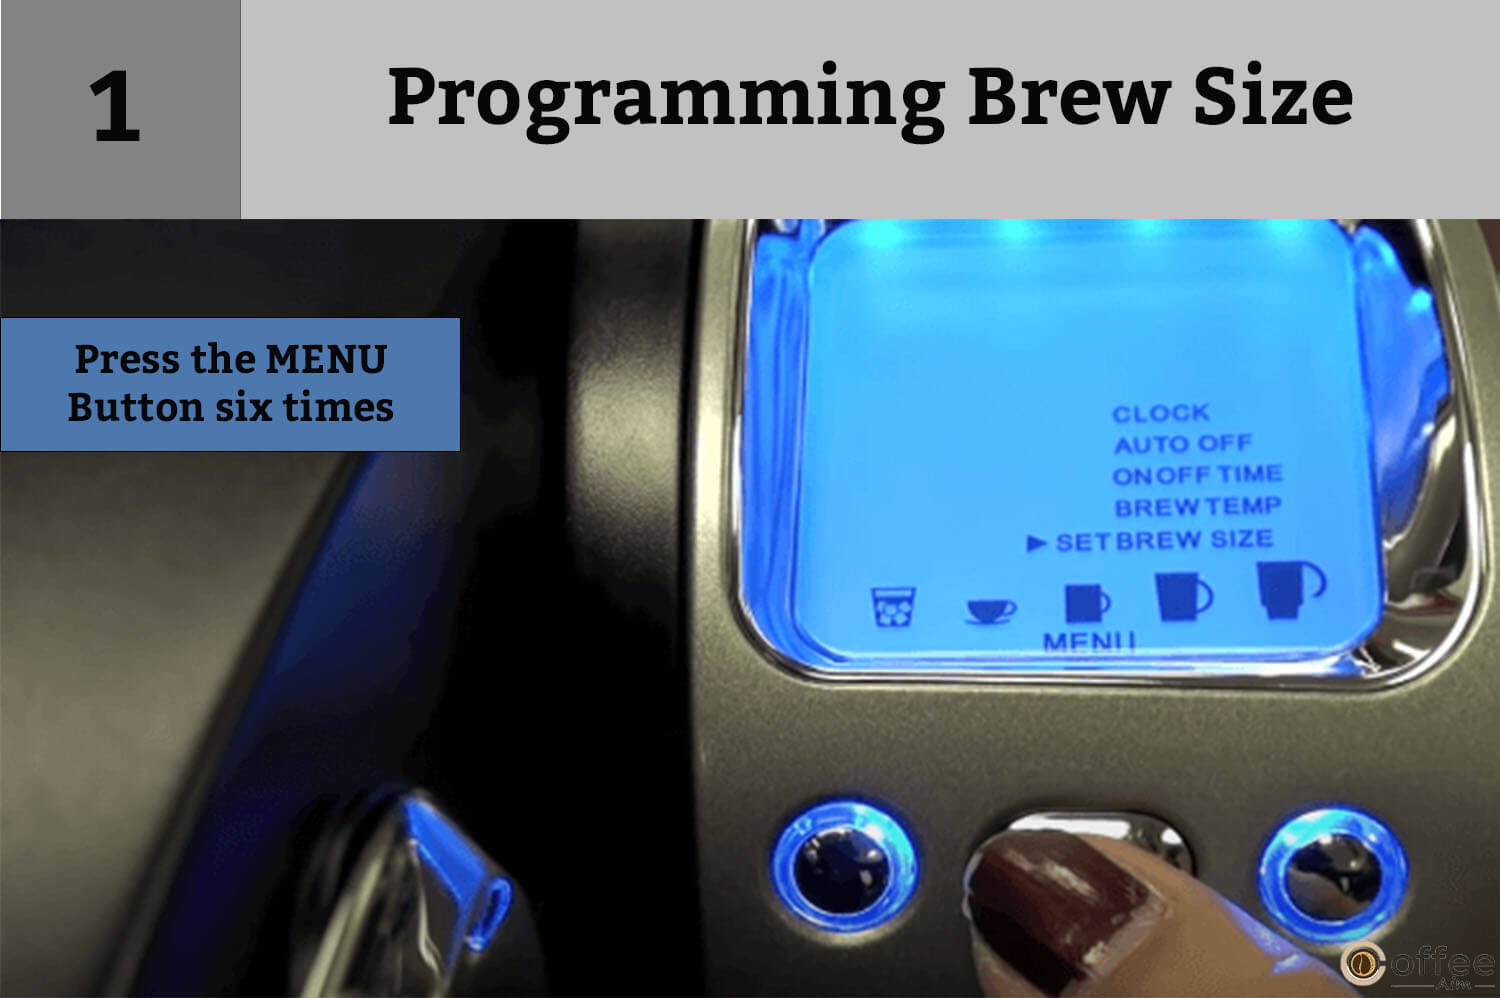
1. Press the MENU Button six times.
2. Choose your preferred preset brew size using the Left and Right Controls.

3. After selecting the desired default brew size, click the MENU Button once to exit. Your brewer will display the brew size on the LCD.

Cleaning Of Keurig B-76
It is critical to keep your machine clean regularly. A dirty coffee machine will produce stale coffee. If you don’t clean your brewer, coffee residue and limescale will accumulate. Both will reduce the efficiency of your machine’s operation, increase the likelihood of blockages, and negatively impact the flavor of your coffee. However, consistent cleaning and maintenance can reduce reactive breakdowns, extending the life of your machine. It also ensures that your coffee always tastes fresh. Thorough cleaning of your appliance should assist in reducing any unneeded expenditures in the long term.
Cleaning Of External Parts
You should clean the external components of your brewer regularly.
1. Never put the Brewer in water or any other liquid. Your appliance runs on electricity, and electrocution is dangerous if it comes in contact with water. You can use a soapy, wet, non-abrasive cloth to clean the Housing and other exterior components.

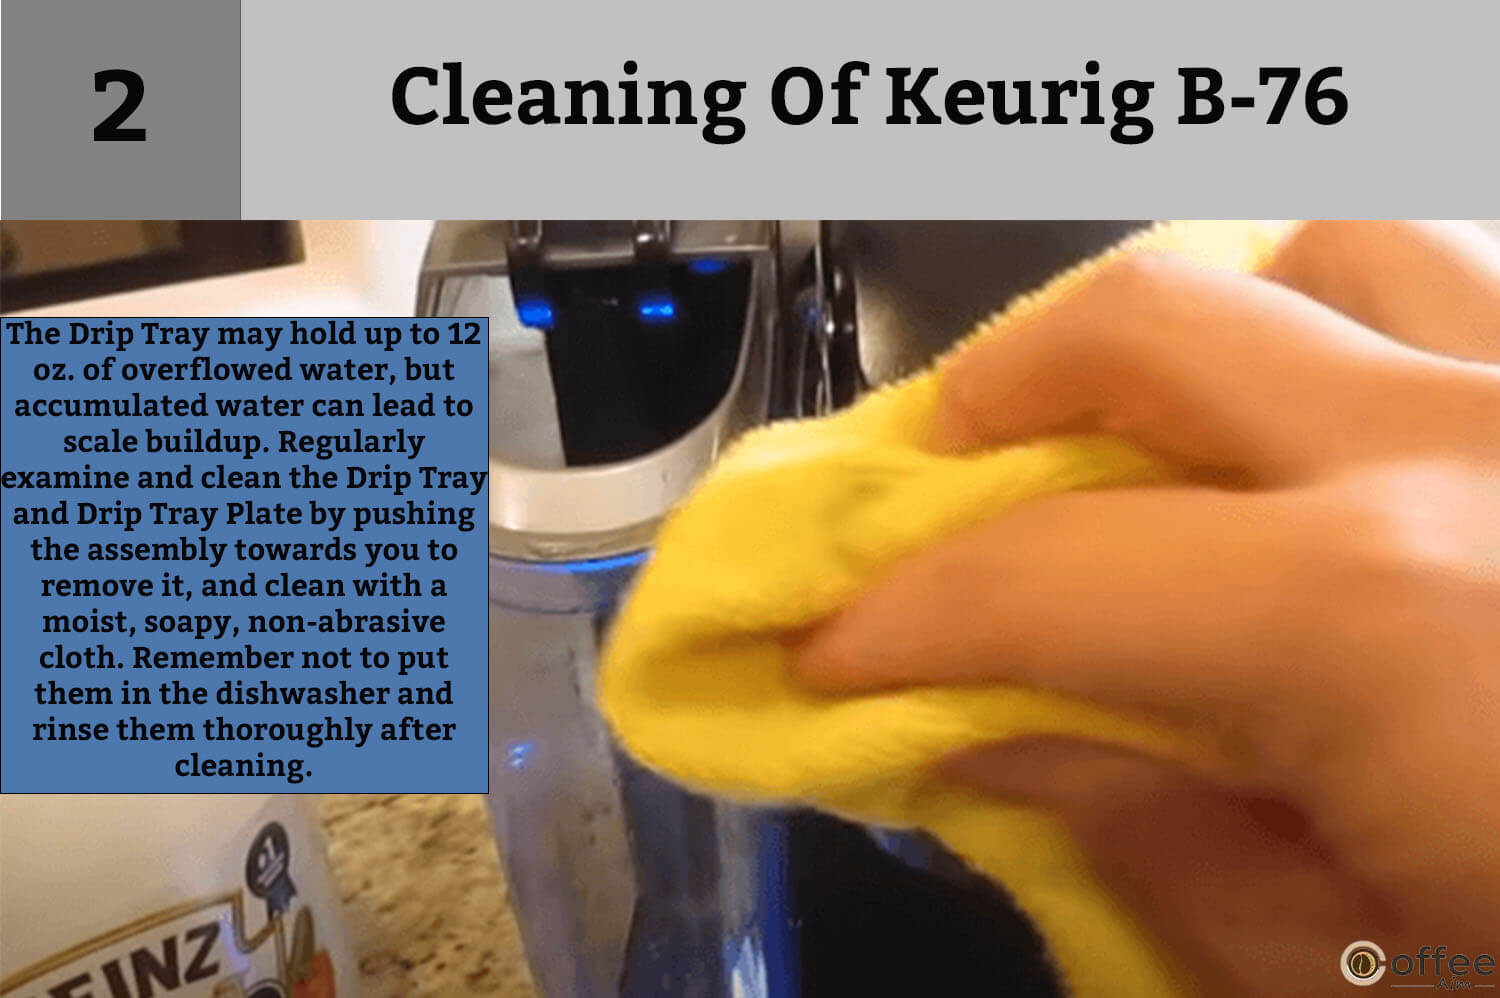
2. The Drip Tray may hold up to 12 oz. of overflowed water. Accumulated water will cause scales to build up in your machine. Therefore, you should regularly examine and clean the Drip Tray and Drip Tray Plate. To remove the drip tray assembly, just push it towards you, maintaining its level at all times to minimize spillage. The Drip Tray and Drip Tray Plate are not dishwasher-safe. After cleaning them with a moist, soapy, non-abrasive cloth, rinse them thoroughly.
Cleaning The K-Cup Holder Assembly
You should clean the K-Cup holder assembly properly to remove any coffee residues.
1. Cleaning the parts- The K-Cup Holder Assembly is dishwasher safe and can be put on the top shelf of the dishwasher. In the dishwasher, use low-temperature cycles to clean the parts. To remove from the Brewer, open the lid by raising the Handle. Grab the top of the K-Cup Holder with one hand while pressing up from below with the other until it releases. After cleaning, line the K-Cup Holder with the opening, using the two front ribs as a guide, and snap it into place from the top.

2. Cleaning the Funnel- Coffee residues can also accumulate in the funnel. So, you should also clean it. Pulling on the Funnel until it pops off from the K-Cup Holder will remove it. You can wash the funnel in the dishwasher. To replace it, just snap it back onto the K-Cup Holder Assembly.

3. Cleaning the Exit Needle- The Exit Needle is positioned at the bottom of the K-Cup Holder Assembly on the inside. If coffee grinds cause a blockage, you can use a paper clip or similar tool to clear it. Remove the K-Cup Holder assembly and Funnel. Put the paper clip into the Needle to loosen and push the clog out. You can wash the K-Cup holder in the dishwasher.

CAUTION: Sharp needles penetrate the K-Cup above and below the K-Cup Holder. Avoid putting your fingers in the K-Cup Assembly Housing to avoid harm.
Cleaning The Water Reservoir & Water Reservoir Lid
Scales can also build up in the water reservoir tank and lid because of the hard water. Dissolved mineral levels in hard water are more significant than typical. So, scales build up frequently. As a result, you should examine and clean the water reservoir tank and lid regularly. You should not wash the Water Reservoir Lid or tank in a dishwasher.
After cleaning them with a moist, soapy, non-abrasive cloth, you should rinse them appropriately. Do not use a cloth to dry the interior of the Water Reservoir, as fine fibers from the fabric may remain inside it. Remove any water filters you use inside the Water Reservoir before cleaning it.
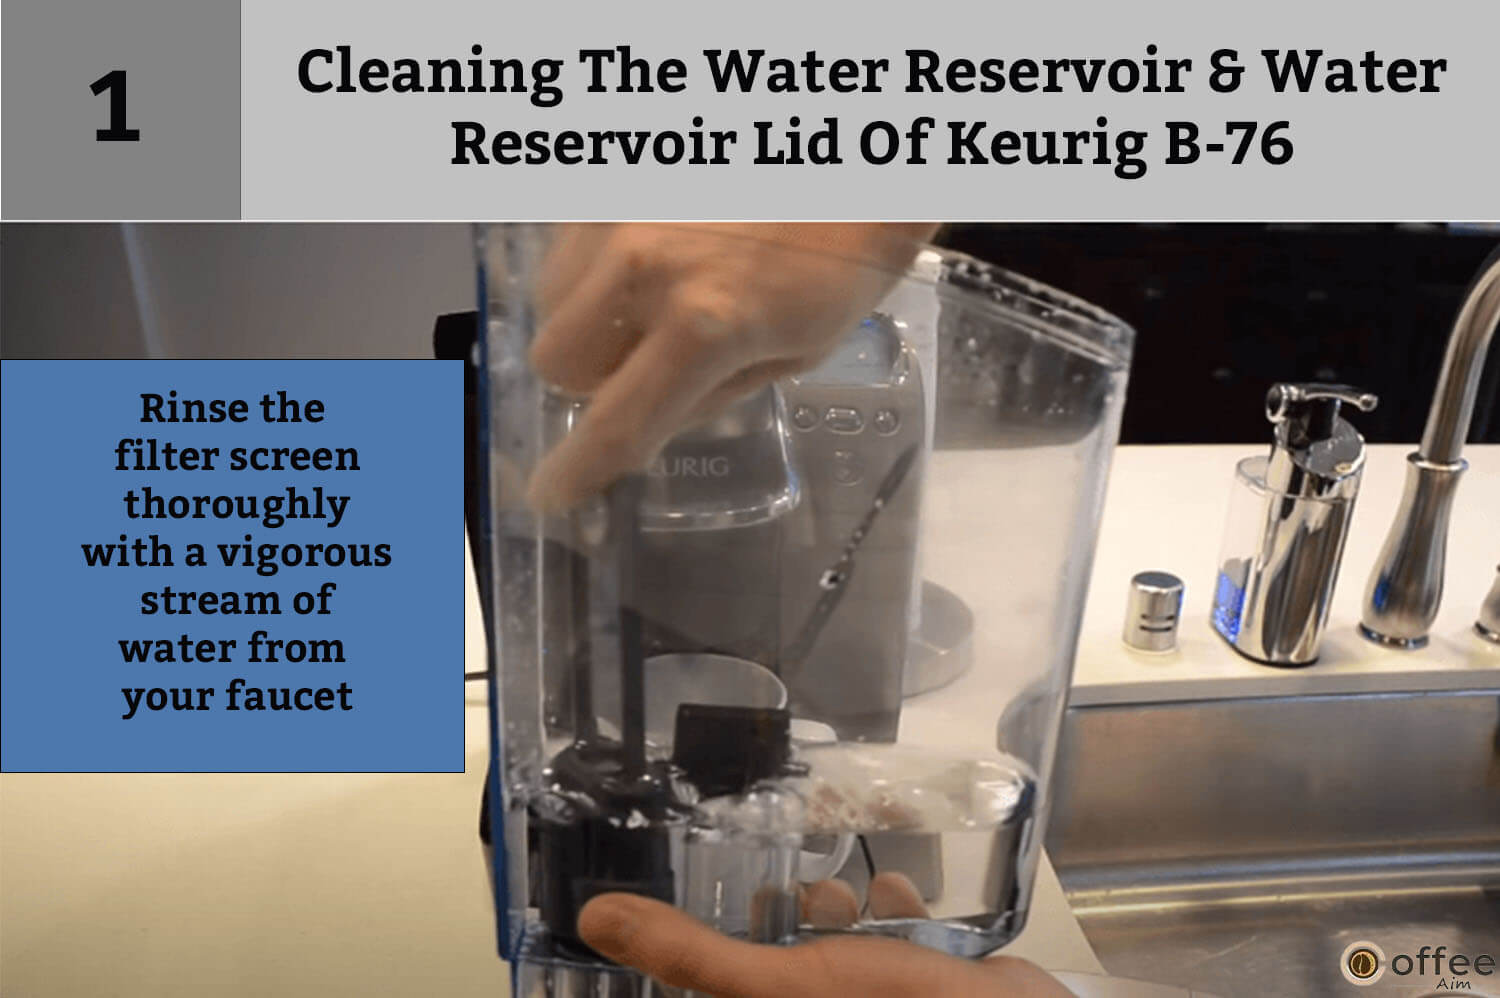
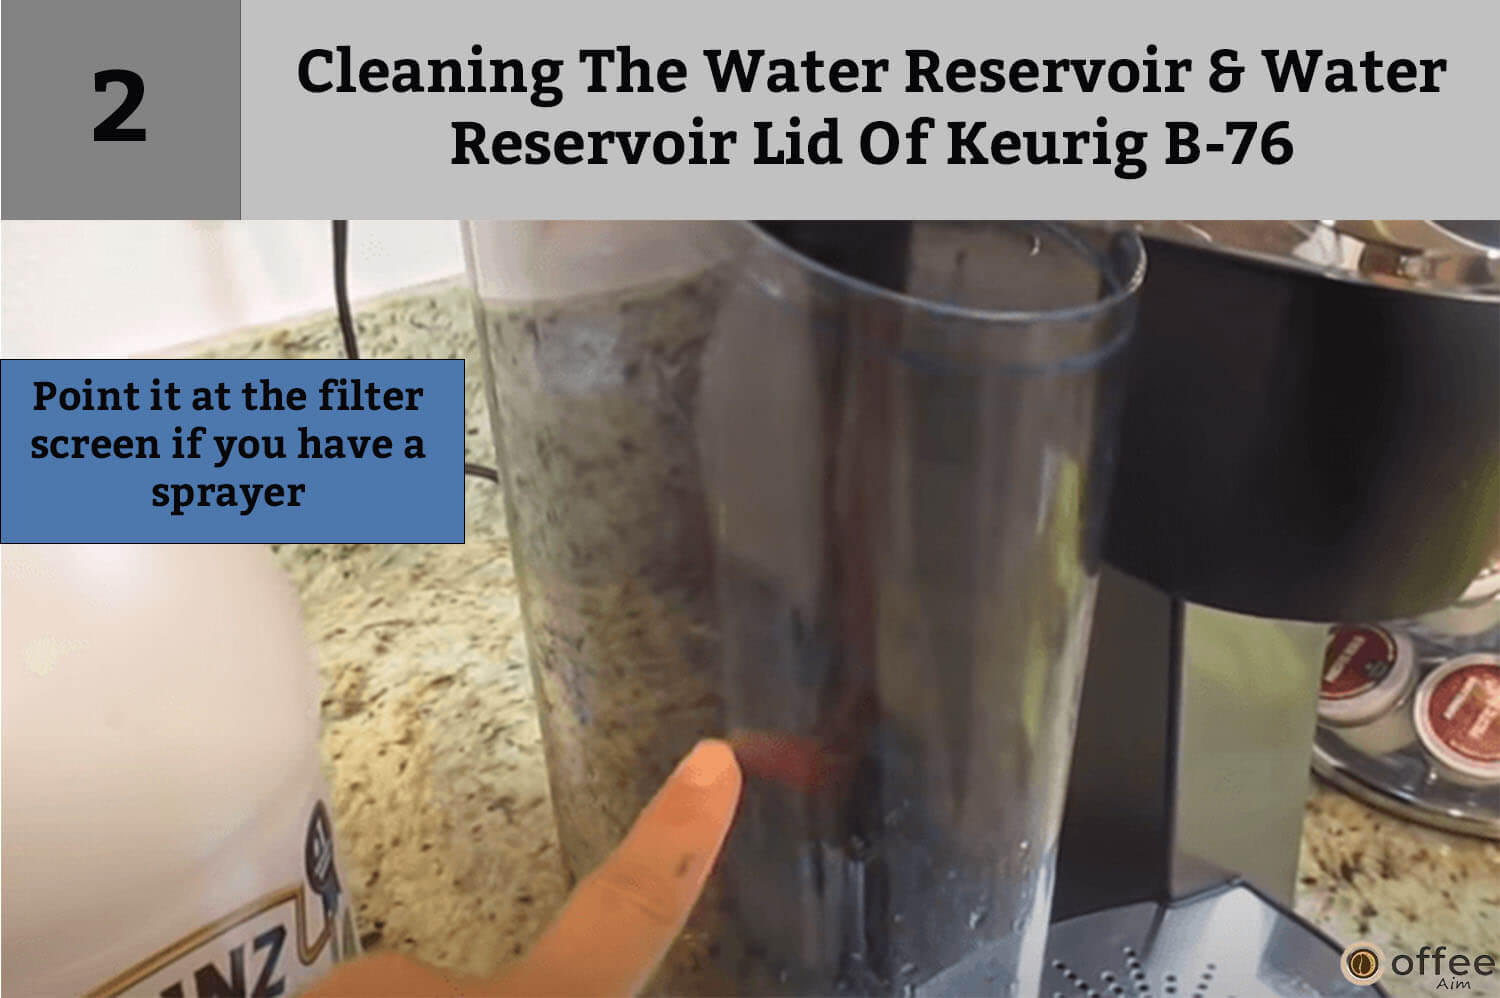
To clean the filter screen at the bottom of your Water Reservoir, empty it and do one or more of the following processes.
1. Rinse the filter screen thoroughly with a vigorous stream of water from your faucet.
2. Point it at the filter screen if you have a sprayer.
3. Fill the Water Reservoir with about two inches of clean water and agitate (shake) it.

After properly cleaning the water reservoir, drain the Water Reservoir, fill it with clean water, and return it to the Brewer. Repeat the preceding steps if necessary.
CAUTION: After cleaning, properly rinse the Water Reservoir to ensure that no cleaners or cleaning solutions remain since they may contaminate the water supply in the Brewer and also affect the taste of your coffee, tea, or hot chocolate.
Descaling
The process of eliminating mineral buildup from a coffee machine is known as descaling. Your Keurig B-76 may look very clean and shiny on the outside, but it can be pretty icky on the inside because of the mineral buildup. When opposed to soft water, hard water contains more minerals. These minerals can build up in your machine’s components, obstructing some channels.
These buildups can also affect the flavor of your coffee. Regrettably, using only hot water to clean or rinse the machine will not remove mineral buildup and residues. So proper descaling is necessary to remove the scales and ensure the appropriate working of your appliance. While the scale is non-toxic, it can impair Brewer’s performance if unchecked. De-scaling your Brewer helps to keep the heating element and other internal elements of the Brewer that come into touch with water in good working order.
To guarantee optimal performance, the Brewer should be de-scaled every 3-6 months to ensure optimal performance. But calcium deposits can accumulate faster, necessitating more frequent descalement. If the LCD Control Center displays “DE-SCALE,” you should de-scale immediately. Even if “DE-SCALE” isn’t shown, you should still de-scale your brewer every 3-6 months.
Descaling Instructions
For an excellent descaling operation, follow the procedure described below:
1. Prepare Your Machine For Descaling:

- To begin, you will require a
minimum of 48 ounces of undiluted white vinegar,
Access to an empty sink,
A sizeable ceramic mug (do not use a paper cup)
- Remove all the water from the Water Reservoir.
- Turn off the “Auto Off” functions.
2. Fill And Clean:

- Add around 48 ounces of vinegar into the Water Reservoir.
- Run a brew cycle with a big cup on the Drip Tray Plate. DO NOT USE A K-CUP PORTION PACK; just press the BREW Button.
- When the mug is filled, pour its contents into the sink.
- Continue brewing without a K-Cup until the “ADD WATER” appears on the LCD.
- Now let the Brewer stand for at least 4 hours while still turned on.
- Remove any remaining vinegar and thoroughly rinse the Water Reservoir.
3. Rinse

- Fill the Water Reservoir with fresh water.
- Start a water brew cycle with a big cup on the Drip Tray Plate.
- When the mug is filled, pour its contents into the sink.
- Continue brewing until the message “ADD WATER” appears on the LCD.
- You may need to perform additional water brew cycles if you notice any residual taste.
NOTE: Repeat the de-scaling procedure above if “DE-SCALE” is still shown after finishing the operation.
Service
This Brewer is only user serviceable within the required cleaning and maintenance procedures. Please see the Warranty section of this article for servicing information.
Storage
Proper storage is essential to avoid damaging your appliance by weather, dust, filth, and grime. It also ensures the durability and proper working of your Keurig B-76.
- If you do not use your brewer for an extended period, store it properly.
- You should take care when storing your appliance so that no parts are damaged.
- When storing your machine, constantly drain the water reservoir tank properly. If water remains in the tank, scales can build up inside it, and the risk of the water freezing inside remains (if the brewer is stored in a freezing environment).
- Also, keep your brewer in a dry and frost-free environment to avoid ice buildup. If you own the Brewer in a cold climate, water may freeze within the Brewer and cause damage. Doing this will hinder the proper functioning of your machine.
- Please store your Brewer upright to minimize water leaks from the inner tank.
- When you prepare to use your brewer after storing it, we recommend washing the Water Reservoir with fresh water and performing three cleansing brews without a K-Cup. Rinsing before using it will remove any residues if present in your brewer.
- If you plan to relocate your Brewer, turn it off, disconnect it, and empty the Water Reservoir.
- If your Brewer has been exposed to temperatures below freezing, please allow it to reheat to room temperature for at least 2 hours before using.
- Move the Brewer upright to guarantee the inner tank does not leak through the vent.
Troubleshooting
Keurig B-76 is an electrical device susceptible to damage and malfunction. Suppose you run into any difficulties while using your device. In that scenario, you may tackle the problem quickly and efficiently by consulting the list of potential issues and their corresponding fixes described below.
| Situation | Solution |
| Brewer has no power | Connect Brewer to a separate power source.Double-check that it is safely plugged in.Use a different outlet.If required, reset your home’s circuit breaker.Check that the Power Switch is switched on and the LCD lights are lit. |
| Brewer will not brew | After inserting the K-Cup into the K-Cup Holder and ensuring that you securely press the Handle down and the LCD Control Center reads “READY TO BREW” with the Left, Right, and BREW Buttons flashing, press the Left, Right, or BREW Button.If the LCD Control Center displays “ADD WATER,” add water to the Water Reservoir or ensure it is correctly positioned in its base. If the LCD Control Center indicates “ADD WATER” even after refilling, contact Customer Service at 1.866.901. BREW (2739).The coffee grinds may have obstructed the Exit needle. (Refer to Cleaning the K-cup holder assembly, Cleaning the exit needle, as described above) See below if the LCD Control Center displays “PRIME” and the blue light in the Water Reservoir flashes. |
| LCD Control Center indicates “PRIME,” and the blue light in the Water Reservoir is flashing | Remove the Water Reservoir and adequately clean it. Confirm if the Water Reservoir is filled with water. Return it to the Brewer and double-check that it is appropriately positioned.If you’ve followed the steps above twice and the problem remains, call Customer Support at 1.866.901. BREW (2739). |
| Brewing a partial cup | The Exit Needle may be obstructedIf required, clean the K-Cup Holder Assembly and rinse it under the water.You may have removed the Water Reservoir during the brewing process. Replace the Water Reservoir and brew water without using a K-Cup.“De-Scale” the Brewer.If you have tried the de-scale operation on your Brewer twice and it is only brewing a half cup, contact Customer Service at 1.866.901.BREW (2739). |
| The time is not displayed on the LCD Control Center | You must set it before the LCD does not display the time. Follow the instructions to set the clock. If power is interrupted in the Brewer, you must set the clock again. |
| Brewer shuts off or turns on automatically | Verify that the Auto Off timer or On/Off time features are not enabled. To do so, hit the MENU Button beneath “MENU” and scroll through the programming choices. For Auto Off timer and On/Off, the LCD will display “OFF.” Reset the AUTO ON and OFF features if “OFF” is not shown. |
| The blue light in Water Reservoir is flashing. | The water level is low. Therefore, brewing a full cup is impossible. Fill the Water Reservoir with water.If the LCD Control Center displays “PRIME,” please refer to the “The LCD Control Center displays PRIME and the blue light in the Water Reservoir flashes” described above. |
If any problems persist, contact Customer Service at 1.866.901.BREW (2739).
Limited One-Year Warranty
Keurig, Incorporated provides a one-year documented guarantee of your appliance’s quality and proper functioning. This warranty gives you legally-ensured service replacement or correction of issues insofar as the contract stipulates in its conditions for the duration of its term. But this warranty is only valid for brewers in the United States and Canada. The legal rights this warranty provides vary from state to state, and in the case of Canada, from province to province.
For one year from the date of purchase, Keurig, Incorporated promises that your Brewer will be free of defects in materials or quality under regular household usage. Your brewer comes with a warranty card. Please complete and return the warranty card so we can save your purchase information in our system. Keurig will, at its discretion, repair or replace the Brewer free of charge upon receipt of proof of purchase. If a replacement Brewer is required to service this warranty, it may be new or renovated. If a replacement Brewer is supplied, it will be covered by a new one-year limited warranty.
What Is Not Covered By The Limited Warranty?
Keurig B-76 is a household appliance and should only be used for its intended purpose. Your machine is prone to damage; therefore, you should handle it carefully. This warranty does not cover consequential or incidental damages, including property damage or unexpected costs and expenses resulting from any breach of this warranty, even if foreseeable.
Certain states or provinces do not allow the omission or limitation of incidental or consequential damages, so the preceding limitation or exclusion may not apply to you, depending on where you purchase the appliance.
If your machine needs servicing, then it should only be done by Keurig’s authorized service providers. This warranty does not cover damages caused by services done by anyone other than Keurig or its authorized service providers, using non-genuine Keurig components, or external factors like abuse, misuse, insufficient power, or acts of God.
Other Limitations
This exclusive warranty supersedes all other express warranties, written or oral.
Additionally, Keurig disclaims any other contracts relating to your Keurig B-76 brewer, including any implied warranty of merchantability or fitness for any particular purpose. Because certain states or provinces do not allow such implied warranty disclaimers or restrictions on how long an implied warranty lasts, the preceding limitation may not apply to you, depending on the state or province of purchase.
How Do You Obtain Warranty Service?
Keurig Brewers are high-quality appliances that, with appropriate maintenance, are designed to last for years. But, problems can occur while operating it. So, if warranty service is required, please contact Keurig Customer Service at 1.866.901.
BREW (2739). Please only return your Brewer to Keurig Customer Service after obtaining an Authorization to Return number (ATR). Keurig Brewers that do not have an ATR number will be returned to the sender unserviced.
Keurig, Incorporated
55 Walkers Brook Drive
Reading, MA 01867
1.866.901.BREW (2739)
Conclusion
That’s all there is to it. After reading this guide, you can use your Keurig B-76 like a pro. You are now familiar with all the parts and instructions for your Keurig B-76, and you can operate it more conveniently. You are now aware of how you may extend the life of your appliance via appropriate maintenance and cleaning. You can also refer to this article in the future if you need assistance with your machine.
I hope you have a fantastic experience with Keurig B-76. For more information about coffee, visit my website,”CoffeeAim”.
FAQs
Why Is My Keurig B-76 Platinum Not Working?
Ensure the Keurig B-76 Platinum is powered on and flick the power switch on the machine’s rear. If it doesn’t work, ensure your building’s power outlet and circuit breaker are operational.
Furthermore, try resetting the circuit breaker.
How Do You Tell If Your Keurig Is Clogged?
You may have a blockage if your Keurig suddenly stops making cups of coffee. You may resolve this typical issue by cleaning all detachable parts with dish soap and hot water. You can break up most of the jams produced by coffee grounds with a paperclip or a plastic straw.
Why Does The Descaling Light Continue To Flicker After Descaling?
If the descaling indicator remains illuminated, the machine has yet to be thoroughly washed with water after applying the descaling chemical. We recommend flushing the unit with fresh water.