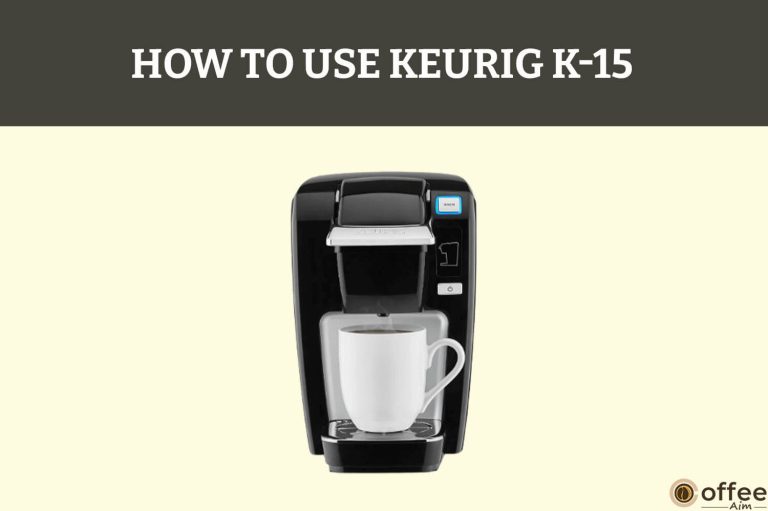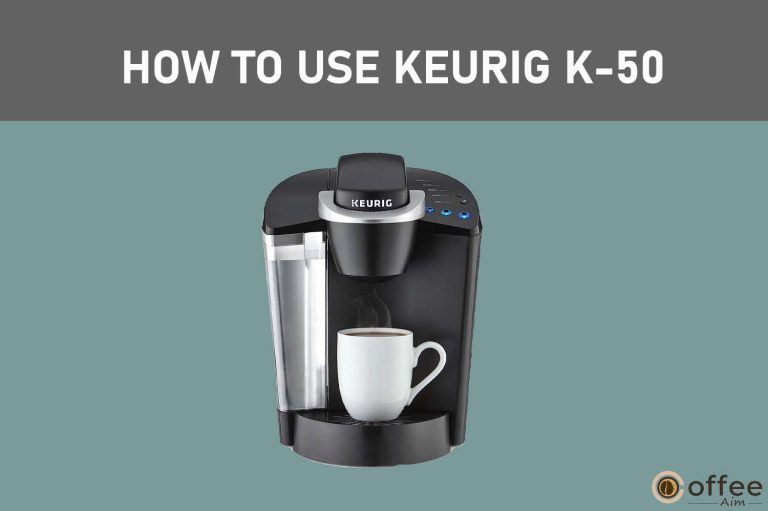
Quick Navigation
As a Coffee lover, having a coffee Brewer in your home is truly a blessing since it allows you to explore various delicious custom coffee beverages that you can create at your convenience. Are you someone who has purchased a Keurig B-45 but facing a problem where you’ve lost the manual or struggling to understand the instructions provided in Brewer’s literature as a new user?
Don’t worry if you are experiencing either of these issues. This article is the ultimate guide for the Keurig B-45, providing detailed instructions and explanations on setting up, using, and troubleshooting your coffee, Brewer. Additionally, I’ll share tips and tricks on how to maximize the potential of your Keurig B-45.
Safety Precautions:
Every user must take precautions as it can cause any fatal injury or there is a high risk of your product damage. Children must be kept away for safety, or their supervision is essential as the Brewer dispenses very hot water. Run a water cycle after every time you finish your brewing cycle of hot cocoa or gourmet tea to avoid clogging the exit needle.
For all the precautions you need to remind, click the link below.
“Safety precautions of Keurig B-45”
What Is Inside The Box?
Unpacking a purchase is always an exciting experience, but ensuring everything is included in the package is also crucial. While unboxing your Keurig B-45, knowing what items should be included in the box is essential. I recommend contacting the seller for assistance if you notice anything missing from the list below.
1. The Coffee Machine

The Coffee Machine is the first item you’ll see when you unbox your Keurig B-45. The Coffee Machine includes several essential elements, including the control panel, buttons, handles, Water Reservoir, and lid. These components are incorporated into the primary housing, which acts as the device’s central base.
2. User Manual
A manual comes with your Keurig B-45, a written guide that gives instructions, guidelines, and information about Keurig B-45. It helps users comprehend how to use and maintain the product correctly and serves as a valuable resource for addressing troubleshooting and problem-solving issues.
Unboxing Instructions
Proper unboxing is a skill everyone needs to know, as improper opening or positioning might cause damage to your highly demanded product.
Here is the Keurig B-45 step-by-step unboxing guide set for the users:
- Put the Brewer box onto a flat surface.
- Open the box.
- Take out the literature book.
- Open the box with its front facing down.
- Lift the plastic bag containing the Brewer from the box.
- Gently lift the Brewer off the bottom polyfoam and place it upright on a flat and stable surface.
- The Brewer is still enclosed in polyfoam.
- Carefully remove the plastic bag from the polyfoam-encased Brewer.
- Record its serial number on page no 3 of the guidebook from the bottom of the Brewer or its box.
- Put the Brewer on a flat, steady surface and remove the tapes from its Water Reservoir.
Note: Keep an eye out for the plastic bag. Children should be kept away from them.
Specifications
Are you sure that Keurig B-45 has all the features you are looking for in a Brewer? You can only ensure yourself by familiarizing yourself with the details of every part Keurig B-45 is offering. Knowing the specification will also allow you to understand the technical details of your Keurig B-45, such as its capabilities, limitations, and performance characteristics. So without further ado, Let us jump into the details.
If you do not find Keurig B-45 specification meeting your needs, I recommend you return it.
| Features | Details |
| Product Line/System | Keurig 1.0 Elite |
| K-Cup Compatibility | Unlicensed K-Cups, Keurig 2.0 licensed K-Cups, and ground coffee with the My K-Cup |
| Brew Sizes | 6 oz, 8 oz |
| Water Reservoir | 48 oz |
| Water Filter | Compatible but not included |
| Dimensions | Width 9.8″ W Depth 13.0″ D Height 13.3″ H |
| Display | Button control for Brew Size and Power; LED indicators for Add Water, Descale, Heating, Auto-Off, and Power |
| Temp Control | No |
| Strength Control | No |
| Weight | 12.0 lbs |
| Other Features | Auto-On/Off, removable drip tray, comes with K-Cup variety pack |
Parts Of Keurig B-45
If you aspire to become an expert in using your Keurig B-45 coffee maker, you must be willing to put in some effort. Gaining a thorough understanding of the different parts of the machine is essential if you hope to achieve this goal. With a detailed knowledge of the various parts that make up the Keurig B-45, you can maximize the potential of your Keurig B-45 and make the most of its features and functionalities.
1. Water Reservoir Lid

This is a lid that covers the Water Reservoir to prevent spills.
2. Water Reservoir

The Water Reservoir is a portable container that holds approximately 48 ounces of water for brewing. You can lift it, add water, and insert it into the machine before brewing.
3. Two Lock Tabs Slots

On the Keurig B-45, these slots hold the Water Reservoir Lid, which secures the lid to the reservoir.
4. Handle
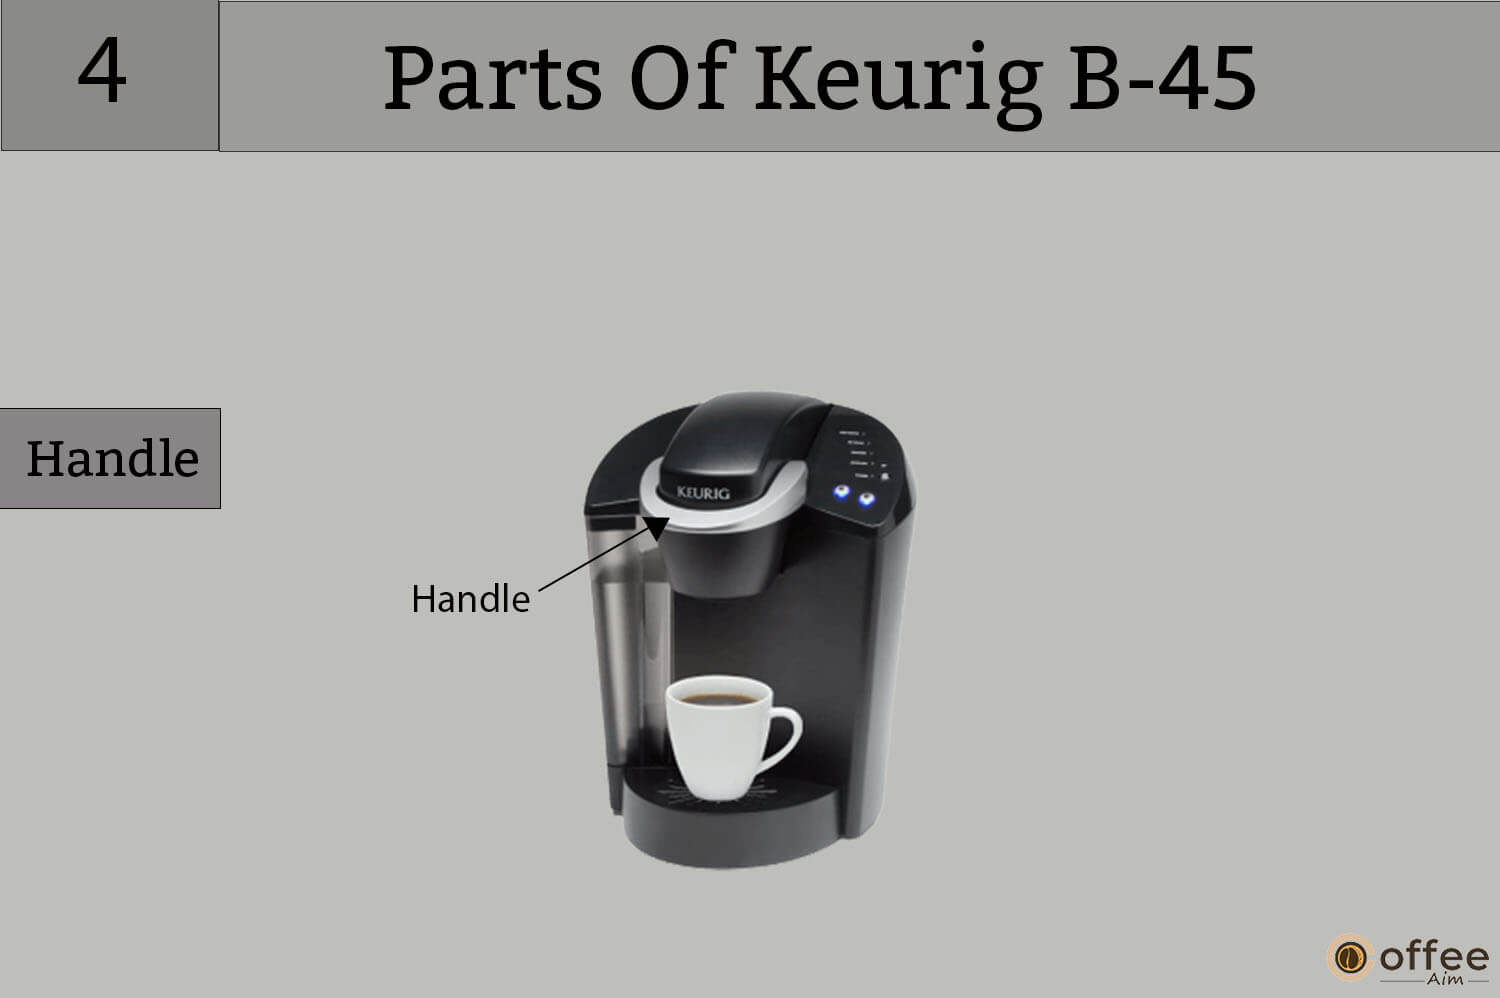
This Handle is located on the K- cup cover lid. Using the Handle, you can lift the K- Cup lid from the coffee maker.
5. Funnel

The Funnel is an integral part of the K-Cup Pod Holder Assembly, attached under the K-Cup Holder. It serves the purpose of directing the hot water and coffee into the cup.
6. K-Cup Pod Holder

The K-Cup pack holder is a vital component of the Keurig B-45 as it is responsible for holding the K-Cup during the brewing process. Its primary function is to puncture the K-Cup and facilitate the flow of hot water through it, resulting in the extraction of flavorful coffee.
7. Lid

K-cup lids cover K-Cup portion packs. It must be lifted to insert the K-Cup portion pack into the coffee maker.
8. K-Cup Portion Pack Assembly Housing

The K-Cup Portion Pack Assembly Housing holds the K-Cup portion pack.
9. Housing

This is the main body of your Keurig B-45. It includes both the K-Cup portion Pack Assembly Housing and the Water Reservoir.
10. Drip Tray Plate

The surface on which the coffee mug is placed while brewing is known as the Drip Tray plate. It’s meant to collect any spills or drips that can happen during the brewing process.
11. Drip Tray

The removable part of the coffee maker beneath the Drip Tray plate is the drip tray. It must be drained regularly to ensure the drip tray does not overflow.
12. Drip Tray Base

The Drip Tray Base is a part of the coffee maker that holds the Drip Tray and collects any spills or drips.
13. Vent

The Vent is a little opening in the top of the coffee maker that allows steam to escape during the brewing process.
14. Power Cord

The electrical cord that connects to a wall to operate a coffee maker is called a power cord.
Controls And Indicators
To ensure that you get the most out of your Keurig B-45, it’s crucial to familiarize yourself with all of the necessary controls and indicators. This will allow you to optimize your machine’s performance and achieve maximum output with high efficiency.
15. Small Cup Buttons

On the front of the Keurig B-45, there are Small Cup Buttons with a small cup icon that can be utilized to prepare a small cup of 6 oz/ 177.441 ml of coffee or any other hot drink.
Add
16. Small Mug Buttons

It is located on the front of the Keurig B-45 and labeled with a small mug icon and can be used to brew a small mug of 8 oz/236.588 ml coffee or other hot beverage. Add
17. Power Button

The Power Button is used to switch on and off your Keurig B-45.
18. Power Light (Green)
It is positioned on the Keurig B-45. When the Brewer is turned on, the power button will light up green.
19. Auto Off Button

The Auto Off Button is used to automate the coffee maker to switch off after a set amount of time. This function helps in conserving energy and prevent accidents.
20. Auto Off(Light Green)
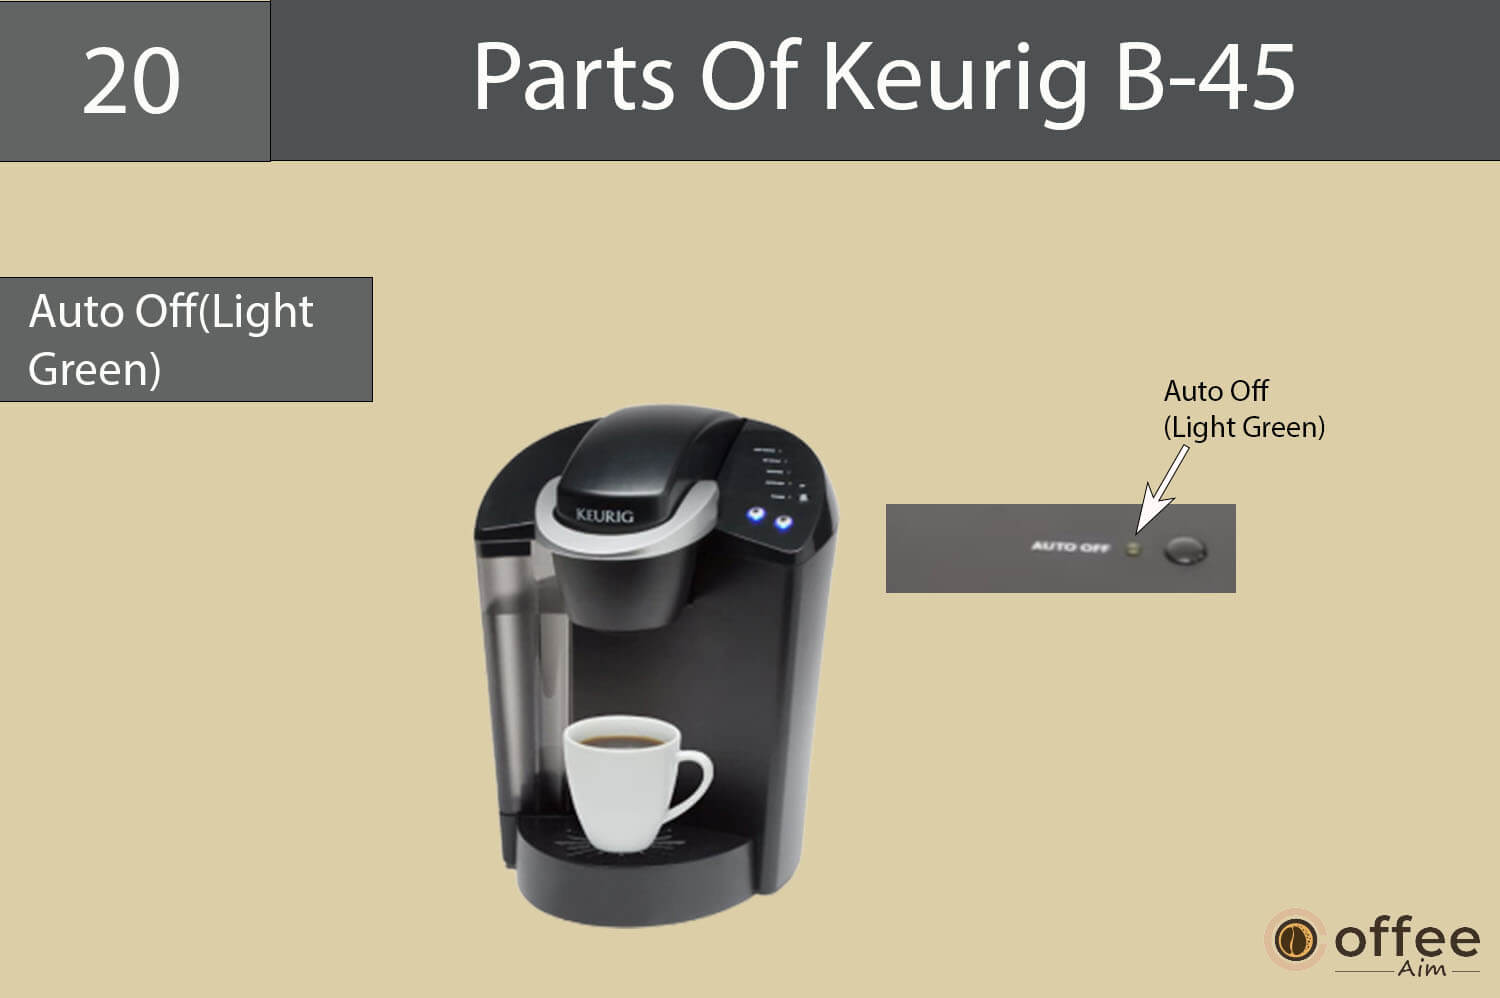
The Auto Off LED is placed on the front of the coffee maker and lights green when the Auto Off function is active.
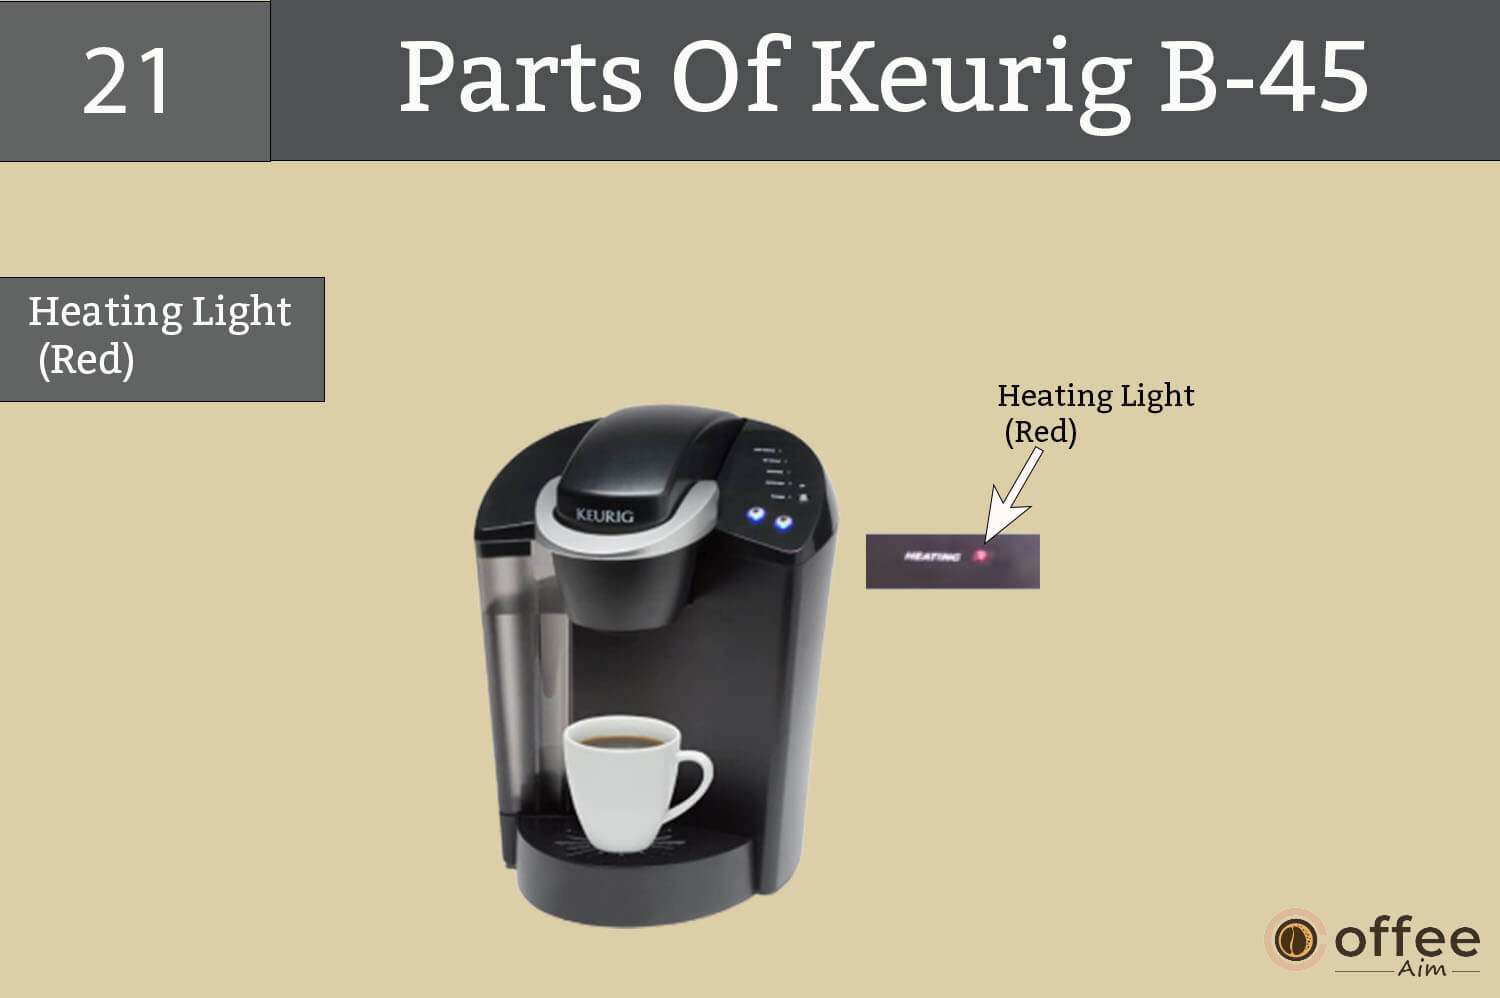
21. Heating Light (Red)
The Heating LED, which is positioned on the front of the coffee maker, flashes red when the water in the coffee maker is heated to the proper brewing temperature.
22. Descale Light ( Red)

The Descale LED is on your Keurig B-45 and lights red when it is time to descale the coffee maker
23. Add Water Light (Blue)

The Add Water LED on the front of the Keurig B-45 lights blue when the water level in the Water Reservoir is low and needs to be refilled.
Setting Up Your Keurig B-45 For First Use Or After Storage Period
Now, you are heading towards a fascinating yet sensitive part of your brewing journey: setting up your Keurig B-45. I did not mean to startle you by saying this. Before you get panicked, I am already here to assist you. Simply follow the steps below to set up your Brewer.
Note: If your Brewer has been exposed to cold temperatures before setting it up, it should be maintained at room temperature for two hours before the subsequent brewing. An excessively cold Brewer will not be able to function.
Assemble Your Brewer
Assembling a Brewer is crucial for achieving optimal coffee brewing performance and savoring a delightful cup of coffee. Properly following instructions is essential for consistent results.
- Remove the plastic wrap from the cable, connect the Brewer to a grounded outlet, and remove any packaging tape.

2. Place a large cup of at least eight oz on the Drip Tray Plate.

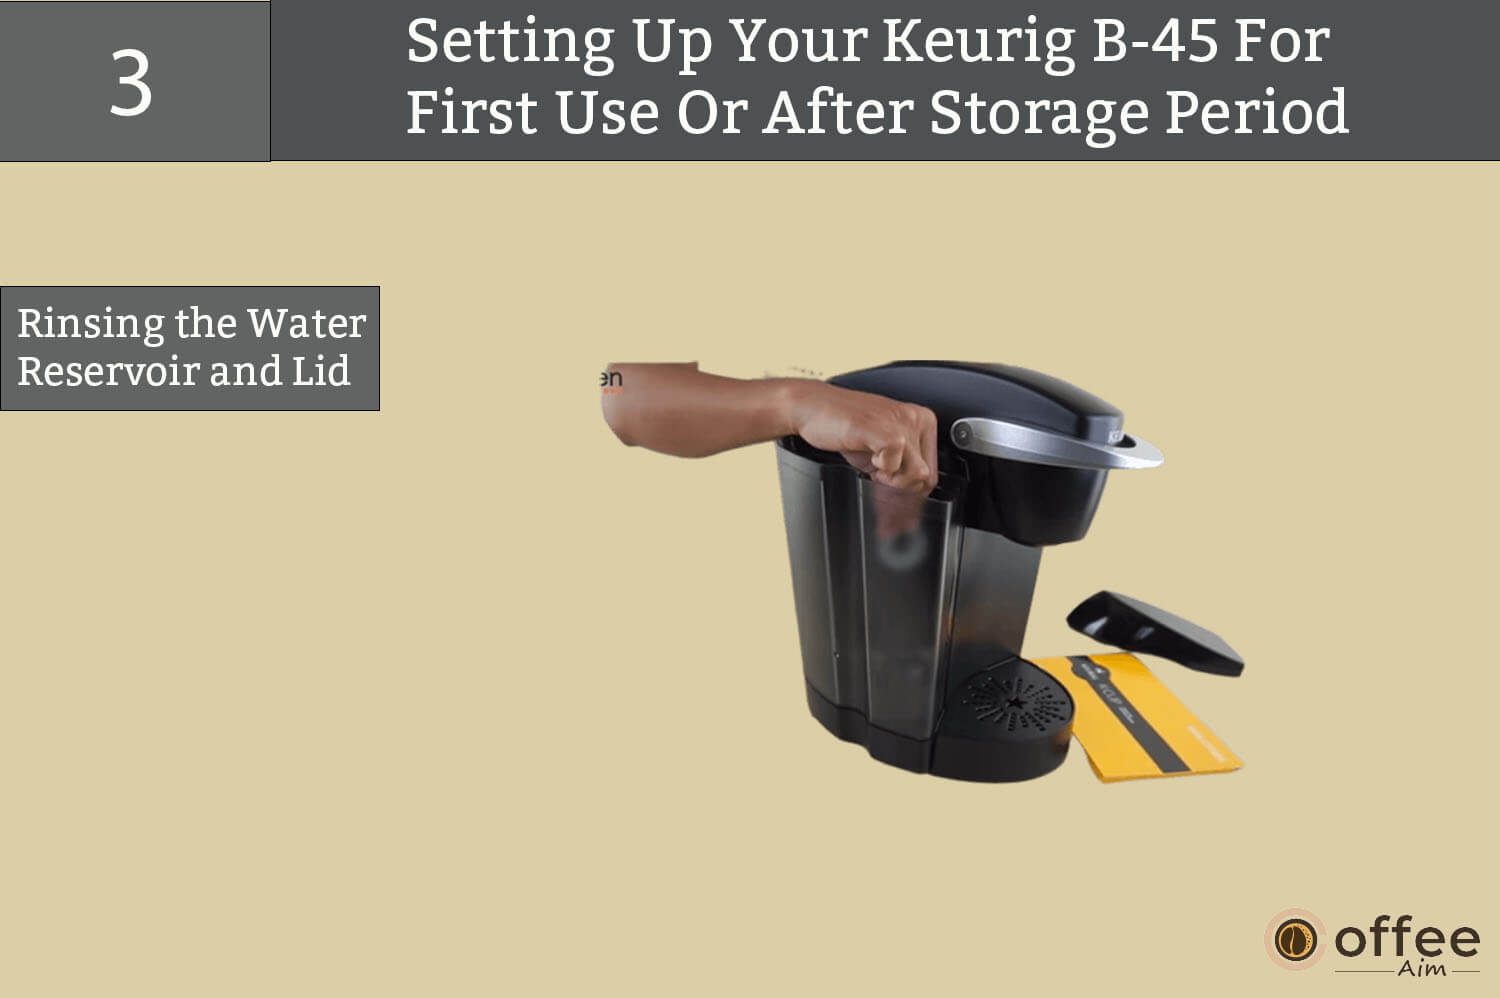
3. Remove the Water Reservoir lid and the Water Reservoir from the Brewer (Fig.1). Then, lift the reservoir straight up and thoroughly clean it with fresh water.
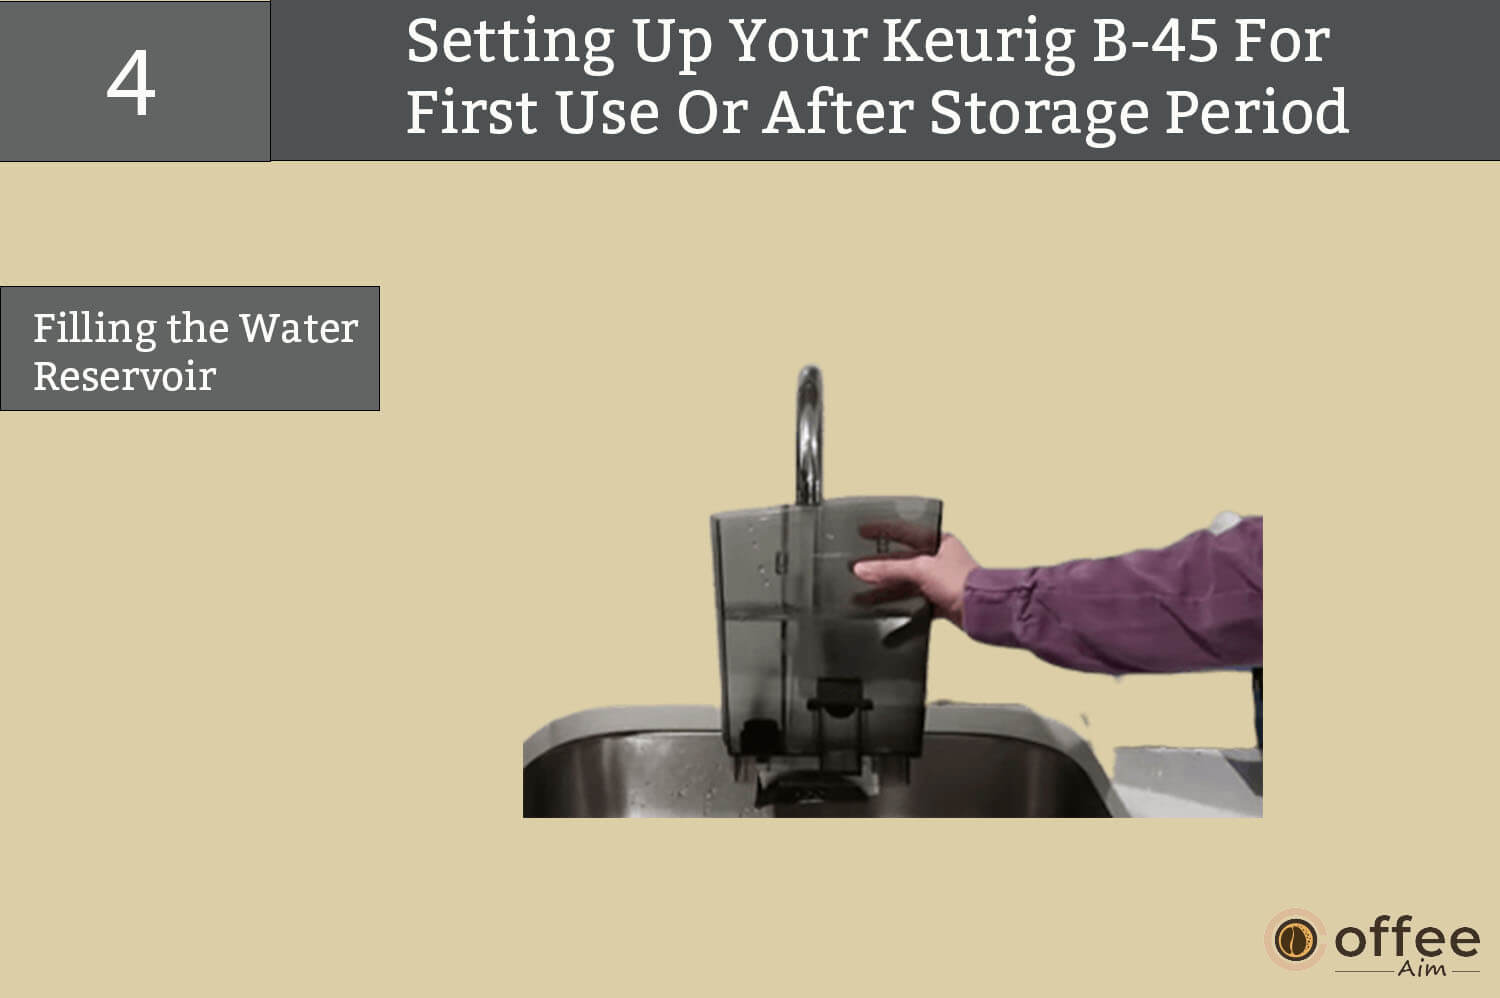
4. Fill the Water Reservoir with bottled or filtered water carefully, ensuring it does not exceed the line indicated just below the top edge of the clear viewing area. Avoid overfilling.
5. Ensure that the Water Reservoir Lock Tabs are securely in place with the Brewer before inserting the base of the Water Reservoir into the left side of the Brewer (refer to figure 2). Then, replace the lid of the Water Reservoir.

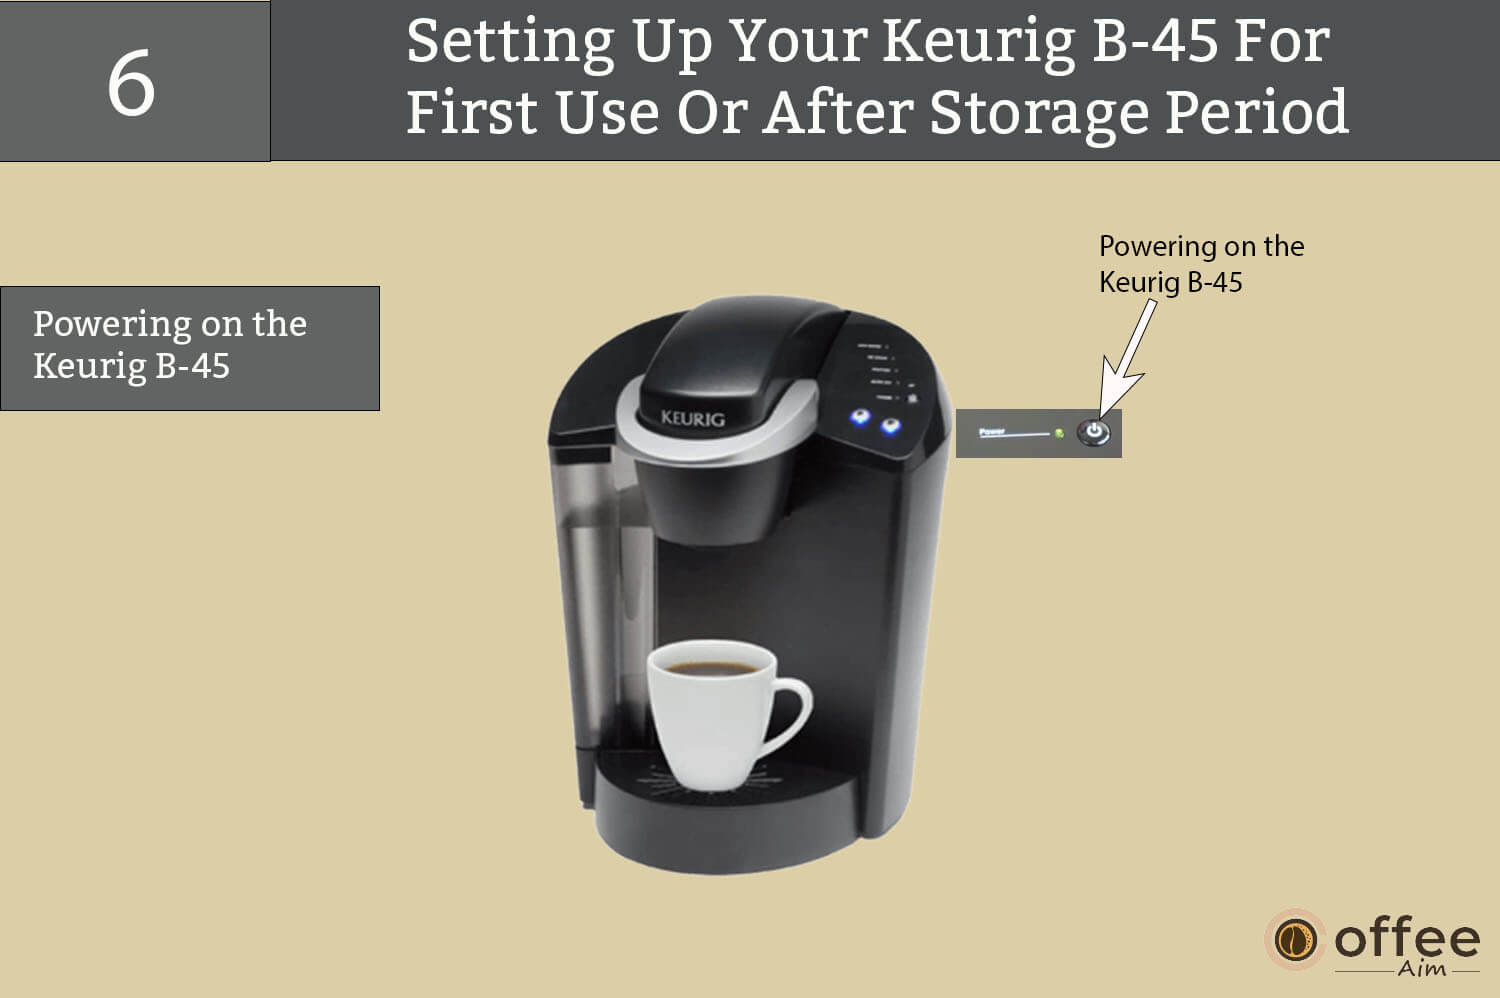
6. Press the Power button on Brewer’s upper right panel to start your Keurig B-45. A green light will illuminate as an indication that the Brewer is in functional mode.
Note: It should be noted that a K- Cup should not be utilized for this part of the process.
Note: If the Water Reservoir is empty or not placed on the Brewer, a blue light next to ADD WATER will begin to illuminate. The Small Mug Button will turn on once the water is introduced to the Water Reservoir.
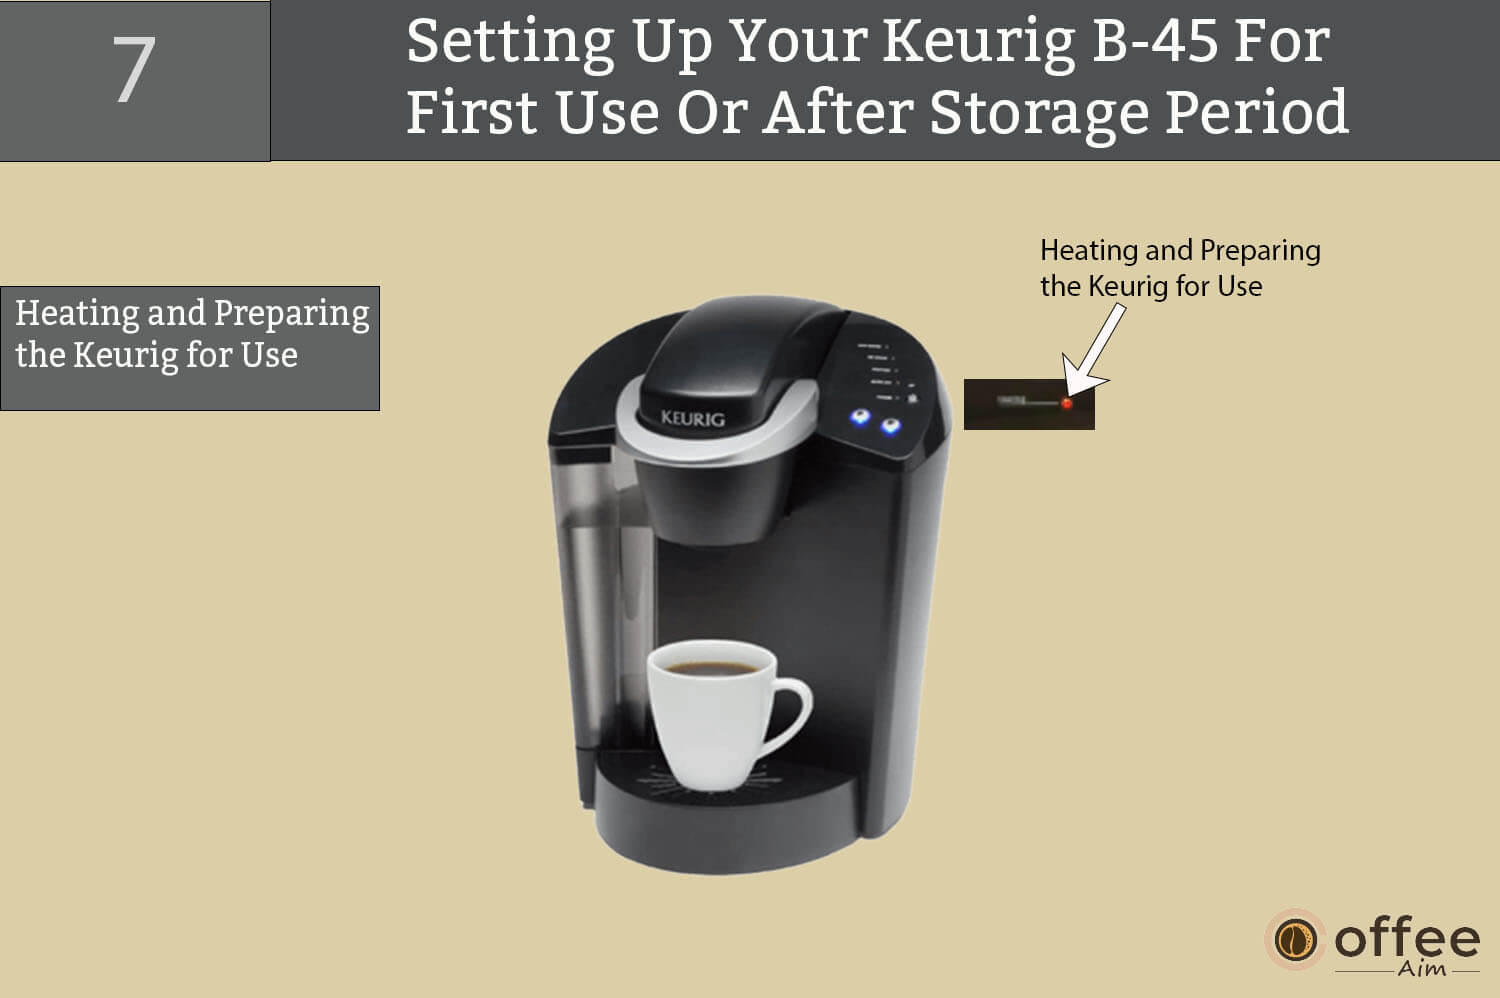
7. In the Keurig B-45, the water-filling process is automated. The Brewer will automatically fill and then begin heating the water, which takes approximately four minutes. The red light next to “HEATING” on the LED Control Center will illuminate during heating. Once the water has been heated, the red light will turn off, and the button for a small mug will start flashing.
Note: Do not lift the Brewer while the water is heating.
- You may observe small amounts of water flowing from the vent and dropping into the Water Reservoir throughout this and subsequent heating processes; this is typical and should not be a concern.
- The control panel has a “Small Mug Button” in the bottom left corner. Begin the cleaning brew procedure by pressing the Small Mug Button, as shown in the diagram (Fig.3). Put the hot water in the sink.
- The warming procedure may take up to 15 seconds, during which the red light next to “HEATING” on the LED Control Center will stay on. Once the water has warmed, the red light will switch off.
Congratulations, With the setup process complete, you are ready to start brewing.
Ready To Brew Your First Cup
At last, your wait is over as you have reached the most awaited steps. So, are you ready to brew your hot cup of coffee in Keurig B-45?
If you’re making your first cup of hot coffee with your Keurig B-45, there are a few important steps that you should follow. These include
1. Activate your Brewer by turning it on. The green light next to the power button on the control center will light up, indicating that your Brewer is now in operation.

2. Place a cup or mug on Drip Tray Plate.

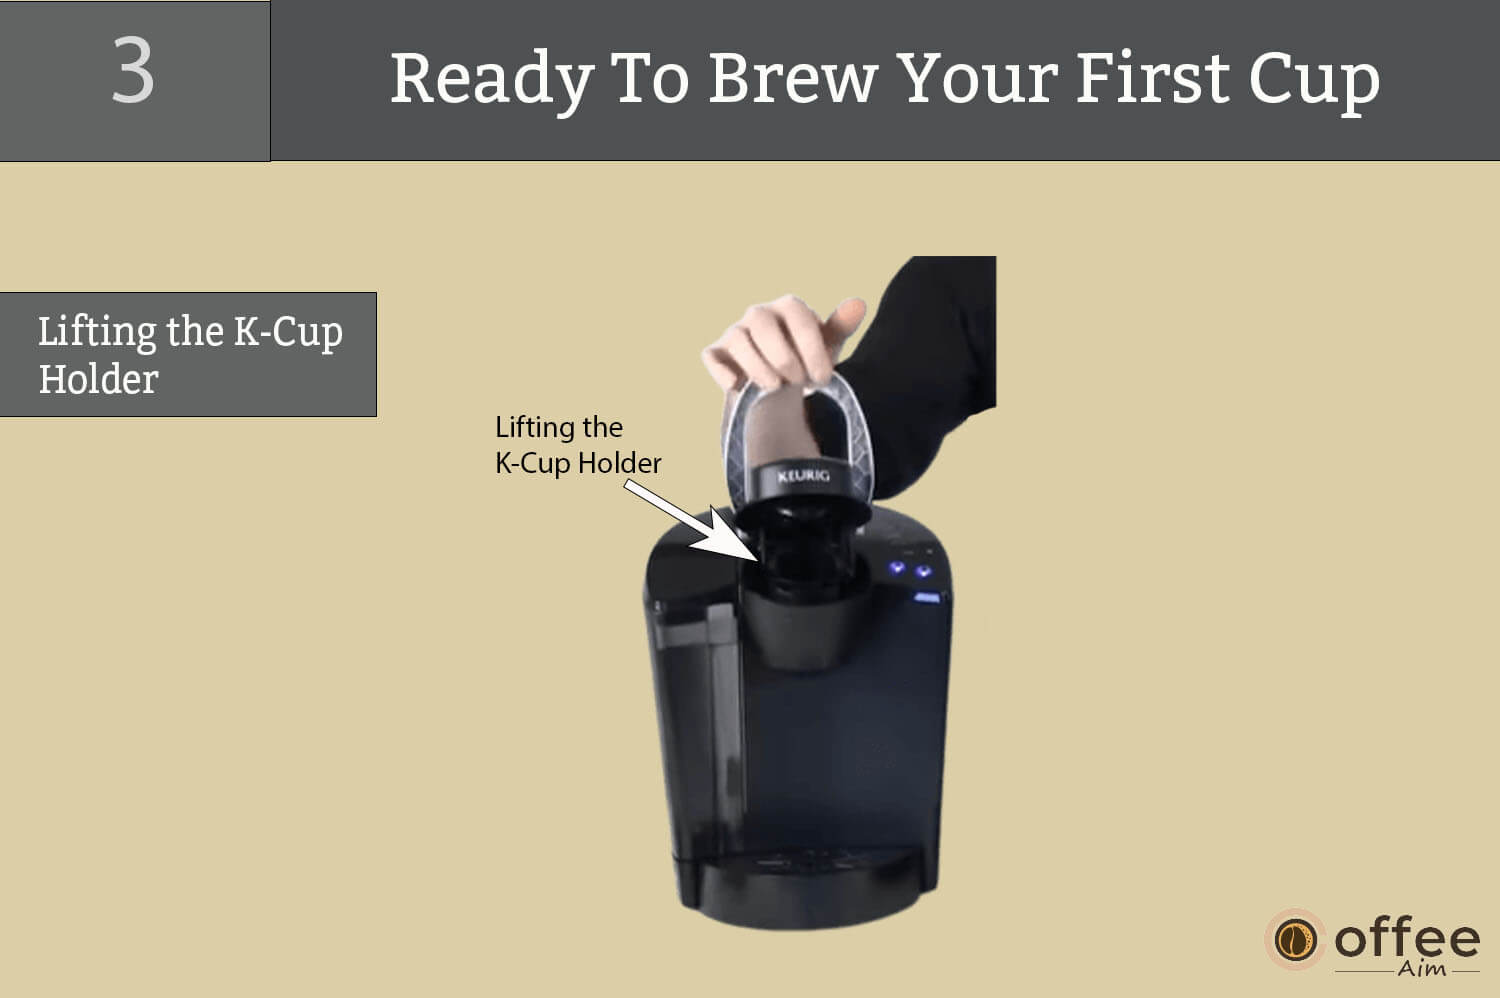
3. Lift the Handle, and the K-cup Pack Holder will open towards you.
4. Select a K-Cup Pack.
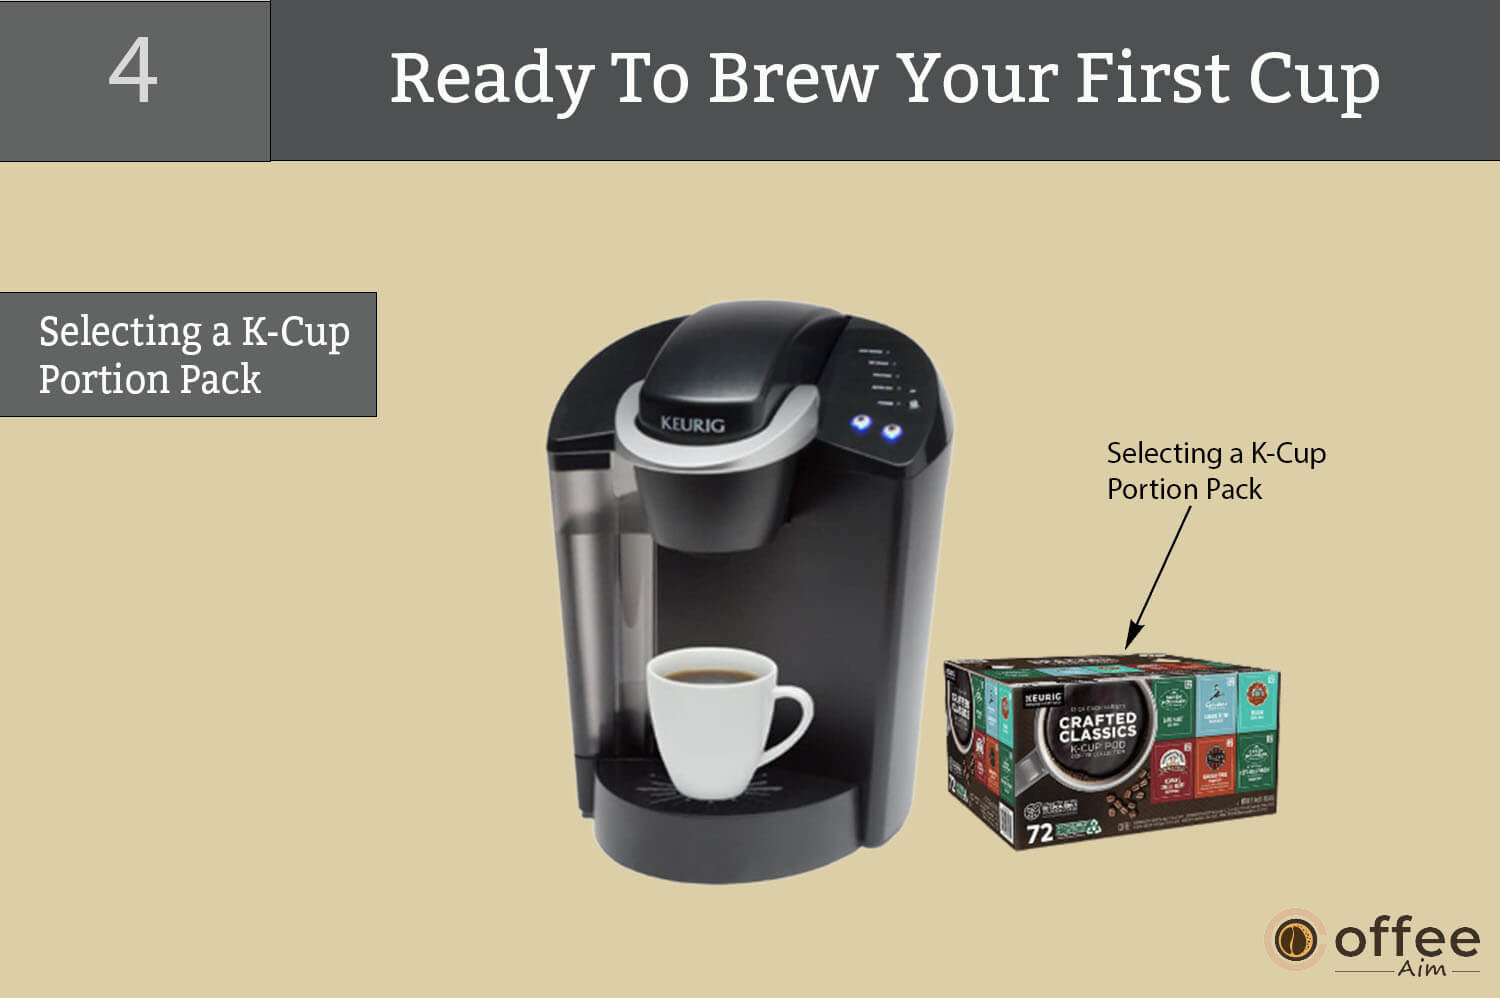
Note: Avoid puncturing the K-Cup or removing the foil cap.
5. Place the K-cup Pack in the Pack holder.
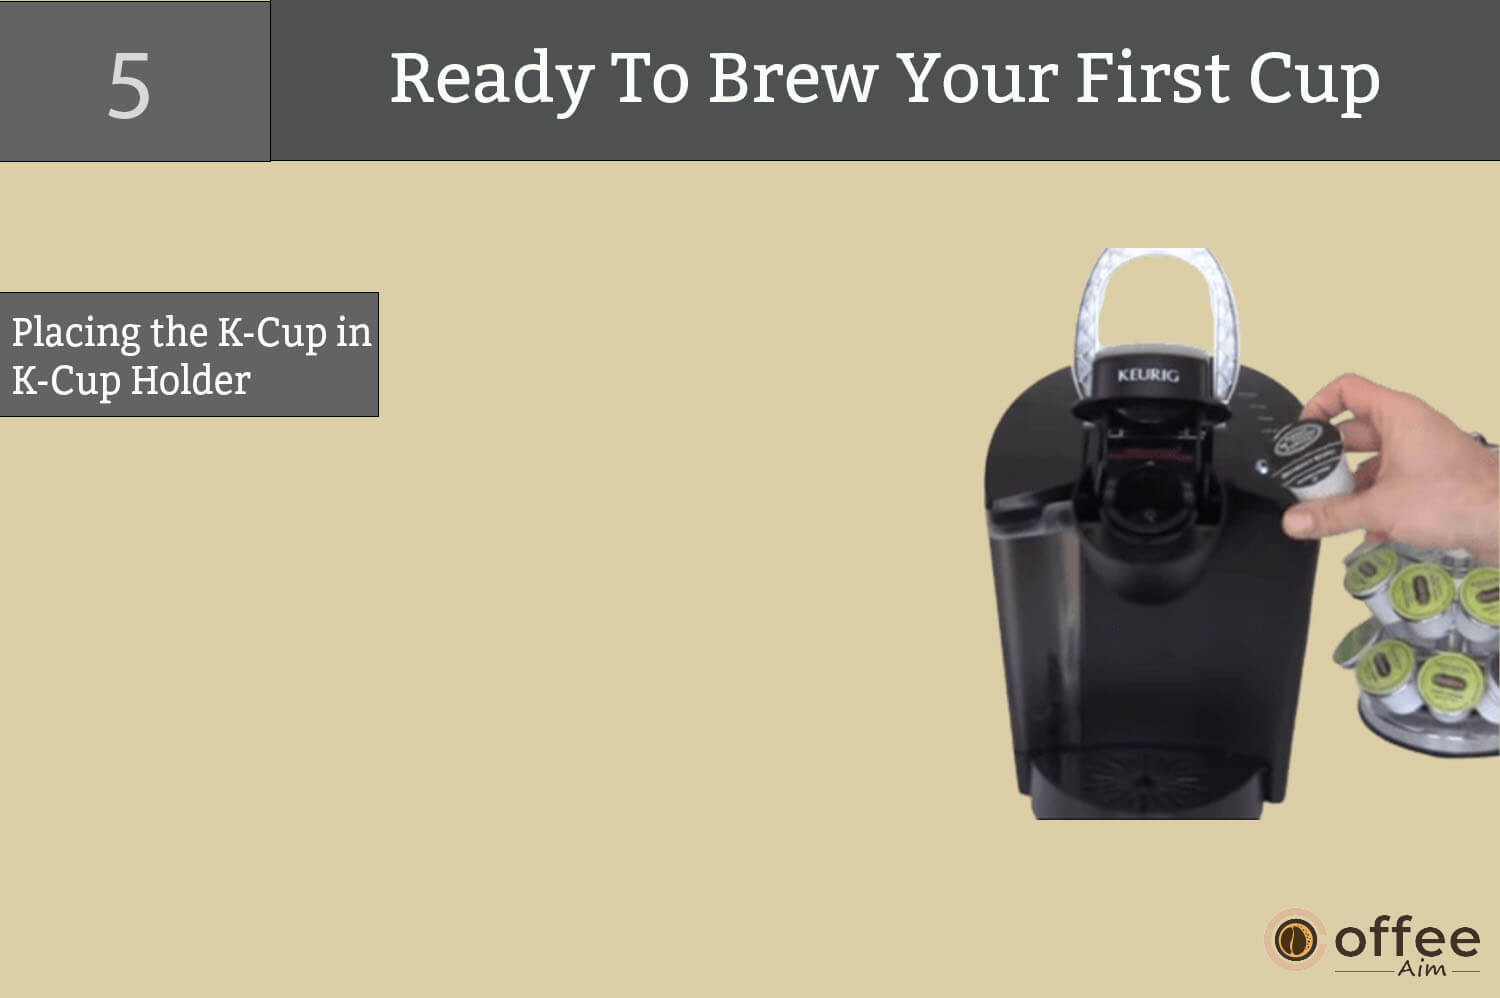
Notes: You should be cautious with the needles since there are two of them to pierce the k Cup, one above the K-Cup Holder and the other at its base. To prevent the danger of harm, do not put your fingers in the K-Cup Holder.
6. Lower the Handle completely to close the Lid. (Within 60 seconds, you have to choose the brew size; otherwise, it will be deactivated to avoid any mishaps, for re-activation lift and lower the handle again)

7. Select the brew size: Small Cup for 5.25 oz and Small Mug for 7.25 oz.

8. The Blue Brew Button will remain illuminated during the brewing process.

Nots: You must use extra caution since the water in the K-Cup Holder is extremely hot. Lifting the Handle or opening the K-Cup Assembly Housing during brewing is risky and can result in serious injury.
9. There is a slight pause at the beginning of the brewing process. This process lasts for 1 minute, and after its ends, there will release a burst of air to remove all the liquid from the K-Cup Pack.

10. Lift the Handle and dispose of the used K-cup Pack.
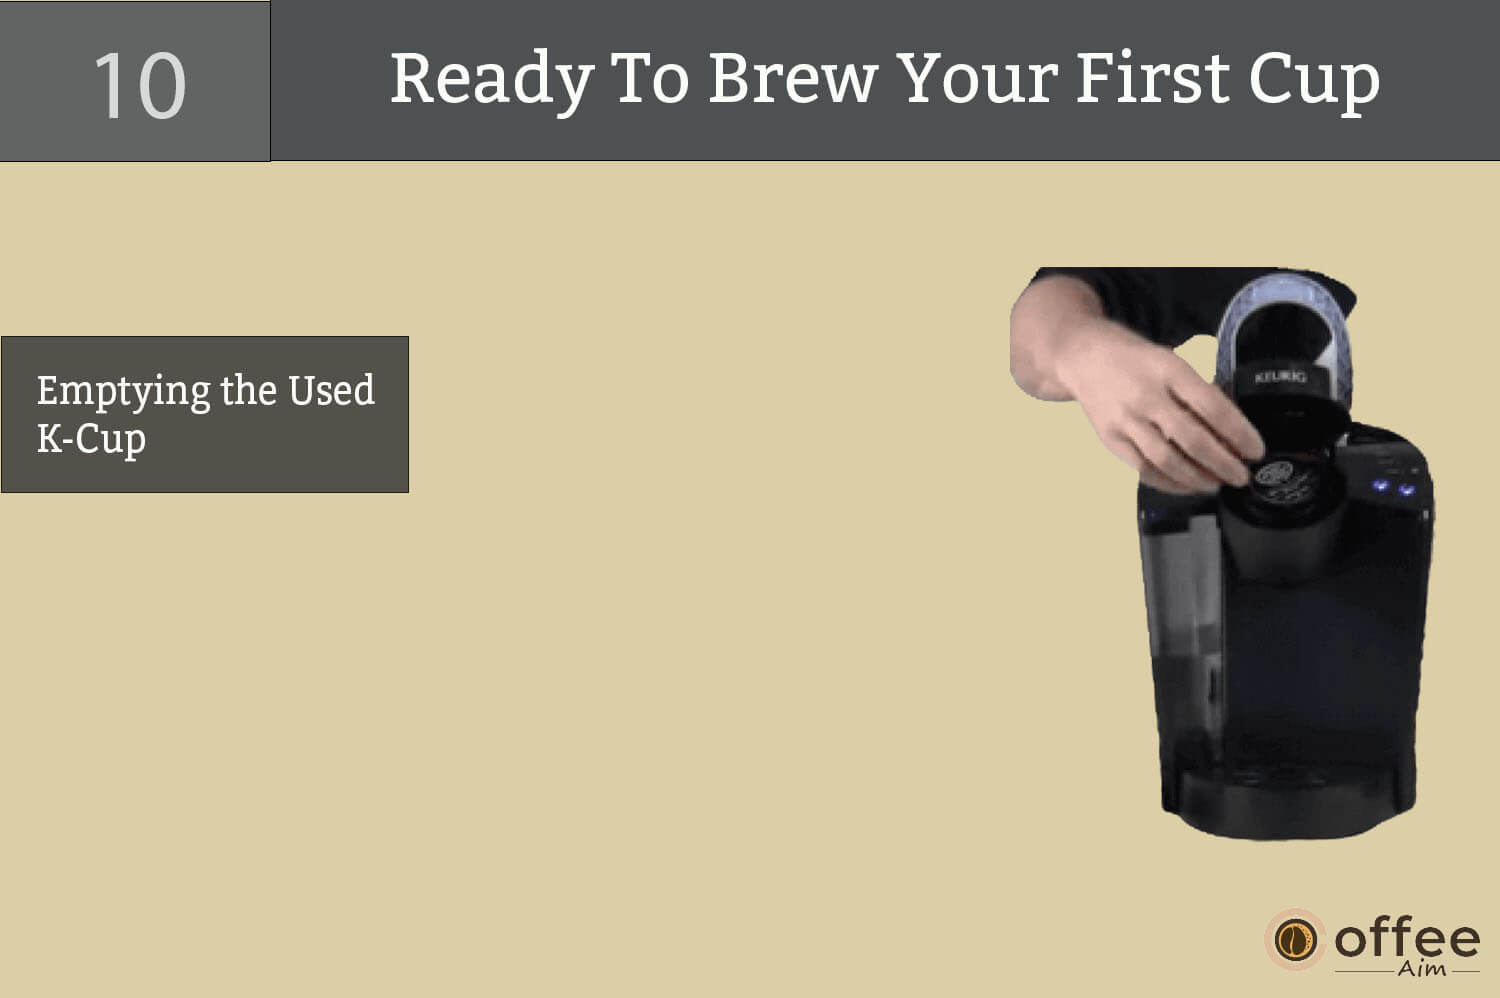
Note: You should remain careful because the K-Cup will be very hot.
11. Enjoy four first cups of Gourmet tea, coffee, or hot cocoa from the Keurig B-45 Brewer.

12. The Red Heating Light will be illuminated as the water is heated for the next brew cycle. The Brewer will be ready to use in the next 15 seconds.
Note: If the pump begins to vibrate after brewing, do not be alarmed; this is typical when the Brewer fills in preparation for the next brew.
1. Stopping The Brew Process

If you need to stop the brewing process, which has started, just press the Power Button to turn it off. Once the coffee, tea, or hot cocoa flow stops, the Green Power Light will turn off, indicating that the heating element has shut off.
Note: You may notice a reduced amount of coffee, tea, or hot cocoa in your cup during your next brewing cycle. It is necessary to perform a cleansing brew using water only. This should be done immediately following the completion of a previous brew cycle. Then your Next brew will then be of the correct volume.
Adding The Water
The Keurig B-45 features a convenient notification system that informs you when it is time to refill the Water Reservoir. The blue Add Water Light will turn on as the water in the Water Reservoir is low or if the Water Reservoir has been removed. Furthermore, your Brewer will not allow you to brew if this light has been illuminated.
The Water Reservoir can be filled in two ways:
1. While the Water Reservoir is still connected to the Brewer, remove the top, fill it with water using a jug, and replace it.

2. Then, before removing the Water Reservoir from the Brewer, remove the top from the Water Reservoir. Fill the container with water. Replace the Lid and reconnect the Water Reservoir to the Brewer. It is critical to note that the Water Reservoir should never be removed when brewing.

How To Brew Hot Water In Keurig B-45?
The Keurig B-45 Brewer is equipped with the ability to brew hot water, making life easier. This function can be utilized to heat water for cooking, making soup, creating instant hot chocolate, and more. Let’s get started!
By following a few easy steps, you can use the Brewer for this purpose.
1. Raise and lower the handle without using the K-Cup portion pack.

2. The blue LEDs behind the brew buttons on the LED Control Center will flash.
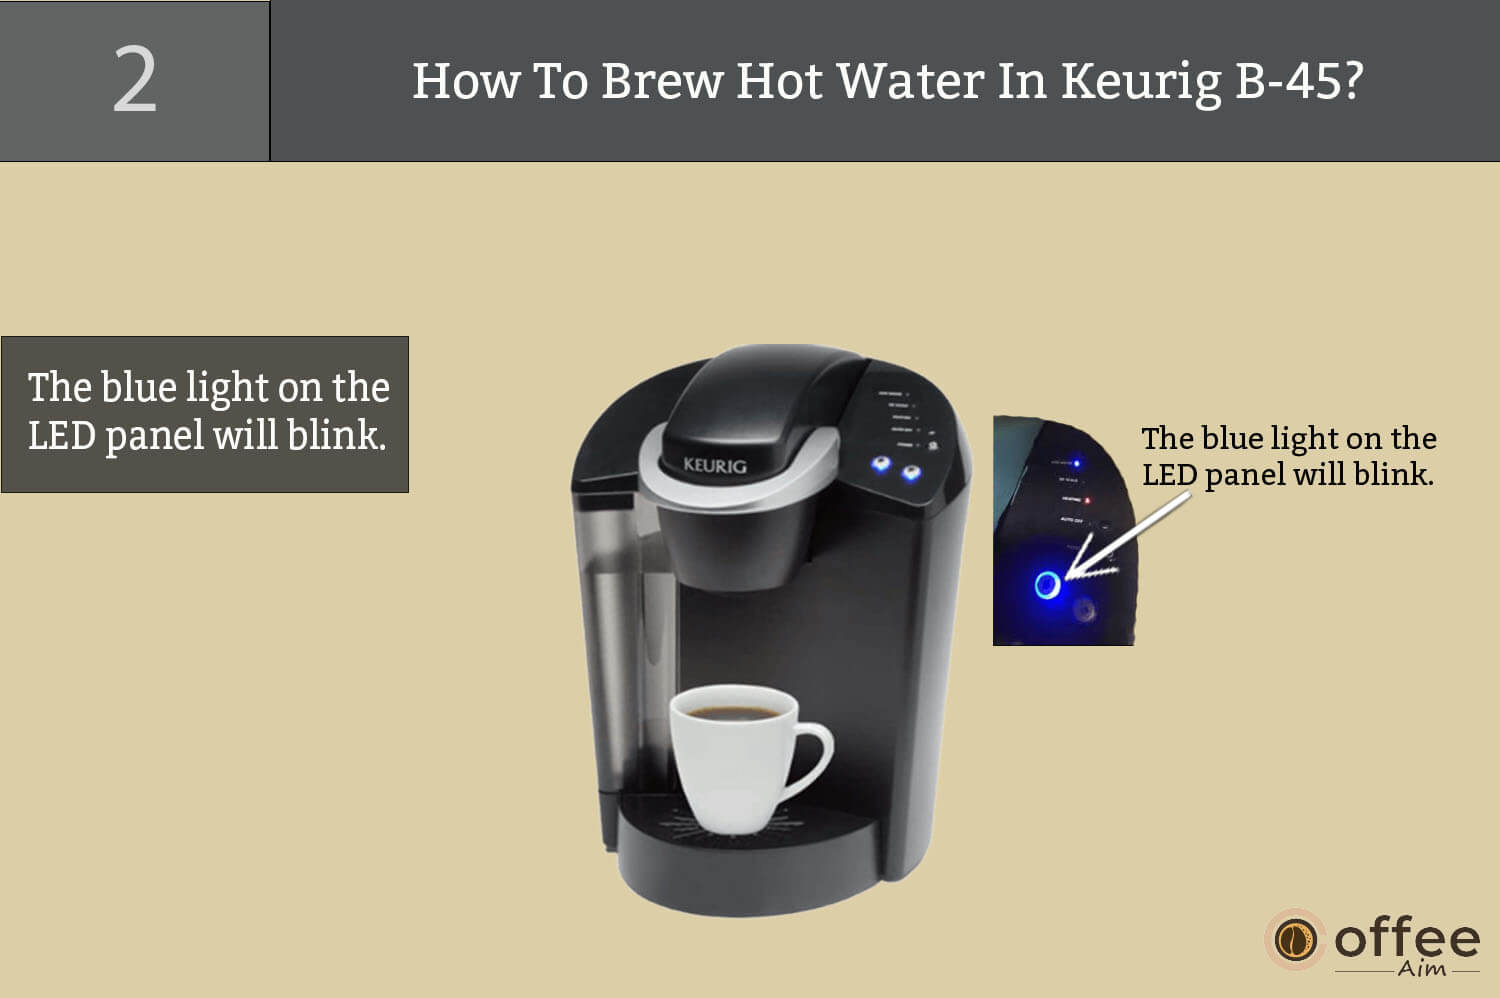
3. Then, before hitting the brew button, set a mug or cup on the drip tray plate.

Note: To avoid issues, run a hot water brew cycle without a K-Cup after brewing a hot cocoa K-Cup.
How To Purge The Brewer?
If your Brewer has been used for less than a week, I recommend emptying the water from the inner tank.
1. If the Water Reservoir contains water, remove the lid and lift the reservoir straight up and away from the Brewer. Rinse it with water, then empty and refill. Then, Place the Water Reservoir back on the Brewer and replace the lid. (If there is no water in Reservoir, simply refill.)

2. Ensure that your Brewer is turned on. Next, raise and lower the handle on the Brewer without inserting a K-Cup. Wait until the red light next to the ‘HEATING’ indicator turns off before proceeding.

3. The blue lights behind the Brew Buttons on the LED Control Center will flash. Place a cup or mug on the drip tray plate before pressing the brew button.

4. To effectively purge the water, repeat steps 2 and 3 twice more from the inner tank.

Control And Indicators
You have always wanted to use a Brewer with convincing and user-friendly features. Congratulations, your prayers have been heard. Your Keurig B-45 is equipped with a control and indicator panel, including the convenient Auto Off timer, allowing you to control while ensuring a seamless shut-off manually. I will make sure that you will gain comprehensive knowledge related to the control and indicators panel. Let us begin.
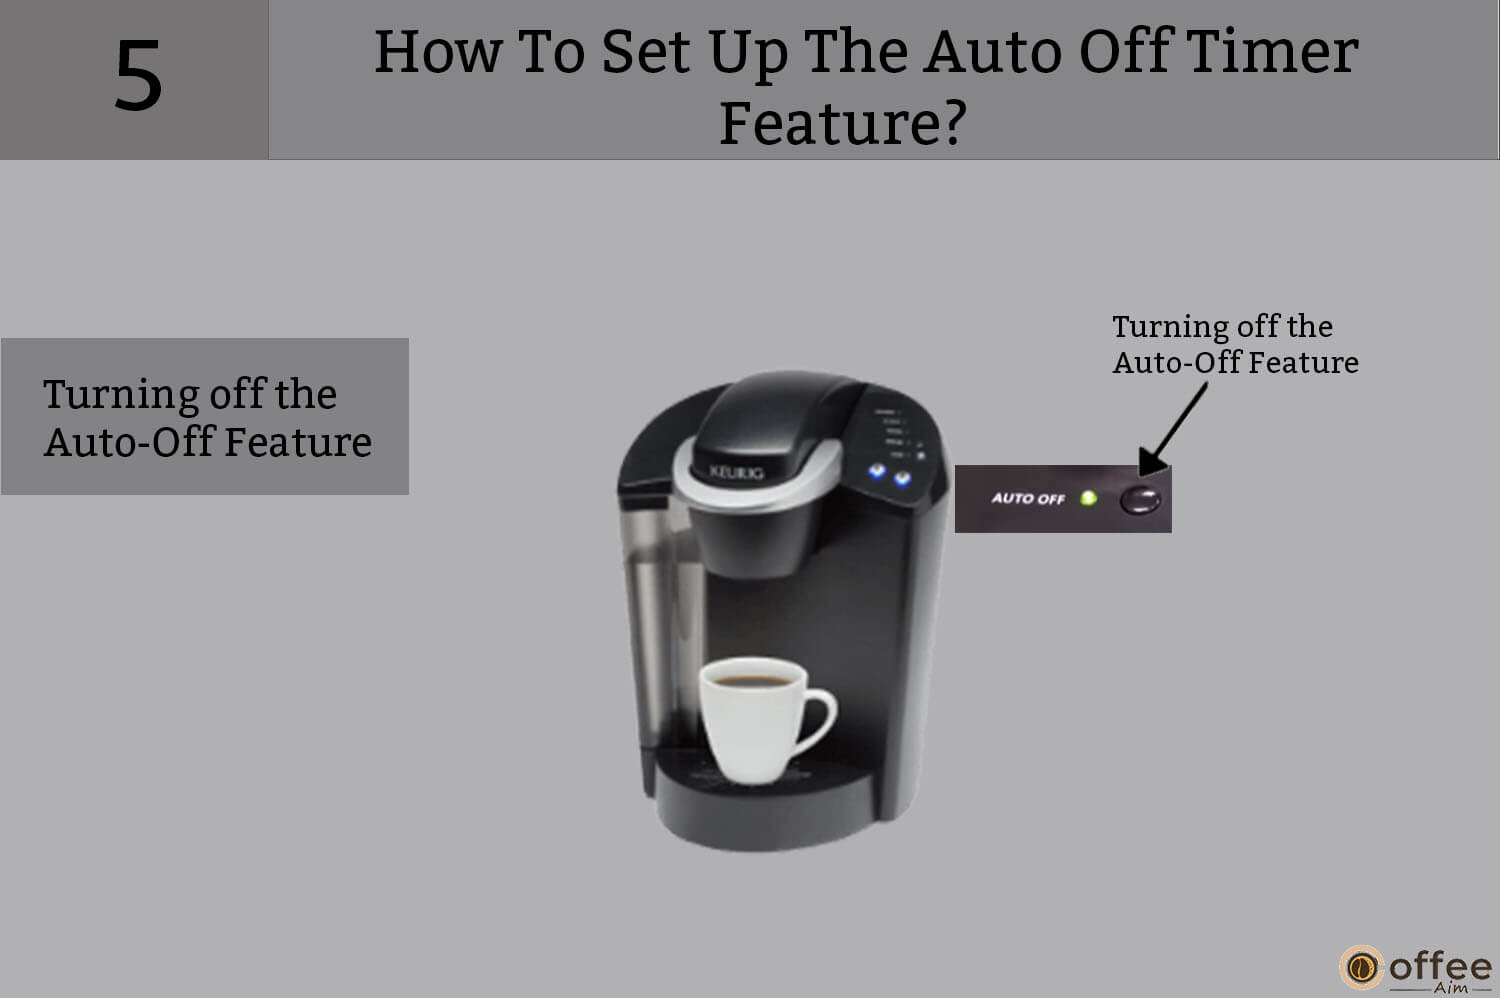
How To Set Up The Auto Off Timer Feature?
If you want to Set up your Brewer to turn off automatically after two hours of the last brew, follow the steps below.
1. Press the Power Button to start the Brewer.

2. On the LED Control Center, push the black button to the right of the “AUTO OFF” inscription. (Fig. 7)
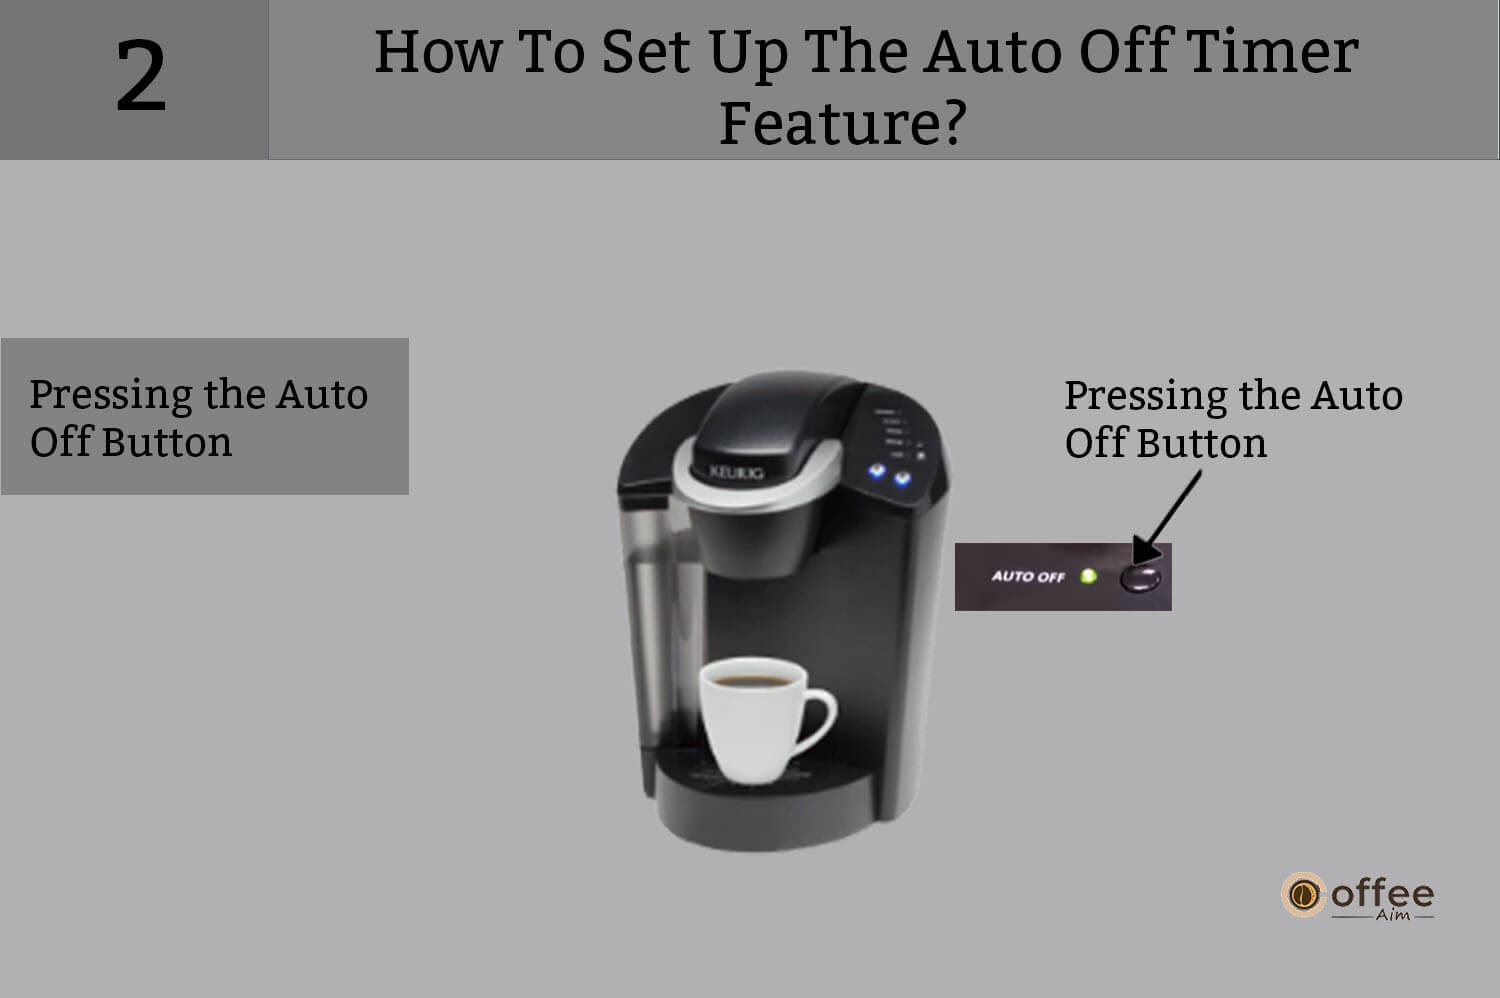
3. The green light next to “AUTO OFF” will turn on.

4. If the Auto off Timer is enabled, your Brewer will shut off automatically two hours after your previous brew.

5. To switch off the Auto Off Timer, simply push the black Button again, and the green light next to ‘AUTO OFF’ will turn off.
Cleaning & Maintenance Of Your Keurig B-45
If you don’t clean your Brewer regularly, coffee oils, minerals, and other residues can build up. The consequences of this can include a decrease in the quality and taste of the coffee, a decrease in the efficiency of the machine, as well as an onset of health problems.
Can you guarantee that the coffee you make in your Brewer is hygienic? You can only claim this if your Brewer has been perfectly cleaned. Additionally, cleaning your Brewer will extend its lifespan. To ensure a hygienic brewed coffee, I am providing detailed instructions for cleaning your Keurig B-45.
How To Clean The External Parts?
Brewer’s exterior parts should be cleaned regularly. Let us begin cleaning the exterior parts.
1. First and foremost, you must ensure that your Keurig B-45 is never immersed in water or other liquids. All external components, including the Housing, should be cleaned using a soapy, damp, non-abrasive cloth.

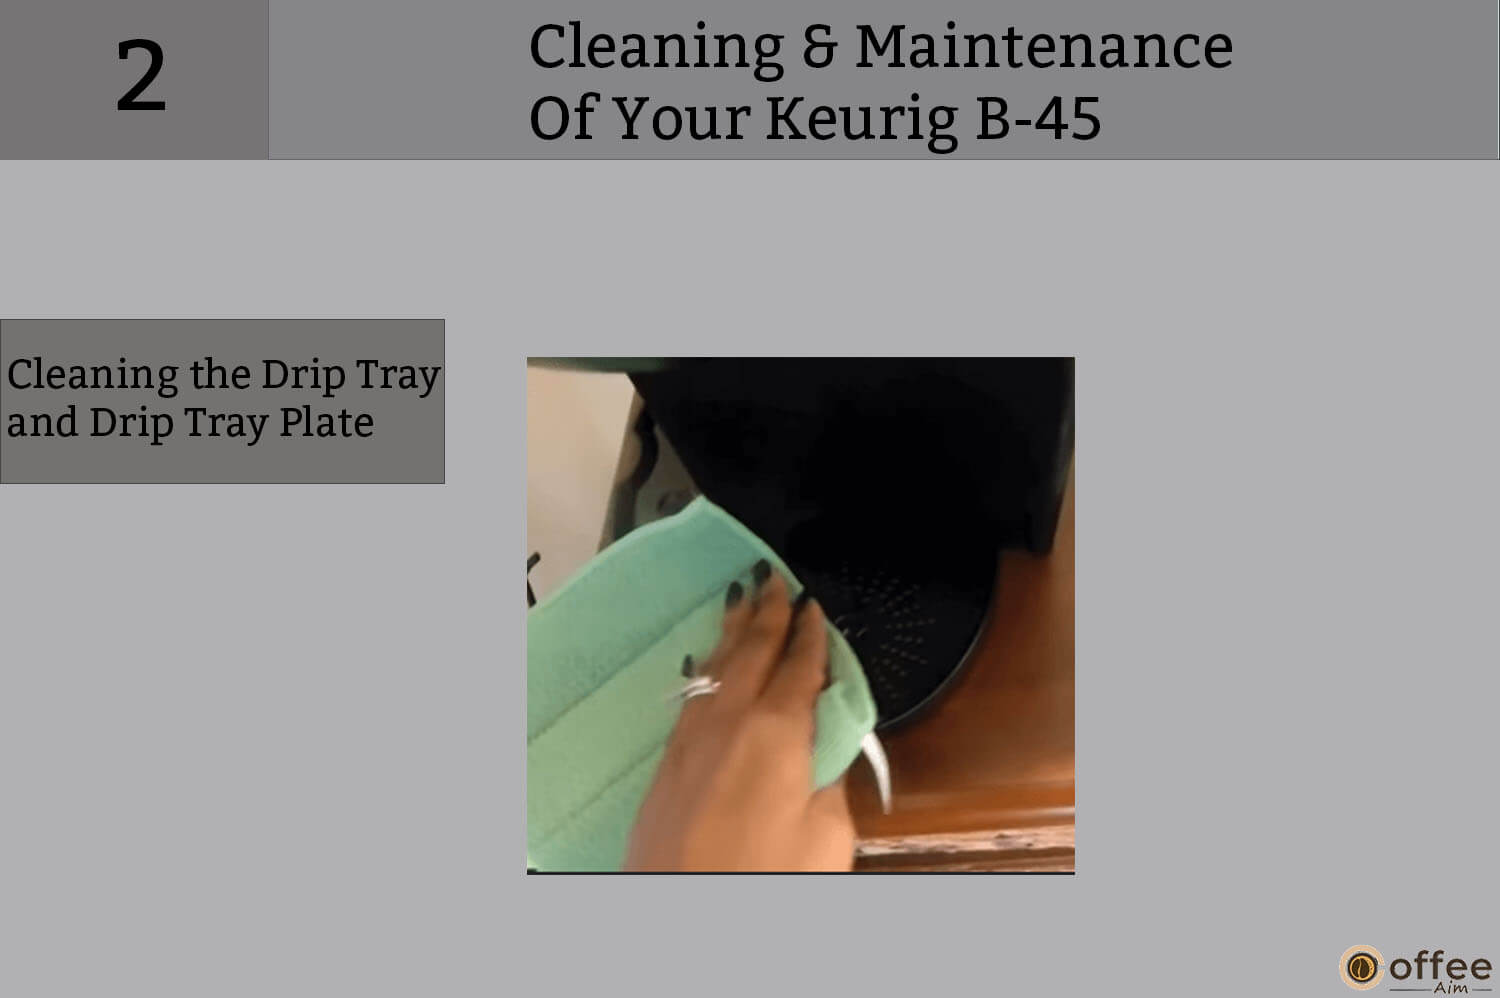
2. The drip tray has a maximum capacity of 8 ounces; otherwise, it would overflow. Regularly, the drip tray and drip tray plate should be inspected and cleaned. Remove the drip tray assembly by sliding it toward you and keeping it level at all times to avoid spillage. The Drip Tray and Drip Tray Plate can be washed in the dishwasher.
How To Clean The K-Cup Holder Assembly?
Following the exterior cleaning, you can now clean the K-cup holder assembly. Let’s get started with the cleaning.
Cleaning the Parts
Follow the instructions below to clean the pieces of the K-cup Holder Assembly.
1. You can wash the K Cup Holder Assembly in the dishwasher.

2. Place it on the top rack of a dishwasher and use low-temperature cycles.

3. Remove the plug, and lift the handle to open the lid. Then, release the K-Cup holder from the machine by using one hand to hold the top of the holder and the other hand to push up on the bottom. (Fig.8)

4. After cleaning, use the two front ribs as a guide to align the K-Cup Holder with the opening and snap it into place from the top.

Cleaning the Funnel
Cleaning small parts, such as the funnel, is crucial to Brewer cleaning. It is because the funnel often contains drink residue that may be left behind after each use. To give it a gleaming clean, just follow these simple steps.
1. As illustrated in the image, you must pull the Funnel until it pops out to remove it from the K-Cup holder ( Fig.9)
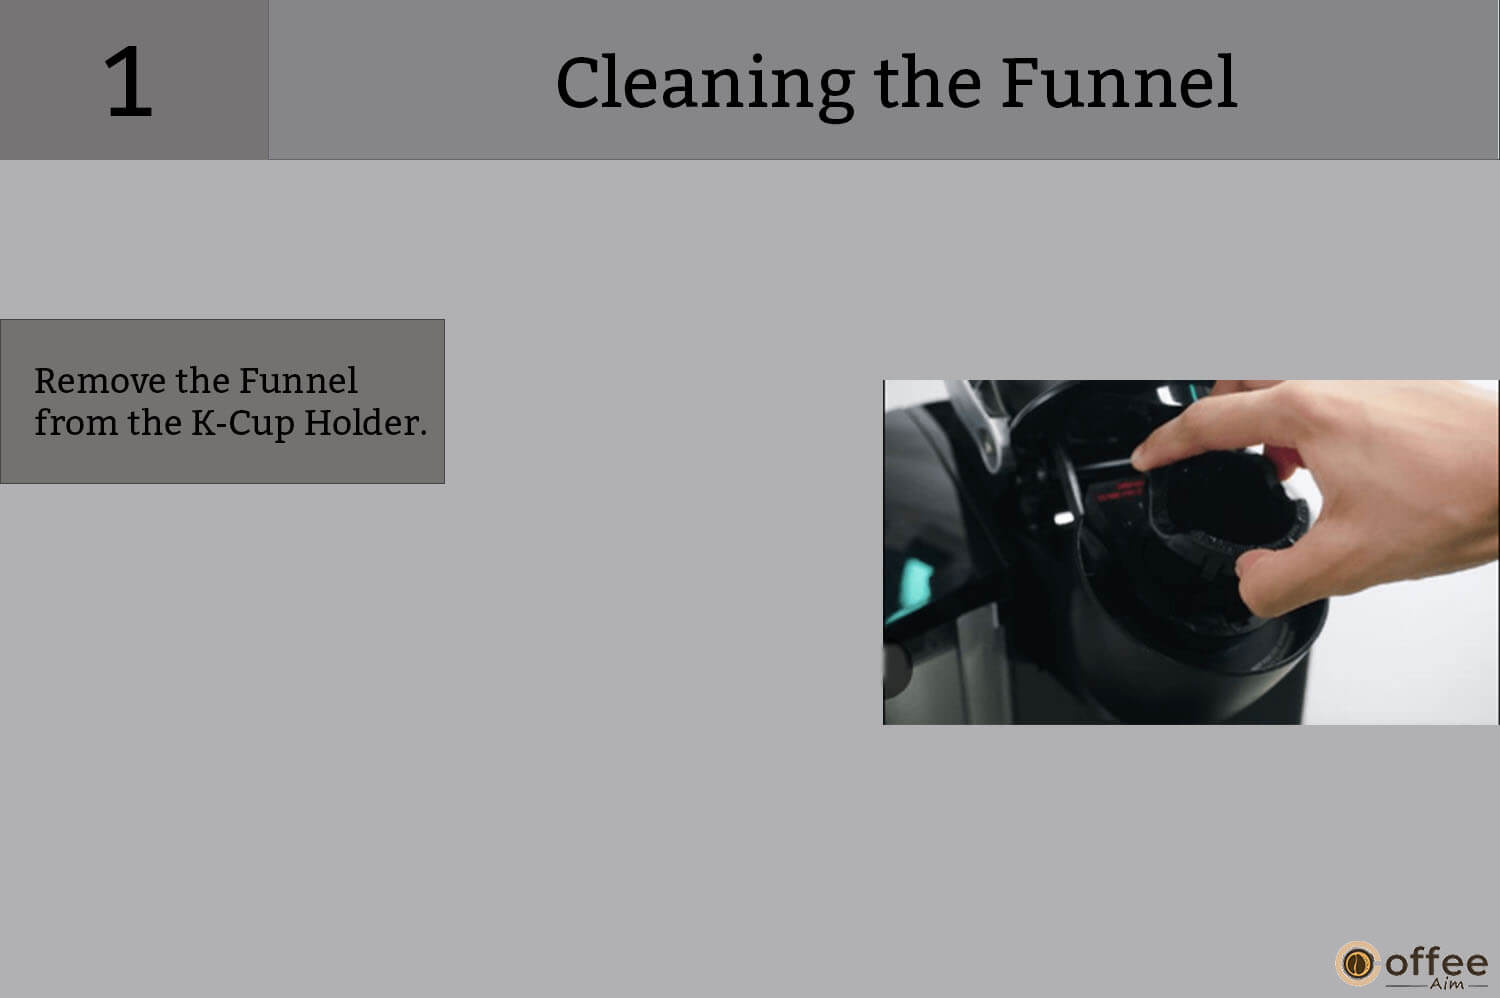
2. The funnel can easily be cleaned in a dishwasher. Simply snap it back onto the K-Cup Holder Assembly to re-attach it.

Cleaning The Exit Needle
Do you know that a dirty needle can harbor harmful bacteria? Make it crucial to clean the Exit Needles with more care. Follow the steps below to have a perfectly cleaned Exit Needle.
1. The Exit Needle is placed at the bottom of the K-Cup Holder Assembly. Clogs caused by coffee grinds can be cleaned with a paper clip or other similar objects.

2. Now, remove the K-cup holder assembly and funnel.
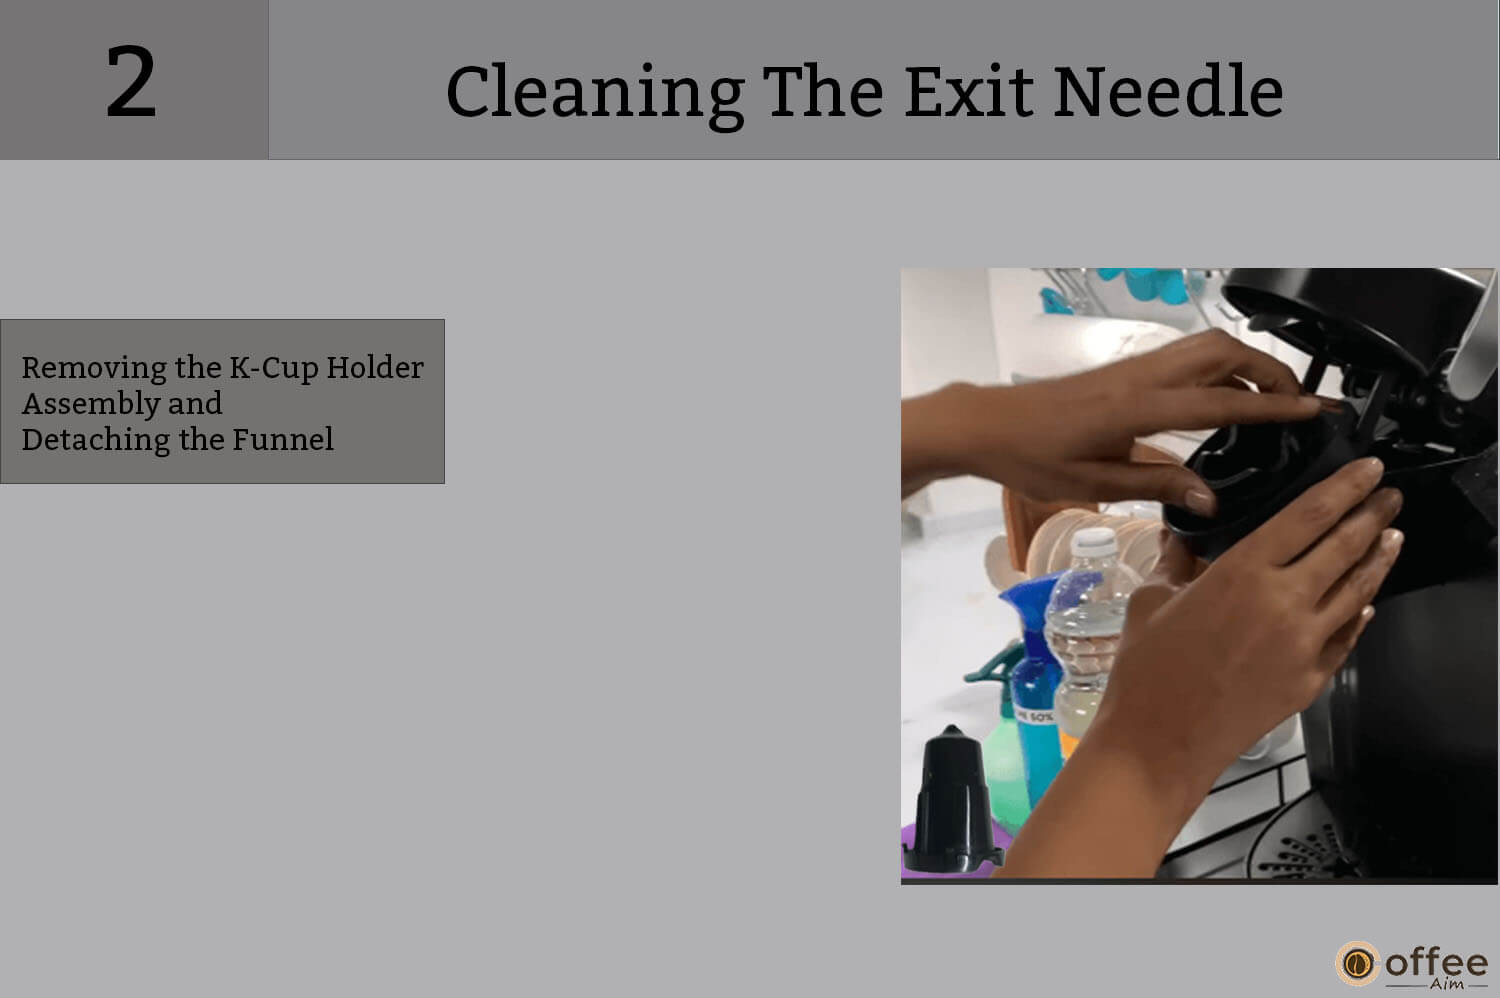
3. Insert the paper clip into the needle to unclog and remove the blockage (as seen in fig. 9)

4. The K- Cup holder is dishwasher safe. Therefore, you can clean the funnel in the dishwasher.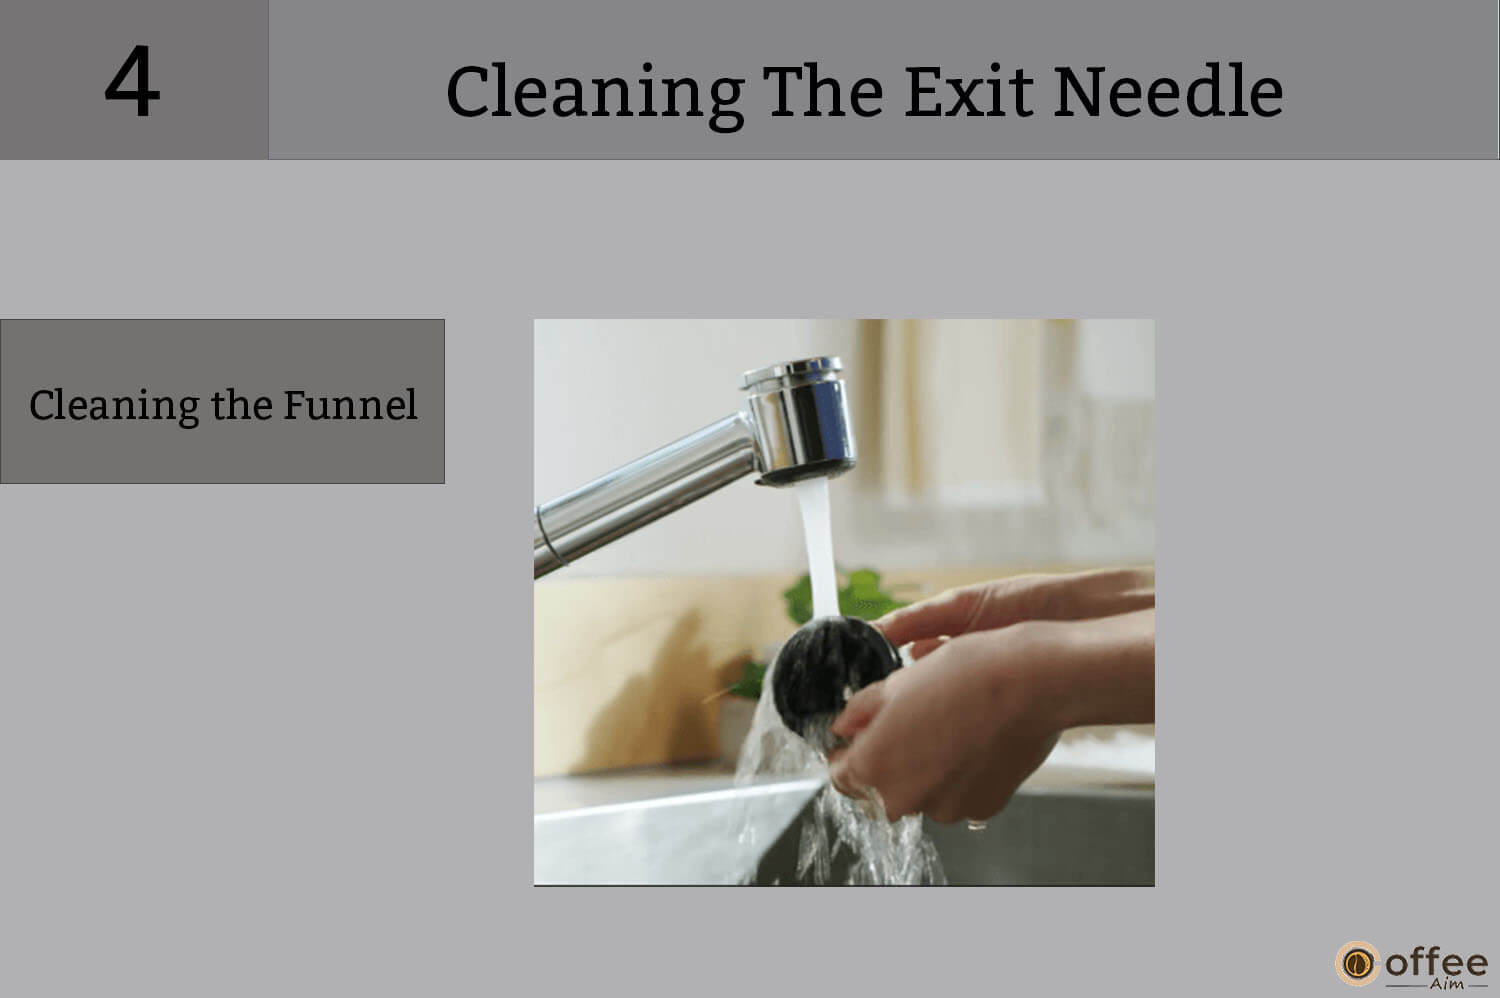
Note: Keep in mind that there are sharp and pointed needles at the bottom of the K-Cup Holder and above the K-Cup Holder that pierces the K-Cup during the cleaning procedure. To avoid injury, keep your fingertips away from the K-Cup Assembly Housing.
How To Clean The Water Reservoir & Water Reservoir Lid?
If you are wondering whether the Water Reservoir and lid are dishwashers-safe. The answers to your queries are here; just waiting for you. Read on to discover all the dishwasher-related details.
1. The Water Reservoir Lid and Water Reservoir are not dishwashers safe, so never put them in it. Instead, clean them with a wet towel and thoroughly rinse them.

2. Ensure that the Water Reservoir has been properly cleaned to prevent cleansers or cleaning solutions from polluting Brewer’s water supply.

3. Avoid using a cloth to dry the Water Reservoir’s outside surface since lint may still be present.

Descale Your Keurig B-45
A build-up of minerals over time can become a problem for your Keurig B-45. This buildup can negatively impact your coffee’s taste, your coffee maker’s performance, and even its lifespan.
Regularly descaling your Brewer is crucial to maintaining its optimal performance. To ensure that you keep your Keurig B-45 in tip-top shape, here are some essential tips to keep in mind.
The mineral concentration of water varies by location. Calcium deposits can form in your Brewer depending on the mineral composition of the water. Although the scale is non-toxic, failing to pay attention can harm Brewer’s performance.
Descaling your Brewer facilitates the elimination of contaminated minerals and other materials from your Brewer. The Brewer should be descaled every three to six months to ensure peak performance.
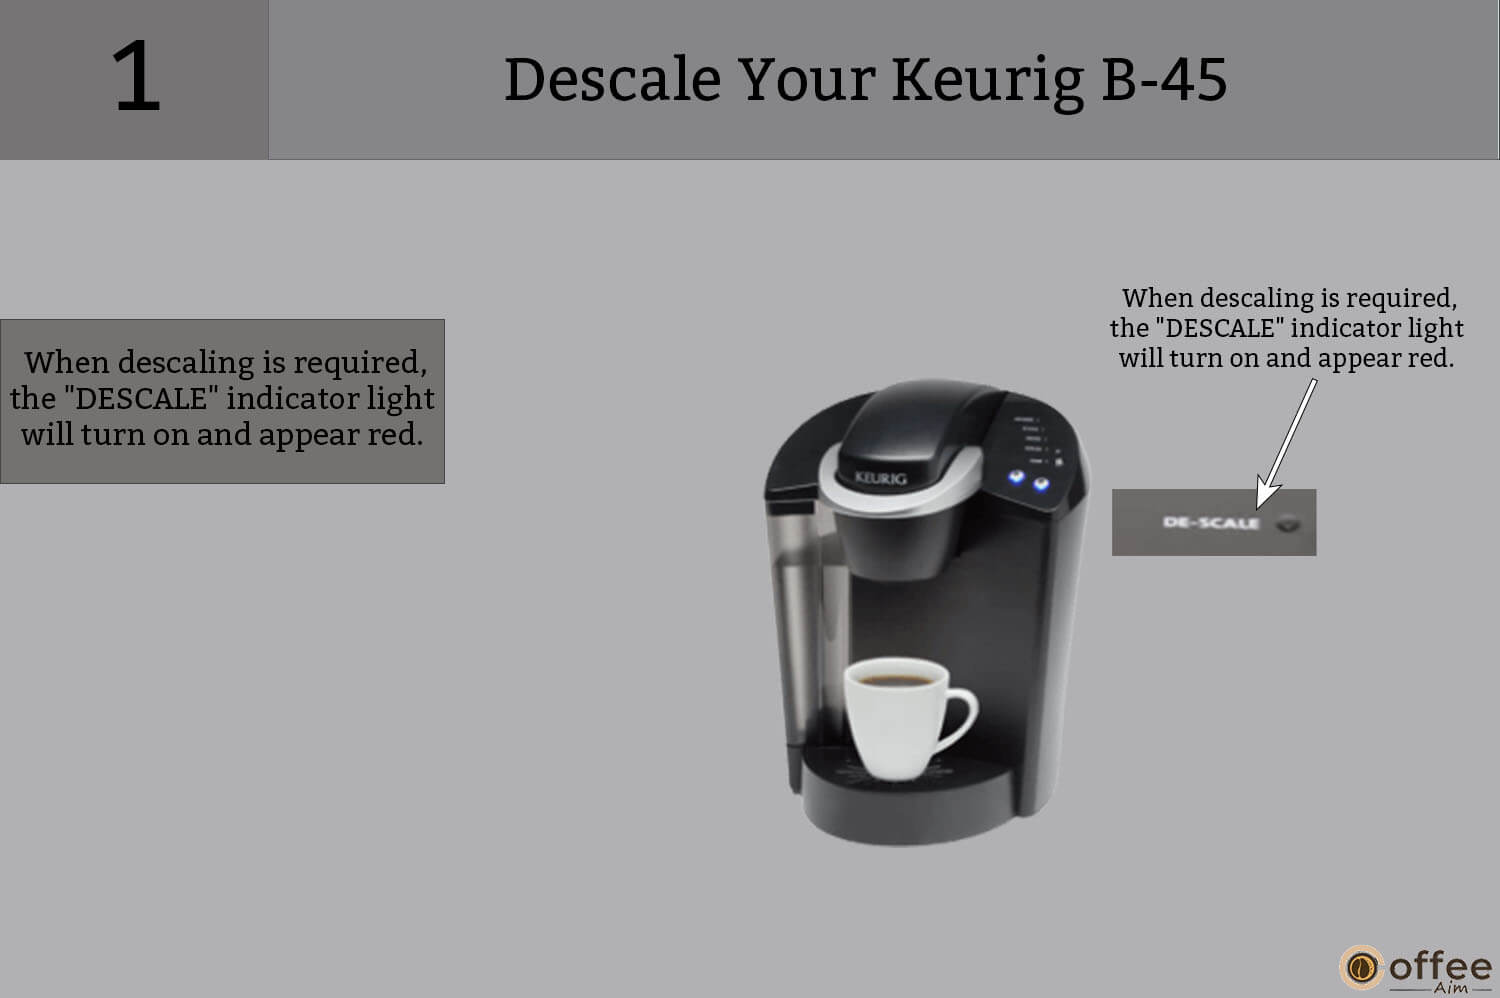
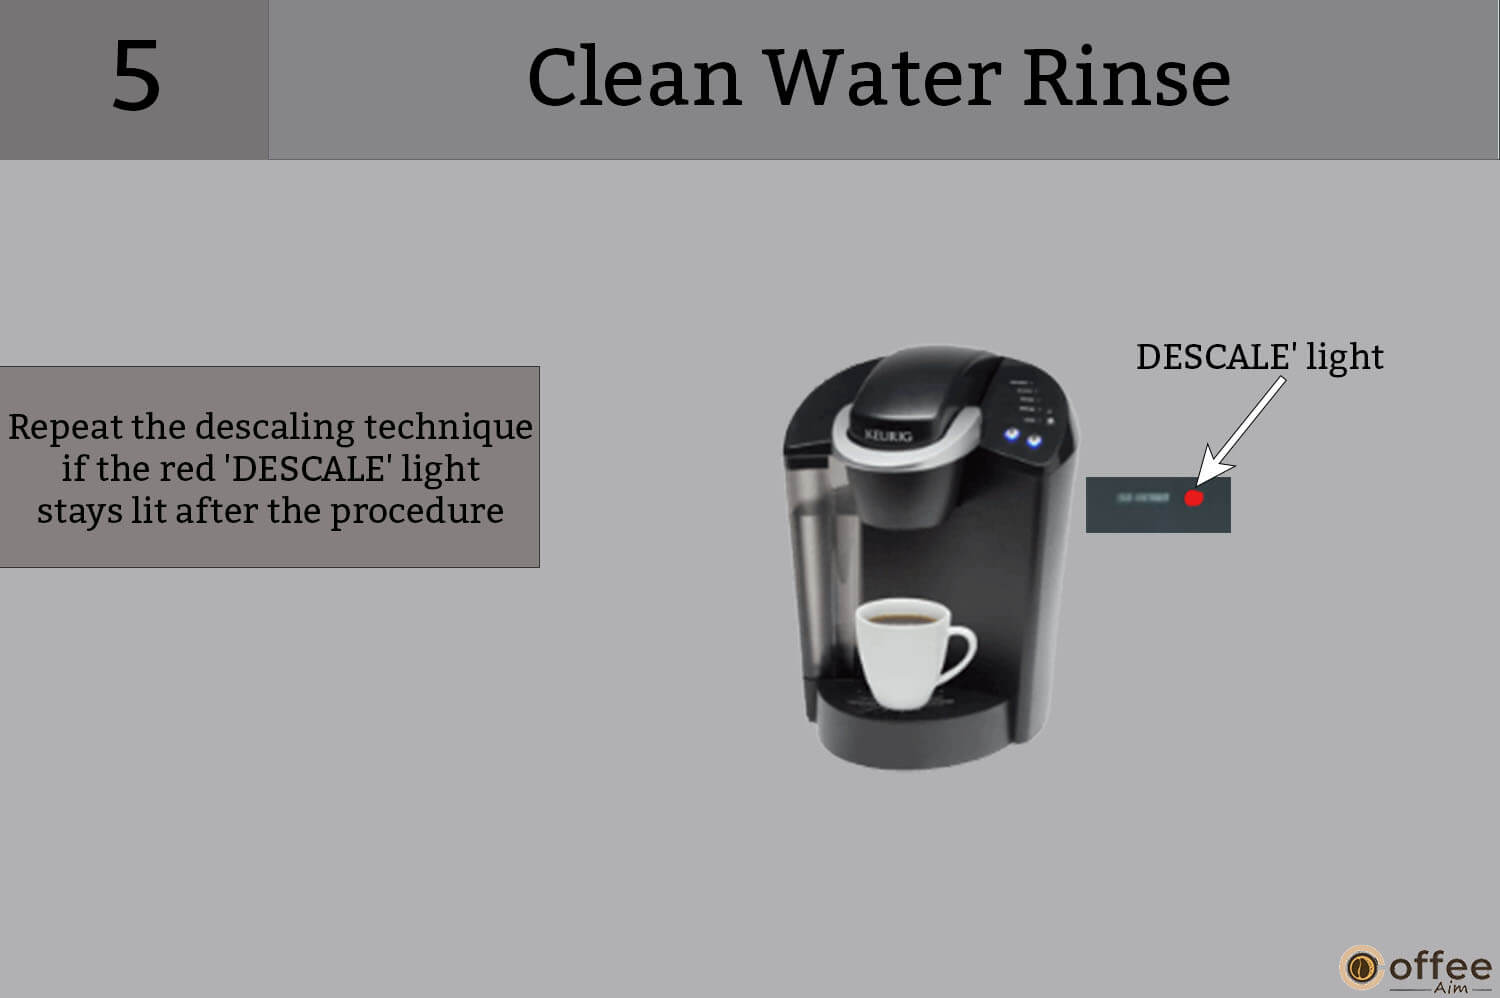
If calcium deposits accumulate more quickly, the Brewer must be de-scaled more frequently. Your Brewer can detect when scale building is interfering with its performance. When descaling becomes necessary, the red light next to “DESCALE” will illuminate. As seen in the image (fig. 10).
To thoroughly descale your Brewer, follow the methods below.
Note: You should be aware that your coffee maker will continue to function even if the term “DESCALE” is shown. If you wait too long to descale the Brewer after it has been displayed, it will be ruined. When this happens, the term “DESCALE” will begin to flash to notify you that if you don’t descale quickly away, otherwise your Keurig B-45 will potentially suffer damage.
Descaling Process
Are you a descaling for the first time an old user who wants to refresh your memory? No worries! Just follow these step-by-step instructions to ensure a proper descaling of your Keurig B-45. Let’s get started!
1. Prepare
Check that you have everything you need to begin the descaling procedure. Begin the process by following the steps outlined below.
- Make sure you have at least 48 ounces of pure white vinegar on hand. You’ll also need a small mug (no paper cups) and an empty sink.

2. First, drain the water from the reservoir.

3. Now, Turn off the Auto Off feature.

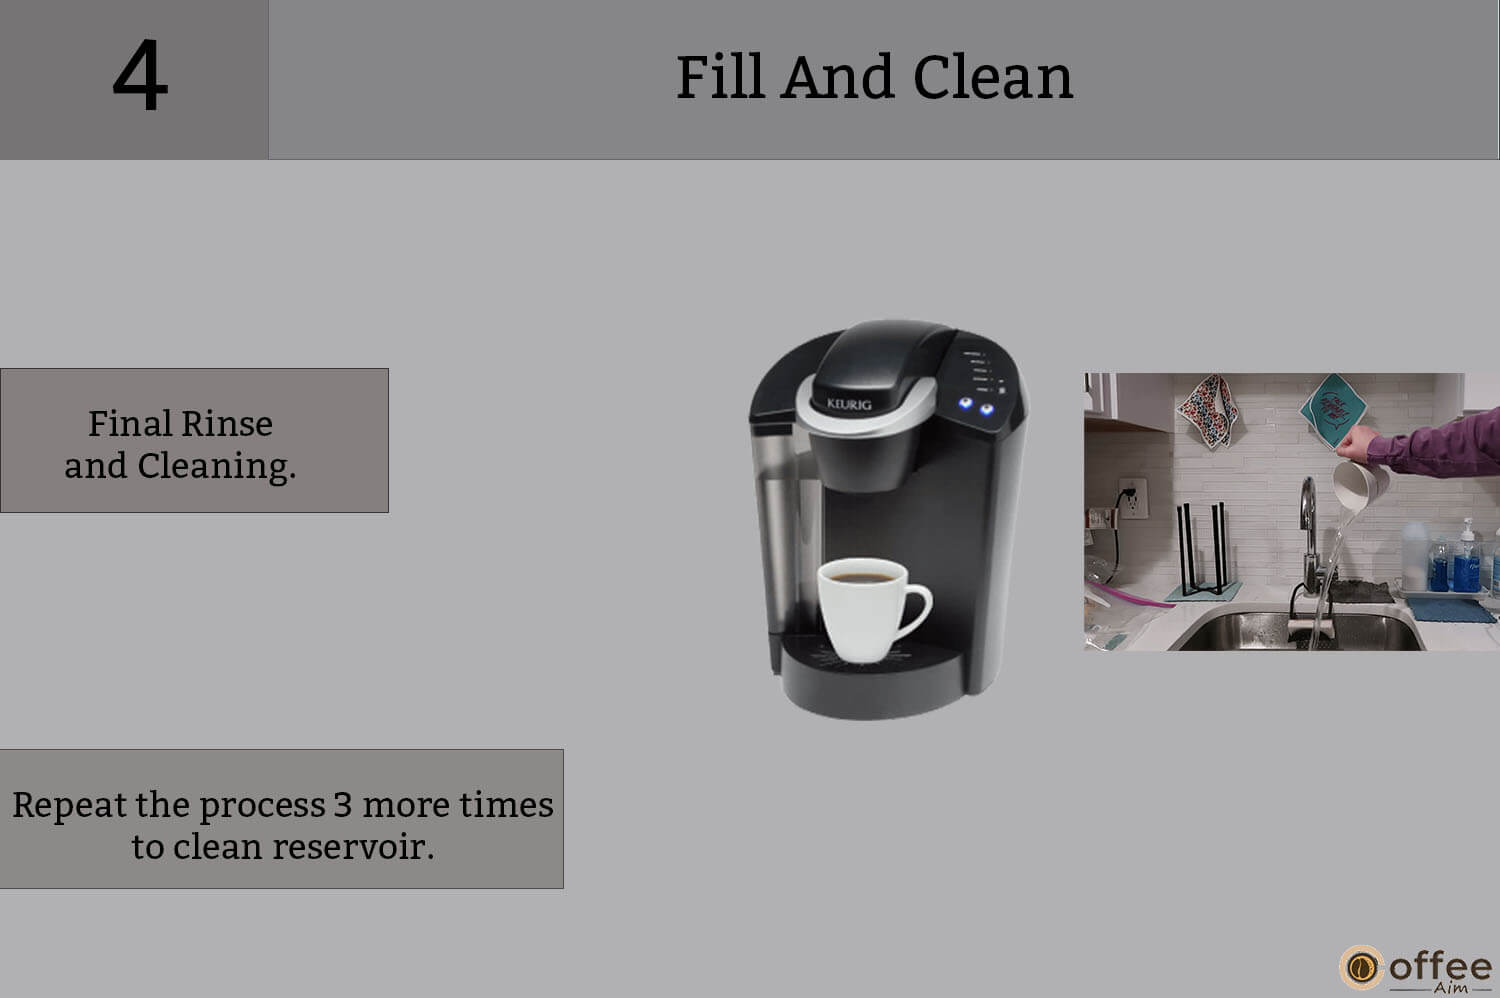
Fill And Clean
To clean the Water Reservoir, fill it partially with vinegar. Read the instructions below to learn more about this procedure.
1. Begin by adding vinegar to the Water Reservoir.

2. Place a large cup on the Drip Tray Plate and begin the water brewing cycle.

Note: It should be noted that K-Cup should not be used during descaling.
3. Only press the Small Mug Button, then empty the cup’s contents into the sink.

4. Repeat this technique three times more.
- Allow the Keurig B-45 to stand for at least 4 hours without turning it off.
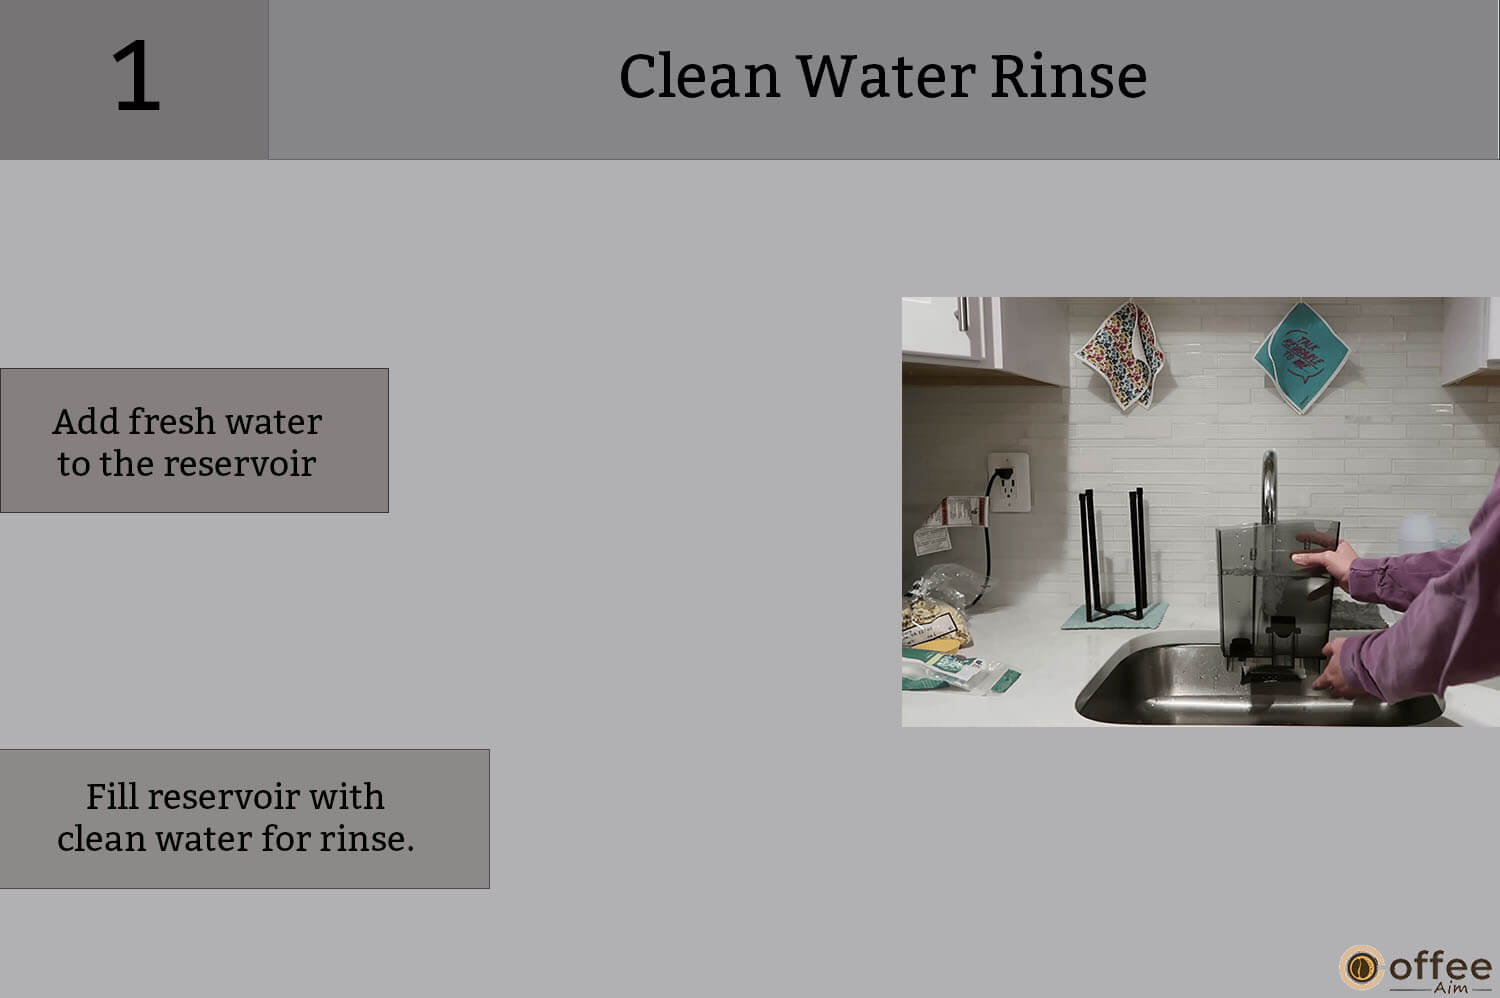
Clean Water Rinse
The rinsing procedure will begin when the filling and cleaning processes are completed. To properly rinse it, you must follow the directions.
1. Fill the Water Reservoir with clean water.
2. Place a small mug on the drip tray plate and begin brewing water without a K-Cup. Then, dispense the small mug’s contents into the sink.
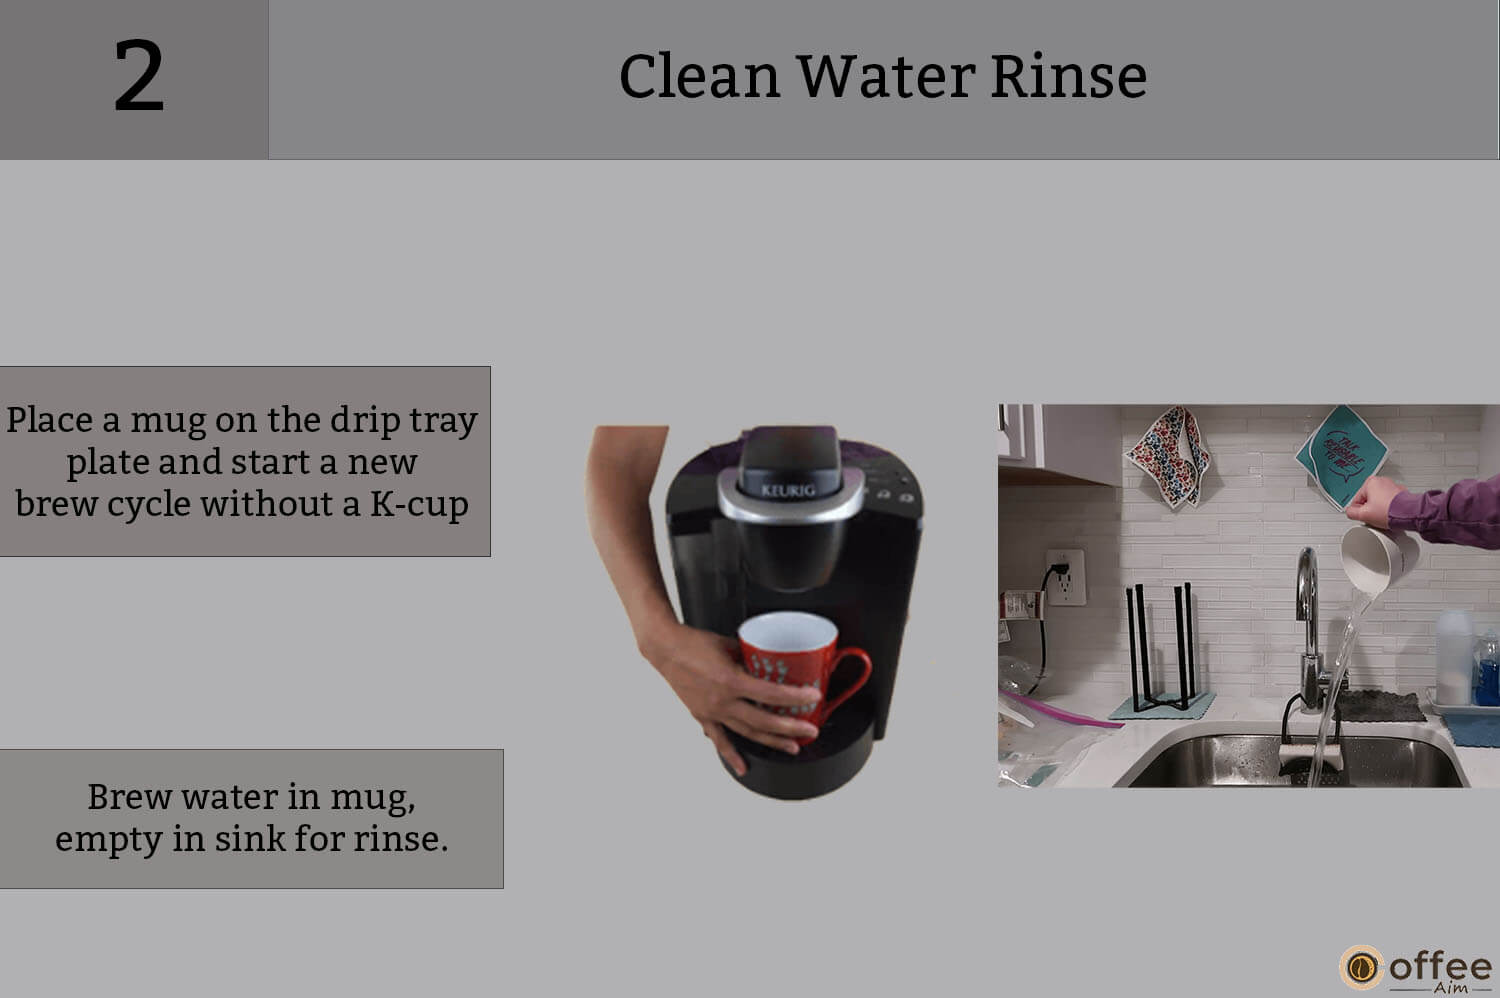
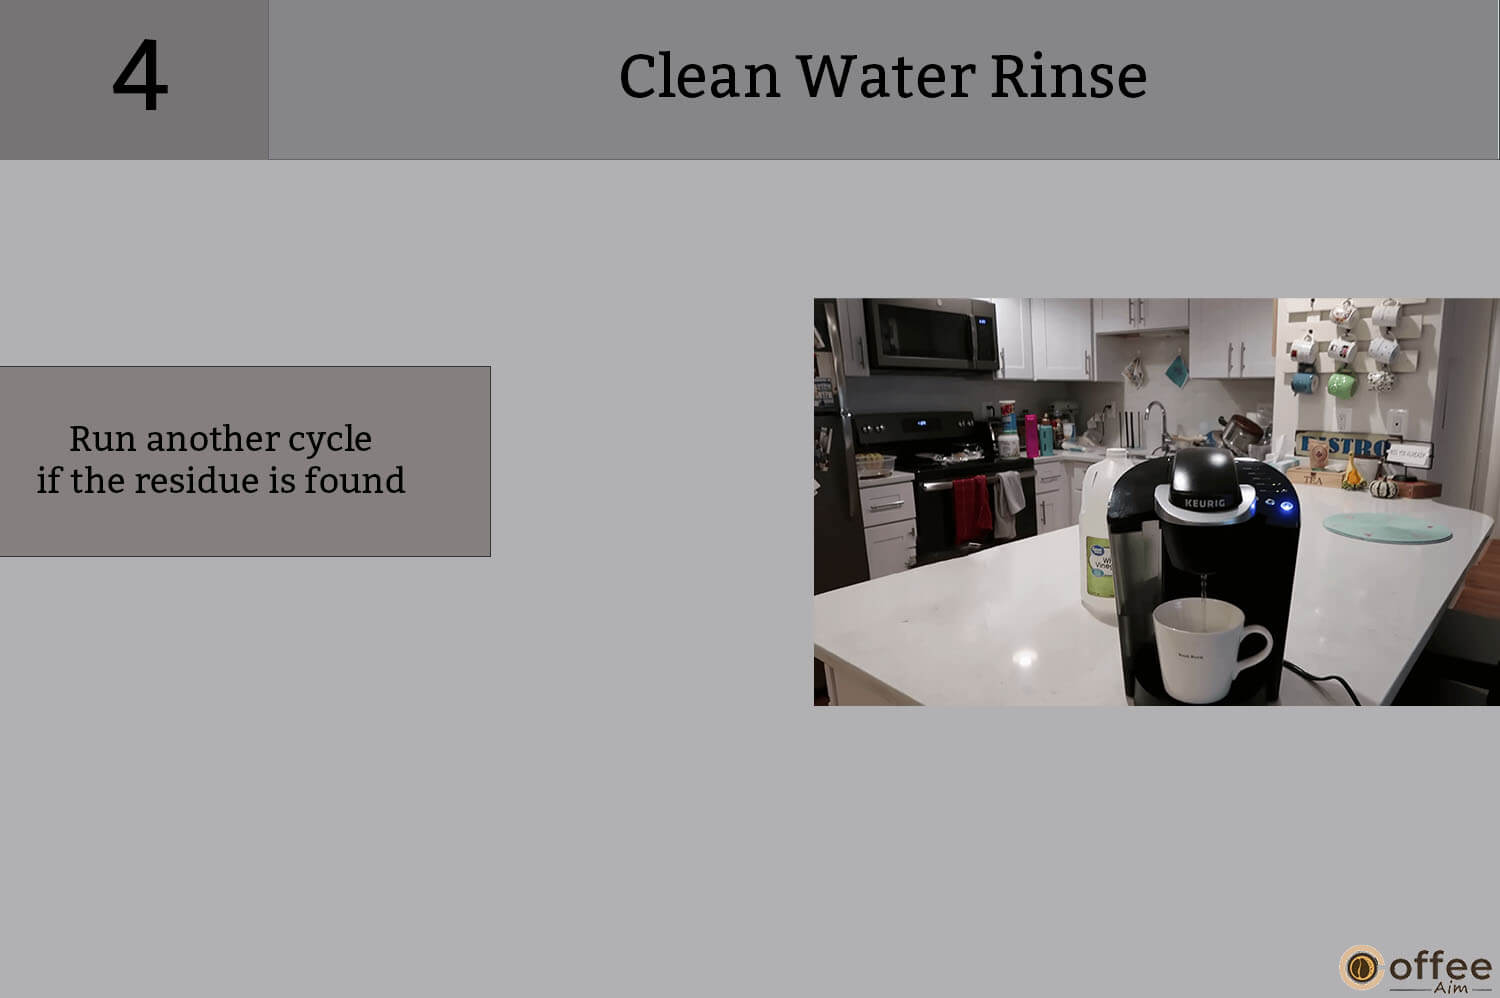
3. Continue to brew until the Water Reservoir is depleted of water.

4. If you detect any leftover flavor, run more water brew cycles.
5. Repeat the descaling method described above if the red ‘DESCALE’ light on the LED Control Center stays bright after the procedure is completed.
How To Store Your Keurig B-45?
Storing your Keurig B-45 should be one of your top priorities when you’re going on vacation or a long trip. Don’t simply leave it sitting on a shelf, collecting dust. But Proper storage requires some mandatory steps, and you must get your hands on this useful information. Let’s start.
- Before storing your Keurig B-45, drain the Water Reservoir and ensure it is safe and dry.
Note: Please maintain your Brewer upright to prevent water leaks from the inner tank.
- Make sure your Brewer is at room temperature. If you store it in a chilly environment, the residual water in the reservoirs may freeze. When you’re ready to use them after storing them, I recommend running three cleaning brews without a K-Cup and rinsing them with new water.
- Before relocating your Brewer, turn it off, unplug it from the wall, and empty the Water Reservoir. If your Brewer has been exposed to temperatures below freezing, please allow at least two hours for it to warm up.
Troubleshooting
Your taste buds are craving coffee, but your Keurig B-45 has developed a glitch. Don’t let it ruin your night – you can fix it yourself! Understanding how to handle frequent issues will empower you to be self-sufficient rather than relying on professionals for every little problem. Check out the following table for common issues and their solutions. With these troubleshooting tips, you’ll never have to go without your beloved night coffee again.
| Problems | Solutions |
| If Brewer does nothave power. | ● Connect Brewer to a separate outlet.● Make sure that the plug is inserted firmly.● Use an alternative outlet.● If required, reset the circuit breaker in your house.● Verify whether the power button has been activated and the power light is on. |
| If Brewer is notbrewing when used forthe first time. | ● Before making the first brew, the Brewer must be primed by filling the internal hot water tank. The red light next to “DESCALE” will flash on the LED Control Center.● Allow your Keurig B-45 to get up to room temperature for at least two hours before turning it on if it is cold or frozen. |
| If Brewer is not brewing. | ● Ensure that the K-Cup portion pack is securely inserted into the K-Cup Holder and that the blue lights beneath the brew buttons on the LED Control Center are blinking.● If the blue light next to the phrase “ADD WATER” on the LED Control Center is on, fill the Water Reservoir with water or check that it is firmly placed in its base. |
| Brewing a Single Cup. | ● Possibly Exit Needle is clogged.● If necessary, clean the K-Cup Holder and rinse it.● During brewing, the Water Reservoir may have been taken out. Replace the Water Reservoir, and then brew water without using a K-Cup.● If the red “DESCALE” indicator light is on, descale the Brewer. |
| If Brewer shuts offautomatically. | ● Ensure that the Auto Off Timer function is not activated. Press the black button to disable the Auto Off Timer function if the green light next to “AUTO OFF” on the LED Control Center is on. |
Helpful Hints
Finally, I’d like to share some practical ideas with you that you may utilize during your brewing experience.
Always Have Your Brewer Switched On.
I recommend that you leave your Keurig B-45 turned on at all times to have a fresh cup of coffee, tea, or hot cocoa whenever you desire. So you won’t have to wait if your taste buds demand it. Alternatively, you may program the Brewer to switch off automatically two hours after your last brew.
Make Use Of Bottled Or Filtered Water
I strongly advise you to use filtered or bottled water to improve the flavor of your coffee. Because water quality varies by region, you may detect an unpleasant flavor in your coffee, such as chlorine or other mineral flavors. To avoid this, you should drink filtered or bottled water.
Customize The Size, Flavor & Brew That’s Perfect For You
There are other K-Cup and cup-size options. Still, if you want a solid and robust cup of coffee, I recommend using an Extra Bold K-Cup, which contains up to 30% more ground coffee than standard versions. The most important pro tip is that a lower brew size results in a more intense flavor, while a higher brew size results in a less intense flavor.
Plug Brewer Into Its Own Grounded Outlet
Always connect your Brewer to a separate grounded outlet for your and your loved ones’ safety. If the outlet is overburdened with other appliances, your Brewer may not function correctly. A separate circuit and outlet should be installed for your Brewer.
Brewing Into A Travel Mug
Remove the Drip Tray Assembly and set the travel cup on the Drip Tray Base to brew coffee into a travel mug.
Service
This Brewer cannot be maintained by the user beyond these suggested cleaning and maintenance techniques; for help, visit this section on warranties.
Warranty
Are you concerned that your new Keurig B-45 may malfunction? You do not need to be anxious about this. As a buyer, you have placed your faith in Keurig appliances and invested your money by acquiring their appliance. To maintain your trust, Keurig Appliances gives a one-year guarantee if you discover any functional problem in your Brewer. As a Keurig B-45 owner, you should be aware of the terms and circumstances of the company’s warranty policy.
One-Year Limited Warranty
I recommend that you return the warranty card that came with your Keurig B-45 after thoroughly filling it out so that your purchase information becomes safe in Keriug’s System. Keurig guarantees that your Brewer will be free of material flaws under regular household use for one year from the date of purchase. Keurig will repair or replace the Brewer free of charge upon receipt of proof of purchase.
If a replacement Brewer is needed to fulfill the terms of this warranty, you will be provided with either a new or a previously used Brewer.
Keruig exclusively provides this Guarantee to Brewers in the United States and Canada. Other legal rights may exist, which vary from state to state and, in the case of Canada, from province to province. You have specific legal rights under this guarantee.
Things That Are Not Covered In The Warranty
It is very unfortunate to tell you that this warranty does not cover every kind of damage or malfunction in the Brewer
- This warranty excludes consequential or incidental damages, such as damage to property, and does not cover related costs and expenses if the warranty is breached.
- The exclusion of accidental or incidental damages may vary from state to state, and the limitation may not apply depending on the location of purchase.
- This warranty does not cover damage caused by services from companies other than Keurig or its approved service providers, the use of non-genuine Keurig parts, or external factors such as overuse, abuse, improper power supply, or acts of God.
How Can You Obtain The Facility Of Warranty
Keurig Brewers are high-quality machines that, with proper care, should last for many years; however, upon any malfunction, If you need warranty assistance, call Keurig Customer Service at 1.866.901.BREW (2739).
FAQs
Do All K-Cups fit All Keurigs?
It’s important to note that not all K-Cup pods are compatible with every Keurig machine. Keurig offers three different pod sizes, including mini, original, and XL. However, not all machines are capable of accommodating all three sizes.
How Do I Force My Keurig To Reboot?
Performing a fundamental reset can often resolve many common issues with Keurig Brewers. To initiate a fundamental reset, turn off the machine if it’s still on and unplug it for several minutes. Afterward, plug the machine back in and attempt to rerun a brew cycle.
How Do You Tell If Your Keurig Is Clogged?
If you are experiencing a sudden decrease in the amount of coffee brewed by your Keurig, it indicates a clog in the system. Fortunately, this issue is often fixable by cleaning all of the removable parts with hot water and dish soap and by descaling the Brewer. In most cases, clogs caused by coffee grounds can be cleared by using a paperclip and a plastic straw.
How Do You Know If Your Keurig Needs Descaling?
Descaling is an essential maintenance task that should be performed every 3 to 6 months or as indicated by the descale light for certain Keurig Brewers.