Quick Navigation
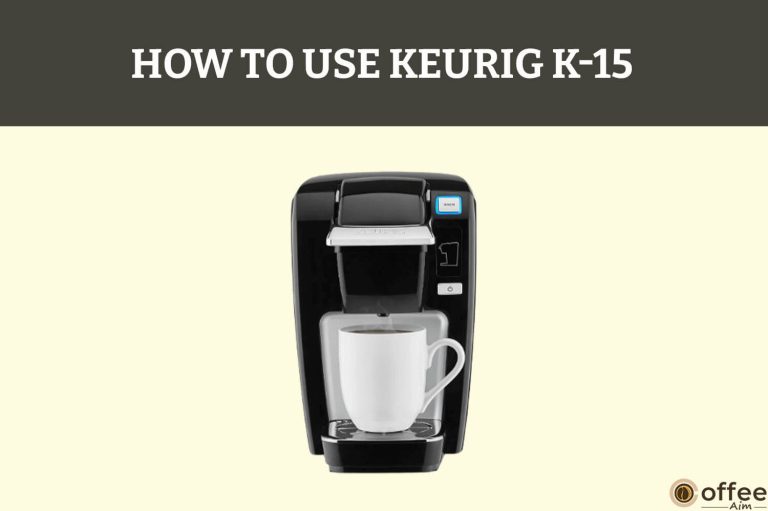
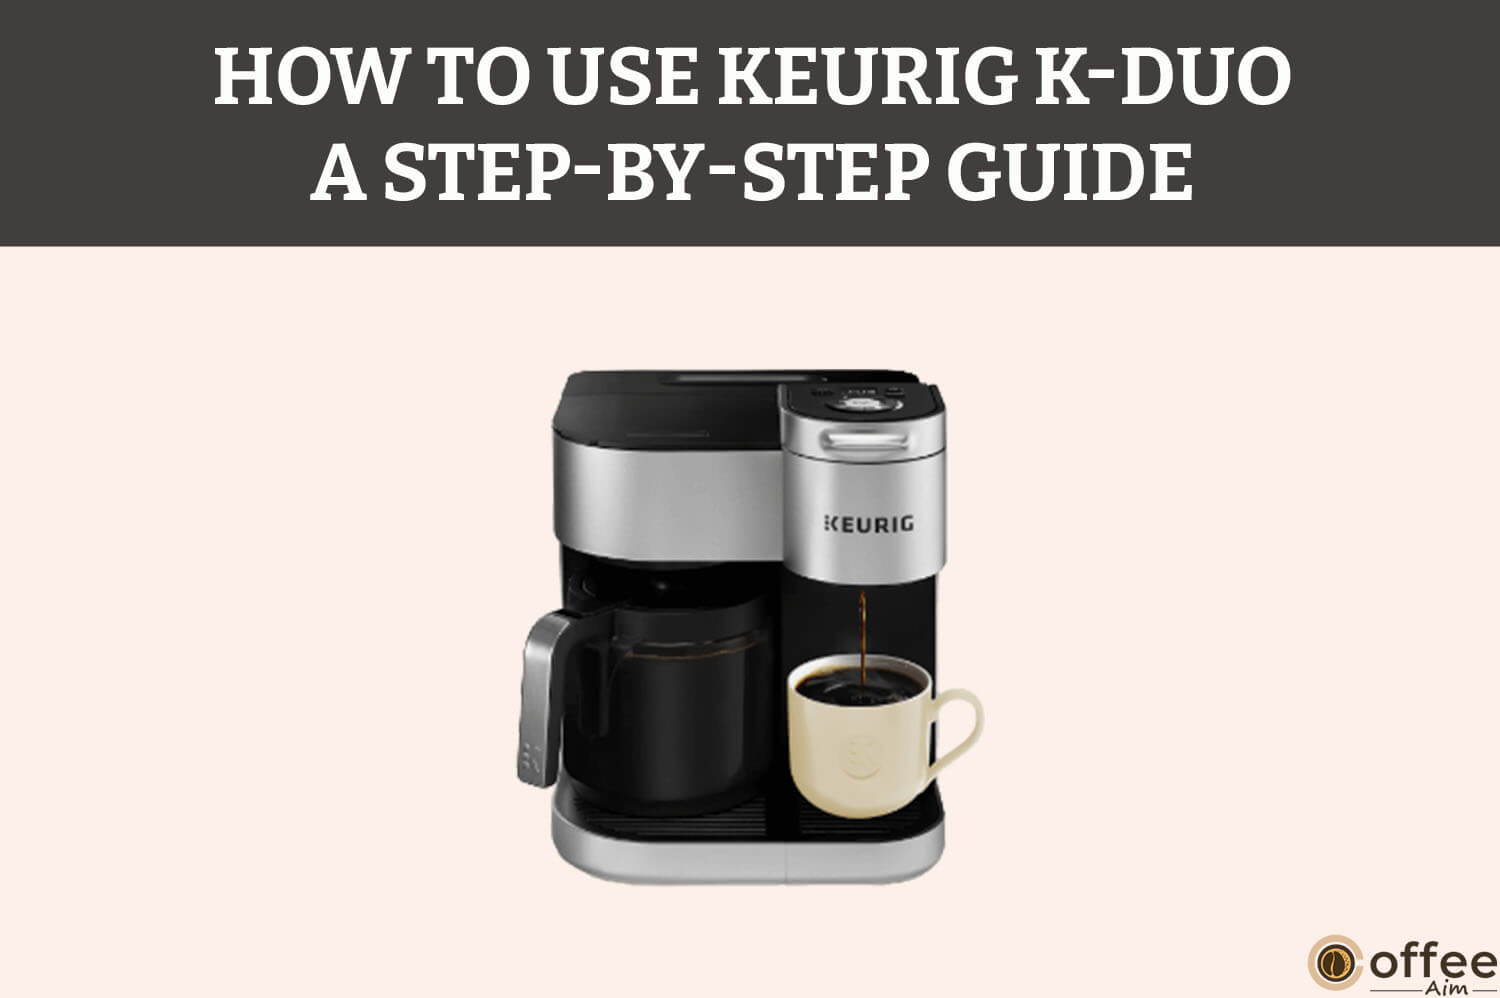
In this winter season, everyone wants to warm themselves. You too? That’s good. Now the question arises, how? Obviously, by drinking something hot. What’s your favorite hot drink? Coffee? That’s great. I am a great lover of coffee. That’s why I own a Keurig K-Duo to make this delicious drink. However, I faced problems while operating it. Not a big issue! All the new and old users of Keurig K-Duo can face trouble at any point. Well, no worries anymore, as I am here to troubleshoot all the problems related to your coffee maker. Then without any further delay, let’s move toward learning how to use Keurig K-Duo and make coffee to entertain ourselves and our friends.
Safety Precautions
Safety is the first thing to keep in mind before using any appliance. Therefore, a fantastic article about its safety precautions is available. Don’t forget to visit that to ensure your safety and your dear ones. Also, maintain your Keurig K-Duo to enjoy your coffee for long periods. You can avoid all sorts of mishaps by following these safety precautions.
Specifications Of Keurig K-Duo
Specifications of an appliance let you know about it particularly. You can check these specifications to check if they match your standard and choice. Otherwise, if it isn’t perfect for you, then return it. So let’s take a tour of Keurig K-Duo specifications!
| Specifications | Detail |
| Product Line/System | K-Duo |
| Brew Sizes | 6oz, 8oz, 10oz, 12oz (single, serve), and up to 60 oz carafe |
| Water reservoir | 60 oz |
| Display | Button control panel with buttons for Brew strength, Brew size, and Auto-On a plus digital clock display |
| Temp control | No |
| Strength control | Yes |
| Dimensions | Width 10.9″ Depth 12.8″Height 12.9″ |
| Weight | 10.7lbs |
| Other features | Auto-On/Off comes with h 60 oz glass carafe e and a heating plate, Auto-On/Off for carafe, pause and pour for carafe |
Coffee Maker Features
You might be wondering about the features of your unique coffee maker- Keurig K-Duo. Let’s resolve this mystery and make you fully aware of all its features.
So let’s start:
- Smart Start
What Is A Smart Start?
It helps in heating and brewing in one single step. You don’t need to heat the coffee maker before selecting your brew size. Just power on your coffee maker, add coffee and choose your brew size. Press the brew button. The coffee maker will heat up automatically and start brewing. This is called a bright start.
- Single Cup Auto Off
This feature automatically turns your coffee maker off after a single cup preparation to save energy for the next brew.
- Carafe Auto Off
This function automatically turns your heating plate off after 2 hours of the last brew for energy saving.
- Auto Brew
This feature programs the carafe to brew at a specific time up to 24 hours in advance.
- Strong Brew
It increases your coffee strength and intensity for a single cup. For bolder coffee, you can press the strong button.
- High Altitude
If you want your coffee maker to work correctly at a high altitude, like 1500 meters or 5000 feet, then do the settings of High Altitude.
How can you do this?
You must press and hold the POD and CARAFE buttons for three seconds. As it is enabled, you can see a mountain 🏔icon on the display screen.
What Is Inside The Box?
As you open the seal pack of your Keurig K-Duo, you find the following items in it. If anything is missing or damaged or the seal is not in perfect condition, return the package immediately.
So let’s start!
Keurig K-Duo Machine

This is the main item that you ordered to enjoy your lovely drink. Use it to prepare your favorite coffee at home.
User Manual

It contains two user manuals. One is in English, and the other is in French to guide you properly about using your coffee maker.
Water Reservoir

Put fresh and potable water in the reservoir and enjoy a fresh cup of coffee!
Parts Of Keurig K-Duo
To know the usage of Keurig K-Duo, you need to be fully aware of all its parts with names, locations, and uses. So let’s start!
Water Reservoir And Water Reservoir Lid
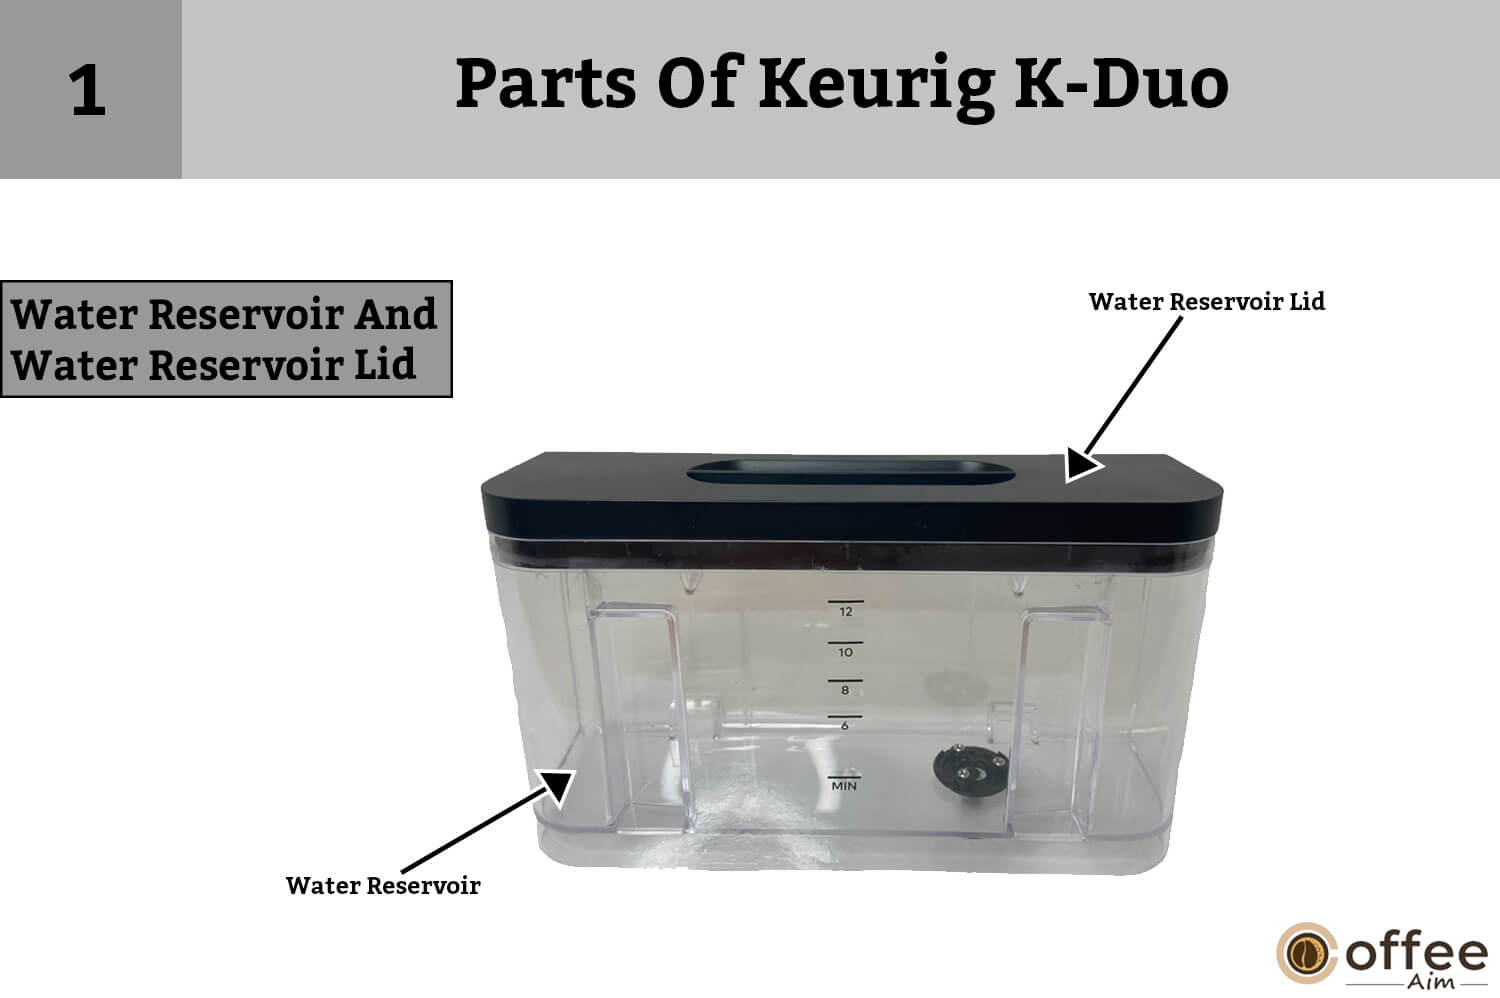
It is present on one side of the coffee maker. You put fresh and potable water in this reservoir, and the lid covers this water reservoir to protect water from dust and spills.
Water Reservoir MAX FILL Line
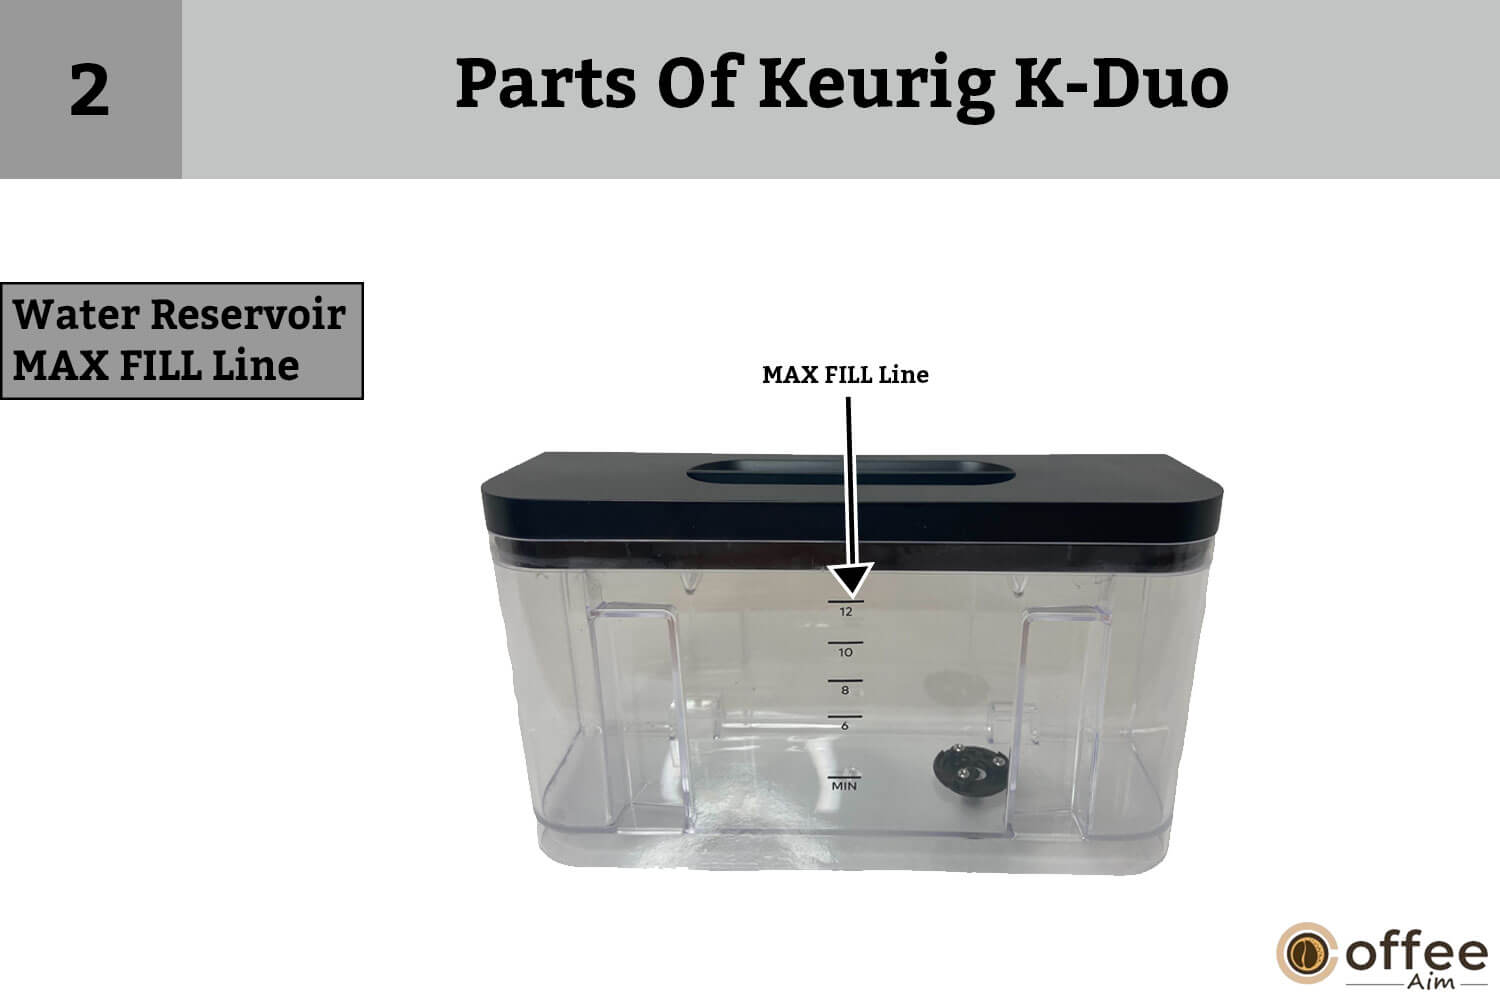
The water water reservoir has engraved mark on ot refer as MAX FILL line. It is the standard point up to which you should fill the water reservoir.
Water Reservoir Lock Tabs

These are the lock tabs present on the rear side of the water reservoir through these tabs the water reservoir get attached to the brewer.
Power Cord

This is the power cord of Keurig K-Duo. Plug it into the socket and get your coffee maker on.
Handle

This is the handle of your coffee maker. Pick and place your Keurig K-Duo from one place to another with it.
Filter Basket Cover

This is the cover of the filter basket, and it keeps it secure from outer impurities.
Filter Basket

This is the filter basket of Keurig K-Duo. This metal filter lets the extracted coffee go through while holding the grounds.
Carafe & Lid

This is a carafe with a lid. It is present at the bottom of the coffee maker. It is used to prepare coffee.
K-Cup Pod Holder

This is a k-cup pod holder to place the k-cup pods to make coffee. It is the compartment where you insert a pod.
Funnel

It is v-shaped part attached beneath the pod holder. It directs the brewed coffee/hot water towards the coffee spout.
K-Cup Pod Holder Assembly Housing

The funnel and K-Cup pod holder collectively called as K-cup pod holder assembly and the point where this assembly is inserted/present is referred as K-p=cup pod holder assembly housing.
Drip Tray Plate

This drip tray plate is present at the bottom of your coffee maker. This is where we set a cup of coffee to fill up.
Drip Tray

It is the container/plate which holds the coffee/water spills during the dispensing. It can hold 8oz of overflow; therefore, you have o empty it periodically.
Drip Tray Plate Base

It is present at the bottom of your coffee maker below the drip tray. It’s purpose is to manage a tall mug. For example, if you are using a tall mug then remove the drip tray and place your mug directly on drip tray base.
Heating Plate

This is the heating plate of Keurig K-Duo. As it heats up, then you can prepare your coffee.
Before You Brew
Before brewing your lovely drink, you need to do a few things. It would help if you unpacked your coffee maker. Then you can start making your favorite coffee. So let’s unveil the things before brewing!
1. Plug & Place:

- First of all, remove the packing tape from your Keurig K-Duo.
- Then plug it into an outlet.
- Now place a single large-sized mug on the drip tray. The size of the profile should be 355ml to 12 oz minimum.
- Now rinse the carafe and place it on the heating plate.
2. Rinse & Fill:

- Now remove the water reservoir lid. Lift the reservoir straight to remove it.
- If you have a Keurig Water Filter, you can install it now.
- Take help from your Water Filter Starter Kit for detailed instructions.
- Now, fill the reservoir with fresh water to the Max fill line.
- After filling the reservoir, replace it. Don’t forget to ensure that lock tabs are engaged with the coffee maker.
3. Power On & Set Clock:

- Press the power button.
- Now use the H/M buttons to set the clock.
- Press the blinking brew button to confirm the time.
- Set the clock in such a way as to use the auto brew functionality.
4. Cleansing Brew – Single Cup:
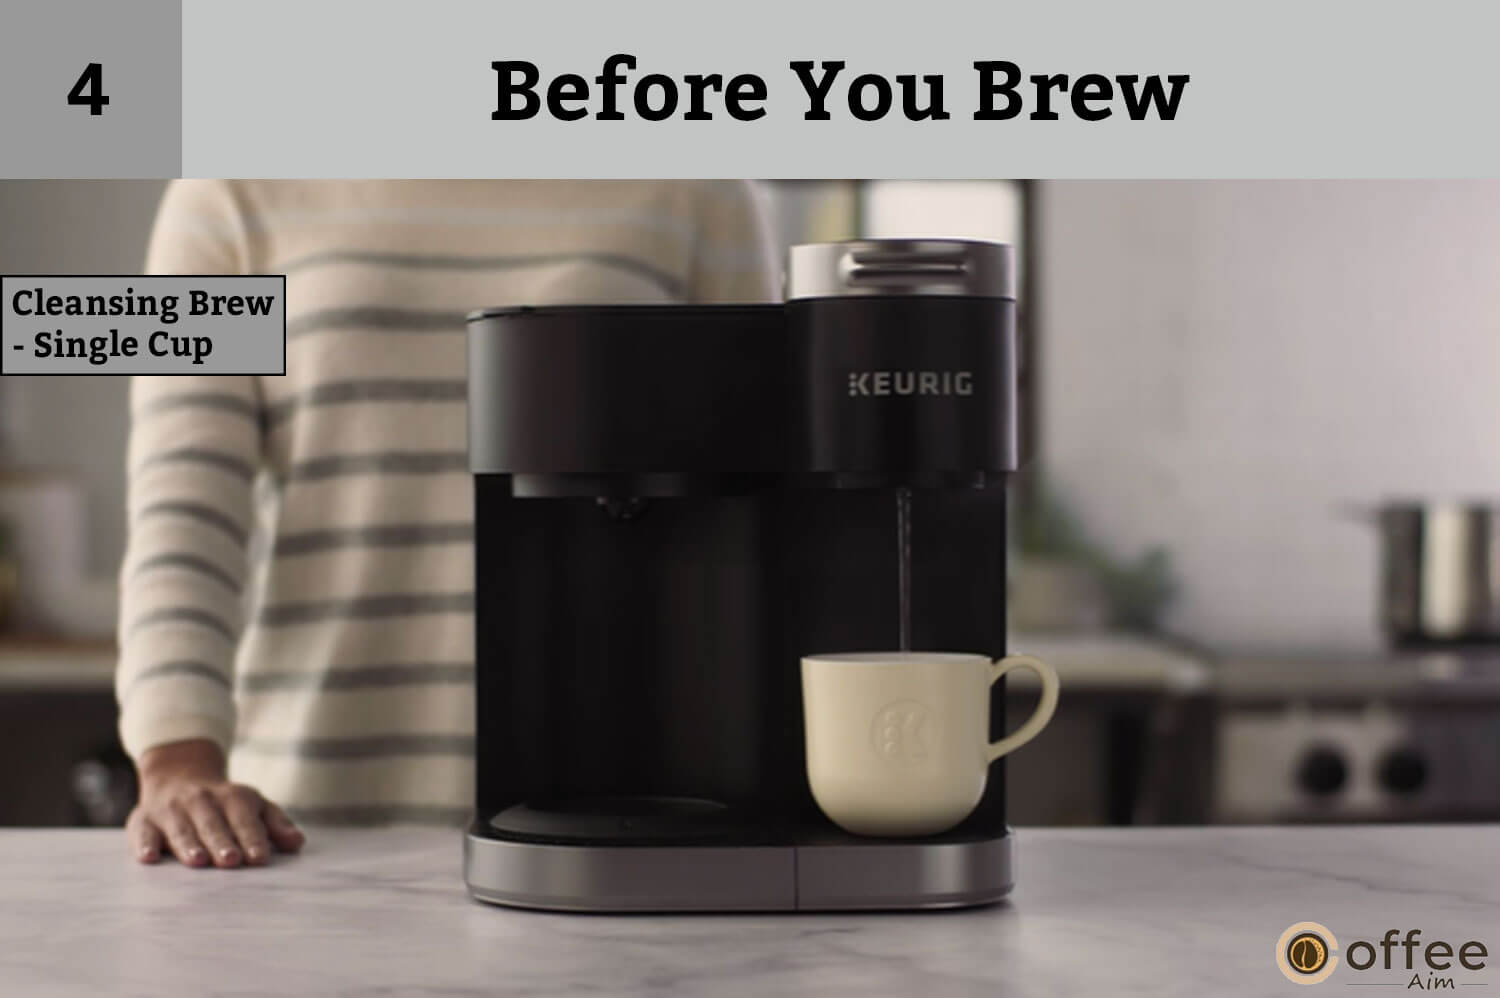
- Now press the POD button.
- As a result, four brew-size buttons will blink.
Note: Don’t insert a K-Cup Pod.
- Then press the button mentioned eight on it.
- Now the brew indicator light is blinking.
- Now press the brew button to start the cleansing brew.
- Once the coffee maker is heated, the cleansing brew will start.
- The starting heating system process takes almost four minutes.
- While the coffee maker is heating, the brew indicator light will pulse slowly off and on. The brew light will become solid once it is heated up.
- The brew is complete when the brew indicator light illuminates no more.
- Now pour the hot water into the sink.
- Another important thing, among multiple brew cycles, the coffee maker may take a few seconds to heat up. So don’t worry at all.
5. Cleansing Brew- Carafe

- Avoid filling your filter basket with coffee grounds.
- Now press the CARAFE button.
- You can see four brew-sized buttons blink. Please press the button that mentions eight on it.
- Now the brew indicator light is blinking.
- Press the brew button to start the cleansing brew.
- The carafe button is illuminating red as the heating plate is on, and the cleansing brew is complete.
- Now you can turn off the heating plate by pressing and holding the Carafe button.
- Then pour the hot water into the sink.
Brew Your First Single Cup
After setting and cleaning your Keurig K-Duo properly, now it’s time to prepare your first single cup. Make it, take a sip, and enjoy the company of your favorite drink in complete silence. Your lovely glass is two steps away from your access.
So without any further delay, let’s begin:
1. Place Mug & Pod

- Keep a mug on the drip tray. If you are using a travel mug, then remove the drip tray and place your profile on the drip tray base.
- Now lift the handle and keep a K-Cup pod in the K-Cup pod holder.
- Lower the handle completely to close the lid properly.
High Altitude Brewing
When you are holding the coffee maker holder up, then put some pressure on the K-Cup Pod in the pod holder. Keep on doing it until the bottom of the K-Cup pod is punctured by the exit needle.
2. Brew & Enjoy!

- Press the power button.
- As a result, the CARAFE and POD buttons will blink.
- Now you have to select CARAFE and then the size of your brew.
- Now press the Brew button to initiate your brewing.
- If you want a strong cup of coffee and put in more coffee beans, press Strong first. Then press the brew button.
- When the indicator light is not illuminating anymore, then brewing is complete.
Here is an additional tip for coffee lovers!
After brewing cocoa or other sweetened pod, use a Keurig rinse pod or run a cleaning brew immediately. Only then can you keep the needles clean and enjoy your delicious drink.
After five minutes, the coffee maker goes into Auto Off mode. To reactivate it, press the power button.
Brew Your First Carafe
Now as you have learned how to brew your first single cup, now let’s move toward brewing your first carafe. Don’t enjoy your coffee alone. Instead, let your friends enjoy it too.
So let’s start to learn how to make your favorite hot drink to avoid the effects of the winter season:
It also consists of two steps.
1. Place Carafe & Fill the Basket:

- First of all, fill the water reservoir to the Max fill line.
- Now lift the filter basket cover-up and insert a twelve-cup paper filter into the filter basket.
- Now add your desired amount of coffee grounds. Generally, one tablespoon is recommended for a single cup.
- Now close the filter cover basket tightly and ensure the carafe is in good touch with the heating plate.
Necessary instruction: The maximum capacity for regular coffee grounds is 15 tablespoons and 12 tablespoons for decaf. If you exceed this limit, it may cause overflow. So be careful!
2. Brew & Enjoy!

- Press the power button.
- As a result, the carafe and pod buttons will blink.
- Then select the carafe and then choose the size of the brew.
- Press the brew button to begin brewing.
- Once the brew is complete, the heating plate will turn on and automatically remain on for two hours. The brew button will indicate red.
- If you want to turn off the heating plate, then press and hold the CARAFE button until the red light illuminates to turn it back.
- Now pause and pour a mid-brew cup. Keep brewing the remaining amount while using the twenty seconds automatic pause feature. However, if you remove the carafe for more than twenty seconds, it may cause an overflow in the filter basket.
Auto Brew Instructions
Instead of manual instructions each time, you can also set your Keurig K-Duo on auto brew mode. Seems interesting? How can you do it? Let’s dive into details to learn about it:
- Fill the water reservoir to the Max Fill line and load the filter paper and coffee grounds.
- Then press the Auto button. Now press the H/M buttons to set the time for the auto brew to begin. Now press the blinking brew button to confirm the timing.
- Now you have to choose your brew size and press the brew button to confirm your brew size.
The Auto brew setup is 100% complete now!
How can you know that it is complete?
A clock icon appears on the screen. The auto button is illuminated to indicate that auto brew is on.
An important thing to keep in mind:
Once the auto brew is on, you can only make a single cup at one time. After enabling auto brew, if you want to disable it, press the auto button once. Then the clock icon disappears from the screen.
Caring For Your Coffee Maker
As you love your coffee, in the same way, you need to take care of your coffee maker to keep on enjoying your lovely drink for long periods.
Everything needs proper care and cleaning for better performance and longer usage duration.
If you clean your coffee maker regularly, then it can work smoothly and properly. Don’t forget to turn off and unplug your coffee maker before cleaning it.
You can use Keurig Rinse Pod or a cleansing brew immediately after making cocoa or other sweetened pods. In this way, you can keep needles neat and clean
Keep in mind these parts are not dishwasher safe.
Now let’s talk about caring about different parts of your coffee maker one by one.
Coffee Maker Exterior

A good and maintained outlook impresses the most. So you need to clean your coffee maker from the exterior first of all. Keep on cleaning it from time to time.
- Always clean it with a wet, soapy, non-abrasive, and lint-free cloth.
- Never immerse your coffee maker in water or other liquids.
Water Reservoir & Reservoir Lid:
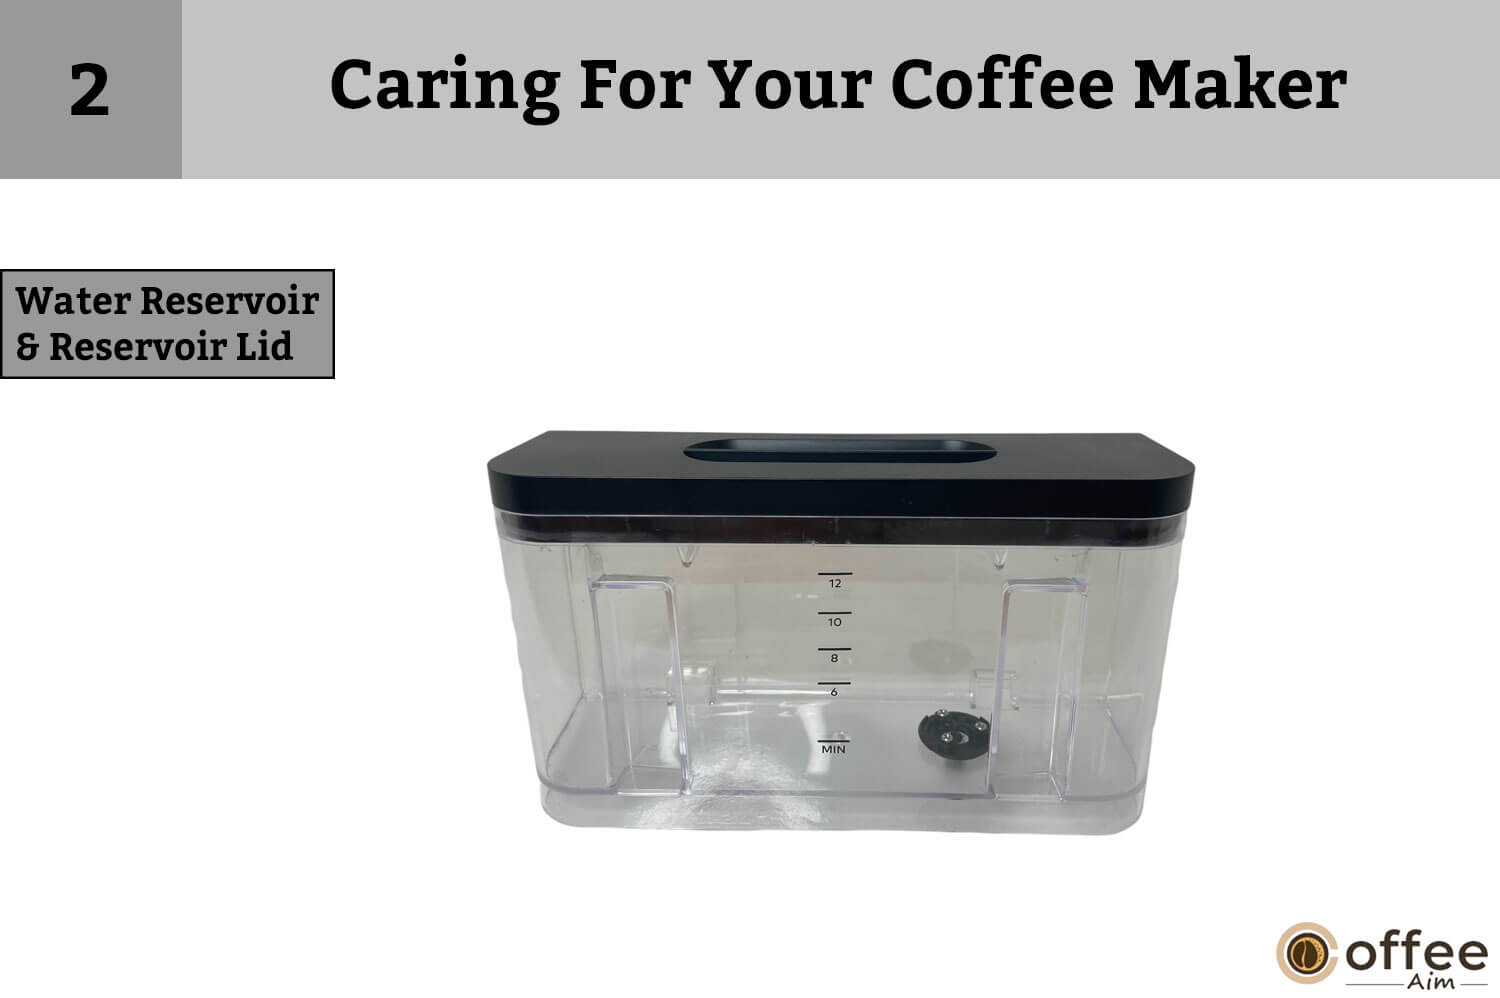
- The water reservoir & reservoir lid should be cleaned periodically with a wet, clean, soapy, and non-abrasive cloth.
- Thoroughly rinse the reservoir after cleaning it. This rinse will ensure no remaining detergents in the pool contaminate the water supply.
- After cleaning and cleansing, fill the reservoir with fresh and potable water and return it to the coffee maker.
- Don’t dry the reservoir with the cloth to avoid lint.
- Also, don’t put the water reservoir and reservoir lid into the dishwasher.
An important thing to note:
If you are using a water filter inside the water reservoir, don’t forget to remove it before cleaning. Replace the filter cartridge regularly according to the filter instructions.
Drip Tray:
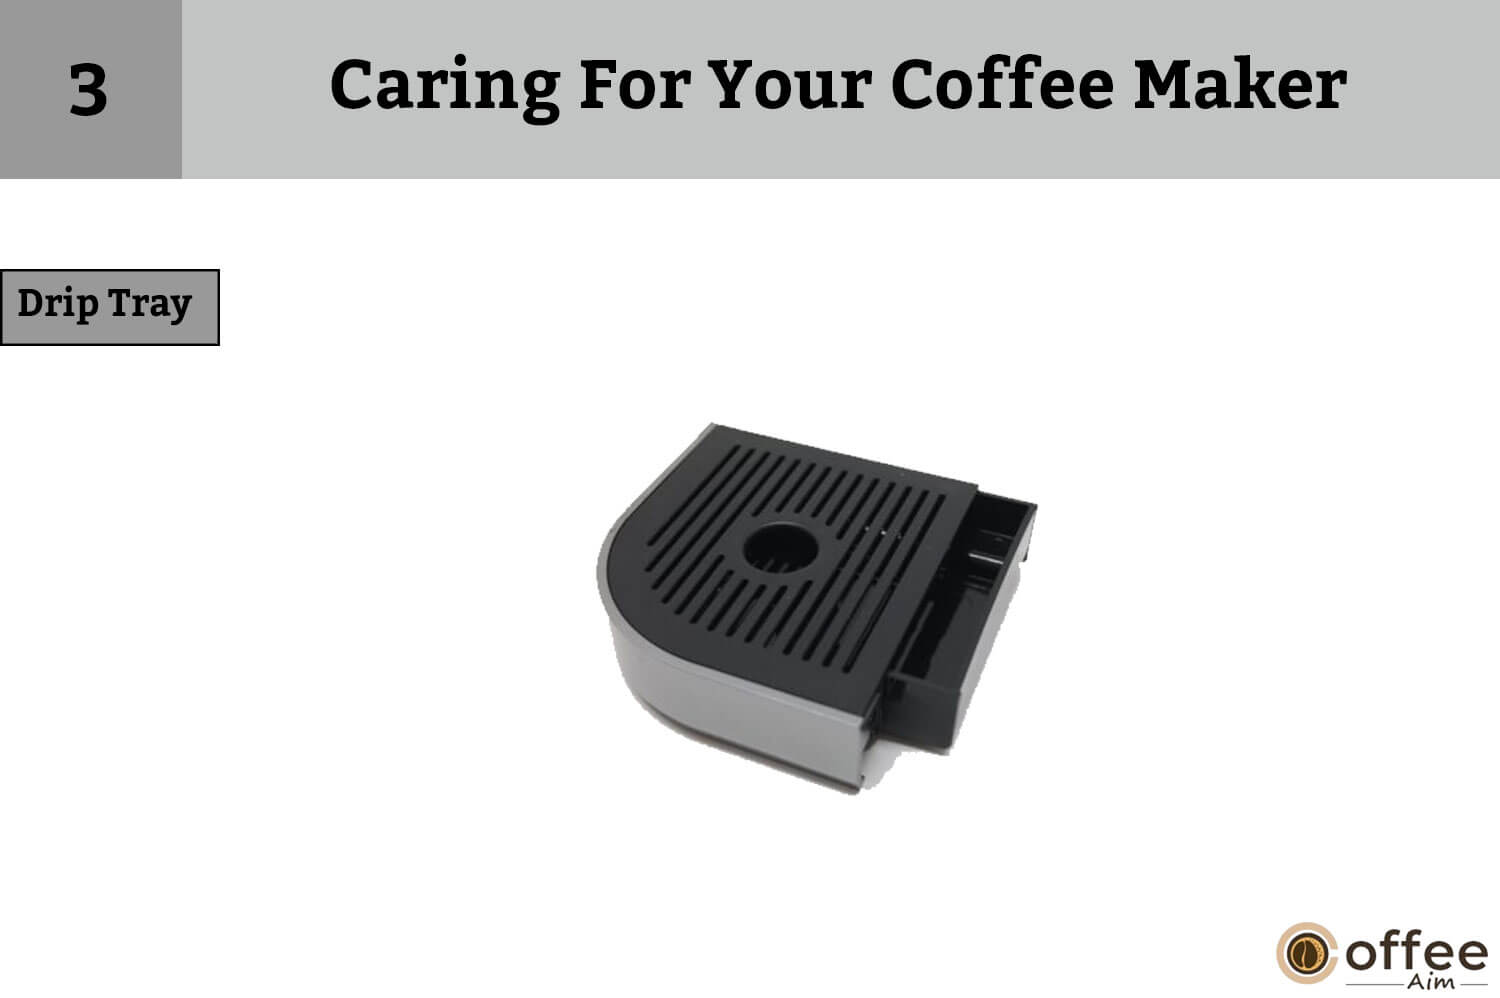
- This drip tray can hold up to 237ml/8 oz of overflow.
- You can empty and clean it occasionally.
- To remove it, you have to slide it toward you. Avoid spilling it by maintaining the level.
- Clean it with a clean, wet, non-abrasive, and lint-free cloth.
Carafe & Carafe Lid:

- Clean and wash both the carafe and carafe lid after every single brew.
- Use a clean, wet, non-abrasive, and lint-free cloth.
Filter Basket:
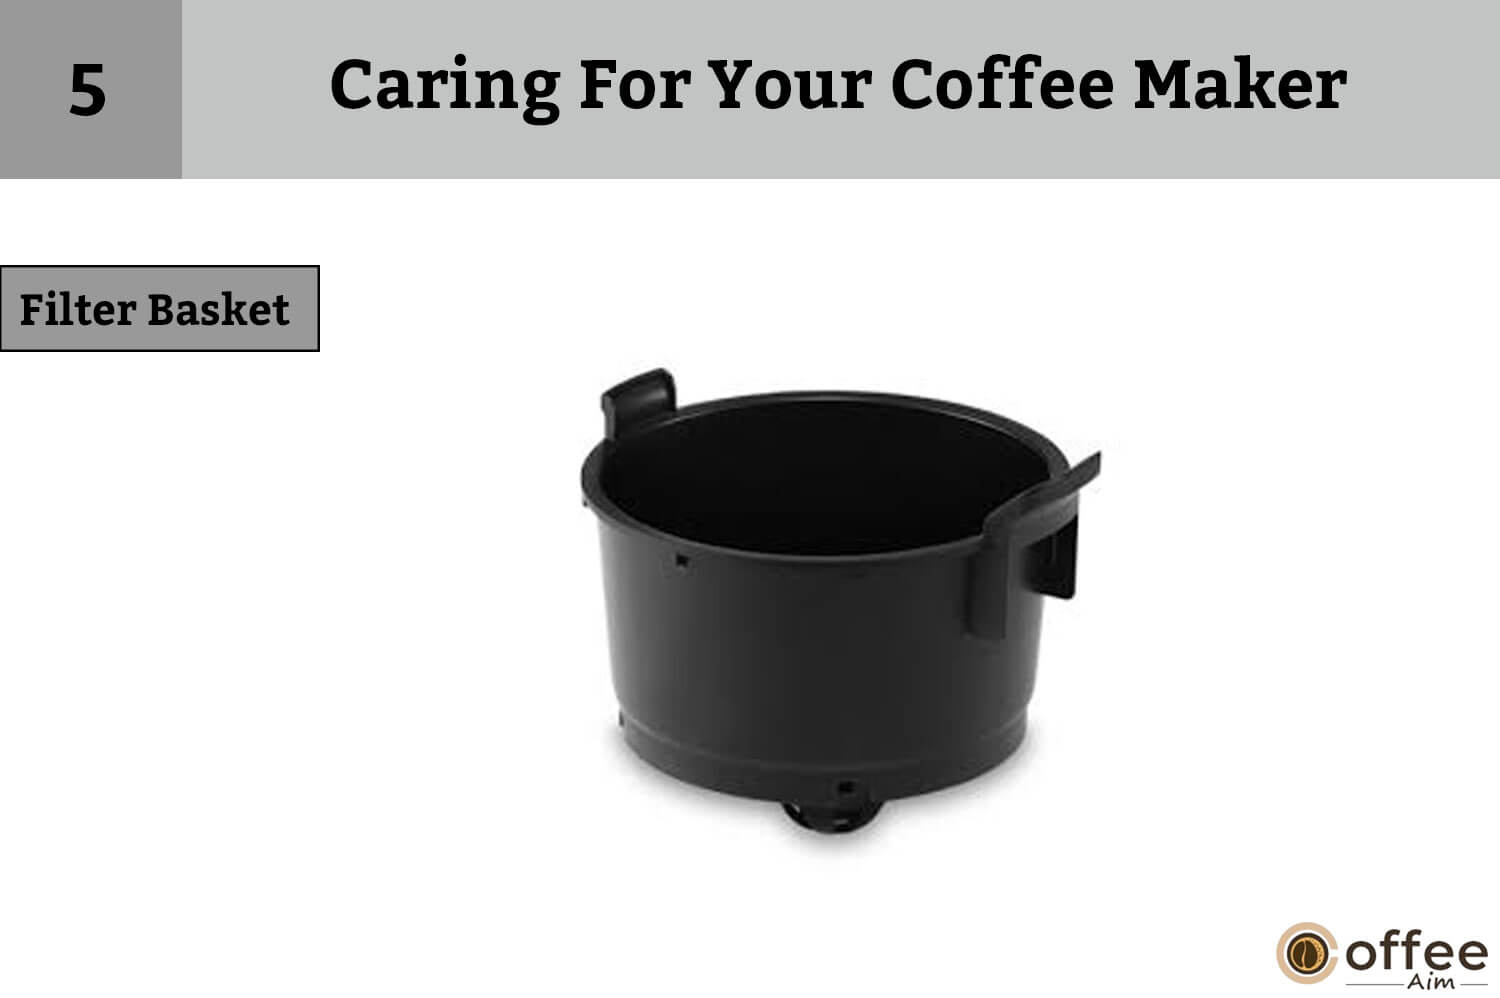
- Remove the filter basket from your coffee maker.
- Then remove and discard the filter paper and coffee grounds.
- Wash the filter basket in warm and soapy water.
- You have to rinse it thoroughly.
- Always dry all parts after usage.
- After every brew, you must discard the filter paper and coffee grounds.
Heating Plate:
- Wait until the heating plate cools down completely.
- Then wash it properly with a wet, clean, soapy, non-abrasive, and lint-free cloth.
- Never use rough, rugged, abrasive, or strong detergents to clean the heating plate.
- To turn off the hearing plate, you can either press the power button or press and hold the carafe button until the red light indicator is no longer illuminated.
K-Cup Pod Holder:

- To remove the K-Cup pod holder from the coffee maker, lift the handle and grasp the top of the k-cup pod holder with one hand while pushing up the bottom of the k-cup pod holder with another hand. Keep on doing it until it releases.
- After cleaning thoroughly, align the K-Cup pod holder with the opening using the two front ribs as a guide and snap it into place from the top.
An important caution:
Don’t put your fingers into the needles of the k-cup pod holder, as you may injure your fingers. Be cautious to avoid any injury. These are the sharp needles that puncture the K-Cup pod above the K-Cup pod holder and at the bottom of the K-Cup pod holder.
Don’t forget to dispose of the used k-cup pod holder after every brewing.
Funnel

- You can remove the funnel from the k-cup pod holder by pulling on it until it pops off.
- To replace it, orient the snaps to the indent and snap it back onto the k-cup pod holder.
Exit Needle:

- You have to remove the pod holder assembly to detach the funnel.
- Now locate the exit needle on the inside bottom of the k-cup pod holder.
- Then insert a straightened paper clip into the exit needle to loosen any coffee grounds.
Entrance Needle:
- Lift the handle of your coffee maker.
- Now locate the entrance needle on the underside of the lid.
- To clean all three holes of the needle, hold the handle of the coffee maker upward and then carefully insert a straightened paper clip into all three holes of the hand.
- Now gently move it around to loosen any coffee grounds.
- Now ultimately, lower the handle.
- Then run only two water-brew cycles.
- Don’t insert a K-Cup pod.
Descaling Your Coffee Maker
It is essential to descale your coffee maker after every three months. To descale correctly, you need to follow the descaling procedure properly.
Why Is It Necessary To Descale Your Coffee Maker?
The amount of scaling depends upon the mineral content of your water. In your coffee maker, there can be calcium deposits or another scaling material.
If you do not pay any attention to it, it may affect the performance of your coffee maker.
If you descale your coffee maker regularly after every 3-6 months, you can maintain the heating element properly. Other parts of the coffee maker, which are in direct contact with the water, keep on performing well if descaled well. If calcium is depositing fastly, then you need to descale your coffee maker more often to avoid any misshapen.
Descaling Procedure
Before moving toward the descaling procedure, you need to collect the following things:
- A large ceramic mug
- Freshwater
- Keurig Descaling Solution
- Access to a sink
There is no need to use a paper cup. Make sure that there are no beverage pods in the k-cup pod holder. Almost 75 minutes are required for this dealing procedure.
Don’t forget to empty the water from the water reservoir tank. If you use a Keurig water filter, remove it and keep it aside.
Step 1. Descaling Solution Rinse:

- First of all, power off the coffee maker.
- Take the emptied water reservoir and pour the entire Keurig descaling solution into it.
- Now fill that empty bottle of Keurig escaping solution with fresh water and pour it into the pool.
- Don’t insert K-Cup pods or coffee grounds in the pod holder.
- Then place a large ceramic mug on the drip tray and press the POWER button.
- Then select POD and press the button mentioned 12 on it.
- Press the brew button to start a single-cup rinse brew.
- Now pour this hot liquid into the sink.
- Ensure that the carafe is on the heating plate.
- Press the CARAFE button and then press the button mentioned 12 on it and press the brew button to start a carafe rinse brew.
- As the brew is complete, pour the hot water into the sink.
- Press the power button to turn off the heating plate.
Step 2. Rinse & Rest:

- Now let the coffee maker rest for thirty minutes at least.
- After thirty minutes, dispose of any residual solution from the water reservoir and rinse properly.
Step 3. Fresh Water Rinse:

- Now fill the water reservoir with fresh water to the MAX fill line.
- Ensure that the carafe is on the heating plate.
- Press the POWER button and select the carafe.
- Then press the 12-number button and press the brew button to start a carafe water brew.
- As the mixture is complete, press and hold the carafe button to turn off the heating plate.
- Pour that hot liquid into the sink.
- Now fill the water reservoir to the Max fill line once again.
- Now repeat the twelve-cup carafe rinse three times to make four brews.
- Again fill the water reservoir to the Max fill line and place a large ceramic mug on the drip tray.
- Now press the power button and select POD.
- Then press the button mentioned 12 on it.
- Press the brew button to start a single-cup water brew. Pour that hot water into the sink.
- Repeat the 355ml/ 12 oz brew process three times to make four times brews.
Don’t worry if the cleaning action of the Keurig Descaling solution results in the form of “foam” dispensed from the coffee maker. It is very natural as the solution reacts with the inside scale. If too much scale is deposited, you can’t fill the coffee maker appropriately after adding a descaling solution. Then you may not see any output dispensed. You may hear the sound of blowing air.
If it happens with your coffee maker, then follow these things:
- Turn off and unplug your coffee maker.
- If there is a Keurig Descaling Solution in the water reservoir, dispose of the material, rinse it thoroughly, and refill it with water.
- Now plug the coffee maker again in, power it on, and repeat step 3 of the FreshWater Rinse Cycle.
- Your coffee maker will generally start as all the descaling material has been removed.
- If there is still any problem, let your coffee maker stay unplugged for thirty minutes before rinsing again.
Troubleshooting
You can face multiple issues while operating your coffee maker. Please don’t panic, as you will learn about all those problems and their solutions individually. You can keep on enjoying your lovely drinks without wasting much of your time.
So let’s dive into the details!
Grounds In Your Coffee
This is a widespread problem that coffee makers often face. You can get rid of this problem by following these tips. Coffee grounds can be entangled in the exit or entrance needles while making coffee. It would help to have a straightened paper clip or a similar tool to clean these needles.
- First of all, clean the exit needle of the k-cup pod holder. Exit needle care instructions have already been described in detail.
- Then clean the entrance needle of the coffee. The procedure of cleaning has already been mentioned in detail.
- Carafe Brewing: The maximum capacity for regular ground coffee is 15 tablespoons and 12 tablespoons for decaf. If you exceed this limit, you may face overflow.
Coffee Maker Will Not Brew
In some cases, the coffee maker doesn’t brew properly. If you are also facing the same trouble, then let’s see the possible situations and their resolutions:
- After placing the K-Cup pod in the k-cup pod holder, ensure the handle is pushed down properly and securely.
- If you see an add water light illuminated, then add water to the water reservoir. Don’t cross the Max fill line while filling the water reservoir.
- Ensure that the water reservoir is seated correctly in its base.
- Even after refilling, if the water light is still illuminated, contact Keurig Customer Care Service.
- Another problem is that you may see all the buttons blinking simultaneously. In that case, take help from Keurig Customer Care Services.
Brewing A Partial Cup Or Carafe
Another problem you may have faced or can meet in the future is that your coffee maker is brewing a partial cup or carafe. So let’s deal with this trouble too:
- Always ensure the water amount in the reservoir to perform the selected brew size.
- The exit needle can also be blogged. Kindly refer to the exit needle care instruction.
- You may have removed the water reservoir mistakenly during the brewing. Then replace the water reservoir and perform a rinsing brew without a K-Cup pod.
- You may need to descale the coffee maker. If you have already performed the descaling procedure on your coffee maker two times and still face partial coffee brewing issues, then you must contact Keurig Customer Care Services.
- The drip stop can also be clogged. Remove the filter basket drawer and filter basket. Now rinse thoroughly to remove any grounds in the plunger.
- If your residence is high altitude and you face this problem, contact Keurig Customer Care Services.
The Coffee Maker Does Not Have Power Or Shuts Off
Sometimes, you cannot turn on or turn off your coffee maker. This situation may irritate you as you want to enjoy your lovely drink. Don’t worry. Have a look at the possible solutions:
- Don’t forget to press the power button to turn on your coffee maker.
- Plug the coffee maker into its own grounded outlet.
- Your coffee maker may not work correctly if the electric circuit is overloaded with other appliances.
- Operate the coffee maker on its course away from other devices.
- To save energy, your coffee maker will auto-turn off after five minutes of the last brew.
- After trying all these tricks, if your coffee maker is still not operating, then contact Customer Care Services.
Helpful Hints
Here are a few helpful hints to help you improve the taste of your coffee and maintain your coffee maker for better performance and longer usage duration. So wait no more and get yourself aware of the hints:
- Water quality matters a lot. If you find an undesired taste in your drinks, like chlorine or other mineral taste, use filtered or bottled water.
- Distilled water is not recommended.
- Install Keurig Water Filter to avoid water impurities and improve the taste of your desired drinks.
Carafe Brewing
Here are a few things that can help you to improve your carafe brewing. So let’s start:
- The maximum limit for regular coffee grounds is 15 tablespoons and 12 tablespoons for decaf. In case you exceed this limit, get ready for overflow.
- When you are inserting a paper filter into the filter basket, then ensure it is properly seated.
- If you didn’t use your coffee maker for a few days, run a full carafe rinse brew to flush out the internal water.
Service
You can perform the recommended cleaning and maintenance procedures. However, this coffee maker is not user serviceable. For better service solutions, you can refer to the warranty section of this article.
Storage
There are a few storage tips that can prove helpful in improving the performance of your coffee maker. You can enjoy your energetic drinks for long periods.
So please have a look!
- Always empty the water reservoir before storing or transporting it.
- Also, store your coffee maker in a safe and frost-free environment.
- Store your coffee maker in its upright position. Only then can you avoid water leakage from the inner tank.
- If you store your coffee maker in a cold environment, then water can freeze inside the coffee maker and can cause damage.
- When you use your coffee maker after storage, rinse the water reservoir properly with fresh water.
- Run three rinsing brews without a K-Cup pod holder.
- Also, run 12-cup brew rinsing without ground coffee.
- If you plan to move your coffee maker somewhere else, then turn your coffee maker off, unplug it, and make sure to empty the water reservoir.
- If you keep your coffee maker at a location below freezing, then make sure to set it at room temperature for at least two hours before using it.
- Don’t forget to turn off your coffee maker before storing it.
- If you are storing your coffee maker for a more extended period, then conduct a proper descaling procedure before and after holding it. Only then can you use it in its best condition.
Click Or Call
Here is a fantastic feature of Keurig Coffee makers. If you have any issues regarding your Keurig coffee maker, please contact their manufacturers around the clock.
If you face any troubles, approach them at keurig.ca for step-by-step videos on cleaning, descaling, and more.
If something is still ambiguous, then call 1-800-361-5628
Warranty
Now let’s move toward the warranty terms and conditions of the Keurig coffee maker. So let’s start:
Limited Year Warranty
- Keurig Green Mountain Inc (Keurig) warrants that your Keurig coffee maker is free of defects in materials and artistry for one year under regular home usage from the date of purchase.
- You need to register your Keurig coffee maker at keurig.ca/ welcome so that they may register your date of purchase in their system.
- They will repair your coffee maker free of cost on receipt proof of the date of purchase.
- They are bound to replace your coffee maker with the new one or recondition it if necessary.
- If you replace your coffee maker, then a new one-year limited warranty shall apply to the replaced coffee maker.
- This warranty only applies to coffee makers in the United States and Canada and gives you specific legal rights.
- These legal rights vary from state to state.
- In the case of Canada, these legal rights vary from province to province.
- If you use only Keurig K-cup brand pods, only then can you avail the proper functioning and lifetime of your Keurig coffee maker.
- If you use any non-Keurig k-cup pods and other accessories, then any malfunctioning or damage is not covered by this warranty card. You shall have to pay charges for the repair.
What Is Not Covered By The Limited Warranty?
Here are a few things to keep in mind which are not covered by this limited warranty:
- Any consequential or incidental damages, such as property loss, are not covered.
- Incidental costs and expenses resulting from any breach of this warranty, even if foreseeable, are not covered.
- Some States or provinces don’t allow the exclusion or limitations of incidental or consequential damages, so the above exclusion or limitation doesn’t apply to the specific states or provinces.
- It depends upon the state or province from where you purchased your coffee maker.
- This warranty does not cover costs if you use non-Keurig k-pods or other accessories.
- If you call anyone other than a Keurig-authorized person, you are responsible for yourself.
- The warrant doesn’t cover using parts other than the original Keurig parts.
- Other external damages like abuse, misuse, inappropriate poet supply, or acts of God are not covered by the warranty.
Other Limitations
Here are a few more limitations that you have to keep in mind while using your Keurig coffee maker.
So let’s dive into details:
- This warranty is exclusive and is instead of any other express, whether written or oral.
- Keurig disclaims all other warranties concerning your K-Duo coffee maker, including any implied warranty of merchantability or fitness for any particular purpose.
- Some States or provinces don’t allow disclaimers of such implied warranties. So it all depends upon your state or province from where you buy your coffee maker.
How Do You Obtain Warranty Service?
Do you want to get warranty services for Keurig coffee makers? Then there are details for your convenience. So let’s begin:
- Keurig coffee makers are top-quality appliances. If you care for them properly, you can use them for many years with excellent performance.
- However, there is a need to raise awareness among people. You can call Keurig Customer Services at the toll-free number 1-800-361-5628.
- Don’t return your coffee maker for servicing without first speaking to Keurig Customer Service to obtain a Return Materials Authorization (RMA) number.
- Keurig coffee makers returned without an RMA number will be returned to the sender without servicing.
Conclusion
I have described all essential informational instructions about the usage of Keurig Coffee makers. I hope there are no more queries related to the coffee maker. However, if you are still ambiguous about anything, reread the article. You can also ask any questions by commenting in the comment section.
Keurig coffee makers are the best quality-wise, and they are durable. They need proper maintenance. So use them with complete care and enjoy your drinks for a long time.
To know more about other Keurig coffee makers and coffee beans, visit CoffeeAim.
Have a lovely drink!
I am waiting for your excellent views!
FAQS
How Do You Use The Keurig Coffee Maker For The First Time?
- You keep a mug on the drip tray.
- Then lift the handle and place the K-Cup pod in the k-cup pod holder.
- After closing the lid properly, press the Power button.
- Then select Carafe, brew, and then strong if you want a strong cup of coffee.
What Button Do You Press On Keurig?
You press the Power button to make coffee on your Keurig coffee maker. Before that, you have to fill the water reservoir. As the water heats up, place a mug on the drip tray. Then lift the handle and put a k-cup pod in the k-cup pod holder.
How Do You Use A Keurig Mini Coffee Maker?
If you can use the Keurig coffee maker, then you can easily use the Keurig mini coffee maker. Everything is the same. You can carry this mini coffee maker with you easily everywhere. If you don’t have a huge social circle and love to enjoy your coffee alone, this mini coffee maker is best for you.