Quick Navigation
You fell in love with the coffee of your favorite shop and wanted to replicate the same taste and quality. Yet, at an economical rate, at home, for that, you bought the Keurig K-45, but now you’re stuck somewhere in the middle as you are finding it challenging to comprehend the minute details about the usage and care of your Brewer. It can be very challenging for beginners and old users to get to the bottom of various stages of the brewing process.
Nevertheless! Fortunately, I am here to help you solve this problem, so you no longer have to worry about it. In this article, you will find every possible solution to any issue regarding your Keurig K-45. Consider this article as your guidebook.
From the moment you open the box to the first sip of your freshly brewed coffee, I will guide you through the process step by step. So, let’s start this journey!
Safety Precautions
Before diving into the information of Keurig K-45, I would like to touch on the subject of the Importance of your safety. Are you aware that according to the US Consumer Product Safety Commission, 31,000 household electrical fires occur each year and that over 180 incidents of electrocution or other electricity-related catastrophes might have been avoided if consumers had taken extra precautions? I recommend you remain extra cautious since the safety of your loved ones and other people should always come first. Click the link below to learn more about the essential safety precautions and how to avoid accidents.
Specifications Of Keurig K-45
The time has come to know about its specifications. It is essential to understand the specifications of your new coffee maker after purchasing it, as it will help you use it properly and make the most of its features. Knowing the machine’s capacity, brewing methods, and settings will allow you to customize your coffee experience and ensure you use it to its full potential without any trouble. If these specifications are unsuitable for you, return your coffee maker for a refund or exchange.
| Features | Details |
| Product Line/System | Keurig 1.0 Elite |
| K-Cup Compatibility | Unlicensed K-Cups, Keurig 2.0 licensed K-Cups, and ground coffee with the My K-Cup |
| Brew Sizes | 5.25 ounces (155.261 ml) 7.25 ounces (214.40 ml)9.25 ounces (273.5551 m) |
| Water Reservoir | 48 oz |
| Water Filter | Included |
| Dimensions | Width: 9.8″Depth: 13.0″Height: 13.3″ |
| Display | Button controls for Brew Size and Power; LED indicators for Add Water, Descale, Heating, Auto-Off, and Power |
| Temp Control | No |
| Strength Control | No |
| Weight | 12.0 lbs |
| Other Features | Quiet Brew Technology Auto-On/OffRemovable drip trayK-Cup variety pack |
Unpacking Of Keurig K-45
I know you are eagerly waiting to unpack your Brewer finally, and you can’t wait to start experimenting with different coffee blends and brew strengths. So without further ado, let’s dive in and discover what your new Keurig K-45 offers.
If you find anything missing listed below, I recommend contacting the seller.
Click on the link to purchase the Keurig K-45 which comes with all the essentials written below Related: Click to Buy From Amazon
1. The Coffee Machine
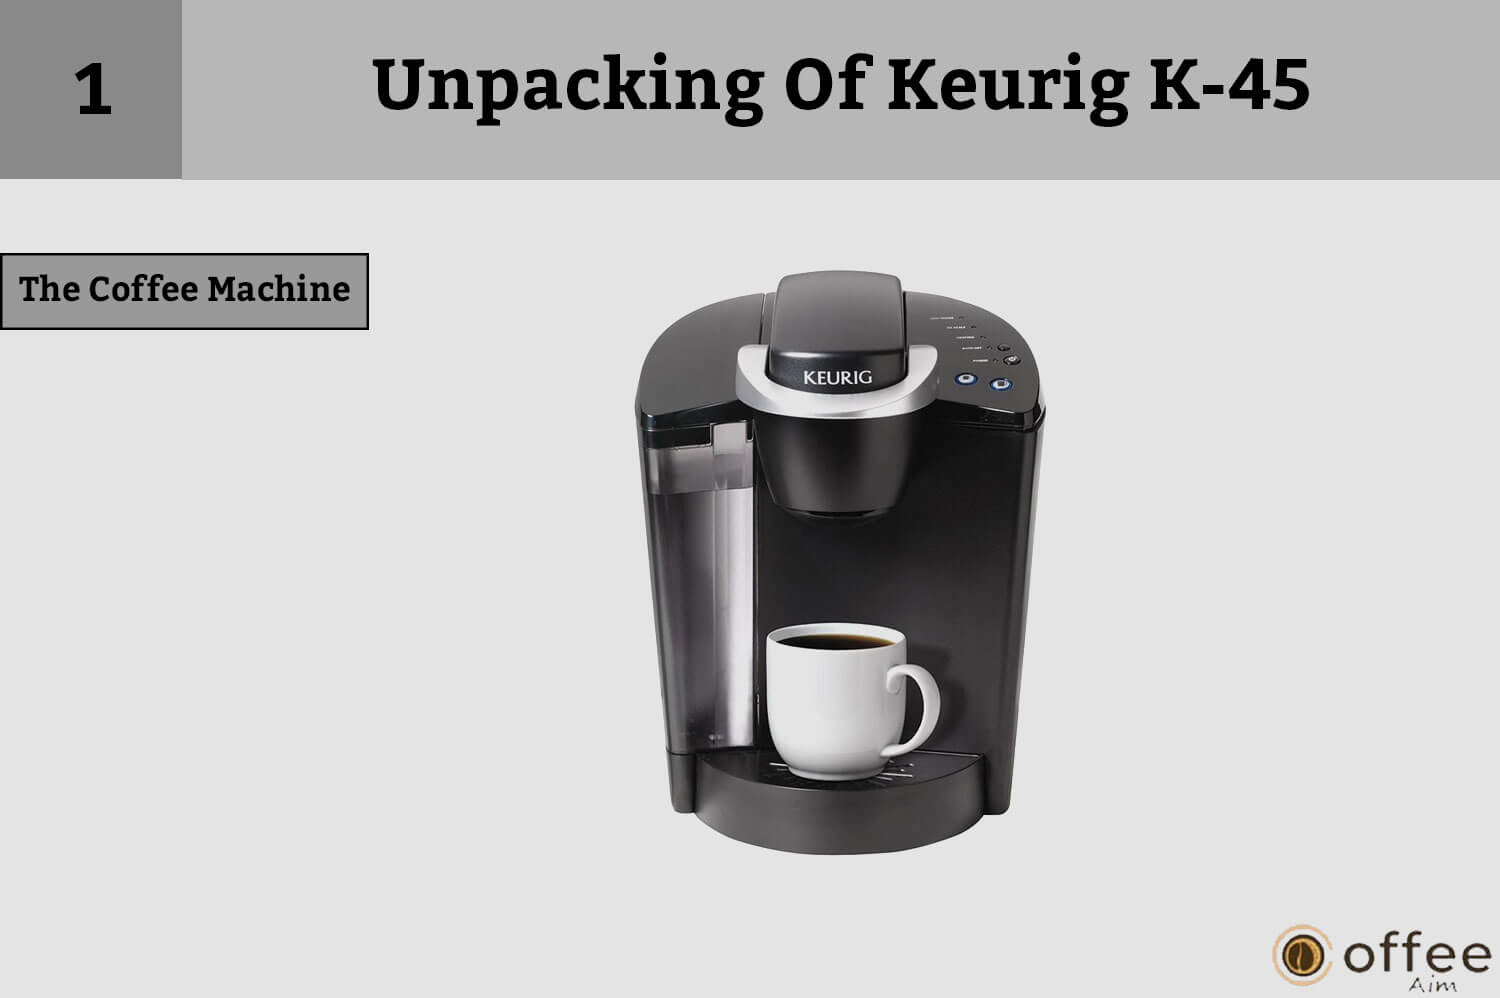
Upon unboxing, the main component you will come across is the Housing, also known as the main body. It includes all features, including the control panel, buttons, handles, water reservoir, and lid.}}
2. Water Filter Handle

The water filter handle is a device that attaches to your coffee maker and helps to filter out impurities and contaminants from your tap water. It ensures that you can enjoy a pure and refreshing cup of coffee every time you brew.
3. A Charcoal Filter

The charcoal filter is a type of filter that uses activated charcoal to absorb impurities and improve the taste and quality of the water.
4. A 12-Pack K-Cup Variety Pack

A 12-pack K-Cup variety pack is a collection of different flavors and blends of coffee designed to be used with K-Cup coffee makers.
5. User Manual

A manual is a written document that provides instructions, guidelines, and information about a particular product or service. It is often used to help users or consumers understand how to properly use or maintain a product and can be an essential resource for troubleshooting and problem-solving.
Unpacking Instructions
Be sure to carefully read and follow the instructions to ensure proper set-up and usage of your Keurig K-45.
- Carefully put the box of your new coffee Brewer on a stable surface like a table or table or counter or the floor to ensure easy and safe unboxing.
- Open the box.
- Remove the Manual from the box.
- Place the box on its side with the front facing downwards.
- Take a grip on the plastic bag by reaching your hand in the box.
- Now, gently remove the plastic bag and all the packaging materials from the box.
- Carefully remove the polyfoam from your Keurig K-45.
- Gently lift the coffee Brewer out of the bottom polyfoam and place it on a stable and level surface with the machine upright.
- Remove your Brewer from the plastic bag.
- Now, it is time to write down the serial number of the coffee Brewer on page 3 of the instruction manual. You can locate the serial number either at the bottom of the box or on the Brewer itself, behind the removable Drip Tray.
- Place the coffee Brewer upright on a stable and leveled surface after writing down the serial number. Then, Carefully remove the tape securing the Water Reservoir in place.
- I recommend you keep all of the packaging materials if you need to transport the coffee Brewer in the future. It will ensure that it stays safe during transport.
Warning: Protect your children by keeping the plastic away from them.
Parts Of Keurig K-45
Hold your horses! There Is no need to rush; eventually, you will have your freshly brewed coffee in your hands, but before that, you must have adequate knowledge of each component and part you are going to use in your Keurig K -45; hence you will be able you serve yourself a perfect brew.
1. Water Reservoir Lid

The water reservoir lid is a covering that sits on top of the water reservoir and seals it to prevent any water from spilling out. It can be easily removed to allow for easy refilling of the reservoir.
2. Water Reservoir

The water reservoir is a container that holds the water used to make coffee. It is usually detachable and can be filled and replaced easily.
3. MAX FILL
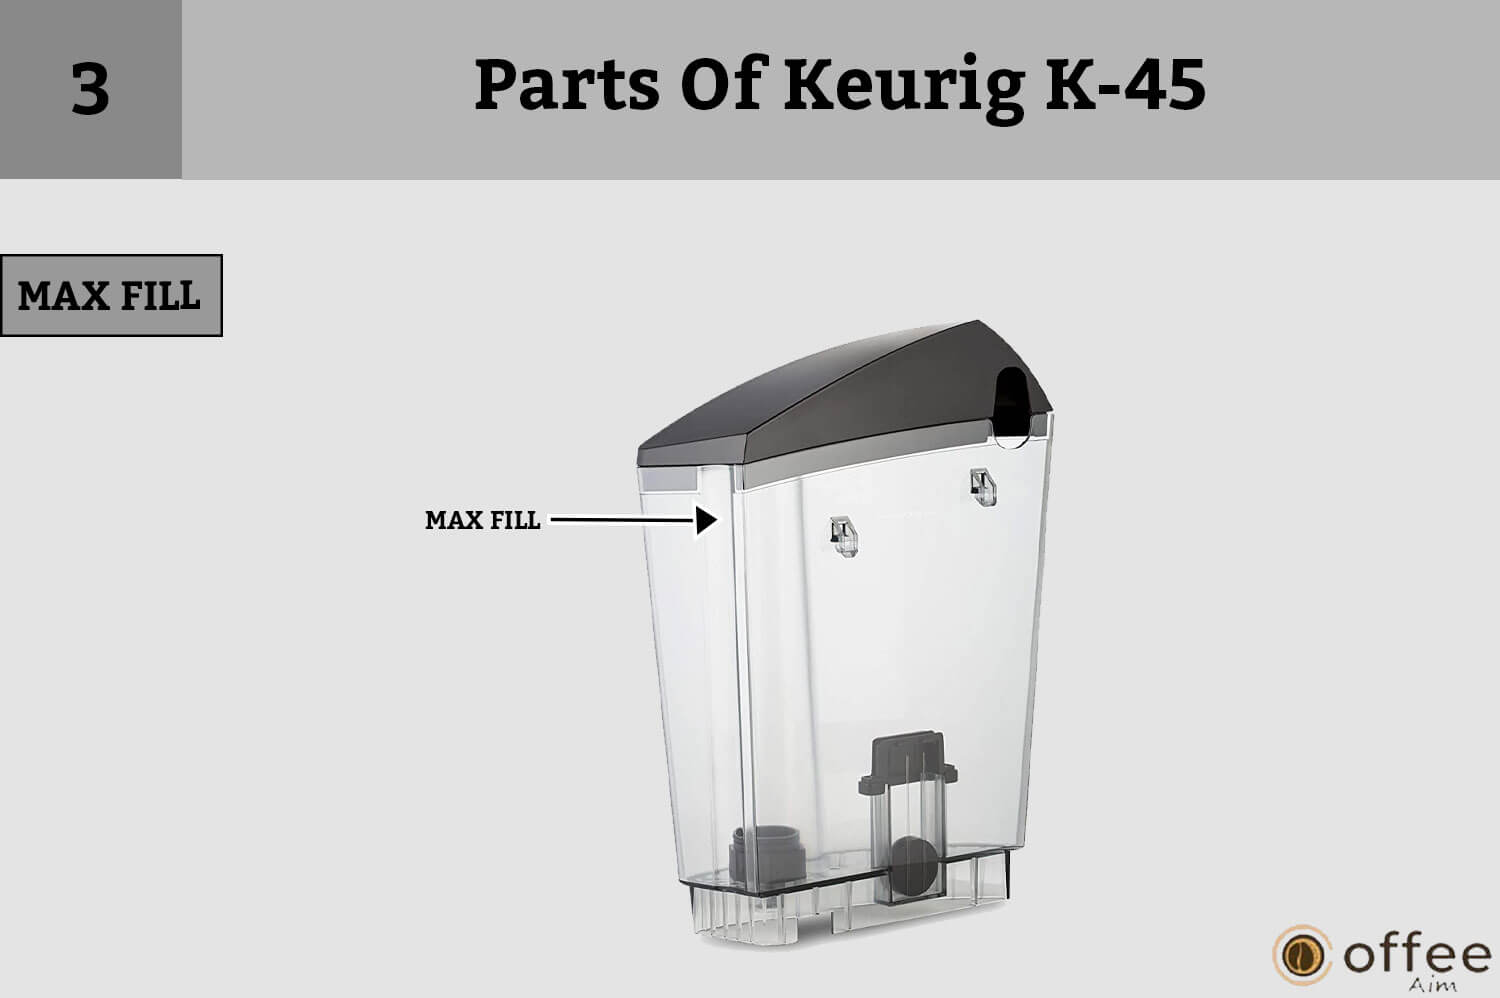
MAX FILL is a marking on the water reservoir that indicates the maximum level of water that can be filled. It is essential to stay within this level to avoid any potential overflow.
4. Water Reservoir Lock Tab Slots

The lock tab slots are the areas where the water reservoir locks onto the coffee maker. They ensure a secure and stable fit between the two components.
5. Handle

The handle is situated on the K-Cup cover lid and is used to lift the lid from the coffee maker. With the handle, you can easily remove the K-Cup cover lid.
6. Funnel

The funnel is a part of the K-Cup pack holder assembly and guides the K-Cup into the pack holder. It helps to ensure that the K-Cup is positioned correctly for optimal brewing.
7. K-Cup Pack Holder (E And F Are The K-Cup Pack Holder Assembly)

The K-Cup pack holder is where the K-Cup is placed for brewing. It is designed to puncture the K-Cup and allow hot water to pass, extracting the coffee.
8. Lid

The lid is the cover for the K-Cup pack assembly Housing, which houses the K-Cup pack holder. It prevents dirt or dust from entering the assembly and keeps it clean.
9. K-Cup Pack Assembly Housing
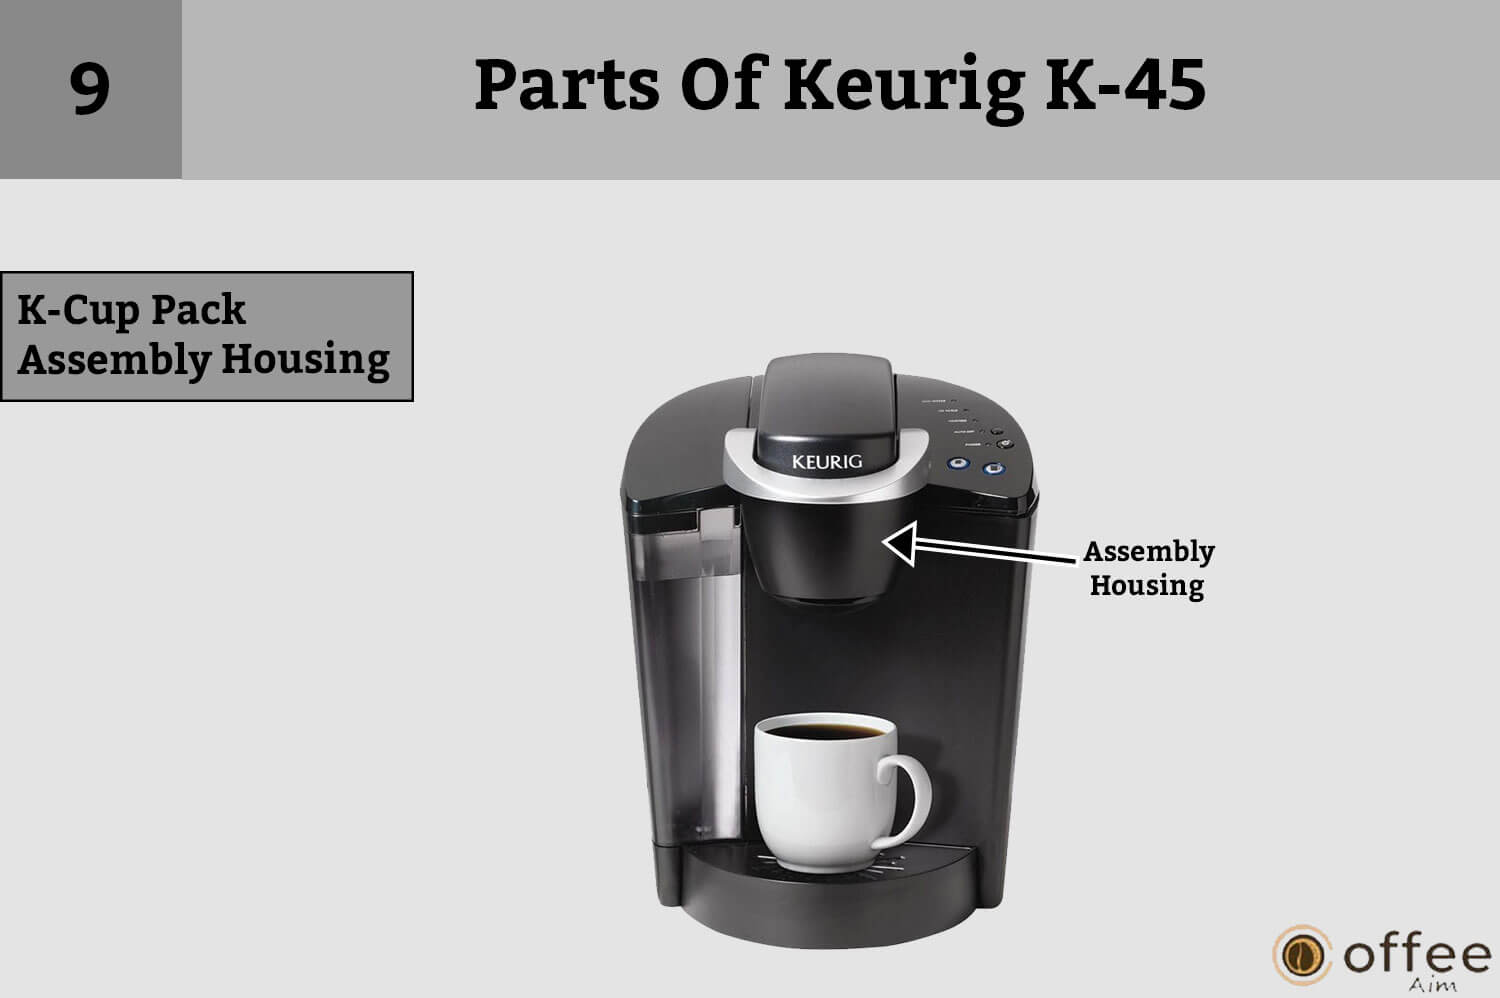
The K-Cup pack Assembly Housing is the compartment that houses the K-Cup pack holder and funnel. It can be removed for cleaning.
10. Housing

Keurig Housing is the machine’s main body, consisting of a removable water reservoir, control panel, and all other components.
11. Drip Tray Plate

The drip tray plate is the removable part of the drip tray that sits above the drip tray. It collects any excess coffee or water that may spill during brewing. It is also used to place your coffee cup.
12. Drip Tray

The drip tray is a part of the coffee maker that collects any excess coffee or water that may drip or spill during brewing. It can be easily removed for cleaning.
13. Drip Tray Base

The drip tray base is the bottom part of the drip tray that supports the drip tray plate. It is usually detachable for easy cleaning. Furthermore, if you use a tall mug, remove the drip tray plate and place your mug on the drip tray base.
14. Vent

The vent is a small opening on the coffee maker that allows air to circulate through the machine. It helps to regulate internal temperature and pressure.
15. Power Cord

The power cord is the cable that connects the coffee maker to an electrical outlet. It provides power to the coffee maker for operation.
Control And Indicators
Keurig K-45 is equipped with a control panel that houses various controls and indicators to operate different functions of the Brewer and display its status. Understanding the functions of each control on the panel is crucial for the effective use of the Brewer.
1. Small Cup Button

The small cup button is a control button that sets the coffee maker to brew a small cup of coffee. It can brew up to 5.25 ounces (155.261 ml).
2. Small Mug Button

The small mug button is a control button that sets the coffee maker to brew a small mug. It can brew up to 7.25 ounces (214.40 ml).
3. Large Mug Button

The large mug button is a control button that sets the coffee maker to brew a large mug of coffee. It can brew up to 9.25 ounces (273.5551 ml ).
4. Power Button

The power button is a control button that turns the coffee maker on or off.
5. Power Light (Green)

The power light is a green indicator light that indicates when the coffee maker is turned on.
6. Auto-Off Button

The auto-off button is a control button that sets the coffee maker to turn off automatically after a set period of time.
7. Auto-Off Light (Green)

The auto-off light is a green indicator that turns on when the coffee maker is set to turn off automatically.
8. Heating Light (Red)

The red “Heating light” indicates that the coffee maker is overheating.
9. Descale Light (Red)

The red “auto-off light” indicates that the coffee maker needs to be descaled.
10. Add Water Light (Blue)

The add water light is a blue indicator light that illuminates when there is a need to add water to the water reservoir.
Initial Set-up And Activation For First Use And After A Storage Period
Did you get perplexed after seeing so many parts and controls? If yes, I remind you that I am here to help you. It is essential to know every process of a coffee machine because it ensures that the Brewer is accurately assembled and ready to brew high-quality coffee.
So get ready to have another informational ride on your Keurig K-45, but this time we will explore its initial setup and activation.
Note: It is important to note that if your coffee Brewer has been exposed to freezing temperatures, it should be allowed to reach room temperature for at least two hours before attempting to use it for brewing. It is because a cold Brewer needs to be fixed and may result in malfunction or poor-quality coffee. Allowing the machine to reach room temperature before using it will ensure it can function properly and produce delicious coffee.
Important: You can only use your Brewer once it is set up according to the following instructions.
Setting Up Your Brewer
- Once the coffee Brewer has reached room temperature, it is time to set it up. The first step is to remove the wrapping from the cord and plug the machine into a grounded outlet. Then, unwrap the packing tape from the Brewer to ensure it is fully operational.

- To brew coffee, place a large mug (with a minimum capacity of 10 oz.) on the Drip Tray Plate of the machine.

- To remove the water reservoir from your Brewer, lift off the lid from the reservoir (as shown in figure 1). Next, gently lift the reservoir straight up and away from the Brewer. Be careful, as it may be a bit tight. Once you have removed the reservoir, give it a good rinse with fresh water to ensure it is clean and ready for use.

- Now, to brew the coffee, fill the water reservoir with bottled or filtered water, but make sure that it should not exceed the MAX FILL line.

- Make sure the Water Reservoir Lock Tabs are engaged with the Brewer before inserting the Water Reservoir base into the left side of the Brewer (fig. 2). Now, replace the water reservoir’s lid.

- To turn on the Brewer, press the power button placed on the upper right panel, and the green power light will illuminate.

Note: It should be kept in mind that a K- Cup should not be used for this sequence.
Note: If a blue light ADD WATER starts illuminating, the Water Reservoir is empty or not in place on the Brewer.
- The Brewer will automatically start filling the water and heating it up. This process will take about 4 minutes to complete. During the heating process, the red Heating Light will turn on. Once the water is heated, the red Heating Light will turn off, and the Small Cup, Small Mug, and Large Mug buttons will illuminate.

NOTE: Never lift the handle during this heating period, or it can burn you.
NOTE: Small amount of water may start coming from the vent and dripping into the Water Reservoir during this and another heating process. You should not worry about this because it usually happens during this process.
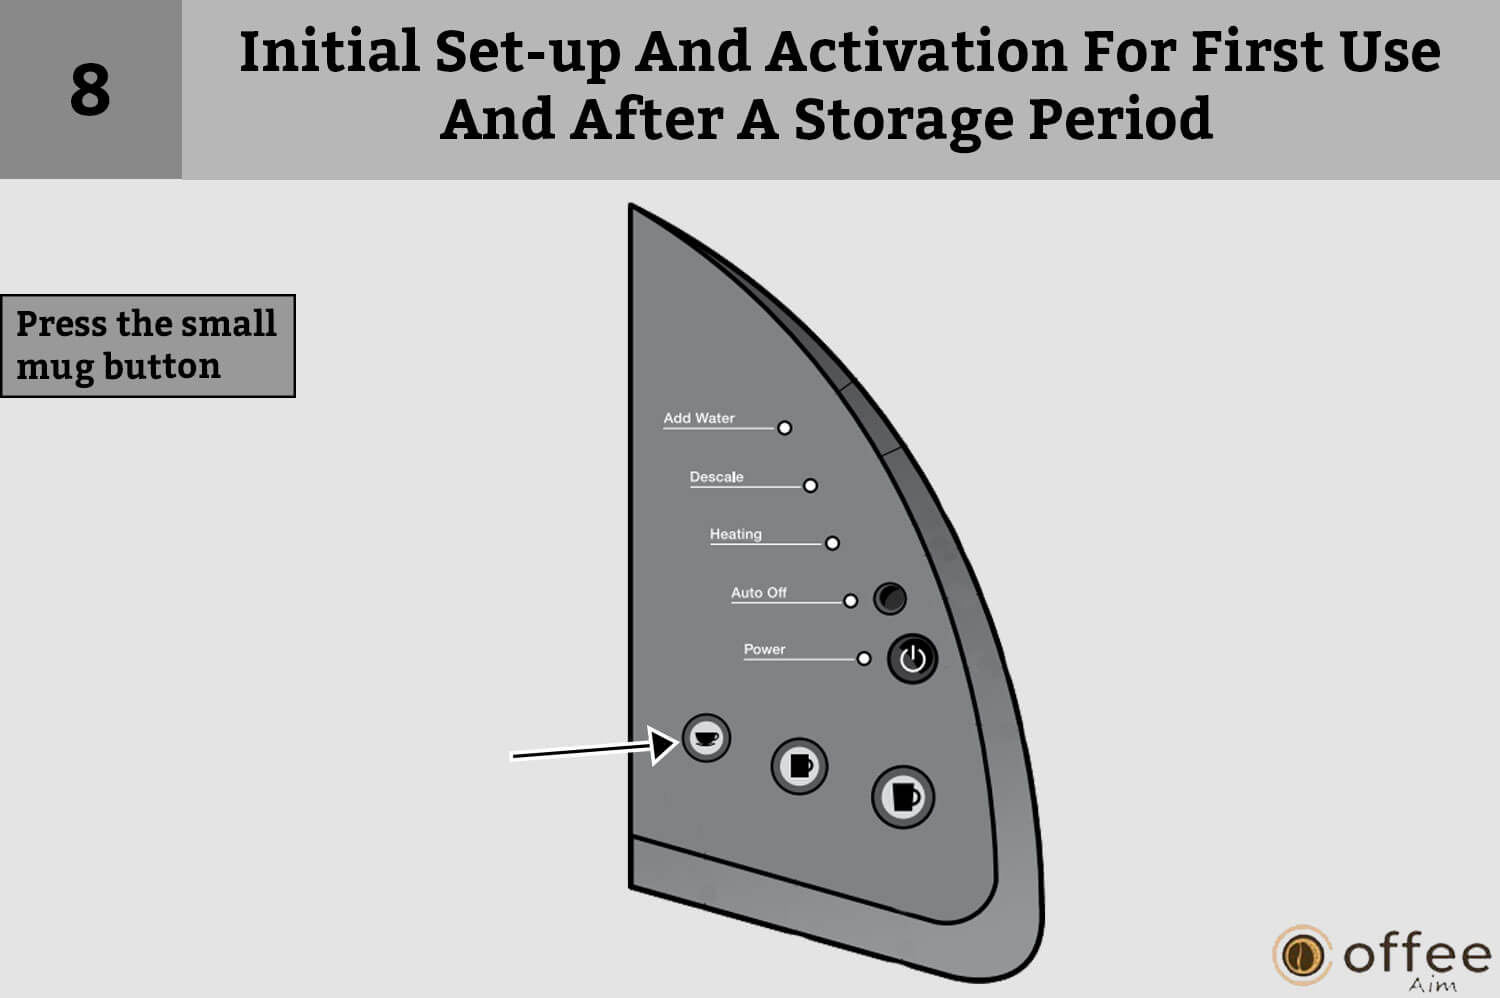
- Raise and lower the handle. Press the small mug button to initiate a cleaning cycle ( figure 3). Empty the hot water into the sink.
- After brewing, the machine may need a few seconds to reheat the water for the next brew. During this time, you may notice the red heating light turning on. Once the water reaches the correct temperature, the red light will turn off, indicating it’s ready for the next brew.

- As the one- time-step- up is completed, you are ready to brew your first coffee.
Ready To Brew Your First Cup Of Coffee
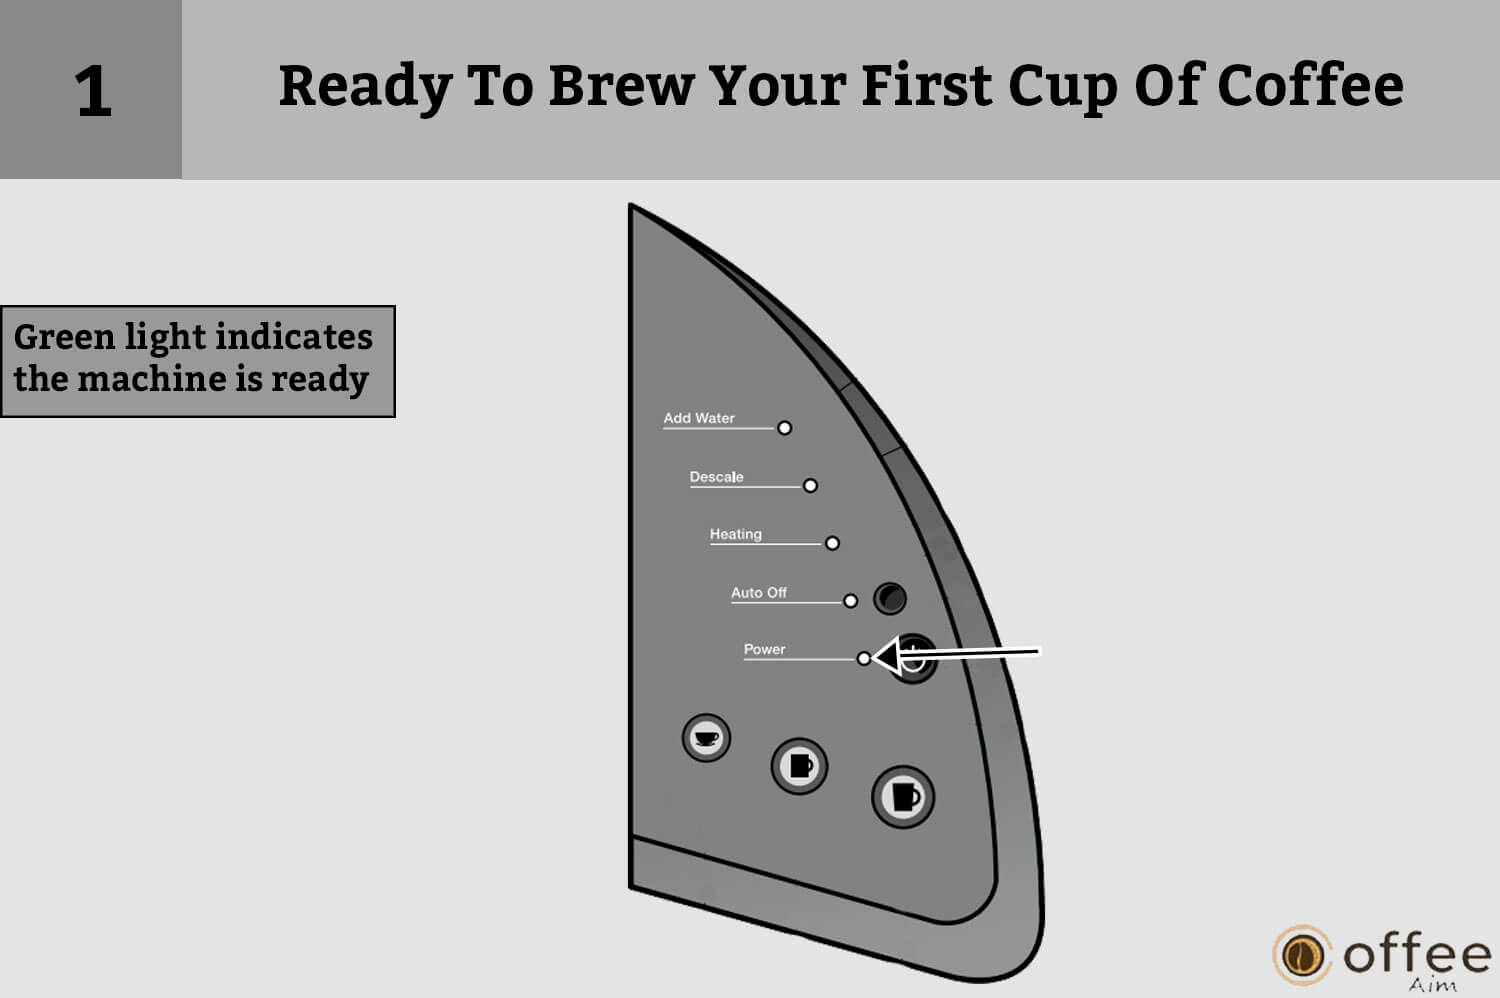
- When the machine is turned on, you’ll see a green light indicating it’s receiving power and is ready to use.
- Place a cup or mug on the Drip tray plate

- Now, open the K- Cup holder. It will open towards you when you lift the handle, as shown in figure (Fig.4)

- Choose your favorite K-Cup Pack.

Note: Avoid puncturing the K-Cup or removing the foil cap.
- Insert a K-Cup into the designated holder, as illustrated in figure 5.

Note: You should be careful doing this part as there are two pointed needles to puncture the K-Cup, one located above the K-Cup Holder and the other at its bottom. Do not stick your fingers in the K-Cup Holder to reduce the risk of injury.
- To start the process, close the lid by lowering the handle.

- Choose the size of the brew according to your mood. You have the option of a small cup, which will give you 5.25 ounces, a small mug, which will give you 7.25 ounces, or a large mug, which will give you 9.25 ounces.

Note: If you don’t start a brew within 60 seconds, the brew buttons will automatically deactivate to prevent accidents. To reactivate them, simply lift and lower the handle.
- The blue Brew Button you choose will remain illuminated while brewing.

Note: You should remain careful because the K-Cup will be very hot.
- Please be patient; there may be a slight delay before the brewing process starts. After about a minute, you will notice that all of the liquid from the K-Cup will be fully expelled through a burst of air.

- Now lift the handle, take out the used K-Cup, and throw it away.

Caution: The K-Cup is still hot; dispose of it carefully.
- You are now ready to savor your first cup of Keurig K-45 brewed coffee, tea, or hot chocolate.

- The red Heating Light will turn on as the water heats up for the upcoming brew cycle. It will take around 15 seconds for the Brewer to be ready to use.

- During the brewing process, the LED Control Center’s red light next to “HEATING” will turn on to indicate that the water is being heated for the next brew cycle. It is normal. In about 15 seconds, the Brewer will be ready for use again.

Note: There is no need to be alarmed if the pump starts vibrating after your brewing because this usually occurs when the Brewer starts filling in preparation for the next brew.
Stopping The Brew Process
If you want to stop brewing due to any interruption or urgency, rest assured that it is a simple task. With a single power button press, you can instantly shut down the heating process. You will witness that the flow of coffee or tea will immediately stop, and the green light will no longer flash. It allows you to attend to urgent matters without delay or hassle. You can always resume the brewing process later on. So you can enjoy your coffee or tea without any interruptions.
Note: You could get less coffee, tea, or hot chocolate in your cup with the next brew. After finishing a brew, I recommend you perform a water-based cleanse. Consequently, your NEXT brew will have the appropriate volume.
Adding Water
Do you know that your Keurig K-45 has a convenient feature that alerts you when it’s time to add water? The LED Control Center on your coffee maker will display a blue light next to “ADD WATER” when the water level in the water reservoir is low or if the reservoir has been removed. This blue “ADD WATER” light will prevent the Brewer from functioning until water is added, as shown in (Fig 6). This feature ensures that you always have enough water to brew your coffee, tea, or cocoa, making your brewing experience seamless.
How To Add Water In Your Brewer In Keurig K-45?
- First, Remove the lid, add water to the Water Reservoir while it is still connected to the Brewer, and then replace the lid. Never make the mistake of filling the water beyond the “MAX FILL” Line, as it will start overflowing.

- Before lifting the water reservoir from the Brewer, make sure first to remove the lid. Then lift the water reservoir and place it away from the Brewer. Then, fill it up with water. Once done, securely replace the lid and reattach the water reservoir to the Brewer.

Caution: It is essential to remember that the water reservoir should never be removed while the brewing process is ongoing to avoid any accidents or interruptions.
Brewing Iced Beverages
Do you want to experience the ultimate refreshment by brewing your iced tea and iced coffee hot over ice? What are you waiting for? Let’s learn how to make your favorite iced coffee in Keurig K-45.
- To brew a perfect cold coffee or tea, you simply need to place a tall glass filled with ice on the Drip Tray Plate (or remove the Drip Tray Assembly for even taller cups).
- Select your preferred K-Cup pack and press the desired brew size.
- Don’t forget to watch for the Brew Over Ice icon on specially crafted K-Cup packs, designed to enhance the flavors and aromas when brewed over ice.
- You have the perfect cup of cold brew to beat the heat.
IMPORTANT: Never use a glass cup for brewing because the glass can get cracked.
Brewing Hot Water
- You simply need to raise and lower Brewer’s handle without inserting a K-Cup pack.

- The blue Brew Buttons will flash.

- Place a mug or cup on the Drip Tray Plate before pressing the Brew Button.

Note: Run a hot water brew cycle without a K-Cup after brewing a hot cocoa K-Cup to prevent malfunctions
How To Purge Your Keurig K-45?
- Firstly see, If the water reservoir is complete, and take off the lid before lifting it straight up and away from the Brewer. Rinse with water, then empty and refill. Then reinstall the Brewer’s Lid and Water Reservoir.

- Make sure to switch on the Brewer. Wait until the red light next to “HEATING” goes off before raising and lowering the handle on the Brewer.

- The blue lights on the LED Control Center behind the Brew Buttons will illuminate. Place a cup or mug on the drip tray plate Before pressing the brew button.

- To purge the water effectively, repeat procedures above 2 and 3 two more times from the inner tank.

- I recommend you repeat steps 2 and 3 twice to purge the water from the internal tank thoroughly.
Controls & Indicators
Keurig K-45 is manufactured to expand convenience and efficiency. One panel that describes every brewing process by only flashing different lights is its control and indicators panel, which includes an Auto Off timer feature. This feature allows the Brewer to turn off automatically after a specific time, making it even more convenient. Setting up the Auto Off timer feature is simple. Let’s discuss other unique control and indicators of your Keurig K-45 coffee maker!
How To Set Up The Auto Off Timer Feature?
- Press the Power Button to start the Brewer.
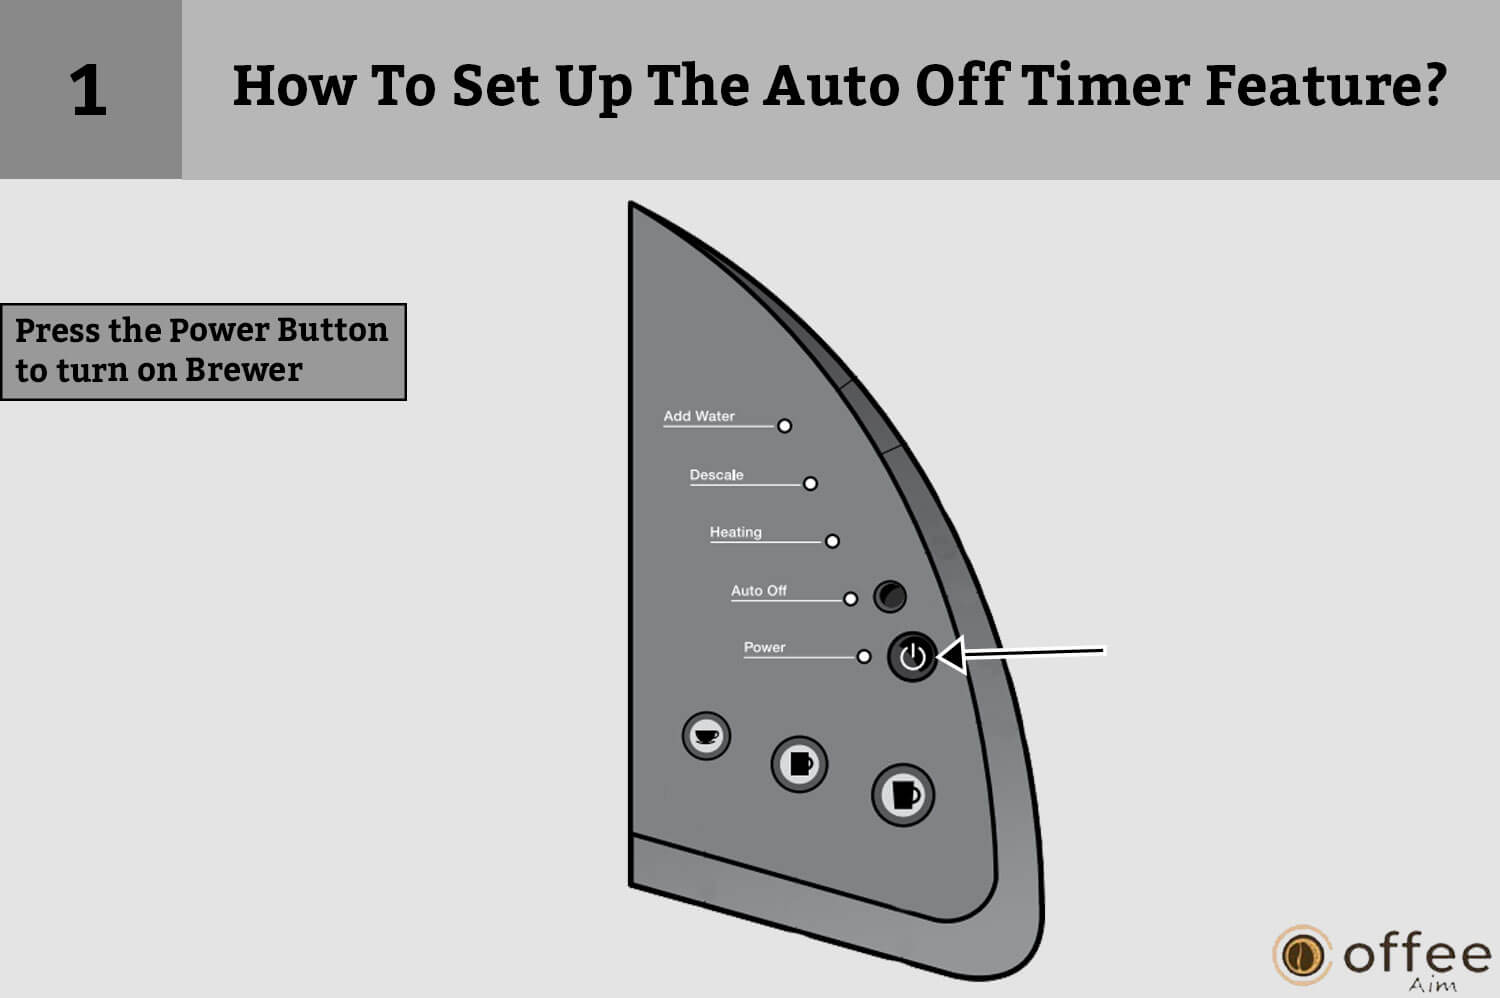
- Press the black Auto Off Button (fig. 7) to enable the Auto Off Timer function. The green Auto Off Light will turn on.

- Enable the Auto Off Timer. Your Brewer will shut down two hours after your previous brew.

- It will turn on the green light next to “AUTO OFF.” If the Auto off Timer is activated, your Brewer will automatically shut down two hours after your last brew.

How to Clean & Do Maintenance Of Keurig K-45
Your preference for homemade coffee is a testimony that you are very concerned about the hygiene and health of your loved ones. To convince yourself that you are not drinking unhygienic homemade coffee, you must clean your Brewer every now and then.
Yes, this is extra work, but with your health being your first priority, this process should not be a hassle for you. Let us jump into the cleaning method of your Keurig K-45!
How To Clean The External Parts

The external parts are those which are not directly connected to the machine body of your Keurig K-45. I recommend you regularly clean Brewer’s external parts. Let’s start the cleaning of external parts.
- You must first ensure that the Brewer is never immersed in water or other liquids. All external parts, including the Housing, can be cleaned using a soapy, damp, non-abrasive cloth.
- The Drip tray has a maximum 8-ounce capacity; otherwise, it will overflow. The drip tray and plate must be examined and cleaned up regularly. Slide the drip tray assembly toward you and remove it. Make sure to keep it level at all times to prevent spills. You can wash the Drip Tray and Drip tray plate in a dishwasher.
How To Clean The K-Cup Holder Assembly?
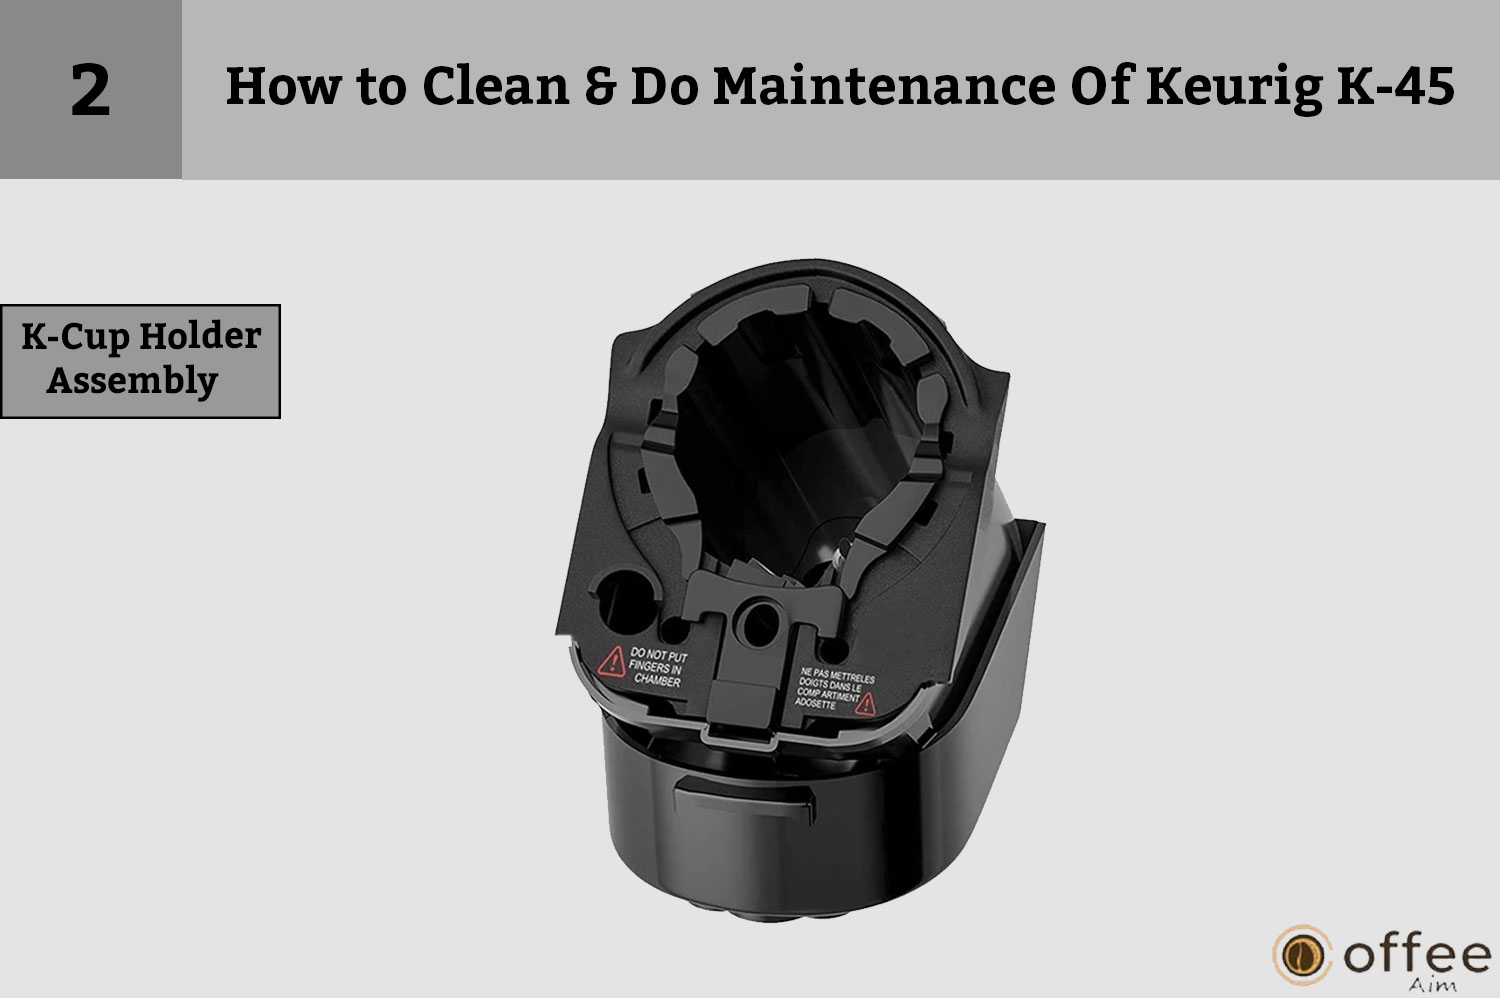
Now that you have cleaned the external parts of your Brew, it’s time to clean the K- Cup Holder Assembly. Let’s get started with the cleaning process.
Cleaning The Parts
To clean the parts of the K-cup Holder Assembly, follow the guidelines I am going to tell you.
- There is no specific requirement for cleaning a K-Cup. You can also wash it in a dishwasher if you want.
NOTE: Always use low-temperature cycles in the dishwasher
- Now, remove the K-cup from the Brewer, lift the handle, and, with one hand, hold the top of the K-Cup Pack Holder; with the other, press up from below on the bottom of the K-Cup Pack Holder until it releases (Fig 8).
- Once it is cleaned, use the two front ribs as a guide to line up the K-Cup Holder with the opening and snap it into place from the top.
Cleaning the Funnel
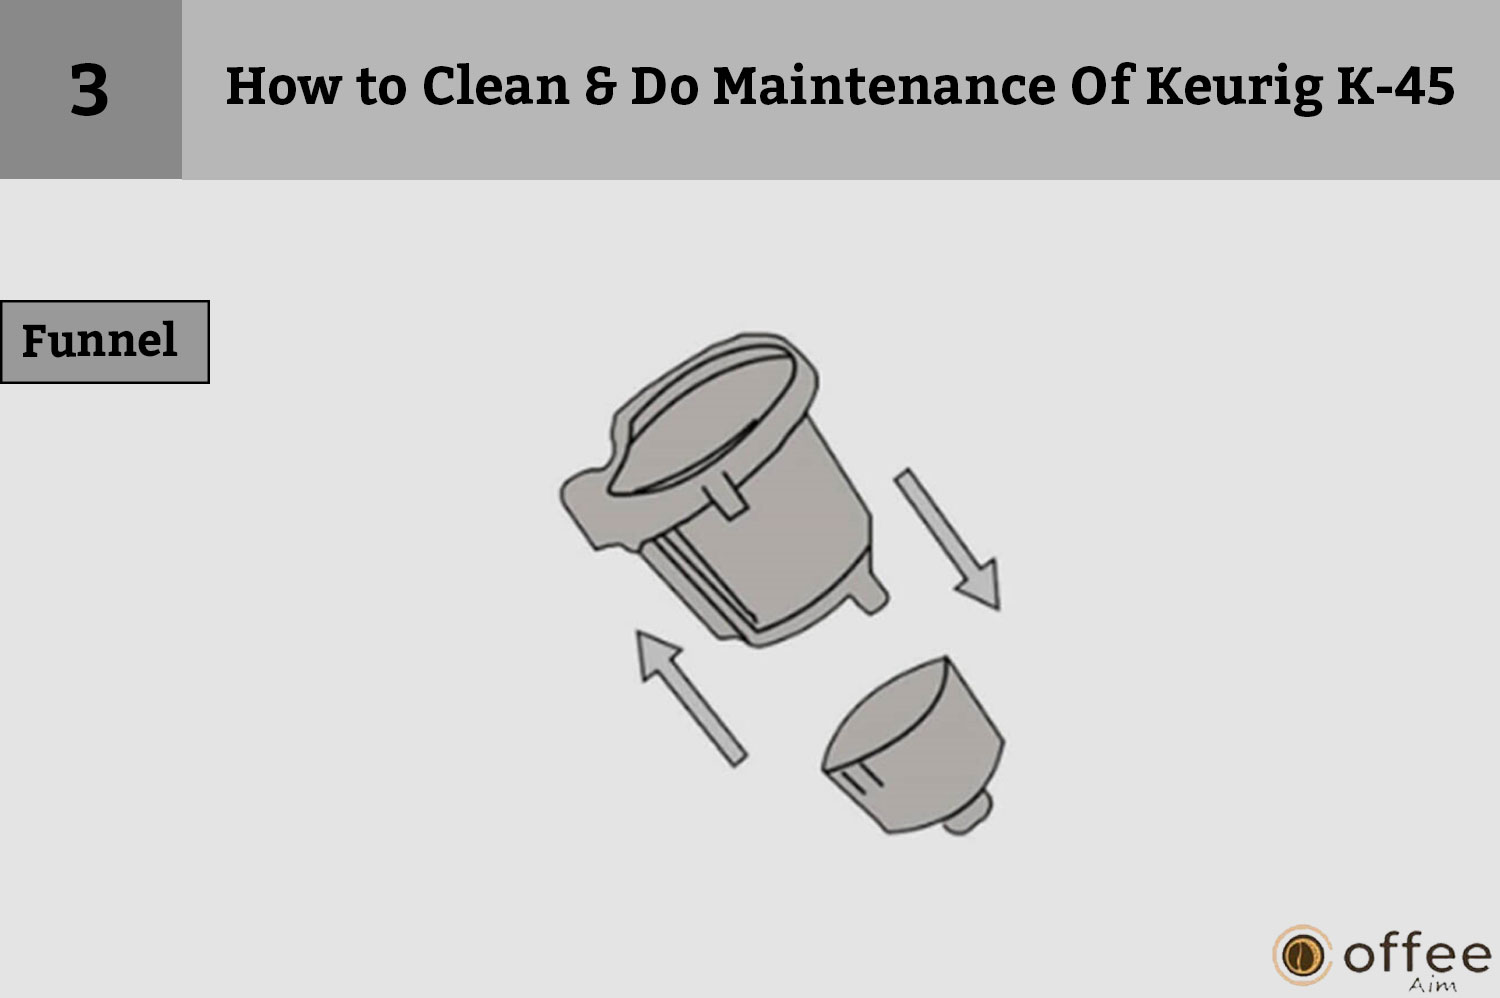
The funnel is that part that is often exposed to the remnants of your drinks. Therefore it is highly important to clean it properly. To do so, follow these instructions.
- Remove the funnel from the K-Cup holder by pulling it until it pops out, as shown in the figure( Fig.9)
- Now clean the funnel.
- You can also wash the funnel in the dishwasher.
- Now after cleaning it, simply attach the funnel back onto the K-Cup pack holder assembly by snapping it.
Cleaning The Exit Needle

The exit needle in the Brewer can accumulate dirt and bacteria if not cleaned properly, posing a health risk. To ensure proper hygiene, cleaning the exit needle regularly is essential.
- Choose a paper clip or similar tool that can be used to clean it.
- Remove K-Cup Pack Holder Assembly and separate the funnel.
- To remove the clog and push it out, insert the paperclip (fig. 9) into the Exit Needle.
- The K-Cup Pack Holder is dishwasher safe.
Note: The K-Cup pack holder and the bottom of the K-Cup Pack Holder contain sharp needles that puncture the pack. Never put your hand or fingers in the K-Cup Pack Assembly Housing
to avoid the risk of injury
Cleaning The Water Reservoir & Water Reservoir Lid

Cleaning your water reservoir and its lid is as essential as cleaning other parts of your Brewer.
The following is the information you should know before cleaning your Water reservoir and its lid.
- First, you must be aware that The Water Reservoir Lid or Water Reservoir should not be put into the dishwasher
- After cleaning, they must be properly washed with a moist, soapy, non-abrasive cloth.
- Never dry the internal part of the Water Reservoir with a cloth, as it may cause the reservoir to retain lint.
Now empty your water reservoir and follow all the steps to clean the filter screen at the bottom.
Caution: If you use a water filter in the Water Reservoir, remove it before cleaning it.
- Use a strong force of water to rinse the filter screen.
- Spray the filter screen with water if you have a sprayer.
- Fill the Water Reservoir with about two inches of clean water and agitate it (shake it).
- Now, Empty the Water Reservoir, fill it with clean water and return it to the Brewer.
- If you still need to clean it, repeat the above procedures.
Caution: After cleaning, remember to carefully rinse the Water Reservoir. This will guarantee that no cleansers or cleaning solutions stay in this section, which might pollute Brewer’s water supply.
Descale Your Brewer
Do you know that over a period of time, a mineral buildup can occur in your Brewer? This buildup, consequently, can negatively affect the performance and taste of the coffee as well as the lifespan of your Brewer. Hence, it is really important to descale your Brewer regularly. Following are some important tips I want to share with you.
- In order to maintain optimal performance, you should descale your Brewer every 3-6 months. However, if you use it frequently, then the calcium deposits build up at a faster rate, so it may be necessary to descale the machine more frequently.
- Flashing of the Red Descale light will indicate when your Brewer asks for a descale. However, if it doesn’t, I would still recommend you to descale it every 3-6 months.
How to Descale your Keurig K-45?
I think now you are ready to Descale your Brewer. Follow the instructions for all stages mentioned below.
Prepare:
- To start the process, you must have the following things with you.
- At least 48 oz. of undiluted white vinegar.
- Access to an empty sink.
- A large ceramic mug (do not use a paper cup).
- Now, Empty the Water Reservoir.
Caution: You must remove any water filters that are inside the Water Reservoir before starting.
- Deactivate the Auto Off feature. See the instruction in the AutoOff section of this article.
Fill And Clean:
- Pour around 48 ounces of undiluted white vinegar into the Water Reservoir. Fill it, but not exceeding the MAX FILL line.
- Place a big cup on the Drip Tray Plate and start a cleaning brew by pressing the brew button.
Note: Don’t insert a K-cup pod.
- Repeat the brewing procedure until the blue Add Water Light flashes.
- Leave the Brewer for at least 4 hours while it is still turned on.
- Remove the remaining vinegar and thoroughly rinse the Water Reservoir.
RINSE:
- Ensure the Water Reservoir is full of fresh water but not beyond the MAX FILL line.
- Place a big cup on the Drip Tray Plate and run a cleansing brew. Then, dump the contents of the big cup into the sink.
- Repeat the brewing procedure until the blue Add Water Light is turned on.
- Now, Even after following all the steps, you may need to do further cleansing brews if you notice any residual flavor.
Note: If the red Descale Light remains on after finishing the operation, restart the descaling procedure described above.
How To Store Your Keurig K-45?
Sometimes you won’t be using your Brewer; it is important to store it to ensure it remains in good condition properly. By following the steps, you can ensure that your Brewer is always in good working condition and ready to brew your favorite coffee whenever you desire.
- To properly store your Brewer, empty the water reservoir and place it in a dry and secured location. It will help prevent any moisture damage and keep it safe while it is not in use.
Note: Please keep your Keurig K45 in its straight position to prevent water leakage from the inner tank.
- Store your Brewer at room temperature, as placing it in a cold area may cause any residual water to freeze. When you want to use it again, first run three water-cleaning brews.
- To store your Brewer, turn it off, empty the water reservoir, and let it reach room temperature for at least 2 hours if it was exposed to below-freezing temperature before moving.
Troubleshooting
You do not need to ruin your mood if your Brewer starts showing signs of a malfunction because You can fix those problems yourself. Moreover, it is also important to know how to troubleshoot and fix your Brewer because it can save you time and money. Instead of waiting for a professional to come out and repair it, you can fix the issue yourself and get your Brewer up and running again quickly.
The following frequent issues are usually the root cause of your Keurig K-45 malfunction. The following table shows the possible troubleshooting problems and their solutions. Let’s explore!
| Problems | Solutions |
| If Brewer does nothave power. | ● Connect Keurig K-45 to a separate outlet.● Insert the plug firmly.● Use an alternative outlet.● Reset your house’s circuit breaker if necessary.● Make sure the power button is activated and the power light is on. |
| If Brewer is notbrewing. | ● Ensure the K-Cup pack is securely placed in the holder, the handle is fully pressed down, and the blue brew buttons are flashing before brewing.● If the “Add Water” blue light is illuminated, fill the water reservoir to the “MAX FILL” line, but do not exceed it. Ensure the reservoir is properly seated in its base before continuing.If the blue Add Water Light continues to be flashing even after refilling, then I would recommend you contact Customer Service at 1.866.901.BREW (2739)If the “Add Water” light, “Heating” light, and “Small Mug” buttons are all flashing at the same time, please see to the next solution. |
| Blue Add Water Light, red Heating Light, and Small Mug Button are all flashing simultaneously. | ● To fix the mentioned issue, remove the water reservoir and clean it thoroughly (as per instructions given in the cleaning section). Fill the reservoir to the “MAX FILL” line without exceeding it. Reattach the reservoir to the Brewer and ensure it is properly seated. Press the flashing “Small Mug” button to continue. If you have repeated the above procedure twice and the situation still persists, contact Customer Service at 1.866.901.BREW (2739). |
| Brewing a Single Cup. | ● Possibly Exit Needle is clogged.● If needed, clean the K-Cup holder and rinse it thoroughly.● If the Water Reservoir becomes detached during brewing, reattach it, then run a cleaning brew without a K-Cup.● If the red “DESCALE” indicator light is on, descale the Brewer.If the descaling process has been performed on the Brewer twice and it still only brews a partial cup, please contact customer service at 1-866-901-2739 for further assistance. |
| If Brewer shuts offautomatically. | ● Verify that the Auto Off Timer function is not enabled by checking if the “AUTO OFF” light on the LED Control Center is on. If it is, press the black button to turn it off before proceeding with brewing. |
| Water appears in the Brewer base with the Water Reservoir removed. | It is normal for a small amount of water (less than 10ml) to collect in the bottom of the water reservoir when it is not seated in the Brewer for an extended period of time. This should not affect the operation of the Brewer.Use a clean cloth or paper towel to absorb the water.Place the water reservoir back into the Brewer base. |
Helpful Hints
Before I go, I want to share some helpful tips with you so you can have a great experience while using your Brewer.
1. Keep Your Brewer Turned ‘ON’ At All Times
If you want to enjoy a fresh cup of coffee, tea, or hot cocoa whenever you want, I recommend keeping your Brewer turned on at all times. This way, you won’t have to wait for it to heat up. Alternatively, you can set your Brewer to automatically turn off after two hours of inactivity to save energy.
2. Use Bottled Or Filtered Water.
If you want your coffee to taste better, I suggest using filtered or bottled water. Sometimes, the water from your tap may have a bad taste of chlorine or minerals. To avoid this, use filtered or bottled water instead. It will make your coffee taste much better.
3. Customize The Size, Flavor & Brew Perfect For You.
You have endless options available in K-Cup and two in the cup size. However, if you want a solid and intense coffee, use an Extra Bold K-Cup, which contains up to 30% more ground coffee than regular varieties. And The most pro Tip is that a smaller brew size will result in a more intense flavor, while a larger brew will result in a less intense flavor.
4. Plug Brewer Into Its Own Grounded Outlet
Always use a separate grounded outlet to plug your Brewer, as this is a matter of your and your loved ones’ safety. Your Brewer may not work correctly if the outlet is overloaded with other appliances. You should install a separate circuit and outlet for your Brewer.
5. Brewing Into A Travel Mug
If You want to brew coffee into a travel mug, remove the Drip Tray Assembly and place the travel mug on the Drip Tray Base.
6. Descale Your Brewer Regularly.
I recommend you describe your Brewer regularly to maintain the quality of your Brewer and coffee.
Information About Services
This Brewer should only be cleaned and maintained as instructed in this guide. An authorized technician should do any additional service or repairs and be covered by the warranty.
Click Or Call
To get more information, you can watch videos by scanning the QR Code or contact customer survive by calling Keurig.
Scan here.

Have Questions? Keurig Is Here To Help!
Keurig is dedicated to ensuring your satisfaction. If you have any questions or concerns, simply call their customer support team at 1.866.901.BREW (2739) to receive prompt assistance without having to leave the comfort of your own home.
Warranty
Are you worried about the durability of your Keurig K-45 and what happens when it gets itself a severely malfunctions? As a Keurig K-45 owner, you can rest assured that the manufacturer’s warranty covers any malfunctions that may occur within the first year of use. It’s essential to familiarize yourself with the terms and conditions of this warranty policy.
Limited One-Year Warranty
I recommend that you fill out and return the warranty card that came with your Brewer to ensure your purchase details are recorded in Keurig’s system. Keurig guarantees that your Brewer will be free of defects in materials and workmanship under everyday home use for one year from the date of purchase. If a problem arises during this period, Keurig will repair or replace the Brewer at no cost, provided you can provide proof of purchase.
I would advise you to keep the warranty card that accompanied your Brewer and to fill it out thoroughly with your purchase details to ensure they are recorded in Keurig’s system. If a replacement Brewer is required under warranty, it may be a new or previously used unit.
When a replacement Brewer is delivered, it will come with a new one-year warranty. You should also note that only people in the United States and Canada can avail of the service of this warranty. You may also have other legal rights that vary by state and province. This warranty provides you with specific legal rights; it is essential to be familiar with them.
This warranty does not cover any damage or malfunction of the Brewer resulting from the use of non-Keurig Brewed K-Cup brand packs or accessories. If it is noticed that the damage or malfunction was caused by such use, a service fee may be charged by the Keurig company.
What Is Not Covered By The Limited Warranty?
This warranty has certain limitations because Keurig does not offer a warranty for every kind of damage or malfunction in the Brewer.
- The Company will not cover consequential or incidental damages such as property damage.
- It will not cover any incidental costs or expenses that may result from a breach of the warranty, even if they were foreseeable.
- Moreover, this warranty does not cover harm brought on by services provided by companies other than Keurig or its approved service providers, the use of parts other than genuine Keurig parts, or outside factors, including overuse, abuse, improper power supply, or acts of God.
How Can You Obtain The Facility Of Warranty?
In case you want to avail of the facility of warranty, simply call Keurig Customer Service at their toll-free phone number 1.866.901.BREW (2739). Remember never to return your Brewer for servicing without first speaking to Keurig Customer Service to get an Authorization to Return number (ATR).
Conclusion
With the knowledge gained from this article, you can now easily enjoy your Keurig B-41 Brewer. Now there will be no confusion or complications when brewing your favorite cup of coffee, tea, or hot cocoa. If you still have ambiguities, I recommend rereading the article. I am signing off with the hope that you find the brewing process as simple and enjoyable as the taste of a delicious cup of coffee.
If you are a coffee enthusiast like me, you should visit www.coffeeaim.com for the most amazing content on your favorite subject, coffee.
FAQs
Does The Keurig K-45 Have A Water Filter?
The Keurig K-45 is equipped with a water filter starter kit. The requirement for a water filter is determined by the quality of the water source you are using.
Is It Ok To Use Keurig Without Filter?
While it is possible to use tap water or any other water source without a water filter on the Keurig machine, the purpose of the water filter starter kit is to eliminate any unpleasant taste or odor from the water used for brewing coffee. It is not a necessary functional component of the Brewer. Many users prefer to use filtered water from their fridges or purified bottled water for a better taste experience.
Can You Clean A Keurig With Just Dish Soap?
It is possible to use dish soap for cleaning the water reservoir of your machine, provided that you rinse it thoroughly to remove any soapy residue before putting it back into the machine.
Do I Need To Descale My Keurig If I Use Filtered Water?
The frequency of descaling is determined by the mineral composition of your water. This is why I recommend the use of filtered or bottled water. Calcium deposits or scale can accumulate in your Brewer and impair performance. Descaling your Brewer every 3 to 6 months can help avoid this from happening.