Quick Navigation
Hi there! Are you feeling a little lost on how to use your Nespresso Gran Lattissima? I understand operating a coffee machine can be overwhelming. That’s why I have written this comprehensive guide to help you get maximum benefits from your coffee machine. You don’t need to look further; you can trust me since I am here to cheer you up with a bold, rich espresso made from your Nespresso Gran Lattissima.
By following this guide, you will master the art of homebrewing and make a perfect cup of coffee in no time with your coffee machine. Ready? Let’s begin your brewing journey with your Nespresso Gran Lattissima.
Precautions Of Nespresso Gran Lattissima
Before we get into the specifications of your Nespresso Gran Lattissima Plus, I want a few minutes of yours. In order to enjoy your coffee in peace, it is crucial to be aware of potential risks and follow precautions to avoid accidents like electric shocks, spilling hot beverages, and scalding by touching hot surfaces while brewing. It is better to operate your machine by taking the right precautions.
Please read the Safety Precautions by clicking the link below and remember them for a safe brewing journey with your coffee machine.
Specifications Of Nespresso Gran Lattissima
Note: If any of the below features does not match your preferences, you can return the appliance to Nespresso.
Nespresso Gran Lattissima is designed with fantastic features to give you a versatile coffee brewing experience. The machine has a glass touch panel of nine buttons featuring seven coffee recipes, which include three black coffee drinks and four milk recipes. Thanks to its separate milk frothing system, it gives your Cappuccino and Latte Macchiato a foamy texture. In contrast, the two options are hot milk and hot foam. The Gran Lattissima warms up in quick 25 seconds, so you can brew your drink in under a minute.
Also, it offers an easy self-cleaning option that allows you to clean the Milk container and Spout while sipping your freshly prepared Latte Macchiato. This feature is quite helpful for lazy people like me. I must say that Nespresso Gran Lattissima is like having a cafe at your place. The list of features will not end here; let’s move forward and check some other features mentioned below.
| No. | Features | Specifications |
| 1. | Power | 1300 Watt |
| 2. | Voltage | 120 V |
| 3. | Frequency | 60 Hz |
| 4. | Pressure | 19 bar / 1.9 MPa |
| 5. | Weight | 5.18 kg / 1141.9 lb |
| 6. | Water Tank Capacity | 1.3 L / 44 oz |
| 7. | Milk Container Capacity | 17 oz |
| 8. | Used Capsule Capacity | 10 Capsules |
| 9. | Dimensions | Width: 7.99 in / 20.3 cm Depth: 10.79 in / 27.4 cm Height: 14.4 in / 36.7 cm |
Unbox Your Nespresso Gran Lattissima
Ready to unbox your package of Nespresso Gran Lattissima? You can already sense the aroma of freshly prepared coffee, don’t you? Let’s unbox the package and see what’s inside. You will find some essential items in the box while unboxing your machine. So, check the package carefully. You can call the Nespresso Club and request a replacement if any items are not in the box. Let’s check what items you will find inside the box.
1. Coffee Machine

The first thing you see in the box is your Nespresso Gran Lattissima coffee maker. Now you can savor three types of black coffee with a touch of a button and get the coffee shop experience right in your home with six different milk recipes.
2. User Manual

You get this user manual with your coffee machine. It is for your assistance as it has all the instructions for operating your machine. Keep this user manual inside the Nespresso folder box and place it safely so you can easily find it whenever you want to read instructions.
3. Capsules Set

There is a trail pack of 14 Nespresso capsules, which came with your machine. All the capsules are covered with aluminum, enclosing unique flavors inside. You can enjoy the amazing flavors of Nespresso coffee without purchasing the capsules for the first brew. The trial pack might differ from the pack displayed in the picture below.
4. Welcome To Nespresso Folder

Welcome to the Nespresso folder is a box that came with the package of Nespresso Gran Lattissima. It has information booklets about your coffee machine and also, and you can keep the user manual inside this box.
5. 1x Water Hardness Test Stick, In The User Manual

You will find one water hardness test stick on the first page of the user manual of Nespresso Gran Lattissima. This stick is to calibrate or monitor the water hardness level of water which you will use to brew your coffee. Then program the water hardness setting on your coffee machine based on the water hardness level.
Type Of Nespresso Gran Lattissima
One of the best things about your Nespresso Gran Lattissima is that it comes with a variety; it has a separate Rapid Cappuccino System, which you can connect to your machine when you brew different milk-based beverages. And remove the Rapid Cappuccino System when you want an espresso and lungo shot, as shown below.
A. Machine Without Rapid Cappuccino System

You can use your Nespresso Gran Lattissima without Rapid Cappuccino System to brew Espresso and Lungo shots. Your machine looks like the picture mentioned below.
B. Machine With Rapid Cappuccino System ( For Milk-Based Recipes)

Rapid Cappuccino System is for milk-based beverages; connect it to the steam connector of the machine when you want to brew any milk recipe, including Cappuccino, Latte Macchiato, Cafe Latte and Flat White. This is how your Nespresso Gran Lattissima looks with the Rapid Cappuccino System.
Parts Of Nespresso Gran Lattissima
Before we dive into the brewing process, it is crucial to know about parts of your coffee machine to produce the finest cup possible and maintain or troubleshoot your coffee machine. When you become aware of the function of each part, you can improve the brewing process by making necessary adjustments. Spend a few minutes reading about the parts of your Nespresso Gran Lattissima.
- Water Tank

A large transparent water tank sits at the back of your Gran Lattissima coffee maker. Its capacity is 1.3 L / 44 oz, allowing you to brew several drinks without refilling it. It has a MAX Fill line and a descaling mark indicating how much water is enough to fill the water tank.
- Lever

The lever is the handle that covers the capsule compartment. To insert a capsule, lift the lever to open the capsule compartment.
- Capsule Compartment

The Capsule compartment is the holder where you put the capsule to brew coffee. It is located on the head of the machine and enclosed with the help of a lever. To open the capsule compartment, lift the lever.
- Steam Connector Door

There is a small window on the machine’s front face, which is a steam connector door. This door has a steam connector inside to attach the Rapid Cappuccino System. You can slide the door to the right and open the steam connector to attach the Rapid Cappuccino System.
- Steam Connector

The Steam connector is present on the inside of the steam connector door. It is for the attachment of the Rapid Cappuccino System.
- Coffee Outlet

The coffee outlet is a large round dispenser on the front of the machine, from where the coffee flow comes out.
- Drop Collector Housing

Drop collector housing is where the drop collector is situated on the machine.
- Used Capsule Container

The used capsule container is below the capsule compartment, which has a capacity of 10 used capsules.
- Drip Tray

A drip tray is beneath the used capsule container, where the leaked water is stored. It is an easily removable and washable drip tray.
- Small Cup Grid

The small cup grid is to place small cups while making Espresso or small glass drinks. It is dishwasher friendly, and you can also clean it by hand. It is like a plate/lid on the small cup support.
- Small Cup Support

The Small cup support is used to support a small cup. If you are using a large mug, then remove it and place the mug on the base.
- Cup Grid

A Cup grid is a stainless steel grid where you can place a large cup to brew coffee or a container while cleaning or descaling your machine. The cup grid also allows the overflowing liquid to pass and fall into the drop collector.
- Drop Collector

The drop collector is a tray at the bottom below the cup grid. It is to store overflowing liquid or spills.
- Descaling Pipe Storage

There is a small tray at the back of your Nespresso Gran Lattissima, which is known as descaling pipe storage. It stores the descaling pipe inside. When you need to descale your coffee machine, open the small descaling pipe storage cover to take out the descaling pipe.
- Descaling Pipe

A Descaling pipe is a black plastic nozzle used to dispense the mixture of descaling solution water from the machine. When you need to descale your coffee machine, attach the descaling pipe to the steam connector of your coffee machine. After descaling, store it inside the descaling pipe storage door at the back of the machine.
- Descaling Pipe Cover

The Descaling pipe cover is to close the descaling pipe storage tray at the back of the machine.
- Descaling Alert

On top of the machine, there is a descaling sign. When the machine needs descaling, the descaling sign shines orange.
- Milk System Cleaning Alert

The milk system cleaning alert is on the top right beside the descaling and power buttons. After each milk recipe, the cleaning alert shines orange.
Touch Beverage Buttons
Nespresso Gran Lattissima has a nine one-touch button panel. Seven represent different recipes, and two buttons are for froth and hot milk. Let’s move forward and check the purpose of each button.
- On-Standby Button

The on-standby button is a round button on the machine’s top corner; it is used as a power button to switch on and off the machine. (standby mode consumption 0.22 Wh)
- Lungo

The lungo button is to brew a 110ml / 3.7 oz long cup of coffee.
- Espresso

The espresso button is to brew a 40ml / 1.3 oz strong shot of coffee.
- Ristretto

The Ristretto button is to brew a 25 ml / 0.84 oz concentrated shot of coffee.
- Cappuccino

The Cappuccino button prepares a creamy cappuccino, a milk-based beverage characterized by a milky coffee topped with a thick layer of milk foam.
- Flat White

The Flat white button adds a generous amount of frothed milk to an espresso coffee.
- Cafe Latte
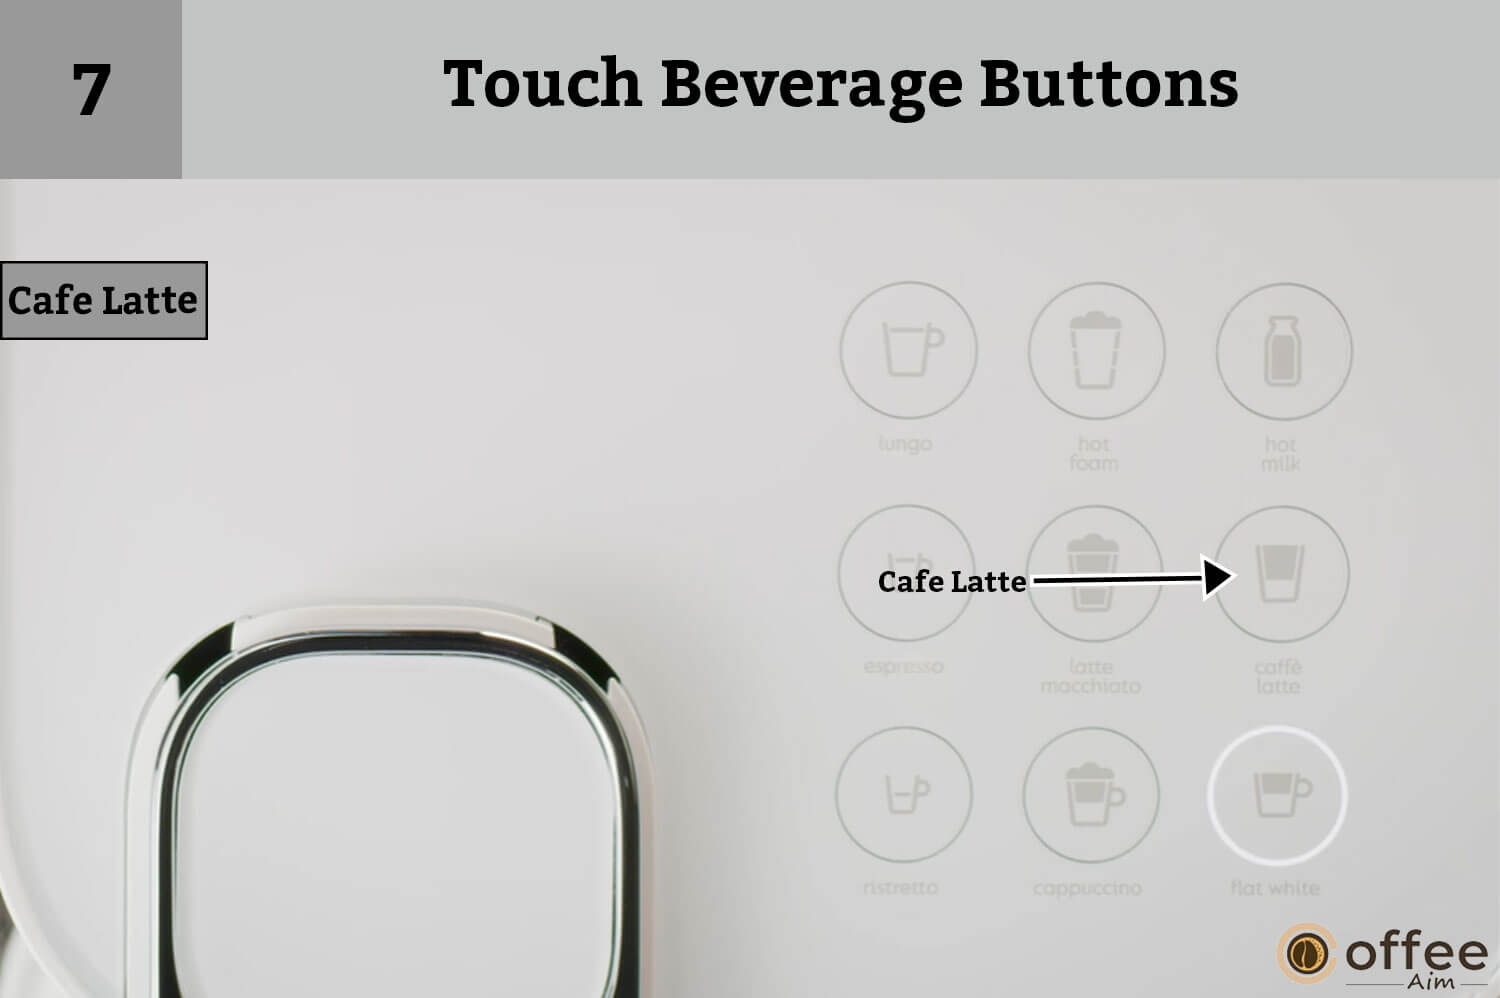
The Cafe latte button adds a generous amount of hot, slightly frothed milk to a long coffee.
- Hot Milk

The hot milk button prepares a steaming glass of milk. You can use hot milk to prepare hot chocolate.
- Latte Macchiato

The Latte Macchiato button prepares a milk-based recipe in which a glass full of frothed milk is topped with coffee.
- Hot Foam

The hot foam button is to brew hot foam. You can use the hot foam button to customize a drink by brewing a shot of Espresso or Lungo and topping it with hot foam.
Rapid Cappuccino System
Rapid Cappuccino System is the milk frothing system of Nespresso Gran Lattissima, especially for milk-based beverages. It consists of a 0.5L / 17 oz milk container with a milk spout on the side of it, which dispenses hot milk foam and hot milk while brewing a milk recipe. The rapid cappuccino system consists of different components. Let’s check them out to get familiar. Then you can easily assemble or disassemble the rapid cappuccino system.
- Milk Froth Regulator Knob

The milk froth regulator knob is a circular knob attached to the milk container lid. It has three different positions; you can turn it to either froth, clean, or remove position according to your preferences. But it is not for the adjustment of froth texture because the rapid cappuccino system froths the milk at a single temperature.
- Milk Container Lid

The milk container lid is to close the milk container. The lid has a froth regulator knob at the top, a detach button on its side, a milk spout on the left, and the rapid cappuccino system connector at the back.
- R.C.S Housing

Rapid cappuccino system housing is where the Milk frothing system of your Nespresso Gran Lattissima is connected.
- R.C.S Connector

The Rapid Cappuccino System connector is located at the back side of the milk container lid. It is used to connect the Rapid Cappuccino System to the steam connector of the machine.
- Lid Detach Button

The lid detaches buttons are present on both sides of the milk container. Push the detach button, and the lid will separate from the milk container.
- Milk Spout Connector
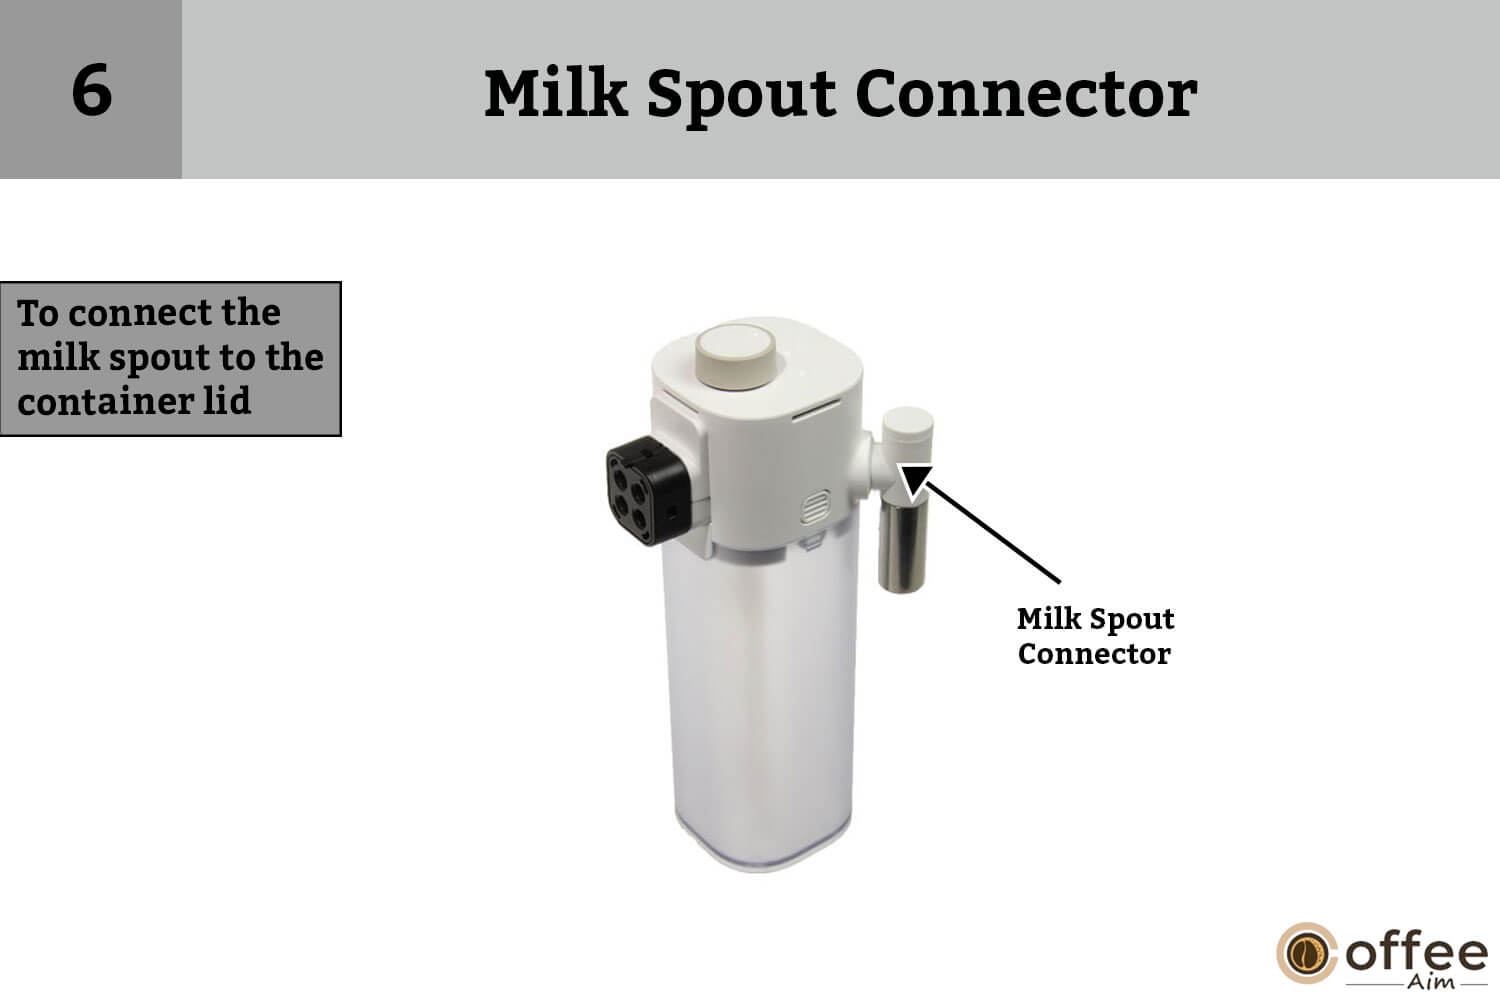
The milk spout connector connects the milk spout to the milk container lid.
- Milk Spout

The stainless steel milk spout is attached to the milk container lid, from where the milk froth comes out. You have to adjust it towards the center of the cup work.
- Milk Aspiration Tube

The milk aspiration tube is an elongated tube attached to the lid of the milk container. It sucks the frothed milk from the container and releases it into the cup through the milk spout.
- Milk Container

The milk container is a 0.5 L /17 oz removable plastic jug placed on the right grid of the coffee machine. It has a milk frothing system that froths the milk to prepare a milk-based recipe. Fill the milk container for a milk recipe, and always use skimmed or semi-skimmed milk in the milk container. Do not use raw milk.
- ‘’Remove Knob’’ Position

The ‘’Remove knob’’ position is to remove the knob. When you clean the rapid cappuccino system by hand, turn the milk froth regulator knob to the remove knob position to remove the knob.
- ‘’Froth’’ Position

The ‘’Froth’’ position is to activate the frothing of milk. Rotate the Milk froth regulator knob to the froth position while brewing a milk-based beverage.
The froth position indicates it is to activate the milk frothing.
- ‘’Clean’’ Position

The ‘’Clean’’ position is to activate the cleaning of the milk frothing system. Rotate the milk froth regulator knob to the clean position after brewing a milk-based beverage to clean the system.
Milk Recipes
Four milk-based beverage options are available on your Nespresso Gran Lattissima: Cappuccino, Cafe Latte, Latte Macchiato, and Flat White. Each beverage has a distinct taste and texture through its unique recipe. Let’s check out the details of each drink.
| CAPPUCCINOA cappuccino is a milky coffee topped with a thick layer of milk froth on top. | CAFE LATTEA caffe latte is a coffee to which a generous amount of hot, slightly frothed milk is added. | LATTE MACCHIATOA latte macchiato is a recipe in which coffee is poured into a glass full of frothed milk. The 3 “milk-coffee-froth” layers characterize it. | FLAT WHITEA flat white is an espresso coffee to which a generous amount of hot, slightly frothed milk is added. |
Recommended Proportion Quantity:100ml/ 3.38 fl oz milk foam. 40ml/ 1.35 fl oz coffee. Quantity:100ml/ 3.38 fl oz milk foam. 40ml/ 1.35 fl oz coffee. | Recommended Proportion Quantity:110ml/ 3.71 fl oz coffee140 ml/ 4.73 fl oz milk60ml/ 2.02 fl oz milk foam Quantity:110ml/ 3.71 fl oz coffee140 ml/ 4.73 fl oz milk60ml/ 2.02 fl oz milk foam | Recommended Proportion Quantity:230 ml/ 7.77 fl oz milk foam40ml/ 1.35 fl oz coffee Quantity:230 ml/ 7.77 fl oz milk foam40ml/ 1.35 fl oz coffee | Recommended Proportion Quantity: 40ml/ 1.35 fl oz coffee100ml/ 3.38 fl oz milk |
| Choice Of CoffeeRistretto or Espresso Capsule | Choice Of CoffeeLungo Capsule | Choice Of CoffeeRistretto or Espresso Capsule | Choice Of CoffeeEspresso or Ristretto Capsule |
| Choice Of CupA Cappuccino Cup | Choice Of CupA Recipe Glass | Choice Of CupA Recipe Glass | Choice Of CupA Cappuccino Cup |
| TipsThe milk froth quality can be affected by the type,freshness and temperature of the milk (ideally stored at 4°C/ 39.2 °F). | TipsThe thin layer of milk froth on top should be about 1 cm. It is usuallybrownish, tainted with coffee color. | TipsThe milk froth quality can be affected by the type,freshness, and temperature (ideally stored at 4°C/ 39.2 °F). | TipsThe layer of milk froth on top should be thin by about half a centimetre. It is usually brownish, tainted with coffee color, and more liquid and shiny with tiny bubbles. |
How To Use Nespresso Gran Lattissima For The First Time Or After A Long Period Of Non-Use
Are you excited about using your Nespresso Gran Lattissima for the first time? But looking for simple step instructions? Operating a coffee machine is not as difficult as it appears. With a few simple steps, you can operate it efficiently. So don’t worry! I will walk you through each step, from setting up the machine to savoring your perfectly brewed cup of coffee.
Let’s get started!
CAUTION: Please read safety precautions first to avoid risks of electric shock.
NOTE: To switch off the machine, press the on-standby button (standby mode consumption 0.22 Wh)
- Unwrapping Of Nespresso Gran Lattissima

Start by removing all the packaging material, such as tape or plastic wrap. Then remove the drip tray, water tank, and capsule container. Adjust the cable length and place the excess cable in the cable guide of the machine.
- Rinse The Water Tank
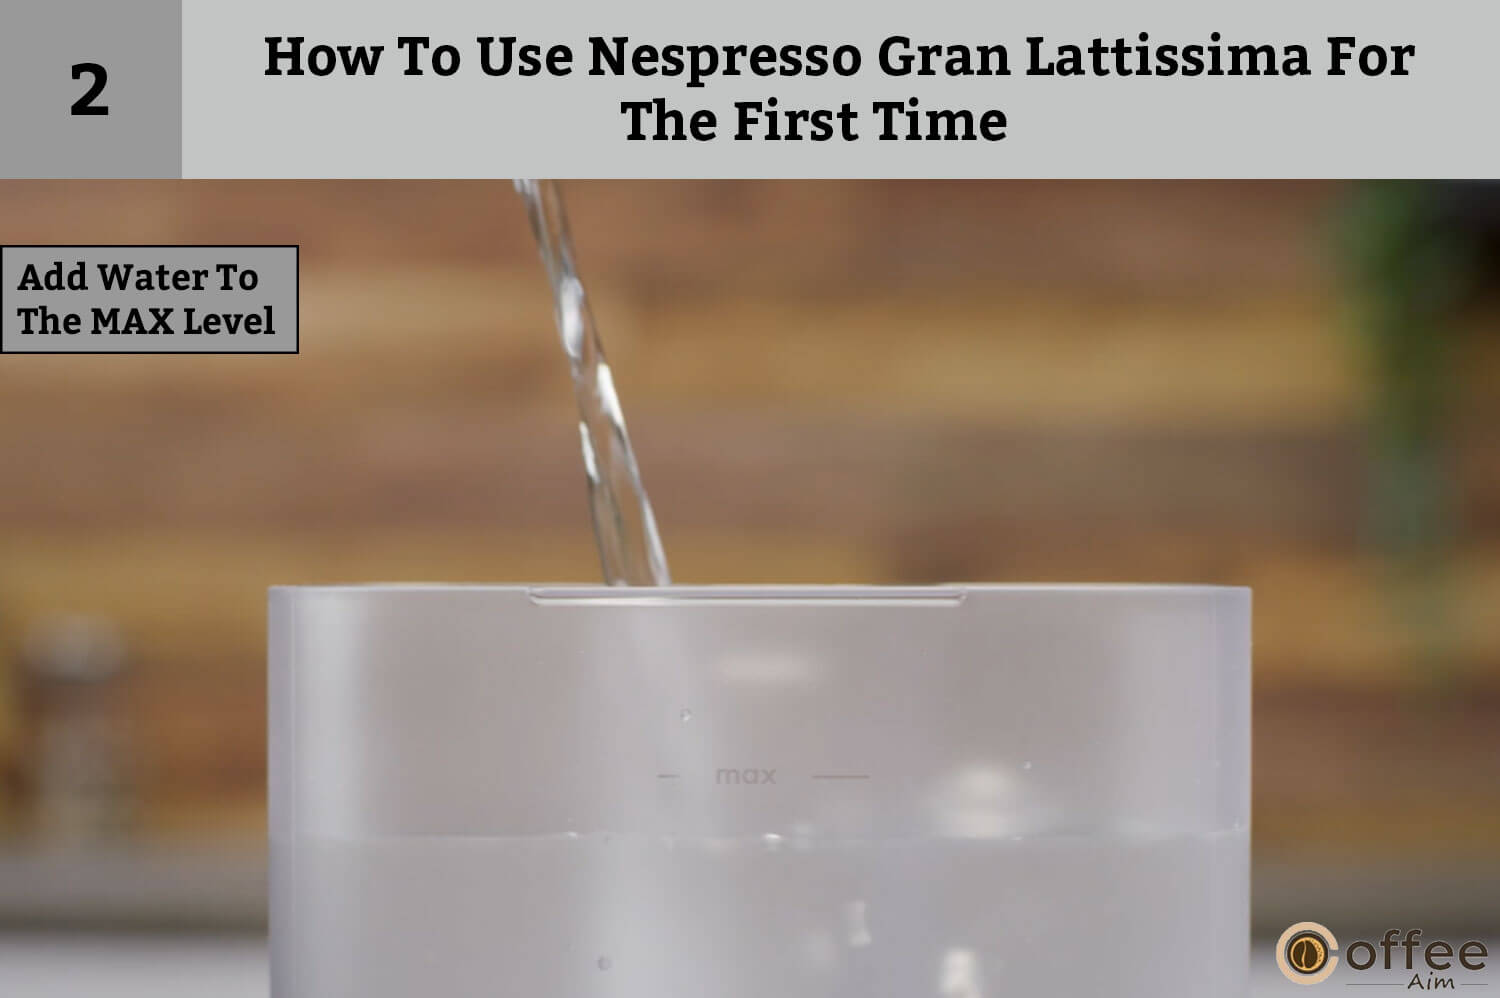
Before you start operating your coffee maker, wash the water tank. Then fill it with fresh drinking water to the MAX FILL level. Then, connect the power cable to the socket.
- Power On Your Machine
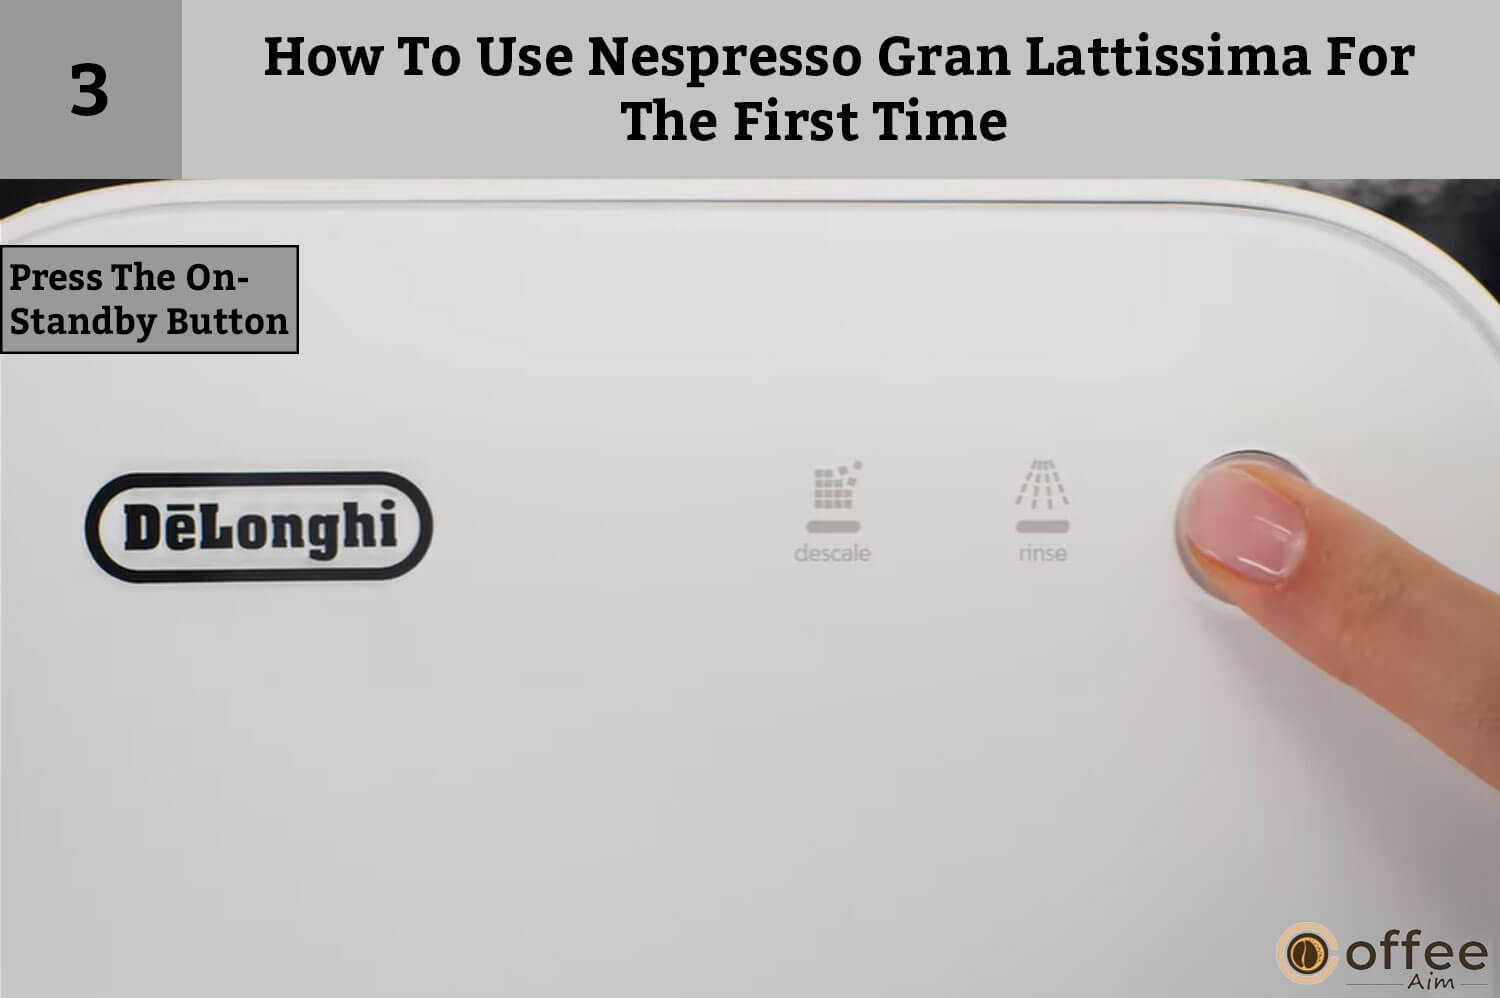
Turn on your Nespresso Gran Lattissima by pushing the on-standby button. The coffee button light blinks for 25 seconds till the machine heats up.
CAUTION: When you plug the cable into the socket, please check for ground continuity.
- Run Cleaning Cycle

The first use of your Nespresso Gran Lattissima machine requires cleaning to ensure the machine is free from impurities. During the manufacturing process, some water is used to test the machine, which may leave some impurities behind and can affect the taste of your coffee. To start cleaning, place a container under the coffee outlet, push the Lungo button, and perform the cleaning cycle three times.
NOTE: Machines are properly tested after being manufactured. You may find some coffee grounds in the rinsing water.
- Disassemble And Clean The Rapid Cappuccino System

Detach the Rapid Cappuccino System and disassemble it, to clean all six parts of it in the dishwasher. In the absence of a dishwasher, perform hand washing of the Rapid Cappuccino System. After washing, reassemble the parts and attach the R.C.S to the machine and turn the milk froth regulator knob to the ‘’Clean’’ position and clean the system before you prepare a milk recipe.
Time To Brew Your Coffee
Are you under stress because of the never-ending workload? Then it’s time to lift your mood with a warm cup of coffee. Whether you are a coffee expert or a newbie, this guide will show you how to brew a perfect espresso with your Nespresso Gran Lattissima without making any blunders. Ready to start your brewing journey? Let’s get started!
NOTE: You can press any coffee button during the heating. When the machine is ready, the coffee will automatically flow out of the coffee outlet.
- Insert A Capsule

To brew your coffee, the first thing you need is a capsule. So, insert the capsule by lifting the lever. Then close the lever.
- Place A Cup

Ensure you have closed the lever after inserting the capsule. Now, place a cup under the coffee outlet.
- Choose The Coffee Type And Press The Button

Three coffee varieties are available in your Nespresso Gran Lattissima. Extremely concentrated shot of Ristretto (25ml), bold and rich Espresso (40ml), and less concentrated long black Lungo (110ml). Press the related button after selecting the type of coffee you want to brew. Preparation will stop automatically.
- Press The Button To Stop The Coffee Flow
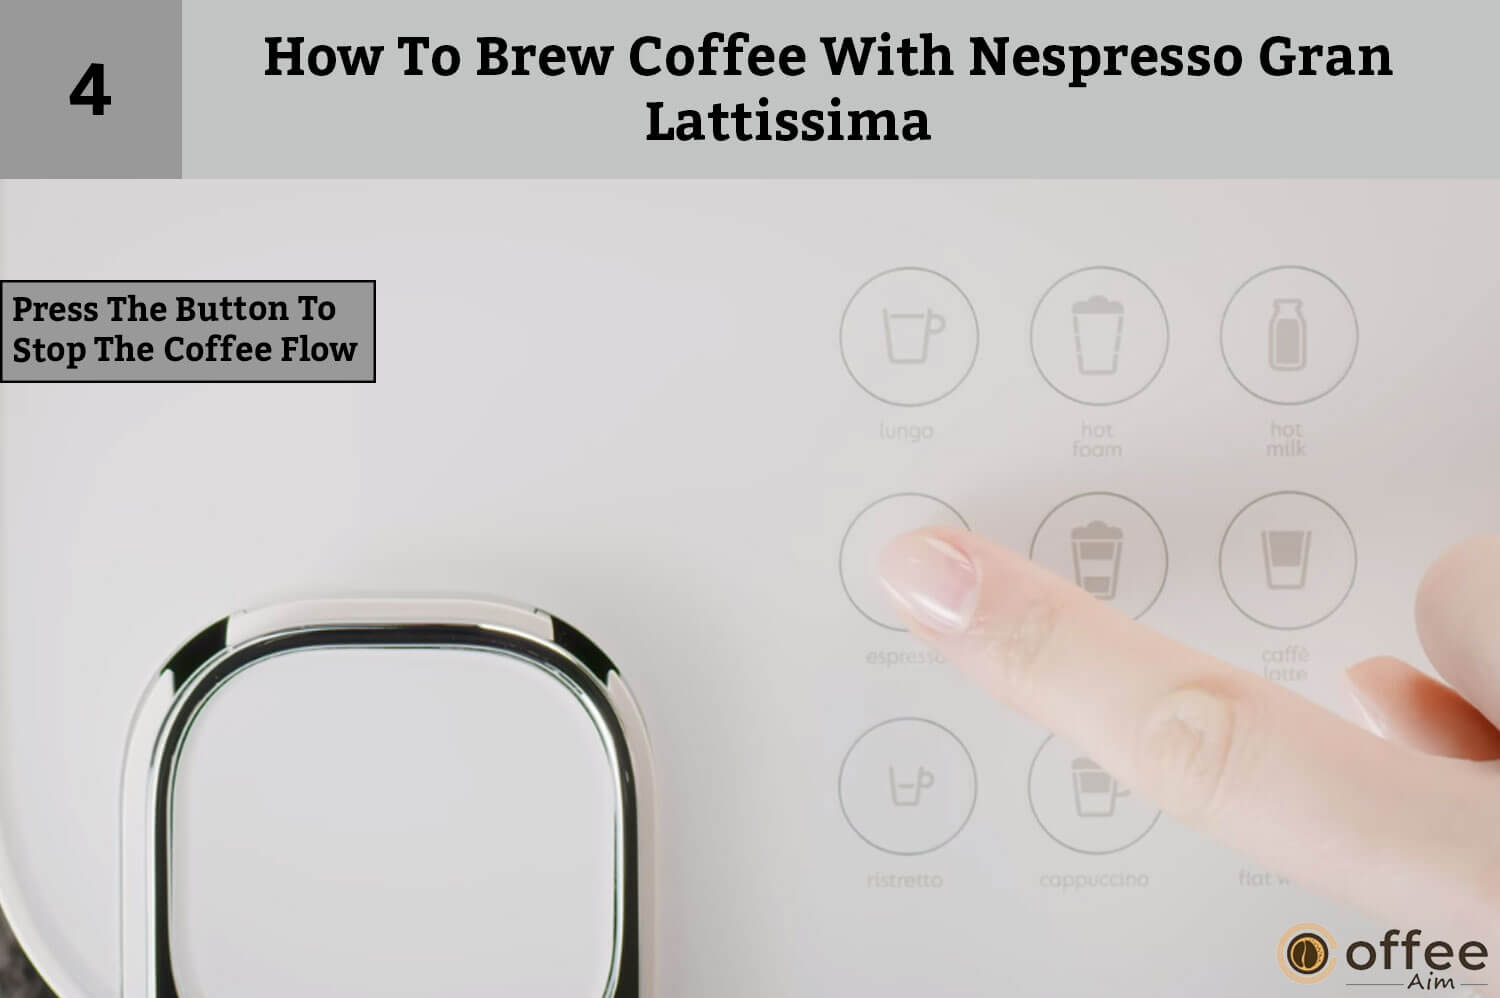
If you want to stop the coffee flow manually or fill your cup to the top, press the selected coffee button through which you start brewing. Then lift the lever to allow the ejection of the used capsule into the capsule container.
Assembling/ Disassembling Of Rapid Cappuccino System
Assembling and disassembling the Rapid Cappuccino System is a simple process as long as you know a few simple steps. Once you know the right way to separate the parts of it, you can easily reassemble them in a matter of minutes. Scroll down to read the steps one by one about how you can assemble or disassemble the frothing system of your machine.
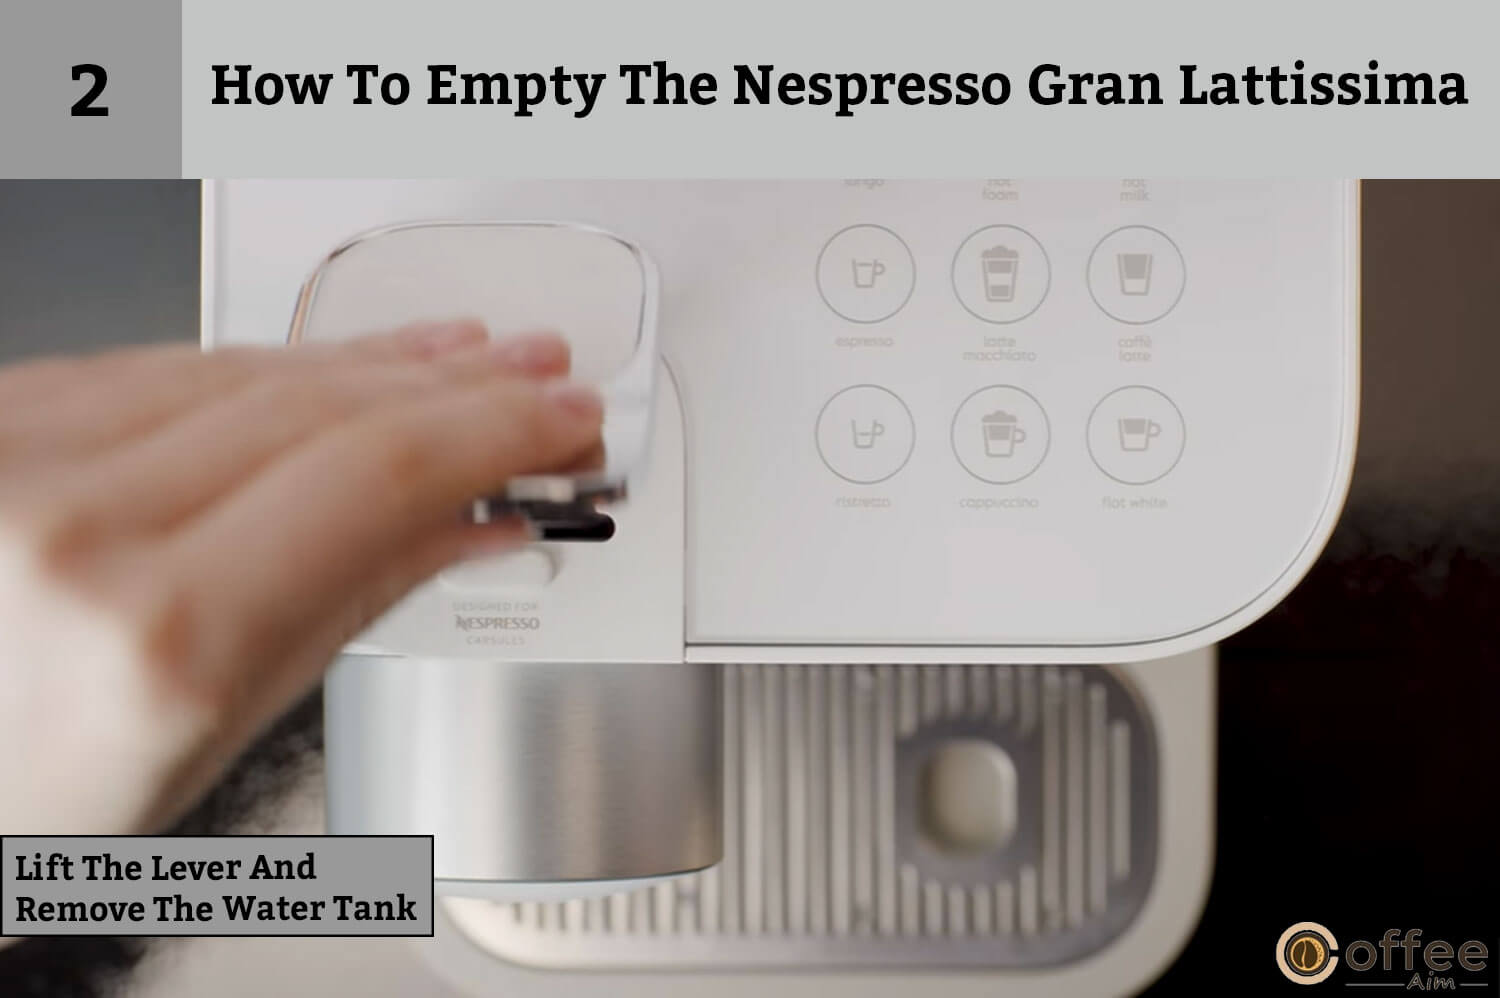
- Remove The Milk Container

Press the side buttons on the milk jug to remove the milk container. Then disconnect the milk aspiration tube.
CAUTION: When assembling the Rapid Cappuccino System, insert the aspiration tube firmly so it cannot move.
- Detach The Milk Spout

Set the milk spout in the vertical position to detach it.
CAUTION: The black rubber of the milk spout is not detachable.
- Unlock The Connector

To unlock the connector of the Rapid Cappuccino System, turn it to unlock position and remove it.
- Remove The Milk Froth Regulator Knob

To remove the milk froth regulator knob, move it to the remove position and detach it.
How To Make Cappuccino Or Latte Macchiato
Are you planning to impress your friends with a cafe-style Cappuccino at your home? But you don’t know how to prepare a Cappuccino with your Nespresso Gran Lattissima? Then, it’s time to learn it. Here, I will guide you through making a perfect creamy Cappuccino or Latte Macchiato with a few simple steps. Let’s grab a cup and dive into the process.
NOTE: For the perfect milk froth in your coffee, always use skimmed or semi-skimmed cow milk at refrigeration temperature (about 4°C/ 39.2 °F). Vegetable milk is not intended to work with the milk system.
- Fill The Milk Container

To prepare a milk-based drink, the first thing you need is milk. So, fill the milk container to the MAX level, and make sure you are not overfilling the milk container. Then close the milk container by placing the lid.
- Insert The Capsule And Connect The Rapid Cappuccino System

Open the lever, put the capsule in the capsule compartment then close the lever. Attach the Rapid Cappuccino System to the machine; it takes around 15 seconds to heat up.
- Place Your Cup

Now place your cup of Cappuccino or glass of Latte Macchiato beneath the coffee outlet. Adjust the position of the milk spout by moving it towards the center of the cup. Move the milk froth regulator knob to the froth position.
- Select The Milk Recipe

Press the milk recipe button you want to brew.
Caution: You must not keep the milk in a refrigerator for more than two days. If the milk container is left outside the fridge for more than 30 minutes, disassemble the rapid cappuccino system and clean all the parts of it. Dishwashing or hand washing is recommended.
- Cleaning Alert
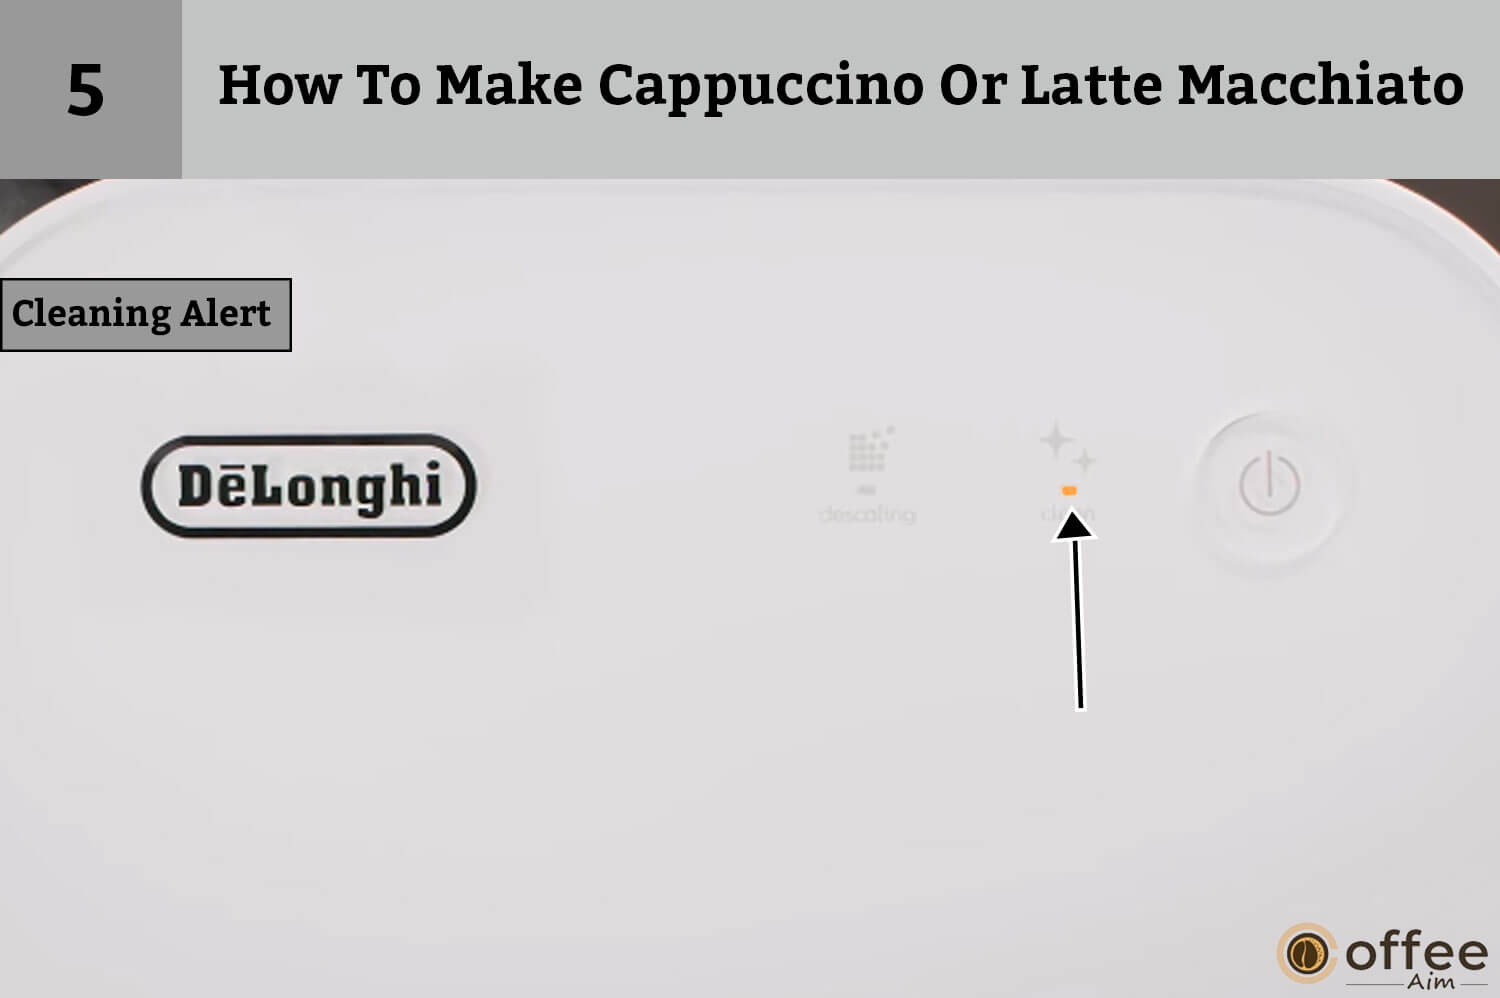
When the milk recipe preparation completes, a cleaning alert will appear as an orange light to indicate the cleaning of the Rapid Cappuccino System is required.
- Start Cleaning

To start cleaning, place a cup under the coffee outlet and move the milk froth regulator knob to the clean position. As the milk system rinsing starts, hot water and steam flow through the milk spout. The rinsing will stop automatically.
- Remove The Capsule

Lift the lever to allow the capsule ejection into the used capsule container.
- Turn The Knob To Froth Position

Once the rinsing cycle completes, the cleaning alert will disappear. Then move the milk froth regulator knob to the froth position.
- Place The Rapid Cappuccino System In Refrigerator

If you find milk in the Rapid Cappuccino System, detach it from the machine, place it immediately in the refrigerator, and close the steam connector door.
- Clean The Rapid Cappuccino System

When the milk in the container is insufficient for the next milk recipe or two days, have passed. Disassemble the Rapid Cappuccino System and clean all the parts on the upper side of the dishwasher before you fill it again.
Daily Care Of Nespresso Gran Lattissima
Avoid using any strong cleaner or chemical agent. Take a damp cloth and a mild cleaner to clean the machine’s surface. You must not clean the machine parts in the dishwasher except the drip tray, capsule container, and Rapid Cappuccino System. Before you place any part of the machine in the dishwasher, always ensure it is dishwasher safe or not.
- Remove And Clean The Parts Of The Machine

Take out the water tank from the machine, drain the water, and rinse it before you fill it again with potable water. Lift the lever to allow the ejection of the used capsule in the capsule container. Remove the cup support, drip tray, and capsule container and rinse it.
- Press The Lungo Button

Place a container below the coffee outlet and press the Lungo button to start rinsing.
- Clean The Coffee Outlet

Take a clean damp cloth to clean the surface of the machine and the coffee outlet.
Handwashing Of Rapid Cappuccino System
For ideal cleaning of the Rapid Cappuccino System, we recommend dishwashing, but you can wash the parts of the Rapid Cappuccino System by hand in case of the absence of a dishwasher. Follow the procedure of dishwashing each time you use the Rapid Cappuccino System.
- Disassemble The Rapid Cappuccino System

To rinse the Rapid Cappuccino System, disassemble it and rinse thoroughly with hot water (40°C/ 104°F) to remove any milk residues. Also, use a sponge to get rid of all the visible dirt.
- Soak The Parts In Hot Water
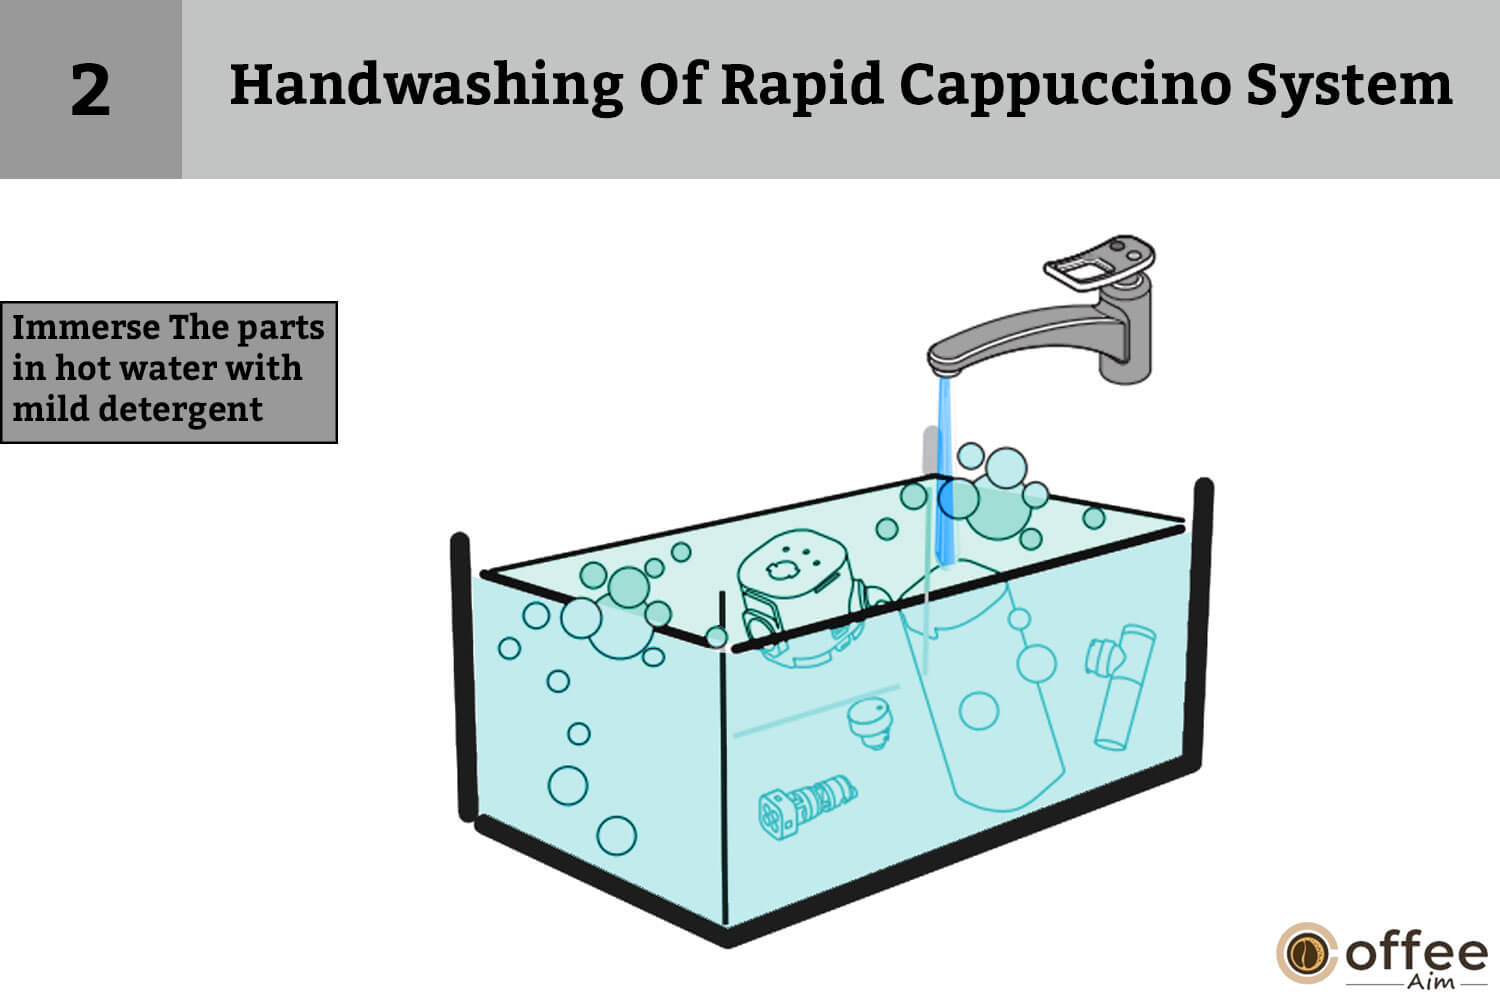
Immerse the parts of the Rapid Cappuccino System in hot water (40°C/ 104°F). Wash the parts thoroughly in hot water with a mild cleaning agent for 30 minutes. Avoid using a strong cleaning agent.
- Clean The Milk Container

Use a mild cleaning agent to clean the inside of the milk container, the milk spout connector, and the milk knob, and wash them with hot water. Ensure the air inlet is clean and clear to get the perfect foam in your cup. Avoid using anything abrasive which may cause a scratch on the surface of the milk container.
NOTE: If the Rapid Cappuccino System is still dirty after cleaning, we recommend you purchase a new one by contacting the service center.
- Reassemble The Parts Of the Rapid Cappuccino System

Use a new, clean towel, cloth or paper to dry the parts of the Rapid Cappuccino System and reassemble them. But if the Rapid Cappuccino System is very dirty, you must perform the rinsing two times by turning the knob to the (CLEAN) position. As the rinsing starts, steam and hot water will flow out of the milk spout.
How To Program The Volume In Nespresso Gran Lattissima
The temptation of getting your desired dose of coffee before you open your eyes in the morning is a daydream. And with the programmable feature of Nespresso Gran Lattissima, you don’t have to wait much. Follow the steps below to program your coffee machine according to your preference.
- Activate The Programming Mode

To activate the programming mode, touch the button relative to the drink you want to program and hold it for three seconds. As the preparation starts, the buttons will start blinking.
- Programming Completed

When the flow reaches the desired volume of your drink, release the button. If there are additional ingredients in the recipe, touch the button one more time and hold it until the flow reaches the desired level. When the final ingredient of the recipe is delivered, the button blinks three times to confirm the new drink volume. Your machine has saved the volume for future preparations.
How To Restore The Volume To Factory Settings In Nespresso Gran Lattissima?
Suppose you have programmed your drink for the Lungo button, but now you want to program it for the Espresso button; how can you do it? You can reprogram your drink by restoring the default settings. Here is a quick guide to restoring the default settings in your Nespresso Gran Lattissima.
- Power Up

Switch on the machine by pressing the on-standby button.
NOTE: Remove the milk container.
- Enter The Menu Mode

To enter the menu mode, touch the flat white and hot milk buttons simultaneously and hold for three seconds. The cleaning and descaling alert will start blinking.
NOTE: If you do not perform any action within 30 seconds of entering the menu mode, the machine will exit the menu mode automatically. And you can exit the menu mode by pressing the hot milk and flat white button together for three seconds.
- Press The Flat White Button

Now, press the flat white button, and it will start blinking.
- Press The Flat White Button Again

As you press the flat white button again, it will blink three times to confirm restoring volume to factory settings.
Factory Settings
- Programmable coffee volume ranges from 15 to 130ml (from 0.50 to 4.39 fl oz).
- The programmable max milk volume is 400ml (13.52 fl oz).
CAUTION: If you have programmed the coffee volume to more than 150ml/ 3.55 fl oz. Allow the machine to cool down for five minutes before you brew the next recipe, to avoid the risk of overheating.
NOTE: The milk froth volume will be affected by the type of milk and its temperature.
NOTE: To get the best in-cup results for each coffee type, we recommend keeping the factory settings for Espresso and Lungo.
| Recipe | Ingredients | Quantity (ml / fl oz) |
| Coffee | 110/3.71 | |
| Coffee | 40/1.35 | |
| Coffee | 25/0.85 | |
| Milk | 200/6.76 | |
| MilkMilk FoamCoffee | 140/4.37140/4.3740/1.35 | |
| Milk FoamCoffee | 100/3.7140/1.35 | |
| Coffee | 150/ 5.07 | |
| CoffeeMilk Milk Foam | 110/3.71140/4.3760/2.02 | |
| 1. Coffee2. Milk | 40/1.35100/3.71 |
Time To Descale Your Nespresso Gran Lattissima
If you notice an orange light illuminating the descaling button, prepare to descale your machine right away because this descaling alert indicates that this is the time to descale your coffee machine. You must not ignore this alert, as it appears only when the mineral deposits of our water start to build up inside your machine.
So, follow the process below to ensure your machine will run efficiently for the rest of its life and your coffee will taste as good as it did the first time.
Note: The descaling process will take approximately 20 minutes.
- Descaling Alert

When the orange light illuminates on the descaling alert, descale your machine immediately.
- Remove The Capsule

Lift the lever to allow the ejection of a used capsule in the capsule container.
- Add Descaling Agent

Add 100 ml (3.71 fl oz) of the descaling agent to the water tank and fill the water to the descaling mark on the tank (~500 ml/ 16.9 fl oz). Also, empty the cup support, used capsule container, and drip tray.
- Connect The Descaling Pipe

Take the descaling pipe from the back of the machine and attach it to the steam connector of your machine. Then place the water tank in position. The machine enters the descaling mode.
- Orange Light Blinks

As the machine enters the descaling mode, an orange descaling alert will blink throughout the process. The flat white button illuminates white.
- Place A Container

Place one container of 1 Litre / 34 fl oz under the coffee outlet and one below the descaling pipe nozzle.
- Start Descaling

To start descaling, press the flat white button. Descaling will start, and the descaling mixture will flow from the descaling nozzle and the coffee outlet alternatively. The flat white button illuminates as the water tank goes empty and the descaling cycle completes.
- Rinse Out All Parts And Fill The Water Tank

Empty the cup support, drip tray, drop collector, and used capsule container. Clean the water tank by rinsing it thoroughly and filling it with potable water to the MAX level.
- Start the Water Rinsing Cycle

Press the flat white button to start the rinsing cycle. Water will flow through the coffee outlet and descaling nozzle one by one until the water tank gets empty.
- Remove The Descaling Pipe

As the water tank goes empty, the rinsing cycle will stop. The machine will switch off. Remove the descaling pipe with the handle and store it at the back of the machine in the descaling pipe storage space. Now empty the drip tray and add fresh drinking water to the water tank.
WARNING: To avoid the risk of burn, use a handle or knob to remove the descaling pipe as the descaling pipe becomes hot during the descaling process.
- Descaling Completed

At the end of the descaling process, take a damp cloth to clean the machine’s surface. Your machine descaling is now complete.
NOTE: If the descaling does not finish properly ( for instance, due to lack of electricity, insufficient water in the water tank, or pipe disconnection), the machine requests to start the descaling cycle from the beginning.
Water Hardness Setting
You have a newly bought Nespresso Gran Lattissima, which features a water-hardness setting. That’s really important because hard water with higher mineral content will cause scales to build up faster within your machine, and long-term scale buildup is the major reason for machine failure. So, to keep your machine free from scale buildup, you must check the water hardness level by following the procedure below and programming the water hardness setting on your machine.
- Soak The Sticker In Water

Take the water hardness sticker from the first page of the user manual and place it under tap water for a second. The water hardness sticker measures the level of minerals in the water which you will use to brew coffee.
- Color Changes To Red

Color of the water hardness sticker changes according to the water hardness level. The number of red squares shows the water hardness level.
- Power Up

Turn On The Machine by pressing the on-standby button.
- Enter The Menu Mode

Enter the menu mode by pressing the flat white and hot milk buttons simultaneously and holding for three seconds. The cleaning and descaling alert will start flashing.
Note: If you do not perform any action within 30 seconds of entering the menu mode, the machine will exit the menu mode automatically. And you can exit the menu mode by pressing the hot milk and flat white button together for three seconds.
- Press The Cappuccino Button

Now, press the Cappuccino button to activate the water hardness setting mode.
- Press The Button Based On The Number Of Red Squares

Press the button depending on the number of red squares on the water hardness sticker, as mentioned in the table below. You can set the desired value by clicking the corresponding button within 30 seconds. The button blinks three times to confirm the new value. Your machine will exit the menu mode automatically and return to the ready mode.
| Water Hardness Level | Button To Press | fH | dH | CaCO3 |
| Hot Foam | < 5 | < 3 | < 50 mg/l | |
| Latte Macchiato | >7 | > 4 | > 70 mg/l | |
| Cappuccino | >13 | > 7 | > 130 mg/l | |
| Hot Milk | >25 | > 14 | > 250 mg/l | |
| Caffe Latte | >38 | > 21 | > 380 mg/l |
Empty The System Before Storage Or Repair
If you are migrating to a new place, you need to shift all the stuff, including your coffee machine, because you will not use it for some time. Then you have to empty the system before you pack it for shifting. Or, if you are sending your machine for repair, you must follow the below steps to empty the system.
- Power Up

Switch on your Nespresso Gran Lattissima
- Remove The Capsule
Lift the lever and allow the ejection of the capsule into the capsule container. Remove the water tank and place a container under the coffee outlet.
- Enter Menu Mode
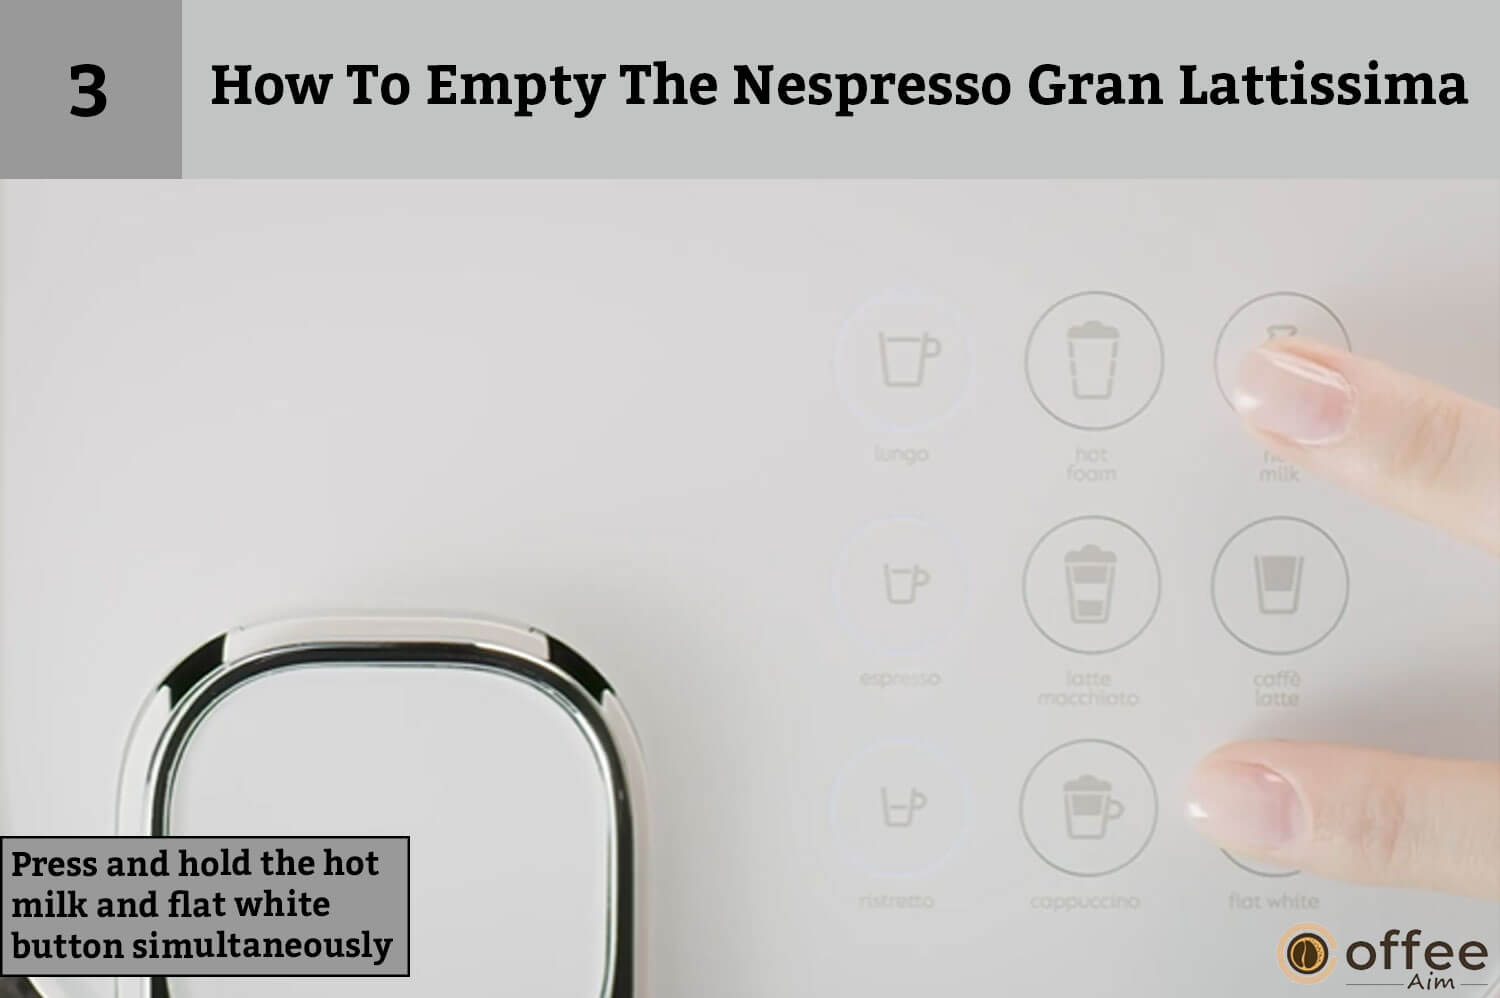
Enter the menu mode by pressing the hot milk and flat white button simultaneously and holding for three seconds. The cleaning and descaling light will start blinking.
NOTE: If you do not perform any action within 30 seconds of entering the menu mode, the machine will exit the menu mode automatically. And you can exit the menu mode by pressing the hot milk and flat white button together for three seconds.
- Press The Espresso Button

To enter the emptying mode, press the espresso button.
- Press The Espresso Button Again

As you press the espresso button again for confirmation, the emptying will start. When emptying is in progress, all the buttons will start flashing. When the emptying completes, the machine will automatically turn off.
NOTE: After emptying, the machine will block the system for approximately 10 minutes.
CAUTION: Storage of the machine in a cold environment can lead to leakage and water circuit damage by frost.
How To Set The Auto-Off Timer In Nespresso Gran Lattissima
Nespresso Gran Lattissima has an excellent automatic power-off feature for power consumption. So, if you mistakenly leave your machine at night without turning it off, Thanks to the automatic power-off feature, your machine will automatically turn off. You can set the Auto-off timer on your coffee machine according to your preference. Scroll down to read the procedure below and set the Auto-off timer on your coffee machine.
- Power Up

Turn on the machine by pressing the on-standby button.
- Enter The Menu Mode

Press the hot milk and flat white button simultaneously and hold for three seconds to enter the menu mode. The cleaning and descaling light will start blinking.
Note: If you do not perform any action within 30 seconds of entering the menu mode, the machine will exit the menu mode automatically. And you can exit the menu mode by pressing the hot milk and flat white button together for three seconds.
- Press The Ristretto Button

Press the ristretto button to activate the Auto-off timer for nine minutes in your machine.
- Change The Auto-Off Timer

You can change the Auto-off timer and set the desired time by pressing the corresponding button. If you want to set the Auto-off timer for thirty minutes, press the espresso button. Whereas for eight hours, press the Lungo button. The button will blink three times to confirm the new timer, and the machine automatically exits the menu mode and returns to ready mode.
| Automatic Power Off | |
| 9 minutes | |
| 30 minutes | |
| 8 hours | |
Troubleshooting
You received your package of Nespresso Gran Lattissima a few days back. Now, it is causing problems such as inconsistent light blinking, leakage from the capsule area or any other problems. Read this troubleshooting guide to find solutions to your problems.
| Problem | Solution |
| No light indication. | Check the plug, mains, fuse, and voltage. In case of problems, call the Nespresso club. |
| No water, no coffee. | The water tank is empty. Fill the water tank.Descale your machine if necessary. |
| Coffee flows out very slowly. | Flow speed depends on the coffee variety.Descale your machine if necessary. |
| Only water flows out ( even the capsule is inserted ) | In case of a problem, send the machine for repair or call the Nespresso Club. |
| Coffee is not very hot. | Preheat your cup.Descale your machine if necessary. |
| Leakage from capsule area ( water in capsule container ) | Place the capsule in the correct position. If leakage occurs, call the Nespresso Club. |
| The button blinks irregularly | Send the machine for repair or call the Nespresso Club. |
| All the buttons blink together for ten seconds, and the machine turns off automatically. | It is an Error alert; send the machine for repair or call the Nespresso Club. |
| All the coffee buttons blink three times rapidly, and the machine returns to ready mode. | The water tank is empty. |
| The cleaning and descaling alert is blinking. | The machine is in menu mode. Press the hot milk and flat white buttons simultaneously for 3 seconds to exit menu mode or wait 30 seconds. The machine will exit the menu mode automatically.Descaling has not been properly completed. Repeat the descaling cycle. |
| Descaling alert illuminates as orange. | The machine signalling a descaling alert depending on the beverage consumption usage. Descale your machine. |
| The descaling alert flash orange and the flat white button light become steady. | The machine is in the descaling mode. Press the flat white button to start the descaling process. |
| Cleaning alerts illuminate as orange. | Disassemble the Rapid Cappuccino System and clean all the parts in the upper level of the dishwasher. If a dishwasher is unavailable, wash the Rapid Cappuccino System by hand. |
| All coffee buttons and milk recipe buttons blink alternatively. | The machine is overheated. Wait until the machine cools down.The emptying function will block the machine for approximately 10 minutes after the emptying procedure. |
| The lever is not closing properly. | Empty capsule container. Ensure that no capsule is blocked inside the capsule container. |
| Milk froth quality is not up to standard. | Use skimmed or semi-skimmed cow milk at refrigerator temperature (about 4° C).The milk froth regulator knob is in the ‘’remove knob’’ position. Turn it to the (Froth) position.Rinse the Rapid Cappuccino System after each milk preparation.Descale your machine.Do not use frozen milk.Ensure the air aspiration part is clear and clean.Ensure all the parts of the Rapid Cappuccino System are assembled correctly. |
| I am unable to enter the menu mode. | Make sure you remove the milk container. Make sure you press and hold the hot milk and flat white buttons simultaneously for 3 seconds.Make sure you remove the descaling pipe. |
| You cannot pull off a milk container. | Press the buttons on the sides of the milk container to remove the lid. |
| Switch off the machine. | Press the on-standby button (The machine is on stand-by – consumption 0.22 Wh) |
| The Milk container is attached, but the milk recipe buttons are not enabled. | The milk froth regulator knob is in the (Clean) position. Move it to the (Froth) position. |
Limited Warranty
De’Longhi offers a two-year warranty on this item from the date of purchase against any manufacturing and material fault.
- De’Longhi will exchange or repair any damaged product at no cost to the owner during the warranty period.
- Only the remaining half of the original warranty, or six months, will be offered as the warranty on replacement items or repaired parts of your machine.
- This limited warranty will not cover any defects resulting from misuse, improper maintenance, or accidents.
- The provisions of this limited warranty do not exclude or modify the mandatory statutory rights that apply to this product’s sale, except to the extent permitted by applicable law.
Contact The Nespresso Club
If you require further information, have any questions, or need assistance because we might not have predicted all your machine uses, simply call the Nespresso or Nespresso Authorized Representatives. You can find contact details of the closest Nespresso in the ‘’Welcome To Nespresso’’ folder of your machine or at nespresso.com.
Conclusion
The comprehensive guide on how to use Nespresso Gran Lattissima has ended. You are now aware of the operating method of your coffee maker. Let’s upgrade your coffee game with six recipes of Nespresso Gran Lattissima and transform your kitchen into a cafe. I have explained every setting of your coffee machine in detail. But, If you are still unclear in any of the steps, I recommend you reread this guide and clear out your confusion. Let’s wrap up while savoring a cafe-style Cappuccino in the comfort of your home. Don’t forget to clean the system after each milk recipe.
Furthermore, If you are interested in reading about coffee and coffee makers, visit my website, CoffeeAim.
Thanks for reading!
FAQs
Why Is My Lattissima Not Frothing?
It’s annoying if the frothing system produces very little or no milk foam.
To ensure proper working of the Lattissima milk frother, check the following things, Clean the system after each milk recipe as milk residue can clog the steam pipe, and make sure to descale your machine correctly. Also, disassemble and clean all the parts of the milk frother.
How Can I Clean The Rapid Cappuccino System When The Dishwasher Is Not Available?
In the absence of a dishwasher, you can wash the parts of the Rapid Cappuccino system by hand. Disassemble the parts and clean them thoroughly with hot water. You can use a sponge to remove any dirt. Immerse the components in a mix of hot water and mild detergent for thirty minutes and rinse with hot water.
How Do I Reset My Nespresso Gran Lattissima?
Switch on the machine and remove the milk container. Enter the menu mode, press the flat white and hot milk buttons together, and hold for three seconds. The cleaning and descaling light will start to blink. To reset the factory settings, press the flat white button; it will blink. Then press it again to confirm the factory reset. The button will flash three times, which indicates your machine is restored to default settings.
How Do I Clean My Delonghi Gran Lattissima?
Do not immerse any part of gran Lattissima in water except the rapid cappuccino system. Disassemble and clean the parts of the rapid cappuccino system in the dishwasher, but if it is not available, you can wash them by hand.
How Do You Make Cappuccino With Gran Lattissima?
Fill the milk container to the MAX level, then lift the lever to insert the capsule. Connect the rapid cappuccino system, and the machine will take 15 seconds to warm up. Place a Cappuccino cup under the coffee outlet. Position the milk spout toward the center of your cup and turn the knob to the froth position. Press the Cappuccino button and let the machine do its work. The machine will start to prepare your drink as it heats up and will stop automatically.