Quick Navigation
Greetings, fellow coffee enthusiasts! Your presence on my blog suggests that you too are part of the coffee-loving community. Allow me to introduce myself, I am a writer who was inspired to pursue my passion due to my overwhelming love for coffee. I like to believe that I am the biggest coffee lover out there. But, can you rival my love for this delightful beverage?
Enough with my bragging Now let’s discuss the objective of your arrival. Let me guess… Are you that newbie who recently bought Nespresso Atelier and cannot comprehend its features or that one old user who lost the manual? Regardless of which category you fall into, I am here to help anyone who loves the aroma of Coffee more than anything else.
So are you ready to embark on this bumpy ride enriched with excitement? Let’s start!
Safety Precautions
Did you know that the Consumer Product Safety Commission reported approximately 9,100 coffee maker-related injuries in the US in 2020? These statistics emphasize the importance of taking precautions when using coffee appliances. To learn about all the preventive measures in detail, visit this link for further information.
Specifications Of Nespresso Atelier
As a Nespresso Atelier user, it’s crucial that you familiarize yourself with its specifications. Understanding its features, such as its capacity, brewing options, and settings will allow you to properly use the machine and achieve optimal results. This way, you can tailor your coffee experience to your preference and make the most of your machine’s capabilities. For your convenience, I have accumulated every specification and its details in the table below. Let us take a look at it.
| Specification | Details |
| Dimensions (W×D×H) | Width: 434 cm Depth: 279 cmHeight: 119 cm |
| Weight | 3.92 Kilogram |
| High-pressure | pump up to/max 19 bar |
| Descaling alarm | YES |
| Water tank capacity | 1 liter |
| Used capsules container capacity | 13 |
| Descaling alert | According to programmed water hardness |
| Power rating (in watts) | 1.5 Watt |
| Cable length | 0.8 centimeter |
| Other features | Hot or cold milk froth Espresso, Ristretto, Lungo, Cappuccino, and Latte Macchiato Steam pipe for milk frothing |
Unpacking Of Nespresso Atelier
Take a deep breath because you are going to experience the emotions filled with excitement and anticipation as you will unveil the Nespresso Atelier. This is the moment you have been eagerly awaiting, where the magic within will be revealed and each component of the Nespresso Atelier will be explored. Get ready to be amazed as we embark on this journey together and unravel the mysteries contained within.
If during your exploration, you find any parts missing from the list provided, I would advise reaching out to the seller for assistance.
1. Coffee Machine
The centerpiece of the package, the Nespresso coffee machine is designed to bring the café experience to your home.

2. Nespresso View Mug (270ml)
A beautifully crafted 270ml mug designed specifically for Nespresso coffee, perfect for enjoying your morning brew.

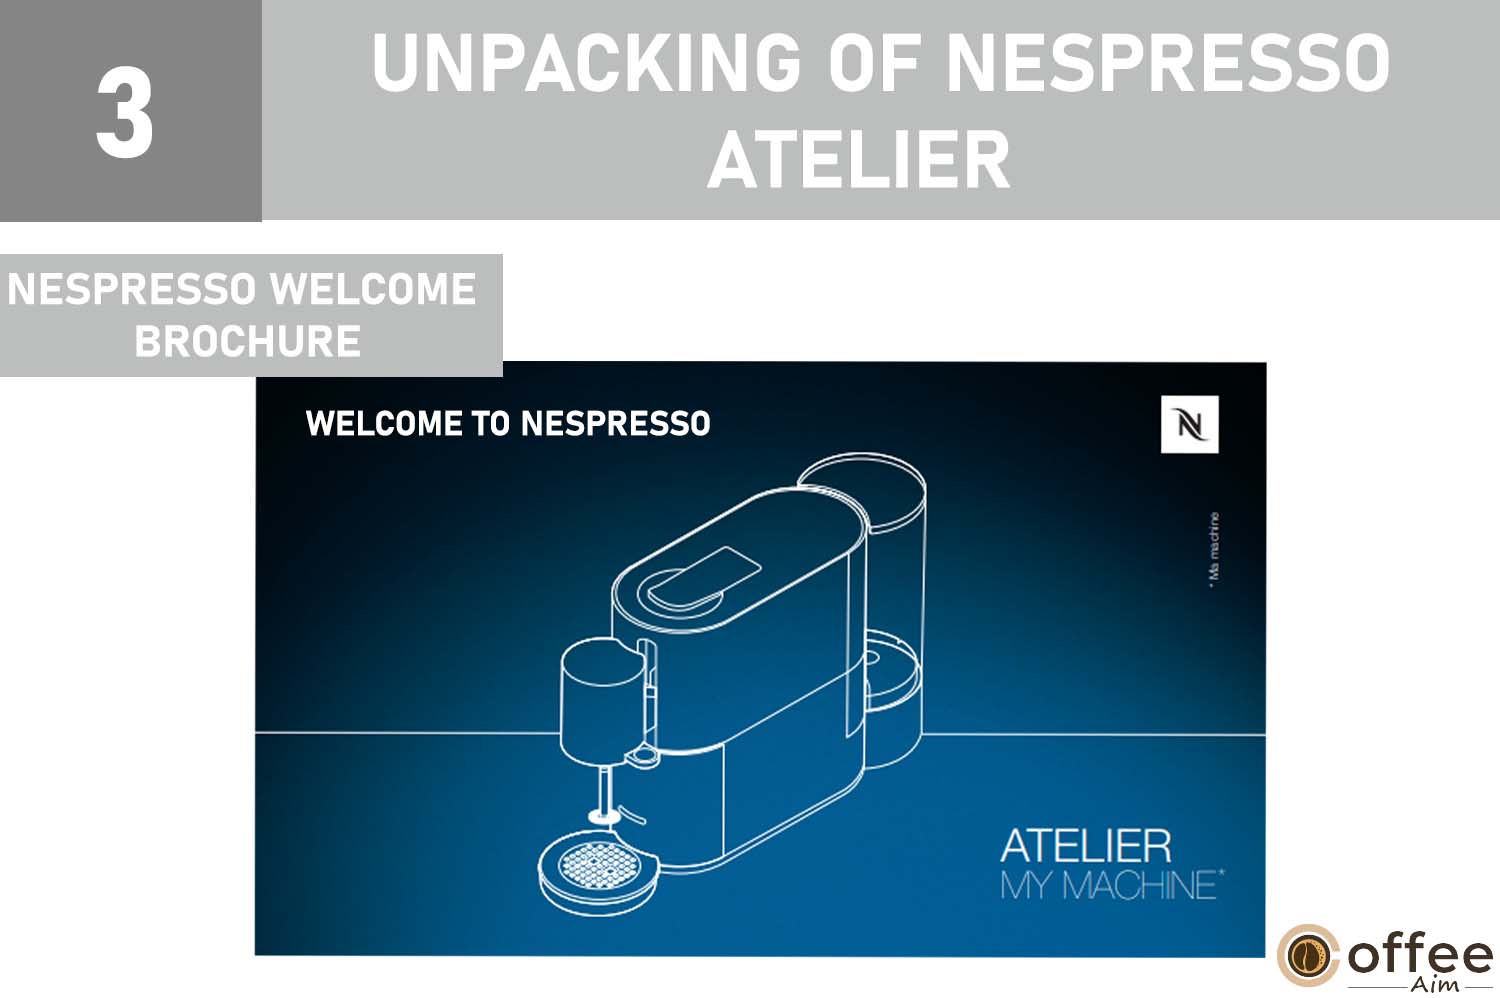
3. Nespresso Welcome Brochure
An informative guide that welcomes you to the world of Nespresso and provides an overview of the brand and its products.
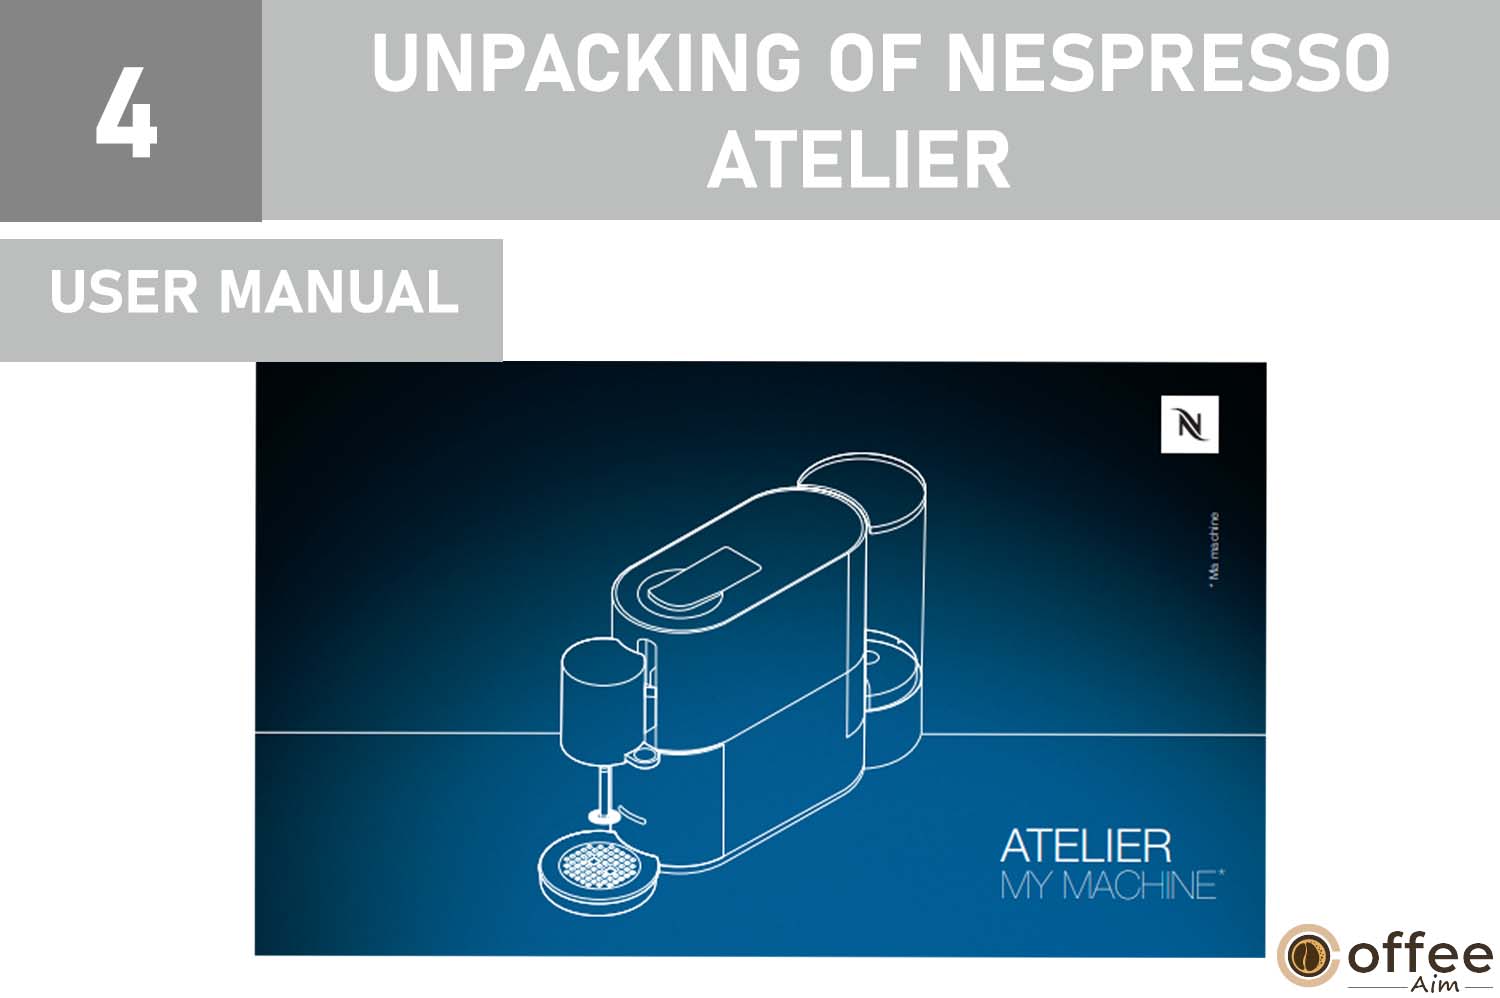
4. User Manual
A comprehensive guide that provides step-by-step instructions on how to set up, use, and maintain your Nespresso machine.
5. Testing Box Of Nespresso Capsules
A selection of Nespresso capsules that allow you to test a variety of flavors and find your perfect blend.

6. Water Hardness Test Stick
A tool included in the user manual that helps you determine the hardness of your water, is important for the proper maintenance of your machine.

7. Recipes Leaflet
A collection of recipes and inspiration for creating café-style drinks at home using your Nespresso machine.
8. Milk Frother And Descaling Information
Essential information on how to properly use and maintain the milk frother and keep your Nespresso machine in top condition through descaling.
Parts Of Nespresso Atelier
Becoming a pro with your Nespresso Atelier coffee maker requires a deep understanding of its parts. By familiarizing yourself with each part, you’ll be equipped to tackle any challenges that come your way, and you’ll be able to keep your machine running smoothly with ease. So Should we delve deep into this?
1. Water Tank
The water tank holds the water that is used to make the coffee. It is removable, making it easy to refill and clean.

2. Drip Tray
The drip tray sits under the coffee outlet and collects any drips from the coffee. It is removable, making it easy to clean.

3. Display
The display provides information on the coffee maker’s status, such as the water level and the type of coffee selected.

4. Buttons
The buttons allow you to select the type of coffee you want to make and adjust to the coffee size and temperature.
5. Power Cable
The power cable provides the necessary power to the coffee maker.

6. Cup Holder
The cup holder is adjustable, allowing you to use different sizes of cups and mugs with the coffee maker.

7. Descaling Alert
Descaling is an important process for removing mineral buildup in the coffee maker, which can affect its performance and taste. The descaling alert alerts the user when it is time to descale the machine.

8. Milk Frother Cleaning Alert
The milk frother cleaning alert reminds the user to clean the milk frother after each use to maintain its optimal performance and avoid any buildup of milk residues.

9. Recipe Keys
The recipe keys allow the user to select different coffee recipes with the touch of a button.

10. Drip Grid
The drip grid is a removable tray that catches any drips from the coffee. It can be easily cleaned for maintenance.

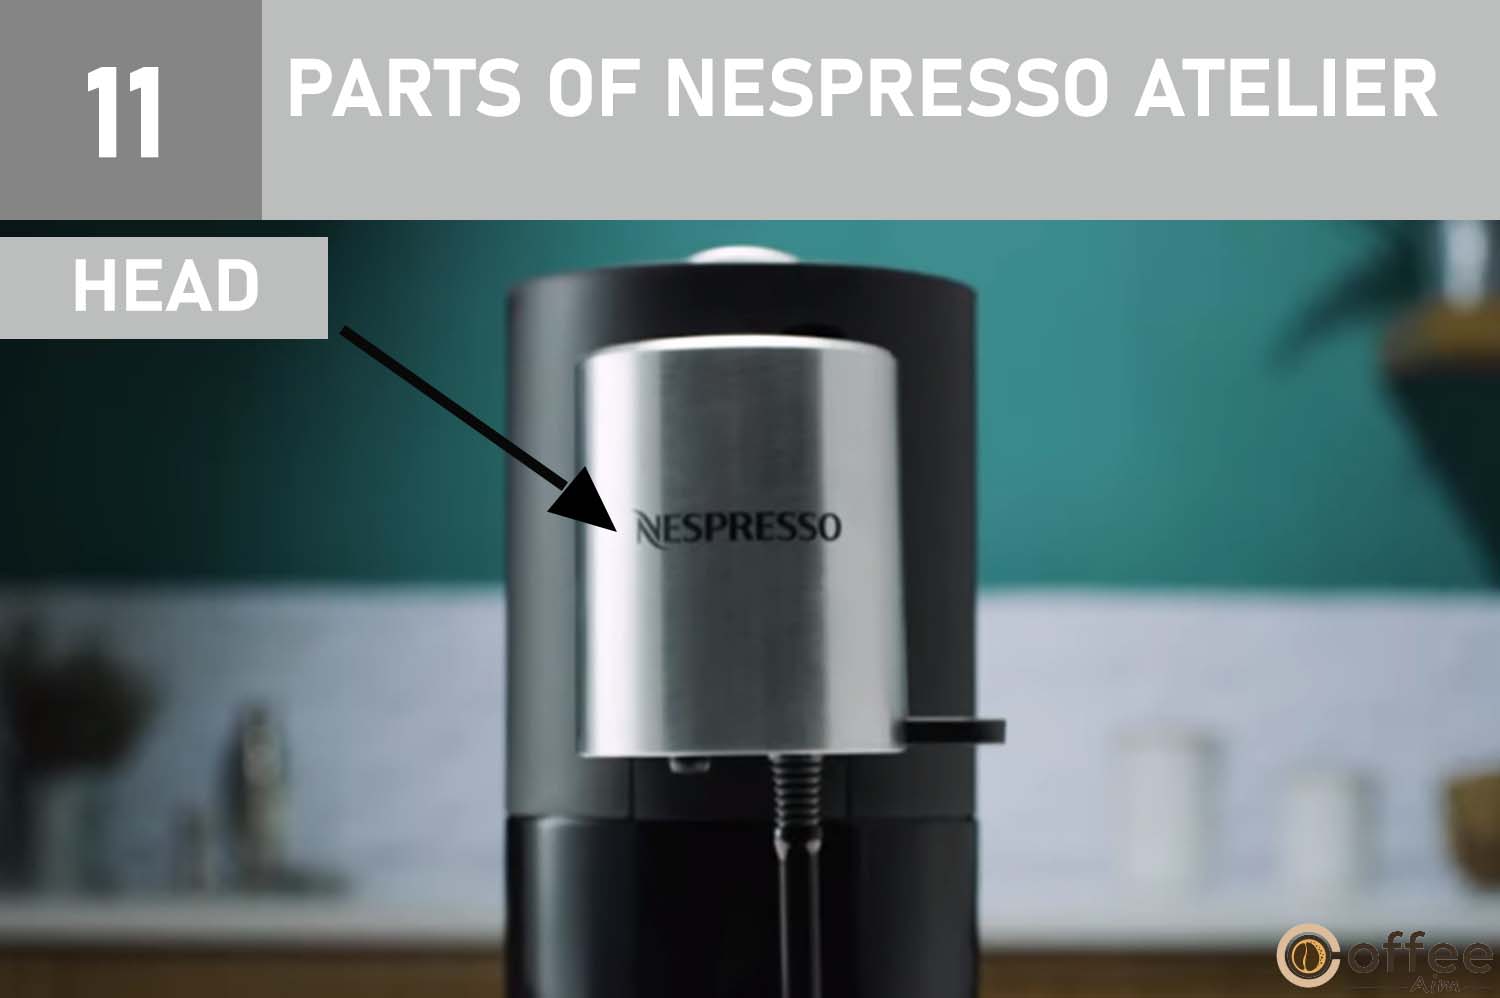
11. Head
The head of the coffee maker is responsible for puncturing the capsule and extracting the coffee.
12. Coffee Outlet
The coffee outlet is through which the coffee is dispensed into the cup.

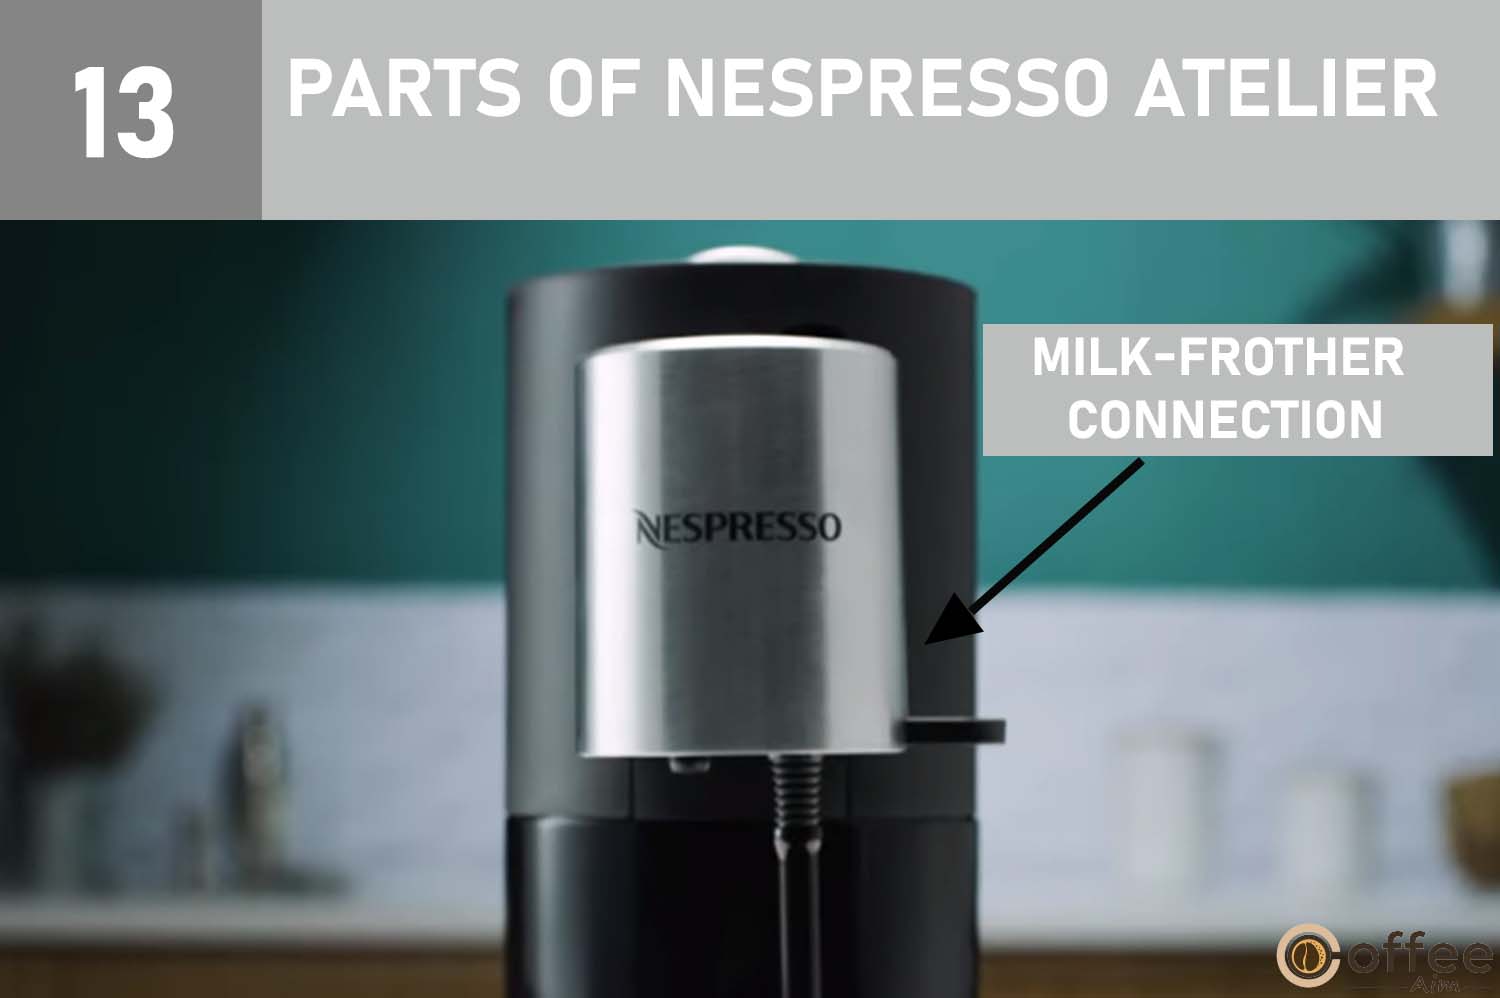
13. Milk-Frother Connection
The milk-frother connection is where the milk frother is attached to the coffee maker.
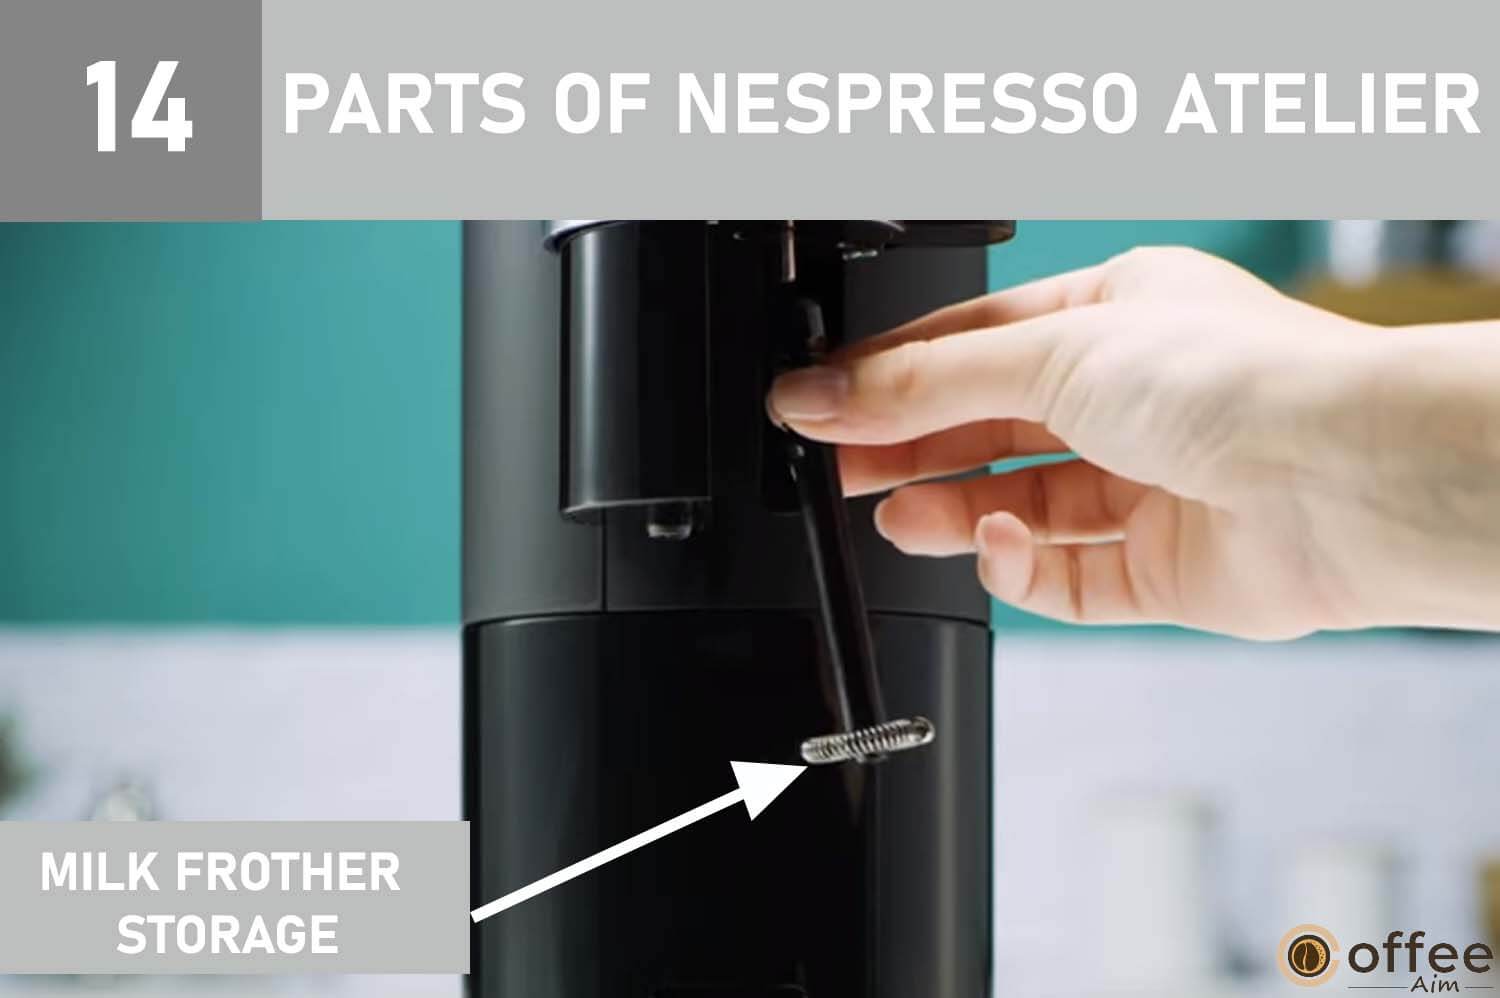
14. Milk Frother Storage
The milk frother storage is a designated area to store the milk frother when it is not in use.
Milk-Frother Position When Creating Milk Recipes
The milk frother position when creating milk recipes determines the frothing quality and amount of milk in the final result.
15. Lever
The lever is used to open and close the brewing unit for inserting and removing the capsule.

16. Drip Base
The drip base is the base that holds the drip tray.

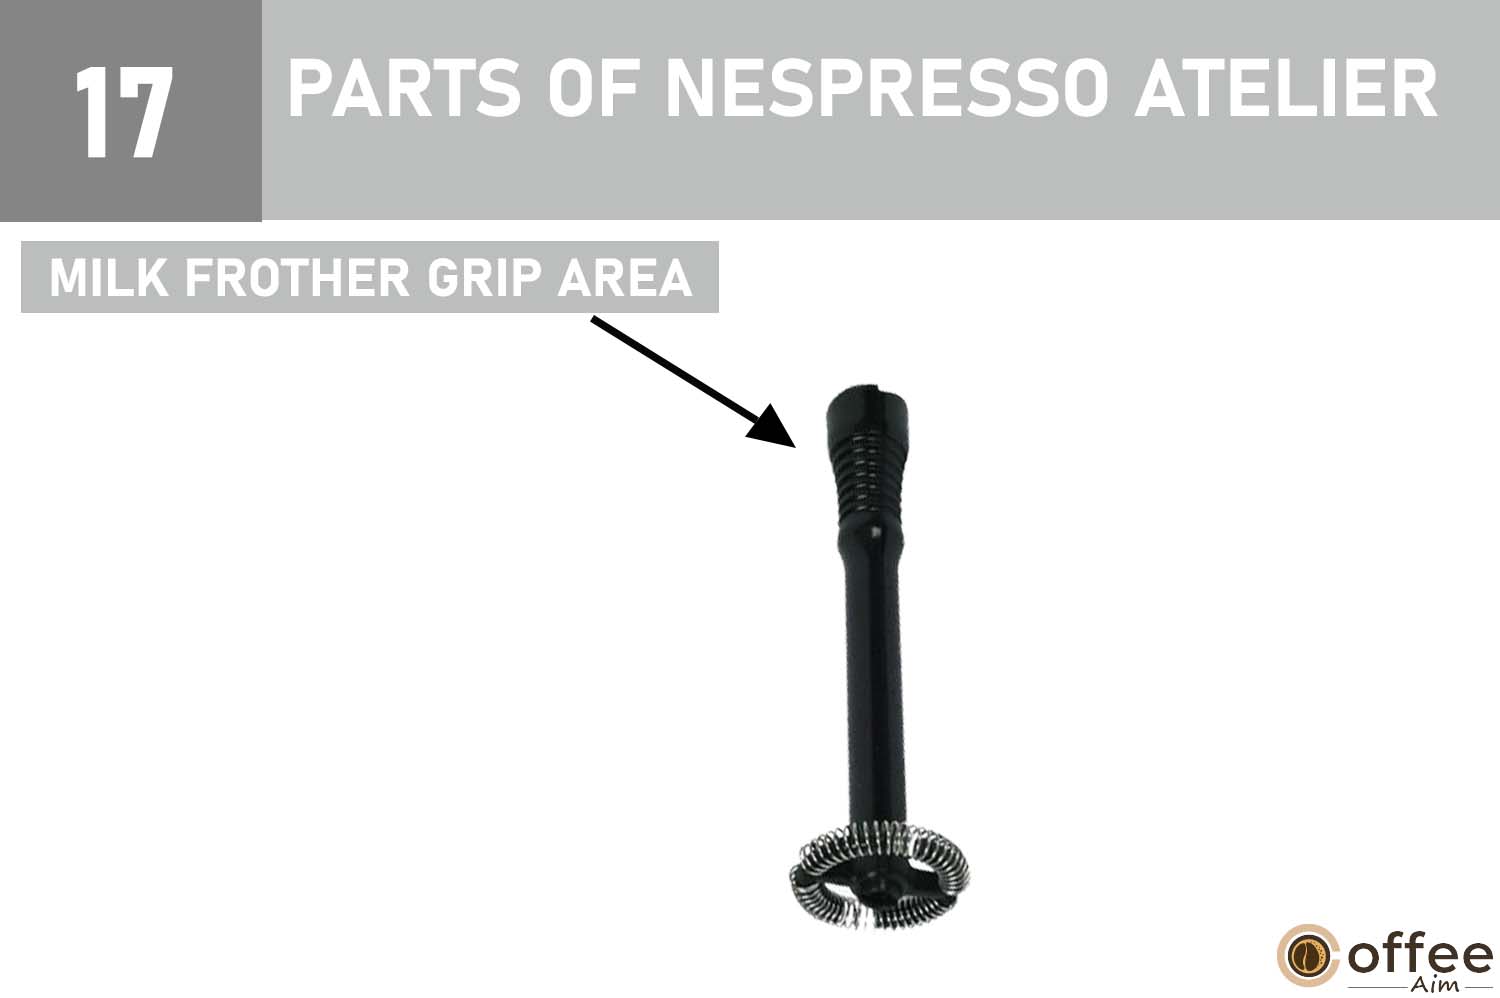
17. Milk Frother Grip Area
The milk frother grip area is the area that the user holds onto when using the milk frother.
First Use Or After A Long Period Of Non-Use Of Nespresso Atelier
Let us now embark on a thrilling coffee experience with your Nespresso Atelier. Whether it’s your first time or a long-awaited reunion, this machine will surely bring excitement with each use. To fully enjoy the pleasures of this unique coffee maker, it’s essential to have a comprehensive understanding of its components, operation, and upkeep.
So, let’s dive into the world of the Nespresso Atelier and start your journey today!
Caution: First, read the safety instructions to avoid the dangers of deadly electrical shock and fire.
Remember:
- The machine will not create coffee until the priming process is done.
- Descaling is required when the machine indicates that it is necessary (blinking “Descaling” alert indicator light). If descaling is not conducted after 30 cycles, the “Descaling” alarm indicator light illuminates steadily and the computer locks until descaling is completed.
Step 1
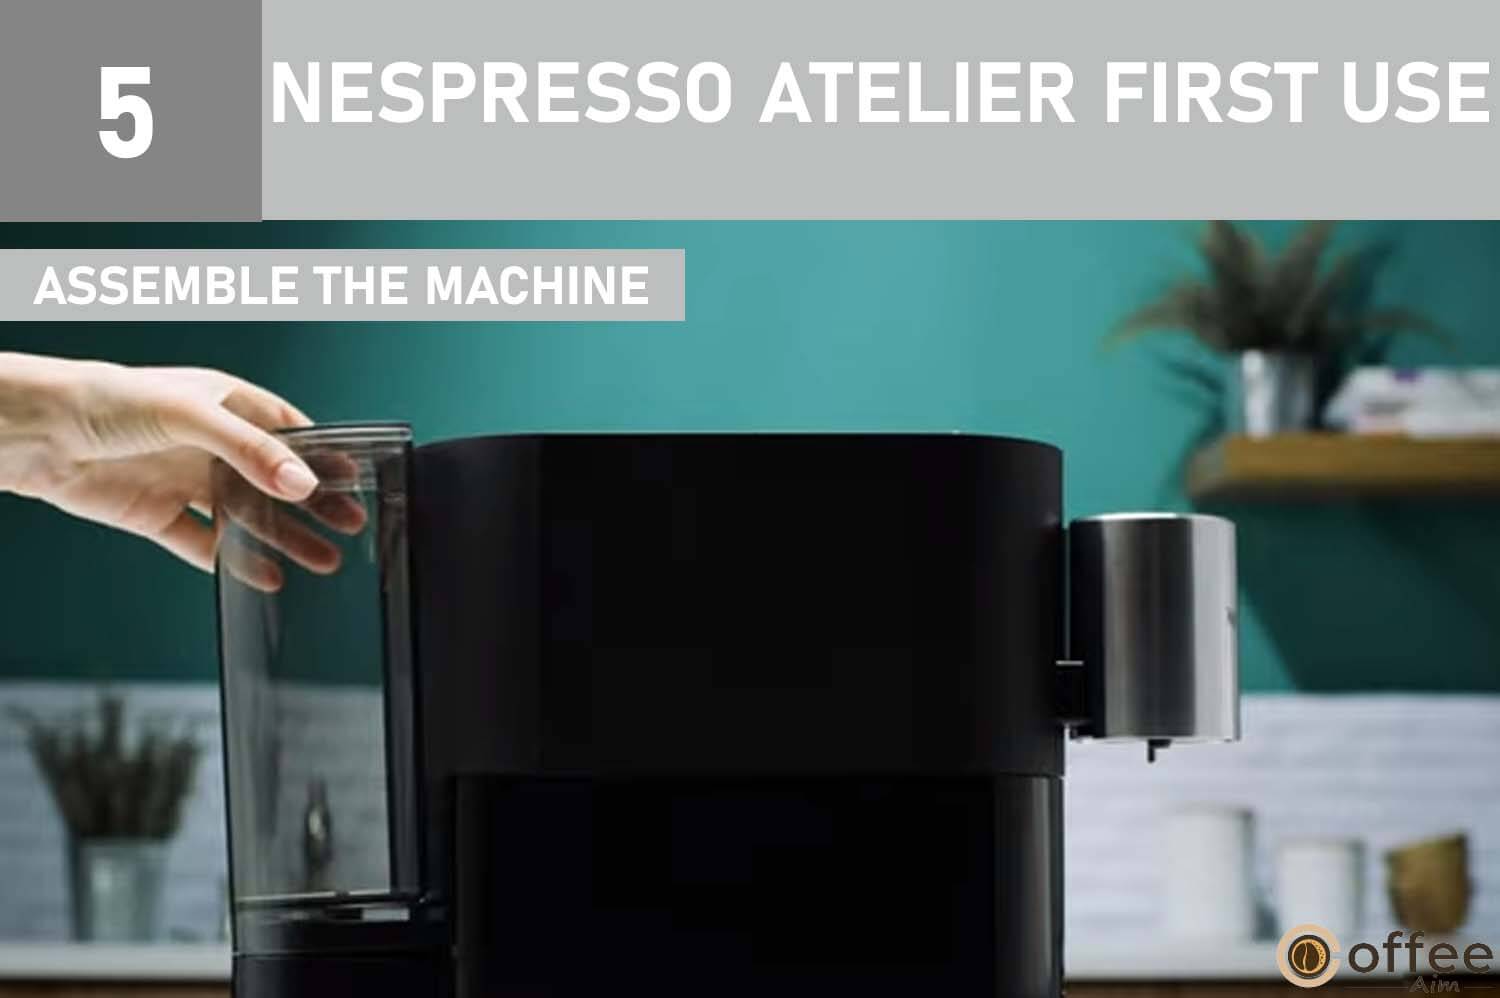
After unpacking your Nespresso Atelier, place it on a horizontal stable, uncluttered work surface. Then remove the water tank, drip tray, drip base, and capsule container. After this, remove the milk frother from its storage.

Step 2
According to your preference, position the cord to the right or left of the machine by using the housing intended for this purpose under the machine.

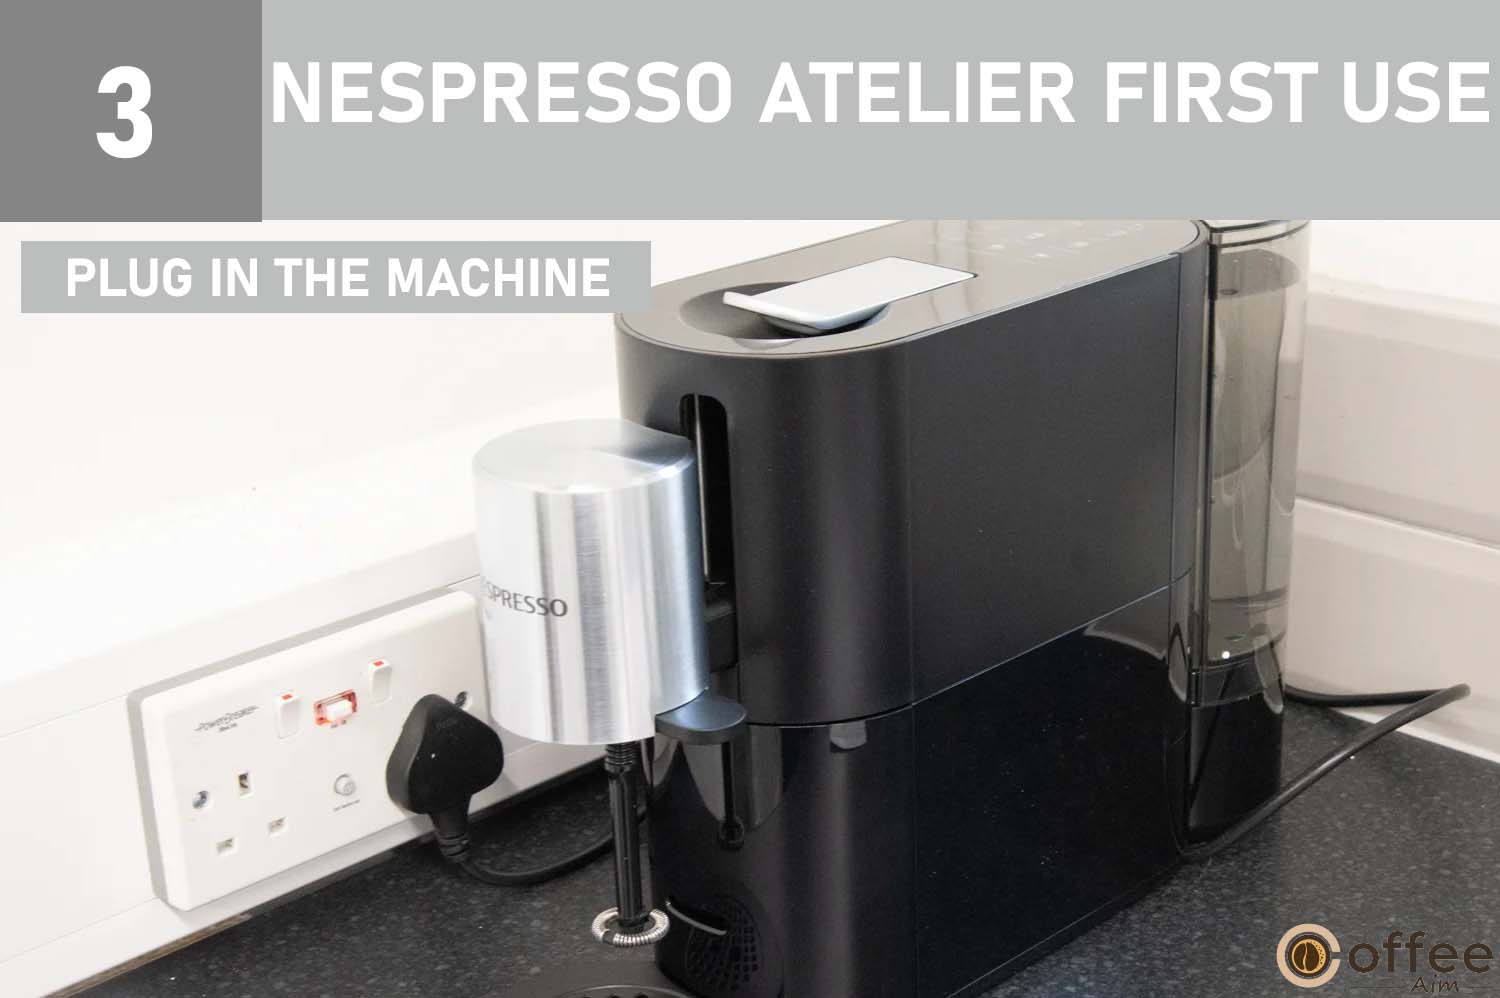
Step 3
Plug your machine into the mains.
Step 4
Rinse the water tank before filling it with fresh drinking water.

Step 5
Place the water tank on its base, then insert the capsule container and the drip tray. Then place the milk frother.
Caution: Refer to the “Assembly and Disassembly of the Milk Frother” section.
Step 6
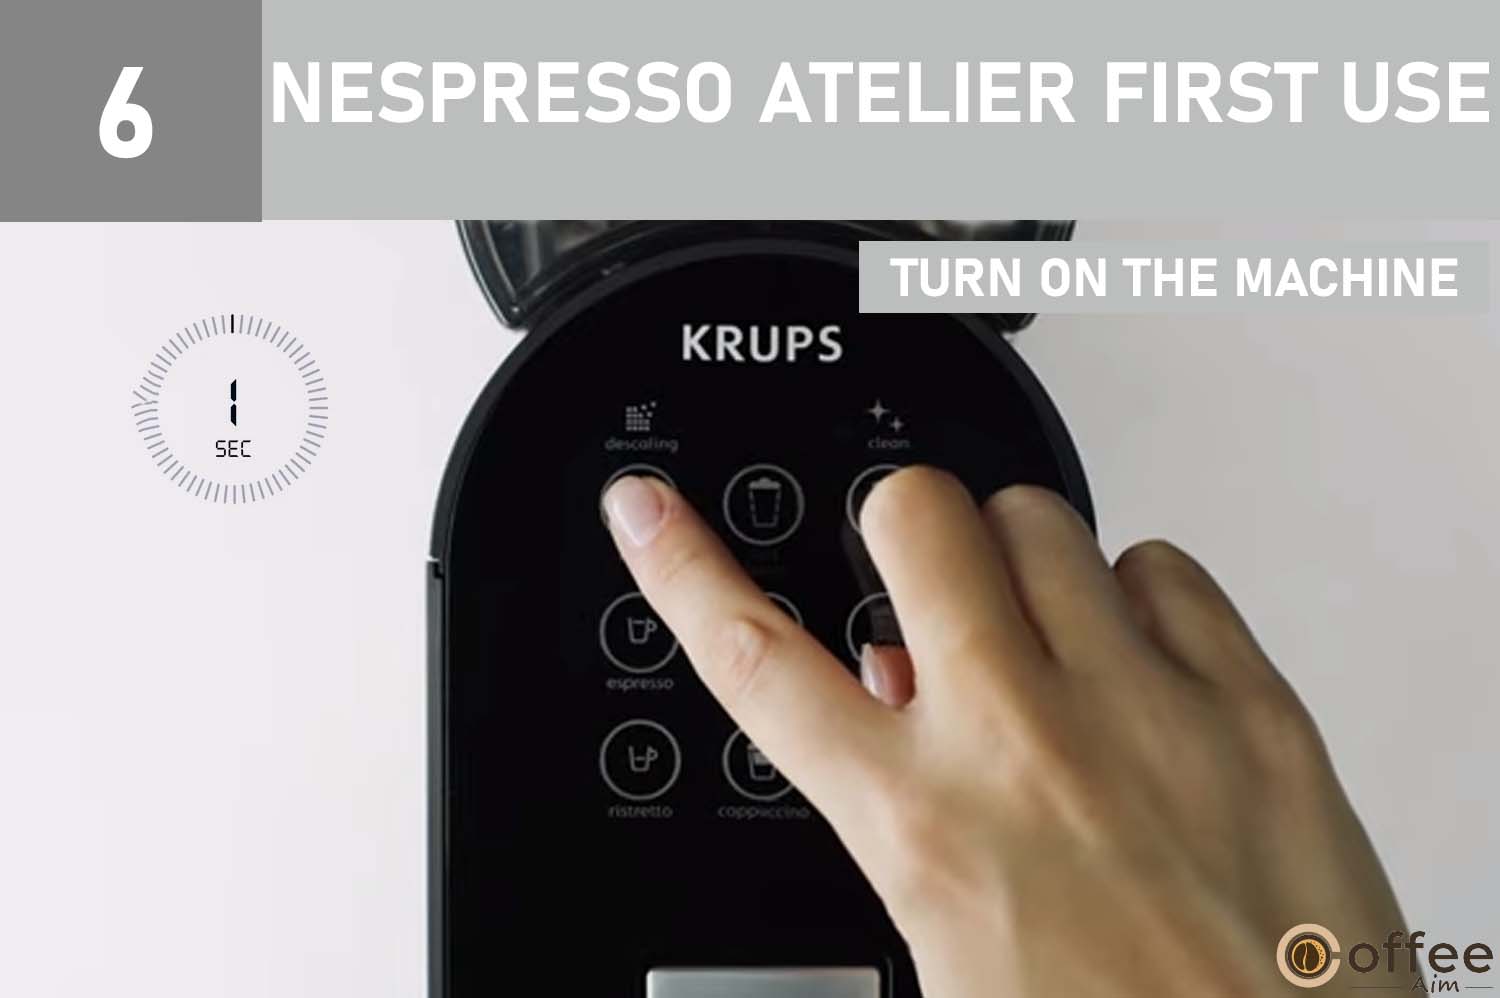
Turn on your machine by pressing one of the 9 keys for one second.
Step 7
The nine recipe keys will flash. This indicates that The machine is in the heating process. Check that the milk frother is correctly inserted if just three keys are flashing.

Step 8
Place a container of 600ml under the head.

Step 9
Lift the lever and leave it in an open position.

Step 10
After it, press one of the 9 keys again. The 9 keys blink quickly.
Caution: For a few seconds, some water may leak from the milk frother.
Step 11
Priming is completed, lower the lever.

Step 12
While the machine is heating up, the light will flicker. The presence of a steady light indicates that the machine is ready for rinsing.

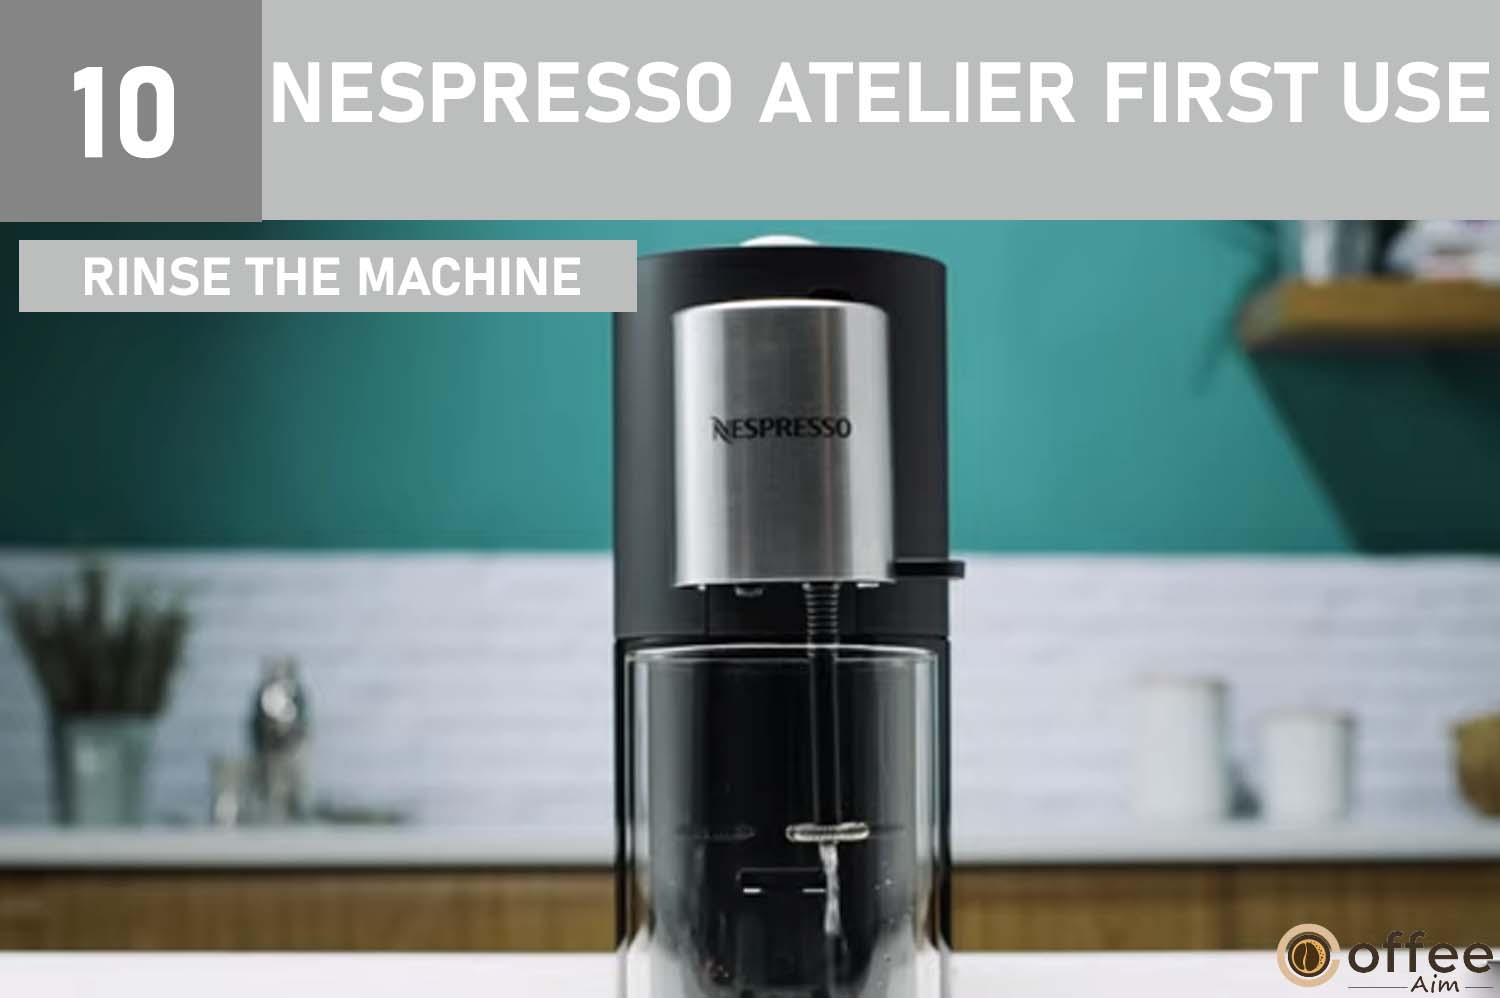
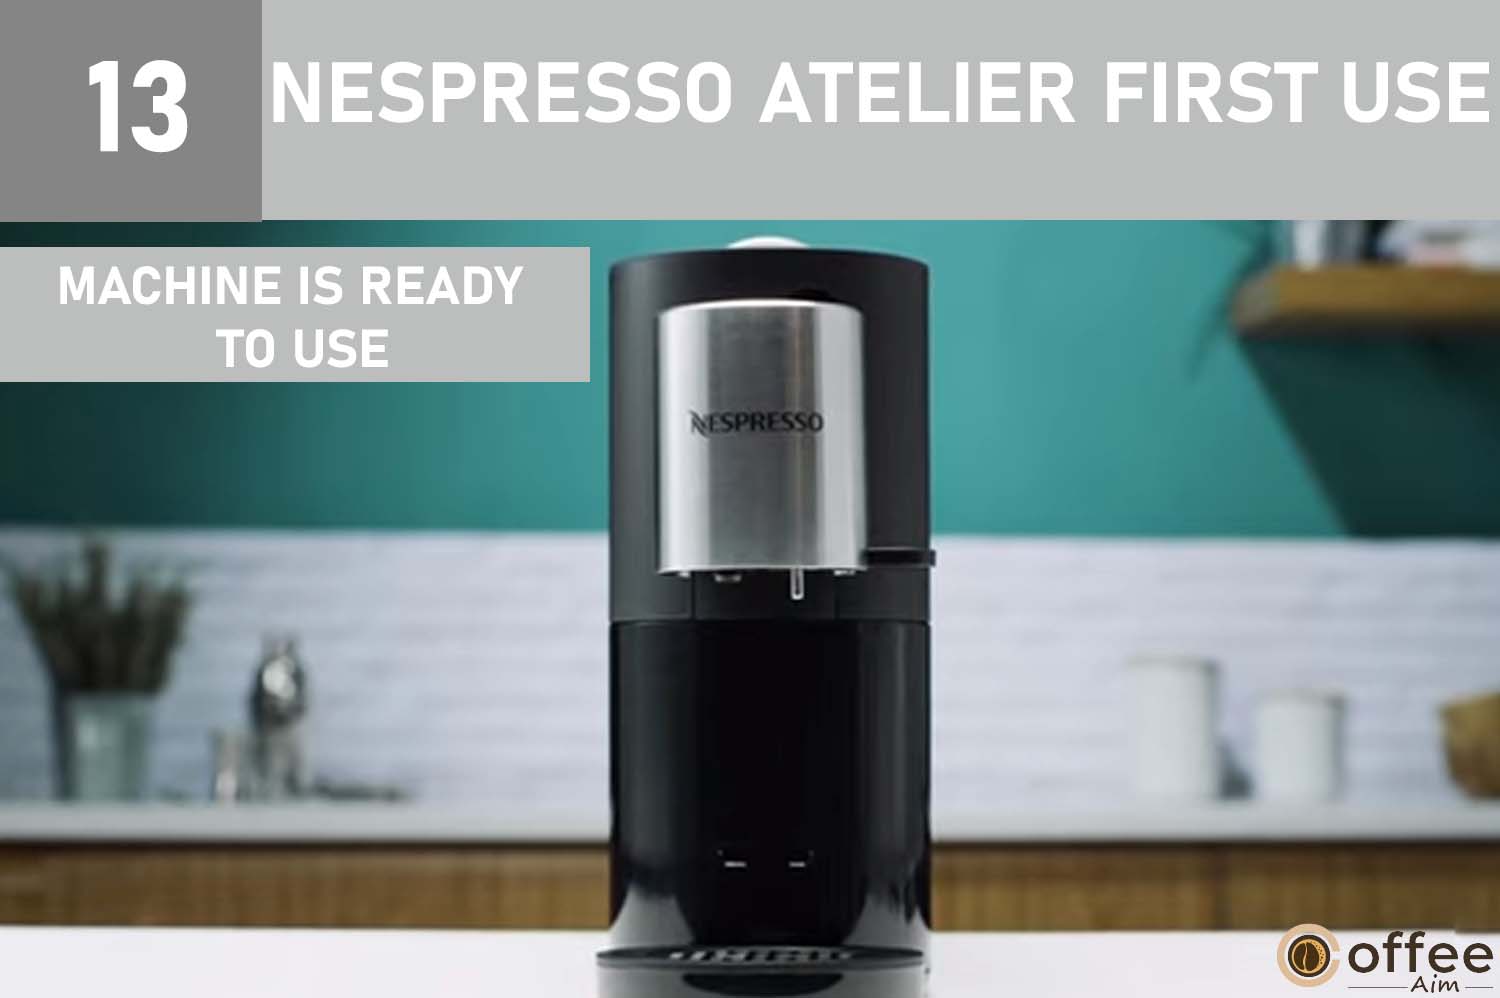
Step 13
To rinse the machine, push the Lungo key. Repeat this process three times. Then, to clean the steam circuit, hit the Hot Foam key. The machine is now operational.
Caution: After being built, all Nespresso machines are thoroughly tested, therefore; coffee traces may be seen in the rinse water.
Coffee Preparation
Now It’s time to indulge in the ultimate coffee experience with the Nespresso Atelier. Do not worry, during this journey I’ll be your guide, taking you through each step to create the perfect cup of coffee. Pay close attention to each detail, and you’ll be amazed by the rich and delicious taste of your coffee. Get ready to elevate your coffee game and enjoy every sip with the Nespresso Atelier.
- Start your Nespresso Atelier by pressing one of the coffee buttons (Ristretto, Espresso, Lungo).

- Open the lever and insert a capsule into the machine.

- Close the lever and place a cup under the coffee outlet.

- Ensure the proper placement of the drip tray to accommodate your cup.

- Press the desired coffee button (Ristretto, Espresso, Lungo). The button will blink during the coffee flow and will remain lit once the recipe is complete. The preparation will stop automatically. To stop the flow of coffee at any time, press the same button again.

- Once the coffee is ready, take your cup, open the lever to eject the capsule, and savor the delicious taste of your classic coffee.

Water Hardness Setting Of Machine
Do you know that the quality of your coffee can be greatly impacted by the water you use in your coffee machine? Hard water, rich in minerals, can leave behind buildup in your machine, affecting its performance and lifespan. But fear not; by adjusting the water hardness setting, you can keep your coffee machine functioning at its best and brewing delicious coffee every time.
Let us Discover the magic of perfectly crafted coffee by understanding the importance of water hardness and learning how to adjust the setting on your machine.
Caution:
- This stage involves determining the water hardness (i.e. the limestone level) so that the machine may customize how frequently descaling occurs. The water hardness level may be determined using the water hardness stick, which can be found on the first page of the user handbook. By default, the water hardness is set at 4.
- Wet the hardness stick in the water you intend to use. Using the water hardness table, determine the level of hardness in the water. See the table below:
| Button Image | Related Buttons For Setting | Strip Level | Level | dH | fH | mg/L CaCO3 |
| Lungo | 0 | <3 | <5 | <50 | ||
| Hot foam | 1 | >4 | >7 | >70 | ||
| Cold foam | 2 | >7 | >13 | >130 | ||
| Espresso | 3 | >14 | >25 | >250 | ||
| Latte macchiato | 4 | >21 | >38 | >380 |
1. Turn on your machine by pressing one of the 9 keys.

2. Press the Cold Foam + Mocha keys together for 3 seconds to activate the “Descaling” and “Clean” alert indication lights, as well as the Lungo, Hot Foam, Cold Foam, Espresso, and Latte Macchiato keys.

3. Select the key that corresponds to the measured hardness. The key blinks three times to confirm the new value.

4. The machine exits the Water Hardness Setting Menu mode automatically.
NOTE: After 15 seconds of inactivity, the Water Hardness Setting Menu option is off.

Assembly And Disassembly Of The Milk Frother
Assembling and disassembling the milk frother of your coffee machine is a simple process that can greatly impact the performance and longevity of your machine. Regular cleaning and maintenance of the milk frother can prevent mineral buildup and ensure that your frother is functioning at its best.
Whether you’re new to your coffee machine or have been using it for a while, it’s important to know how to properly assemble and disassemble the milk frother for optimal results. In this guide, we’ll walk you through the simple steps of assembling and disassembling the milk frother, so you can enjoy the perfect foam and froth in every cup of coffee.
- Detach the milk frother from the machine’s casing.

- Elevate the head of the machine.

- Plug the milk frother into the connector and make sure it is securely in place. Once the machine recognizes the milk frother, the buttons for milk-based drinks will light up.

4. When the preparation is finished, the “Clean” warning becomes orange.

5. Lift the head, remove the milk frother via the grip area, and the “Clean” indicator light goes off. Dishwasher or hand wash the milk frother with a light/soft detergent.

6. Wash the Milk Frother with a Light Detergent

Caution: Before handling the milk frother, wait until the preparation is complete and the “Clean” indicator light illuminates. Because the milk frother may be hot after preparation, it is critical to grab it by the grip area designed for this reason.
Milk Recipe Preparations When Using A Nespresso View Mug (270ml)
You want that perfect balanced taste in your coffee. Right? To create a perfect cup of coffee or milk-based beverages, it is crucial to understand the proper ratio of milk, coffee, and foam. This guide will provide you with the ideal proportions for each of these components, enabling you to make these drinks with professional-level precision.
INFORMATION: To achieve the best foam results, it is recommended to use refrigerated UHT or pasteurized milk that is either skimmed or semi-skimmed, kept at a temperature of approximately 4°C. Alternatively, you can use non-dairy milk alternatives like soy, almond, or oat drink.
The amount of foam produced will vary depending on the type of milk used, its temperature, the cup size, and the position of the milk frother in the mug. It is important to clean the milk frother after each use to ensure optimal performance.
CAUTION: When preparing recipes with ingredients like ice cubes or chocolate pieces, make sure that they do not obstruct the movement of the milk frother. It is also crucial to ensure that the milk frother is not in contact with the sides or bottom of the mug to prevent any overflow. To ensure the best results, be sure to follow the instructions provided.
For the best results when making your milk-based beverages, I recommend you to use the Nespresso View Mug with a capacity of 270 ml, which is included in the box and can also be purchased at the Nespresso outlet.
1. Lift up the head of your machine using the handle and place the milk frother.
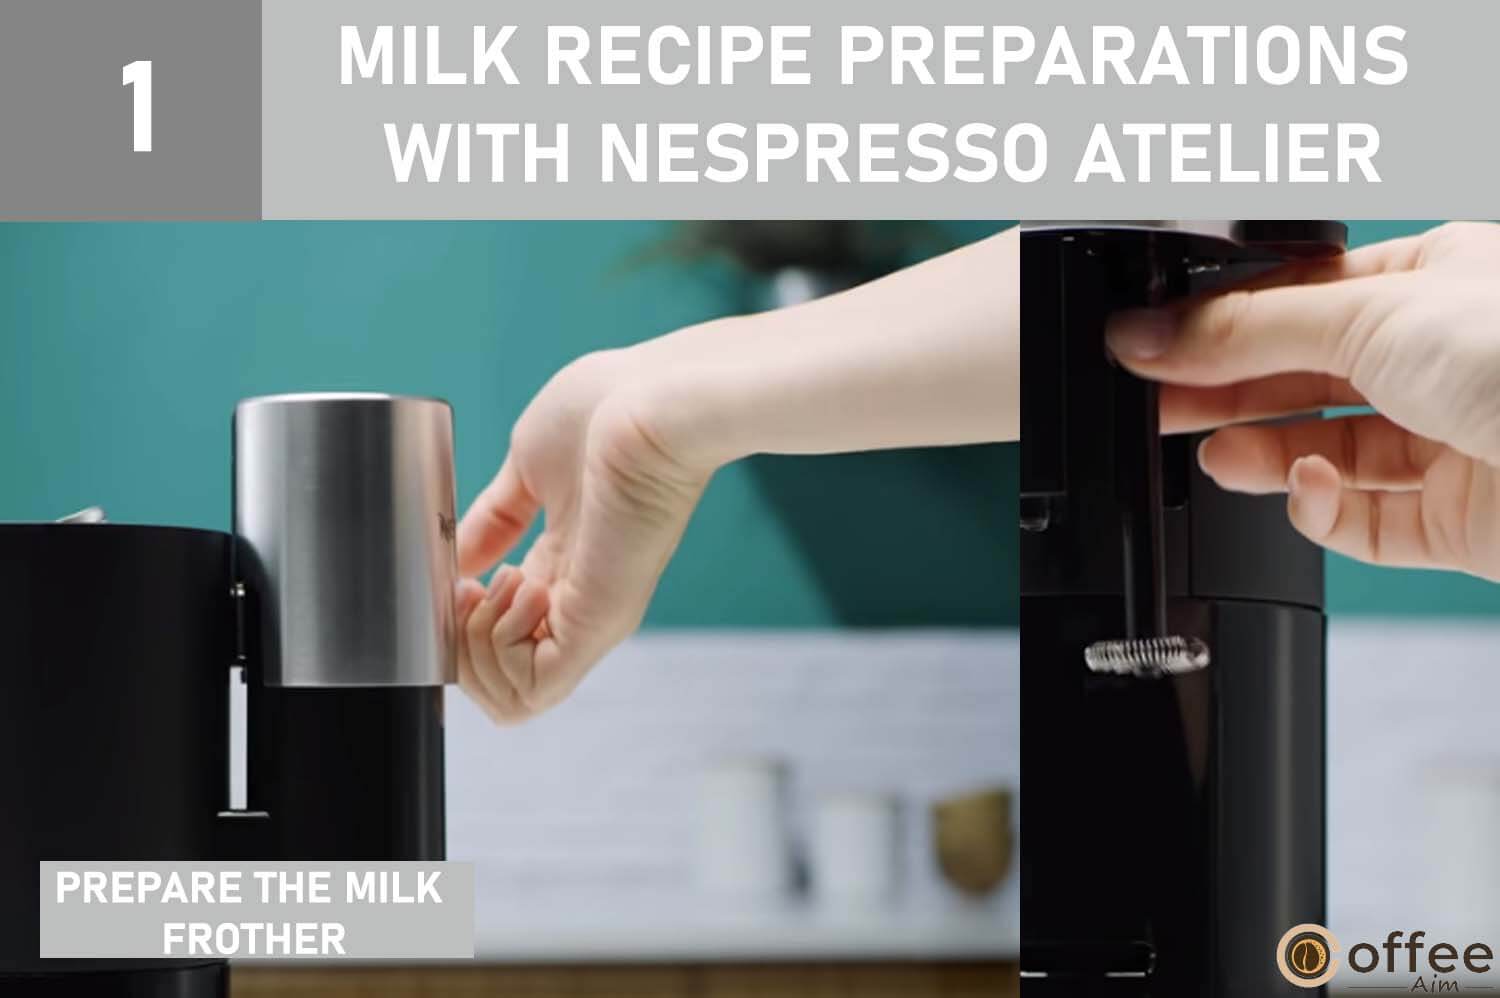
2. In your view cup, combine the ingredients and milk according to the directions (see the recipes page).
Place it behind the head and lower it until the milk frother is submerged.

3. Lift the lever entirely and insert a capsule only when creating a milk recipe with coffee. Pull the lever back and close the lever.

4. Select the recipe key. The milk-foaming process begins automatically. While the recipe is being made, the selected recipe key blinks gently.

5. When making a coffee-based recipe, once the milk has been frothed, the flow of coffee will begin automatically.
INFORMATION: The Espresso button will illuminate at the conclusion of preparation, indicating that your coffee is ready to be topped up.
6. Upon completion of the preparation process, the “Clean” indicator light will illuminate in orange. To clean the milk frother, lift the head and grasp the designated grip area to remove the frother. The “Clean” indicator light will then turn off. The milk frother can be cleaned either by dishwashing or hand washing.

CAUTION: After cleaning, place the frother back into its housing. It is crucial to wait until the end of the preparation and the “Clean” indicator light to illuminate before handling the milk frother, as the frother may become hot during the preparation process. Always handle the frother by its designated grip area to prevent burns.
7. Take your cup. Lift and close the lever to eject the capsule when preparing a recipe with coffee.

Milk Recipe Preparations When Using Your Personal Cup
When you are using your personal cup instead of a Nespresso view mug, you must follow these 4 rules to ensure the recipe quality and prevent overflow during the preparation of your coffee.
1. Ensure that the cup you are using does not have a flaring shape.
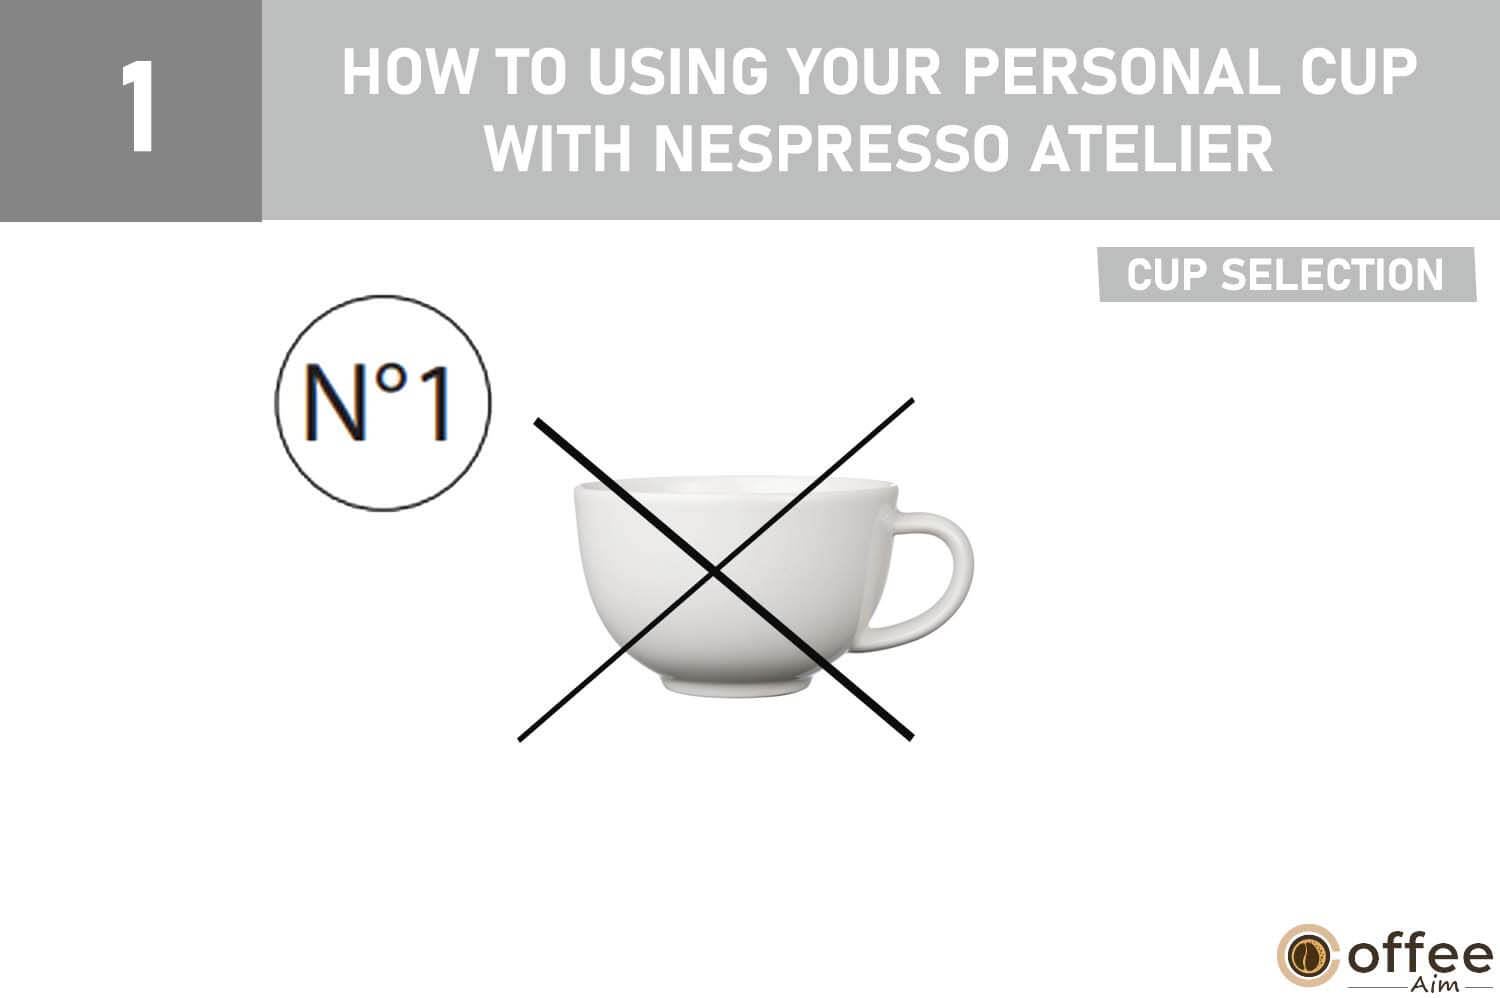
2. The cup must have a diameter of at least 7 cm.

3. For hot milk drinks, make sure to use a minimum of 80 ml of milk.

4. The milk level in the cup should not exceed half of its total capacity.

Preparation
Here are the instructions for coffee preparations when you are using your personal cup.
1. Raise the head of the machine and place the milk frother.

2. Adjust the drip tray to the high position. If your cup is too tall, place the drip tray in the low position or remove it.

3. Put the ingredients and milk for the desired recipe in the cup, place it under the head of the machine, and lower the head.

4. Ensure the milk frother is fully immersed in the milk by adjusting the quantity of milk. The milk should not exceed half of the cup’s capacity.

5. When preparing a milk-coffee recipe, lift the lever completely, insert the capsule, and close the lever.

6. When making a coffee recipe, the coffee will automatically flow after the milk frothing is completed.

7. Once the coffee preparation is done, the “clean” indicator light will turn orange.

NOTE: To clean the milk frother, lift the head of the machine and remove the frother by its grip area. The “clean” indicator light will turn off.
8. Once the preparation of coffee is done, the “clean” indicator lights up orange. Lift up the head, and remove the milk frother using its grip area. The “clean” indicator light turns off. Clean the milk frother.
NOTE: Before handling the milk frother, ensure the clean indicator lights up. Taking the milk frother by its grip is crucial because it may be hot after the preparation of coffee.

9. After enjoying your coffee, lift and close the lever to eject the capsule if making a coffee recipe.
Programming Coffee Volume
One of the great benefits of having a programmable coffee maker is the ability to control the volume of coffee produced. You’re One of those fortunate people with a Brewer that facilitates you with this amazing feature. Whether you’re brewing for a large family or just need a single cup to get you through the day, programming the coffee volume is an essential feature that every coffee lover should know how to use.
Now, I will explain the steps to program the coffee volume on your programmable coffee maker. Whether you’re a seasoned coffee drinker or just starting out, these instructions will help you get the most out of your coffee machine.
- To turn on the machine, press one of the coffee buttons.

2. To make coffee, lift the lever completely and insert a capsule.

3. Close the lever and place a cup under the coffee outlet.

4. Press and hold the Ristretto, Espresso, or Lungo button. Release the button when the desired amount of coffee has been dispensed.

5. The programmed key blinks rapidly 3 times to confirm the new setting. The coffee volume level is now stored.

| Recipes | Factory Settings | Programmable Quantity |
| Ristretto | 25 ml /0.845oz | From 15 to 35 ml / 1.18 to 2.36 oz |
| Espresso | 40 ml / 0.50oz | From 35 to 70 ml/ 1.180 to 2.36oz |
| Lungo | 110 ml/ 1.35oz | From 70 to 150 m / 2.36 to 5.07 oz |
NOTE: The best recommendation for you is to maintain the factory settings for Ristretto, Lungo, and Espresso to ensure the best results in your cup for all types of coffees.
Reset To Factory Settings
If you have made any changes to your Nespresso Vertuo machine that you would like to undo, there is an option for a factory reset that can restore the device to its original default settings. Here’s how you can perform a reset on your machine:
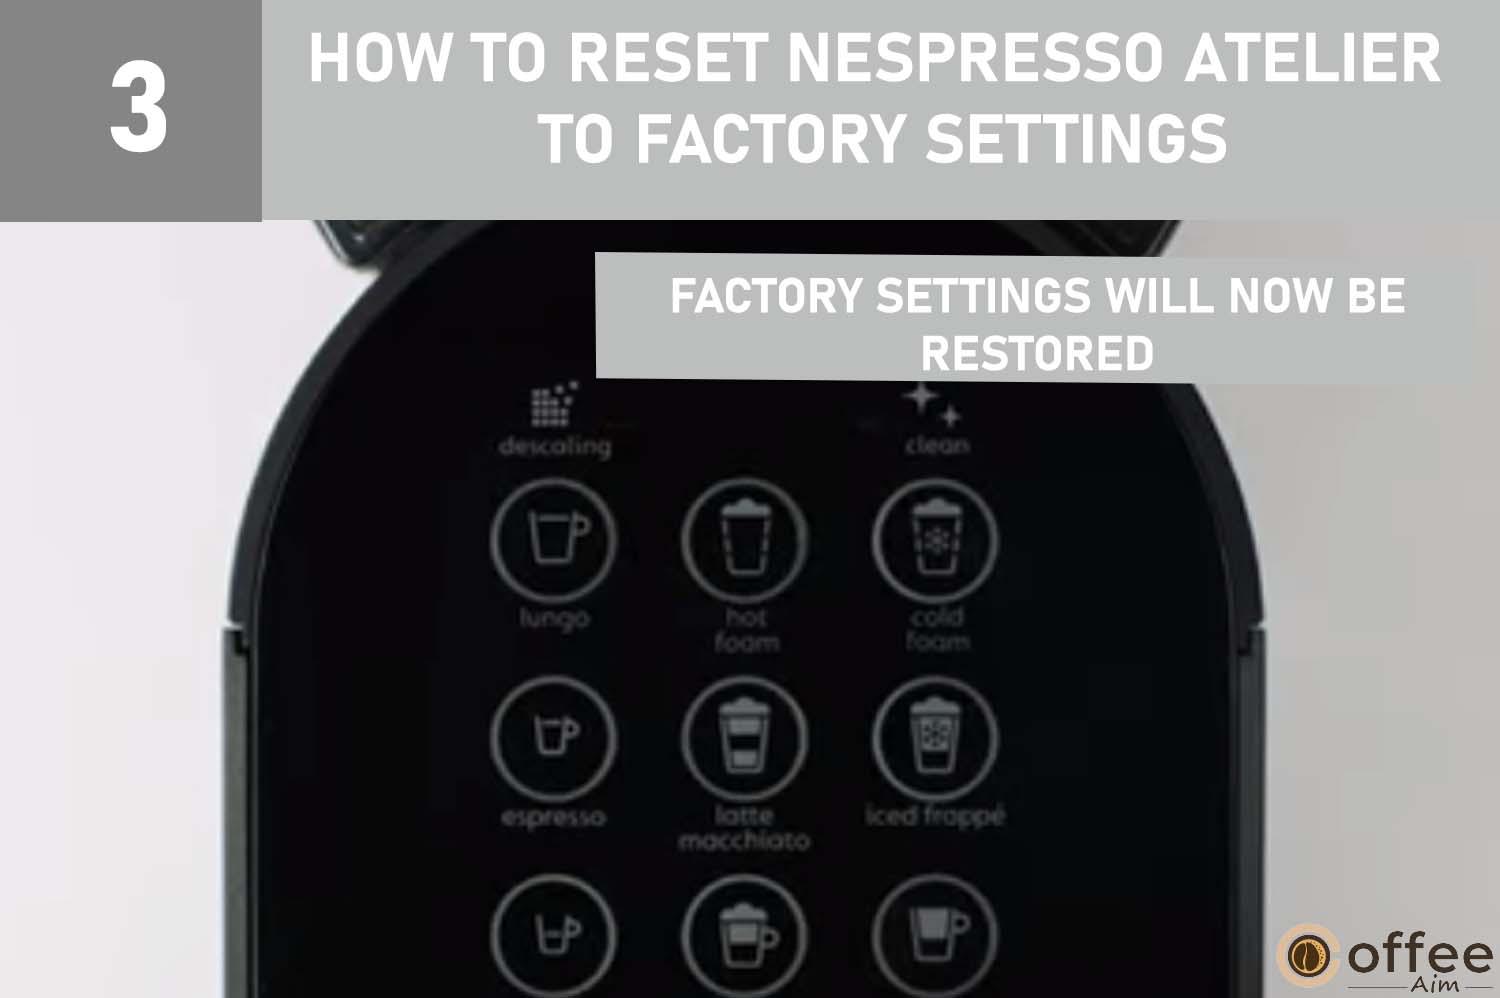
1. Turn on the machine by pressing one of the coffee keys (Ristretto, Lungo, Espresso).

2. Next, press and hold the Lungo and Mocha keys simultaneously for 3 seconds. This will activate the Factory Settings Menu, and the Lungo and Mocha keys will blink three times to indicate that it has been activated.

3. The factory settings will now be restored, and the machine will automatically exit the Factory Settings Menu mode.
Automatic Power Saving Setting
Forgetfulness is no longer an issue when it comes to your coffee maker! The brilliant engineers behind the Nespresso Vertuo have thought of everything and included an Auto-off feature as the default setting. This amazing option allows the machine to shut off effortlessly on its own, reducing electricity consumption and saving energy. No more worries about leaving your coffee maker on all day or overnight. The Nespresso Atelier is designed to make your life easier and more convenient.
1. Turn on the machine by pressing one of the coffee keys (Ristretto, Lungo, Espresso)

2. Press and hold the Hot Foam and Cappuccino keys simultaneously for 3 seconds. This will activate the Automatic Power Saving Setting menu and the “Descaling” and “Clean” alert indicator lights will turn on, while the Hot Foam, Latte Macchiato, and Cappuccino keys will blink.

3. To choose your desired automatic power-off time, press one of the Hot Foam, Latte Macchiato, or Cappuccino keys. You have 15 seconds to make your selection by pressing the corresponding key.
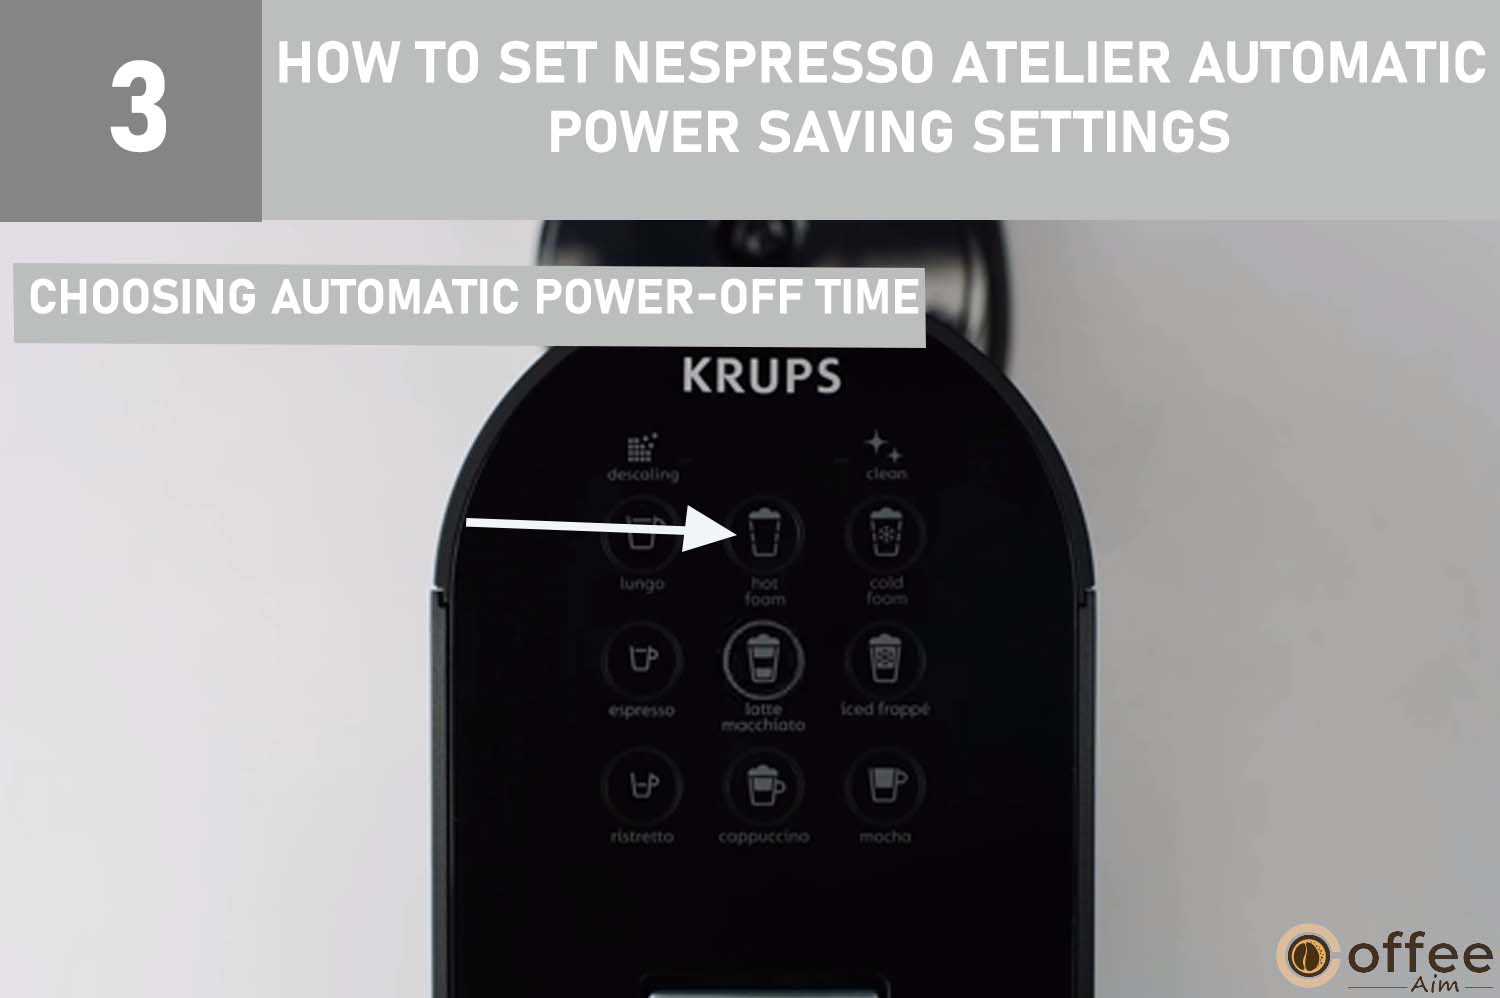
| TYPE | TIME |
| Hot Foam | 3 min |
| Latte macchiato | 9 min. Factory settings |
| Cappuccino | 3 hours |
4. The selected key will blink three times to confirm the newly programmed value.

5. After you’ve made your selection, the machine will automatically exit the Automatic Power Saving Setting menu.
Note: The menu will also deactivate after 15 seconds of inactivity.

Daily Maintenance
Proper daily care is essential for your Nespresso to perform optimally and consistently produce high-quality beverages. Regular cleaning, descaling, and maintenance will extend the machine’s lifespan, prevent malfunctions, and maintain your coffee’s rich taste and aroma. Invest in daily care for your Nespresso Atelier to ensure long-lasting, delicious coffee.
Note: When you are about to clean your machine, make sure that you don’t use any solvent-based cleaning products. Use a non-abrasive damp cloth and a gentle cleaning agent to clean the surface of your machine. Also, ensure that you don’t wash any of your machine’s components in the dishwater, except for the milk frother and the capsule container. Follow the following instructions while cleaning your machine.
1. Lift and close the lever to eject the used capsule. Then, remove the milk frother.

2. Gently pull the drip tray to remove both the drip base and the capsule container, and empty them. Rinse with drinking water and dry with a clean, damp cloth before putting them back in place.

3. Take out the water tank, fill it with fresh drinking water, and place a container under the coffee outlet (which has a capacity of 600 ml). Press the Lungo key to rinse the machine.

4. Clean the coffee outlet and the milk frother connection with a clean, damp cloth. Finally, wipe the entire machine with a non-abrasive cloth.

Descaling
It’s time to repay your Nespresso Brewer by performing a descaling process. Over time, mineral deposits, also known as scale, can accumulate in your brewer, and if left unattended, this scale buildup can negatively impact the performance of your machine.
Descaling is crucial and must be done when the machine signals the need for it (indicated by a steady “Descaling” alert light). The machine will lock itself until the descaling process is completed. The descaling process takes approximately 25 minutes, including a 20-minute descaling cycle and a 5-minute rinse cycle. During the descaling cycle, your active participation is required as you must perform certain operations. So, set aside enough time to perform the descaling process.
1. Descale your machine when the “Descaling” alert indicator light blinks.

2. Eject the capsule by lifting and closing the lever.

3. Empty the drip tray, drip base, and capsule container. Fill the water tank with 500ml of fresh drinking water and add 1 pouch of Nespresso descaling liquid.

4. Attach the milk frother.

5. Place a container with a minimum capacity of 1L under the head.

6. To enter descaling mode, press the Lungo and Ristretto keys simultaneously for 3 seconds. Both keys will blink to confirm the activation of the descaling mode.

Note:
- Throughout the descaling procedure, the “Descaling” alert indicator light remains illuminated in orange.
- Once the system is in the descaling mode, it must complete the steps below in its entirety before switching back to the default mode. Any interruption (such as the machine stopping or a power loss) will cause the descaling process to restart.
7. To start the descaling program, press the same keys again. The descaling liquid will alternate between flowing out of the coffee outlet and the milk frother.

8. Once the descaling cycle is complete (the water tank will be empty), the Lungo and Ristretto keys will blink.

9. Rinse the water tank and fill it with fresh drinking water.

10. To start the descaling process again, press the Lungo + Ristretto keys simultaneously for 3 seconds. When the keys blink, press them again to initiate the descaling program.
The descaling liquid will alternate between the coffee outlet and the milk frother.

11. After the descaling cycle is finished and the water tank is empty, the Lungo + Ristretto keys will blink again. Fill the water tank with fresh water for rinsing. Once the rinsing is complete, the “Descaling” alert light will turn off, and the machine will return to ready mode. Store the milk frother in its housing and fill the water tank with freshwater.

12. Clean the machine with a damp cloth and you’re done with the descaling process.

Priming After Emptying Or Unpriming
When it comes to brewing coffee, one of the most important steps is priming the coffee maker. This involves preparing the machine to make the perfect cup of coffee. However, sometimes, you may need to empty or unprime the brewer for various reasons. In this article, we will discuss the steps for priming your coffee maker after emptying or un-priming it.
This function is performed to empty air from your machine to ensure the quality of the preparation of coffee and also as a safety measure; otherwise, the machine may get blocked if there is any air present.
Let us start the process!
- Put the milk frother in. Press one of the nine keys for one second to turn on your device.

2. The 9 recipe keys will start blinking non-stop.

3. Put a 600 ml jar under the machine’s head.

4. Lift the lever and leave it open.

5. Reinstall the water tank after filling it.

6. Press one of the 9 keys. The 9 keys will blink quickly.

7. For a few seconds, some water may flow from the milk frother.

8. After priming, the machine returns to “Ready for Use” status.

Emptying The System Before A Period Of Non-Use
(For Frost Protection, Or Before A Repair)
1. Insert the milk frother into the machine. Press one of the 9 keys for 1 second to turn on the machine.The milk frother must be inserted before starting the process.

2. Remove the water tank and lift the lever to eject the capsule, and leave the lever open. Then, place a 600ml container under the head.

3. Simultaneously press the Cold Foam + Ristretto keys for 3 seconds. Both keys will blink.

4. Simultaneously press the Cold Foam + Ristretto keys again to start the emptying process. Some steam may come out of the coffee outlet and milk frother during this process.

5. The keys will blink softly and emptying will commence.

6. Once emptying is complete, both keys will blink 3 times and the machine will turn off automatically.

7. Close the lever and remove the container, milk frother, drip tray, capsule container, and drip base. Clean these components.

Troubleshooting
Your midnight cravings for a steaming cup of coffee is about to be quenched until you encounter a hiccup with your Brewer. Fear not, for you can easily fix the issue without having to call in the experts. With a little know-how, you’ll save yourself time and be able to handle minor glitches with ease. So, let’s take a look at some of the most common coffee maker problems and their straightforward solutions, all ready to be tackled by you.
| Problems | Possible Solutions |
| No light on the keys and indicator lights | Examine the plug, outlet, voltage, and fuse.Start the machine by pressing one of the nine keys for one second.If the issue persists, contact Nespresso. |
| The “Descaling” alert blinks orange and the milkbased drinks keys work. | Descaling is required: there are only a few cycles left before your system locks itself. Descale the machine. |
| When you press the recipe key, it does not start and the “Descaling” alert, Lungo and Ristretto keys blink | The machine is in descaling mode and cannot be used. Descale the machine; see the “Descaling” section for further information. |
| During descaling, the Lungo + Ristretto keys blink and the “Descaling” indicator light remains lit. | Your water tank is empty, but the descaling cycle has not been finished. Rinse the water tank and thoroughly fill it with new drinking water. To restart the cycle, press the Lungo + Ristretto keys together. |
| The 9 keys blink quickly non-stop. | The water tank is completely drained. Several recipes were started in a succession with no water in the tank; the priming mode would be triggered after hitting any key. Fill the water tank with water.Under the head, place the milk frother and a container. After pushing a key, some water may escape. |
| The recipe key blinks rapidly during preparation. | The water tank is empty. Fill the tank with water. |
| The milk foam is insufficient. | Use chilled skimmed or semi-skimmed milk (4 degrees Celsius).After each preparation, rinse the milk frother.Descale the device (see the section below titled “Descaling”). See the section under “Milk Recipe Preparations.” Place the cup properly in the machine’s center.Clean the connector to the milk frother. |
| Milk-based recipes keys do not light up | Set the milk frother up so that each key is illuminated. |
| Milk overflows from the mug during preparation. – | Before producing milk-based preparations, go to the “Milk recipe preparations” section to change the amount of milk or select a better cup. |
| The “Clean” alert is a steady orange light | Get rid of the milk frother. Wash it. |
| The lever does not fully close. | Take the capsule out and empty it. Verify that the capsule container doesn’t contain any blocked capsules. |
| Leakage around the capsule (water present in the capsule container) | Insert the capsules as directed.Whenever there is a spill, contact Nespresso. |
| No coffee, no water. | Fill the water tank, it’s empty.If required, descale; see the “Descaling” section. |
| The coffee flows very slowly | The type of capsule determines the flow rate.If required, descale (see “Descaling” paragraph). |
| No coffee, only water is flowing (despite having inserted a capsule). | Contact Nespresso |
| The coffee is not hot enough. | Warm up the cup.Give the appliance a thorough rinse.Descale if necessary; see the section on “Descaling.” |
| Cannot go to the Menu Mode (e.g. “Descaling” “Automatic Power Saving Setting”) | Activate the device.Be careful to hit all the keys at once for 3 seconds. Plug the device in and out. Call Nespresso if the issue continues. |
| Irregular blinking. | Call Nespresso or send the device to the repair shop. |
| The 9 keys blink simultaneously for 10 seconds and the machine turns off. | Breakdown Alert: Arrange for a repair or contact Nespresso |
Recycling And Environmental Protection
To recycle the valuable materials present in your machine and ensure their proper separation into various categories, you can reach out to local recycling authorities. For additional information on this topic, you can contact Nespresso using the following contact information.
Nespresso Contact Information
If you need further information, assistance with a problem, or simply want to seek advice, you can reach out to the Nespresso Club. The contact information for the Nespresso Club can be found in the “Welcome to Nespresso” booklet that came with your machine’s packaging or through the Nespresso website at www.nespresso.com.
Guarantee
Krups offers a two-year warranty on this product, starting from the date of purchase or delivery. This warranty covers any material or manufacturing defects and requires proof of purchase to be valid. During the warranty period, Krups will repair or replace any faulty products at no additional cost to the owner. Replaced or repaired products are guaranteed for either the remaining portion of the original warranty or for six months, whichever is longer.
However, this warranty does not apply to any damage caused by accidents, improper use, inadequate maintenance, normal wear, and tear, or commercial use. This limited warranty does not affect any legal rights related to your purchase, as outlined by current legislation.
If you believe your product to be defective, please contact Nespresso for further instructions on where to send or bring it for repairs. For more information, you can visit the Nespresso website at www.nespresso.com.
Conclusion
With a wealth of knowledge about the Nespresso Atelier now at your fingertips, you can confidently brew like a barista and enjoy every sip with a smile. Your love for coffee has led you here and I’m sure it will continue to be a passion. To delve deeper into the magical world of coffee, be sure to visit coffeeaim.com. Here, you’ll find an abundance of information and resources to feed your coffee obsession.
So, go ahead, take a sip of that delicious coffee, and savor the moment. Wishing you many more cups of happiness!
FAQs
How Do You Make A Flat White With A Nespresso Atelier?
Savor the rich, creamy taste of a classic Flat White with this simple Nespresso recipe. Combine 1/3 part espresso with 2/3 part hot milk, lightly frothed to perfection. Indulge in the delightful blend of bold coffee and smooth milk, every sip is sure to satisfy. Happy brewing!
Does Nespresso Atelier Heat Up Milk?
This device immediately steams and foams the milk in the mug before adding coffee. This Nespresso machine is fantastic if you enjoy using a device that can perform all of those things.
Can You Make Cold Drinks With A Nespresso?
Tempered glass Nespresso recipe glasses are ideal for serving chilled beverages and come in sizes up to 350ml. The Aeroccino milk frother lets you froth cold milk at the press of a button. Enjoy your iced coffee wherever you go by keeping it cooler for longer.
Can Nespresso Brew Just Hot Water?
Yes. You may brew only water. Water will only be heated if the Nespresso capsule is not inserted and the button is not heated.
Which Milk Works Best With Nespresso?
Whole milk (full cream milk) produces a thicker, creamier foam, giving your coffee drink more body. Low-fat and skim milk are significantly lighter and produce more froth with bigger air bubbles for a more delicate latte or cappuccino.